WordPress is a powerful publishing tool, especially when you use the full range of options available. With the basic settings configured (which you do in Chapter 7), now is the time to go forth and blog! You can, at this point, skip to the "Blog It!: Writing Your First Entry" section in this chapter and jump right in to creating new posts for your blog. Or you can stay right here with me and discover some of the options you can set to make your blog a bit more organized and logical from the get-go.
A blog can become unwieldy and disorganized, requiring you to revisit these next few features sometime in the near future so that you can get the beast under control. So why not do a little planning and get the work over with now? I promise it won't take that long, and you'll thank me for it later.
In WordPress, a category is what you determine to be the main topic of a blog post. Through the use of categories, you can file your blog posts into topics, by subject. To improve your readers' experiences in navigating through your blog, WordPress organizes posts by the categories you assign to them. Visitors can click the categories they're interested in to see the blog posts you've written on those particular topics. You should know ahead of time that the list of categories you set up is displayed on your blog in a few different places, including the following:
Body of the post: In most WordPress themes, you see the title followed by a statement such as Filed In: Category 1, Category 2. The reader can click the category name to go to a page that lists all the posts you've made in that particular category. You can assign a single post to more than one category.
Sidebar of your blog theme: You can place a full list of category titles in the sidebar. A reader can click any category and get taken to a page on your site that lists the posts you've made within that particular category.
Subcategories (also known as category children) can further refine the main category topic by listing specific topics related to the main (parent) category. In your WordPress Dashboard, on the Manage Categories page, subcategories are listed directly below the main category. Here's an example:
Books I Enjoy (main category)
Fiction (subcategory)
Nonfiction (subcategory)
Trashy romance (subcategory)
Biographies (subcategory)
For Dummies (subcategory)
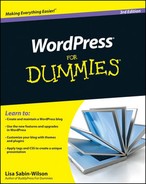
Upon installation, WordPress gives you one default category called Uncategorized (see the Categories page shown in Figure 8-1). That category name is pretty generic, so you'll definitely want to change it to one that's more specific to you. (On my blog, I changed it to Life in General. Although that name's still a bit on the generic side, it doesn't sound quite so . . . well, uncategorized.)
Note
The default category also serves as kind of a fail-safe. If you publish a post to your blog and don't assign that post to a category, the post automatically gets assigned to the default category, no matter what you name the category.
So how do you change the name of that default category? When you're logged in to your WordPress Dashboard, just follow these steps:
Click the down arrow to the right of the Posts menu, and then click the Categories link.
The Categories page opens, containing all the tools you need to set up and edit category titles for your blog.
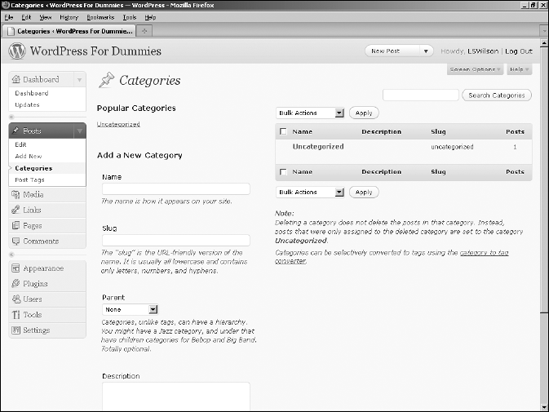
Click the title of the category you would like to edit.
If you want to change the Uncategorized category, click the word Uncategorized, and you go to the Edit Category page (see Figure 8-2).
Type the new name for the category in the Category Name text box.
Type the new slug in the Category Slug text box.
The term slug refers to the word(s) used in the Web address for the specific category. For example, the category of Books has a Web address of
http://yourdomain.com/category/books;if you change the Category Slug to Books I Like, then the Web address ishttp://yourdomain.com/category/books-i-like(WordPress automatically inserts a dash between the slug words in the Web address).Choose a parent category from the Category Parent drop-down menu.
If you want this category to be a main category, not a subcategory, choose None.
(Optional) Type a description of the category in the Description text box.
Use this description to remind yourself what your category is about. Some WordPress themes display the category description right on your site, too, which can be helpful for your visitors. (See Chapter 12 for more about themes.) You'll know if your theme is coded in this way if your site displays the category description on the category page(s).
Click the Update Category button.
The information you just edited is saved, and the Categories page reloads, showing your new category name.
Today, tomorrow, next month, next year — as your blog grows in size and age, you will continue adding new categories to further define and archive the history of your blog posts. You aren't limited in the number of categories and subcategories you can create in your blog.
Creating a new category is as easy as following these steps:
Click the down arrow to the right of the Posts menu, and then click the Categories link.
The Categories page opens.
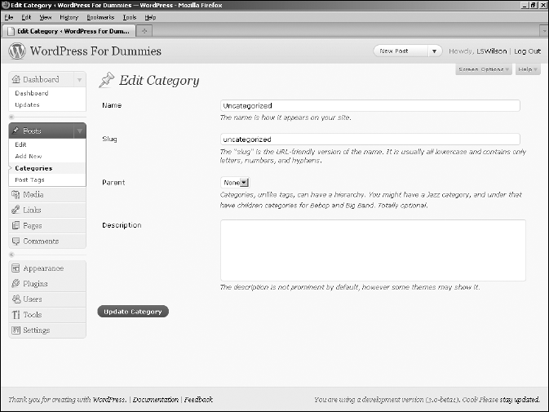
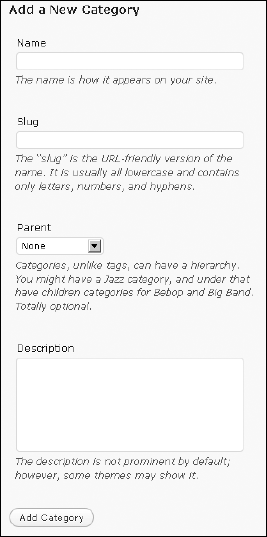
The left side of the Categories page displays the Add a New Category section.
See Figure 8-3.
Type the name of your new category in the Name text box.
Suppose that you want to create a category in which you file all your posts about the books you read. In the Name text box, type something like Books I Enjoy.
Type a name in the Slug text box.
The slug creates the link to the category page that lists all the posts you've made in this category. If you leave this field blank, WordPress automatically creates a slug based on the category name. If the category is Books I Enjoy, WordPress automatically creates a category slug like this:
http://yourdomain.com/category/books-i-enjoy. If you want to shorten it, however, you can! Type books in the Category Slug text box, and the link to the category becomes this:http://yourdomain.com/category/books.Choose the category's parent from the Parent drop-down menu.
Choose None if you want this new category to be a parent (or top level) category. If you'd like this category to be a subcategory of another category, choose the category you want to be the parent of this one.
(Optional) Type a description of the category in the Description text box.
Some WordPress templates are set up to actually display the category description directly beneath the category name (see Chapter 12). Providing a description helps you to further define the category intent for your readers. The description can be as short or as long as you like.
Click the Add Category button.
That's it! You've added a new category to your blog. Armed with this information, you can add an unlimited number of categories to your blog.
You can delete a category on your blog by hovering the pointer over the title of the category you want to delete. Then click the Delete link that appears below the category title.
Warning
Deleting a category doesn't delete the posts and links in that category. Instead, posts in the deleted category are assigned to the Uncategorized category (or whatever you've named the default category).
Note
If you have an established WordPress blog with categories already created, you can convert some or all of your categories to tags. To do so, look for the Category to Tag Converter link on the right side of the Category page in your WordPress Dashboard. Click it to convert your categories to tags. (See the nearby sidebar "What are tags, and how/why do I use them?" for more information on tags.)
A link list, commonly referred to as a blogroll, is a list of links to other Web sites and blogs that you've collected and want to share with your readers. The link list is displayed in your blog, usually in the sidebar, through the use of widgets, or on a dedicated page of links, if your theme has a links page template (see Chapter 12 to find out how to create a template).
You can use a link list in various ways:
As with posts, you can create multiple categories for your links in the WordPress Dashboard if you want to have more than one link list. Sometimes, having a large list of links below the heading Blogroll is just too generic, and you may want to display groups of links with different headings that further define them.
Tip
By default, WordPress provides one link category called Blogroll. You can keep this name as is or change it in the same way that you change a post category name (refer to "Changing the name of a category," earlier in this chapter). Just click the name of the category and edit the details as you need to.
You can define your links by creating link categories in the Dashboard and then assigning links to the appropriate categories. To create link categories, follow these steps:
Click the down arrow to the right of the Links menu, and then click the Link Categories link.
The Link Categories page opens, as shown in Figure 8-4. The left side of the Link Categories page displays the Add Category section.
Type the name of the link category in the Link Category Name box.
Type the slug of the link category in the Link Category Slug box.
This entry is the same as the category slug described previously in the "Changing the name of a category" section in this chapter.
(Optional) Type a description of the link category in the Category Description box.
Providing a description helps you further define the category intent for your readers. The description can be as short or as long as you like. Some WordPress themes are set up to actually display the category description directly beneath the category name (check out Chapter 12 for information on template tags that will allow you to add category descriptions).
Click the Add Category button.
The Link Categories page refreshes and displays your new link category.

Revisit the Link Categories page any time you want to add, edit, or delete a link. To edit or delete a link category, you would follow the same steps as you did in the previous section for post categories. You can create an unlimited amount of link categories to sort your link lists by topics. (I know one blogger who has 50 categories for his links.)
In Chapter 5, I show you how to display your link lists by using WordPress widgets, and in Chapter 12, I provide information about different ways you can display your link lists by using template tags.
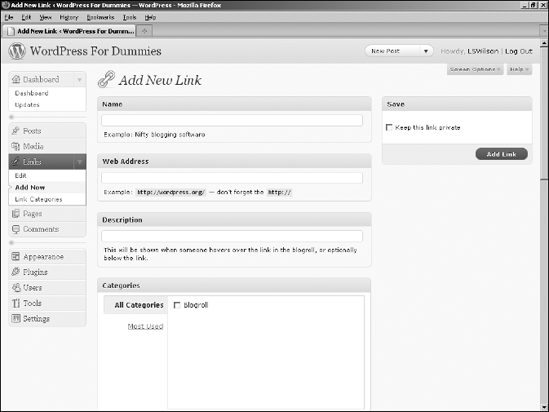
You've created your link categories; now you just need to add some new links! To add a new link, follow these steps:
Click the Add New link on the Links menu.
The Add New Link page opens, as shown in Figure 8-5.
Type the name of the link in the Name text box.
This is the actual name of the site that you are adding to your link list.
Type the URL of the link in the Web Address box.
This is the destination you want your visitors to go to when they click the name of the site. Don't forget to include the
http://part of the Web address; for example,http://lisasabin-wilson.com.(Optional) Type a description of the site in the Description box.
Providing a description helps further define the site for your readers. Some WordPress templates are coded to display the link description directly below the link name through the use of a specific WordPress template tag.
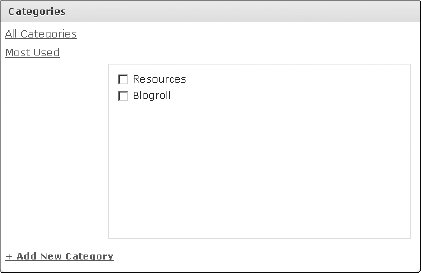
(Optional) Select a category.
Assign your new link to a category by checking the box to the left of the category you've chosen in the Categories module. If you don't select a category for your new link, it's automatically assigned to the default category. Figure 8-6 shows the list of link categories I have in my blog.
(Optional) Select a target for your new link.
Click one of the following radio buttons in the Target section:
_blank: Loads the link in a new browser window
_top: Loads the link in the top frame (if your site is designed with frames)
_none: Loads the link in the same browser window
The third option — None — is my personal preference and recommendation. I like to let my visitors decide whether they want a bunch of new browser windows opening every time they click a link on my site.
You can reposition the Target module by dragging and dropping it to a new location on the Add New Link page. You can also collapse this module.
Set the Link Relationship (XFN) options (Optional).
XFN stands for XHTML Friends Network and allows you to indicate the relationship you have with the people you are linking to by defining how you know, or are associated with, them. Table 8-1 lists the different relationships you can assign to your links. Link Relationship (XFN) is kind of a silly bookmark-type assignment that indicates how well you know the person whose site or blog you're linking to by defining your relationship with her. You can find more information on XFN at
http://gmpg.org/xfn.You can reposition the Link Relationship module by dragging and dropping it to a new location on the Add New Link page. You can also collapse (close) this module.
Table 8-1. Link Relationships Defined
Link Relationship
Description
Identity
Check this box if the link is to a Web site you own.
Friendship
Choose the option (Contact, Acquaintance, Friend, or None) that most closely identifies the friendship, if any.
Physical
Check this box if you've met the person you're linking to face to face. Sharing pictures over the Internet doesn't count; this selection identifies a person you've physically met.
Professional
Check one of these boxes if the person you're linking to is a co-worker or colleague.
Geographical
Choose Co-Resident if the person you're linking to lives with you, or choose Neighbor or None, depending on which option applies to your relationship with the person you're linking to.
Family
If the blogger you're linking to is a family member, choose the option that tells how the person is related to you.
Romantic
Choose the option that applies to the type of romantic relationship, if any, you have with the person you're linking to. Do you have a crush on him? Is she your creative muse or someone you consider to be a sweetheart?
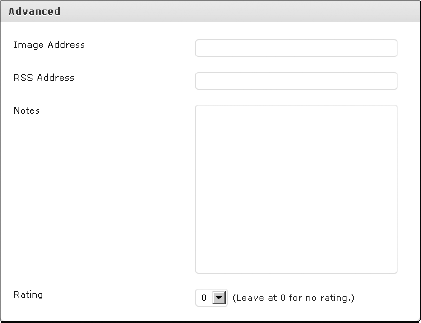
Set the advanced options for your new link (see Figure 8-7).
You have four options in the Advanced module:
Image Address: Type the URL of the picture that you want to appear next to the link in your link list.
This option associates an image with the link. To use it, you need to know the direct URL to the image source (such as
http://yourdomain.com/images/image.jpg).Tip
To find the URL for an image displayed on a Web site, right-click the image and choose Properties from the shortcut menu. Copy and paste all the text from the Address (URL) field to the Image Address box in the WordPress options box.
RSS Address: Add the site's RSS feed alongside the link that appears on your site. (Not all WordPress themes accommodate this feature.)
Tip
To find the RSS URL of the site you're linking to, visit that site, and locate the RSS link. (It's usually listed in the sidebar or footer of the site.) Right-click the link, and from the shortcut menu, choose Copy Shortcut (in Internet Explorer) or Copy Link Location (in Firefox). Then, in WordPress, paste the link in the RSS Address field.
Notes: Type your notes in the Notes field.
These notes aren't displayed on your site, so feel free to enter whatever notes you need to further define the details of this link. A month from now, you may not remember who this person is or why you linked to her, so here is where you can add notes to remind yourself.
Rating: Use the Rating drop-down menu to rate the link from 0–10, 0 being the worst and 10 being the best. Some WordPress themes display your link list in the order in which you've rated your links, from best to worst.
You can reposition the Advanced module by dragging and dropping it to a new location on the Add New Link page. You can also collapse (close) this module.
To save your changes, scroll up to the top of the Add New Links page and click the Add Link button. Choose whether to make the link public or private.
To keep the link private, select the Keep This Link Private box. No one you can see the link. If you want the link to be publicly displayed on your blog, leave that box unchecked.
You can reposition the Save module by dragging and dropping it to a new location on the Add New Link page. You can also collapse (close) this module.
A blank Add New Links page opens, ready for you to add another new link!
You can edit the links in your blog by clicking the Edit link on the Links menu; the Edit Links page opens.
Note
When you first view the Edit Links page, some links are already assigned to your blog. By default, WordPress provides seven links in your link list. These links go to some helpful Web sites that contain information and resources for the WordPress software. You can delete these links, but I recommend saving them for future reference.
Here's what you can do with your links:
Edit an existing link: Click the name of the link you'd like to edit. The Edit Link page opens. Edit the fields you need to change; click the Save button at the top right of the page.
Sort the links: You can sort by Link ID, Name, Address, or Rating by using the Order by Name drop-down menu. Likewise, you can sort your links by category by using the View All Categories drop-down menu and selecting the Link Category you'd like to filter your links by.
Search for specific links using keywords and phrases: Enter your keyword in the text box at the top right hand side of the Edit Links page and click the Search Links button. If any links match the keywords and/or phrase you typed, they display on the page.
Each WordPress blog post is assigned its own Web page, and the address (or URL) of that page is called a permalink. Posts that you see in WordPress blogs usually have the post permalink in four typical areas:
The title of the blog post
The Comments link below the post
A Permalink link that appears (in most themes) below the post
The titles of posts appearing in a Recent Posts sidebar
Permalinks are meant to be permanent links to your blog posts (which is where the perma part of that word comes from, in case you're wondering). Other bloggers can use a post permalink to refer to that particular blog post. So ideally, the permalink of a post never changes. WordPress creates the permalink automatically when you publish a new post.
By default, a blog post permalink in WordPress looks like this:
http://yourdomain.com/?p=100/
The p stands for post, and 100 is the ID assigned to the individual post. You can leave the permalinks in this format, if you don't mind letting WordPress associate each post with an ID number.
WordPress, however, lets you take your permalinks to the beauty salon for a bit of makeover so you can create pretty permalinks. I'll bet you didn't know that permalinks could be pretty, did you? They certainly can. Allow me to explain.
Pretty permalinks are links that are more pleasing to the eye than standard links and, ultimately, more pleasing to search-engine spiders. (See Chapter 14 for an explanation of why search engines like pretty permalinks.) Pretty permalinks look something like this:
http://yourdomain.com/2008/01/01/pretty-permalinks/
Break down that URL, and you see the date when the post was made, in year/month/day format. You also see the topic of the post.
To choose how your permalinks look, click Permalinks in the Settings menu. The Permalink Settings page opens (see Figure 8-8).
In this page, you find several options for creating permalinks:
Default (ugly permalinks): WordPress assigns an ID number to each blog post and creates the URL in this format:
http://yourdomain.com/?p=100.Day and Name (pretty permalinks): For each post, WordPress generates a permalink URL that includes the year, month, day, and post slug/title:
http://yourdomain.com/2008/01/01/sample-post/.Month and Name (also pretty permalinks): For each post, WordPress generates a permalink URL that includes the year, month, and post slug/title:
http://yourdomain.com/2008/01/sample-post/.Numeric (not so pretty): WordPress assigns a numerical value to the permalink. The URL is created in this format:
http://yourdomain.com/archives/123.Custom Structure: WordPress creates permalinks in the format you choose. You can create a custom permalink structure by using tags or variables, as I discuss in the next section.
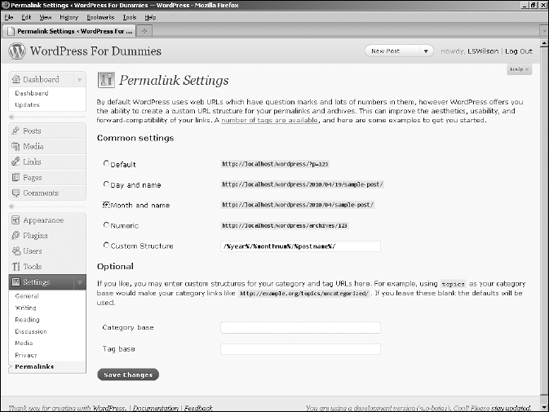
To create the pretty-permalink structure, select the Day and Name radio button; then click the Save Changes button at the bottom of the page.
A custom permalink structure is one that lets you define which variables you want to see in your permalinks by using the tags in Table 8-2.
If you want your permalink to show the year, month, day, category, and post name, you'd select the Custom Structure radio button in the Customize Permalink Structure page and type the following tags in the Custom Structure text box:
/%year%/%monthnum%/%day%/%category%/%postname%/
Table 8-2. Custom Permalinks
Permalink Tag | Results |
|---|---|
| 4-digit year (such as |
| 2-digit month (such as |
| 2-digit day (such as |
| 2-digit hour of the day (such as |
| 2-digit minute (such as |
| 2-digit second (such as |
| Text — usually, the post name — separated by hyphens (such as |
| The unique numerical ID of the post (such as |
| The text of the category name that you filed the post in (such as |
| The text of the post author's name (such as |
Under this permalink format, the link for a post made on February 1, 2008, called WordPress For Dummies and filed in the Books I Read category, would look like this:
http://yourdomain.com/2008/01/01/books-i-read/wordpress-for-dummies/
Note
Be sure to include the slashes before tags, between tags, and at the very end of the string of tags. This format ensures that WordPress creates correct, working permalinks by using the correct re_write rules located in the .htaccess file for your site. (See the following section for more information on re_write rules and .htaccess files.)
Warning
Changing the structure of your permalinks in the future affects the permalinks for all the posts on your blog . . . new and old. Keep this fact in mind if you ever decide to change the permalink structure. An especially important reason: Search engines (such as Google and Yahoo!) index the posts on your site by their permalinks, so changing the permalink structure makes all those indexed links obsolete.
Don't forget to click the Save Changes button at the bottom of the Customize Permalink Structure page; otherwise your permalink changes aren't saved!
After you set the format for the permalinks for your site by using any options other than the default, WordPress writes specific rules, or directives, to the .htaccess file on your Web sever. The .htaccess file in turn communicates to your Web server how it should serve up the permalinks, according to the permalink structure you've chosen to use.
To use an htaccess file, you need to know the answers to two questions:
If you don't know the answers, contact your hosting provider to find out.
If the answer to both questions is yes, proceed to the next section. If the answer is no, skip to the "Working with servers that don't use Apache mod_rewrite" section, later in this chapter.
You and WordPress work together in glorious harmony to create the .htaccess file that lets you use a pretty permalink structure in your blog. The file works like this:
Using a plain-text editor (such as Notepad for Windows or TextEdit for a Mac), create a blank file; name it
htaccess.txt;and upload it to your Web server via FTP. (See Chapter 6 for more information about FTP.) When the file is on your Web server, rename the file.htaccess(notice the period at the beginning), and make sure that it is writable by the server by changing permissions to either 755 or 777. (See Chapter 6 for information on changing permissions on server files.)Tip
If
.htaccessalready exists, you can find it in the root of your directory on your Web server — that is, the same directory where you find yourwp-config.phpfile. If you don't see it in the root directory, try changing the options of your FTP client to show hidden files. (Because the.htaccessfile starts with a period [.], it may not be visible until you configure your FTP client to show hidden files.)Create the permalink structure in the Customize Permalink Structure page in your WordPress Dashboard.
Click the Save Changes button at the bottom of the Customize Permalink Structure page.
WordPress inserts into the
.htaccessfile the specific rules necessary for making the permalink structure functional in your blog.
If you followed these steps correctly, you have an .htaccess file on your Web server that has the correct permissions set so that WordPress can write the correct rules to it. Your pretty permalink structure works flawlessly. Kudos!
If you open the .htaccess file and look at it now, you'll see that it's no longer blank. It should have a set of code in it called rewrite rules, which looks something like this:
# BEGIN WordPress
<IfModule mod_rewrite.c>
RewriteEngine On
RewriteBase /
RewriteCond %{REQUEST_FILENAME} !-f
RewriteCond %{REQUEST_FILENAME} !-d
RewriteRule . /index.php [L]
</IfModule>

# END WordPress
Note
I could delve deeply into .htaccess and all the things you can do with this file, but I'm restricting this section to how it applies to WordPress permalink structures. If you'd like to unlock more mysteries about .htaccess, check out "Comprehensive Guide to .htaccess" at http://javascriptkit.com/howto/htaccess.shtml.
Using permalink structures requires that your Web hosting provider has a specific Apache module option called mod_rewrite activated on its servers. If your Web hosting provider doesn't have this item activated on its servers, or if you're hosting your site on a Windows server, the custom permalinks work only if you type index.php in front of any custom permalink tags.
For example, create the custom permalink tags like this:
/index.php/%year%/%month%/%date%/%postname%/
This format creates a permalink like this:
http://yourdomain.com/index.php/2008/02/01/wordpress-for-dummies
You don't need an .htaccess file to use this permalink structure.
Tip
Through my experiences over the years, I have discovered that Yahoo! Hosting doesn't allow users access to the .htaccess file on their server, and it doesn't use mod_rewrite. So if you're hosting your domain on Yahoo!, you will need to use the custom permalink technique that I describe elsewhere in this chapter in the section "Working with servers that don't use Apache mod_rewrite."
In Chapter 2, you can read about RSS feed technology and why it's an important part of publishing your blog. Allow me to quote myself from that chapter: For your blog readers to stay updated with the latest and greatest content you post to your site, they need to subscribe to your RSS feed.
RSS feeds come in different flavors, including RSS 0.92, RDF/RSS 1.0, RSS 2.0, and Atom. The differences among them lie within the base code that makes up the functionality of the syndication feed. What's important is that WordPress supports all versions of RSS — which means that anyone can subscribe to your RSS feed with any type of feed reader available.
I mention many times throughout this book that WordPress is very intuitive, and this section on RSS feeds is a shining example of a feature that WordPress automates. WordPress has a built-in feed generator that works behind the scenes to create feeds for you. This feed generator creates feeds from your posts, comments, and even categories.
The RSS feed for your blog posts is autodiscoverable, which means that almost all RSS feed readers and even some browsers (Firefox, Internet Explorer 7, and Safari, for example) automatically detect the RSS feed URL for a WordPress blog. Table 8-3 gives you some good guidelines on how to find the RSS feed URLs for the different sections of your blog.
Table 8-3. URLs for Built-In WordPress Feeds
Feed Type | Example Feed URL |
|---|---|
RSS 0.92 |
|
RDF/RSS 1.0 |
|
| |
Atom |
|
Comments RSS |
|
Category RSS |
|
Tip
If you're using custom permalinks (see "Making your post links pretty," earlier in this chapter), you can simply add /feed to the end of any URL on your blog to find the RSS feed. Some of your links will look similar to these:
http://yourdomain.com/feed— your main RSS feedhttp://yourdomain.com/comments/feed— your comments RSS feedhttp://yourdomain.com/category/cat-name/feed— RSS feed for a category
Try it with any URL on your site. Add /feed at the end, and you'll have the RSS feed for that page.
RSS feeds are important parts of delivering content from your blog to your readers. RSS feeds are expected these days, so the fact that WordPress has taken care of the feeds for you, is compliant with all RSS formats, and offers so many internal feeds gives the software a huge advantage over any of the other blog-software platforms.
It's finally time to write your first post in your new WordPress blog! The topic you choose to write about and the writing techniques you use to get your message across are all on you; I have my hands full writing this book! I can tell you, however, how to write the wonderful passages that can bring you blog fame. Ready?
Composing a blog post is a lot like typing an e-mail: You give it a title, you write the message, and you click a button to send your words into the world.
Tip
You can collapse or reposition all the modules on the Add New Posts page to suit your needs. The only section on the Add New Posts page that cannot be collapsed and repositioned is the actual title and post box (where you write your blog post).
Follow these steps to write a basic blog post:
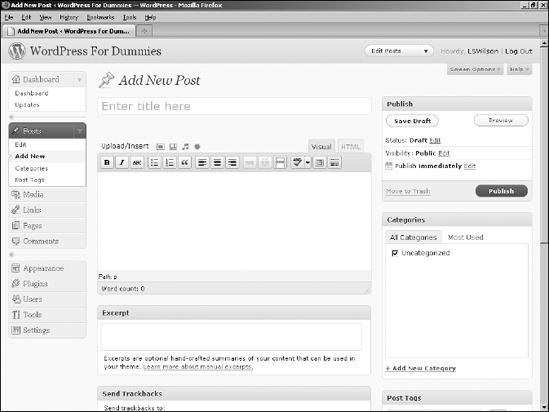
Click the Add New link on the Posts menu.
The Add New Post page opens, as shown in Figure 8-9.
Type the title of your post in the text box at the top of the Add New Post page.
Type the content of your post in the text box.
You can use the Visual Text Editor to format the text in your post. I explain the Visual Text Editor and the buttons and options after these steps.
Click the Save Draft button in the Publish module, located at the top right side of the Add New Post page.
The page refreshed with your post title and content saved, but not yet published to your blog.
By default, the area in which you write your post is in Visual Editing mode, as indicated by the Visual tab that appears above the text. Visual Editing mode is how WordPress provides WYSIWYG (What You See Is What You Get) options for formatting. Rather than have to embed HTML code in your post, you can simply type your post, highlight the text you want to format, and click the buttons (shown in Figure 8-9) that appear above the box in which you type your post.
If you've ever used a word processing program, such as Microsoft Word, you'll recognize many of these buttons:
Bold: Embeds the
<strong> </strong>HTML tag to emphasize the text in bold. Example: Bold Text.Italic: Embeds the
<em> </em>HTML tag to emphasize the text in italics. Example: Italic Text.Strikethrough: Embeds the
<strike> </strike>HTML tag that puts a line through your text. Example: Strikethrough Text.Unordered List: Embeds the
<ul><li> </li></ul>HTML tags that create an unordered, or bulleted, list.Ordered List: Embeds the
<ol><li> </li></ol>HTML tags that create an ordered, or numbered, list.Blockquote: Inserts the
<blockquote> </blockquote>HTML tag that indents the paragraph or section of text you've selected.Align Left: Inserts the
<p align="left"> </p>HTML tag that lines up the paragraph or section of text you've selected against the left margin.Align Center: Inserts the
<p align="center"> </p>HTML tag that positions the paragraph or section of text you've selected in the center of the page.Align Right: Inserts the
<p align="right"> </p>HTML tag that lines up the paragraph or section of text you've selected against the right margin.Insert/Edit Link: Inserts the
<a href=" "> </a>HTML tag around the text you've selected to create a hyperlink.Unlink: Removes the hyperlink from the selected text, if it was previously linked.
Insert More Tag: Inserts the
<!--more-->tag, which lets you split the display on your blog page. It publishes the text written above this tag with a Read More link, which takes the user to a page with the full post. This feature is good for really long posts.Toggle Spellchecker: Perfect for typo enthusiasts! Checking your spelling before you post is always a good idea.
Toggle Full Screen Mode: Lets you focus purely on writing, without the distraction of all the other options on the page. Click this button, and the Post text box expands to fill the full height and width of your browser screen. To bring the Post text box back to its normal state, click the Toggle Full Screen button again. Voilà — it's back to normal!
Show/Hide Kitchen Sink: I saw this button and thought, "Wow! WordPress does my dishes, too!" Unfortunately, the button's name is a metaphor that describes the advanced formatting options available with the Visual Text Editor. Click this button, and a new formatting menu drops down, providing options for underlining, font color, custom characters, undo and redo, and so on — a veritable kitchen sink full of options!
You can turn off the Visual Text Editor by clicking the Your Profile link on the Users menu. Uncheck the Use the Visual Editor When Writing box to turn off this editor if you'd rather insert the HTML code yourself in your posts.
Note
If you'd rather embed your own HTML code and skip the Visual Text Editor, click the HTML tab that appears to the right of the Visual tab. If you're planning to type HTML code in your post — for a table or video files, for example, — you have to click the HTML tab before you insert that code. If you don't, the Visual Text Editor formats your code, and it most likely will look nothing like you intended it to.
At this point, you can skip to the "Publishing your post" section of this chapter for information on publishing your post to your blog, or continue with the following sections to discover how to refine the options for your post.
Note
WordPress has a nifty, built-in autosave feature that saves your work while you're typing and editing a new post. If your browser crashes or you accidentally close your browser window before you've saved your post, it will be there for you when you get back. Those WordPress folks are so thoughtful!
Directly above and to the left of the Visual Text Editor row of buttons is an Add Media area with a row of four icons. These icons let you insert images/photos, photo galleries, videos, and audio files into your posts. WordPress has an entire Media Library capability, which I describe in great detail in Chapter 9.
After you write the post, you can choose a few extra options before you publish it for the entire world to see. These settings apply to the post you're currently working on — not to any future or past posts. You can find these options below and to the right of the Post text box (see Figure 8-10). Click the title of each option — the settings for that specific option expand.
Note
You can reposition the different post option modules on the Add New Post page to fit the way you use this page.
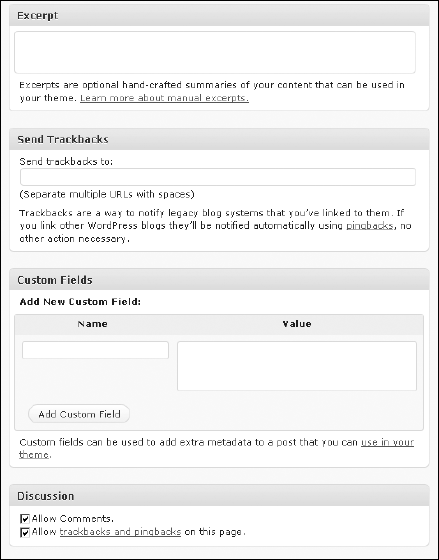
Here are the options found underneath the Post text box:
Excerpt: Excerpts are short summaries of your posts. Many bloggers use snippets to show teasers of their blog posts, thereby encouraging the reader to click the Read More links to read the posts in their entirety. Type your short summary in the Excerpt box. Excerpts can be any length, in terms of words; however, the point is to keep it short and sweet and tease your readers into clicking the Read More link.
Send Trackbacks: I discuss trackbacks in Chapter 2, if you'd like to refresh your memory banks on what they are. If you want to send a trackback to another blog, enter the blog's trackback URL in the Send Trackbacks To box. You can send trackbacks to more than one blog; just be sure to separate trackback URLs with spaces.
Custom Fields: Custom fields add extra data to your posts and are fully configurable by you.
Discussion: Decide whether to let readers submit comments through the comment system by checking Allow Comments on this Post box. By default, the box is checked; uncheck it to disallow comments on this post.
Here are the options found to the right of the Post text box:
Publish: These are the publishing and privacy options for your post, which I covered in the "Publishing your post" section.
Categories: You can file your posts in different categories to organize them by subject. (See more about organizing your posts by category in "Staying on Topic with Categories," earlier in this chapter.) Check the box to the left of the category you want to use. You can toggle between listing all categories, or seeing just the categories you use the most by clicking the All Categories or Most Used links, respectively. Don't see the category you need listed here? Click the + Add New Category link, and you can add a category right there on the Add New Post page!
Post Tags: Type your desired tags in the Add New Tag text box. Be sure to separate each tag with a comma so that WordPress knows where each tag begins and ends. Cats, Kittens, Feline represents three different tags, for example, but without the commas, WordPress would consider those three words to be one tag. See the sidebar "What are tags, and how/why do I use them?" earlier in this chapter for more information on tags.
Featured Image: Some WordPress themes are configured to use an image (photo) to represent each post that you have on your blog. The image can display on the home/front page, blog page, archives, or anywhere within the content display on your Web site. If you're using a theme that has this option, you can easily define the post thumbnail by clicking the Set Featured Image link under the Featured Image module on the Add New Post page. Then you can assign an image that you've uploaded to your site as the featured image for a particular post.
You have given your new post a title and written the content of your new blog post. Maybe you've even added an image or other type of media file to your blog post (see Chapter 9), and have configured the tags, categories, and other options. Now the question is: Publish? Or not to publish (yet)?
WordPress gives you three options for saving or publishing your post when you're done writing it. The Publish box is located on the right side of the Add New (or Edit) Post page. Just click the title of the Publish box to expand the settings you need. Figure 8-11 shows the available options in the Publish box.
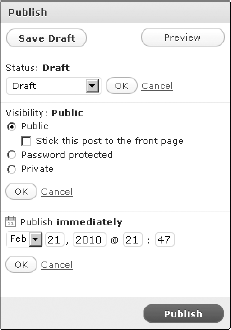
The Publish module has several options:
Save Draft: Choose this option to save your post as a draft. The Edit Post page reloads with all your post contents and options saved; you can continue editing it now, tomorrow, or the next day. To access your draft posts, click the Edit link on the Posts menu.
Preview: Click the Preview button to view your post in a new window, as it would appear on your live blog if you had published it. Previewing the post doesn't publish it to your site yet. It gives you the opportunity to view it on your site and check it for any formatting or content changes you'd like to make.
Status: Click the Edit link to open the settings for this option. A drop-down menu appears and you can select Draft or Pending Review:
Select Draft to save the post, but not publish it to your blog.
Select Pending Review, and the post shows up in your list of drafts next to a Pending Review header. This option lets the administrator of the blog know that contributors have entered posts that are waiting for administrator review and approval (helpful for blogs with multiple authors).
Click the OK button to save your settings.
Stick This Post to the Front Page: Select this box to have WordPress publish the post to your blog and keep it at the very top of all blog posts until you edit this post and change this setting.
This is otherwise known as a sticky post. Typically, posts are displayed in a chronological order on your blog, displaying the most recent post on top. If you make a post sticky, it remains at the very top no matter how many other posts you make after it. When you want to un-stick the post, deselect the Stick This Post to the Front Page box.
Password Protected: By assigning a password to a post, you can publish a post to your blog that only you can see. You can also share the post password with a friend, who can see the content of the post after entering the password. But why would anyone want to do this? Imagine that you just ate dinner at your mother-in-law's house and she made the worst pot roast you've ever eaten. You can write all about it! Protect it with a password and give the password to your trusted friends so that they can read all about it without offending your mother-in-law.
Private: Publish this post to your blog so that only you can see it — no one else will be able to see it, ever. You may want to do this for posts that are personal and private only to yourself (if you're keeping a personal diary, for example).
Publish Immediately: Click the Edit link, and you can set the timestamp for your post. If you want the post have the current time and date, ignore this setting altogether.
If you'd like to future-publish this post, you can set the time and date for anytime in the future. This feature has come in handy for me many times. For example, when I have a vacation planned and I don't want my blog to go without updates while I'm gone, I'll sit down and write a few posts and set the date for a time in the future. They're published to my blog while I was somewhere tropical, diving with the fishes.
Publish: This button wastes no time! It bypasses all the previous draft, pending review and sticky settings and publishes the post directly to your blog immediately.
After you choose an option from the drop-down menu, click the Save button. The Write Post page saves your publishing-status option.
Tip
If you want to publish your post right away, skip all the other options in the Publish module, and just click the Publish button. This method eliminates the fuss with the Publish Status options and sends your new post to your blog in all its glory.
Tip
If you click Publish and for some reason don't see the post you just published on the front page of your blog, you probably left the Publish Status drop-down menu set to Unpublished. You'll find your new post in the draft posts, which you'll find by clicking the Edit link on the Posts menu.
While I write this book, I have editors looking over my shoulder, making recommendations, correcting my typos and grammatical errors, and helping me by telling me when I get too long-winded. You, on the other hand, are not so lucky! You are your own editor and have full control of what you write, when you write it, and how you write it. You can always go back and edit previous posts to correct typos, grammatical errors, and other mistakes by following these steps:
Find the post that you want to edit by clicking the Edit link on the Posts menu.
The Edit Posts page opens and lists the 20 most recent posts you've made to your blog.
Tip
You can filter that listing of posts by date by choosing a date from the Show All Dates drop-down menu at the top of the Edit Posts page. For example, if you choose April 2010, the Edit Posts page reloads, displaying only those posts that were published in the month of April 2010.
You can also filter the post listing by category. Select your desired category from the View All Categories drop-down menu.
When you find the post you need, click its title.
The Edit Post window opens. In this window, you can edit the post and/or any of its options.
You can also click the Edit link that appears beneath the post title on the Edit Posts page.
Tip
If you only need to edit the post options, click the Quick Edit link. The post options open, and you can configure post options like the title, status, password, categories, tags, comments, and timestamp. Click the Save button to save your changes.
Edit your post; then click the Update Post button.
The Edit Post window refreshes with all of your changes saved.
The feature that really catapulted blogging into the limelight is the comments feature, which lets visitors interact with the authors of blogs. I cover the concept of blog comments and trackbacks in Chapter 2. They provide a great way for readers to interact with site owners, and vice versa.
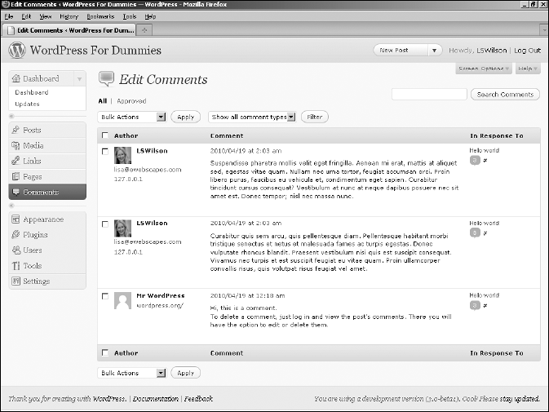
To find your comments, click the Comments link on the Comments menu; the Edit Comments page opens (see Figure 8-12).
When you hover over the comment with your mouse, several links appear that give you the opportunity to manage those comments:
Unapprove: This link only appears if you have comment moderation turned on and appear with approved comments only. The comment is placed in the moderation queue, which you get to by clicking the Awaiting Moderation link that appears below the Manage Comments header. The moderation queue is kind of a holding area for comments that haven't yet been published to your blog. (See the following section for more on the moderation queue.)
Reply: Click this link, and a text box drops down, where you can type and submit your reply to this person. This feature eliminates the need to have to load your live site in order to reply to a comment.
Quick Edit: Click this link and, without ever leaving the Edit Comments page, the comment options open, and you can configure the post options like name, e-mail, URL, and comment content. Click the Save button to save your changes.
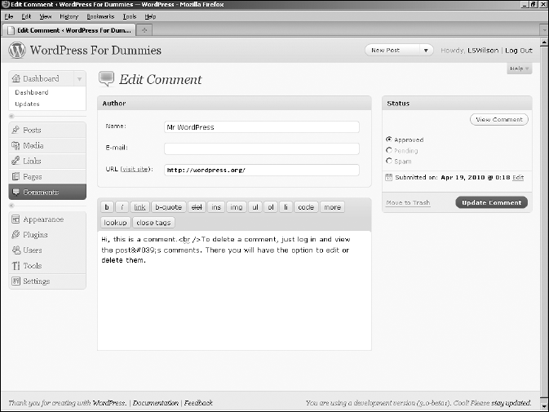
Edit: Click this link to open the Edit Comment page where you can edit the different fields, such as name, e-mail, URL, and comment content (see Figure 8-13).
Spam: Click this link to mark the comment as spam and toss it into the spam bin where it will never be heard from again!
Trash: This link does exactly what it says; it sends the comment to the trash can and deletes it from your blog.
Tip
If you have a lot of comments listed in this page and want to bulk-edit them, check the boxes to the left of all the comments you want to manage; then select one of the following from the Actions drop-down menu at the top left of the Edit Comments page: Approve, Mark As Spam, Unapprove, or Delete.
If you have your options set so that comments aren't published to your blog until you approve them, you can approve comments from the Edit Comments page as well. Just click the Pending link, and you go to the Edit Comments page. If you have comments and/or trackbacks awaiting moderation, you see them on this page, and you can approve them, mark them as spam, or delete them.
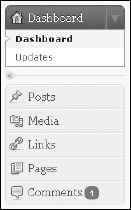
A nice feature of WordPress is that it immediately notifies you of any comments sitting in the moderation queue, awaiting your action. This notification, which appears on every single page, is a small orange conversation bubble that appears in the left navigation menu, to the right of the Comments menu. Figure 8-14 shows that I have 10 comments awaiting moderation. I'd better get busy and deal with those comments!
Tackling spam with Akismet
I touch on Akismet a few times throughout this book. Why do I discuss it so much? Only because it's my humble opinion that Akismet is the mother of all plugins and that no WordPress blog is complete without a fully activated version of Akismet running in it.
Apparently WordPress agrees, because the plugin is packaged in every WordPress software release beginning with version 2.0. Akismet was created by the folks at Automattic, the same folks who brought you the WordPress.com-hosted version (discussed in Part II of this book). Automattic also works with of some of the original developers of the WordPress software platform.
Akismet is the answer to combatting comment and trackback spam. Matt Mullenweg of Automattic says Akismet is a "collaborative effort to make comment and trackback spam a non-issue and restore innocence to blogging, so you never have to worry about spam again" (from the Akismet Web site at http://akismet.com).
I've been blogging since 2002. I started blogging with the Movable Type blogging platform and moved to WordPress in 2003. As blogging became more and more popular, comment and trackback spam became more and more of a nuisance. One morning in 2004, I found that 2,300 pieces of disgusting comment spam had been published to my blog. Something had to be done! The folks at Automattic did a fine thing with Akismet. Since the emergence of Akismet, I've barely had to think about comment or trackback spam except for the few times a month I check my Akismet spam queue.
I talk in greater detail about plugin use in WordPress in Chapter 10, where you find out how to activate Akismet and make sure that it is protecting your blog from trackback and comment spam.