After the core webOS applications, one of the first applications built for webOS was the News application. In August 2008, the webOS platform was far enough along that the webOS Engineering team wanted to have someone completely unfamiliar with webOS write a webOS application. An experienced JavaScript developer built a primitive version of the News application and gave us feedback on the tools and documentation. After a month, we ended the experiment, put the prototype into Subversion and went on with the project.
Over a recent holiday, I started poking around at the application thinking that it would be fun to get it updated to the latest framework and see what could be done with it. Within a few days, I had rewritten the application and had something useful; a week or so later it was ready to post on the internal website. I was amazed at how much fun I was having with it and felt guilty for continuing to work on it; it was addictive.
An RSS (Really Simple Syndication) reader is a useful application and although simple to write, it uses a lot of the features of the framework, so it seemed like a good choice for a sample application in this book. We’re going to build the application up bit by bit throughout the book to explore how to write a webOS application and how to use the different APIs, widgets, and styles. We won’t use every API or every widget or every style, but there’ll be enough from each part of the framework that you can see how to apply the examples to things that are not covered.
The News application manages a list of newsfeeds, periodically updating the feeds with new stories. It has the following major features:
Users can monitor the newsfeeds for unread stories, scroll through the stories within a feed, and display individual stories.
Feeds and stories are cached on the device for offline viewing.
The original and full story can be viewed in the browser.
Keyword searches are carried out over the entire feed database.
Stories are shared through email or messaging.
Feeds are updated in the background with optional notifications and a dashboard summary.
The application was localized for the Spanish language.
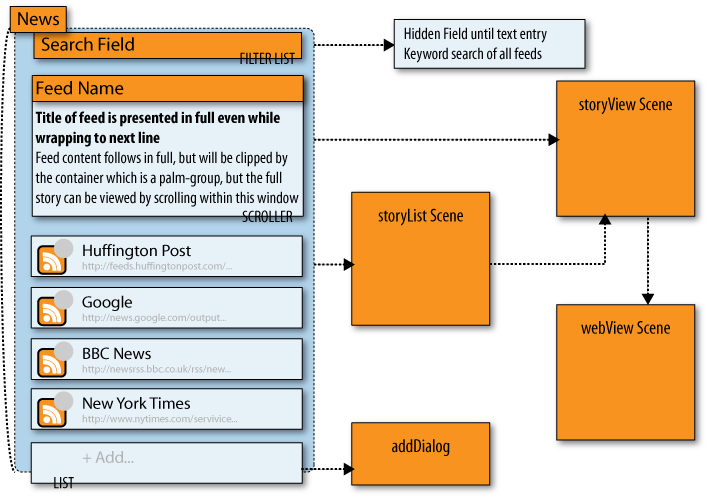
It’s useful to block out the design for an application before you begin any coding or detail design.A wireframe shows the layout of an application view and the UI flow from one view to the next. A set of the News wireframes is shown in Figure 2-1.
This shows the main scene of the News application with a featured story in the top third of the screen. This is a text scroller widget encapsulated with a base div style called palm-group-title. Below the feature story area is the feed list widget, which serves as an index of the selected feeds. At the top of the scene is a search field built with a filterlist widget, which is hidden until some text is keyed, at which point the entered text will be used in a keyword search of the entire feed database.
Note
None of the style or widget names will make much sense right now, so don’t worry about that, but note that the wireframe calls out these base styles and the widgets that will be used.
The News application supports other scenes, which users can bring
into view by tapping different elements. Tapping a feed list entry will
bring up a new scene called storyList, which is a
list of the stories in the feed. A scene of a specific story is viewed
by tapping the story in the list. You can also get to the
storyView scene by tapping the featured story.
Tapping a story from storyView will go to the
original story URL in yet another scene, the webView
scene.
A complete set of wireframes would include a diagram for each scene and for each dialog box, such as the dialog box in this scene that adds new feeds to the list.
Chapter 1 includes an overview on style guidelines, and it’s at this wireframe design stage that the guidelines are best applied. The News application uses physical metaphors of showing the feeds and stories in lists that can be tapped (to view), scrolled, deleted, or rearranged. Users add new feeds by tapping on the end of the list. No menus are needed; all the actions are directly applied to the elements on the screen.
The SDK includes a comprehensive set of style guidelines that you may find helpful. It covers broad user-experience guidelines for designing webOS applications, and includes technical details that are essential for visual and interaction designers. The style guidelines will help you design for the platform and not just a single device.
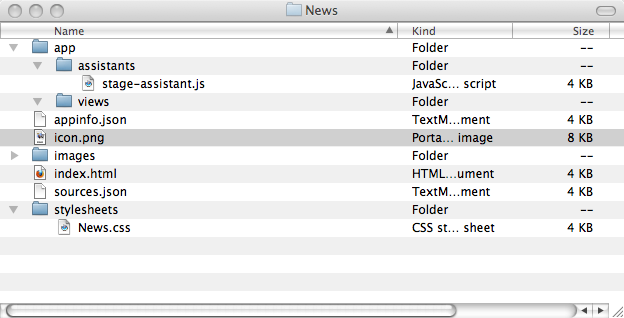
We’ll start by repeating the steps covered in the previous section
to create a new application project. Using palm-generate, create a new
application named News. You’ll
see an initial application structure (shown in Figure 2-2):
$ palm-generate News
Running this app simply displays some text, which isn’t very interesting. We’ll add the first scene and some actual application content, but first there’s some basic housekeeping to do.
Start by cleaning up the index.html file.
Remove all of the HTML code between the <body> and </body> tags, and update the application
title. In the following sample, the application title has been left as
News, but it has been formatted into
title case:
<?xml version="1.0" encoding="UTF-8"?>
<!DOCTYPE html PUBLIC "-//W3C//DTD XHTML 1.1//EN"
    "http://www.w3.org/TR/xhtml11/DTD/xhtml11.dtd">

<html xmlns="http://www.w3.org/1999/xhtml" xml:lang="en">
<head>
  <title>News</title>
  <script src="/usr/lib/mojo/framework/mojo.js" type="text/javascript"
    x-mojo-version="1"></script>

  <!-- application stylesheet come in after the one loaded by the framework -->
  <link href="stylesheets/News.css" media="screen" rel="stylesheet"
     type="text/css" />
</head>
<body>
</body>
</html>While not strictly necessary, each application should have a unique launcher icon. To implement this, you will create a custom graphic and replace the generic icon.png in the News directory. If you don’t want to draw a custom graphic you can repurpose other graphics as long as they have close to a 1:1 aspect ratio (square, in other words) by using resampling tools like the Preview application on the Macintosh. See the sidebar Designing for Palm webOS for more information on creating application icons.
Next, we’ll open the appinfo.json file and
update the id property. You should at
least replace the yourdomain string
with your actual domain name (in this case we’ll use palm) or some other unique string and add the
vendor name. We’ll also modify the title to put the application name in
title case:
{
    "title": "News",
    "type": "web",
    "main": "index.html",
    "id": "com.palm.app.news",
    "version": "1.0.0",
    "vendor": "Palm",
    "icon": "icon.png"
}
The application doesn’t yet do anything more than before, but now it is uniquely the News application. It’s time to add the first newsfeed features.
The first scene will just display a story from one newsfeed, which
will be hardcoded to start with. This scene will use several of Mojo’s scene styles,
including palm-page-header, palm-page-header-wrapper, and title.
As you learned earlier in the chapter, a scene is defined by an
HTML view file and controlled by a JavaScript assistant. Again, use palm-generate, this
time to create a scene:
$ palm-generate -t new_scene -p "name=storyView" News
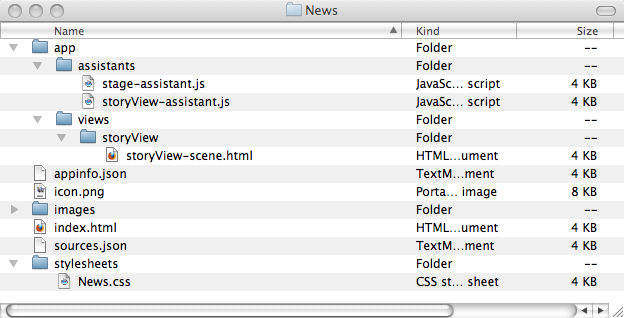
This command creates a directory with the scene name, and within
that directory, an empty HTML file with the scene name followed by
-scene.html. In this case, the
filename will be views/storyView/storyView-scene.html. It
also creates a JavaScript assistant, assistants/storyView-assistant.js, with the
same base scene name. The JavaScript assistant will be discussed in
the next section. The file structure is shown in Figure 2-3.
Within the scene’s view file, you need to specify the complete
HTML required by the scene. The title and text will be inserted
dynamically, so there are just div tags for the title with an id
storyViewTitle, and
the story item with the id storyViewSummary,
with some template strings between the div tags for the dynamic
data:
<div id='storyViewScene'>
    <div class="palm-page-header multi-line">
        <div class="palm-page-header-wrapper">
            <div id="storyViewTitle" class="title left">
            </div>
        </div>
    </div>
    <div class="palm-text-wrapper">
        <div id="storyViewSummary" class="palm-body-text">
        </div>
    </div>
</div>
You’ll notice that the storyViewTitle div is wrapped by two div
tags, which each have class names corresponding to Mojo scene styles.
Scene styles are covered later in this chapter, but for this example
you should note that the scene styles are defined through empty divs
with class names corresponding to the scene style selected. Where
multiple elements can be included in the style, there will be an inner
wrapper style for each element.
Occasionally, the styles will have modifiers; in the example above,
the base style is modified with multi-line,
signifying some behavior to accommodate titles that are longer than a
single line.
In Mojo, CSS class names belong to the designers and are used for styling, whereas the element IDs belong to the developer. This rule allowed the Mojo design and development teams to work somewhat independently without conflicting. You always invoke a Mojo style by assigning the appropriate style class name to the div. For scene styles, the element will usually be an empty div, sometimes with some required nested div(s).
Mojo requires that the scene assistant’s name match the view
name, so you should notice that
palm-generate created a scene assistant called
storyView-assistant.js in the News/app/assistants directory. The
assistant includes a function definition along with the four standard
methods:
setupactivatedeactivatecleanup
The function naming is important; the assistant’s name should be the same as the filename, with the removal of any delimiters and beginning with a capital letter, as in this example:
/*  StoryViewAssistant - NEWS

    Copyright 2009 Palm, Inc.  All rights reserved.

    Passed a story element, displays that element in a full scene view.

    Major components:
    - StoryView; display story in main scene

*/

function StoryViewAssistant() {

}

// setup
StoryViewAssistant.prototype.setup = function() {

    // Update story title in header and summary
    var storyViewTitleElement = this.controller.get("storyViewTitle");
    var storyViewSummaryElement = this.controller.get("storyViewSummary");
    storyViewTitleElement.innerHTML =
        "Green Inc.: Cities Target Lending to Speed Energy Projects";
    storyViewSummaryElement.innerHTML =
        "A number of municipalities across the country are getting creative and
         experimenting with incremental, neighborhood- or district-based lending
         programs that help homeowners pay the up-front capital costs for efficiency
         or renewable energy projects.";
};

// activate - called each time the scene is revealed
StoryViewAssistant.prototype.activate = function(event) {

};

// deactivate - called each time the scene is replaced by another scene
StoryViewAssistant.prototype.deactivate = function(event) {

};

// cleanup - called once, after deactivate when scene is popped
StoryViewAssistant.prototype.cleanup = function(event) {

};
The setup method is
invoked, and the story’s title and text are put into the div tags and
into the scene before the scene is activated. We use the Mojo
controller method, get(), to retrieve the
storyViewTitle and
storyViewSummary DOM elements from the scene, and
then insert the title and text items into the respective element’s
innerHTML.
The get() method is
functionally equivalent to the conventional getElement() or Prototype’s $() functions, but is required when
developing multistage and background applications (see Chapter 10). It’s good practice to use it in
even simple applications like this.
The code sample shows empty activate, deactivate, and cleanup
methods, which are created by palm-generate when generating a new scene.
Empty methods are okay, but can be omitted. If any of the standard
methods are omitted, the framework will just skip over the call to
that method.
To push the scene, modify stage-assistant.js to push the storyView scene:
function StageAssistant () {
}

StageAssistant.prototype.setup = function() {
    this.controller.pushScene("storyView");
};
Notice that only the scene name is used here. You can see why the naming convention is important; the framework uses the scene name to access the assistant, view directory, and view file. Finally, add a reference into sources.json to load storyView-assistant.js:
[
  {
    "source": "app/assistants/stage-assistant.js"
  },
  {
    "source": "app/assistants/storyView-assistant.js",
    "scenes": "storyView"
  }
]
Now run the application by packaging and installing the
application. You’ll need to first launch the emulator or attach a
device to your desktop over USB. In either case, first run palm-package and then palm-install:
$ palm-package News
Creating package in /Users/Mitch/Documents/workspace/com.palm.app.news_1.0.0_all.ipk
$ palm-install --install com.palm.app.news_1.0.0_all.ipk
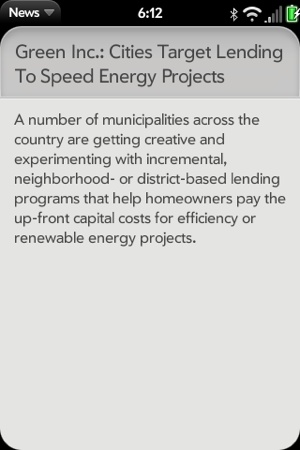
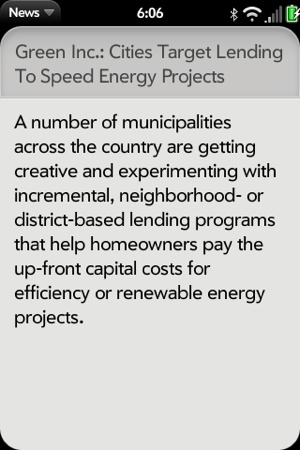
Figure 2-4 shows the first scene.
The first scene was styled using standard framework styles.
The story title is styled with palm-page-header,
palm-page-header-wrapper, title, and left, while the story text uses palm-text-wrapper and palm-body-text. In many cases, the framework
styles will be all you need, but you can use the application’s
stylesheet to override those styles or add your own
application-specific styles.
For example, we could override the palm-body-text style if we wanted to change
the text body style to enlarge text so that it’s easier to read. Add a
rule to the News.css file, and
you will see a new version of the scene, as shown in Figure 2-5:
/*    News CSS
    App overrides of palm scene and widget styles.
*/

.palm-body-text  {
    font-size: 16pt;
}
The style override is applied to the base style class palm-body-text, but this change will affect
every use of that style within your application. If you are just
trying to change this one instance of this style, you should add
another class to the element you wish to style and apply the rule to
that class instead. Here we create a rule with a new class name,
news-large:
/*    News CSS
    App overrides of palm scene and widget styles.
*/

.news-large  {
    font-size: 16pt;
}
Then add this class name to the text element in view/storyView/storyView-scene.html and
you’ll again see the results shown in Figure 2-5:
<div class="palm-text-wrapper">
    <div id="storyViewSummary"  class="palm-body-text news-large">
    </div>
</div>With the base styles, it’s the class names that must be kept intact in order to retain the base styling, but you can freely create custom styles to augment the base styles.
Note
It may be necessary to override the base styles to get the right appearance for your application, so don’t be afraid to dive into the CSS. Palm’s development tools help you see the styling rules applied to any given element to help you make the desired adjustments.
Applying styles is an important topic, so we’ll return to it again later. Chapter 7 is devoted entirely to advanced styles, covering some general styling tips and techniques. A lot of time can be spent getting the right pixels in the right places.
Mojo includes a sophisticated suite of base styles that are used heavily by the framework and the core webOS applications. You should leverage them within your applications where the base styles will make your application feel like a native webOS application, and users will learn how to use your application more quickly, based on their experience with other applications. That said, you have ultimate flexibility to change the appearance of your application as needed, and you can override individual properties within the styles to tailor them to your needs.
This section will give a brief overview of the webOS base styles and provide some basic techniques that you can use. It’s beyond the scope of this book to describe the base styles in detail. It’s a big topic and, given the central nature of the UI design to Palm webOS, it’s also changing frequently. If you’re interested in an in-depth description of webOS styling, you should check out the “Human Interface Guidelines,” and the “Styles and CSS Reference” in the Palm SDK. In addition, Appendix C includes a reference to the base styles with more detail on the options for applying those styles.
Mojo defines base styling for key textual elements such as body, paragraph, input, button, and others. If you want your application to have the look and feel of a webOS application, you shouldn’t override these styles. These style definitions can be found in the Mojo framework in stylesheets/global-base.css.
The most basic style elements are those used to present a scene template. These include page headers, groups, labels, spacers, and dividers, along with background images. Some of the styles that you will find are shown in Table 2-3; most of these styles are found in the Mojo framework in stylesheets/global-lists.css and are described in more detail in Appendix C.
Table 2-3. Scene styles
You can use each of these styles as-is or adjust the style properties in your CSS. These are just a few of the scene styles available through the framework; the SDK includes a much more extensive discussion of the styles available to you.
Each widget is designed with a base style. In the next three chapters, we’ll cover widgets in detail, including the base styles and properties. Generally speaking, however, you will be able to override the widget style in your application CSS, and you can refer to the style definitions in the framework’s CSS files for guidance. Be careful though; the widgets are tuned around the provided styles and you can easily break the widget’s behavior by overriding the widget’s style. Table 2-4 cross-references the widget styles with the framework’s CSS files.
It’s helpful to understand what’s happening when an application is launched and the first scene is pushed. When News is launched, the Mojo framework will first look for an AppAssistant, an optional controller class. The AppAssistant is used to handle launch arguments from the system and to set up stages if the application requires more than the main Card view or has multiple stages, but it isn’t a required element. If the system finds the AppAssistant, it will be called. Otherwise this step will be skipped.
In this minimal form, News doesn’t have an AppAssistant; many simple single stage applications don’t. But as you’ll see in Chapter 10, the AppAssistant is important for background applications and to applications with multiple stages.
Note
In Chapter 10 we’ll add the AppAssistant to News and explore its use in detail.
The StageAssistant contains code that applies to all scenes in a stage and is used to push the first scene onto the stage, which will create the initial view for the application. The terms push and pop are used to refer to scenes being made visible in a window (push) or removed from the window (pop), reinforcing the concept that scene navigation is like managing a stack. The user opens new scenes with a tap and then uses the back gesture to return to the previous scene (as if tracking along a stack of scenes).
The framework always creates a stage controller and if the application includes a defined Stage Assistant, its constructor function is used to create a Stage Assistant and its setup method is called.
If there isn’t a Stage Assistant, or if there is one but it doesn’t push an initial scene, the framework will look for a scene named main to push as the first scene. If you provide a Stage Assistant and push the first scene directly, you may call the scene whatever you choose; otherwise, the first scene assistant must be named main, and main-assistant.js must be included in your assistant’s directory.
Most of what happens within a webOS application occurs within a
scene. Once the initial scene is pushed, the framework will load the
scene’s view file, then invoke first the setup and then the activate methods of the Scene Assistant. The
setup method sets up widgets and
event listeners, and performs other setup functions that persist across
the life of the scene. activate is
always called before the scene is put into the view, either because of a
push or because a later scene was popped. setup is only called when the scene is
pushed.
When a scene is popped or covered up by the push of a new scene,
the framework invokes the deactivate method for
the old scene before activating the new scene. The naming conventions
allow the framework to manage both the view and assistant methods of the
scene without explicit configuration files. It may seem a little
cumbersome at first, but it’s a simple and self-documenting technique.
cleanup is called only when the scene
is popped.
All Palm applications will have at least one stage, with each stage supporting one or more scenes. Applications can have multiple stages and the means to transition between these stages. When creating applications that can support multiple activities, such as an email application that supports both viewing a message list and composing multiple email messages, you should structure the application stages around activities.
At this point, the application displays a single story within a single scene, which is very limited. We can display more stories by adding some additional scenes, but first we’ll create the core data model to store the newsfeeds and stories. Under News/app/models, create feeds.js, an object that will include the global array of newsfeed objects, each of which in turn includes an array of stories. Later we’ll add methods to the object to perform common functions, such as updating and backing up the data. The following code sample includes a breakdown of these data objects and expands the definition of our sample newsfeed with four sample stories:
/*  Feeds - the primary data model for the News app. Feeds includes the primary
      data structure for the newsfeeds, which are structured as a list of lists:

    Feeds.list entry is:
      list[x].title           String    Title entered by user
      list[x].url             String    Feed source URL in unescaped form
      list[x].type            String    Feed type: either rdf, rss or atom
      list[x].numUnRead       Integer   How many stories are still unread
      list[x].newStoryCount   Integer   For each update, how many new stories
      list[x].stories         Array     Each entry is a complete story

    list.stories entry is:
      stories[y].title        String    Story title or headline
      stories[y].text         String    Story text
      stories[y].summary      String    Story text, stripped of markup
      stories[y].unreadStyle  String    Null when Read
      stories[y].url          String    Story url

    Methods:
    initialize(test) - create default and test feed lists
    getDefaultList() - returns the default feed list as an array
*/

var Feeds = Class.create ({
    //  Default Feeds.list
    defaultList: [
        {
        title:"New York Times",
        url:"http://www.nytimes.com/services/xml/rss/nyt/HomePage.xml",
        type:"rss",
        numUnRead:4,
        stories:[
            {
                title: "Obama Warns of Prospect for Trillion-Dollar Deficits",
                text: "Barack Obama delivered a stark assessment of the
                  economy, saying that his administration would be forced
                  to impose tighter discipline on government.",
                unReadStyle: "unReadStyle",
                url: "http://www.nytimes.com/2009/01/07/world/asia/
                  07india.html?_r=1&partner=rss&emc=rss"
            },
            {
                title: "Hundreds of Coal Ash Dumps Lack Regulation",
                text: "Most of the coal byproduct dumps across the United
                  States are unregulated, although they contain chemicals
                  considered as threats to human health.",
                unReadStyle: "unReadStyle",
                url: "http://www.nytimes.com/2009/01/06/world/asia/
                  06iqbal.html?partner=rss&emc=rss"
            },
            {
                title: "Gazprom Dispute Entangles Europe",
                text: "Russia's gas price dispute with Ukraine escalated,
                  disrupting deliveries to the European Union in the midst
                  of a bitter cold spell.",
                unReadStyle: "unReadStyle",
                url: "http://www.nytimes.com/2009/01/07/world/europe/
                  07gazprom.html?partner=rss&emc=rss"
            },
            {
                title: "Green Inc.: Cities Target Lending to Speed Energy
                  Projects",
                text: "A number of municipalities across the country are
                  getting creative and experimenting with incremental,
                  neighborhood- or district-based lending programs that help
                  homeowners pay the up-front capital costs for efficiency or
                  renewable energy projects.",
                unReadStyle: "unReadStyle",
                url: "http://greeninc.blogs.nytimes.com/2009/01/06/cities-use-
                  creative-targeted-lending-to-speed-energy-projects/
                  ?partner=rss&emc=rss"
            }
        ]
    }],

    // initialize - Assign default data to the feedlist
    initialize: function()  {
        this.list = this.getDefaultList();
    },

    // getDefaultList - returns the default feed list as an array
    getDefaultList: function() {
        var returnList = [];
        for (var i=0; i<this.defaultList.length; i++)   {
            returnList[i] = this.defaultList[i];
        }

        return returnList;
    }
});
The Feeds object is defined using Prototype’s Class.create() function, a convenient way to
build an object with class-like behavior. If you’re not familiar with
this notation, refer to http://www.prototypejs.org/api for more information about
Prototype functions.
Feeds includes a single feed
entry for the New York Times RSS feed and four stories. Each feed entry
includes a title, a URL, the feed type, and some other properties that
we’ll be using in the upcoming chapters. The stories array contains the
individual stories, each of which has a title, the text body, a
read/unread flag, and a stripped version of the text.
The stage assistant is modified to create an instance of the Feeds
object and then push the storyView scene as before,
but this time with some arguments identifying the source feed (this.feeds.list[0]) and the index of the first
story:
/*  StageAssistant - NEWS
    Responsible for app startup.
    Major components:
    - setup; app startup and initial load of feed data
        from the Depot and setting alarms for periodic feed updates

    Data structures:
    - feeds; feed object used for main feedlist in feedList-assistant
    - globals; set of persistant data used throughout app

*/
//  ---------------------------------------------------------------
//  GLOBALS
//  ---------------------------------------------------------------

//  News namespace
News = {};

//  Constants
News.unreadStory = "unReadStyle";


function StageAssistant () {
}

StageAssistant.prototype.setup = function() {
    this.feeds = new Feeds();           // initialize the feeds model
    // start with the first feed and the first story in the feed
    this.controller.pushScene("storyView", this.feeds.list[0], 0);
};
In the StageAssistant setup method, arguments have been added to the pushScene method call. Any number of arguments
can be provided after the first required argument, which is the scene
name.
The StoryViewAssistant is
updated to handle the input arguments and the new data structures. In
the function invocation, the arguments are assigned to properties of the
scene assistant, making them available to each scene method. This is a
common technique when handling input arguments to a scene so that the
arguments can be used throughout the scene assistant’s scope:
/*  StoryViewAssistant - NEWS

    Passed a story element, displays that element in a full scene view and
    offers options for next story (right command menu button) and previous
    story (left command menu button) Major components:
    - StoryView; display story in main scene
    - Next/Previous; command menu options to go to next or previous story

    Arguments:
    - storyFeed; Selected feed from which the stories are being viewed
    - storyIndex; Index of selected story to be put into the view
*/

function StoryViewAssistant(storyFeed, storyIndex) {
    //  Save the passed arguments for use in the scene.
    this.storyFeed = storyFeed;
    this.storyIndex = storyIndex;
}

StoryViewAssistant.prototype.setup = function() {

    if (this.storyIndex === 0)    {
        this.controller.get("previousStory").hide();
    }

    if (this.storyIndex == this.storyFeed.stories.length-1)    {
        this.controller.get("nextStory").hide();
    }

    this.nextStoryHandler = this.nextStory.bindAsEventListener(this);
    this.previousStoryHandler = this.previousStory.bindAsEventListener(this);
    this.controller.listen("nextStory", Mojo.Event.tap, this.nextStoryHandler);
    this.controller.listen("previousStory", Mojo.Event.tap,
        this.previousStoryHandler);

    var storyViewTitleElement = this.controller.get("storyViewTitle");
    var storyViewSummaryElement = this.controller.get("storyViewSummary");
    storyViewTitleElement.innerHTML = this.storyFeed.stories[this.storyIndex].title;
    storyViewSummaryElement.innerHTML = this.storyFeed.stories[this.storyIndex].text;

};

//    activate - display selected story
StoryViewAssistant.prototype.activate = function(event) {

   if (this.storyFeed.stories[this.storyIndex].unreadStyle == News.unreadStory) {
        this.storyFeed.numUnRead--;
        this.storyFeed.stories[this.storyIndex].unreadStyle = "";
    }
};

StoryViewAssistant.prototype.deactivate = function(event) {

};

StoryViewAssistant.prototype.cleanup = function(event) {
    this.controller.stopListening("nextStory", Mojo.Event.tap,
      this.nextStoryHandler);
    this.controller.stopListening("previousStory", Mojo.Event.tap,
      this.previousStoryHandler);
};

StoryViewAssistant.prototype.previousStory = function(event) {
    this.controller.stageController.pushScene("storyView", this.storyFeed,
      this.storyIndex-1);
};

StoryViewAssistant.prototype.nextStory = function(event) {
    this.controller.stageController.pushScene("storyView", this.storyFeed,
      this.storyIndex+1);
};
In the setup method, listeners
are set up for previousStory and
nextStory. These are button elements
that, when tapped, will cause a new scene to be pushed with the
appropriate story. Notice that the listeners are removed in the
cleanup method.
Warning
Remove all event listeners in the scene’s cleanup method. Failing to do so is a common cause of memory leaks in webOS applications.
The nextStory and previousStory methods push a new scene with
the new story. The scene that is pushed is this same storyView scene, showing some of the
flexibility of the scene model.
Note
You may have noticed that we created properties of the scene
assistant for data used within the assistant scope. It’s a useful way
to manage data that is limited to a particular instance of the
assistant. To access the assistant object and its properties in your
event listeners, you need to bind the assistant’s controller instance
to the event listeners. The code examples throughout the book use
Prototype’s bindAsEventListener,
but you aren’t required to use that method.
The button elements are added to the end of storyView-scene.html:
<div id="previousStory" class="palm-button">Previous</div>
<div id="nextStory" class="palm-button">Next</div>
Although Mojo has button widgets, the framework does support all
standard HTML elements and has included a palm-button class for the button element that
provides a style for HTML buttons that is consistent with the widget
styles.
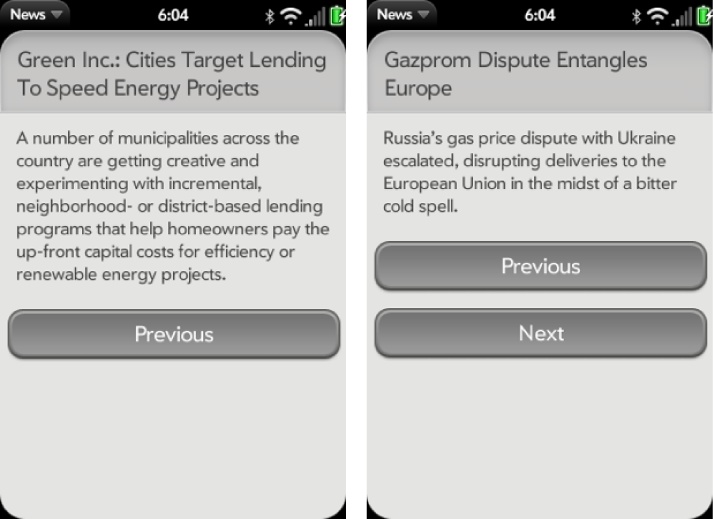
Run this version of the application and push the buttons to go from one story to the next and back again. You should see views similar to those shown in Figure 2-6.
But there’s a problem with this solution. Since scenes are stacked when pushed, each button press (whether next or previous) adds another scene to the stack—to no real advantage. Try tapping next and previous a few times, then start using the back gesture. You just unwind all the stories that you pushed on the stack.
pushScene is just is one of the StageController methods provided to help you
manage the scene stack efficiently. In our example, it would be better
to use the swapScene method. As
its name implies, swapScene swaps the
new scene for the old and doesn’t increase the stack depth. It’s an easy
change because swapScene uses the
same syntax as pushScene:
StoryViewAssistant.prototype.previousStory = function(event) {
    this.controller.stageController.swapScene("storyView", this.storyFeed,
      this.storyIndex-1);
};

StoryViewAssistant.prototype.nextStory = function(event) {
    this.controller.stageController.swapScene("storyView", this.storyFeed,
        this.storyIndex+1);
};
Now when you tap through the stories, you are just swapping one story for another on the stack. So when you swipe back you’ll find that you are already at the top of the stack. It’s hard to see how important this is given that this is currently such a simple application, but it will become more obvious as we go forward.
Both examples using pushScene()
and swapScene() use the default
transition animation when changing scenes, which is zooming style. This
is the recommended style for moving up or down the scene stack, but not
for a lateral transition. You can override the default animations and in
this case, we specify a cross-fade transition. The swapScene() method calls
below use a sceneArguments object,
with name and transition properties;
you’ll use the sceneArguments object
anytime you need to override the default arguments of a scene
method:
StoryViewAssistant.prototype.previousStory = function(event) {
    this.controller.stageController.swapScene(
        {
            transition: Mojo.Transition.crossFade,
            name: "storyView"
        },
        this.storyFeed, this.storyIndex-1);
};

StoryViewAssistant.prototype.nextStory = function(event) {
    this.controller.stageController.swapScene(
        {
            transition: Mojo.Transition.crossFade,
            name: "storyView"
        },
        this.storyFeed, this.storyIndex+1);
};
This is as much as we’re going to do with News in this chapter, so if you’re eager for more hands-on information, you can skip to the next chapter at this point. The remaining section of this chapter covers more advanced topics that will help you understand the underlying framework design, but they aren’t strictly needed to write webOS applications. You can always come back to this topic later if you are interested in learning more about it.

