Chapter 14. Doing Payroll
If you decide to outsource the headaches of payroll to a payroll service company, as many businesses do, you can skip this chapter—except for the first section, which starts on Adding Payroll Transactions from an Outside Service. With outsourced payroll, the only thing you have to do in QuickBooks payroll-wise is add a couple of transactions for each payroll, allocate salaries and wages, payroll taxes, and any other payroll expenses to the accounts in your chart of accounts. For a small payroll, outside services are a pretty good deal. The payroll service takes care of all the grunt work for the equivalent of the cost of a few hours of your time. Even with the highest level QuickBooks Payroll Service, you have to devote some time and brain power to payroll.
If you want to process payroll within QuickBooks, you first have to sign up for one of the payroll services that Intuit offers. To keep expenses low, you can choose a bare-bones service that provides only updated tax tables. At the other end of the spectrum, you can opt for QuickBooks’ full-service payroll. Or you can compromise somewhere in the middle.
After you choose a level of QuickBooks payroll service, your next task is to set up everything the program needs to calculate payroll amounts. You can walk through each step on your own or use a wizard. Either way, the Payroll Setup wizard keeps track of what you’ve done and what you still have to do. This chapter takes you through every payroll step from the initial setup to running a payroll, printing checks, and remitting payroll taxes and reports to the appropriate government agencies.
Note
Payroll regulations are complex and vary depending on the size of your payroll and the states to which you remit payroll taxes. This chapter focuses on how to process payroll in QuickBooks. For more information on your company’s payroll requirements, check with your accountant or the IRS and state tax agencies you work with.
Adding Payroll Transactions from an Outside Service
Lots of companies use outsourced payroll services, like ADP or Paychex, to avoid the brain strain of figuring out tax deductions and complying with payroll regulations. When you use one of these services, you send them your payroll data and receive reports about the payroll transactions that they processed. The payroll service takes care of remitting payroll taxes and other deductions to the appropriate agencies.
The problem is that none of these payroll transactions appear in your QuickBooks company file unless you add them. Fortunately, you don’t have to enter every last detail into QuickBooks. You can create a journal entry debiting the payroll expense accounts and crediting your bank account (Creating General Journal Entries). Or you can create a vendor in QuickBooks for payroll and then memorize a split transaction that distributes the money from your checking account into the appropriate expense accounts, as shown in Figure 14-1:
Create a vendor for your payroll transactions.
On the QuickBooks Home page, click Vendors. In the Vendor Center toolbar, click New Vendor. You don’t have to fill in all the fields in the New Vendor window; simply type a name like Payroll in the Vendor Name box and click OK.
Open your payroll bank account’s register window.
In the Chart of Accounts window, double-click the account name.
Figure 14-1. In most cases, your payroll falls into three categories. Salaries and wages represent the net pay that employees receive from their paychecks. Employee withholdings are the taxes withheld from employees’ paychecks like federal and state income taxes, social security and Medicare contributions, and local taxes. Payroll taxes are the taxes that your company pays, such as social security and Medicare. If you also pay officers’ salaries, you can include a fourth expense account for them.In the first blank transaction’s Payee field, type the name of the payroll vendor you set up, and then click Splits.
The Splits pane opens below the transaction.
Fill in the Account fields for each payroll expense.
You leave the Amount fields blank, because you’re simply memorizing the transaction so you can record future payrolls, which usually have different amounts.
To remember which accounts you allocate payroll to, memorize the payroll transaction by pressing Ctrl+M.
In the Memorize Transaction dialog box, type a name for the transaction. You can set up a reminder schedule that matches the frequency of your payroll (Using a Memorized Transaction). Click OK to memorize the transaction and close the Memorize Transaction dialog box.
Back in the bank account register, click Restore to clear the values in the payroll transaction.
If you want to record a payroll, you can fill in the amount fields with the values from your payroll statement, and then click Record.
To record a payroll, press Ctrl+T to open the Memorized Transactions list. Double-click the payroll transaction you memorized.
In the Write Checks window, in the Amount field, type the total amount that the payroll service withdrew from your payroll bank account. On the Expenses tab, fill in each Amount field with the values from your payroll services statement. Then, click Save & Close to record the transaction.

Choosing a Payroll Service
If you don’t use an outside payroll service, you’ll probably choose one of QuickBooks’ payroll services to process payroll in the program. These services help you calculate deductions, enter your results into your company file, print the paychecks, remit your payroll taxes, and generate the appropriate payroll tax reports. Without a payroll service, you have to perform all those tasks on your own. When you take the value of your time into account, even the most expensive payroll service might look like a good deal.
Intuit provides three payroll services, so you can choose between low-cost basic services, moderately priced and moderately featured services, and a more costly but comprehensive service. Choose Employees → Payroll Service Options → Learn About Payroll Options. QuickBooks opens a Web page (http://payroll.intuit.com/payroll_services) that describes Intuit’s offerings. QuickBooks’ three payroll options fall into do-it-yourself or delegate-to-Intuit categories. Here’s a quick overview to get you started:
Basic Payroll is the first do-it-yourself option ($129 a year for up to three employees; $229 a year for four or more employees). You set everything up at the start, as you do for all the services. But then, for each payroll, you enter hours or payroll amounts, and QuickBooks uses the data in tax tables (downloaded so they’re always up to date) to calculate the deductions and payroll taxes for you. Basic Payroll spits out reports with the info you need to fill out the federal and state tax forms you have to file. Your job is to print the paychecks from QuickBooks (or use direct deposit for an additional fee), fill out the government payroll tax forms, and send them in with your payment.
Enhanced Payroll is a more robust version of do-it-yourself payroll. For starters, if you have to withhold state taxes, Enhanced Payroll can handle preparing federal and state payroll forms. You just print them, add your John Hancock, and mail them in. If the tax agencies you work with support e-file or e-pay services, Enhanced Payroll can file your tax forms and pay payroll taxes, too. This service also handles Workers’ Compensation. It costs $249 per year for up to three employees, $349 a year for four or more employees.
With Assisted Payroll, you don’t have to make federal and state payroll tax deposits, file required tax reports during the year, or prepare W-2 and W-3 forms at the end of the year. The service handles all these tasks for you. In addition, Intuit guarantees that your payroll and payroll tax deposits and filings are accurate and on time. Of course, you have to send Intuit the correct data on time in the first place. But if Assisted Payroll then makes a mistake or misses a deadline, it pays the resulting payroll tax penalties. The price of the service varies depending on your payroll schedule and number of employees, but it’s $60 per month plus $1 per employee per pay period. The one-time setup fee is $49, printing W-2s is $40 plus $4.25 for each W-2; and it costs another $10 per month for each additional state you have to work with.
Applying for a Payroll Service
Before you begin the mechanics of setting up your payroll, you have to select and sign up for one of the QuickBooks Payroll Services. To apply for one of Intuit’s services, choose Employees → Payroll Service Options → Order Payroll Service. QuickBooks opens a browser window to the QuickBooks Payroll Services website. Click Learn More to review Intuit’s payroll options.
Before you click Buy Now to launch the online subscription process, gather the following info:
The legal name of your company is on your Articles of Incorporation or other legal documents from when you formed your company.
Your Federal Employer Identification Number (EIN) is a nine-digit number issued by the IRS.
The legal names of each company principal, and the company’s legal name and address.
A mailing address (other than a post office box).
If you’re activating direct deposit, you also need the bank routing number and account number for the account from which you’ll distribute payroll. You have to create this account in your company file before you activate direct deposit.
A credit card number for the subscription fee.
After you submit the application, QuickBooks checks the company information and credit card number you provided. If it runs into any problems, a message tells you to contact Intuit (and conveniently lists the telephone number to call).
Note
When you install QuickBooks, the preference for payroll is turned on automatically. If you turned it off initially because you had no employees but now want to use payroll features, see Payroll & Employees to learn how to set payroll preferences based on the payroll service you choose.
Setting Up Payroll
The easiest way to begin setting up payroll is by choosing Employees → Payroll Setup, which launches the Payroll Setup wizard. Figure 14-2 shows how the wizard helps you see where you are in the payroll setup process. The following sections cover the payroll setup steps in detail.
You don’t have to go through the entire payroll setup process in one shot. Click Finish Later if you want to take a break. The wizard remembers everything you’ve done when you return. Yes, you have to complete every bit of payroll setup before you can run a payroll.
Warning
Don’t try to set up payroll the same day you want to run it for the first time. Intuit needs a few days to turn on your payroll service after you’ve completed your part of the setup process.
Setting Up Compensation and Benefits
The first payroll task is telling QuickBooks how you compensate your employees—whether you pay them a salary, hourly wages, or additional income such as bonuses or commissions. You also specify employee benefits like retirement contributions and insurance premiums—no matter whether the company or the employees pay for them. The QuickBooks Payroll Setup wizard takes the guesswork out of choosing items for payroll. All you have to do is turn on checkboxes for the items you use and answer a few simple questions. Here’s how:
Choose Employees → Payroll Setup.
The QuickBooks Payroll Setup wizard launches. Click Next to get past the introduction.
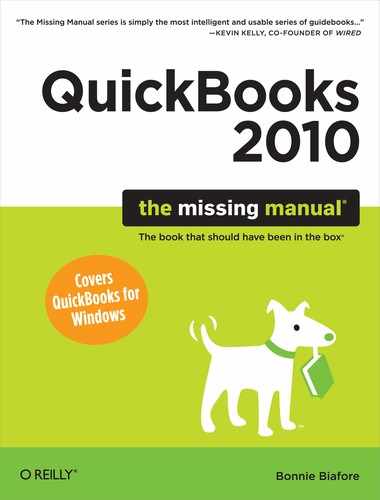
Click Company Setup, and then click Compensation.
The wizard displays the payroll items you’ve selected. You can then add, edit, or delete items to reflect your payroll needs.
To add another payroll item in the current category, click Add New (below the list of compensation items).
The Add New window includes checkboxes for the available items in that category, as shown in Figure 14-3.
Turn on the checkboxes for the compensation items you use, answer any questions that the wizard asks, and then click Finish.
The selected items appear in the wizard’s Compensation list, but behind the scenes they show up in the Payroll Item List (choose Lists → Payroll Item List). It also links those items to accounts in your chart of accounts, so you can track your payroll expenses. For example, a salary payroll item links to an Expense account, like Salaries & Wages. (To see these accounts, open the Payroll Item List, select the payroll item, and then press Ctrl+E. Click Next to see the expense account that goes with the item.) Likewise, if you deduct money from paychecks to pay taxes (Creating employee records), the wizard connects the tax payroll item to a vendor (that is, the tax agency), so you’re ready to send payroll taxes you owe. If QuickBooks adds items you don’t need to the Payroll Item List, like extra pay for overtime, select an item, and then click Delete.
Figure 14-3. You don’t calculate each employee’s pay per payroll cycle in the Payroll Setup wizard. Instead, you set up hourly or annual pay rates for each employee (even if they all get the same rate) as described on Creating employee records. QuickBooks uses the employee pay rates to calculate the values for each paycheck.To proceed to employee benefits, in the QuickBooks Payroll Setup wizard, click either Continue at the bottom-right of the window or Employee Benefits in the step navigation bar.
In the step navigation bar, you’ll see several subcategories of employee benefits: Insurance Benefits, Retirement Benefits, Paid Time Off, and Miscellaneous.
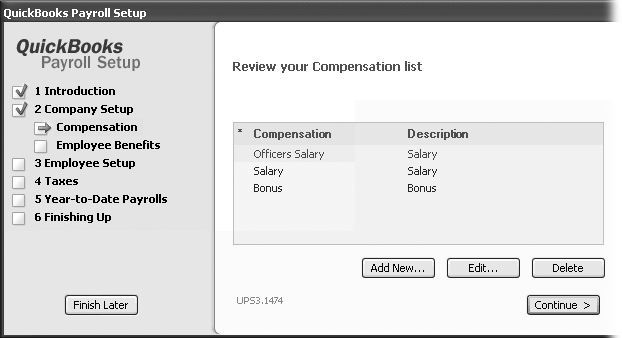
Click Insurance Benefits.
The Insurance Benefits list shows any insurance benefits you’ve already set up, like pre-tax health insurance premiums.
Click Add New, and then turn on the checkboxes for items like “Dental insurance”, “Vision insurance”, Group Term Life, or Medical Care FSA (FSA stands for “flexible spending account”).
If you don’t know what a benefit represents, click the Explain link to the right of its name. If QuickBooks needs to know more about the benefit like who pays for it and whether it’s tax-deductible, you’ll see the Next button instead of the Finish button. For example, for dental insurance you pick whether you or the employee pays, or whether you split the cost. You can also set up a scheduled payment to pay the insurance premiums.
When you’re done answering questions, click Finish to close the Add New dialog box and return to the wizard.
The benefit(s) appear in the wizard’s list. Notes about the benefit show up in parentheses after the benefit name, like “(company paid)” if your company pays the entire premium.
If you want to edit an item that’s already in the list, click it, and then click Edit (below the item list).
An Edit dialog box like the one shown in Figure 14-4 opens.
Repeat steps 6 through 9 for each category of employee benefits.
Retirement benefits include things like 401(k) contributions and company matching. Paid time off covers things like sick time and vacation. Miscellaneous cleans up with anything else that’s added or deducted from paychecks, like cash advances, mileage reimbursements, or union dues. For additions or deductions that aren’t covered by any of the Miscellaneous Item checkboxes, turn on either “Miscellaneous addition” or “Miscellaneous deduction”.
You aren’t finished with the wizard just yet, but you’re done setting up payroll items for compensation and benefits. See the next section to learn how to set up employees with the wizard.

Setting Up Employees
Before you dive into setting up employees with the Payroll Setup wizard, completing two prerequisites first can speed up your work. Besides, after defining all your payroll items, you could probably use a break. In the Payroll Setup wizard, click Finish Later and perform these two steps:
Gather employee information and records. You need personal information, such as Social Security numbers and hire dates, along with signed W-4 and I-9 federal forms. For employees already on the payroll, you need their pay rates, the total pay they’ve received, and deductions taken, along with sick time and vacation balances.
Set up employee payroll defaults. If you have more than a few employees, you can save time by setting up the payroll items that apply to every employee, like common deductions. That way, QuickBooks automatically fills in these payroll items for you when you create a new employee record. You then make only any necessary modifications for that individual. QuickBooks has a feature designed especially for this timesaving scheme, as described in the next section.
Setting employee defaults
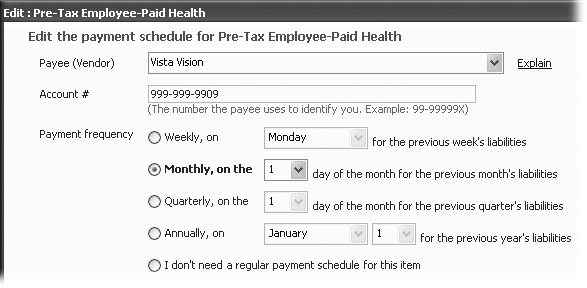
Typically, you use a common set of payroll items for all your employees, such as salary, tax deductions, health insurance, and 401(k) contributions. Instead of assigning the same payroll items to each employee, you can save these standard items so that QuickBooks fills in most of the payroll fields for you. You can also specify the pay period you use and the class (Filling in Expense Accounts Automatically) to apply if you track performance by class.
To set up your standard payroll characteristics, on the QuickBooks Home page, click Employees. In the Employee Center window’s toolbar, choose Manage Employee Information → Change New Employee Default Settings. In the Employee Defaults dialog box, you can set up standard items for every type of payroll item you use, as shown in Figure 14-5.
Note
If you track employee work hours in QuickBooks (Turning on Time Tracking) and pay your employees by the hour, the program happily calculates their paycheck amounts. In the Employee Defaults dialog box, simply turn on the “Use time data to create paychecks” checkbox below the Earnings section. To determine the gross amount of paychecks, the program multiplies the hours on employee timesheets for the pay period by the employees’ hourly rates.
The Employee Defaults dialog box includes the same set of fields and checkboxes that you’ll find in the Payroll Setup wizard and on the “Payroll and Compensation Info” tab in the New Employee window (in the Employee Center toolbar, click New Employee, and then, in the “Change tabs” drop-down list, choose “Payroll and Compensation Info”). When you edit an employee record, you can change any default payroll settings that don’t apply to that employee.
Creating employee records
You can create employee records in the Payroll Setup wizard (Employees → Payroll Setup) or by creating new employee records outside of the wizard (in the Employee Center, choose New Employee to open the New Employee window). The info you have to provide is the same, but the Payroll Setup wizard is easier to navigate.
Tip
You can run the Payroll Setup wizard any time you want. For example, if you hire a new employee, run the wizard and add the new employee’s record right then and there.
With employee records in hand and payroll settings in place, you can add employees in no time with the Payroll Setup wizard. Choose Employees → Payroll Setup to open the wizard once again. In the wizard’s navigation bar, click Employee List. The wizard prompts you to provide all the information it needs to process payroll, as Figure 14-6 shows.
Here’s how to fill out employee information in the Payroll Setup wizard:
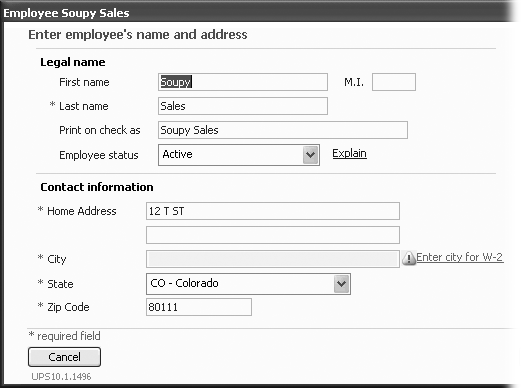
Contact information. For W-2 forms, you need the basic info about an employee (employee name and address). In the Payroll Setup wizard, if you add or edit an employee, the name and address screen collects the employee’s contact information, including phone number and email. This screen also includes the “Employee status” drop-down list, where you choose Active or Inactive depending on whether the employee is working for you at the moment. If you want to add additional contact information, do so in the Edit Employee dialog box (in the Employee Center, right-click an employee’s name and choose Edit on the shortcut menu).
Hiring information. When you click Next on the “Enter employee’s name and address” screen, this screen lets you fill in the basics about the person’s employment: whether the employee is an officer, owner, or regular Joe; Social Security number; and hire date. You can also enter a release date, which is a diplomatic name for the last date the employee worked for you. (Although you enter hiring information in QuickBooks, you still need separate files outside of QuickBooks to keep track of employee information.)
Note
Corporations have to keep track of compensation to corporate officers separate from employee compensation, which you do by choosing Officer in the “Employee type” drop-down list. In addition, you’ll need two separate expense accounts for compensation, such as Salaries & Wages for your employees and Officer Salaries for the officers.
Wages and compensation. This screen is where you specify the compensation the employee receives, and payroll frequency. The wizard automatically displays the default payroll items for new employees. Turn on the checkboxes for the items that apply to the employee. The label doesn’t tell you, but the Amount boxes expect the annual pay rate, not how much the employee is paid each pay period.
Benefits. On this screen, you specify the benefit deductions for the employee, like 401(k) and health insurance. Besides turning benefits on or off, you can specify the deduction as a dollar amount or percentage. For example, if the employee wants to contribute 15 percent of her pay to her 401(k), you can type 15% in the Amount box. QuickBooks fills in the Annual Limit box for 401(k) with the current annual limit set by the government. For other benefits, you have to type the annual limit, if one exists.
Sick time. The sick time screen includes fields for specifying your sick time policies: how much the employee earns and when, maximum amounts, and current balances.
Vacation time. The vacation time screen is almost identical to the sick time screen, except that it specifies the employee’s vacation earnings.
Direct deposit. If you offer direct deposit, you can turn on direct deposit for an employee and specify whether the deposit goes to only one bank account or to two (checking and savings, for example).
State tax. The state tax screen has two drop-down lists for telling QuickBooks where the employee lives and works. The choices you make determine the state tax and unemployment tax that the employee pays. You’ll have to answer more questions about state taxes after you tell the wizard about the federal taxes.
Federal tax. On this screen, you tell the wizard about the employee’s filing status, the number of allowances, extra withholding, and whether the employee is subject to deductions like Social Security and Medicare.
At long last, you’ll see the Finish button in the bottom-right corner of the Employee dialog box. Click it to complete the setup. If you missed any info, an exclamation mark in a yellow triangle appears to the left of the employee’s name.
An X in a red circle appears if there’s a serious problem with something you entered. (The Summary column tells you what’s missing.) Click Edit, and then fill in the missing information.
You can then add more employees. Or, to move on to tax settings (in the Payroll Setup navigation bar, click Taxes), as described in the next section.
Setting Up Payroll Taxes
The next major step in setting up payroll is to tell QuickBooks your company’s tax information: your tax identification numbers, the tax agencies you pay, and any local payroll taxes. In the Payroll Wizard navigation bar, click Taxes to see an overview of what you can expect. In the navigation bar, click “Federal taxes” to get down to work. The Federal tax screen simply lists the federal taxes for which you’re responsible.
Note
You specify your federal tax ID number in the Company Information dialog box (choose Company → Company Information).
To add state taxes, in the navigation bar, click “State taxes”. Then, below the list of state taxes, click Add New. When you choose a state, the wizard adds the typical taxes for that state like income tax, unemployment tax, and so on. You have to provide your account number with the state and enter the rate. (You have to wait until after January 1 to enter tax rates for the next year.) Select a tax and click Edit to change how the tax’s name appears on paychecks or to change it to inactive (if you no longer employ people in a particular state, for instance).
Tip
If you use a QuickBooks payroll service, you can set up a schedule for your payroll tax payments. In the navigation bar, click “Schedule payments”. Then in the Schedule Payments dialog box, you tell QuickBooks who to pay and when. QuickBooks keeps track of what you owe to each tax agency and reminds you when it’s time to pay your taxes. (The reminders show up in the Payroll Center: choose Employees → Payroll Center.)
Entering Historical Payroll
If you start using QuickBooks in the middle of a year, the best approach to record-keeping is entering all your financial transactions from the beginning of the year. At the end of the year, you and your accountant will be glad you did. But with payroll, it’s essential to enter all the payrolls you’ve processed since the beginning of the year. That’s the only way to produce W-2s at the end of the year that show the correct totals for the entire year. In addition, entering previous payroll data means that the payroll calculations take into account deduction limits. For example, for 2009, Social Security taxes apply to only the first $106,800 of income. Income that an employee earns beyond that is free of Social Security tax.
Tip
Toward the end of the year, the easiest solution is to wait until January 1 to switch to QuickBooks payroll.
If you use an outside service, you can add a single transaction with the year-to-date totals from the most recent statement the service sent you. For QuickBooks payroll services, you have two choices for getting this year’s historical payroll information into your company file:
Run previous payrolls one by one. This approach gives an added bonus: you can take practice runs through the payroll process and verify the values against existing payroll reports from your other system. If you take the dummy payroll approach, be sure to turn off the “To be printed” checkbox. Instead, fill in the check numbers from those past payrolls.
Use the Payroll Setup wizard to add payroll amounts for the payrolls you ran without QuickBooks payroll services. Of course, you have to complete the first four wizard setup steps described on the previous pages. In the Payroll Setup wizard, when you see checkmarks in front of steps 1 (Introduction) through 4 (Taxes), you’re ready to enter the year-to-date amounts. Gather your manual payroll records for the year so far and then, in the navigation bar, click Year-to-date Payrolls. You simply click through the screens and type in the values from each quarter’s payrolls.
Running Payroll
Once your payroll setup is complete, generating payroll checks each pay period takes only a few minutes. Before you run payroll, you need up-to-date tax tables, as the box below explains. This section explains the steps for running a payroll, from selecting which employees you’re going to pay to printing the checks.
Note
When you use direct deposit services, you have to run payroll at least two banking days before the actual pay date so the service can process the payroll and transfer money into your employees’ accounts. The transmission date may change due to bank holidays, so be sure to check payroll messages from the bank to see if you need to transmit payroll data earlier than usual. If you pay employees by the hour, this processing period creates a lag in employees’ pay. For example, if you pay employees for the hours they work between the 1st and the 15th of the month, direct deposits wouldn’t appear in their accounts until the 17th at the earliest.
Choose Employees → Pay Employees or on the Home page, click Pay Employees.
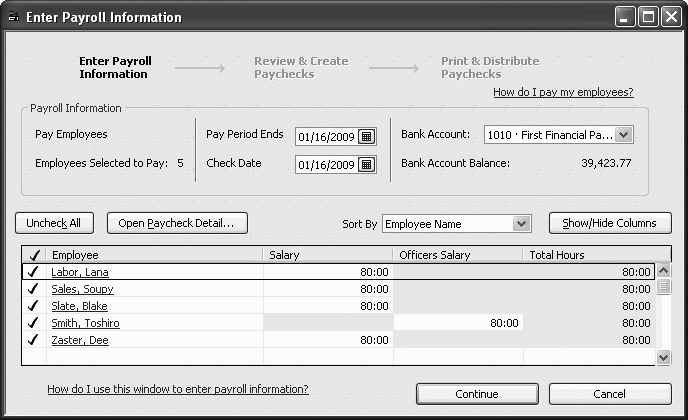
The Enter Payroll Information window (Figure 14-7) opens to the first screen where you set up the pay period and check date, and pick the employees to pay.
The Bank Account box is automatically set to the account you choose for payroll in QuickBooks preferences as described on Setting the Way Company Checks Work.
If the Pay Period Ends date isn’t correct, choose the date you want.
Each time you run payroll, QuickBooks changes the date to the next payroll date based on the payroll frequency you set in Employee Defaults (Setting employee defaults). In the Check Date box, choose the date you want on the paychecks you produce.
Figure 14-7. Employees who are set to inactive status in the Employees List don’t show up in the Enter Payroll Information window; neither do employees whose release dates (Creating employee records) are prior to the date in the Pay Period Ends box.To select all your employees, which is the most common choice, click Check All above the employee table.
But if you pay employees by the hour, you might want to select only the employees who worked during the pay period. To select individual employees, click the employee’s checkmark cell to turn it on.
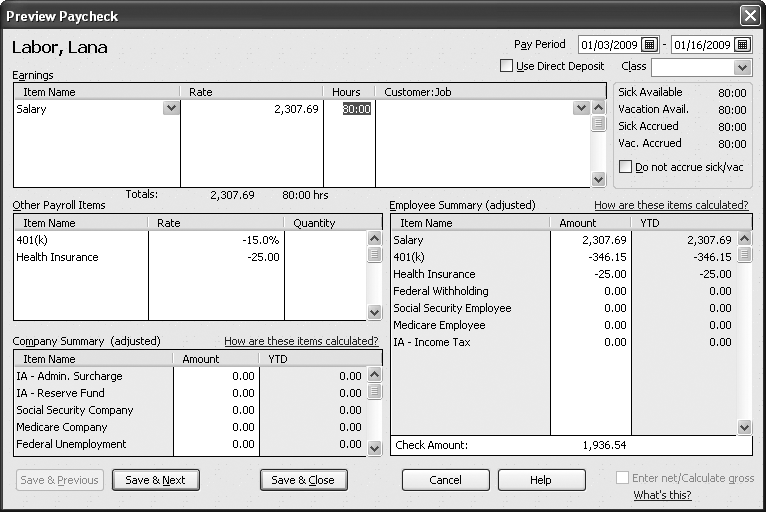
If you want to look at what QuickBooks calculated for employee paychecks, click Open Paycheck Detail above the employee table.
The Preview Paycheck dialog box (a real monster as Figure 14-8 shows) starts with the first selected employee’s earnings and payroll items. You can change the values in white cells. Gray cells like the ones for year-to-date values aren’t editable.
Click Save & Next to view the next paycheck.
Or, click Save & Close to return to the Enter Payroll Information window without reviewing other employees’ records.
Figure 14-8. In the Preview Paycheck dialog box, the Earnings section shows the gross amount of the employee’s paycheck. For salaried employees, QuickBooks prorates the salary to the length of the pay period. In the Other Payroll Items section and Company Summary section, the program uses the tax tables and your payroll items to calculate paycheck deductions or additions. Below the Class box is available sick and vacation time. The Employee Summary section shows the entries you typically see on a pay stub.Back in the Enter Payroll Information window, click Continue to move on to creating paychecks.
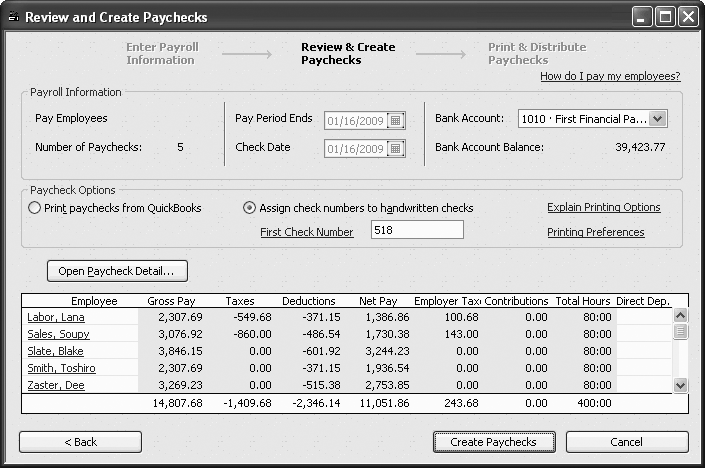
The “Review and Create Paychecks” window opens, as shown in Figure 14-9. The employee table shows the values for each employee’s paycheck and the total for each category. If you see any numbers that don’t look right, click Open Paycheck Detail and repeat step 4 to correct the values.
When everything looks good, you’re ready to create the paychecks. In the “Review and Create Paychecks” window, click Create Paychecks.
QuickBooks creates the records for the paychecks, but you still have some printing to do, as the next section explains.
Printing Paychecks and Pay Stubs
When your employees want paper paychecks that they can deposit at the bank, you print the paychecks you just created (with accompanying pay stubs). But when employees use direct deposit (Setting Up Payroll Taxes) so the money goes directly to their bank accounts, you don’t have to print paychecks. In fact, you shouldn’t or you’ll end up with two QuickBooks transactions deducting money from your payroll account. Still, your employees want a record of their pay for the period, so you print pay stubs instead. Printing paychecks and pay stubs is almost identical to printing expense checks. This section describes the process, including the minor differences.
Note
If you’ve signed up for QuickBooks’ direct deposit, you still have to create paychecks, but you don’t print them. After you create the direct deposit paychecks, you process them by choosing Employees → Send Payroll Data. (If you haven’t signed up for direct deposit, you won’t see this menu entry.) To send the paychecks, click Go Online, and when you’re done, click Close.
Before you print paychecks, load the printer with checks for the account you use for payroll, whether it’s your regular checking account or a separate one.
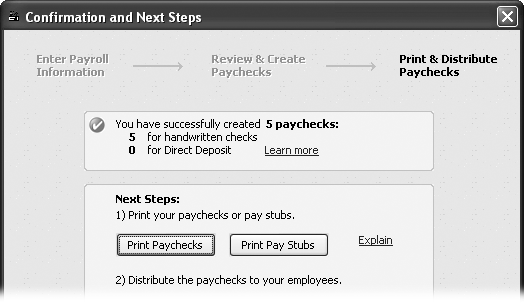
If you clicked Create Paychecks in the “Review and Create Paychecks” window, you see the “Confirmation and Next Steps” dialog box. It shows how many paychecks are waiting to be printed, and how many are going to be deposited directly, as Figure 14-10 shows.
To print paychecks, simply click Print Paychecks.
If you want to print pay stubs for direct deposits, click Print Pay Stubs. Instead of a check for an employee, a pay stub is like a report of the employees’ payroll data that you can distribute. (If you forgot to load the printer with checks, click Close. You can print the checks or stubs later by choosing File → Print Forms → Paychecks or File → Print Forms → Pay Stubs.)
Figure 14-9. If you’re filling in payrolls you ran before using QuickBooks payroll services, select the “Assign check numbers to handwritten checks” option. In the First Check Number box, type the starting check number for that payroll run. For current payroll runs, select the option for how you produce paychecks. If you hand-write checks, type the first check number in the box. For employees who have their paychecks deposited directly (Setting Up Payroll Taxes), click the employee’s Direct Deposit cell to turn on its checkmark.In the “Select Paychecks to Print” dialog box (or “Select Paystubs to Print” dialog box), QuickBooks selects all the unprinted checks or pay stubs. Make sure that you’re using the correct bank account and check number.
If the account in the Bank Account box is wrong, choose the account you use for payroll from the drop-down list. In the First Check Number box, type the number on the first check in the printer.
The “Select Paychecks to Print” dialog box automatically displays all paychecks, both direct deposit and paper. If you process paychecks and direct deposit paychecks in different ways, choose one of the Show options (Paychecks or Direct Deposit) to list only one type at a time.
If you want to customize the data that appears on paychecks, click Preferences.
In the Payroll Printing Preferences dialog box, you can specify whether to print used and available vacation and sick time and—if you’re security conscious—whether to omit all but the last four digits of employees’ Social Security and bank account numbers. Click OK to return to the “Select Paychecks to Print” dialog box.
When you’re ready to print the paychecks, in the Select Paychecks to Print dialog box, click OK.
The Print Checks dialog box opens with the same options you see when you print expense checks (Writing Checks Without Entering Bills). You can choose the style of check to use and how many checks are on the first sheet in the printer. Click Print to begin printing paychecks.
After QuickBooks prints the paychecks, it opens the Print Checks-Confirmation dialog box. If a problem happened, click the Reprint cell for each check that didn’t print properly, and then click OK to reprint those checks.
After the checks or stubs are printed, click Close and distribute the checks and pay stubs to your employees. If an employee loses a paycheck and wants you to print a new one, see the box on Printing Paychecks and Pay Stubs.
Paying Payroll Taxes
In addition to paying your employees, you also have to remit payroll taxes and withholdings to a number of government agencies. There’s no set answer for which payroll taxes you have to pay and when you need to pay them. The federal government has its requirements; each state has its own rules and schedules; and, in some areas, local governments tack on their own payroll taxes as well.
Note
QuickBooks Payroll services provide tables for federal and state payroll taxes. You have to calculate local taxes yourself.
Because the penalties for submitting payroll liabilities to the government are meant to hurt, you don’t want to skip the reports that show how much you owe in payroll taxes and when the payments are due. The Payroll Liability Balances report shows how much you owe for each type of payroll tax for the current quarter. You’ll find the information you need to fill in on state tax forms on the Employee State Taxes Detail report.
Government agencies send you letters telling you what your tax rates are and what payment schedule you have to follow. When you set up payroll in QuickBooks (Setting Up Payroll Taxes), you enter these details. The tax tables that QuickBooks’ payroll services download update tax rates to what agencies are demanding at the moment. Because the specifics of remitting payroll taxes vary from company to company, you need to follow the instructions you receive from the tax agencies, your bank, and your accountant. Meanwhile, when it’s time to remit payroll taxes, here’s how you generate the payment checks:
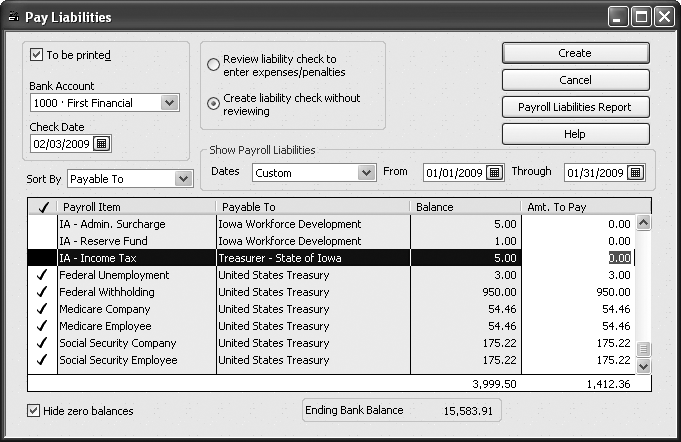
Choose Employees → “Payroll Taxes and Liabilities” → Pay Payroll Liabilities (or on the Home page, click Pay Payroll Liabilities).
QuickBooks opens the Select Date Range For Liabilities dialog box, where you specify the starting and ending dates for the payment period for a payroll tax. For example, the federal government determines payment frequency by the amount that you withhold from your employees’ paychecks, and the most common frequency is monthly.
In the Dates drop-down list, choose the period for which you’re paying payroll liabilities, such as Last Calendar Quarter or Last Month.
The Dates drop-down list includes the most typical date ranges you’ll need. However, if you have a special date range to cover, in the From and To boxes, choose the starting and ending dates, respectively.
Click OK.
The Pay Liabilities dialog box opens (Figure 14-11), listing all the payroll liabilities you have to remit and the agencies or organizations to whom you send the payments. QuickBooks automatically turns on the “To be printed” checkbox, which adds checks to the queue of checks to be printed. If you write the checks by hand, turn off this checkbox.
In the Bank Account box, choose the bank account that you use for payroll.
QuickBooks fills in the account you specified in payroll preferences (Setting the Way Company Checks Work).
In the Check Date box, choose the date you want on the checks.
Make sure that the check date meets the payment schedule requirements for the tax agency you’re paying.
Choose the payroll liabilities that you want to pay with one check by clicking the cell in the checkmark column for each payroll item.
The government isn’t known for picking up on small details, such as two different payroll liabilities on the same check—unless the IRS is on an audit kick. So it’s a good idea to create separate checks for each payroll liability to the same agency. To separate payments to the same vendor, select one payroll liability for a vendor during the first pass. After you’ve created the first batch of payroll liability checks, open the Pay Liabilities window once more and select another payment for the same vendor.
When you’ve chosen the items you want to pay, click Create.
The window closes and QuickBooks creates checks for the payroll liabilities, but not as you might expect. Instead of creating one check for each payroll liability, the program creates a single check for each vendor (tax agency, insurance company, or other organization).
If you turned on the “To be printed” checkbox, QuickBooks adds the checks to the queue of checks to be printed. If this checkbox is turned off, the program records the transactions in your company file, but you have to write the checks by hand.
Figure 14-11. To keep the list as concise as possible, turn on the “Hide zero balances” checkbox. QuickBooks displays only the liabilities that have a balance. But a payroll liability with a balance doesn’t mean a payment is due. Select only the payroll items whose payment frequency requires a payment now. When you click one of the Medicare or Social Security payroll items, QuickBooks automatically selects the other, because both are due at the same time.To print the checks, choose File → Print Forms → Checks.
The “Select Checks to Print” dialog box opens.
In the Bank Account drop-down list, choose the account you use for payroll.
If necessary, in the First Check Number box, type the first check number in your printer. QuickBooks automatically selects all the checks in the queue. If you want to prevent a check from printing in this run, uncheck it.
Click OK to open the Print Checks dialog box.
The options for payroll liability checks are the same as paychecks and expense checks (Printing Checks).
Note
If you use Assisted Payroll, the payroll service automatically makes your federal and state payroll tax liability payments. But you have to send the payroll data to the service so it knows how much to send to the appropriate tax agencies.
After you have checks in hand, fill in the coupons or forms that the tax agency sent you and send the payment and the payment coupon per the agency’s instructions. For example, make federal payments at the bank where you keep your payroll account.
Preparing Payroll Tax Forms
Tax agencies require that you regularly submit forms documenting the payroll taxes and withholdings you’re supposed to remit and how much you’ve already sent in. If you use Basic Payroll or a non-QuickBooks service, you can’t produce payroll tax forms in QuickBooks. However, some QuickBooks payroll services let you print payroll tax forms and W-2s. If you subscribe to Enhanced Payroll, you can generate federal and state tax forms. Although the forms that QuickBooks produces aren’t exact replicas of the preprinted forms you might receive from the government, they’re close enough that you can send them in without fear of rejection.
Note
Many tax agencies are moving to phone and electronic filing. If you use one of these filing options, choose Reports → Employees & Payroll and then choose a report, like Employee State Taxes Detail, to get the values you need for your filing.
Regardless of which tax form you want to generate, the steps are basically the same:
Choose Employees → Payroll Tax Forms & W-2s → Process Payroll Forms.
QuickBooks opens the Select Form Type dialog box, which includes option buttons for federal and state forms.
Choose the “Federal form” option or the “State form” option, and then click OK.
The next dialog box that appears is the Select Payroll Form dialog box, which lists the federal and state forms that QuickBooks can generate. Depending on the form you choose, you specify the filing period.
How you specify the filing period varies by form. If you choose the Quarterly Form 941, in the Quarter drop-down list, choose the quarter for which you want to generate a report. QuickBooks changes the date in the Quarter Ending box to match the quarter you choose. Form 940 requires only the filing year, and W-2s don’t need anything.
To export your payroll data to the form and display the filled-in form, click OK.
The form appears in the Payroll Tax Form window. Although QuickBooks formats the form so it’s easy for you to read and review, when you print the form, it looks like the preprinted forms you receive from the tax agency. To print the form, in the Payroll Tax Form window, click Print. Now you’re ready to mail the report in.