Chapter 16. Making Journal Entries
Intuit claims that you don’t need to know double-entry accounting (Accounting Basics—The Important Stuff) to use QuickBooks. Most of the time, that’s true. When you write checks, receive payments, and perform many other tasks in QuickBooks, the program unobtrusively handles the double-entry accounting for you. But every once in a while, QuickBooks transactions can’t help, and your only choice is moving money around directly between accounts.
In the accounting world, these direct manipulations are known as journal entries. For example, if you posted income to your only income account but have since decided that you need several income accounts to track the money you make, journal entries are the mechanism for transporting money from that original income account to the new ones.
The steps for creating a journal entry are deceptively easy; it’s assigning money to accounts in the correct way that’s maddeningly difficult for weekend accountants. And unfortunately, QuickBooks doesn’t have any magic looking glass that makes those assignments crystal clear. This chapter gets you started by showing you how to create journal entries and providing examples of journal entries you’re likely to need.
Note
In the accounting world, you’ll hear the term “journal entry,” and see it abbreviated JE. Although QuickBooks uses the term “general journal entry” and the corresponding abbreviation GJE, both terms and abbreviations refer to the same account register changes.
Balancing Debit and Credit Amounts
In double-entry accounting, both sides of any transaction have to balance, as the transaction in Figure 16-1 shows. When you move money between accounts, you increase the balance in one account as you decrease the balance in the other—just as shaking some money out of your piggy bank decreases your savings balance and increases the money in your pocket. These changes in value are called debits and credits. If you commit anything about accounting to memory, it should be the definitions of debit and credit, because these are the key to successful journal entries, accurate financial reports, and understanding what your accountant is talking about.
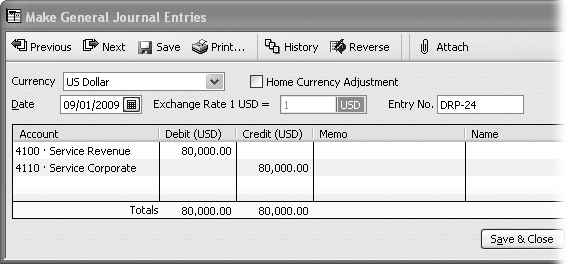
Table 16-1 shows what debits and credits do for different types of accounts and can take some of the pain out of creating journal entries. For example, buying a machine is a debit to the equipment asset account because it increases the value of the equipment you retain. A loan payment is a debit to your loan account because it decreases your loan balance. And (here’s a real mind-bender) a credit card charge is a credit to your credit card liability account because purchases on credit increase the amount you owe.
Note
One reason that debits and credits are confusing is that the words have the exact opposite meanings when your bank uses them. In your personal banking, a debit to your bank account decreases the balance and a credit to that account increases the balance.
As you’ll see in examples in this chapter, you can have more than one debit or credit entry in one journal entry. For example, when you depreciate equipment, you can include one debit for depreciation expense and a separate credit for the depreciation on each piece of equipment.
Some Reasons to Use Journal Entries
Here are a few of the more common reasons that businesses use journal entries:
Reassigning accounts. As you work with QuickBooks, you might find that the accounts you originally created don’t track your business the way you want. For example, suppose you started with one income account for all the consulting services you provide. Now you have three income accounts: one for income from designing consumer surveys, a second for income for conducting surveys, and a third for the money you make working the statistics to deliver the right results. To move income from your original account to the correct new account, you debit the income from the original account and credit it to the new account, as described on Reclassifications and Corrections.
Correcting account assignments. If you assigned an expense to the wrong expense account, you or your accountant can create a journal entry to reassign the expense to the correct account. If you’ve developed a reputation for mis-assigning income and expenses, your accountant might ask you to assign any questionable transactions to uncategorized income or expense accounts. Then, when she gets the file at the end of the year, she can create journal entries to assign those transactions correctly. You can verify that the assignments and account balances are correct by running a trial balance (Generating Year-End Financial Reports).
Reassigning jobs. If a customer hires you for several jobs, your customer might ask you to apply a payment, credit, or expense from one job to another. For example, if expenses come after one job is complete, your customer might want to apply them to the job still in progress. QuickBooks doesn’t have a command to transfer money between jobs, but a general journal entry does the trick as Reclassifications and Corrections explains.
Reassigning classes. Journal entries can transfer income or expenses from one class to another. For example, nonprofits often use classes to assign income to programs. If you need to transfer money to a program, create a journal entry that has debit and credit entries for the same income account, but changes the class (see Filling in General Journal Entry Fields).
Depreciating assets. Each year that you own a depreciable asset, you decrease its value in the appropriate asset account in your chart of accounts (Acquiring a Chart of Accounts). Because no cash changes hands, QuickBooks doesn’t have a command to handle depreciation of assets as it does for transactions like bills, invoices, and checks. As you’ll learn on Recording Owners’ Contributions, a journal entry for depreciation debits the depreciation expense account (increases its value) and credits the asset account (decreases its value).
Recording transactions for a payroll service. If you use a third-party payroll service like Paychex or ADP, the payroll company sends you a report. To get the numbers from the report into your company file where you need them, you can use journal entries. For example, you can move money to your payroll account, record paychecks, and record the additional expenses that employers incur.
Recording year-end transactions. The end of the year is a popular time for journal entries, whether your accountant is fixing your more creative transactions or you’re creating journal entries for non-cash transactions before you prepare your taxes. For example, if you run a small business out of your home, you might want to show a portion of your utility bills as expenses for your home office. When you create a journal entry for this transaction, you debit the office utilities account and credit an equity account for your owner’s contributions to the company.

Creating General Journal Entries
In essence, every transaction you create in QuickBooks is a journal entry. When you write checks, the program balances the debits and credits behind the scenes.
To explicitly create QuickBooks general journal entries, you first need to open the Make General Journal Entries window using any of the following methods:
Choose Company → Make General Journal Entries.
If the Chart of Accounts window is open, right-click anywhere and then choose Make General Journal Entries on the shortcut menu.
If the Chart of Accounts window is open, click Activities and then choose Make General Journal Entries.
Here are the basic steps for creating a general journal entry in QuickBooks:
In the Make General Journal Entries window, choose the date on which you want the general journal entry to happen.
If you’re creating a general journal entry to reassign income or an expense to the correct account, you should use the date that you make the correction. However, when you or your accountant make end-of-year journal entries—to add the current year’s depreciation, say—it’s common to use the last day of the fiscal year as the date.
Note
If you turn on the multiple currency preference (Multiple Currencies), the Make General Journal Entries dialog box includes boxes for the currency and the exchange rate. If you select an account that uses a foreign currency in a journal entry line, QuickBooks fills in the exchange rate and asks you to confirm that the exchange rate is correct. If it isn’t, open the Currency List (choose Lists → Currency List) and update the exchange rate for the currency (Other Helpful Financial Reports).
Although QuickBooks automatically assigns numbers to general journal entries, you can specify a different number. In the Entry No. box, type the entry number you want.
When you type an entry number, QuickBooks fills in the entry number for your next entry by incrementing the one you typed. For example, suppose your accountant adds several journal entries at the end of the year and uses the entry numbers ACCT-1, ACCT-2, ACCT-3, and so on. When you begin using the file again, you can type a number to restart your sequence, such as DRP-8. When you create your next journal entry, QuickBooks automatically fills in the Entry No. box with DRP-9.
You can also use words to indicate the type of journal entry you’re creating. For example, you can label the journal entries that record payroll transactions for your outside payroll service with PAY.
Note
If you don’t want QuickBooks to number general journal entries automatically, you can turn off the automatic numbering preference in the Accounting preferences section (Accounting).
Fill in the first line of your general journal entry, which can be either a debit or a credit. For details about filling in each field in a general journal entry line, see the next section.
When you click the Account cell in the next line, QuickBooks automatically enters the offsetting balance, as shown in Figure 16-3.
Fill in the second line of the general journal entry.
If your second line doesn’t balance the debit and credit columns, continue adding additional lines until you’ve added debit and credit amounts that balance.
If the offsetting value that QuickBooks adds to the second line is what you want, all you have to do is choose the account for that line, and then click Save & Close.
When the debit and credit columns are the same, click Save & Close to save the general journal entry and close the Make General Journal Entries window.
If you want to create another general journal entry, click Save & New.
Filling in General Journal Entry Fields
Each line of a general journal entry includes a number of fields, although for most general journal entries, the key fields are the Account field, either the Debit or Credit field, and the Memo field. But every field comes in handy at some point, so they’re all worth knowing about. Here’s what each field does and when you might fill them in:
Account. Choose the account that you want to debit or credit. Every line of every general journal entry has to have an assigned account.
Debit. If you want to debit the account on the line, type the amount of the debit in this field.
Credit. If you want to credit the account on the line, type the amount of the credit in this field.
Memo. Entering a memo is a huge help when you go back to review your journal entries. For example, if you’re reclassifying an uncategorized expense, type something like “Reclassify expense to correct account.” For depreciation or insurance, you can include the dates covered by the journal entry.
Name. If you’re debiting or crediting an Accounts Receivable or Accounts Payable account, you have to choose a name, as explained in the box on Creating General Journal Entries. However, you might also fill in the Name field if you’re creating a journal entry for billable expenses and want to assign the expenses to a customer.
Billable?. The Billable? column lets you designate part of your journal entry as billable expenses. When you choose a name in the Name field, QuickBooks automatically adds a checkmark in the Billable field, as shown in Figure 16-3. If you don’t want to make the value billable to the customer, turn off the checkmark in the Billable? field. Leave this field alone when you create general journal entries to reassign some of your existing expenses to be billable to a customer.
Class. General journal entries are transactions just like checks and invoices, which means you should choose a class for each line to keep your class reports accurate. If you create a general journal entry to reassign income or expense to a different class, the Account on each line stays the same, but the class you choose is different.
Checking General Journal Entries
If you stare off into space and start mumbling “Debit entries increase asset accounts” every time you create a general journal entry, it’s wise to check that the general journal entry did what you wanted. Those savvy in the ways of accounting can visualize debits and offsetting credits in their heads, but for novices, thinking about the changes you expect in your profit and loss report or balance sheet is easier.
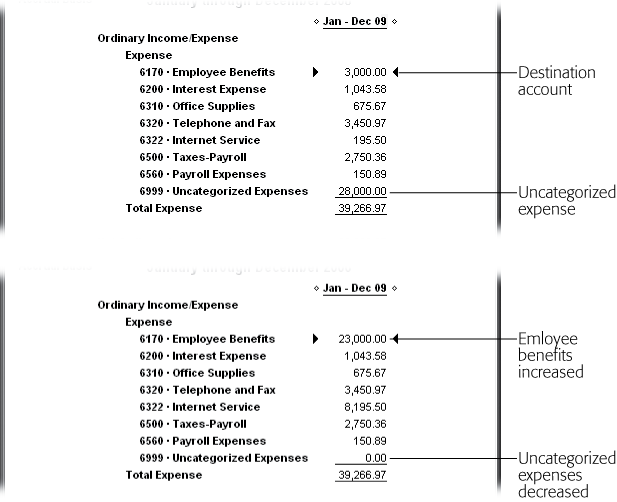
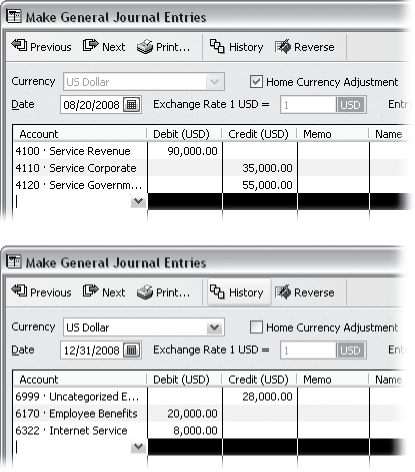
For example, if you plan to create a journal entry to reassign expenses in the Uncategorized Expenses account to their proper expense account homes, you’d expect to see the value in the Uncategorized Expenses account drop to zero while the values in the correct expense accounts increase. Figure 16-4 shows how you use a profit and loss report (see Understanding the Profit & Loss Report) to check your general journal entries.
Note
Some general journal entries affect both Balance Sheets and Profit & Loss reports. For example, as you’ll see on Recording Owners’ Contributions, a depreciation journal entry uses an asset account, which appears only in the Balance Sheet, and an expense account, which appears only in the Profit & Loss report. In situations like this, you’ll have to review both reports to verify your numbers.
Reclassifications and Corrections
As you work with your QuickBooks file, you might realize that you want to use different accounts. For example, as you expand the services you provide, you might switch from one top-level income account to several specific income accounts. Expense accounts are also prone to change—when the Telephone account splits into separate accounts for landline service, wireless service, and Internet service, for example. For that matter, any type of account is a candidate for restructuring, as one building grows into a stable of commercial properties or you move from a single mortgage to a bevy of mortgages, notes, and loans.
Reclassifying Accounts
Whether you want to shift funds between accounts because you decide to categorize your finances differently or you simply made a mistake, you’re moving money between accounts of the same type. The benefit to this type of general journal entry is that you only have to think hard about one side of the transaction. As long as you pick the debit or credit correctly, QuickBooks handles the other side for you.
Debits and credits work differently for income and expense accounts, and Figure 16-5 shows you how to set them up for different types of adjustments.
Accountants sometimes create what are known as reversing journal entries. These are general journal entries that move money in one direction on one date and then move the money back to where it came from on another date. Reversing journal entries are common at the end of the year, when you need your books configured one way to prepare your taxes and another way for your day-to-day bookkeeping.
Note
It’s easy enough to create two general journal entries, each using the same accounts, but with opposite assignments for debits and credits. In QuickBooks Premier Edition, the Make General Journal Entries dialog box includes a Reverse command, which automatically creates a reversing journal entry for you.
Reassigning Jobs
If you need to transfer money between different jobs for the same customer, general journal entries are the answer. For example, your customer might ask you to apply a credit from one job to another, because the job with the credit is already complete, so your customer wants to apply that credit toward a job that’s still in progress.
When you move money between jobs, you’re transferring that money in and out of Accounts Receivable. Because QuickBooks allows only one Accounts Receivable account per journal entry, you need two journal entries to transfer the credit completely. (Figure 13-10 on Setting Up QuickBooks for Prepayments shows what these journal entries look like.) You also need a special account to hold the credit transfers. An Other Expense account called something like Credit Transfers will do. After you have the transfer account in place, here’s how the two journal entries work:
Transfer the credit from the first job to the transfer account. In the first journal entry, you debit Accounts Receivable for the amount of the credit. Be sure to choose the customer and job in the Name field. This half of the journal entry removes the credit from the job’s balance. In the second line of the journal entry, choose the transfer account. The amount is already in the Credit cell, which is where you want it for moving the amount into the transfer account.
Transfer the money from the transfer account to the second job. In this journal entry, debit the transfer account for the money you’re moving. Then, the Accounts Receivable account receives the amount in its Credit cell. In the Name cell, choose the customer and the second job. This journal entry transfers the money from the transfer account to the second job’s balance.
Recording Depreciation with Journal Entries
When you own an asset, such as the deluxe Cat-o-matic cat herder, the machine loses value as it ages and clogs with furballs. Depreciation is an accounting concept, intimately tied to IRS rules, that reduces the value of the machine and lets your financial reports show a more accurate picture of how the money you spend on assets links to the income your company earns. Typically, you’ll calculate depreciation in a spreadsheet so you can also see the asset’s current depreciated value and how much more it will depreciate.
But depreciation doesn’t deal with hard cash, which is why you need to create a general journal entry to enter it. Unlike some other general journal entries with a wide choice of accounts, depreciation journal entries are easy to create, because the accounts you can choose are limited. The debit account is an expense account, usually called Depreciation Expense. (If you don’t have a Depreciation Expense account, see Creating an Account to learn how to create one.) The offsetting account is the account for the fixed asset that you’re depreciating.
Tip
If you depreciate the same amount each year, memorize the first depreciation transaction you create (Memorized Transactions). The following year, when it’s time to enter depreciation, press Ctrl+T to open the Memorized Transaction List window. Select the depreciation transaction, and then click Enter Transaction. Another way to copy a journal entry is to click Previous until you see the journal entry you want. Then, right-click the Make General Journal Entries window and choose Duplicate Journal Entry from the shortcut menu. Make the changes you want and click Save & Close.
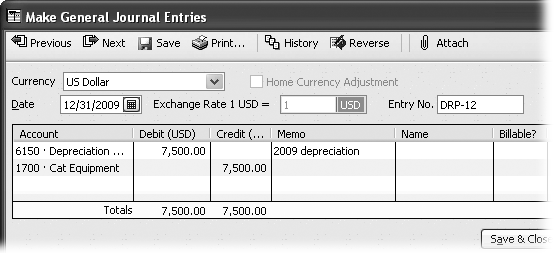
For a depreciation general journal entry, you want to reduce the value of the fixed asset account and add value to the Depreciation Expense account. If you remember that debit entries increase the value of expense accounts, you can figure out that the debit goes with the expense account and the credit goes to the fixed asset account. Figure 16-6 shows how depreciation debits and credits work.
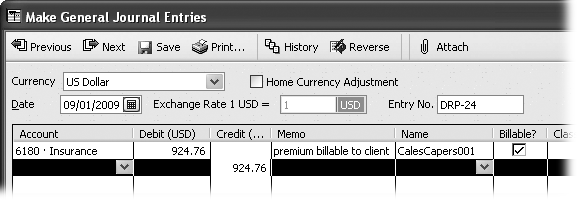
Recording Owners’ Contributions
If you run your business from your home, you may want to allocate a portion of your utility bills, homeowners’ insurance premiums, repairs to your home, and other home-related expenses to your company. The money you spent on home office expenses is already out the door, but those expenditures are equivalent to personal funds you contribute to your business. To show this contribution in QuickBooks, you credit the total expenses for your home office to an equity account for your owner’s contributions to the company. Then, you debit expense accounts for each type of home office expense, as shown in Figure 16-7.