Chapter 9. Paying for Expenses
Although most small business owners sift through the daily mail looking for the envelopes that contain checks, they usually find more envelopes containing bills. One frustrating aspect of running a business is that you often have to pay for the items you sell before you can invoice your customers for the goods.
When you use QuickBooks, paying bills is a multistep process. If you want your financial records to be right, you have to tell the program about the expenses you’ve incurred. And, if you want your vendors to leave you alone, you have to pay the bills they send.
Handling expenses can take several forms. QuickBooks is up to the challenge and, aside from a few idiosyncrasies that drive accountants wild, it succeeds. This chapter explains your choices for paying bills (now or later) and describes how to enter bills and your payments. If you pay bills right away, you’ll learn how to write checks, use a credit card, or pay with cash in QuickBooks. If you enter bills in QuickBooks for payment later, you’ll learn how to handle the easy ones, such as rent, as well as reimbursable expenses and inventory.
QuickBooks is happy to help you through every step of the process: entering bills you receive, setting up bill payments, and even printing the checks you mail to vendors. But for modest enterprises with few expenses, writing checks by hand and entering them in the program works just as well.
When to Pay Expenses
When it comes to handling expenses, QuickBooks gives you a choice—pay now or pay later. (You can choose to not pay bills, but QuickBooks can’t help you with collection agencies or represent your company in bankruptcy court.) If bills arrive about as often as shooting stars, paying each bill immediately is a snap, and you’ll know your bills are paid on time. In QuickBooks, paying immediately means writing a check, entering a credit card charge, making an online payment, or using some money from petty cash—all of which are described in this chapter.
But when bills arrive as steadily as coffee orders at the local Starbucks, you’ll probably want to set aside time to pay bills all at once when it won’t interfere with delivering services or selling products. What’s more, most companies don’t pay bills until just before they’re due—unless there’s a good reason. Setting up vendor bills for later payment is known as using accounts payable because you store your unpaid expenses in an Accounts Payable account.
In QuickBooks, entering bills for later payment delivers all the advantages of convenience and good cash management. You can tell the program when you want to pay bills—for instance, to take advantage of an early payment discount or the grace period that a vendor allows. Then, you can go about your business without distraction, knowing that QuickBooks will let you know when bills are on deck for payment.
Tip
For the infectiously forgetful, QuickBooks can add bills to your Reminders List (Reminders). Choose Edit → Preferences and, in the Edit Preferences dialog box, click the Reminders icon. Click the Company Preferences tab. For the Bills to Pay option, choose Show Summary or Show List and then specify the number of days of lead time you want before bills are due.
Once you decide whether you’re going to pay bills now or later, you’re better off using that method consistently. Otherwise, you could pay for something twice by entering a bill in QuickBooks and then, a few days later, writing a paper check for the same expense. If you take the Accounts Payable path (paying later), you can still charge expenses to your credit card and write checks by hand when you’re out of the office, and enter those transactions in QuickBooks without a corresponding bill. To prevent duplicate payments, though, always enter bills you receive as bills in QuickBooks and pay them using the Pay Bills command (Selecting Bills to Pay).
Entering Bills
At first glance, entering bills and then paying them might seem like more work than just writing a check. But as you’ll learn in this chapter, after you enter bills in QuickBooks, the program makes it incredibly easy to pay them.
To enter bills in QuickBooks, open the Enter Bills window using any of the following methods:
On the Home page, click Enter Bills (it’s in the Vendors panel).
In the Vendor Center icon bar, click New Transactions → Enter Bills.
Choose Vendors → Enter Bills.
The fields on a vendor’s bill are similar to the ones you see on the invoices you create. In fact, if your vendors use QuickBooks, the bills you receive are just another company’s QuickBooks invoices (see Chapter 10) or statements (see Chapter 11).
With the Enter Bills window open, here’s how to enter a bill in QuickBooks:
In the Vendor drop-down list, choose the vendor who billed you.
QuickBooks automatically chooses the Bill option so that you can record a vendor bill. (You’ll learn about recording a credit from a vendor on Recording Vendor Credits.) The program also turns on the Bill Received checkbox because you rarely enter a bill you haven’t received. Turn off this checkbox only if you receive a shipment of inventory without a bill, which you’ll learn about on Receiving Inventory Before the Bill.
If you set up any pre-fill accounts in the vendor’s record (Filling in Expense Accounts Automatically), QuickBooks automatically adds those accounts to the table on the Expenses tab.
In the Date box, type or select the date you received the bill.
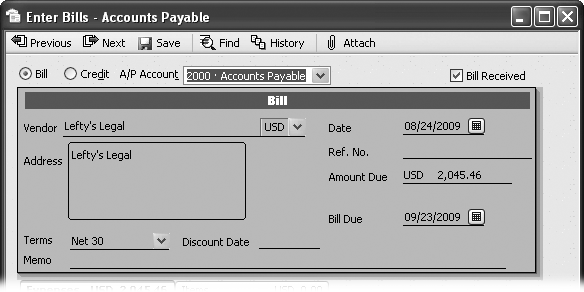
If you set up payment terms in the vendor’s record (Importing Vendor Information), QuickBooks figures out when the bill is due and fills in the Bill Due box, as you can see in Figure 9-1. For example, if the bill date is 8/24/2009 and the vendor’s payment terms are Net 30, the bill is due 30 days (one month) after the bill date, which is 9/23/2009.
If QuickBooks fills in a date that doesn’t match the due date on the bill you received, in the Bill Due field, enter the date printed on the vendor’s bill—it’s the one you want to go by.
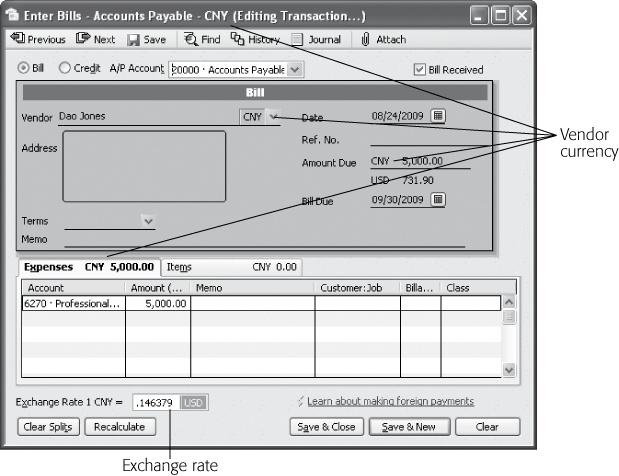
Figure 9-1. The Terms field shows the payment terms from the vendor record. If you haven’t assigned payment terms to a vendor, you can do so right in the Enter Bills window. In the Terms drop-down list, choose the terms that the vendor requires. When you save the bill, QuickBooks asks if you want the new terms to appear the next time. The program is trying to ask if you want to save the terms to the vendor’s record; click Yes.In the Ref. No. box, type the vendor’s invoice number, statement date, or other identifying feature of the bill you’re paying.
The Ref. No. box accepts any alphanumeric characters, so you can type reference numbers such as “1242,” “Invoice 1242,” or “Statement 1/6/2010.”
If you want to include additional notes about the bill, type a description in the Memo box.
In the Amount Due box, type the total from the bill.
The only time you’d change the amount is when you take a discount that the vendor forgot to apply or deduct a portion of the bill because the goods were defective. QuickBooks displays the Expenses tab initially, which is where you enter information about expenses such as utility bills, office supply bills, and your attorney’s fees. If you assign only one pre-fill account (Filling in Expense Accounts Automatically) to the vendor, QuickBooks automatically fills in the first cell in the Amount column with the Amount Due value.
Note
The box below tells you what to do when you receive a bill from a vendor who uses a different currency.
Figure 9-2. You can’t change a vendor’s currency after you’ve recorded your first transaction for that vendor. To switch to a different currency, you have to create a new vendor record using the new currency. The alternative is to calculate the bill’s values in your home currency based on the going exchange rate and enter the bill in QuickBooks with those converted values.In the first cell in the Account column, choose the expense account from your chart of accounts that corresponds to the first expense on the bill.
When you click a cell in the Account column, a down arrow appears. Clicking the down arrow displays a drop-down list of every account in your chart of accounts, but the program automatically highlights the first expense account in the list. To choose a different expense account—the account for your legal fees, say—scroll in the drop-down list and select the account you want.
If you set up any pre-fill accounts in the vendor’s record, QuickBooks automatically fills in cells in the Account column with those accounts.
If the bill covers several types of expenses (such as airfare and your travel agent’s fees), in the first Amount cell, type the amount that belongs to the expense account in the first row.
If you assign more than one pre-fill account to a vendor, QuickBooks doesn’t make any assumptions about how the amount due should be divided. You have to type the amounts in each row’s Amount cell.
Tip
You can increase or decrease the width of drop-down lists (to see the full names of the accounts in your chart of accounts, for example). When the drop-down list is open, position your cursor over the lower-right corner of the list. When it changes to a two-headed arrow, drag to adjust the width and height. In addition, you can change the width of the columns on the Expenses and Items tabs. Position your cursor over the vertical line between two column headings and drag to the left or right to respectively shrink or widen the column on the left.
If an expense relates to a job, in the Customer:Job cell, choose the customer or job.
If you fill in the Customer:Job cell, QuickBooks turns on a checkmark in the Billable? column. If you don’t want to charge the customer for the expense, click the checkmark to turn it off.
Tip
If you’re recording reimbursable expenses, which eventually appear on a customer invoice (Adding Billable Time and Costs to Invoices), be sure to type a meaningful description in each Memo cell. QuickBooks uses the text in the Memo cell as the description of the expense on your invoice. If there’s no Memo text, your invoice includes charges without descriptions, which is bound to generate a call from the customer.
If you’re tracking classes, choose the appropriate class for the expense.
The Class column appears only if you’re using QuickBooks’ classes (Filling in Expense Accounts Automatically).
If the bill you’re entering includes different types of expenses, repeat steps 5 through 8 to add a row for each type of expense, as shown in Figure 9-3.
As soon as you finish one row in the table, QuickBooks fills in the Amount cell in the next row with the amount that’s still unallocated. For the first through the next to last line, you have to edit the amount that the program fills in to match your expense. The amount that QuickBooks enters for the last line should be correct if you haven’t made any typos.
If the multiple accounts and amounts are hopelessly mangled, click Clear Splits to clear the table so you can start over.
Click Save & Close to save the bill and close the window.
Or, if you haven’t had enough, click Save & New to save the bill and then display a blank bill.
Automating Recurring Bills
Many of your bills are due the same time every month, and some are even the same amount every month. For example, your $1,000 rent check is due the first of every month. Your electric bill is due the 19th of the month, but the amount varies each time. Each time you reorder office supplies or inventory, the items you buy are often the same. These sorts of bills are perfect for QuickBooks’ memorized transactions.
In QuickBooks, you can memorize bills and reuse them. You can even create a group of bills so that you can process all the bills due on the same day of the month. Even when some fields change, recalling a transaction with most of the fields filled in saves you time.
Tip
If you get the same bill only once in a blue moon, memorizing it might be overkill. Instead, just create a duplicate using the Vendor Center whenever you need it. Go to the Transactions tab and then click Bills. Double-click the bill you want to reuse to open it in the Enter Bills window. Then, right-click and choose Duplicate Bill from the shortcut menu. Make any changes you want, like the date and the amount, and then click Save & Close.
Memorizing a Bill
Here’s how to memorize a bill:
On the Home page, click Enter Bills (or choose Vendors → Enter Bills).
QuickBooks opens the Enter Bills window.
Fill in all the fields that will be the same on each bill, as shown in the background in Figure 9-4.
If a field changes for each bill, such as the Amount Due, simply leave that field blank (or 0.00 for amount fields). When you use the memorized bill, fill in the empty fields with the values on the bill that your vendor sent.
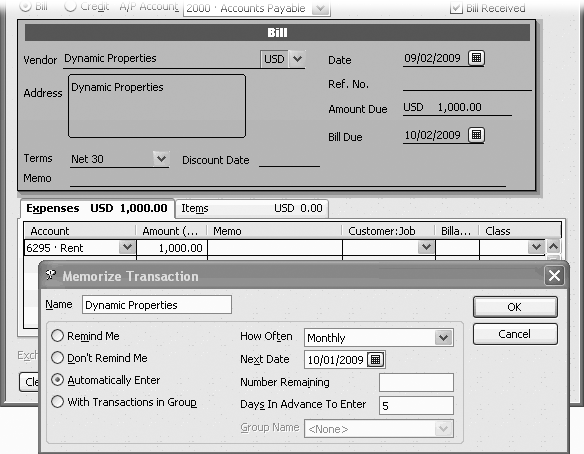
When the bill is set up the way you want, press Ctrl+M to open the Memorize Transaction dialog box (in the foreground in Figure 9-4). In the Name box, type a name for the memorized bill.
QuickBooks automatically fills in the Name box with the vendor name, but you can type a more meaningful name. For example, naming a memorized bill “Rent” is more helpful than using the landlord’s name.
If you want QuickBooks to remind you when it’s time to pay the bill, choose the Remind Me option and tell the program when to remind you.
If bills don’t arrive on a regular schedule (like the ones for snowplowing), choose the Don’t Remind Me option. Then, when you receive a bill, you can call up the memorized transaction as described on Editing a Memorized Transaction.
For bills that you receive regularly, in the How Often box, choose the frequency, such as Monthly. In the Next Date, choose the next due date. For example, if the bill you memorized is set for 2/5/2010, choose 3/5/2010.
Figure 9-4. For bills that are identical from month to month, such as rent, choose the Automatically Enter option. You can tell QuickBooks how many days before the due date to enter the bill, as shown here. When that date arrives, the program tacks the bill onto the list of bills waiting to be paid (see Reminders). When you choose Automatically Enter, the Number Remaining box becomes active, so you can type how many payments remain, which is ideal for loan payments that—thankfully—don’t go on forever.To memorize the bill, click OK.
QuickBooks adds the bill to the Memorized Transaction List, closes the Memorize Transaction dialog box, and returns to the Enter Bills window.
If you want to add the bill to the queue of bills to be paid, click Save & Close. If you created the bill only to memorize it, click the dialog box’s Close button (the red X in the top-right corner), and then click No when QuickBooks asks if you want to save the transaction.
Using a Memorized Bill
How you generate a bill from a memorized transaction in QuickBooks depends on whether you’ve opted for total automation, a reminder, or no reminder:
Automatically Enter. If you create a memorized bill with the Automatically Enter option, that’s exactly what the program does. When the next scheduled date for the bill arrives, QuickBooks creates a new bill and adds it to the list of bills waiting to be paid.
Remind Me. When you ask QuickBooks to remind you and the scheduled date arrives, the program adds the bill to the Reminders List. In the Reminders List, below the “Bills to Pay” heading, double-click a bill to open the Enter Bills window. The bill that you see contains only the memorized information. Make any changes you want, fill in the empty fields, and then click Save & Close.
Tip
For reminders that are hard to miss, tell QuickBooks to display the Reminders List each time you open the company file. As soon as you log into the file, you’ll see the tasks awaiting you. To set this behavior, choose Edit → Preferences and, in the icon bar, click Reminders. Click the My Preferences tab and turn on the only checkbox there: “Show Reminders List when opening a Company file”.
Don’t Remind Me. When you memorize a bill that you use only occasionally or for bills that occur on an irregular schedule, choosing Don’t Remind Me stores the bill in the Memorized Transaction List in case you need it. When you want to use the memorized bill, click it in the Memorized Transaction List, and then click Enter Transaction.
Creating Memorized Groups of Bills
The first day of the month is the nemesis of bill payers everywhere because so many bills are due then. QuickBooks can’t ease the pain of watching your money go out the door, but it can at least ease the burden of entering all those bills in the program. Memorized bills are a start, but why enter individual memorized bills when you can enter several at once?
You can set up memorized transaction groups that act like their individual memorized counterparts—to remind you about all the bills due on a specific day or enter all the recurring transactions automatically.
Most QuickBooks features let you create new list entries whenever you need them by choosing <Add New> from a drop-down list, but memorized groups break the mold. When you first open the Memorize Transaction dialog box, the With Transactions in Group option and the Group Name box are tantalizingly visible, but they stay grayed out no matter what you click.
That’s because, to add a memorized transaction to a group, you have to first create a memorized group. The steps are easy, once you know the right order:
Press Ctrl+T to open the Memorized Transaction List.
The Memorized Transaction List window opens.
In the Memorized Transaction List menu bar, click Memorized Transaction and then, on the shortcut menu, choose New Group.
QuickBooks opens the New Memorized Transaction Group dialog box—identical to the Memorize Transaction dialog box except that it doesn’t have the “With Transactions in Group” option and Group Name box.
Name the group something meaningful like Monthly Bills. Fill in the other fields as you would for a memorized transaction (Memorized Transactions).
Tell QuickBooks how and when you want to be reminded.
Click OK to save the group.
Now that the group exists, you can add individual transactions to it.
To add an existing memorized transaction to the group, in the Memorized Transaction List window, select the transaction you want to add, and then press Ctrl+E to edit it.
The Schedule Memorized Transaction dialog box opens.
Select the “With Transactions in Group” option. In the Group Name box, choose the group you just created, and then click OK.
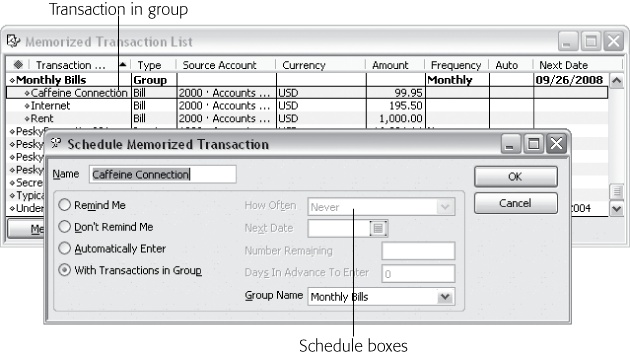
When you add a memorized transaction to a group, you’ll see that QuickBooks tucks the transaction underneath the memorized group in the Memorized Transaction List, as shown in Figure 9-5.
Tip
Create separate memorized groups for bills with consistent amounts and those whose amounts vary. That way, you can set up the unvarying memorized group with the Automatically Enter option, so QuickBooks simply adds all the bills to your list of bills to be paid without any intervention from you. Then, you can set the second memorized group to use the Remind Me option, so you can go through each bill and fill in the amount before you record it.
Purchasing Inventory
Purchasing and paying for inventory items is mostly the same as paying for other expenses. But as you learned in Chapter 4, inventory always seems more complicated than the other things you sell.
Part of the problem with inventory is that you have to keep track of how much you have. As inventory wends its way from your warehouse to your customers, it also hops between accounts in your chart of accounts (see Product Items). An income account tracks the money you make from selling inventory; a second account tracks the costs of the inventory you’ve sold; and a third asset account tracks the value of the inventory you still own.
Purchasing inventory involves three transactions in QuickBooks:
Adding the inventory you purchase to a QuickBooks inventory asset account.
Entering the bill you receive for the inventory you bought.
Paying the bill for the inventory.
What’s tricky is that you don’t know whether the bill or the inventory will arrive first. In many cases, the bill arrives with or after the shipment. But Samurai Sam could email you a bill while you wait weeks for your swords to arrive. You don’t want to pay for products you haven’t received—nor do you have to. (If you decide to pre-pay, see the box below to learn how to do so in QuickBooks.) In the following sections, you’ll learn how to use QuickBooks commands to handle any order of bill and inventory arrival.
If you want to track inventory in QuickBooks, your first task is turning on the preference for inventory and purchase orders (Items & Inventory). Although the program turns on purchase order features as part of tracking inventory, you can skip purchase orders if you don’t use them in your business. As soon as you turn on inventory, QuickBooks adds icons for purchase orders and inventory to the Home page; the Vendors menu picks up inventory-related commands like Create Purchase Orders and Receive Items; and the chart of accounts gains a non-posting account called Purchase Orders.
Creating Purchase Orders
Before you get to receiving inventory and paying the corresponding bills, it’s a good idea to make sure that you actually receive the inventory you ordered. If you ordered corsages for Mother’s Day, but the box that shows up contains corsets, the mistake is obvious. Remembering what you ordered is tougher when products and quantities vary. Most businesses address this problem by creating purchase orders for the inventory they buy. When the order arrives, comparing the shipment to the purchase order can confirm that the items and quantities are correct. Because purchase orders are typically the first step in purchasing, the QuickBooks Home page places the Purchase Orders icon in the pole position in the Vendors workflow.
Note
You can create all the purchase orders you want without altering the balances in your income, expense, and asset accounts; and the purchase orders won’t appear in your Profit & Loss or Balance Sheet reports.
Purchase orders are known as non-posting transactions. No money changes hands (or accounts), so there’s nothing to post in your chart of accounts. In QuickBooks, the first posting for purchased inventory happens when you either receive the inventory or the bill.
The Create Purchase Orders dialog box is like a mirror-image of the Create Invoices dialog box that you’ll meet in Chapter 10. You choose a vendor instead of a customer, and the Ship To address is your company’s address, as shown in Figure 9-6.
Here’s how you create a purchase order:
On the Home page, click Purchase Orders (or choose Vendors → Create Purchase Orders).
In the Create Purchase Orders window, QuickBooks fills in the current date, and there’s no reason to change that because purchase orders are a paper trail of what you order. The program also fills in the Ship To box with your company’s address. If you’re ordering inventory that you want shipped directly to one of your customers, choose that customer (or job) in the Ship To drop-down list at the top of the window, which changes the shipping address that appears in the Ship To box.
In the Vendor box, choose the vendor you’re ordering your inventory from.
QuickBooks fills in the Vendor box in the header area with the vendor name and address (from the vendor record you created on Entering Address Information) as shown in Figure 9-6.
If you use classes to categorize income and expenses (Filling in Expense Accounts Automatically), choose a class for the purchase order.
If you use classes and skip this box, QuickBooks politely reminds you that the box is empty when you try to save the purchase order. Click Cancel to return to the purchase order so you can choose a class, or click Save Anyway to save the purchase order without a class.
Figure 9-6. QuickBooks has one predefined template for purchase orders, confusingly called Custom Purchase Order. If you want to customize your purchase order form (Basic Customization), click the customize icon (it looks like a pencil and a ruler) at the upper-right of the Create Purchase Orders window.When you create your first purchase order, in the P.O. No. box, type the number that you want to start with.
From then on, QuickBooks increments the number in the P.O. No. box by one. If you order your products over the phone or through an online system and the vendor asks for your purchase order number, give them this number.
In the drop-down list for the first Item cell in the table, choose the item that corresponds to the first product you’re purchasing.
The Item drop-down list shows all the entries in your Item List, even though companies usually create purchase orders only for inventory items. (As you type the first few letters of an item’s name, QuickBooks displays matching entries. You can keep typing or click the item you want as soon as you see it.)
When you choose an item, QuickBooks fills in other cells in the row with information from the item record (see Chapter 4). The Description cell gets filled in with the item record description, which you can keep or edit. The Rate cell grabs the value from the Cost field of the item record (that’s the price you pay for the item).
In the cell in the Qty column, type the quantity you want to purchase.
QuickBooks fills in the Amount cell with the total purchase price for the item: the quantity multiplied by the rate.
If you’re purchasing inventory specifically for a customer or job, choose the customer or job in the drop-down list.
The Create Purchase Orders dialog box doesn’t include a column for designating purchases as billable. Don’t worry: You tell QuickBooks that an item is billable when you create a bill or receive the item into inventory.
Repeat steps 5 through 7 for each product you’re purchasing.
You can insert and delete lines in a purchase order as you can on invoices (Inserting and deleting line items) and other forms with tables. To insert a line, right-click a line and choose Insert Line from the shortcut menu. To delete the line, choose Delete Line from the shortcut menu.
At the bottom of the Create Purchase Orders dialog box, in the Memo box, type a summary of what you’re ordering.
The contents of the Memo field show up when it’s time to apply a purchase order to a bill (as you’ll learn shortly), making it easy to identify the right purchase order.
If you have additional purchase orders to create, simply click Save & New to save the current purchase order and begin another.
To save the purchase order you just created and close the Create Purchase Orders window, click Save & Close. Click Clear to throw out your choices or changes on the purchase order.

Receiving Inventory and Bills Simultaneously
For many orders, you’ll find your bill tucked into one of the boxes of your shipment like a bonus gift. Although a bill isn’t the most welcome of gifts, receiving a bill and inventory simultaneously is a bonus because you can record your inventory and the accompanying bill at the same time in QuickBooks. Here’s how you process a shipment and bill at the same time:
On the Home page, click Receive Inventory and then choose Receive Inventory with Bill (or choose Vendors → “Receive Items and Enter Bill”).
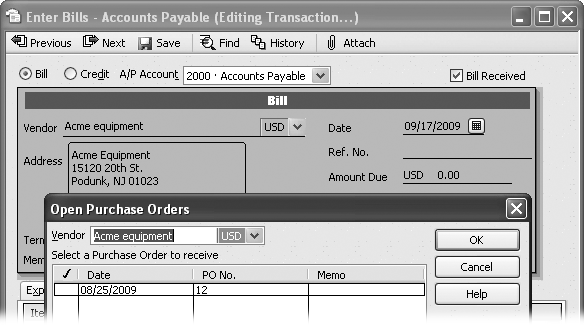
QuickBooks opens the Enter Bills window that you first met on Entering Bills and automatically turns on the Bill Received checkbox as it does when you create a regular bill. The difference in the Enter Bills window comes to light when you choose a vendor, as described in Figure 9-7.
If any open purchase orders exist for that vendor and you want to apply the shipment you received to one of them, in the Open POs Exist message box, click Yes. Click No if the items you received don’t go with any open purchase orders.
QuickBooks opens the Open Purchase Orders dialog box (in the foreground in Figure 9-7). You can also open the Open Purchase Orders dialog box from the Enter Bills window by clicking Select PO (below the items table).
In the Open Purchase Orders dialog box, you’ll see only purchase order dates, purchase order numbers, and memos. If the vendor’s bill includes the purchase order number, picking the correct purchase order is easy.
Figure 9-7. In the Enter Bills window, when you choose the vendor who shipped the items you’ve received from the Vendor drop-down list, QuickBooks checks for any open purchase orders for that vendor. If it finds any open purchase orders, it displays the Open POs Exist message box, so you can apply the items you’ve received to a purchase order.If you filled in the Memo box when you created the purchase order, that note may help you identify which purchase order to choose. But if you don’t know which one to pick, click Cancel to close the Open Purchase Orders dialog box. To view a report of open purchase orders, choose Reports → Purchases → Open Purchase Orders. Double-click a purchase order to view its details.
If you want to apply the shipment to an existing purchase order, in the “Select a Purchase Order to receive” table, click the checkmark column (the first column) for the purchase order you want. Click OK.
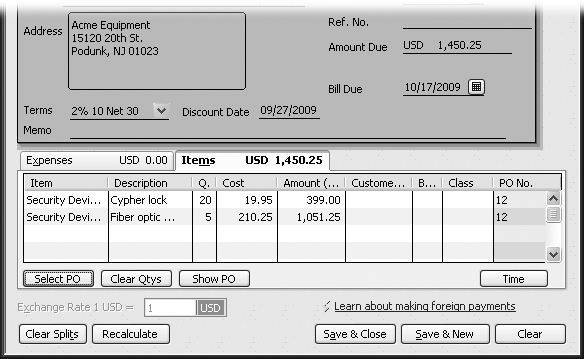
QuickBooks displays a checkmark in the purchase order’s checkmark cell. When you click OK, the program closes the Open Purchase Orders dialog box and fills in the bill fields with purchase order information, like the amount and the items ordered, as shown in Figure 9-8.
Figure 9-8. When you choose an open purchase order, QuickBooks uses the information from the purchase order to fill in fields in the Enter Bills window, such as the Amount Due field in the header as well as the Items tab with most of the information about the items you ordered. When you work from a purchase order, QuickBooks displays the purchase order number in the PO No. column.In the Date box, fill in the date when you received the bill.
If you’ve already defined the payment terms in the vendor record (Entering Address Information), QuickBooks fills in the Terms box and automatically calculates the date in the Bill Due box. If the bill you received shows different terms or a different due date, update the values in the Bill Due and Terms boxes to match the vendor’s bill. When you save the bill, the program offers to save the new terms in the vendor’s record.
If you didn’t create a purchase order for the shipment you received, fill in the fields as you would for a regular bill.
In the Amount Due field, type the amount due from the vendor’s bill. You’ll also have to fill in the Items tab manually with the items you received. For each item you receive, in a blank line on the Items tab, specify the item, quantity, customer or job, and class. QuickBooks fills in the Description and Cost cells using the values in the item record (see Chapter 4) and then calculates the Amount by multiplying the quantity by the item cost.
Click Save & New or Save & Close.
When you save a combination inventory/bill transaction, QuickBooks goes to work behind the scenes. For the inventory you received, QuickBooks first debits your inventory account for the amount you paid for the inventory items. The program also updates the quantity on hand for the item (Inventory Valuation Summary report). The amount of the bill also increases the balance in your Accounts Payable account.
Receiving Inventory Before the Bill
When you receive inventory, you want to record it in QuickBooks so you know that it’s available to sell. If you receive inventory without a bill, the best solution is to pretend that you received the bill. By creating the bill, your Accounts Payable stays in sync with what you’ve purchased. You simply edit the bill later to match the real one you receive.
An alternative approach is to record the received inventory in QuickBooks without a bill. The program has separate commands to receive inventory and enter bills when they arrive. The box on the next page explains how QuickBooks posts amounts to accounts when you receive inventory without a bill. The fields that you specify and the options at your disposal are the same, they just appear in different windows:
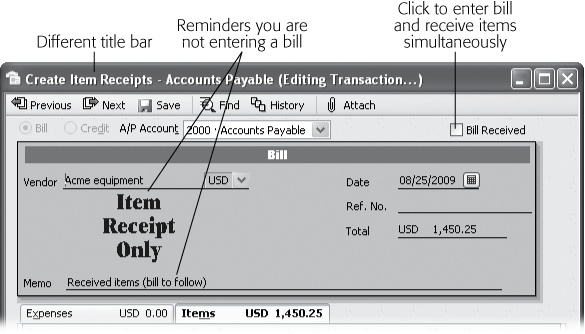
To receive inventory in your company file, on the Home page, click Receive Inventory and then choose Receive Inventory without a Bill (or choose Vendors → Receive Items).
QuickBooks opens the Create Item Receipts window, which is a close relative to the Enter Bills window. In fact, other than the title of the dialog box, only three things are different, all of which are shown in Figure 9-9.
Tip
If you choose “Receive Inventory without a Bill” (or Vendors → Receive Items) and then realize that you do have the bill, there’s no need to close the window and choose a different command. In the Create Item Receipts window, simply turn on the Bill Received checkbox in the top-right corner of the window. The window changes to the Enter Bills window, so you can receive the items and create the bill at the same time (Receiving Inventory and Bills Simultaneously).
Figure 9-9. Because you’re only adding inventory to your company file, QuickBooks automatically turns off the Bill Received checkbox in the Create Item Receipts window. To make it crystal clear that you aren’t creating a bill, the program displays the words Item Receipt Only and, in the Memo box, adds the message “Received items (bill to follow)”.Similar to receiving inventory and a bill at the same time, the Create Item Receipts window reminds you about open purchase orders that you can select to fill in the items received automatically. The rest of the fields behave like the ones in the Enter Bills window.
When you’ve added all the items you received and updated any quantities that differ from those on your purchase order, click Save & Close.
QuickBooks records the inventory in your company file, as described in the box on Receiving Inventory Before the Bill.
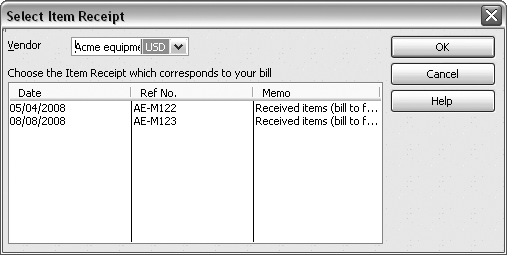
When the bill arrives, choose Vendors → “Enter Bill for Received Items” (or on the Home page, click Enter Bills Against Inventory).
The box below tells you how to recover if you choose Vendors → Enter Bills by mistake.
In the Select Item Receipt dialog box (Figure 9-10), choose the vendor that sent the shipment. Then choose the shipment that corresponds to the bill you just received and click OK.
QuickBooks opens the Enter Bills window and fills in the fields with the information from your Receive Items transaction.
If the prices and quantities on the vendor’s bill are different from those QuickBooks used, on the Items tab, you can update the prices and quantities.
When prices and quantities differ, don’t take the vendor’s bill as the final word. Check your record to see where the discrepancy arose.
If the bill includes sales tax and shipping that you didn’t include on your purchase order, click the Expenses tab, and then fill in additional lines for those charges.
If you changed anything on the Items or Expenses tab, click Recalculate to update the Amount Due field with the new total.
Figure 9-10. The Ref. No. and Memo cells identify the shipments you’ve received. If those fields are blank, the Date cell won’t be enough to select the right item receipt, so click Cancel and then choose Vendors → Receive Items. In the Create Item Receipts dialog box’s menu bar, click Previous or Next to display the item receipt you want, and then fill in its Ref. No. field with the purchase order number for the shipment or the carrier’s tracking number. After you save the item receipts with identifying reference numbers, choose Vendors → “Enter Bill for Received Items” once more.Click Save & Close.
You’ll see a message box that asks if you want to save the changes you made—even if you didn’t make any. QuickBooks asks this question because it has changed the item receipt transaction to a bill in your Accounts Payable account as the box on Receiving Inventory Before the Bill explains. Click Yes to save the changes.
Handling Reimbursable Expenses
Reimbursable expenses are costs you incur that a customer subsequently pays. For example, you’ve probably seen telephone and photocopy charges on your attorney’s statements. Travel costs are another common type of reimbursable expense. Products you purchase specifically for a customer or a subcontractor you hire for a customer’s job are all costs you pass on to your customers.
In accounting, as in QuickBooks, there are two ways to track reimbursable expenses:
As income. With this method, QuickBooks posts the expenses on a bill you pay to the expense account you specify. When you invoice your customer, QuickBooks posts the reimbursement as income in a separate income account. Your income is higher, but it’s offset by higher expenses. This approach is popular because it lets you compare income from reimbursable expenses to the reimbursable expenses themselves to make sure that they match. (The box on Setting Up Reimbursements As Income describes income accounts you need for tracking reimbursable expenses this way.)
As expense. Tracking reimbursements as expenses doesn’t change the way QuickBooks handles bills—expenses still post to the expense accounts you specify. But, when your customer pays you for the reimbursable expenses, QuickBooks posts those reimbursements right back to the expense account. The expense account balance looks as if you never incurred the expense in the first place.
Setting Up Reimbursements As Income
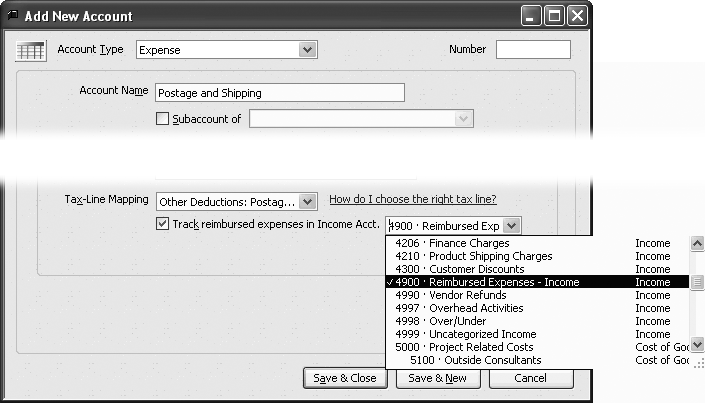
If you want to track your reimbursable expenses as income, you have to turn on the Track Reimbursed Expenses As Income preference (Time & Expenses). Choose Edit → Preferences and, in the Edit Preferences icon bar, click Time & Expenses. On the Company Preferences tab, turn on the “Track reimbursed expenses as income” checkbox.
With this preference turned on, whenever you create or edit an expense account (in the Add New Account or Edit Account windows), QuickBooks adds a “Track reimbursed expenses in Income Acct.” checkbox and drop-down list at the bottom of the dialog box, as shown in Figure 9-11.
Here’s what happens as you progress from paying your bills to invoicing your customers:
When you assign an expense on a bill as reimbursable to a customer, QuickBooks posts the money to the expense account you specified.
When you create an invoice for the customer, the program reminds you that you have reimbursable expenses.
When you add the reimbursable expenses to the customer’s invoice, they post to the income account you specified for that type of expense. See the box above to learn more about creating income accounts for reimbursable expenses.
Note
If you track reimbursable expenses as expenses, you don’t have to set up anything in QuickBooks. When you pay a bill, the expenses post to the expense account. When you invoice a customer, QuickBooks posts the reimbursements back to the same account.
That way, the expense won’t show up on the customer’s invoice.
Recording Reimbursable Expenses
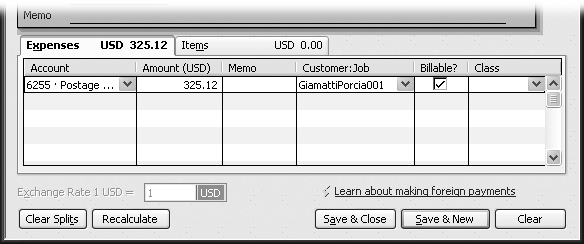
As you enter bills (Entering Bills) or make direct payments with checks or credit cards, you add designated expenses as reimbursable, as shown in Figure 9-12.
When you choose a customer or job in the Customer:Job column, QuickBooks automatically adds a checkmark to the Billable? cell. Be sure to type a note in the Memo cell to identify the expense to you and your customer. QuickBooks uses the text in the Memo field as the description of the reimbursable expense on your invoice.
Paying Your Bills
Entering bills in QuickBooks isn’t the same as paying bills. The bills you enter are a record of what you owe and when, but they do nothing to send money to your vendors. Pay Bills is the command that pushes your money out the door. With this command, you can select the bills you want to pay, how much to pay for each one, your payment method, the payment account, and the date for the payment. If you have credits or early payment discounts, you can include those, too.
Tip
If you want to evaluate all your unpaid bills before you pay them, the Unpaid Bills Detail report displays the bills due up to the current date, grouped by vendor, as described on Purchases Reports.
Selecting Bills to Pay
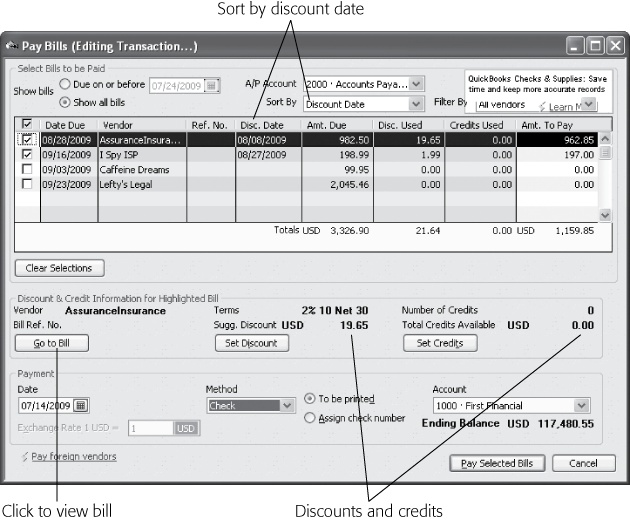
The payment process begins with choosing the bills you want to pay. When you choose Pay Bills (on the Home page or the Vendors menu), QuickBooks opens the Pay Bills window and shows the bills due within the next two weeks. As Figure 9-13 shows, you can change the bills that appear, view bill details, or apply credits and discounts.
Here are the ways you can select bills to pay:
Clicking Select All Bills below the table is the easiest way to select bills. QuickBooks selects all the bills displayed in the Pay Bills table and fills in the Amt. To Pay cells with the total due on each bill. You can choose individual bills for payment by turning on their checkboxes. (The button label changes to Clear Selections when at least one bill is selected.)
Note
When you select more than one bill from the same vendor, QuickBooks automatically combines those bills onto one check when you pay them (Selecting Bills to Pay).
To use different payment methods (check and credit card, for example), make two passes through the Pay Bills window. On the first pass, choose all the bills that you pay by check and, in the Payment Method box, choose Check. During the second pass, in the Payment Method box, choose Credit Card.
To pay bills submitted in different currencies, you have to make a pass through the Pay Bills window for each currency. QuickBooks creates an Accounts Payable account for each currency you assign to vendors. To pay bills from vendors using a specific currency, choose the corresponding Accounts Payable account in the A/P Account drop-down list. The Pay Bills window displays the bill amounts in the foreign currency, and the amount you have to pay in your home currency.
Modifying Payment Amounts
Whether you select individual bills or QuickBooks selects them for you, the program automatically fills in the Amt. To Pay cells with the total amounts that are due. Paying bills in full means you don’t have to worry about the next due date or paying late fees. But making partial payments can stretch limited resources to appease more of your unpaid vendors, as the box below explains. To pay only part of a bill, in a bill’s Amt. To Pay cell, type how much you want to pay.
Tip
If you keep your cash in an interest-bearing account until you need it, you’ll want to know how much money you need to transfer to your checking account to pay the bills. In the Pay Bills window, QuickBooks shows two totals: one for all the bills displayed, and another for what you’ve entered in the Amt. To Pay column. Initially, the two totals are the same. If you change a value in an Amt. To Pay cell, click another cell to update the total Amt. To Pay.
Applying Discounts and Credits to Payments
Most companies like to use their discounts and credits as soon as possible. By far, the easiest way to deal with discounts and credits you receive from vendors is to let QuickBooks automatically handle them. Here’s how you delegate application of early payment discounts and available credits to QuickBooks:
Choose Edit → Preferences. In the Preferences dialog box icon bar, click Bills. Then click the Company Preferences tab.
The setting you choose here applies to every person who logs into your company file. Because the preference appears on the Company Preferences tab, you have to be a QuickBooks administrator to change this setting.
Turn on the “Automatically use discounts and credits” checkbox.
QuickBooks turns on the Default Discount Account box.
In the Default Discount Account box, choose the account you use to track your vendor discounts.
If you don’t have an account set up for vendor discounts yet, choose <Add New> at the top of the Default Discount Account drop-down list. Create a new account (Creating an Account) called something like Vendor Discounts.
Note
Whether you create an income account or expense account for vendor discounts is neither an accounting rule nor QuickBooks requirement, but a matter of how you view vendor discounts. If you think of vendor discounts as expenses you’ve saved by paying early, create an expense account. If you view vendor discounts as money you’ve made, create an income account.
Either way, vendor discounts are different from discounts you extend to your customers. So, in the Default Discount Account box, choose an account specifically for vendor discounts, not your customer discount account.
As you’d expect, turning on the “Automatically use discounts and credits” checkbox tells QuickBooks to apply early payment discounts and available credits to bills without further instructions from you. The program uses your payment terms to figure out the discount you’ve earned, and it adds all available credits to their corresponding bills.
Whether the “Automatically use discounts and credits” preference is on or off, you can control the discounts and credits QuickBooks applies to your bills, as you’ll learn on the following pages. For example, you might want to delay a large credit until the following year. The delay increases your expenses in the current year, which, in turn, decreases this year’s taxable income.
Applying discounts manually
If you want to apply discounts manually or change the discount that QuickBooks added, here’s what you do:
Open the Pay Bills window.
On the Home page, click Pay Bills, or choose Vendors → Pay Bills.
To select a bill that isn’t already selected for payment, turn on its checkbox in the table. If the checkbox is already turned on, select the bill by clicking anywhere in the bill’s row.
In the “Discount & Credit Information for Highlighted Bill” section, QuickBooks shows the discount and credits that are available for the bill. More importantly, the program turns on the Set Discount and Set Credits buttons, which you click to apply discounts and credits, respectively. (If the checkmarked cell is turned off, QuickBooks shows the suggested discount and available credits, but the Set Discount and Set Credits buttons are dimmed.)
To apply or modify a discount to the selected bill, click Set Discount.
QuickBooks opens the “Discount and Credits” dialog box (Figure 9-14). If you’ve turned on multiple currencies, the currency you set for the vendor appears to the left of the Suggested Discount label and in the “Amount of Discount” box.
Figure 9-14. In the “Discount and Credits” dialog box, QuickBooks automatically selects the Discount tab and displays your payment terms, the discount date, and the amount of discount you deserve. If the suggested discount is worth an early separation from your money, click Done to deduct the discount from your bill. Otherwise, click Cancel. If you also want to work on credits (Applying credits manually), when you’re done modifying the discount, click the Credits tab.In the “Amount of Discount” box, QuickBooks fills in the suggested discount. If you want to apply a different discount, type the new value.
Many companies try to save money by taking early payment discounts when they haven’t paid early. Some companies apply discounts regardless of what their payment terms are, and most vendors honor these undeserved discounts in the name of goodwill.
In the Discount Account drop-down list, choose the account you use to track your vendor discounts.
If your vendor discount account is an income account, discounts appear as positive numbers and increase the balance of the income account. In vendor discount expense accounts, discounts appear as negative numbers because they reduce how much you spend on expenses.
Tip
If you want to track discounts on inventory separately, create a Cost of Goods Sold account specifically for inventory discounts. For example, if QuickBooks created account 5000 for Cost of Goods Sold, you can create two subaccounts: 5005 for Cost of Inventory Sold and 5010 for Inventory Discounts. In your financial reports, the two subaccounts show your original cost and the discounts you receive. Account 5000 adds the two subaccounts together to show your net cost of goods sold.
If you track classes, choose the class for the discount.
Typically, you’ll choose the same class for the discount that you used for the original expense.
Click Done.
QuickBooks closes the “Discount and Credits” dialog box. Back in the Pay Bills window, the program adds the discount you entered in the bill’s Disc. Used cell and recalculates the value in the Amt. To Pay cell by subtracting the discount from the amount due.

Applying credits manually
When you select a bill in the Pay Bills window, the “Discount & Credit Information for Highlighted Bill” section shows the credits that are available for the bill. To apply available credits to a bill or remove credits that QuickBooks applied for you, follow these steps:
Open the Pay Bills window. (On the Home page, click Pay Bills, or choose Vendors → Pay Bills.)
If the “Discount and Credits” dialog box is already open because you’ve applied a discount, just click the Credits tab and then continue with step 4.
Select a bill by turning on its checkbox in the table.
In the Discount & Credit Information for Highlighted Bill section, QuickBooks shows the credits available for the vendor, if any. The program turns on the Set Credits button.
To apply a credit to the selected bill, click Set Credits.
QuickBooks opens the “Discount and Credits” dialog box, and displays the Credits tab, shown in Figure 9-15. Credits that are already applied to the bill are checkmarked.
Turn on the checkmark cell for each credit you want to apply. Click Done.
QuickBooks closes the dialog box and applies the credits.
Setting the Payment Method and Account
After you’ve selected the bills to pay and applied any discounts and credits, you still have to tell QuickBooks how and when you want to pay your bills. At the very bottom of the Pay Bills window, these settings are the last choices you have to make before paying your vendors:
Payment Date. QuickBooks fills in the current date automatically. To predate or postdate your payments, choose a different date. Choosing Company-Wide Payroll Accounts tells you how to get QuickBooks to date checks using the day you print your checks.
Figure 9-15. In the table section of the “Discount and Credits” dialog box, click a credit’s checkmark cell to toggle between applying the credit and removing it from the bill. QuickBooks updates the Credits Used value to show the amount of credit applied to the bill. The Amt. To Pay value is the amount you have to pay based on both applied discounts and credits.Payment Method. In the drop-down list, choose how you want to pay the bills. QuickBooks offers Check, Credit Card, and Online Bank Pmt (if you subscribe to QuickBooks online bill payment).
If you pay bills by check and print your checks within QuickBooks, choose the “To be printed” option. The program automatically adfsds the bills you selected to the queue of checks to be printed. You’ll learn about printing these checks on Printing Checks.
If you write checks by hand, choose the “Assign check number” option. When you click Pay Selected Bills, the program opens the Assign Check Numbers dialog box. To assign check numbers starting with the next unused check number, choose the “Let QuickBooks assign check numbers” option. If you want to specify the check numbers for each check you write, choose the “Let me assign the check numbers below” option.
Payment Account. If you specified a default account for the Pay Bills window to use (Setting the Way Company Checks Work), QuickBooks automatically fills in the account. To use a different account, in the Account drop-down list, choose the account you use to pay the bills, such as a checking or credit card account.

Pay Selected Bills
When you’re done setting up bills to pay, click Pay Selected Bills. QuickBooks closes the Pay Bills window, displays a Payment Summary dialog box showing the payments you’ve made, and adds those payments to your bank account register. In the Enter Bills window, QuickBooks adds a PAID stamp to bills you’ve paid. Here are your choices, depending on how you produce checks:
If you write paper checks for your bills, click Done and your QuickBooks work is complete. But you still have to sign your John Hancock to the checks you send out.
For checks you print in QuickBooks, click Print Checks. See Printing Checks to learn how to print checks for the bills you pay. If you aren’t ready to print checks just yet, click Done.
You can create another batch of bill payments (for example, to pay bills using another method) by clicking Pay More Bills in the Payment Summary dialog box.
Producing Checks
When you use Check as the payment method, your bank account register shows check transactions, but you still have to generate checks to send to your vendors. For companies that produce lots of checks, printing checks in QuickBooks can prevent carpal tunnel syndrome. For a sole proprietorship that generates a few checks each month, writing checks by hand is easy enough. QuickBooks accepts either approach with equal aplomb.
Writing Checks by Hand
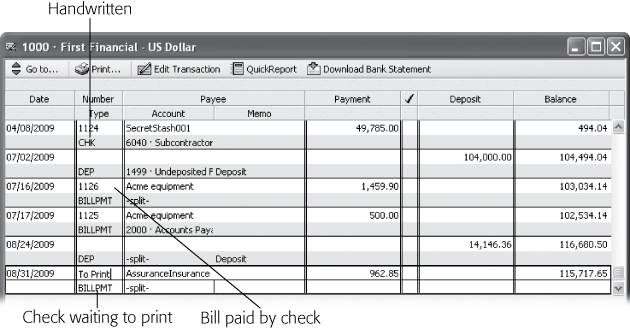
Writing checks by hand doesn’t require any work in QuickBooks. But you still have to keep your company file in sync with your paper checks. Whether you’re writing checks for bills you’ve paid in QuickBooks or scratching out a spur-of-the-moment check to the fortune-teller for this week’s corporate horoscope, you want to make sure that the check numbers in your bank account register match your paper checks.
If check transactions already exist in QuickBooks, synchronizing check numbers is as simple as writing the paper checks in the same order as you entered them in QuickBooks. Open the checking account register window and use the check transactions to guide your check writing, as shown in Figure 9-16.
Note
If the next check number in QuickBooks isn’t the one on your next paper check, you should figure out why they don’t match. The answer might be as simple as a voided check that you forgot to enter in QuickBooks or a check you wrote earlier that was out of sequence. But if someone is walking off with blank checks, you need to take action.
Until you find the reason for the mismatched check number, editing the check numbers that QuickBooks assigns in the checking account register is the easiest way to get checks into the mail. In the register window, double-click an incorrect check number and type the number that’s on your paper check.
Setting Up QuickBooks to Print Checks
If you have scads of checks to generate, printing on preprinted computer checks is well worth the small amount of setup you have to do. If you dedicate a printer to check printing and keep it stocked with checks, setup is truly a one-time event.
Tip
Lock up your preprinted checks and any printer stocked with them. Otherwise, you might discover checks missing, which can lead to money missing from your bank account.
The first step is telling QuickBooks which printer to print to and the type of checks you use. The program remembers these settings, so you need to go through this process just once. After you’ve specified your check printing settings, QuickBooks fills them in automatically in the Print dialog box. You can always change those options before you print.
Here’s how you set up QuickBooks to print checks:
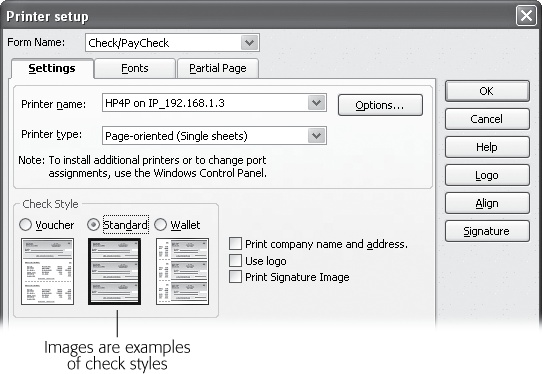
Open the “Printer setup” dialog box by choosing File → Printer Setup.
In the Form Name drop-down list, choose Check/Paycheck.
In the “Printer name” drop-down list, choose the printer you want to use to print checks.
If you choose a printer brand that QuickBooks recognizes (there are only a few it doesn’t), the program automatically fills in the “Printer type” box. If you use a very old or very odd printer, you’ll have to choose the type of printer. “Page-oriented (Single sheets)” refers to printers that feed one sheet at a time. Choose Continuous (Perforated Edge) when the printer feeds a roll of paper.
Note
If you print to checks on continuous-feed paper, the alignment of the paper in the printer is critical. You can save time and a lot of wasted checks by aligning the paper before you print batches of checks, as described on Aligning Forms and Paper.
In the Check Style section, choose the option that represents the style of checks you purchased. (The box above tells you where you can buy your checks.)
The “Printer setup” dialog box displays examples of each check style it can deal with, making it easy to choose the right one, as shown in Figure 9-17. See the box on Printing Checks to learn how to tell QuickBooks how you want to print partial pages of checks.
Figure 9-17. The Standard option sets up QuickBooks to print to checks that fit in a #10 business envelope. These checks typically come three to a page. The Voucher option represents one-page forms that include both a check and a detachable stub for payroll or check information. Wallet checks are smaller than business checks. Because they’re narrower than standard business checks, these forms have a perforation on the left for tearing the check off, leaving a stub containing check information that you can file.If the company you buy checks from wants too much money to print your company info and logo on the checks, turn on the “Print company name and address” and “Use logo” checkboxes.
When you turn on the “Print company name and address” checkbox, QuickBooks prints on your checks the company name and address you filled in when you created the company file (Company Information). If you turn on the “Use logo” checkbox, the program opens the Logo dialog box. Click File. In the Open Logo File dialog box, choose a graphic image of your logo. (QuickBooks can handle BMP, GIF, JPG, PNG, and TIFF formats.)
If your company info and logo are preprinted on your checks, leave the checkboxes for printing your company name, address, and logo turned off.
If you have an image of your signature, you can print it on your checks by turning on the Print Signature Image checkbox (new in QuickBooks 2010).
The program opens the Signature dialog box. Click File. In the Open Logo File dialog box, locate and double-click the graphic image of your signature. (One way to create a graphic file of your signature is by signing a piece of paper and scanning it to your computer.)
Printing Checks
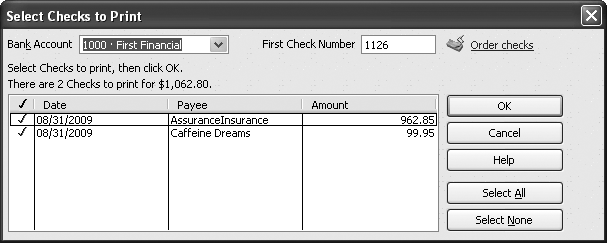
In the Pay Bills window, if you choose the “To be printed” option, QuickBooks adds the checks you’ve selected for payment to a print queue when you click Pay Selected Bills. After you confirm that your preprinted checks are in your printer and that the checks are aligned properly, you can print checks right from the Payment Summary dialog box by following these steps:
In the Payment Summary dialog box, click Print Checks. If the Payment Summary dialog box isn’t open, choose File → Print Forms → Checks.
QuickBooks opens the “Select Checks to Print” dialog box and selects all the unprinted checks, as shown in Figure 9-18.
After you select the checks you want to print (by turning on their checkmark cells), click OK.
QuickBooks opens the Print Checks dialog box, which looks much like the Printer Setup dialog box for checks (Figure 9-17).
If the first page of checks in your printer is a partial page, in the “Number of checks on first page” box, type how many checks you have on the first page.
In the Print Checks dialog box, the “Number of checks on first page” box lets you use leftover checks from previous print runs when you have a page-oriented printer. Type the number of leftover checks on the page from which one or more checks have been printed and insert that page in the envelope feed of your printer. After the program prints checks to that page, it begins feeding sheets of checks from the paper tray.
Click Print.
QuickBooks anticipates the problems that can happen during printing (paper jams, low toner, or an ill-timed margarita spill). After the program prints checks, it opens the Print Checks - Confirmation dialog box.
If there was a problem, in the Print Checks - Confirmation dialog box, click the Reprint cell for each check that didn’t print correctly.
If the whole batch is a loss, click Select All.
Click OK to reprint the checks.
In addition to printing the checks, QuickBooks also removes the words To Print for those checks in your checking account register, replacing them with the check numbers it used.
Writing Checks Without Entering Bills
You might enter bills for the majority of your vendor transactions, but you’re still likely to write a quick check from time to time. For example, when the person who plows your parking lot knocks on the door and asks for payment, he won’t want to wait while you step through the bill entering and paying process in QuickBooks—he just wants his $100. And if you write only a couple of checks a month, there’s nothing wrong with writing checks to pay your vendors without entering a bill in QuickBooks.
When you first use QuickBooks and want some guidance, use the Write Checks dialog box to make sure you enter everything you need. In no time, you’ll grow tired of all the clicking and handholding. At that point, you can switch to recording your checks in the QuickBooks checking account register.
Note
Entering checks in the register is best reserved for paper checks that you write. But you can print a check you enter in the register. First, record the check. Then, right-click it and choose Edit Check to open the Write Checks window. In the window’s menu bar, click Print.
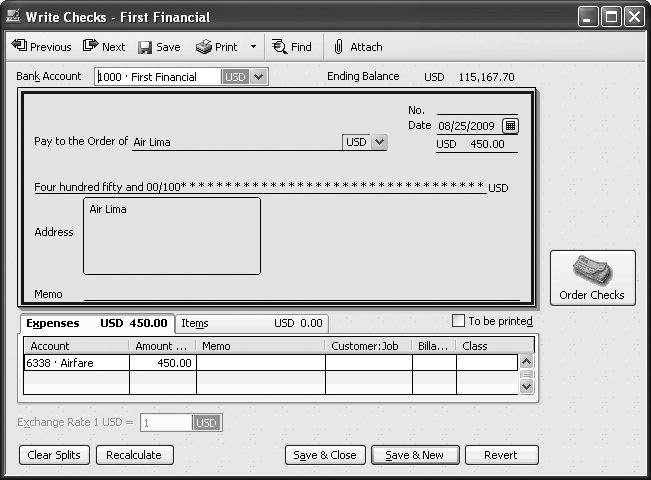
Using the Write Checks Window
The Write Checks window is like a trimmed-down Enter Bills window. There’s no need for fields such as Bill Due or Terms because you’re paying immediately. But bills in QuickBooks take care of allocating costs to expense and inventory accounts. So, for a payment without a bill, you have to provide that information, which is why the Write Checks window has tabs for Expenses and Items. QuickBooks fills in a few fields for you, and the rest of the fields are like the ones you’ve met already in the Enter Bills window (Entering Bills).
Note
The Enter Bills window is no place to write checks for sales tax, payroll, payroll taxes and liabilities, or bills you’ve paid immediately. See Purchases Reports for how to pay sales tax. Chapter 14 explains how you pay employees, payroll taxes, and other payroll liabilities.
To write a check in the Write Checks window, follow these steps:
Press Ctrl+W for fast access to the Write Checks window (or choose Banking → Write Checks).
You can also click Write Checks on the Home page. As you can see in Figure 9-19, QuickBooks tries to flatten the learning curve by making the first part of the Write Checks window look like a paper check. If you use multiple currencies, the Write Checks window tacks on the currency for your checking account in the Bank Account box, the currency for the vendor on the right side of the “Pay to the Order of” box, and the currency for the check to the left of the check amount.
If you set up regular account preferences (Setting the Way Company Checks Work), such as the bank account to use when you open the Write Checks window, the program automatically chooses your bank account for you and positions the cursor in the “Pay to the Order of” field.
QuickBooks automatically fills in the No. box with the next check number for the selected bank account. If the number that the program fills in doesn’t match the check you’re writing by hand, type the number from your paper check.
If you type a check number that’s already been used, QuickBooks warns you about the duplicate number when you try to save the check. In the warning message box, click Cancel, and then, in the Write Checks window, edit the value in the No. field.
Tip
If you suspect that there’s more than one check number awry, open the checking account register to review multiple checks at the same time. To renumber the checks in the register window, double-click a transaction’s Number cell and type the new number. Press Enter to save the change. It’s perfectly acceptable to save a duplicate check number, as long as you keep editing check numbers until all the duplicates are gone.
If you want to print the check, turn on the “To be printed” checkbox just above the right end of the Expenses table.
When you turn on the “To be printed” checkbox, the words To Print appear to the right of the No. label. This setting adds the checks you create to a print queue. When you print those checks (Printing Checks), QuickBooks replaces To Print with check numbers. To write checks by hand, be sure to leave the “To be printed” checkbox turned off.
Figure 9-19. Choosing a vendor fills in not only the “Pay to the Order of” field, but also the Address box, which is perfect for printing checks for mailing in window envelopes. Even though the vendor name appears in the “Pay to the Order of” field, the Address box displays the company name to show you what it prints on checks. If you include account numbers in your vendor records, QuickBooks adds the account number to the Memo field.Add entries to the Expenses and Items tabs for the things the check is paying for, just like you do when you enter a bill (Entering Bills).
QuickBooks calculates the check amount as you add entries on the Expenses and Items tabs. If you fill in the check amount and then start adding expenses and items, you’ll know that the check total and the posted amounts match when no unallocated dollars remain. If you’ve mangled the entries on the Expenses or Items tab, you can start over by clicking Clear Splits.
Click Save & Close to record the check. To write another check, click Save & New. To throw away any values in the window and start over, click Revert.
Adding Checks to an Account Register
Entering checks in a bank account register is fast, easy, and—for the keyboard aficionado—addictive. By combining typing and keyboard shortcuts, such as tabbing from cell to cell, you can make short work of entering checks.
Here’s how you create checks in a register window:
Press Ctrl+A to open the Chart of Accounts window, and then double-click your bank account.
If you have only one bank account, you can open your register with one click: On the icon bar, click Reg to have QuickBooks open the account register window and position the cursor in the Date cell of the first blank transaction. (If you don’t see the Reg icon, see Building Your Favorites Menu to learn how to add it.)
If you want to adjust the check date by a few days, press + or – until the date is what you want.
See Appendix C at www.missingmanuals.com/cds for more date-related keyboard shortcuts.
Press Tab to move to the Number cell.
QuickBooks automatically fills in the next check number for the bank account. If the number doesn’t match the paper check you want to write, press + or — until the number is correct or simply type the new number.
Press Tab to move to the Payee cell. Start typing the name of the payee.
QuickBooks scans the lists of names in your company file and selects the first name that matches all the letters you’ve typed so far. As soon as QuickBooks selects the one you want, press Tab to move to the Payment cell.
In the Payment cell, type the amount for the check.
Press Tab to jump past the Deposit cell to the Account cell.
If the check applies to only one expense account, in the Account drop-down list, choose the account you want.
You can also choose an account by typing the account number or the first few letters of the account name. As you type, QuickBooks selects the first account that matches what you’ve typed. When the account is correct, press Tab to move to the Memo cell.
If your check covers more than one type of expense, you can allocate the payment among several accounts, as you can see in Figure 9-20.
To add a reminder about the check, in the Memo cell, type your notes. When you’ve filled in all the fields you need, click Record to save the check.
Lather, rinse, repeat.
Paying with Cash
If you carry company cash around in your wallet (called petty cash, and described in detail on Purchasing Inventory), or if you receive a cash advance toward travel expenses, you eventually have to record the details of your cash transactions in QuickBooks. For example, on a business trip, you might pay cash for meals, parking, tips, and tolls. When you return with your receipts, your bookkeeper can enter a transaction documenting those expenses in the petty cash account.

Entering cash transactions in the petty cash account register is even easier than entering checks in the checking account register (Adding Checks to an Account Register). For cash transactions, the key fields are the amount and the account. You can skip the Payee field altogether to keep your Vendor List concise. If you want a record of where you spent the cash, type the business name in the Memo cell. QuickBooks assigns a check number to a cash transaction, which you might as well keep. If you hand out petty cash receipts that have receipt numbers, you can type that value in the Number cell.
Paying with Credit Cards
When you make credit card purchases, the easiest way to record those charges in your company file is by signing up for online banking (Setting Up Your Accounts for Online Services) and downloading your transactions (Paying bills online). But you can also enter credit charges manually.
Tip
Whether you download charges or not, entering charges manually is a great way to catch erroneous or fraudulent charges that appear on your statement. For example, after entering your charges manually, you can download the charges from your credit card company. If you see additional charges that don’t match the ones you entered, either you forgot a charge or there’s an error in your account.
Entering credit card charges is similar to writing checks except that you work in the Enter Credit Card Charges window, shown in Figure 9-21. To open it, choose Banking → Enter Credit Card Charges. You can also enter charges directly in the credit card account register, just as you do checks.
Note
To enter a refund for a credit card charge, in the Enter Credit Card Charges window, choose the Refund/Credit option and fill in the rest of the fields based on the refund you received.

Recording Vendor Credits
You ordered 30 dozen lightweight polypropylene t-shirts for your summer Death Valley marathon, but your vendor mistakenly silk-screened the logo on long-sleeved cotton t-shirts heavy enough to survive a nuclear blast. Despite your complaints, the vendor insists on issuing a credit instead of a refund check. The only good thing about this situation is how easy it is to record a credit in QuickBooks:
On the Home page, click Enter Bills (or choose Vendors → Enter Bills).
QuickBooks opens the Enter Bills window as if you’re going to enter a bill.
Just below the window’s menu bar, choose the Credit option.
QuickBooks changes the heading in the window to Credit, and the Amount Due label switches to Credit Amount. The other fields stay the same.
On the Expenses and Items tabs, fill in the cells with the items for which you’re receiving credit.
You can enter positive numbers just as you did when you entered the original bill. QuickBooks takes care of posting the credit amounts to your accounts. Your inventory account decreases due to the inventory items you return. Expense accounts decrease due to expense credits. And the total credit amount reduces the balance in your Accounts Payable account as well.
Click Save & Close.
That’s it! See Applying credits manually for the steps to apply a credit.
Running Expense-Related Reports
Vendors & Payables reports tell you how much you owe each vendor and when the bills are due. Choose Reports → Vendors & Payables, and then choose the report you want to run. The reports in the Purchases category focus on how much you’ve bought from each vendor you work with. This section tells you how to put these two categories of reports to work.
A/P Aging and Vendor Balance Reports
If your company is flush with cash and you pay bills as soon as they appear in the Pay Bills window, your A/P Aging reports and Vendor Balance reports will contain mostly zeroes. In fact, because the Pay Bills window lets you sort bills by due date, discount date, vendor, and amount (Selecting Bills to Pay), you might not find any reason to run these reports. For example, if you juggle payments to vendors to conserve cash, you can easily pay the oldest bills first by sorting bills by due date. But if you want an overview of how much you owe to each vendor and how much is overdue, use one of the following reports:
A/P Aging Summary. This report shows all the vendors you owe money to, and how old your balances are for each one. Double-click a value to see a report of the transactions that produced the amount owed, for example, to look at a bill that’s more than 90 days overdue.
A/P Aging Detail. Run this report to see each unpaid bill sorted by the billing date and grouped by bills that are current, and those that are 1 to 30 days overdue, 31 to 60 days overdue, 61 to 90 days overdue, and more than 90 days late.
Unpaid Bills Detail. If you want to evaluate all your unpaid bills before you pay them, the Unpaid Bills Detail report displays the bills due up to the current date, grouped by vendor. To include bills due in the future, in the Dates box, choose All. If you want to inspect a bill more closely, double-click anywhere in that bill’s line; the Enter Bills window opens with the bill’s information.
Vendor Balance Detail. Run this report to see the bills and payments grouped by vendor.
Purchases Reports
When you run the “Purchases by Vendor Summary” report and see high dollar values, you might want to negotiate volume discounts or faster delivery times. These summary reports can also show when you rely too heavily on one vendor—a big risk should that vendor go out of business.
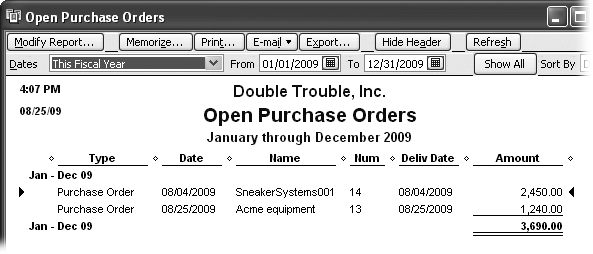
The “Purchases by Item Summary” report shows how many inventory items you’ve purchased and the total you paid. The “Purchases by Item Detail” report shows each purchase transaction with the quantity, cost, and vendor. If your supplies are dwindling, the Open Purchase Orders report shows when more items are due, as shown in Figure 9-22.
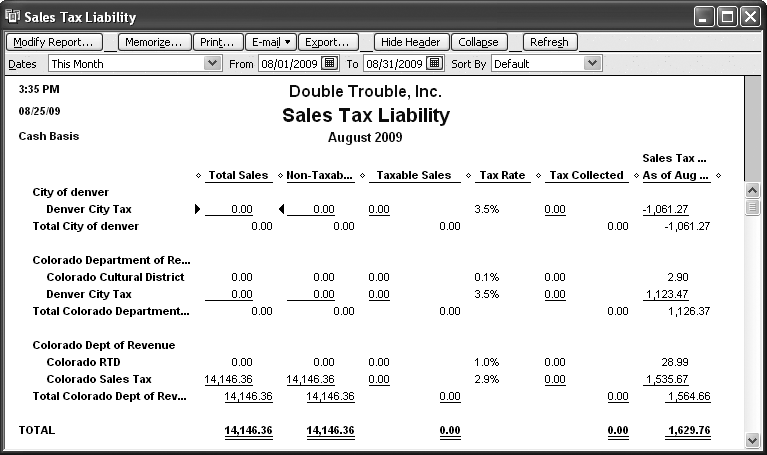
Paying Sales Tax
Sales tax can be complicated, particularly in states where the number of tax authorities has exploded. You might have to pay sales taxes to several agencies, each with its own rules about when and how much. QuickBooks sales tax features can’t eliminate this drudgery, but they can help you pay the right tax authorities the right amounts at the right time—something to be thankful for.
After governmental paperwork, the chief aggravation of sales tax is that setup spans several areas of QuickBooks. If you’re new to collecting sales tax for your products, make sure you’ve completed the following tasks so you’re collecting and tracking sales taxes properly. Only then can you pay the sales taxes you owe:
Sales tax preferences. If you’re liable for sales tax, be sure to turn on the sales tax feature in QuickBooks. Choose Edit → Preferences, and, in the Edit Preferences dialog box’s icon bar, click Sales Tax. On the Company Preferences tab, in the Do You Charge Sales Tax? section, choose Yes.
Note
When you turn on the sales tax preference, QuickBooks automatically creates a liability account in your chart of accounts called Sales Tax Payable. If the sales tax preference is turned off, QuickBooks creates this account for you the first time you add sales tax to an invoice.
To help QuickBooks fill in tax-related fields for you, you can set preferences for the tax codes you use most often for taxable and nontaxable sales. If you sell predominantly in your own state, in the “Your most common sales tax item” drop-down list, choose the sales tax item or sales tax group for your state.
Customer records. When you create a customer in the Customer:Job List, you can assign tax codes and tax items to the customer record (Designating payment information). If you do, QuickBooks automatically applies the correct sales tax items to taxable sales on the customer’s invoices.
Items. When you create items in your Item List, you can specify whether they’re taxable or not (Assigning tax codes to items). When you add these items to invoices or other sales forms, QuickBooks automatically applies the correct tax status. (See pages 124–127 to learn how to set up sales tax items and sales tax groups. When you add these to invoices, QuickBooks calculates the sales taxes you need to remit.)
Invoices and other sales forms. QuickBooks calculates sales tax on invoices and other sales forms based on whether items are taxable and customers are tax exempt.
Note
On the Home page, the Manage Sales Tax icon appears at the right end of the Vendors panel. The Manage Sales Tax window includes links to several sales tax-related tasks, like setting sales tax preferences and viewing the sales tax items you’ve set up. However, you can get to all the same commands by choosing Vendors → Sales Tax, and then choosing a command. Also, remember that you don’t have to close the Manage Sales Tax window when you’re done.
Sales Tax Payment Preferences
The preference settings you choose for paying sales taxes aren’t up to you. Tax agencies decide when your sales taxes are due, usually based on how much sales tax you collect. When you receive a notice about your required payment interval from the state or other tax authority, be sure to update your QuickBooks preferences to match.
To set your sales tax preferences, choose Edit → Preferences, and, in the Edit Preferences dialog box’s icon bar, click Sales Tax. On the Company Preferences tab, QuickBooks provides two sets of payment options to satisfy the tax agencies you’re beholden to:
When do you owe sales tax? If your tax agency deems sales taxes due when you add them to customer invoices (known as accrual basis payment), choose the “As of invoice date” option. If your tax agency says sales taxes are due when your customers pay them (known as cash basis payment), choose the “Upon receipt of payment” option. When you generate sales tax reports (next section), QuickBooks uses these options to calculate the sales taxes that you have to remit.
When do you pay sales tax? Tax agencies determine how frequently you have to remit sales taxes based on how much sales tax you collect. If your sales taxes are only a few dollars, you might pay only once a year. But if you collect thousands of dollars of sales tax, you can be sure that the tax agency wants its money more quickly, such as quarterly or monthly. When your tax agency informs you of your remittance frequency, choose Monthly, Quarterly, or Annually, as appropriate.
Producing Reports of the Sales Tax You Owe
Tax agencies are renowned for their forms. You have to fill out these forms to tell the agencies how much sales tax you’ve collected and how much you’re required to remit to them. Fortunately, QuickBooks can take some of the sting out of your tax paperwork with reports that collate the sales tax information you need. Here are the reports you can generate:
Sales Tax Liability report. This report summarizes the sales taxes you’ve collected for each tax agency. Choose Reports → Vendors & Payables → Sales Tax Liability. QuickBooks automatically sets the dates of the report to match the payment interval preference you chose, as you can see in Figure 9-23.
Sales Tax Revenue Summary. This report shows how much of your sales are taxable. Choose Reports → Vendors & Payables → Sales Tax Revenue Summary.
Remitting Sales Taxes
You don’t have to enter a bill to pay sales taxes. QuickBooks not only keeps records of the sales taxes you owe, but also provides a dialog box especially for sales tax payments. Here’s how you keep the tax agency off your back:
Choose Vendors → Sales Tax → Pay Sales Tax.
QuickBooks opens the Pay Sales Tax dialog box and fills in the sales taxes you owe for the last collection period (as defined in your Sales Tax preferences), as shown in Figure 9-24.
Figure 9-23. If you remit sales taxes to several tax agencies, each with its own payment interval, you can rerun the report with a different interval to calculate the sales tax you owe to other agencies. In the Dates drop-down list, choose another interval, such as Last Calendar Quarter.Figure 9-24. If you remit sales taxes to only one tax agency, or all your sales tax payments are on the same schedule, you can click Pay All Tax to select all the payments in the table. Chances are that you make payments on different schedules to different agencies—in which case, select all the agencies on the same schedule. You’ll have to repeat these steps for agencies on a different timetable.If you use more than one checking account, in the Pay From Account drop-down list, choose the account you want to use for payment.
QuickBooks fills in the Pay from Account box automatically if you set the “Open the Pay Sales Tax form with _ account” preference (Setting the Way Company Checks Work).
In the Pay column, click cells to select the tax payments you want to make.
QuickBooks adds a checkmark to indicate that a payment is selected, and it adds the amount of the remittance in the Amt. Paid cell.
Note
In some states, you may need to adjust the payment you make to a tax agency; for example, to apply a discount for timely payment. Click Adjust to open the Sales Tax Adjustment dialog box. You can increase or decrease the sales by a dollar value, and you have to specify the account to which you want to post the adjustment (the Sales Tax Payable account, say). If the Entry No. box seems vaguely familiar, it’s because this dialog box actually creates a journal entry for the adjustment.
If you want to print the sales tax remittance checks from QuickBooks, turn on the “To be printed” checkbox. When you’re done, click OK.
If you set up the checks to print in QuickBooks, you’ll see them the next time you choose File → Print Forms → Checks. If you didn’t turn on the “To be printed” checkbox, whip out your checkbook and write those remittance checks.