Chapter 13. Managing Accounts Receivable
In between performing work, invoicing customers, and collecting payments, you have to keep track of who owes you how much (known as accounts receivable) and when the money is due. Sure, you can tack on finance charges to light a fire under your customers’ accounting departments, but finance charges are rarely enough to make up for the time and effort you spend collecting overdue payments. Far more preferable are customers who pay on time without reminders, gentle or otherwise.
On the other hand, sales receipts are the simplest and most immediate sales forms in QuickBooks. When your customers pay in full at the time of the sale—at your used music CD store, for example—you create a sales receipt so the customer has a record of the purchase and payment. At the same time, the QuickBooks sales receipt posts the money for the sale into your bank account (in QuickBooks) or the Undeposited Funds account. You can’t use sales receipts for customers who don’t pay in full, because sales receipts can’t handle previous customer payments and balances.
Because companies need money to keep things running, you’ll have to spend some time keeping track of your accounts receivable and the payments that come in. In this chapter, you’ll learn the ins and outs of tracking what customers owe, receiving payments from them, and dinging them if they don’t pay on time. You’ll also learn how to create sales receipts for one sale at a time or to summarize a day’s worth of merchandizing.
The Aging of Receivables
You don’t have to do anything special to create accounts receivable. They’re the by-product of billing and invoicing your customers. But receivables that are growing long in the tooth are the first signs of potential collection problems. Some companies like to check the state of their accounts receivable every day, and with the Company Snapshot, Customer Center and built-in QuickBooks reports, you have three ways to do that in record time.
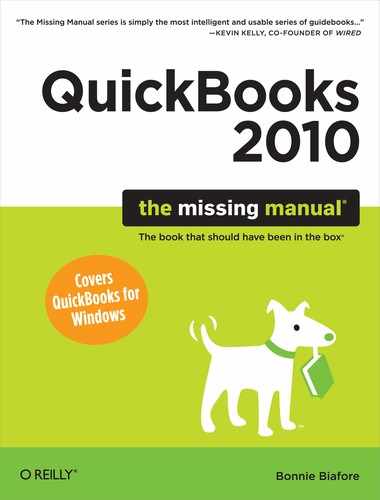
The Company Snapshot can show the balance each customer owes, as you can see in Figure 13-1. (If you don’t see it, click Company Snapshot in the QuickBooks icon bar or choose Company → Company Snapshot.) When you want to see more detail about receivables, turn to QuickBooks built-in aging reports, described in the next section.
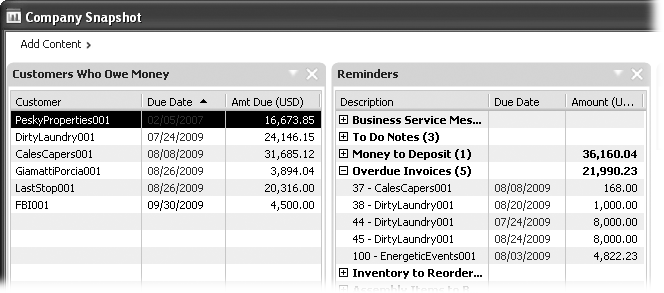
When you open the Customer Center (in the Home page, click Customers, or choose Customers → Customer Center), QuickBooks automatically displays the Customers & Jobs tab, listing your customers and jobs and the balance owed by each one. If you select a customer or job name in the list, you can see the invoices or other sales transactions that generated the open balance on the right side of the window, as shown in Figure 13-2.
Accounts Receivable Aging Reports
Aging reports tell you how many days have passed since you sent each open invoice, and they’re the first step to keeping your accounts receivable from growing overly ripe. It’s a fact of business life that the longer a customer hasn’t paid, the more likely it is that you’ll never see that money. Taking action before an account lags too far behind limits bad debts and protects your profits.
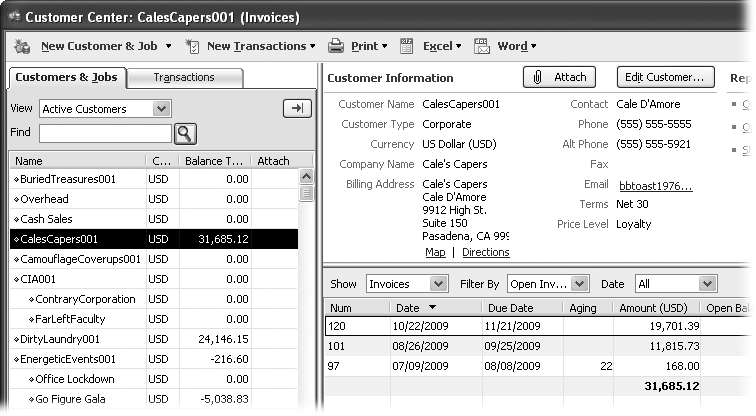
QuickBooks includes two built-in aging reports: the A/R Aging Summary report and the A/R Aging Detail report. Aging reports show how much your customers owe for the current billing period (invoices that are less than 30 days old), as well as unpaid bills and invoices from previous periods (invoices that are between 1 and 30 days late, 31 to 60 days late, 61 to 90 days late, and more than 90 days late).
A/R Aging Summary. For a fast look at how much money your customers owe you and how old your receivables are, choose Reports → Customers & Receivables → A/R Aging Summary, as shown in Figure 13-3 (top).
A/R Aging Detail. To see each customer transaction categorized by age, as shown in Figure 13-3 (bottom), choose Reports → Customers & Receivables → A/R Aging Detail.
Accounts Receivable Graph. The Accounts Receivable Graph doesn’t show as much detail as either of the A/R Aging reports, but its visual nature makes aging problems stand out. To display this graph, choose Reports → Customers & Receivables → Accounts Receivable Graph. Ideally, you want to see the bars in the graph get smaller or disappear completely as the number of days overdue increases. To see more detail for a particular period, in the bar graph, double-click a bar. To see more detail for a customer, double-click the customer’s name in the legend, or double-click the slice in the pie chart that corresponds with the customer.
Note
If you work with more than one currency, the Accounts Receivable Aging reports use your home currency to show all values. To see transactions in the currencies in which they were recorded, in the report window, click Modify Report. On the Display tab, below the “Display amounts in” label, select the “The transaction currency” option. Click OK.
Customer & Job Reports
Aging reports aren’t the only goodies you can generate in QuickBooks. To see all the reports associated with customers and what they owe, choose Reports → Customers & Receivables. Here’s an overview of when it makes sense to use these other reports:
Customer Balance Summary. This report shows the same balance information you see automatically in the Customer Center, but here the job totals appear in one column and the customer totals are offset to the right. And unlike the Customers & Jobs tab, you can easily print this report.
Customer Balance Detail. This report shows every transaction that makes up customers’ balances, so it isn’t short. It lists every transaction (such as invoices, payments, statement charges, and credit memos) for every customer and job, whether the customer is late or not. To inspect transaction details, double-click anywhere in the transaction’s row to show the transaction in its corresponding window (Create Invoices for an invoice, for example). If you’d rather see the transactions for one customer, open the Customer Center (Customers), select the customer, and then, on the right side of the window, click the Open Balance link.
Open Invoices. This includes unpaid invoices and statement charges, as well as payments and unapplied credits, so you can see if a payment or unapplied credit closes out a customer’s balance. The report is sorted and subtotaled for each customer and job, so you can find an unpaid invoice quickly without repetitively clicking Previous in the Create Invoices window. When you find the invoice you want, double-click anywhere in that invoice’s row to open it.
Collections Report. When you’re on a mission to collect the money that’s owed you, the Collections report provides all the information you need. The report shows the past-due invoices and statement charges by customer and job with the due date and number of days that the transaction is past due. To make it easy to contact your customers, the report includes the customer contact name and phone number. Give the report to your most persistent employees and get ready to receive payments. If a customer has questions about a transaction, double-click the transaction’s row to view the transaction in detail.
Tip
When customers have pushed their credit limits—and your patience—too far, you can easily create collection letters by merging information for overdue customers with mail merge collection letters in Word (see Mail Merge to a Word Document).
Unbilled Costs by Job. Another place you might leave money on the table is with job costs that you forgot to add to invoices. Run this report to see if there are expenses you haven’t billed, the type of expense, when you incurred the cost, and other information. If you spot older expenses that you haven’t yet billed, add them to the next invoice (Adding Billable Time and Costs to Invoices).
Receiving Payments for Invoiced Income
How you record an invoice payment depends on the type of payment. Most of the time, you’ll click Receive Payments on the Home page, but you can also choose Customers → Receive Payments. Either way, you’ll see the Receive Payments window, which handles full and partial payments, early payment discounts, credits, and downloaded online payments. The Receive Payments window works for most payments, but you record some types of payments in other places.
Here are the windows that can record payments and when you use them:
Receive Payments. When your customers send you money, on the Home page, click Receive Payments to record them (Customers). This window is for full or partial payments that you receive after you’ve made a sale. Here you can apply early payment discounts, credits for returns, as well as downloaded online payments. (See Applying Credits to Invoices for how you record the deposits for those payments.)
Create Invoices. See the box on Discounting for Early Payment to learn how to record a partial payment that you receive before you prepare an invoice. These payments appear on the invoice you prepare and reduce its balance.
Create Credit Memos/Refunds. If your customer makes a down payment or prepays an invoice, create credit memos to record these payments (Recording Prepayments).
Enter Sales Receipts. When your customers pay in full at the time of sale, record payments in this window (Creating Sales Receipts), whether the customers pay with cash, check, or credit card.
For full or partial payments with or without discounts or credits, follow these steps to record payments you receive from your customers:
On the Home page, click Receive Payments.
QuickBooks opens the Receive Payments window.
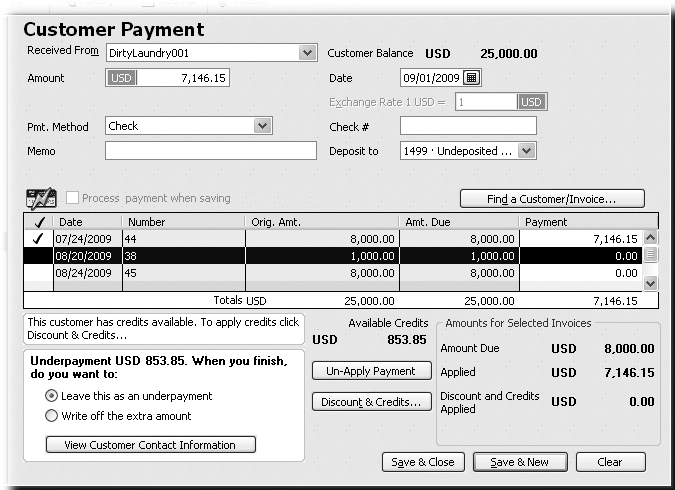
In the Received From box, choose the customer or the job for which you received a payment, as shown in Figure 13-4.
If the customer sent a payment that covers more than one job, in the Received From box, choose the customer name—not any of the individual job names. QuickBooks adds the Job column to the Receive Payments table and fills in the rows with all the outstanding invoices for all of the customer’s jobs. The job name appears in the table when an invoice applies to a specific job. When the cell in the Job column is blank, the invoice applies directly to the customer, not a job.
Note
If you select a customer set up to use a foreign currency, the A/R Account box automatically selects the Accounts Receivable account for the foreign currency. For euros, for example, you’ll see Accounts Receivable - EUR.
Figure 13-4. When you choose a customer or job in the Received From box, the Customer Balance to its right shows the corresponding balance (including any credits available). The program also fills in the table with every unpaid invoice for that customer or job. If you choose a job and don’t see the invoice you expect, in the Received From box, choose the customer (as shown here) to see all invoices for that customer and its jobs.In the Amount box, type the amount of the payment (if the customer uses a foreign currency, type the amount received in the foreign currency).
After you type the payment amount and either press Tab or click another box, QuickBooks automatically selects an invoice for you. If the payment amount exactly matches the amount of one or more unpaid invoices, QuickBooks is smart enough to select the invoices. If the customer sends some other amount of money, however, QuickBooks automatically selects the oldest unpaid invoices. Make sure that QuickBooks selects the correct invoices. Step 6 tells you how to select different invoices.
Tip
When you select a customer set up to use a foreign currency, the “Exchange Rate 1 <currency> =” box appears below the Date box, filled in with the current exchange rate set in QuickBooks. If you want to use a different exchange rate, type it in the “Exchange Rate 1 <currency> =” box. If the exchange rate you use when you receive the payment is different than the exchange rate you used on the invoice, QuickBooks automatically calculates the gain or loss (Other Helpful Financial Reports) for the transaction.
In the Pmt. Method box, choose the method that the customer used to make the payment.
If you choose Cash, QuickBooks displays the Reference # box where you can type a receipt number or other identifier. When you choose the Check payment method, QuickBooks displays the Check # box instead; type the number from the customer’s check. For any type of credit card, in the Card No. box and Exp. Date boxes, type the card number and the month and year that the card expires. The Reference # box that appears is perfect for storing the credit card transaction number.
Note
If you want to sign up for Intuit payments services, such as accepting credit cards or electronic checks, click the “Add credit card processing” or “Add eCheck processing” buttons in the panel on the left side of the Receive Payments window. If you already subscribe to QuickBooks Merchant Services (Importing a Delimited File) and you want to process the payment on the customer’s credit card, turn on the “Process payment when saving” checkbox above the table of invoices. You can download transactions for the payments you received online or via credit card. In the Receive Payments menu bar, simply click Get Online Pmts.
In the Deposit To box, choose the account for the deposit, such as your checking or money market account.
If you have only one account, you won’t see this box at all. But if you have several accounts, such as checking, money market, and petty cash, then you can choose the account for the deposit.
QuickBooks chooses your Undeposited Funds account automatically, which means that the program holds payments in the Undeposited Funds account until you tell it to deposit those payments into a specific bank account. If you’re the impatient type, or if your checking account balance is desperately low, you can deposit a payment directly to the bank account—as long as you follow that QuickBooks transaction with a real-world bank deposit.
Tip
To make reconciling your bank statement a bit easier (Starting a Reconciliation), choose the Deposit To account based on the way your bank statement shows the deposits you make. If your bank statement shows a deposit total, regardless of how many checks were in the deposit, put payments in the Undeposited Funds account. But when your bank shows every check you deposit, choose your QuickBooks bank account so that each payment appears separately. Payroll & Employees explains how to set a QuickBooks preference so that the program always chooses Undeposited Funds for payments.
If QuickBooks selects the wrong invoices, or if you turned off the “Automatically apply payments” preference, in the first column in the unpaid invoice table (the checkmark column), click the cells for the invoices to which you want to apply the payment, as shown in Figure 13-5.
When the payment doesn’t match any unpaid invoices, QuickBooks selects the oldest invoices and adjusts the values in the Payment column to equal the payment total. If you select the invoices, you have to edit the values in the Payment column to match the total payment amount. Select a cell in the Payment column and type the new amount. When you press Tab or click elsewhere in the dialog box, you’ll see the updated amount below the Payment column. When that value equals the value in the Amount box, you’re done.
If your customer reduced the payment by the available credit, click Discount & Credits. In the “Discount and Credits” dialog box, apply the credit to the payment.
See Applying Credits to Invoices for more detail about applying credits.
Figure 13-5. Sometimes, the amount your customer sends doesn’t match any combination of open invoices. If the customer paid too little or too much, you’ll see an underpayment message (shown here) or an overpayment message. Before you edit values in the Payment column, see if the Available Credits value equals the Underpayment value. If it does, your customer reduced the payment by the available credit. See Applying Credits to Invoices to learn how to apply credits.If you want to print a payment receipt, in the Receive Payments window toolbar, click Print.
QuickBooks opens the Print Lists dialog box. If necessary, change the print settings, and then click Print.
Click Save & Close to assign the payment to the selected invoices and close the window.
If you want to apply another payment, click Save & New.

Tip
Say you realize that you’ve applied a payment to the wrong invoice. The easiest way to change a recent payment is to choose Customers → Receive Payments, and then click Previous until the correct payment transaction appears. In the invoice table, turn off the checkmark cell for the current selected invoice, turn on the checkmark cell for the correct invoice, and then click Save & Close.
Applying Credits to Invoices
When something goes awry with the services or products you sell, customers won’t be bashful about asking for a refund or credit (Handling Refunds and Credits). And customers who buy from you regularly might prefer a credit against their next order rather than a refund, so that checks aren’t flying back and forth in the mail. In a business sense, a credit is a lot like a customer payment that you can apply to invoices. In QuickBooks, you apply credits differently than actual customer payments, although you do both in the Receive Payments window.
Tip
For small credits, it’s easier to wait until the customer sends a payment to apply the credit. QuickBooks keeps track of customer credit memos, so you don’t have to remember that the credit is available. When the customer sends a payment and you choose that customer in the Receive Payments window, QuickBooks reminds you about the available credits. Then, you can apply the payment and the credit in the same transaction.
If a customer credit is sizable and the customer has unpaid invoices, you can apply the credit to those invoices whether the customer has sent an actual payment or not.
When you’re ready to apply a credit to an invoice (Handling Refunds and Credits tells you how to create a credit in the first place), here’s what you do:
On the Home page, click Receive Payments (or choose Customers → Receive Payments).
QuickBooks opens the Receive Payments window.
In the Received From drop-down list, choose the customer or job you want.
When you choose a customer or job with an available credit, the Receive Payments window shows the amount of the credit, as shown in Figure 13-5. If you choose a customer, the Available Credits value represents all the credits available for all jobs for that customer.
If your customer gave you instructions about which invoice should get the credit, click anywhere in the line for that invoice or statement except the checkmark column.
When you click a cell in the checkmark column, QuickBooks selects that invoice to receive a real payment.
To apply the credit to the invoice or statement you selected, click Discount & Credits.
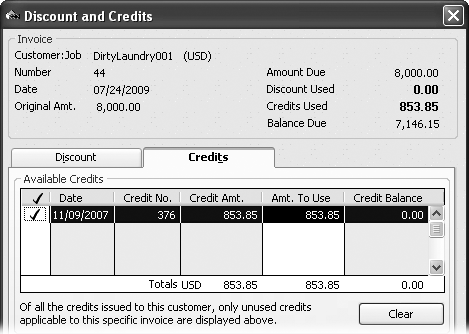
QuickBooks opens the “Discount and Credits” dialog box, shown in Figure 13-6.
To apply a credit, click its checkmark cell to turn it on.
If the customer asked you not to apply a credit, turn off a credit’s checkmark cell.
Click Done.
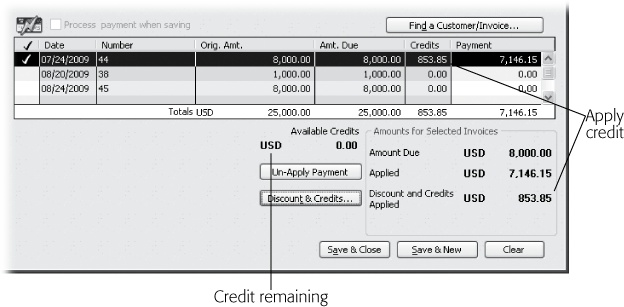
When QuickBooks closes the “Discount and Credits” dialog box and returns to the Receive Payments window, you’ll see the applied credit in two places, as shown in Figure 13-7.
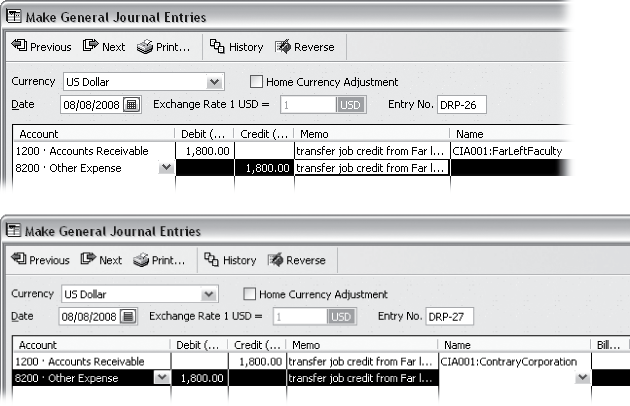
Figure 13-6. If the credit doesn’t appear in the “Discount and Credits” dialog box, it probably relates to a different job or to the customer only. If you want to apply a credit to a different job or to the customer account, see the box on Setting Up QuickBooks for Prepayments.Click Save & Close to apply the credit to the invoice.
If the customer’s available credit is greater than the total for an invoice, you can still apply the credit to that invoice. QuickBooks reduces the invoice’s balance to zero but keeps the remainder of the credit available to apply to another invoice. Simply repeat steps 1 through 6 to apply the leftover credit to another invoice.
Discounting for Early Payment
You don’t know if customers are eligible for an early payment discount until they actually pay early, so it makes sense that you apply early payment discounts in the Receive Payments window. The procedure for applying an early payment discount is almost identical to applying a credit. In fact, if an invoice qualifies for both a credit and an early payment discount, you can apply them both while the “Discount and Credits” dialog box is open.
Note
If the discount is for something other than early payment, such as a product that’s on sale, you add a Discount item to the invoice instead (Applying Subtotals, Discounts, and Percentage Charges).
Here’s how to take an early payment discount from a customer:
On the Home page, click Receive Payments. In the Receive Payments window’s Received From drop-down list, choose the customer or job for the payment you received.
In the table of open invoices, QuickBooks shows all the invoices or statements that aren’t paid.
Click the line (except the checkmark column) for the invoice or statement that the customer paid early.
QuickBooks applies the payment to the invoice. If the customer already deducted the early payment discount, the Receive Payments window shows an underpayment (Applying Credits to Invoices).
To add an early payment discount to the invoice or statement you selected, click Discount & Credits.
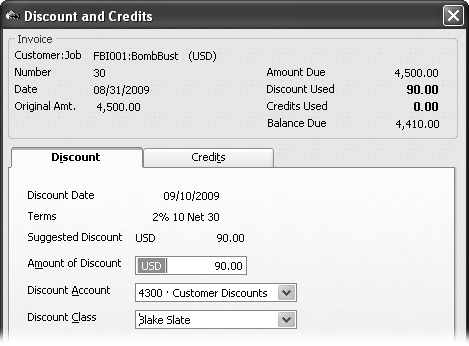
QuickBooks opens the “Discount and Credits” dialog box. If the Credits tab is visible, click the Discount tab to display the Discount fields shown in Figure 13-8. If the date for the payment is earlier than the date shown as the Discount Date, QuickBooks uses the early payment percentage from the customer’s payment terms to calculate the Suggested Discount. For example, if the customer gets a two percent discount for paying early, the suggested discount is two percent of the invoice total.
Figure 13-8. In the “Amount of Discount” box, QuickBooks automatically fills in the suggested discount. You can type a different discount—if the customer paid only part of the invoice early, for instance. The Invoice section at the top of the dialog box shows the amount due on the invoice and the balance due after applying the early payment discount you chose. If the customer has already paid the invoice in full, the early payment discount becomes a credit for the next invoice.Note
Customers often deduct their early payment discounts despite sending their payments after the early payment cutoff date. The typical reaction for most business owners is a resigned sigh. Although QuickBooks shows the suggested discount as zero when a customer doesn’t actually pay early, you can show your customer goodwill and accept their payment. In the “Amount of Discount” box, simply type the discount that the customer took.
In the Discount Account box, choose the income account you’ve set up to track customer discounts.
At first, you might consider posting customer discounts to one of your income accounts for products or services you sell. But customer discounts tend to fall off your radar when they’re buried in your regular income. Keep track of the discounts you give by creating an income account specifically for discounts, called something imaginative like Customer Discounts.
If you spot an expense account called Discounts, don’t use that as your customer discount account either. An expense account for discounts is meant to track the discounts you receive from your vendors.
If you use classes, in the Discount Class box, choose the class you want.
This class is typically the same one you used for the invoice in the first place.
Click Done.
When QuickBooks closes the “Discount and Credits” dialog box and returns to the Receive Payments window, you’ll see the discount in two or three places, as shown in Figure 13-9.
The early payment discount appears both in the invoice table Discount column and in the value shown for “Discount and Credits Applied”. If the customer paid the invoice in full, the early payment discount also becomes an overpayment.
Click Save & Close when you’re done.
You’ve just processed the payment with the discount applied.

Deposits, Down Payments, and Retainers
Deposits, down payments, and retainers are all prepayments: money that a customer gives you that you haven’t actually earned. For example, a customer might give you a down payment to reserve a spot in your busy schedule. Until you perform services or deliver products to earn that money, the down payment is more like a loan from the customer than income.
Receiving money for something you didn’t do feels good, but don’t make the mistake of considering that money yours. Prepayments belong to your customers until you earn them, and they require a bit more care than payments you receive for completed work and delivered products. This section explains how to manage all the intricacies of customer prepayments.
Setting Up QuickBooks for Prepayments
If you accept prepayments of any kind, you’ll need an account in your chart of accounts to keep that money separate from your income. You’ll also need an item that you can add to your invoices to deduct prepayments from what your customers owe:
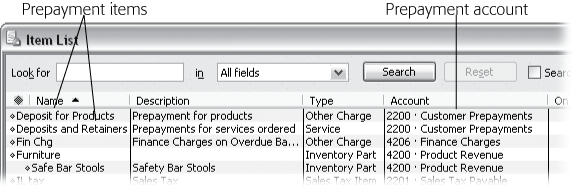
Prepayment account. If your customer gives you money and you never do anything to earn it, your customer is almost certain to ask for the money back. Because unearned money from a customer is like a loan, create an Other Current Liability account in your chart of accounts (see Creating an Account) to hold prepayments. Call it something like Customer Prepayments.
Prepayment item. If you accept prepayments for services, create prepayment items in your Item List. as shown in Figure 13-11.
Recording Prepayments
When a customer hands you a check for a deposit or down payment, the first thing you should do is wait until you’re out of earshot to yell “Yippee!” The second thing is to record the prepayment in QuickBooks. You haven’t done any work yet, so there’s no invoice to apply the payment to. A sales receipt not only records a prepayment in QuickBooks, but when printed, also acts as a receipt for your customer. Here’s how to create one:
On the Home page, click Create Sales Receipts (or choose Customers → Create Sales Receipts).
QuickBooks opens the Enter Sales Receipts window to a blank sales receipt. In the Customer:Job box, choose the customer or job for which you received a deposit or down payment.
Fill in the other header boxes as you would for a regular sales receipt or an invoice (The other header fields).
If you use classes, in the Class box, choose a class to track the prepayment. If you have a customized template just for prepayments (Editing an Existing Form in QuickBooks), in the Template drop-down list, choose that template. In the Date box, choose the date that you receive the prepayment. In the Payment Method box, pick the method the customer used to pay you. If the customer paid by check, in the Check No. box, type the check number for reference.
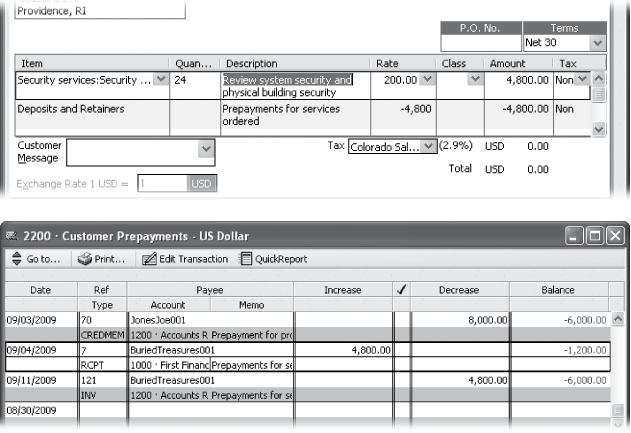
Here’s the key to recording a prepayment to the correct account: In the Item table, click the first Item cell, and in the Item drop-down list, choose the prepayment item you want to use (for example, a Service item called something like Customer Prepayments or Deposits, as described on Recording Prepayments).
Depending on whether the deposit covers services or products, choose the Service item or Other Charge item you created for prepayments (Recording Prepayments). Because your prepayment items are tied to an Other Current Liability account, QuickBooks doesn’t post the payment as income, but rather as money owed to your customer.
In the Amount cell, type the amount of the deposit or down payment.
You don’t need to bother with entering values in the Qty or Rate cells. The sales receipt simply records the total that the customer gave you. You add the detail for services and products when you create invoices later.
Complete the sales receipt as you would for any other payment.
For example, add a message to the customer. If you want to provide the customer with a receipt, turn on either the “To be printed” or “To be e-mailed” checkbox. In the Deposit To box at the bottom-left of the Enter Sales Receipt window, choose Undeposited Funds if you plan to hold the payment to deposit with others. If you’re going to race to the bank as soon as your computer shuts down, choose your bank account.
Click Save & Close.
QuickBooks posts the payment to your prepayment account and closes the Enter Sales Receipts window.
Applying a Deposit, Down Payment, or Retainer to an Invoice
When you finally start to deliver stuff to customers who’ve paid up front, you invoice them as usual. But the invoice you create has one additional line item that deducts the customer’s prepayment from the invoice balance.
Create the invoice as you normally would with items for the services, products, charges, and discounts (Chapter 10). After you’ve added all those items, add the item to deduct the prepayment, as shown in Figure 13-12.
Refunding Prepayments
Deposits and down payments don’t guarantee that your customers follow through with their projects or orders. For example, a customer might make a deposit on décor for his bachelor pad. But when he meets his future wife at the monster truck rally, the plan for the bachelor pad is crushed as flat as the cars under the wheels of a truck. Of course, your customer wants his money back, which means you share some of his disappointment.
Your first step is to determine how much money your customer gets back. For example, if your customer cancels an order before you’ve purchased the products, you might refund the entire deposit. However, if the leopard-print wallpaper has already arrived, you might keep part of the deposit as a restocking fee.
After you decide how much of the deposit you’re going to keep, you have to do two things. First, you need to move the portion of the deposit that you’re keeping from the prepayment account to an income account. Second, you have to refund the rest of the deposit. Here’s how to do both of these tasks:
To turn the deposit you’re keeping into income, create an invoice for the customer or job. Open the Create Invoices window (Ctrl+I), and in the Customer:Job box, choose the customer. Then, in the first Item cell, choose an item related to the cancelled job or order.
For example, if you’re keeping a deposit for products you ordered, choose the “Non-inventory Part” item for those products. If the deposit was for services worked, choose the appropriate Service item.
In the Amount cell, type the amount of the deposit that you’re keeping.
Because items are connected to income accounts (see Chapter 5), this first line in the invoice gets the deposit that you’re keeping to the correct income account for the products or services you sold.
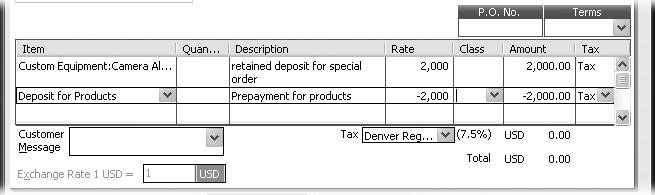
In the second line, add the prepayment item using a negative amount, as shown in Figure 13-13.
This item removes the prepayment from your liability account so you no longer owe the customer that money.
Figure 13-13. In the Amount cell, type the amount of the deposit you’re keeping as a positive number. Then, in the Amount cell for the prepayment, type a negative number, which makes the invoice balance zero. The prepayment item also deducts the deposit from the prepayment liability account, so you no longer “owe” your customer that money.Click Save & Close.
In saving the invoice, QuickBooks removes the deposit you’re keeping from the prepayment liability account and posts that money to one of your income accounts. But if you aren’t keeping the entire deposit, you have to refund the rest to the customer.
To refund the rest of the deposit, create a credit memo for the remainder (Handling Refunds and Credits).
In the Create Credit Memos/Refunds window, in the Item cell, choose the same prepayment item you used in the invoice (a Service item for a deposit for services, an Other Charge item for deposits on products). In the Amount cell, type the amount that you’re refunding.
In the Create Credit Memos/Refunds window, click Save & Close.
QuickBooks removes the remaining deposit amount from your prepayment liability account. Because the credit memo has a credit balance, QuickBooks opens the Available Credit dialog box.
In the Available Credit dialog box, choose the “Give a refund” option, and then click OK.
QuickBooks opens the “Issue a Refund” dialog box and fills in the customer or job, the account from which the refund is issued, and the refund amount. If you want to refund the deposit from a different account, choose a different refund payment method or account.
Click OK to create the refund to your customer.
As soon as you mail the refund check, you’re done.
Applying Finance Charges
If you’ve tried everything but some customers won’t pay, you can resort to finance charges. Finance charges usually don’t cover the cost of keeping after the slackers, but QuickBooks at least minimizes the time you spend on this vexing task.
Customers tend to get cranky if you spring finance charges on them without warning. Up front, spend some time determining your payment policies: what interest rate you’ll charge, what constitutes “late,” and so on. Include these terms in the contracts your customers sign and on the sales forms you send. Then, after you configure QuickBooks with your finance charge settings, a few clicks is all you’ll need to add those penalties to customer accounts.
Finance Charge Preferences
Before you apply finance charges, you need to tell QuickBooks how steep your finance charges are, when they kick in, and a few other details. The Preferences dialog box (choose Edit → Preferences) Finance Charge section is where all these settings reside. Because your finance charge policies should apply to all your customers, these preferences appear on the Company Preferences tab, which means only a QuickBooks administrator can change them. To learn how to set finance charge preferences, see Finance Charge.
Assessing Finance Charges on Overdue Balances
Make sure you apply payments and credits to invoices before you assess finance charges. Otherwise, you’ll spend most of your time reversing finance charges and working to get back into your customers’ good graces.
QuickBooks creates finance-charge invoices for the customers tardy enough to warrant late fees, but you don’t have to print or send these invoices. Instead, assess finance charges just before you print customer statements (Previewing Statements) to have QuickBooks include the finance-charge invoices on statements, along with any outstanding invoices and unpaid charges for the customer.
Here’s how you assess finance charges for slow-paying customers:
On the Home page, click Finance Charges (or choose Customers → Assess Finance Charges).
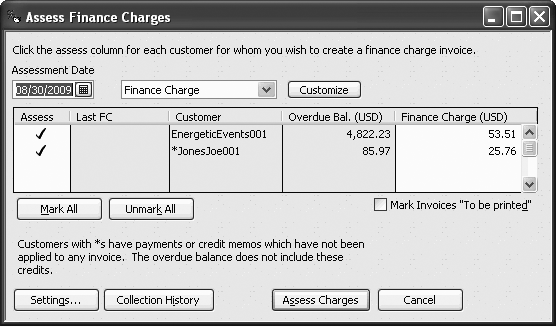
The Assess Finance Charges window, shown in Figure 13-14, opens.
Figure 13-14. In the Assess Finance Charges window, QuickBooks precedes a customer’s name with an asterisk if the customer has payments or credits that you haven’t yet applied. If you see any asterisks, click Cancel. After you’ve processed those payments (Receiving Payments for Invoiced Income) and credits (Applying Credits to Invoices), you’re ready to start back at step 1. QuickBooks automatically chooses the current date as the date on which you want to assess finance charges, and selects all the customers with overdue balances.If you begin the process of preparing statements a few days before the end of the month, in the Assessment Date box, change the date to the last day of the month.
The last day of the month is a popular cutoff day for customer statements. When you change the date in the Assessment Date box and move to another field, QuickBooks recalculates the finance charges to reflect the charges through the new assessment date.
Although QuickBooks automatically selects all customers with overdue balances, you can let some of your customers slide without penalty. In the Assess column, click the Assess cell for a customer to turn off the checkmark and skip her finance charges.
QuickBooks always displays every customer with an overdue balance, and there’s no way to flag a customer as always exempt from finance charges. If you reserve finance charges for your most intractable customers, click Unmark All to turn off all the finance charges. Then, in the Assess column, click only the cells for the customers you want to penalize.
To view the invoices, payments, and credits for a customer, click the row for the customer and then click Collection History. QuickBooks displays a Collections Report with every transaction for that customer.
If you want to change the finance charge amount, in the Finance Charge column, click the cell for the customer and type the new finance charge.
The only time you might want to do this is when you’ve created a credit memo (Handling Refunds and Credits) for a customer, but you don’t want to apply it to an invoice. As long as the credit memo is out there, it’s simpler to forego the finance charges until you’ve applied the credit.
If you want to print and send the finance-charge invoices, turn on the “Mark Invoices ‘To be printed’” checkbox. Then, to finalize the finance-charge invoices for the selected customers, click Assess Charges.
QuickBooks adds the finance-charge invoices to the queue of invoices to be printed. When you print all the queued invoices (Printing One Form), the program prints the finance-charge invoices as well.
If you plan to send customer statements, turn off the “Mark Invoices ‘To be printed’” checkbox. Sending customers a statement to remind them of overdue balances is one thing, but sending a statement and a finance-charge invoice borders on nagging.
Cash Sales
Receiving payment at the same time that you deliver the service or products is known as a cash sale, even though your customer might pay you with cash, check, or credit card. For example, if you run a thriving massage therapy business, your customers probably pay for their stress relief before they leave your office—and no matter how they pay, QuickBooks considers the transaction a cash sale.
If your customers want records of their payments, you give them sales receipts. In QuickBooks, a Sales Receipt can do double-duty; it records your cash sale in the program and you can print it as a paper receipt for your customer. Although cash sales are a simultaneous exchange of money and goods (or services), you don’t actually have to create a QuickBooks sales receipt at the time of the sale.
Here are the two most common ways of handling cash sales:
Recording individual sales. If you want to keep track of which customers purchase which products, create a separate sales receipt for each cash sale. Individual sales receipts track both customers’ purchases and the state of inventory.
Note
If you keep QuickBooks open on the computer in your store, you can print individual sales receipts for your customers. But keeping QuickBooks running on the store computer could be risky if the wrong people started snooping around in your records. And, unless you’re completely proficient with sales receipts in the program, you might find paper sales receipts faster when your store is swamped. When there’s a lull in your store traffic, you can enter individual receipts into your QuickBooks company file.
Recording batch sales. If your shop gets lots of one-time customers, you don’t care about tracking who purchases your products. But you still need to know how much inventory you have and how much money you’ve made. In this situation, you don’t have to create a separate sales receipt for each sale. Instead, create a sales receipt for each business day, which shows how much money you brought in for the day and what you sold.
Creating Sales Receipts
Creating sales receipts in QuickBooks is identical to creating invoices (Creating an Invoice), except for a few small differences. The Enter Sales Receipt window includes a Check No. box to track the customer’s check number. For cash or credit cards, leave this box blank. In a cash sale, the customer pays immediately, so choose Cash from the Payment Method drop-down list. A cash sale also means you’ve got money to deposit; the account in the Deposit To box is where QuickBooks plops the money (Receiving Payments for Invoiced Income).
To create a sales receipt, on the Home page, click Create Sales Receipts (or choose Customers → Enter Sales Receipts). If you want to print the sales receipt for your customer after you’ve filled in all the fields, in the Enter Sales Receipts window’s toolbar, click Print to have QuickBooks open the Print One Sales Receipt dialog box. To learn more about your printing options, see Setting Print Options.
Warning
Keeping track of customers who make one-time cash sales can clog your Customer:Job List with unnecessary information. Keep your customer list lean by creating a customer called Cash Sales (Creating a New Customer).
Editing Sales Receipts
If you’re still creating a sales receipt, you can jump to any field and change its value. Or, you can insert or delete lines in the sales receipt line-item table as your customer tosses another book on the pile or puts one back on the shelf. Although you can edit sales receipts after you’ve saved them, you won’t do so very often. After all, the sale is complete, and your customer has left with her copy. However, you may want to edit the sales receipt after the sale to add more detailed descriptions to items, or to correct an error, for example. To do so, in the Enter Sales Receipts window, click Previous or Next until the receipt you want appears (or use the Find command described on Using the Find Command), and then make your changes.
Voiding and Deleting Sales Receipts
If you created a sales receipt by mistake and want to remove its values from your accounts, you might think about deleting the receipt. However, you should always void sales receipts that you don’t want rather than deleting them.
Voiding a sales receipt resets the dollar values for the transaction to zero so that your account balances show no sign of the transaction. However, it also marks the transaction as void, so you have a record of it.
If you delete a sales receipt, it’s gone for good. QuickBooks deletes the transaction, removing the dollar values and any sign of the transaction from your accounts. You’ll see a hole in your numbering sequence of sales receipts and an entry in the audit trail that says you deleted the transaction (Setting Access Rights).
To void a sales receipt, do the following:
On the Home page, click Create Sales Receipts (or choose Customer → Enter Sales Receipts).
The Enter Sales Receipts window opens.
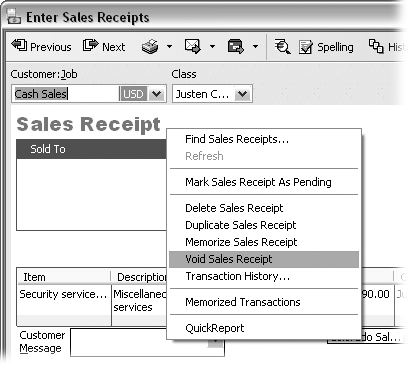
Click Previous or Next until you see the sales receipt. Choose Edit → Void Sales Receipt or right-click the sales receipt and then choose Void Sales Receipt on the shortcut menu, as shown in Figure 13-15.
All the values in the form change to zero and QuickBooks adds the word “VOID:” to the Memo field. As a reminder of the reason that you voided the transaction, type the reason after “VOID:” in the Memo field.
Click Save & Close.
Memorizing a Batch Sales Transaction
If you want to reduce your paperwork by recording one batch sales receipt for each business day’s sales, why not go one step further and memorize a batch sales receipt that you can reuse every day? Here’s how:
On the Home page, click Create Sales Receipts (or choose Customers → Enter Sales Receipts).
QuickBooks opens the Enter Sales Receipts window.
In the Customer:Job box, choose the generic customer you created for cash sales.
If you haven’t set up a cash sale customer, in the Customer:Job box, choose <Add New>. In the New Customer dialog box, fill in the Customer Name box with a name like Cash Sales. Then, click OK to save the customer and use it for the sales receipt.
If you typically sell the same types of items every day, in Item cells, choose the items you sell regularly.
Leave the Qty cells blank because those values are almost guaranteed to change every day.
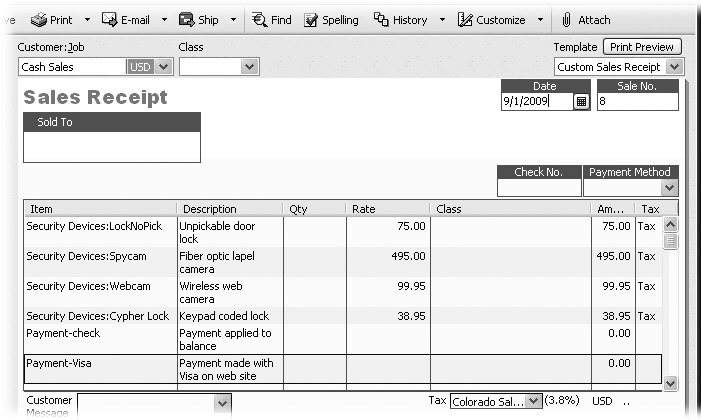
Because a sales receipt is meant to handle cash, the total at the bottom of the form represents the bank deposit you make at the end of the day. If you want to split your daily sales among different types of payments (like Visa, MasterCard, and so on), add a payment item for each type of credit card and other payment type you accept, as shown in Figure 13-16.
Here’s how: In the Item table, choose a payment type item, like Payment-Visa. (When you create a payment item [Payment], choose the “Group with other undeposited funds” option so you can control when you deposit the money.) In the Amount cell, type the amount of money that goes to Visa as a negative number. For example, if customers charged $100 on their Visas, type –100.
Tip
By splitting a sales receipt among different types of payments that group to Undeposited Funds, you can make a single deposit (Recording Deposits) to each merchant card account at the end of the day. To do so, choose Banking → Make Deposits. In the “Payments to Deposit” dialog box, choose the payment type in the “View payment method type” drop-down list. Select the deposits for that card, and then click OK to deposit them as they actually go to the bank or merchant card company. Repeat the Make Deposit command for each type of payment you accept. (This technique works as long as your merchant card company deducts their fees as a single amount, instead of a fee on every charge transaction.)
When the sales receipt is set up the way you want, press Ctrl+M to open the Memorize Transaction dialog box.
In the Name box, type a name for the reusable sales receipt, such as Day’s Cash Sales.
Figure 13-16. Add a payment item line for every payment type you accept (American Express, Discover, debit cards, checks, and so on). Type a negative number for the amount charged to each type of payment. If the Total value doesn’t match the amount of your cash deposit, add an item for excess or short cash to make your bank deposit balance. (The next section explains items for excess and short cash.)If you want to use this memorized sales receipt only on the days you have cash sales, choose the Don’t Remind Me option.
If you receive cash sales every day, choose the Remind Me option and then, in the How Often box, choose Daily.
To memorize the sales receipt, click OK.
QuickBooks closes the Memorize Transaction dialog box and adds the batch sales receipt to the Memorized Transaction List.
In the Enter Sales Receipts window, click Clear to delete the information you used to set up the memorized sales receipt.
To create a new sales receipt for a day, press Ctrl+T to open the Memorized Transaction List window. In the Memorized Transaction List, click the memorized transaction for your batch sales receipt and then click Enter Transaction. QuickBooks open the Enter Sales Receipts window with a sales receipt based on the one you memorized. You can edit the items in the receipt, their quantities, and the prices to reflect your day’s sales. When the sales receipt is complete, click Save & Close.
Reconciling Excess and Short Cash
When you take in paper money and make change, you’re bound to make small mistakes. Unless you’re lucky enough to have one of those automatic change machines, the cash in the cash register at the end of the day often disagrees with the sales you recorded. Over time, the amounts you’re short or over tend to balance out, but that’s no help when you have to record sales in QuickBooks that don’t match your bank deposits.
The solution to this reality of cash sales is one final sales receipt at the end of the day that reconciles your cash register total with your bank deposit slip. But before you can create this reconciliation sales receipt, you need an account and a couple of items:
Over/Under account. To keep track of your running total for excess and short cash, create an Income account, such as Over/Under. If you use account numbers, give the account a number so that it appears near the end of your Income accounts. For example, if Uncategorized Income is account number 4999, make the Over/Under account 4998.
Over item. Create an Other Charge item to track the excess cash you collect, and assign it to the Over/Under account. Make sure that you set up this item as nontaxable.
Under item. Create a second Other Charge item to track the amounts that you’re short and assign it to the Over/Under account. This item should also be nontaxable.
At the end of each day, compare the income you recorded (run a Profit & Loss report and set the Date box to Today) to the amount of money in your cash register. Create a sales receipt to make up the difference. Here’s how:
If you have less cash than you should, create a Sales Receipt and, in the first line, add the Under item. In the Amount cell, type the amount that you’re short as a negative number. When you save the sales receipt, QuickBooks adjusts your income record to match the money in the cash register.
If you have too much cash, create a Sales Receipt and, in the first line, add the Over item. In the Amount cell, type the excess amount as a positive number. This sales receipt increases your recorded income to match the money you have on hand.
Making Deposits
Whether customers mail you checks or hand over wads of cash, taking those deposits to the bank isn’t enough—you also have to record those deposits in QuickBooks. If you initially store payments in the Undeposited Funds account, you have to work your way through two dialog boxes to record deposits; otherwise, you have just one step. Both processes are described in this section.
Note
In the Receive Payments window, when you choose a bank account as the Deposit To account (Receiving Payments for Invoiced Income), there’s nothing more to do after you save the payment—QuickBooks records the payment as a deposit to the bank account.
Choosing Payments to Deposit
When you store payments in the Undeposited Funds account, you end up with a collection of payments ready for deposit to go along with the paper checks you have to take to the bank. When you have payments queued up for deposit and choose Banking → Make Deposits (or on the Home page, in the Banking section, click Record Deposits), QuickBooks opens the "Payments to Deposit” dialog box. You can choose the payments you want to deposit in several ways, as shown in Figure 13-17.
Note
If you have other checks that you want to deposit, such as an insurance claim check or a vendor’s refund, you’ll have a chance to add those to your deposit in the Make Deposit dialog box.
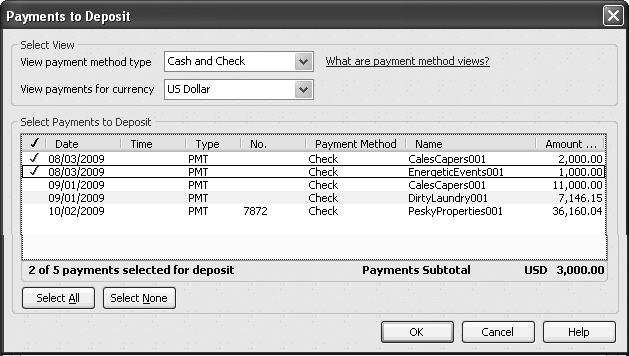
To choose specific payments to deposit, in the checkmark column, click each payment you want to deposit. To select every payment listed, click Select All. When you’ve selected the payments you want, click OK. QuickBooks closes the “Payments to Deposit” dialog box and opens the Make Deposits window, described next.
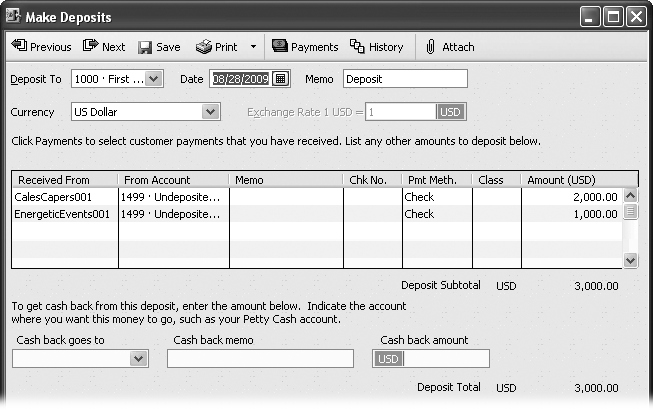
Recording Deposits
The Make Deposits window is like an electronic deposit slip, as you can see in Figure 13-18. The payments you choose to deposit are already filled in. If you have other checks to deposit besides customer payments, they won’t show up automatically in the Make Deposits window, but you can add them to the table.
Note
If you’re depositing a payment made in a foreign currency, in the “Exchange Rate 1 <currency> =” box, type the exchange rate that your bank used for the transaction (to find it, look at your bank statement or review the transaction on your bank’s website). The table of deposits shows the deposit amount in the foreign currency. At the bottom of the window, you can see the deposit total in the foreign currency and your home currency.
After you make your foreign currency deposits, you can see how much you gained or lost due to changes in the exchange rate. Choose Reports → Company & Financials → Realized Gains & Losses. This report shows the payment amounts in your home currency, the exchange rate, and the resulting gain or loss.
Here’s how you add these additional deposits:
Click the first blank Received From cell and choose the vendor or name of the source of your deposit. Then, in the From Account, choose the account to which you’re posting the money.
For example, if you’re depositing a refund check for some supplies, choose the expense account for office supplies.
Figure 13-18. In the Make Deposits window, you can specify the account into which you’re depositing funds, the date, and each payment in the deposit. If you’re in the habit of withdrawing some petty cash from your deposits, you can record that as well. To prevent yourself from bouncing checks, in the Date box, be sure to choose the date that you actually make the deposit.Fill in the rest of the cells (optional).
For customer payments, you can probably skip the Memo cell, but for refunds or checks from other sources, memos can help you remember why people sent you money. In case a question arises, typing the number of the check gives your customer or vendor a reference point.
Tip
If you want to withdraw some money for petty cash from your deposit, in the “Cash back goes to” box, choose your petty cash account. In the “Cash back amount” box, type the amount of cash you’re deducting from the deposit.
If your company is a corporation, you can’t just withdraw money for your personal use. By accounting for the cash in a petty cash account, you can record your cash expenditures in QuickBooks. If you own a sole proprietorship, you can withdraw cash for yourself. In that case, in the “Cash back goes to” box, choose your owner’s draw account.
When you’ve filled in all the fields, click Save & Close.
Depositing Money from Merchant Card Accounts
When you accept payment via credit card, the merchant bank you work with collects your customers’ credit card payments and deposits them in your bank account as a lump sum. Regardless of how credit card payments you receive appear on the merchant bank’s statement, you record your deposits in QuickBooks the way they appear on your bank statement. For example, your merchant bank might show payments and merchant bank fees separately, whereas the amount deposited in your checking account is the net after the fees are deducted.
Here’s how you deposit merchant credit card payments and fees into your bank account:
On the Home page, click Record Deposits (or choose Banking → Make Deposits).
In the “Payments to Deposit” window, in the “View payment method type” drop-down list, choose the merchant card whose payments you want to deposit.
Select the credit card payments you want to deposit, and then click OK.
QuickBooks opens the Make Deposits window, which lists the credit card payments in the deposit table.
If the Deposit Subtotal doesn’t match the deposit that appears on your bank statement, the merchant bank probably deducted its fees. You’ll record those fees in the next step. To make merchant card deposits easier to track, ask your merchant card company to charge one lump sum for fees instead of charging for each transaction; they almost always say yes.
In the first blank row in the Account cell, choose the account to which you post merchant card fees (such as Bank Service Charges). Then, in the Amount cell, type the merchant card fees as a negative number.
In the Make Deposits window, the Deposit Subtotal should equal the deposit that appears on your bank statement.
Click Save & Close when you’re done.
Note
How soon you can enter your merchant card deposits in QuickBooks depends on how wired your company is. For example, the QuickBooks online banking service (Importing a Delimited File) downloads your merchant card deposits into your company file automatically. If you have online account access to your merchant card account, make the deposit in QuickBooks when you go online and see it in your transaction listing. But if you don’t use any online services, enter the deposit in QuickBooks when the merchant card statement arrives in the mail.