Chapter 18. Performing End-of-Year Tasks
As if your typical workday isn’t hectic enough, the end of the year brings an assortment of additional bookkeeping and accounting tasks. As long as you’ve kept on top of your bookkeeping during the year, you can delegate most of the year-end tasks to QuickBooks with a few mouse clicks. (If you shrugged off your data entry during the year, even the mighty QuickBooks can’t help.) This chapter describes the tasks you have to perform at the end of each fiscal year (or other fiscal period, for that matter) and how to delegate them to QuickBooks.
Checking for Problems
If you work with an accountant, you may never run a report from the Accountant & Taxes submenu unless your accountant asks you to. But if you prepare your own tax returns, running the following reports at the end of each year will help sniff out any problems:
Run the Audit Trail report frequently, especially if several people work on your company file, to watch for suspicious transactions—deleted invoices or modifications to transactions after they’ve been reconciled. People make mistakes, and the Audit Trail is also good for spotting inadvertent changes to transactions. QuickBooks initially includes transactions entered or modified today, but you can choose a different date range to review changes since your last review (in the Audit Trail report window, choose a date range in the Date Entered/Last Modified drop-down list, or type dates in the From and To boxes).
The Voided/Deleted Transactions report focuses on transactions that—not surprisingly—have been voided or deleted.
Viewing the Trial Balance
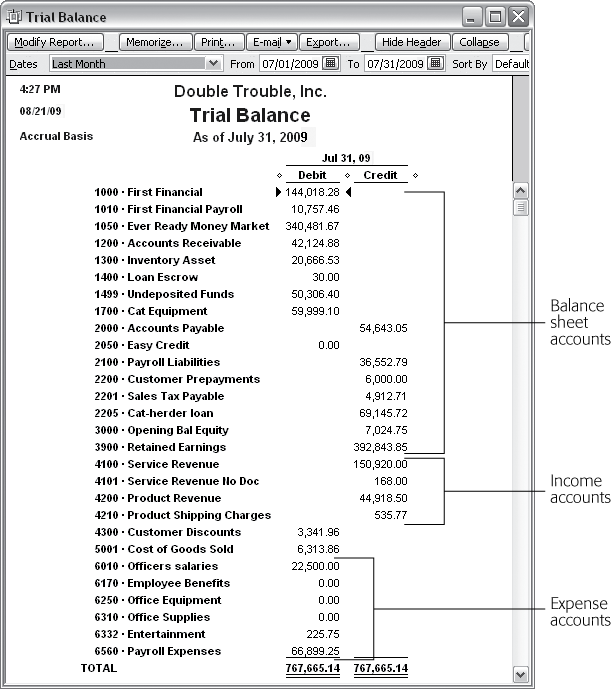
The Trial Balance report is a holdover from the quaint days of paper-based accounting. The name refers to the report’s original purpose: totaling the balances of every account in debit and credit columns to see whether pluses and minuses balanced. If they didn’t, the bookkeeper had to track down the mistakes and try again.
QuickBooks doesn’t make arithmetic mistakes, so you don’t need a trial balance to make sure that debits and credits match. Nonetheless, the Trial Balance report is still handy. Accountants like to examine it for errant account assignments before diving into tax preparation or giving financial advice—and for good reason. The Trial Balance report is the only place in QuickBooks where you can see all your accounts and their balances in the same place, as shown in Figure 18-1.
To display the Trial Balance report, choose Reports → Accountant & Taxes → Trial Balance. QuickBooks then generates a Trial Balance report for the previous month. If you want to see the trial balance for your entire fiscal year, choose This Fiscal Year in the Dates box. The accounts appear in the same order that you see in the Chart of Accounts window (Creating an Account).
Generating Year-End Financial Reports
At the end of every year, tax preparation stimulates a frenzy of financial reporting as companies submit fiscal year Profit & Loss reports (Understanding the Profit & Loss Report) and balance sheets (The Balance Sheet) as part of their tax returns. But tax forms aren’t the only reason for year-end reports. Before you hand over your company file to your accountant or prepare final reports for your tax return, run year-end reports for these reasons, too:
If you work with more than one currency, adjust account balances to reflect the current value based on currency exchange rates. See Other Helpful Financial Reports to learn how to do this.
Inspect year-end reports for funny numbers. They might mean that you posted a transaction to the wrong account or created a journal entry incorrectly.
Analyze your annual results to spot problems with your operations or look for ways to improve.
After you complete your initial review of the year-end reports and make any corrections to transactions, you’ll generate another set of year-end reports after you’ve inspected your results and corrected any mistakes. Then, your accountant (if you work with one) is next in line to see your company file (Sharing the Company File with Your Accountant).
Chapter 17 has the full scoop on generating financial statements. Here’s a quick review of how to generate year-end reports:
Profit & Loss.You’ll need a Profit & Loss report for the entire fiscal year for your tax return. While individuals receive W-2s to show how much money they made in a year, for companies, the Profit & Loss report shows the year’s net income. Whether you’re inspecting your report for accuracy or producing a report for taxes, generate a Profit & Loss report by choosing Reports → Company & Financial → Profit & Loss Standard. If the date on which you generate the report is within the fiscal year, choose This Fiscal Year in the Dates box.
Tip
If you want to make a year-end Profit & Loss report as easy to access as the Profit & Loss Standard report, memorize your year-end report as described on Understanding the Balance Sheet.
Even the most meticulous bookkeeper isn’t likely to notice a few dollars missing from an account. But checking a report for glaring mistakes is worth the few minutes it takes. If you pay your taxes based on erroneous numbers and end up being audited, the ensuing tax penalties and interest are sure to cost more than the time you saved.
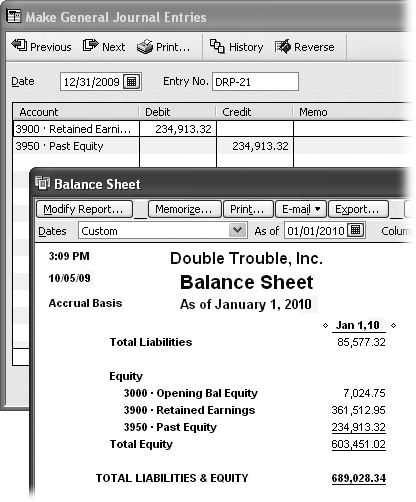
Balance Sheet. A Balance Sheet report for the entire fiscal year also accompanies your tax return. Choose Reports → Company & Financial → Balance Sheet Standard. If the date on which you create the report is within the fiscal year for the report, choose This Fiscal Year in the Dates box. If you generate the Balance Sheet after the end of the fiscal year, choose Last Fiscal Year. See the box on Generating Tax Reports to learn how the Retained Earnings account value changes from one fiscal year to the next.
Statement of Cash Flow. Although a “Statement of Cash Flows” report (see The Statement of Cash Flows) isn’t required for your corporate tax return, looking at cash flow can highlight financial problems before they snowball.
Generating Tax Reports
Whether your accountant has the honor of preparing your taxes or you keep that excitement for yourself, you can save accountant’s fees and your own sanity by making sure your company file is ready for tax season. The key to a smooth transition from QuickBooks to tax preparation is linking each account in your chart of accounts to the correct tax line and tax form.
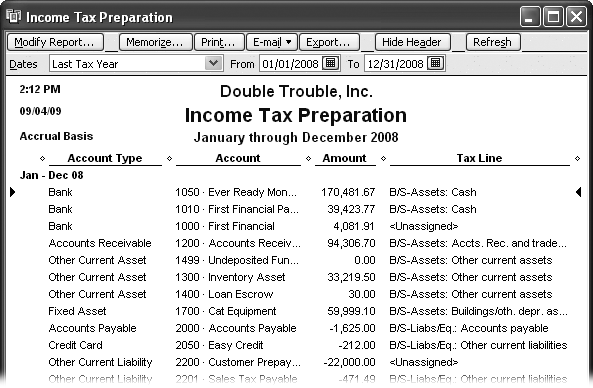
Whether you prepare your own taxes or let your accountant do the honors, a review of the Income Tax Preparation report (choose Reports → Accountant & Taxes → Income Tax Preparation) can save you money on accountant’s fees and IRS penalties (as well as keep more of your hair attached to your scalp). This report lists the accounts in your chart of accounts and shows the tax line to which you assigned it (Figure 18-4). If an account isn’t linked to the correct tax line—or worse, not assigned to any tax line, the Income Tax Summary report, which lists each line on your tax return with the amount you have to report, won’t give you the correct values. See Creating an Account to learn how to connect an account to a tax line.
When all the accounts in your chart of accounts are assigned to tax lines, you can generate a report with all the values you need for your company’s tax return. Choose Reports → Accountant & Taxes → Income Tax Summary. Because you usually run this report after the fiscal year ends and all the numbers are in, QuickBooks automatically fills in the Dates box with Last Tax Year.
Note
As one last reminder of unassigned accounts, the last two lines of the Income Tax Summary report are “Tax Line Unassigned (balance sheet)” and “Tax Line Unassigned (income/expense)”. To see the transactions that make up one of these unassigned values, double-click the number in the corresponding line.
Sharing the Company File with Your Accountant
If you work with an accountant who uses QuickBooks, there are times when a tug of war over your company file is inevitable. You want to perform your day-to-day bookkeeping, but your accountant wants to review your books, correct mistakes you’ve made, enter journal entries to prepare your books for end-of-quarter or end-of-year reports, and so on. QuickBooks has two ways for you and your accountant to share:
With a QuickBooks accountant’s review copy, you and your accountant can stop squabbling because you can each have your own copy of the company file. You work on everyday bookkeeping tasks while your accountant tackles cleaning up earlier periods.
The external accountant user is a super-powered user (in QuickBooks 2009 and later) who can look at anything in your company file—except sensitive customer information like credit card numbers. You set up an external accountant user in your company file for your accountant so he can log into your file, review every nook and cranny of your company’s data (with a new Client Data Review tool especially designed for accountants), make changes, and keep track of which changes are his and which are yours.
This section explains how to use both these approaches.
Creating an Accountant’s Review Copy
The secret to an accountant’s review copy is a cutoff date that QuickBooks calls the dividing date; transactions before the dividing date are fair game for your accountant who can work in the comfort of his own office. Transactions after that date are under your command in your original company file. When your accountant sends a file with changes back to you, the program makes short work of merging your accountant’s changes into the company file. The box below describes other ways you can collaborate with your accountant.
You can’t create an accountant’s copy in multi-user mode. To switch to single-user mode, first make sure that everyone else logs out of the company file, and then choose File → “Switch to Single-user Mode”. After that, creating an accountant’s review copy is a lot like creating other kinds of copies of your company file:
Choose File → Accountant’s Copy → Save File. Because the Save As Accountant’s Copy dialog box automatically selects the Accountant’s Copy option, click Next.
If your accountant has to have unrestricted access to the file, select the Portable or Backup File option instead and see Backing Up Files to learn how to create those types of files.
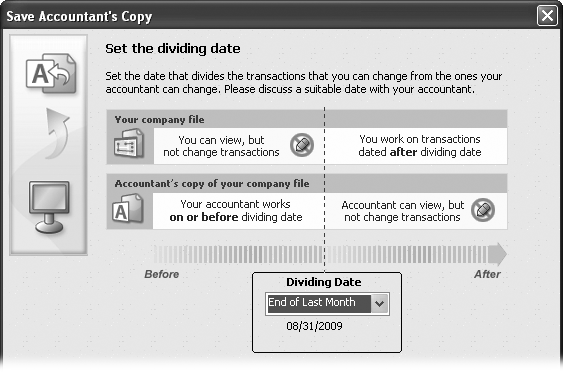
In the “Set the dividing date” screen shown in Figure 18-5, choose the date when control over transactions changes hands. Click Next. In the message box about closing windows, click OK.
Tell the “Set the dividing date” screen what date you want as the dividing line between your work and your accountant’s work. Most of the screen explains what each of you can do before and after the dividing date.
Figure 18-5. The date you use is often the end of a fiscal period. The Dividing Date drop-down list gives you only a brief list of choices, one of which, fortunately, is Custom. If you want to specify a date, choose Custom and then type or choose the date in the date box that pops onto the screen. The other choices include End of Last Month, 2 Weeks Ago, and 4 Weeks Ago.Tip
If you have a few dozen windows open and laid out just the way you want, there’s no need to wail or gnash your teeth as QuickBooks closes all your windows to create the accountant’s copy. Before you create the accountant’s copy, save the current window arrangement so the program can reopen all those windows for you (Preferences for Saving the Desktop). Simply choose Edit → Preferences and, in the Preferences icon bar, click Desktop View. On the My Preferences tab, choose the “Save current desktop” option.
Choose the folder or media where you want to save the copy.
In the Save Accountant’s Copy dialog box, you can choose any drive or folder as the destination for your accountant’s file. QuickBooks sets the “Save as type” box to QuickBooks Accountant’s Copy Transfer Files (*.qbx), and automatically names the accountant’s review copy using the company file name followed by “Acct Transfer” and the date you create the file. The extension .qbx stands for QuickBooks Accountant Transfer File. As usual, you’re free to edit the filename. Accountant’s review copies use the QuickBooks portable file format, so they’re usually small enough to email or save to a USB thumb drive. For example, a 10-megabyte company file may shrink to an accountant’s review copy that’s less than 1 MB.
To create the accountant’s review copy, click Save.
Once you create an accountant’s copy, QuickBooks reminds you that it exists. In the QuickBooks program window’s title bar, you’ll see the words Accountant’s Changes Pending immediately after the company name.
Send the file to your accountant.
Email the file to your accountant, or copy it to a CD or a USB thumb drive and send it.
Sending a Copy Directly to Your Accountant
Intuit is happy to act as a go-between for accountant’s review copies. In QuickBooks, you can tell the program to create an accountant’s review copy and send it to your accountant. Actually, the copy goes up on an Intuit server and your accountant gets an email that the file is waiting. As long as you don’t mind your company file sitting on an Intuit server somewhere, this method may be faster than creating and shipping the accountant’s copy yourself. Here’s what you do to start the ball rolling:
Choose File → Accountant’s Copy → “Send to Accountant”.
The Send Accountant’s Copy dialog box opens and tells you about Intuit’s Accountant’s Copy File Transfer service. Click Next.
In the “Set the dividing date” screen, choose the date that marks when you or your accountant is in charge. Click Next.
The Dividing Date drop-down list has the same options as if you were creating a copy without sending it.
In the “Information for sending the file (1 of 2)” screen, type your accountant’s email address twice.
Make sure the email address is correct—you don’t want to accidentally send your financial information to the wrong person.
Then, type your name and email address in the other boxes, so your accountant knows who the copy came from. Click Next.
In the “Information for sending the file (2 of 2)” screen, type a password to protect your file.
Type the password in the “Reenter password” box to prevent typos from sneaking in. The password has to be a strong password: at least seven characters, at least one number, and at least one uppercase letter. In the Note box, type any instructions for your accountant. Don’t include the password in the Note box; instead, tell your accountant what the password is over the phone or in a separate email.
Click Send.
QuickBooks closes all its windows and tells you that it’s creating and sending an accountant’s copy. You’ll see a confirmation dialog box in QuickBooks (click OK to close it) and a confirmation email in your inbox when the copy has settled successfully onto Intuit’s server.
Your accountant receives an email that the file is waiting with a link to the download page. (The link is good for 14 days; then Intuit deletes your file from the server.) All you have to do is wait for your accountant to send you a file with changes. Then, you import those changes as described in the next section.
Merging Accountant Changes into Your Company File
When your accountant sends back your company file, the file extension changes from .qbx to .qby—the file extension for an accountant’s review copy import file. (Y follows X in the alphabet. Get it?) If you’ve imported data (like customer records) into QuickBooks (Importing a Delimited File), the following steps should be familiar:
If your accountant sent you a CD or disk, insert it into the appropriate drive on your computer. If your accountant sent the file as an email attachment, make sure to jot down the folder on your computer where you saved the attachment.
If your company file isn’t open, open it. Back up your company file (Backing Up Files) before you import your accountant’s changes.
Choose File → Accountant’s Copy → Import Accountant’s Changes. In the Import Changes From Accountant’s Copy dialog box, navigate to the disk or folder that contains the accountant’s file and then double-click the file name.
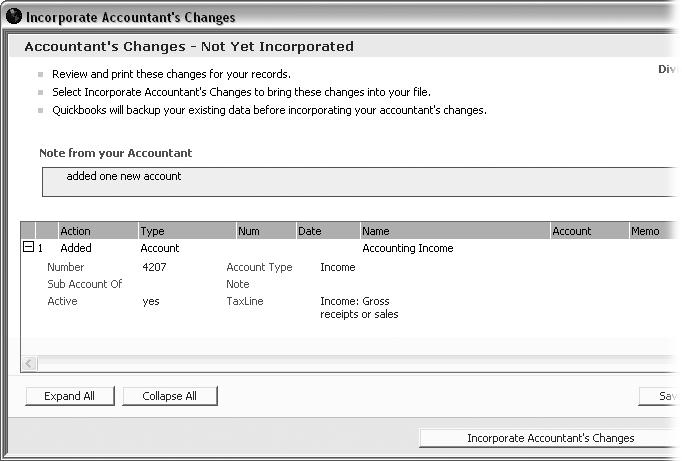
QuickBooks displays the changes your accountant made, as you can see in Figure 18-6. Click Expand All to see the entire list. Review the changes to see if any changes conflict with work that you’ve done while your accountant worked on the copy. Each change comes with an explanation of how to deal with these conflicts.
To make the changes in your company file, click Incorporate Accountant’s Changes. (If you decide not to import the changes, click Close instead.)
QuickBooks backs up your company file and then imports your accountant’s changes. After you review the changes, click Close.
Canceling an Accountant’s Review Copy
From time to time, you might want to get rid of the accountant’s review copy without importing any of the changes. For instance, you created an accountant’s review copy by mistake or your accountant had so few changes that she told you the changes to make. Unlocking your company file so you can get back to performing any type of task requires nothing more than choosing File → Accountant’s Copy → Remove Restrictions. The Remove Restrictions dialog box warns you that you won’t be able to import changes from the accountant’s review copy if you remove restrictions. To show that you know what you’re doing, turn on the “Yes, I want to remove the Accountant’s Copy restrictions” checkbox, and then click OK. The words Accountant’s Change Pending disappears from the QuickBooks window’s title bar.
Setting Up an External Accountant User
Starting with QuickBooks 2009, the external accountant user lets your accountant peruse your bookkeeping data and make changes while protecting your customers’ sensitive financial info. When your accountant logs in as an external accountant user, she can use the Client Data Review to look for problems and clean up any she finds. For example, your accountant can look at the changes you’ve made to lists like the chart of accounts and Items List, scan your company file for payments or credits you haven’t applied, or find sales taxes or payroll liabilities that you didn’t record correctly.
Note
An external accountant user lets an accountant use Client Data Review from within clients’ editions of QuickBooks. When someone logs in as an external accountant user, the Client Data Review command appears on the Company menu in any QuickBooks edition including Pro and Premier.
Here’s how you set up an external accountant user:
Log in to your company file as the administrator (Setting Up the Administrator).
Only an administrator can create an external accountant user (who can perform tasks that even someone with administrator privileges can’t, like run the Client Data Review tool).
Choose Company → “Set Up Users and Passwords” → Set Up Users.
The User List dialog box opens.
Click Add User.
The “Set up user password and access” dialog box opens.
In the User Name box, type the name for the external accountant user. In the Password and Confirm Password boxes, type the external accountant user’s password. Click Next.
The “Access for user” screen appears.
Select the External Accountant option, and then click Next.
Because the external accountant user is so powerful, QuickBooks asks if you want to give that level of access to the person. Click Yes.
Click Finish.
Note
You can also change an existing user to an external accountant user. Log in to your company file as an administrator, and choose Company → “Set Up Users and Passwords” → Set Up Users. In the User List window, select the person you want to change and click Edit User. Change the name and password if you want, and then click Next. On the “Access for user” screen, select the External Accountant option, click Next, and then click Finish.
1099s
In QuickBooks, paying independent contractors is no different than paying other vendors. You enter bills from your contractors and then you pay those bills. No messy payroll transactions; no fuss with benefits or other regulatory requirements. But at the end of the year, you have to generate 1099s for your independent workers.
If you set up QuickBooks to track 1099 payments (Time & Expenses) and your contractors as 1099 vendors (Importing Vendor Information), generating 1099s is a piece of cake. But before you push a stack of 1099 forms through your printer, it’s a good idea to make sure your records are up-to-date and accurate.
Note
If you use one of QuickBooks’ payroll services, you can print W-2s for your employees. Choose Employees → Payroll Tax Forms & W-2s → Process Payroll Forms. See Preparing Payroll Tax Forms.
Generating 1099 Reports
To review the amounts you’ve paid to 1099 vendors, choose Reports → Vendors & Payables, and then choose either of the following reports:
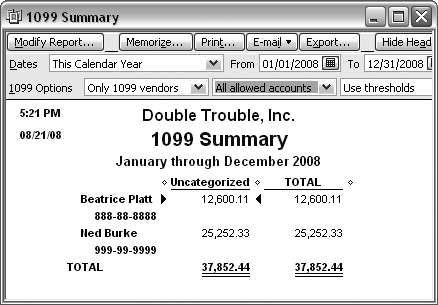
1099 Summary. This report includes each vendor you’ve set up as a 1099 vendor and the total amount you’ve paid the vendor. If any amount looks questionable, just double-click it to display the transactions for the vendor. Although the report lists only the vendors you set up as eligible for 1099 status, as shown in Figure 18-7, you can modify it to make sure you haven’t left any 1099 vendors out. In the first 1099 Options drop-down list, choose “All vendors”.
If the 1099 Summary report is empty, your 1099 account mappings may be missing. In the 1099 Summary report toolbar, in the middle drop-down list, choose “All allowed accounts” to see payments you made to 1099 vendors regardless of the account. If your vendors leap into view, you need to map your accounts to 1099 boxes, as described on Printing 1099-MISC Forms.
Figure 18-7. Regardless of the fiscal year you use for your company, payroll and 1099 tasks run on a calendar year, because your employees and subcontractors pay taxes for each calendar year. That’s why the Dates drop-down list for the 1099 Summary report includes calendar year date ranges.Note
The federal government gives you the tiniest of breaks by setting thresholds for total payments to 1099 vendors. If you pay vendors less than the threshold, you don’t have to generate 1099s for them. (For nonemployee compensation, the threshold is currently $600.)
In the 1099 Summary report window, QuickBooks sets the last box for 1099 options to “Use thresholds”. This choice filters the vendors in the report to those that exceed the government’s threshold. If you want to see all of your 1099 vendors, regardless of what you paid them, in the third box, choose “Ignore thresholds”.
1099 Detail. If you pay your independent contractors on a regular schedule, this report can pinpoint errors because it shows the transactions that produce the vendor’s 1099 amount. If you see a gap in the payment schedule or two transactions in the same month, double-click a transaction amount to open the corresponding window, such as Write Checks.
Printing 1099-MISC Forms
The steps to start printing 1099 forms are simple, but as with any printing task, fraught with nagging details:
Order printable 1099-MISC and 1096 forms.
1099-MISC and 1096 forms use special ink so that government agencies can scan the forms. Intuit sells kits with preprinted 1099 forms. In your browser, navigate to http://intuitmarket.intuit.com. In the horizontal navigation bar, click Tax Products, and then choose 1099 Kits.
You can also order 1099 forms directly from the IRS. Navigate to www.irs.gov, and click the “Forms and Publications” link. On the Forms and Publications page, under the Order heading, click the “Employer forms and instructions” link. In the value box for the 1099 MISC form (about halfway down the list), type the quantity of forms you need, scroll to the bottom of the page, and then click “Add to Cart”.
Load your printer with preprinted 1099-MISC forms.
If you use a printer that feeds individual sheets, don’t bother placing a Copy 2 form after each Copy 1 form so that you can print multiple copies for each vendor. It’s a lot easier to load the Copy 1 sheets and print a set of 1099 forms on those sheets and then load the Copy 2 forms and print a second set of 1099 forms. You’ll send the Copy 1 sheets to the 1099 vendors, but the Copy 2 sheets go to the government in one big batch.
Choose Vendors → Print 1099s/1096.
QuickBooks opens the 1099 and 1096 wizard, which makes it easy to verify your 1099 information before you begin printing.
In the 1099 and 1096 wizard, click Run Report to look at a Vendor 1099 Review report.
After QuickBooks runs the report, if you see vendors whose 1099 eligibility is incorrect, double-click their names to open the Edit Vendor dialog box and make changes. For example, if a vendor’s record doesn’t have a tax ID or address, in the Edit Vendor dialog box, add the missing information (see Entering Address Information). When you’re done, close the Vendor 1099 Review report window.
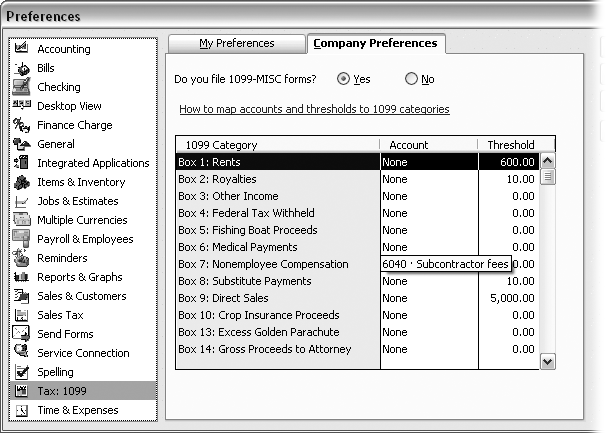
In step 2 of the 1099 and 1096 wizard, click Map Accounts to review or modify your preferences for 1099 accounts. Click OK when you’re done.
QuickBooks opens the Preferences dialog box to the Tax: 1099 section, as shown in Figure 18-8.
In step 3 of the 1099 and 1096 wizard, click Run Report to look at the 1099 Summary report.
This is your chance to make sure you’re printing 1099s for the right vendors and for the correct amounts.
In step 4 of the 1099 and 1096 wizard, click Print 1099s.
QuickBooks opens the “Printing 1099-MISC and 1096 Forms” dialog box with the date range set to the previous calendar year. If you’re generating the forms during the calendar year, in the drop-down list for the top box, choose This Calendar Year.
Click OK.
QuickBooks opens the “Select 1099s to Print” dialog box shown in Figure 18-9, and automatically selects every vendor whose pay exceeds the government threshold.
When the Valid ID and Valid Address columns are replete with the word Yes, click Preview 1099 to see the final forms before they print.
In the Print Preview window, click Zoom In (if necessary) to verify the information. When you’ve reviewed the forms, click Close.
Figure 18-9. Besides columns for vendor name and total pay, the table in the dialog box includes the Valid ID and Valid Address columns. If you tend to create vendors on the fly without bothering to enter pesky details like their tax ID numbers or street address, scan these columns for the word No. If you see it in any cell, click Cancel and edit your vendors to add this essential information. Then, repeat steps 7 and 8 and verify that all the Valid ID and Valid Address cells say Yes.Click Print 1099.
QuickBooks opens the Print 1099 window. If the preprinted forms are waiting in a printer other than the one that the program chose, in the “Printer name” box, choose the printer that holds your preprinted forms.
Click Print.
Preprinted forms usually include Copy 1 for the vendor and Copy 2 for the government. But you’ll also want a copy for your files. Instead of printing a third set of 1099s, run one of the printed sets through your copy machine or printer/ scanner/copier.

Closing the Books for the Year
A few months after the end of a fiscal year, when tax returns rest under the gimlet-eyed scrutiny of the tax authorities, most companies close their books for the previous fiscal year. The purpose of closing the books is to lock the transactions that you’ve already reported on tax returns or in financial results, because the IRS and shareholders alike don’t look kindly on changes to the reports they’ve received.
QuickBooks, on the other hand, doesn’t care if you close the books in your company file. The closing task is mainly to protect you from the consequences of changing the numbers in previous years (like altering the company file so that it no longer matches what you reported to the IRS). Once you’ve set a closing date for your company file (described next), changes to transactions on or before the closing date show up on the Closing Date Exception report (choose Reports → Account & Taxes → Closing Date Exception Report). But you’re free to keep your books open if you’re not worried about editing older transactions by mistake. If you do close your books in QuickBooks, the program still gives you a way to edit transactions prior to the closing date. Unlike other bookkeeping programs in which closed means closed, in QuickBooks, folks who know the closing date password can still change and delete closed transactions, say to correct an egregious error before you regenerate all of your end-of-year reports.
Closing the books in QuickBooks takes place in an unlikely location: the Preferences dialog box. Switch to single-user mode before you close your books. When everyone else has logged off, choose Edit → Preferences and, in the icon bar, click Accounting and then the Company Preferences tab. (Only a QuickBooks administrator can set the password for the closing date.) To close the books as of a specific date, click Set Date/Password. Figure 18-10 shows what to do next.
Tip
Don’t cut and paste the password from the Closing Date Password box to the Confirm Password box. These boxes display filled circles instead of the actual characters, which means you can’t see typos. If you set a password with a typo in it, you’ll be unlikely to stumble on the correct password, and your closed books will remain shut as tight as a clam.

After you’ve set a password for the closing date, you’ll have to enter that password whenever you want to modify transactions prior to that date. For example, if you try to edit a check that you wrote before the closing date, QuickBooks opens a message box with a Password box in it. Type the closing date password, and then click OK to complete your edit.
Tip
After you’ve completed all your QuickBooks year-end activities, create a backup of your company file (Backing Up Files). With all the data that contributed to your financial reports and tax forms in this backup, you’re not going overboard by creating two copies of the backup: one to keep close by in your office and one stored safely offsite in case of emergency.