Lesson 6. Personalizing the Appearance of Your Blog
In this lesson, you learn how to give your site a whole new look and feel without a lot of work or technical skill.
Themes
Themes are what give a WordPress blog its personality. WordPress provides the theme functionality to allow you to easily change the look of your site without being a professional web developer. You have probably seen dozens of WordPress blogs and not realized it (including msnbc.com) because many of the blogs use a different theme than the default that’s supplied with every WordPress blog (see Figure 6.1). A theme is a set of files that define font sizes, margins, screen layout, and more. Your postings, pages, links, and other settings remain the same, but the way they are presented changes. Some refer to this as “skinning” your site, but WordPress refers to it as themes.
Figure 6.1. While functional, the default theme “Kubrick” is a bit plain.
You can change a few things, such as your blog title and tagline, without getting involved with themes, but they have minimal impact on the overall personality of your site.
Themes are very easy to set up and at the same time allow you to customize nearly every aspect of WordPress. This is one area where WordPress.com and WordPress.org differ. Although the basic functionality is the same, the features vary. With WordPress.com, you can choose from dozens of themes. WordPress.org has thousands to choose from. WordPress.com allows you to do custom CSS (cascading stylesheets) with an optional upgrade fee. WordPress.org allows you to customize your CSS for no additional charge. Refer to Lesson 10, “Using Themes on Your Own Site,” for more information on customizing themes on your own blog.
Branding
Your blog reflects part of who you are, or rather whom you would like to represent online. For the sake of this lesson, I assume you are setting up a blog for your own purposes. With that assumption, selecting a theme is purely a matter of personal choice.
If you are setting up a blog for an organization or website that already has a defined brand (color scheme, logo, and so on), you should consider hosting your own blog and enlisting the help of a web developer or read one of many books on the PHP programming or cascading style sheets (CSS) to fine-tune your blog. PHP programming and CSS are beyond the scope of this book.
Finding and Applying a New Theme
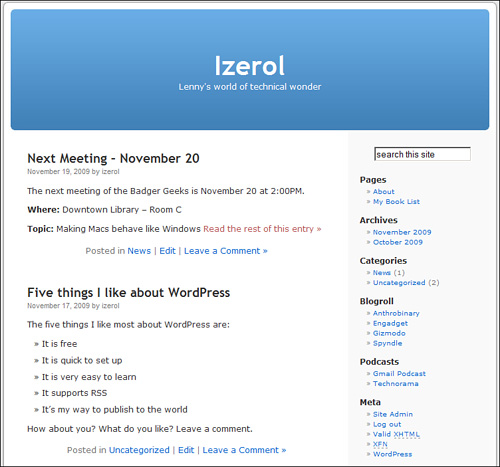
To start locating and applying a new theme, log in and click on Appearance on the side menu. The Manage Themes page appears, as shown in Figure 6.2.
Figure 6.2. The Manage Themes page is your key to refacing your blog.
Your current theme is listed at the top of the page. There are several options available to your theme. They are covered in the “Making Additional Changes” section later in this lesson. Further down the page are 15 random themes. There are currently more than 70 different themes you can choose from. Each theme includes a thumbnail image so you get an idea of what it looks like.
Note: Limited Theme Choices
With WordPress.com, it is not possible to use themes other than the standard themes provided. However, additional themes are available to you if you host your own blog using the software available from WordPress.org. Additional information is available in Lesson 11.
Using the theme browser just under your current theme, you can find themes alphabetically, see the most popular themes, or search for a theme based on keywords (tags) or features. Each theme has one or more tags to help identify and organize it. Use these keywords in the search box to find specific attributes. For example, if you are looking for a green theme, type in green and click Search. For more complex searches based on specific features, click the Feature Filters link next to the Search button, check the features you are interested in, and click Search. If your search does not result in any hits, consider widening the scope of your search by checking fewer options.
The random search is rather like browsing through a clothing store and trying on things. If you don’t like what you see, click the Refresh button to see another set from the dozens of available themes.
Tip: Use Theme Tags to Find Similar Themes
The tags for each theme are links. If you see a feature you like (for example, right sidebar), you can click that tag, and the theme browser shows more themes that contain the same tag.
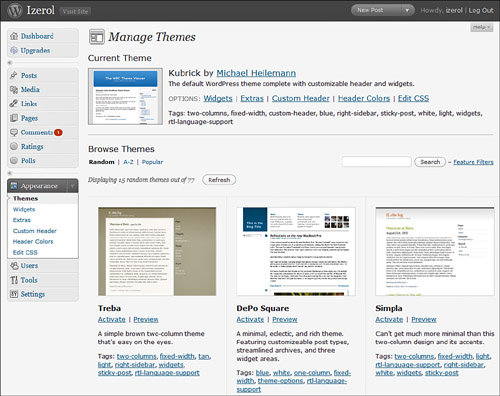
If you spot a theme you want to “try on,” click the Preview link, and your content is displayed in the window that pops up (see Figure 6.3). This preview has no impact on what the current visitors to your blog are seeing.
Figure 6.3. The Preview link lets you see what your content looks like if you apply the theme.
If you like the theme and want to apply it to your site, click Activate “name” in the upper right of the preview window. If you want to keep shopping, click X in the upper left to close the window. Your theme represents you, so have some fun with it.
Caution: Don’t Change Too Often
You can change your theme any time you like by going to the Appearance menu option, locating a new theme, and applying it. However, you should realize your readers may get confused if you change your theme frequently. Changing your theme changes the location of links and icons. Try to settle on a theme and make only minor changes afterward.
Links
Links allow you to create a collection of other websites you want to share. By placing websites in your link library, you can easily present them on your front page with the Links widget. Refer to Lesson 7 for more information on Widgets. You do not need any knowledge of HTML to display links. All you need is a title and the URL of the other site. In turn, you can request others add your blog to their links.
Adding a New Link
To create a new link, click the Add New subpanel under Links on the side menu. Clicking this option displays several fields to identify your new link (see Figure 5.9). At a minimum, fill in the first two fields. Following are the link-related fields:
• Name—This is the name as it is displayed on your web page. It should be an accurate representation of what you are linking to—for example, the name of another blog.
• Web Address—This is the complete web address (including http://) of the site you are linking to.
• Description (optional)—You can add a description here so you can provide additional information when someone hovers their mouse cursor over the link.
• Category (optional)—From this field, you can select a category (or create an additional category) to organize your links.
• Target (optional)—If you choose, you can identify how the link is displayed with one of the following targets:
• _blank causes a new browser window to appear with the linked page when the link is clicked.
• _top presents the new linked page in the top frame of the current page. If your site is designed with frames, selecting this option removes existing frames.
• _none is the default behavior if you choose no target; it places the content in the current window.
This is purely a personal preference if you want new content to go in a new browser window (allowing readers to still maintain a page with your content), minimize the number of open windows (or tabs) readers have, or let them choose how they want their browser to behave.
• Link Relationship (optional)—The link relationship is based on a protocol called XFN, which stands for XHTML Friends Network. It allows you to identify the type of relationship you have with the people or sites you are linking to. To learn more about XFN, visit http://gmpg.org/xfn. The different types of link relationships are as follows:
• Identity—This check box identifies the link as one of your websites.
• Friendship—Select the option that most accurately represents your association with the other person or site.
• Physical—If you have physically met the other person (or people) face-to-face, check the Physical check box.
• Professional—Check this check box if the other person is a professional acquaintance (coworker or colleague).
• Geographical—This option identifies your geographic location in relation to the other person. Co-resident signifies you live with the other person. Neighbor is in a similar geographic region (city, town, or village). None indicates you either don’t know or don’t care.
• Family—If the other person is related to you, choose the option that best represents your relationship in the Family section.
• Romantic—You also have the option to select one or more options if you are romantically involved with the other person.
• Advanced (optional)—The Advanced section allows you to set additional options. The image address lets you link to another site’s image and display it along with the link. There are two things you need to know to use this feature. First, know whether your current theme supports images in the links. Second, know the direct URL to the image you are going to use (for example, http://mydomain.com/images/logo.jpg). The RSS address allows you to specify the RSS feed alongside the site’s link. Again, not all themes support this feature. Notes is a place for you to capture any additional thoughts you have about the link you have collected. There may come a point in the future when you don’t recall adding the information, and these notes may be your only clue where it came from and why it was added. Finally, rating allows you to rate your links from 0 (worst) to 10 (best). Some themes sort the links by ranking.
• Keep this link private—This check box on the right keeps the public from viewing the link. Only site administrators can see private links.
Be sure to click Add Link to save your settings.
Widgets
A widget is a tool or content that displays some type of information on the sidebars of your blog. Although themes give you control of how things are displayed on your blog, widgets enable you to control what is displayed.
Widgets make it easy to add, move, or remove content from the left or right sidebars of your blog provided you are using a widget-ready theme.
Tip: Use Widget-Ready Themes
When selecting a theme, look for themes that are widget ready (use the tag “widgets”). Customizations to non-widget-ready themes require HTML, CSS, and PHP programming knowledge.
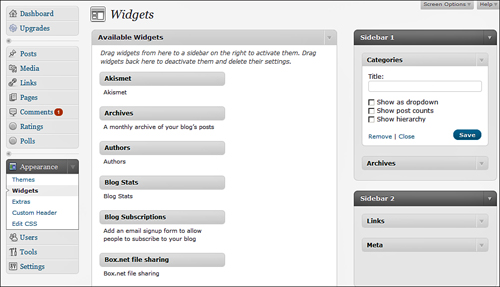
You can find the Widgets page in the Appearance menu under the subpanel labeled Widgets (see Figure 6.4) or from the Widgets option on the Manage Themes page.
Figure 6.4. The Widgets page.
Each widget has a unique function. There are dozens of widgets and new ones being developed all the time. A few of the commonly used widgets you may want to familiarize yourself with are as follows:
• Archives—The archives widget shows a historical collection of your blog posts listed by month. After you have been blogging for a year or two, you might consider the Display as Drop Down option to save space in your sidebar.
• Calendar—The calendar widget displays a monthly calendar of your post activity with clickable links displaying all posts for that date. It does not let you set up a calendar of events. It is used only to display your post activity.
• Categories—The categories widget alphabetically lists the categories of your blogs, which makes it easier for your readers to find your content.
• Links—The links widget displays the entries you have made from the Links subpanel. The links widget is a good way to recommend other sites to your readers.
• Meta—The meta widget contains links to log in and log out, site admin, RSS feeds, and WordPress.com. If you have multiple contributors to your blog, adding the meta widget provides them with an easy way to log in.
Caution: Where’s the Login Link?
If you do not use the Meta widget anywhere, no Login link is presented to administer your blog. Adding /wp-admin to the end of your blog address accomplishes the same thing—for example, http://mysite.wordpress.com/wp-admin.
• Pages—The pages widget adds a list of your blog’s pages to your sidebar. This widget might not be necessary if your theme includes a navigation bar.
• Search—The search widget provides a way for readers to do a simple text search of your content. Despite all the tags and categories, some readers find it easier to search for content.
• Text—The text widget allows you to add arbitrary text or HTML to your sidebar. You can have multiple text widgets with different content in each.
More details about widgets are available at http://en.support.wordpress.com/topic/widgets-sidebars/.
Adding Widgets
The Widgets page displays two major sections in the center and a number of sidebar boxes on the right, which vary according to your theme. The Active Widgets are available for your use. To add a widget to your blog, drag one from the Active Widget section to the appropriate sidebar section on the right. If the sidebar shows only a dark gray title bar, use the triangle to open it. This feature allows you to place widgets in that box.
If you do not place anything in a sidebar box, the theme uses whatever widgets are defined in the theme.
Most widgets have options associated with them, such as allowing you to change the title or display lists as drop-down lists. When you drag a widget to the sidebar, a triangle appears on the right of the widget title bar. Click the triangle to view and set the options. Click Save when you are done making changes to your widget options.
There is no Save or Update button on the Widget page. When you are done configuring the widgets, you can immediately see their effect by viewing your site.
Removing Widgets
To remove a widget from your sidebar, drag it to either the Active Widgets or Inactive Widgets section of the screen. Both sections have the same effect in terms of removing the widget. However, if you’ve made any changes to the widget, such as URLs or other text, those changes are lost if you put it in Active Widgets, whereas your changes are preserved when you put the widget in Inactive Widgets.
Making Additional Changes
In addition to using themes and widgets, there are some additional ways you can customize your blog’s look and feel.
Extras
The Extras page (see Figure 6.5) is available from Appearance, Extras or the Extras option from the Manage Themes page.
Figure 6.5. The options on the Extras page.
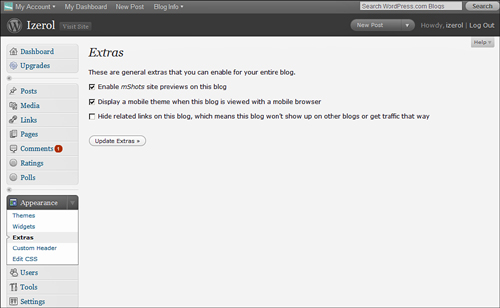
The Extras page has three options available that you can enable for your entire blog.
mShots—Preview Links
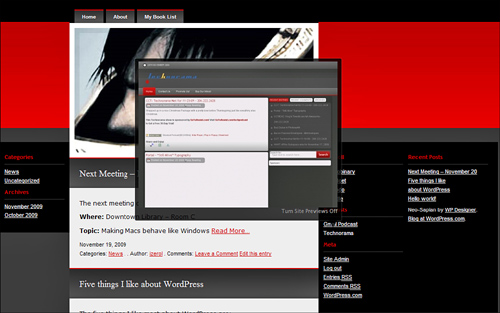
mShots allows a blog reader to get a preview of the sites you link to without leaving your site. To turn on this feature, check the Enable mShots Site Previews on This Blog option on the Extras page. When the reader moves his mouse over a link to another site, a window pops up with a preview of that site (see Figure 6.6). The preview for some sites appears instantaneously, but some sites take a few seconds to generate a preview.
Figure 6.6. mShots show a preview of sites you link to.
Note: Disabling mShots
Your readers can disable mShots for all WordPress.com sites by clicking Turn Site Previews Off in the bottom-right corner of the preview window. However, re-enabling mShots is a bit trickier. To reenable mShots, your readers need to remove the cookie “nopreview” for the domain “.wordpress.com.” Consult your browser’s documentation for detailed information on managing cookies.
Mobile Browsers
The Extras page also has an option to assist readers with mobile browsers. When you check the Display a Mobile Theme When This Blog Is Viewed with a mobile browser setting, you enable one of two mobile themes specially designed for readers using the browser on their mobile devices (see Figure 6.7). The themes are designed to load quickly. The first is designed specifically for the iPhone, iPod Touch, and Android phones. This theme takes advantage of some of the browsing capability of the platform, giving readers access to the following:
• Commenting and post loading using AJAX (for faster interaction)
• Scaled header images if a custom image is used
Figure 6.7. Two theme options available to mobile browsers.
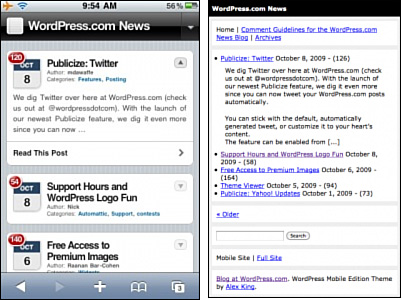
When readers view your site with the mobile theme, the layout does not appear as with a desktop browser. iPhone, iPod Touch, and Android users can switch to your normal theme by turning off the mobile site option at the bottom of the page.
Other mobile browsers get a less fancy theme but still get quick load times. These browsers have a Full Site link at the bottom of the page. The effectiveness of this link is browser dependent.
Possibly Related Posts
WordPress.com came out with a feature called “lateral navigation” that scans the content of your post and then displays other posts from other blogs that may be related (see Figure 6.8).
Figure 6.8. Possibly Related Posts can point your readers to similar material.
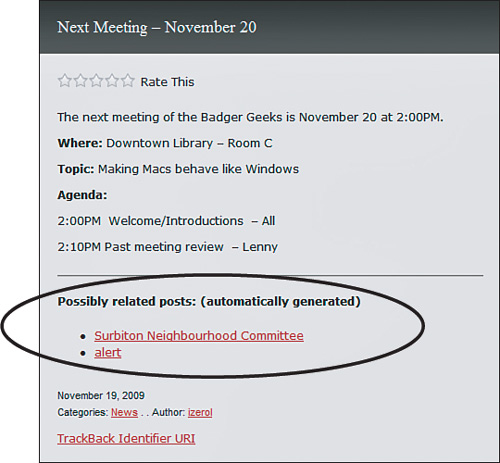
Some blog administrators find this feature annoying, stating that it takes readers away from their blog. The feature is controlled by the Hide Related Links on This Blog option in Appearance, Extras. If you remove related links from your blog, WordPress removes you from other blogs also—which can impact traffic to your site.
If you have made any changes to the Extras page, click Update Extras to save your changes.
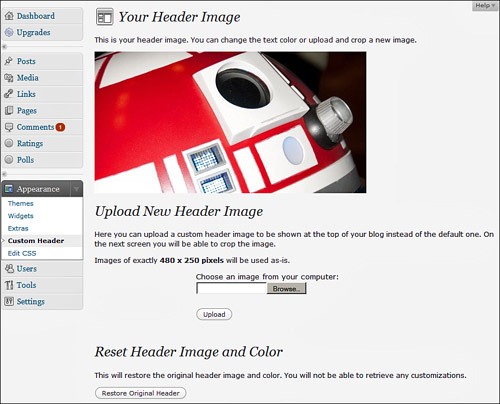
Custom Header Image
Some of the WordPress.com themes look terrific. However, you might think that the header image does not match your personal tastes. Fortunately, some of the themes, including the default (Kubrick), enable you to upload your own header image.
To find out which themes support custom headers, follow these steps:
- Go to Appearance, Themes.
- In the Browse Themes section, click the Feature Filter link.
- Check the Custom Header option.
- Click Apply Filters.
The first 15 themes that support custom headers are displayed. Activate the theme you would like to use.
To change the header image, follow these steps:
- Go to Appearance, Custom Header or the Custom Header link at the top of the Manage Themes page to see the Header Image page (see Figure 6.9).
Figure 6.9. It is possible to upload a new header image with many themes.
- Click the Browse button (or Choose File button on a Mac) to locate an image file on your computer.
- After you locate an image, click Open (or Choose on a Mac).
- Click Upload.
- When your image is finished uploading, it is displayed with a highlighted rectangle.
- Drag and resize the rectangle to crop the image the way you like. The rectangle stays the same proportions to the original image to ensure it is not stretched when it is displayed at the top of your blog.
- Click Crop Header.
- View your blog front page.
You can restore the original header image at any time from the Header Image page by clicking the Restore Original Header button.
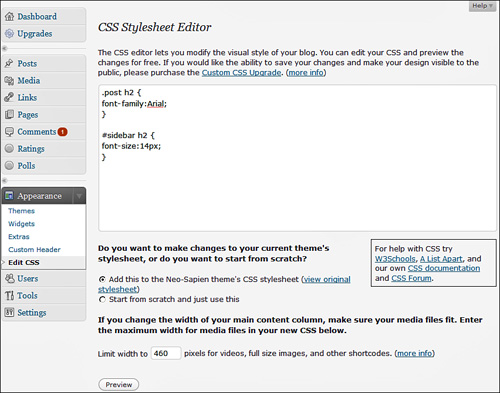
Edit CSS
The Edit CSS option allows you to fine-tune the appearance of your site by creating your own cascading style sheet (CSS) or augmenting the current theme’s CSS. To get to the CSS Stylesheet Editor page (see Figure 6.10), go to Appearance, Edit CSS in the side menu.
Figure 6.10. The CSS Stylesheet Editor allows you to fine-tune your site appearance.
Note: CSS Customizations Require Upgrade
CSS customizations are a paid upgrade to WordPress.com users. You can modify the style sheet and preview the effect your changes have, but you cannot apply them to your site without the upgrade. Go to Dashboard, Upgrades for details and current pricing.
By default, a placeholder message appears in the main text box. This message is entirely comments (denoted by starting with /* and ending with */). Please review these comments before proceeding.
To enter your modifications, remove the existing text and enter your CSS.
Plain English: Cascading Style Sheets
Cascading style sheets provide a set of style templates that define colors, fonts, image sizes, backgrounds, and more. They free the software author from thinking about the layout details. CSS also enable themes to allow third parties to customize the look and feel of the software package.
Just below the editing window are two options affecting how your changes are applied to your blog’s theme:
• Add This to the (Current) Theme’s CSS Stylesheet—This option augments your changes to the theme’s existing style sheet. There are specific ways to override styles that you need to be aware of. Click the View Original Stylesheet link to display the theme’s current settings.
• Start from Scratch and Just Use This—Choose this option if you want to build the entire style sheet. You still need to comply with the theme’s HTML structure. You can refer to the original style sheet to ensure you include all rules/styles. If you miss something, your blog may not appear as you expected.
The Limit Width option modifies the default image size for full-size images, videos, and other media when it is inserted in your blog. Use this option if you have modified the main content area using custom CSS. It does not change the width of existing images and videos, nor does it change the width of your blog.
After you complete your changes, you can see what effect the changes have by using the Preview button. If you have not purchased the Custom CSS upgrade, you will not be able to save your changes. Otherwise, use the Save Stylesheet button to apply the changes to your site.
If you find something that was once working is suddenly behaving unexpectedly, you can use the CSS Revisions section at the bottom of the Edit CSS page to review and reverse changes that you have made. Each time you click the Save Stylesheet button, an entry in the revision history is made.
Here are some suggestions to make your learning CSS curve a bit easier if you are just getting started:
- Read. There are lots of good books and websites that can guide you through cascading style sheets. Online resources include
• W3 Schools CSS material: www.w3schools.com/css/
• Web Design Group guide to CSS: www.htmlhelp.com/reference/css
• Editing WordPress CSS: en.support.wordpress.com/editing-css
• CSS 2.1 Specification: www.w3.org/TR/CSS21
- Start with small changes. Begin your changes with a simple color modification or font family change and understand what impact your changes have.
- Use a validation service. Free websites like http://jigsaw.w3.org/css-validator are set up to ensure you avoid errors by checking for proper CSS syntax and semantics.
- Use the Firebug add-on or Web Developer Toolbar (Firefox users). Firefox has add-ons that allow you to see and modify CSS on a live page. If you use another browser, use your browser’s View, Source option to understand where specific styles are applied.
Summary
Using themes and widgets, you can quickly give your blog an entirely new look and feel without in-depth web development knowledge. With the optional upgrade to customize the style sheet, you can further refine your blog’s appearance. The personality of your blog is limited only by your imagination.