Visual Programming Language (VPL) is a graphical application design tool that you can use to create and execute simple or complex robotics applications. The tool is intuitive and easy to use. You can drag and drop programming elements onto a design surface and then use connections to specify inputs and outputs (see Figure 3-1). The elements can be as simple as a data value or as complex as a service. This chapter will cover how to use the VPL design tool to write both a simple application and a custom activity. You will learn how to send notifications, use built-in services, and debug a VPL application. The chapter should be of interest to beginning and experienced developers.
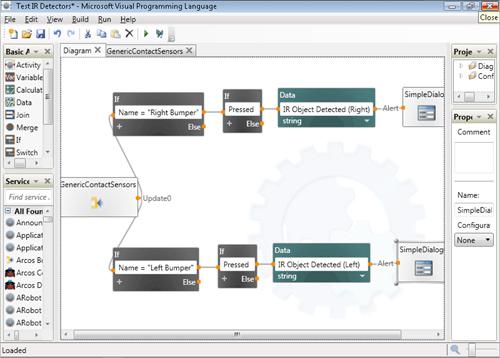
Figure 3-1. The VPL design tool features a drag-and-drop interface for creating robotics applications.
VPL differs from other application development tools in that it is data based and not control based, which affects how applications are executed. A typical Web application may involve users who initiate a sequence of commands based on some function they need to accomplish. For example, a Web application could be designed to place an order for a customer when the customer selects the items to buy and then initiates a checkout.
An application designed with VPL may involve several different processes operating one at a time or all at once. The applications are typically distributed, and operations may occur concurrently. For example, a robot may have several sensors that read information about the robot’s environment. A bumper may indicate whether the robot has encountered another object. A motion sensor could indicate whether an object around the robot is moving, and a GPS device could give the robot’s location. The application that monitors this robot must be able to receive data from all of these sensors concurrently. At the same time, it must then be able to issue commands, such as sending power to the motors that operate the robot’s wheels. To accommodate this type of scenario, an application development tool must be able to reflect nonsequential operations.
VPL can be used by both beginning and experienced programmers. So what constitutes a beginner? Even though VPL is easy to use, readers might feel quickly overwhelmed if they do not understand programming fundamentals such as variable assignments or conditional logic. The Microsoft Robotics Studio (MSRS) documentation claims that nonprogrammers can create robotics applications using VPL, but I am not so sure about this.
VPL is not an object-oriented language, and it was not designed to teach people how to program. It does not provide access to the .NET Framework, and it is not meant to be a general purpose language. However, if a reader has worked at least briefly with another high-level development language, VPL can offer a quick and easy way to bypass much of the plumbing involved with creating a robotics application. It can also offer a wonderful way to visualize the program as a functioning whole and not a series of class files.
VPL may be useful to experienced programmers who wish to build an application quickly using pre-existing services. A team of programmers may wish to build custom base services that can be used to operate one or more robots. These services, along with the generic services already provided with MSRS, could then be used by all of the team members to piece together an application using VPL. Services could be used by multiple robots, thereby making the use of some services a common function. The decision whether to use VPL or the Visual Studio template will depend mostly on programmer preference.
Tip
Services are one of the basic building blocks used in applications built with VPL. If you are not familiar with services and have not read Chapter 2, you should do so before continuing with this chapter.
You build a VPL application by dragging and dropping blocks onto the design surface. Each block can represent a basic activity or a service (see Figure 3-2), such as the ones covered in Chapter 2. Basic activities perform simple functions, such as storing the value of a variable or implementing an If...Else statement. You can refer to a list of basic activities in Table 3-1.
Table 3-1. List of Basic Activities Available in VPL
Name | Description |
|---|---|
Activity | Used to create a new activity. The new activity is user defined and allows programmers to design their own custom activity blocks. Other basic activities and services can be used within the newly created activity. Each new activity can receive an input value and return an output value. The activity can also trigger a notification. |
Variable | Used to store a value that can then be referenced in other activity blocks. You can use a variable to store the state from a service and then use that value across multiple activities or services. In this way, you use variables to share state between activities. The value of a variable can be any of the types supported by the .NET framework, such as int, string, or Boolean. It can also be a list containing one of the supported types. The variable names are case-sensitive, and the values can be set or retrieved. |
Calculate | Used to perform simple arithmetic functions such as add, subtract, multiply, and divide. You can also use logical operators such as && for and, || for or, and ! for not. You can also use Calculate to access individual members of an input message. For example, you can use Calculate to access the different buttons on an Xbox 360 controller. |
Data | Used to supply a data value for another activity box such as a Variable or Calculate. The data value can be one of the supported .NET data types. |
Join | Used to combine the results from more than one activity block. By using this activity, you ensure that a message must be received from all the input connections before an output message is produced. |
Merge | Used to merge the messages from two or more activity blocks. The resulting message is then sent on to the next activity block. This is different from a join, which will synchronize the messages. |
Used to support a conditional expression such as an If..Then..Else statement. The expression can include operators such as = for equals, < for less than, and != for not equals. | |
Switch | Similar to a CASE statement, this activity block is used to match incoming values to a branch in the statement and route the message accordingly. For example, you could use a Switch block to determine which function was selected by a user. |
List | Used to create a list of data items for a specific data type. The list may be used as input for another activity block. |
List Functions | Used to perform a selected function such as append, sort, insert item, or concatenate on the items in an existing list and produce a new list as the result. |
# Comment | Used to add descriptive text to an activity block. |
The basic function of an activity is to accept an input message and produce an output message. What happens in between, or the action that is applied, depends on what type of activity it is. Activities are linked together through the messages passed between them. An output message from one activity becomes the input message for another activity.
The basic activity named Activity allows you to create a user-defined activity. This activity can contain other activity blocks and can even include a reference to itself. The activity can accept an incoming message and return an outgoing message. It can also support one or more notifications. The notifications allow an activity to generate multiple output messages, depending on the result of some user-defined action.
One of the really nice features about VPL is that it allows you to compile your application as a service. When this is done, all the activities within that application are included with the service. This allows you to reuse one activity within another VPL application—this time as a service. The activity you just compiled now appears in the list of services, and you can use it within another VPL application.
You can also use services as activity blocks in VPL applications. VPL allows you to use any Decentralized Software Services (DSS) service built with MSRS in your VPL application. This includes not only the built-in services provided with MSRS but any services you create yourself. Many of the services that come with MSRS are specific to a platform. For example, the following four services specifically support the Boe-Bot:
Boe-Bot BASIC Stamp 2. Provides control access to the BASIC Stamp 2 controller, which provides the brains for the Boe-Bot. This controller service is used to represent the Boe-Bot.
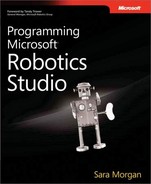
Boe-Bot Generic Contact Sensor. Provides access to the contact sensors supported by the Boe-Bot, which include whiskers and infrared detectors. These can be used as bumpers for the Boe-Bot and indicate when a collision is possible.
Boe-Bot Generic Drive. Uses the generic differential drive contract to implement drive functionality specific to the Boe-Bot. This allows you to drive the Boe-Bot by sending alternating power levels to the motors powering the left and right wheels.
Boe-Bot Generic Motor. Uses the generic motor contract to implement motor functionality specific to the Boe-Bot. This allows you to control whether the motors are enabled or disabled and allows you to set power levels for the motors.
To better understand all the different services available in MSRS, it is helpful to group them into categories. MSRS includes several generic services (see Table 3-2), which can be used to operate a variety of robotics platforms. You can incorporate these services into your VPL applications to perform tasks such as driving the robot and receiving feedback from the sensors. The services are located in the bottom left pane of VPL (see Figure 3-2, shown previously).
Some of the platform-specific services use these generic services as activities. For example, the service named Boe-Bot Generic Drive utilizes the Generic Differential Drive contract to partner with the Boe-Bot BASIC Stamp 2 service.
Table 3-2. Generic Services Included with MSRS and Available as Activities in VPL
Name | Description |
|---|---|
Generic Analog Sensor | Provides access to an analog-type sensor, such as the light sensor included with the LEGO Mindstorms NXT. |
Generic Analog Sensor Array | Provides access to an analog-type sensor array. |
Generic Articulated Arm | Allows you to control an articulated, multi-jointed robotic arm, such as the KUKA LBR3. |
Generic Battery | Used to provide access to a battery sensor, such as the one included with the LEGO Mindstorms NXT. |
Generic Contact Sensors | Commonly used service that allows you to receive feedback from the robot’s contact sensors. This can include sensors such as the whiskers included on the Boe-Bot or the bumpers included on the Create by iRobot. |
Generic Differential Drive | Commonly used service that allows you to operate a robot with two wheels. The motors that drive each wheel must accept power values, and the difference between these values determines in which direction the robot moves. For example, if the two values are the same positive value, the robot moves forward in a straight line. If the power for the right motor is less than the power to the left, the robot will turn to the left. Negative values cause the motors to work in reverse. |
Generic Encoder | Commonly used service that provides access to a DC motor with encoder feedback, such as the one used by the LEGO Mindstorms NXT. |
Generic Motor | Commonly used service that is used to operate a servo motor. This allows you to enable and disable motors, as well as set power levels for all motors. |
Generic Sonar | Used to operate a sonar sensor, such as the one used by the LEGO Mindstorms NXT. |
Used to provide access to a Structured Query Language (SQL) database. | |
Generic Stream | Provides a bidirectional, packet-based stream access. |
Generic WebCam | Used to provide access and capture images from a Web camera. |
In addition to the generic services and platform-specific services, there are a handful of miscellaneous services (see Table 3-3) that demonstrate useful robotics behavior. For example, the Explorer service enables a robot with a differential drive system, bumpers, and laser range finder to explore its surroundings. You can access the code for these services in the MSRS installation directory within the samplesmisc subdirectory.
Note
Keep in mind that any DSS service created with MSRS can be used in a VPL application. The services listed in Table 3-2 and Table 3-3 are just some of the services you can use. Any service you create will also appear in the list of available services.
Table 3-3. Miscellaneous Services Included with MSRS and Accessible from VPL
Name | Description |
|---|---|
Blob Tracker | Used to locate specific BLOBs or regions within an image for simple color tracking. A test service is also included. |
SQL Client for ADO.NET | Provides database access to a SQL database using the ADO.NET data provider. This could be useful for permanent storage of state. |
Direction Dialog | Implements a simple Windows-based dialog box that can be used to drive the robot forward, backward, left, and right. |
Explorer | Used to demonstrate exploration behavior in a robot. When the robot encounters an object with one of its sensors, it will back up and turn the other way to avoid the object and explore the environment. |
Follower | Used to demonstrate multiple behaviors such as text-to-speech, obstacle avoidance, and visual tracking. |
Game Controller | Used to access a DirectInput game controller such as a joystick or gamepad. |
Simple Dashboard | Used to access a Windows-based dialog box that allows you to perform various functions such as driving the robot continuously with a mouse. |
Simple Vision | Provides access to a basic set of services that allow robots with a camera to detect color, faces, and hand gestures. |
Syndication | Provides access to an ATOM/RSS syndication service that allows users to access and update blogs. |
Windows Messages | Used to send and receive Microsoft Windows messages. Includes access to a test service. |
XInput Controller | Provides access to a controller that can be used to control an Xbox 360 gamepad. |
VPL is a graphical design tool in which you build applications by dragging and dropping activities from the left-hand panes onto the main design diagram. By default, VPL starts off by opening an empty diagram (see Figure 3-3). You create an application by dragging activities or services from the left-hand toolboxes onto the design surface.

Activities are linked together through the exchange of messages. Each activity applies an action to an input message and produces an output message. The output message from the source activity becomes the input message for the target activity. For example, assume you had a VPL diagram with two activities: a data activity and a variable activity. The data activity would provide the input for the variable activity. If the data activity was set with a value of false, the output message for the data activity would include the false value. The input message for the variable activity would also include the false value.
You use connections to facilitate the exchange of messages between activities. Connections are established between activities by clicking on the output of the source activity and dragging a line to the input of the target activity. An additional dialog box will then be displayed, which allows you to select an action from the target activity. When that action is applied to the input message, an output message is produced and sent to the target activity.
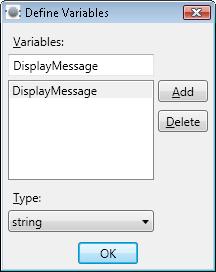
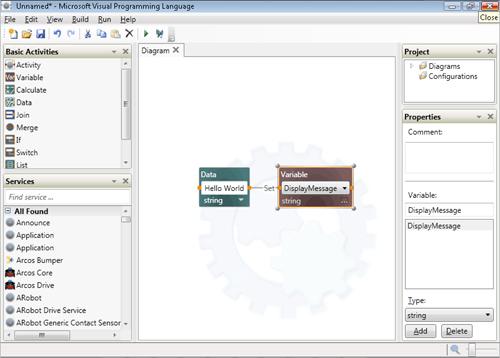
To better understand how connections work, let’s consider the data and variable activities used earlier. It is good programming practice to initialize a variable with a data value. To do this in VPL, you would need to drag both a data and a variable activity onto the design surface. To define a new variable, click the ellipses to open the Define Variables dialog box. Click Add and replace the field name with the variable name of your choice. You will also need to select a variable data type. In Figure 3-4, the variable is named DisplayMessage, and it will contain a data type of string.
Tip
Keep in mind that VPL programming is not like conventional programming. To avoid unnecessary complexity, you should keep the creation of local variables to a minimum.
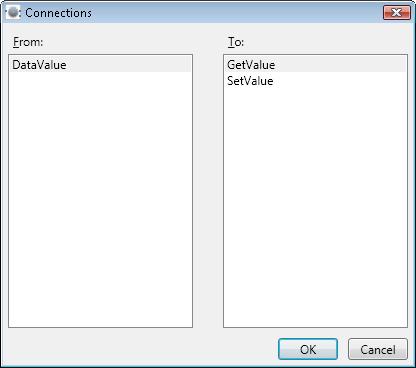
To set the value for a data activity, you can type the value directly into the data text box control. You will also need to select the appropriate data type from the drop-down list beneath the data text box control. The final step will be to establish a connection between the data and variable activity. To do this, drag a line between the right side of the data activity to the left side of the variable activity. The left side of a block represents the output message, and the right side is the input message. When you do this, a Connections dialog box (see Figure 3-5) will appear and prompt you to select the From and To values for this connection. In this case, there is only one From value available and, because you want to set the value of the variable, you should select SetValue as the To value. In this case, SetValue represents the action to be applied to the input message.
After the connection is established, the main diagram will display two blocks with a line drawn between them (see Figure 3-6). You could then build the remainder of the VPL program by dragging additional blocks onto the design surface.
When the activity is a service, you can double-click on the service to access the configuration. The Set Configuration page (see Figure 3-7) allows you to configure a service. The Set Configuration drop down box allows you to select one of the following four options:
Use a manifest. This allows you to specify an existing manifest file to use when loading the service. Once this option is selected, an additional button named Import Manifest will appear. You can click this button and select one of the applicable manifests from a list of available files.
Use another service. This allows you to specify the implementation for a specific service. This can be useful when designing VPL programs that use generic services. You can use the configuration option to specify a platform-specific service after the initial VPL program has been written.
Set initial configuration. This is used to specify initial state values for a service and can also be used to select and configure additional partner services. Partner services allow a service to take advantage of the functionality within another service. For more information about partner services, refer to the section titled Communicating with Other Services in Chapter 2.
None. In many cases, no special configuration is necessary, and this is a perfectly valid option. For example, this option works for the Simple Dialog and Text-To-Speech services.
Figure 3-7 shows the initial configuration options for the WebCam service. It is here that you would specify dynamic parameters such as the camera’s device name and file name used to store the captured image. You can also specify the camera’s image size, field of view angle, and compression quality level setting. If available, you can also set the initial configuration parameters. In this example for the WebCam service, the initial configuration parameters are used to specify the CameraDeviceName and CaptureFile.
The Set Configuration page includes two tabs: Partners and Initial State. You can associate one or more partners with a service, and each of these partners may be associated with a configuration file. Alternatively, a service may have no partners associated with it. When you specify the initial configuration options, VPL will include a configuration file with your VPL application.
Another way to configure services is by using a manifest file. The manifest is an XML-based file that contains a list of services that should be started together. This includes the configuration file, which will vary depending on the needs of the service. The configuration file is also an XML-based file that includes the dynamic configuration parameter values needed for the corresponding service.
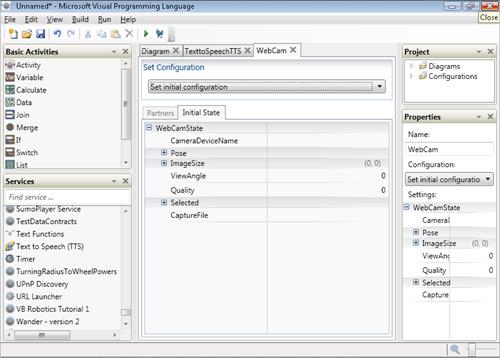
Figure 3-7. The Set Configuration page is used to configure a service using either a manifest or another service.
MSRS includes services and configuration files that can be used to control a handful of robots available for purchase. One such robot is the Boe-Bot by Parallax. When working with the Boe-Bot for an application designed with VPL, you have the option of using a manifest to specify configuration parameters for the Boe-Bot. You do this by selecting Use A Manifest from the drop-down list box and clicking Import Manifest. The Import Manifest dialog box (see Figure 3-8) will then list all manifest files that may be loaded for this service.
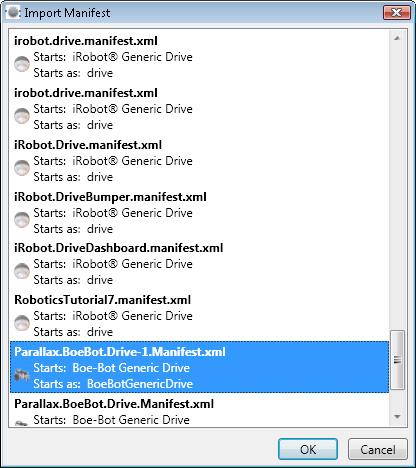
Figure 3-8. The Import Manifest dialog box is used to select a manifest that will be loaded with your service.
Tip
You may see more than one manifest file listed for a specific robot. If this is the case, you can use the mouse to hover over the entry. At this point, you should see a tooltip that shows you where the manifest file is located on your development machine. This should help you determine the correct manifest file to use.
If you choose to import the manifest, you will need to first edit the configuration file and change the value for the serial port element. The configuration file may include elements that are used to store state values. For example, the configuration file used to start the Boe-Bot looks like the following:
<Configuration>
    <Delay>0</Delay>
    <SerialPort>5</SerialPort>
  </Configuration>
  <AutonomousMode>false</AutonomousMode>
  <Connected>false</Connected>
  <FrameCounter>0</FrameCounter>
  <ConnectAttempts>0</ConnectAttempts>
  <MotorSpeed>
    <LeftSpeed>0</LeftSpeed>
    <RightSpeed>0</RightSpeed>
  </MotorSpeed>
  <Sensors>
    <IRLeft>false</IRLeft>
    <IRRight>false</IRRight>
    <WhiskerLeft>false</WhiskerLeft>
    <WhiskerRight>false</WhiskerRight>
  </Sensors>
Elements such as Connected, which specifies if the BASIC stamp is currently connected, represent items saved to state by the BasicStamp2 service. The BasicStamp2 service is provided with MSRS and is one of the services that allow you to control the Boe-Bot. In the next section, you will learn what specifically needs to be done to configure and work with the Boe-Bot robot.
A better way to configure your VPL services is to use VPL directly. For those services that expose their state, you could select Set Initial Configuration from the drop-down box. This will display the Initial State for that particular service. This includes all the state variables, and, from here, you can enter a value for variables such as the COM port.