Until now, this book has focused on robotics hardware supported by Microsoft Robotics Studio (MSRS). This means that the MSRS installation contains the onboard interface and service files necessary to interface with and operate a particular robot. But what if you want to work with your own custom-built robot or a robot kit not already supported by MSRS?
To operate an unsupported robot, you need to create an onboard interface that executes directly on the robotics hardware. You also must create services that not only communicate with the onboard interface but are also used to perform specific functions such as subscribe to a robot’s contact sensors or send commands to drive the robot. In this chapter, we will review the steps needed to operate an unsupported robot named ARobot. Even if you decide not to purchase and assemble the ARobot, the sections in this chapter provide a good understanding of the steps necessary to build your own hardware interface with MSRS.
ARobot is a three-wheeled robot kit (see Figure 7-1) made by a small robotics company in Texas named Arrick Robotics. ARobot was designed and built by the company’s owner, Roger Arrick (see the sidebar titled Profile: Roger Arrick). The ARobot, pronounced "a robot," was created for robot hobbyists, and, like the BoeBot, it uses a Basic Stamp 2 (BS2) controller chip to provide the brains for the robot.
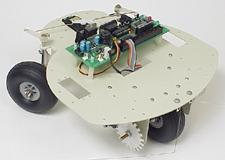
Figure 7-1. The ARobot by Arrick Robotics is an expandable, three-wheeled robot designed for robotics hobbyists.
Profile: Roger Arrick

Roger Arrick is the owner of Arrick Robotics (www.robotics.com), a small electronics company based in Tyler, Texas. After moving out of the increasingly unprofitable computer accessory business, Arrick used his interest and excitement for robotics to venture into the unknown. He started the company in 1987 with no college degree, $1,000, and what he describes as "a wheelbarrow of stubbornness."
When asked about why he loves robotics, Arrick responded with:
Ever since I was knee-high to a solenoid, taking things apart, learning how they worked, and building things have been part of my inner being. Starting with Lincoln Logs, progressing to motorized Erector sets, then graduating to computers, I could not get enough. While my friends played sports and watched TV, I salvaged speakers from old radios and built pinball machines using motors from tape players. Eventually, I learned that my main interests were in machines that moved.
Arrick’s early years with the company were spent building industrial robots that performed tasks such as moving test tubes and dispensing glue. Even though this paid the bills, he had a desire to offer a mobile robot, which spawned the design of the three-wheeled Trilobot (www.robotics.com/trilobot/). Trilobot found its way into university labs and high school classes, but it soon became obvious that a more affordable robot for hobbyists was in order—the ARobot was born.
Unlike many other kits designed for the hobby market, the ARobot uses a metal chassis and a real gear motor. It rapidly gained popularity among hobbyists and soon found itself featured on the front page of the Edmund Scientifics catalog (www.scientificsonline.com), one of the largest retailers of educational toys, hobby supplies, and scientific equipment. In 2003 Arrick released a book titled "Robot Building for Dummies" (www.robotics.com/rbfd/book.html), which taught the fundamentals of robot building using the ARobot as an example.
When asked what makes the ARobot so special and applicable for robotics applications designed with MSRS, Arrick responded with:
ARobot is inherently expandable and open by design. All low-level hardware functionality is accessible through an expansion connector, which is fully documented and supported by examples in the user guide.
ARobot also utilizes a coprocessor dedicated to drive motor and steering control. This relieves the high-level controller from minutia, which often leads to an over-taxed processor and simplifies programming code that would otherwise be bogged down in the gory details of real-time hardware juggling.
These qualities, along with a decent payload capacity, make ARobot perfect for use with a user-provided high-level controller running Microsoft Robotics Studio.
You can purchase a complete ARobot kit from the Arrick Robotics Web site (/www.robotics.com/arobot) for $284. The ARobot will take you around three hours to assemble with basic hand tools. After you assemble it, the robot can be programmed using BASIC Stamp software provided by a company named Parallax (www.parallax.com). You can download a free version of the BASIC Stamp software from the following URL: www.parallax.com/html_pages/downloads/software/software_basic_stamp.asp. You need this to build the onboard remote communications interface for the ARobot. We will cover building this interface in the next section, Build an Onboard Interface.
Unlike the robots covered in previous chapters, the ARobot does not have a two-wheel differential drive system. Instead, it uses a remote control servo motor to steer and a bidirectional, front-drive gear motor to move the robot. Because of this, we will not use the generic drive service included with MSRS when controlling the ARobot’s ability to move. The steps for building the drive service will be covered in the section titled Build a Drive Service.
The ARobot includes two front whisker sensors that can be used as bumpers for the robot. When triggered, they will indicate that an object collision is about to happen. In this case, we will be able to use the generic contact sensors service to implement a bumper service for the ARobot. This will be covered in the section titled Build a Bumper Service.
To communicate with the ARobot using MSRS, we will need to build several layers or services that serve as an abstraction for the actual robot (see Figure 7-2). The first layer that is needed is the onboard interface, which consists of a BASIC program that executes on the ARobot’s BS2 controller. This program will communicate directly with the ARobot’s control service.
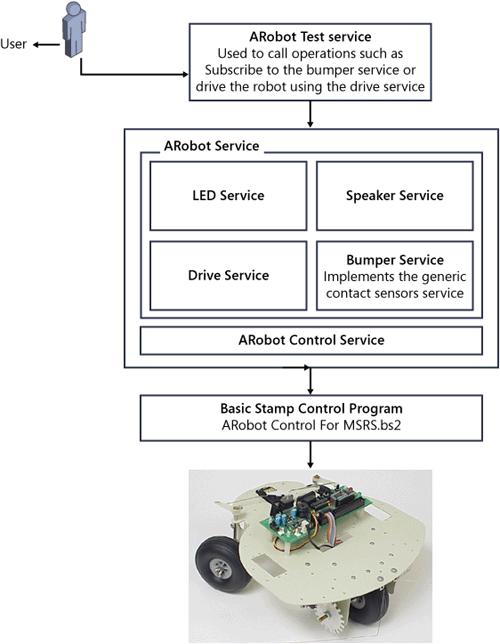
The core service is responsible for accepting operation requests from the ARobot services and mapping them to the appropriate commands that execute on the ARobot. For example, to make the robot move, you need to execute commands on the ARobot that operate the steering and drive motors. Operation requests are sent from the ARobot’s drive service to the core service. These operations are then mapped to the appropriate commands and sent to the ARobot via a wired or wireless serial data connection. The result is movement by the robot.
Each sensor or actuator is represented through an individual service. Multiple high-level services are used to represent the interface that outside services use to communicate with the ARobot. If you were to add an additional component to the ARobot, such as an ultrasonic sensor, then an additional service representing this sensor would also need to be added. Only the high-level services should communicate directly with the core service. Services used to control the ARobot should access these services and not the core service.
Tip
After assembling your ARobot, do not be surprised when you power it up and find that it does nothing. The BS2 comes to you empty. To get the robot to do anything, you will have to download a BASIC program to the coprocessor using the BASIC Stamp Editor. You can download the ARobot User Guide for detailed instructions on how to assemble and operate the ARobot through the following URL: www.robotics.com/arobot/guide.html.