

Developing and deploying applications
This chapter describes how to install and set up your development environment and deploy applications to a Liberty JVM server in CICS. We used the Eclipse integrated development environment (IDE) enhanced with the CICS Explorer software development kit (SDK) and the IBM WebSphere Application Server Liberty Developer Tools plug-in to develop the sample applications.
During testing, we used a local installation of WebSphere Liberty Profile. This chapter also describes the advantages and disadvantages of this installation type. Applications can be tested in the local server if you do not use the CICS specific library (JCICS) to access z/OS resources. Otherwise, testing must be performed in a Liberty Server running in CICS.
This chapter also shows how to build and export your bundles to zFS using the CICS Build Toolkit (CICS BT).
This chapter describes the following topics:
5.1 Creating the development environment
IBM provides the following tools for developing Liberty applications in CICS:
•CICS Explorer SDK
• WebSphere Developer Tools (WDT), which includes a WebSphere Liberty Profile local server runtime for testing and debugging applications
5.1.1 Installing the components
After you complete the steps in this chapter, you will have a complete workbench in which to develop and test your applications. The base development environment that we use is an installation of Eclipse IDE for Java EE Developers, which is available from the following website:
Follow these steps:
1. Install the CICS Explorer SDK
The following steps show how to extend Eclipse with the IBM CICS Explorer SDK. IBM CICS Explorer provides tools and interfaces to CICS that help to manage CICS resources and applications, and to develop Java applications for deployment into CICS:
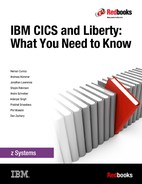
a. Start your Eclipse and go to Help → Install New Software. The wizard opens. See Figure 5-1 on page 71.
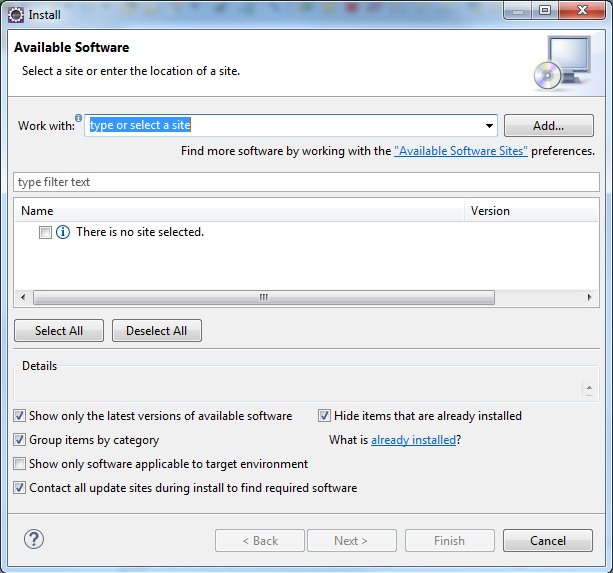
Figure 5-1 Install new software wizard
b. Click Add. In the Add Repository window, add the following information about the software update site to be used and click OK. See Figure 5-2.
Name: Explorer for z/OS Update Site
Location: http://public.dhe.ibm.com/ibmdl/export/pub/software/htp/zos/tools/aqua/

Figure 5-2 Add update site to the repository list
c. In the Available Software window, select IBM CICS Explorer and ensure that all the subcomponents are selected including the CICS SDK for Java and the CICS SDK for Servlet and JSP support (this is the component you need for developing web applications). See Figure 5-3.

Figure 5-3 Selecting IBM CICS Explorer from the available software
d. Click Next, and Next again. Accept the license agreement and click Finish.
In CICS Explorer V5.3, the WebSphere Development Tools are now installed as part of the CICS SDK for Servlet and JSP translation support. However, you still need to create a local Liberty server to perform local testing of the application.
2. Install the local WebSphere Liberty Profile Server
Perform the following steps to create the local WebSphere Liberty Profile Server:
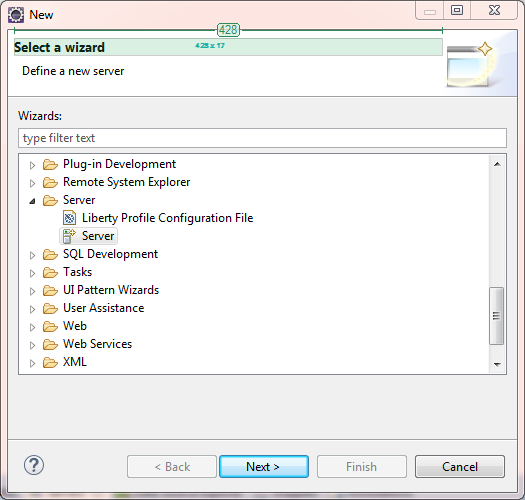
Figure 5-4 Installing a new local server
Figure 5-5 Define a new server type
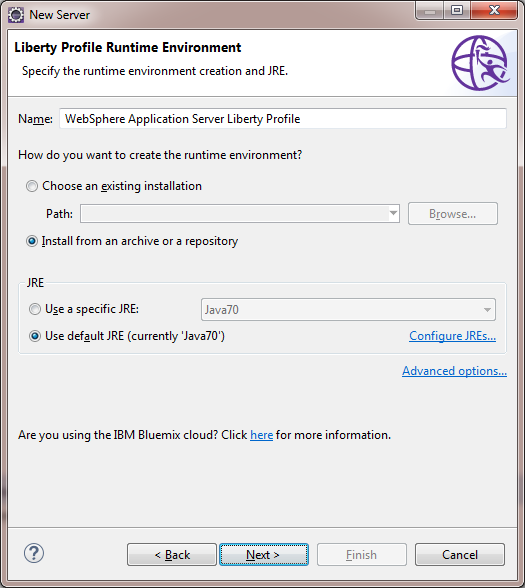
Figure 5-6 Specifying Liberty Profile Runtime Environment
c. Enter a destination path. The destination path is the path where your Liberty server will be installed. Select WAS Liberty V8.5.5.7 Runtime, which provides the basic Java EE 6 Web profile environment for testing our servlet, and click Next twice. See Figure 5-7.

Figure 5-7 Install the runtime environment
d. If you want to change the server name or add an existing application to the server, click Next. Otherwise, accept the license agreement and click Finish and the Liberty runtime is downloaded.
5.2 Creating a HelloWorld application
After setting up the appropriate development environment, you can now create and deploy a simple Liberty application from scratch. The application includes a simple servlet, which responds to HTTP GET requests, either from a browser or another web client.
Use the following stepwise process for developing your HelloWorld servlet:
1. Create a simple dynamic web project, which produces a web archive (WAR) for deployment to the dropins directory.
2. Convert the web project to an OSGi bundle project.
3. At the OSGi bundle to an OSGi application project.
4. Exported as an enterprise bundle archive (EBA) for deployment to Liberty within a CICS bundle project.
This method allows you to start out with a simple deployment model using a WAR. Then, migrate to using an OSGi environment for more advanced modular development, and integrate this with the CICS bundle deployment lifecycle.
Follow these steps:
1. Configure the target platform
Before creating any OSGi applications, you need to first define a target platform that describes the runtime server environment and the interfaces that are available.
a. Open the Eclipse preference page (Window → Preferences) and enter target platform in the search box and then select it from the list. Next, click Add to create a new target platform to represent the CICS runtime. See Figure 5-8.
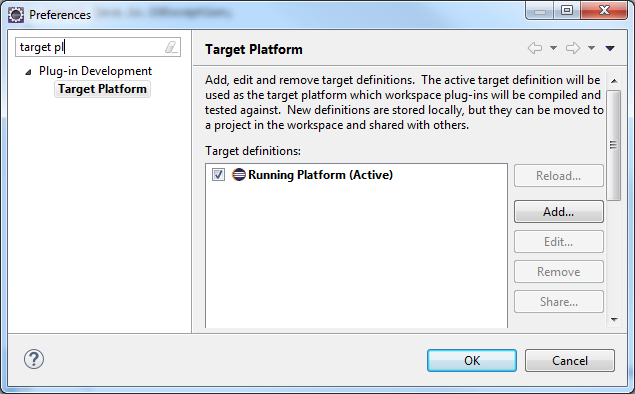
Figure 5-8 Define target platform
b. The CICS Explorer SDK provides useful templates to set up the development environment. Select Template, select CICS TS V5.3 with Liberty and PHP from the drop-down list, and click Next. See Figure 5-9.
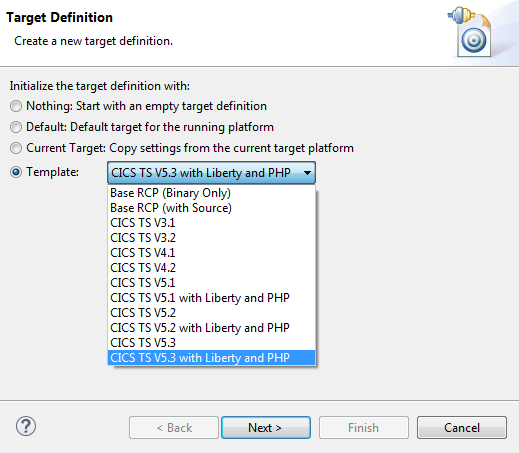
Figure 5-9 Create Target Definition
c. Figure 5-10 shows the contents of the platform and gives you the possibility to extend the platform with your own bundles if required. Click Finish.
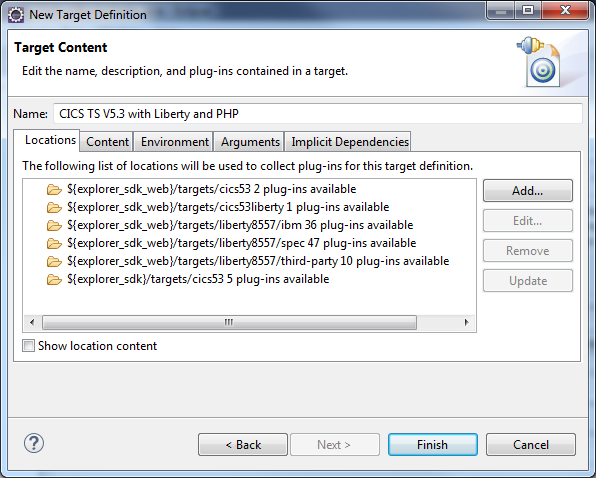
Figure 5-10 Target Content options
d. To finish setting up the development environment, activate the configured platform. Select the CICS TS V5.3 with Liberty and PHP check box, and click OK. See Figure 5-11.
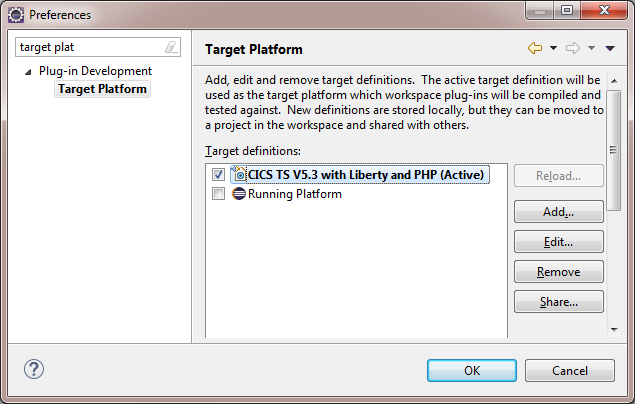
Figure 5-11 Select target platform
2. Create HelloWorld application
Perform the following steps to create the HelloWorld servlet:
a. If not already done, switch to the Java Platform, Enterprise Edition perspective by selecting Window → Open Perspective → Other → Java EE (default). Click OK. See Figure 5-12.
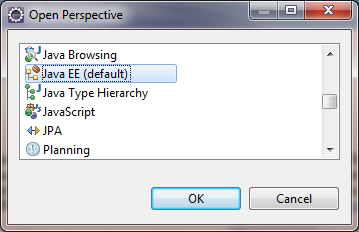
Figure 5-12 Open Java EE perspective
b. Now you can create the HelloWorld project. Click File → New → Web → Dynamic Web Project.
Give your project a name (in this sample, enter com.ibm.liberty.HelloWorld) and clear the Add project to an EAR option because we are not planning on using EJBs. See Figure 5-13.
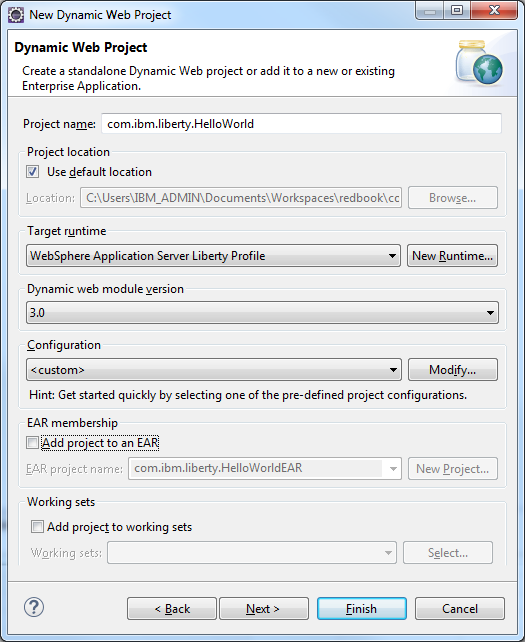
Figure 5-13 Create a Dynamic Web Project
c. Click Next. The next page describes the Java source directory. You do not need to change anything on this page so click Next again.
d. The next page configures the web module settings. Select the check box to Generate web.xml deployment descriptor, and click Finish. See Figure 5-14.
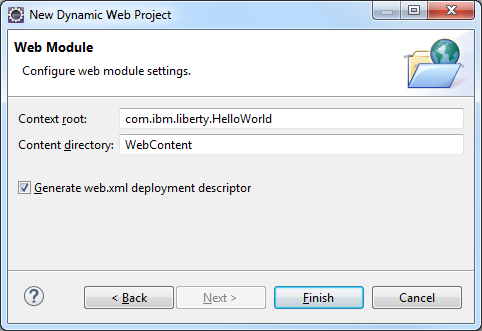
Figure 5-14 Configure web module settings
Now your web project is ready for development work to begin.
Your newly created web-enabled bundle project is now listed in the Enterprise Explorer view of your Eclipse. See Figure 5-15.
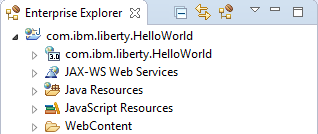
Figure 5-15 Enterprise Explorer view of the project
3. Set the build path
Dynamic web projects are not able to use the Target Platform because they are not OSGi components. Therefore, you need to add both the Liberty and CICS development libraries to the project’s build path. To do this, perform the following steps:
a. In the Enterprise Explorer view, right-click the HelloWorld Project and select Build Path → Configure Build Path. The Java Build Path editor is then displayed. See Figure 5-16.
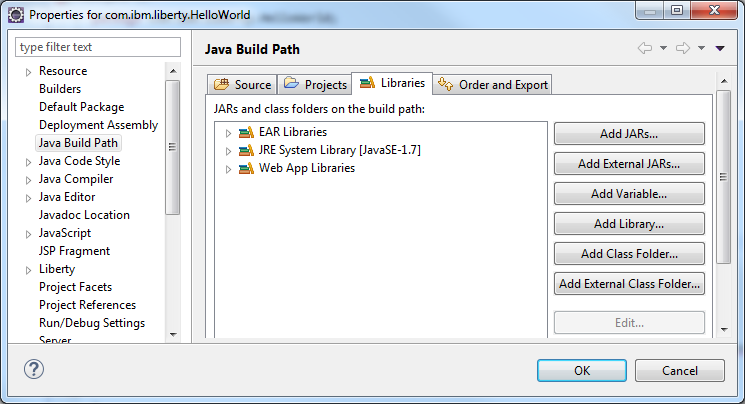
Figure 5-16 Configure Java Build Path
b. Click the Libraries tab and then click Add Library.

Figure 5-17 Add Liberty JVM server libraries
d. In the next window, select CICS TS 5.3 and click Finish.
Both the CICS and Liberty libraries are now added to the project build path, giving access to both the JCICS and the servlet APIs.
Next, you create the sample servlet class.
e. Select File → New → Servlet. In the Create Servlet window, specify the name for the Java package (com.ibm.liberty.HelloWorld) and for the Class (Hello). Click Next. See Figure 5-18.
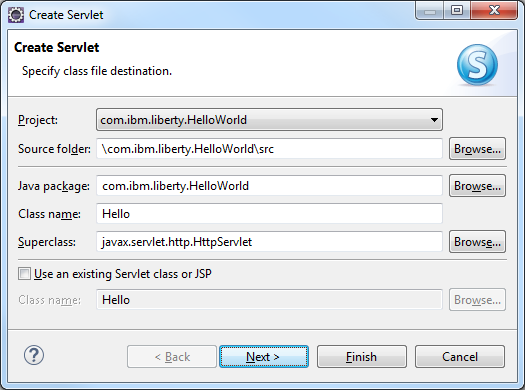
Figure 5-18 Create Servlet window
f. The next page displays information about the servlet. No changes are necessary. Click Next. See Figure 5-19.
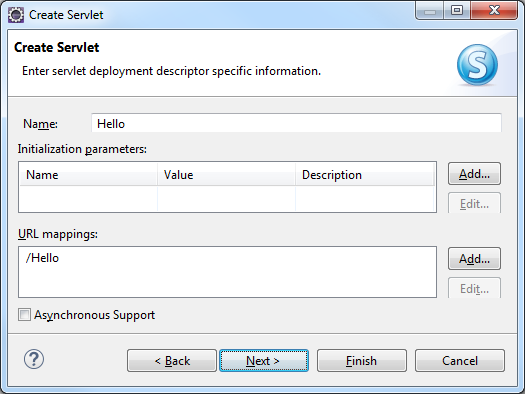
Figure 5-19 Create Servlet default values
g. The last window specifies the HTTP interfaces supported by your servlet. Clear the doPost field because we will only be implementing a doGet() method. Then, click Finish. See Figure 5-20.
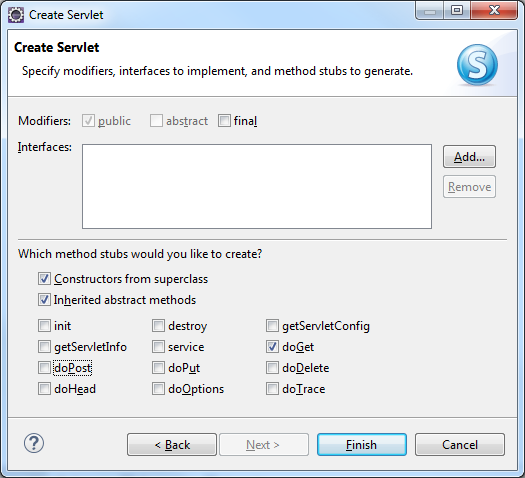
Figure 5-20 Select modifiers
h. The Hello.java class should open automatically. Go to the doGet() method and find this line:
// TODO Auto-generated method stub
i. Replace it with the following code snippet:
ServletOutputStream output = response.getOutputStream();
output.println("Hello World!");
ii. Next, click Source → Organize Imports to add the missing imports. Your Hello World servlet should look like what is shown in Example 5-1.
Example 5-1 Hello source
@WebServlet("/Hello")
public class Hello extends HttpServlet {
private static final long serialVersionUID = 1L;
public Hello() {
super();
}
/**
* @see HttpServlet#doGet(HttpServletRequest request, HttpServletResponse response)
*/
protected void doGet(HttpServletRequest request, HttpServletResponse response) throws ServletException, IOException {
ServletOutputStream output = response.getOutputStream();
output.println("Hello World!");
}
}
Lastly, you need to add the Hello servlet to the welcome file list for the web application.
i. To do this, open the web.xml file in the WebContent/WEB-INF folder of the dynamic web project. Click Welcome File List for the web application (see Figure 5-21), and then in the Details tab, click Add. Select Hello, which is the name of the servlet class, and then close the editor to save the web.xml file.
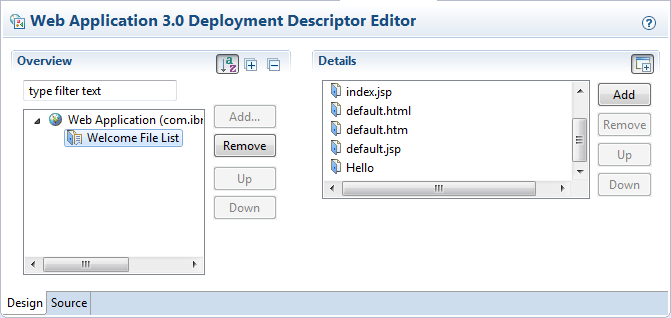
Figure 5-21 Updating the deployment descriptor
Now you are ready to test the application locally on the Liberty server.
j. Right-click your com.ibm.liberty.HelloWorld project and select Run As → Run on Server (Figure 5-22).
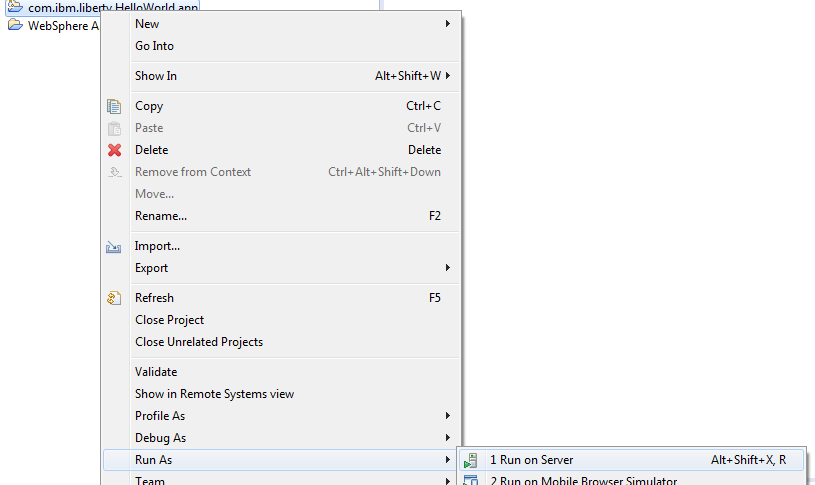
Figure 5-22 Selecting Run on Server option
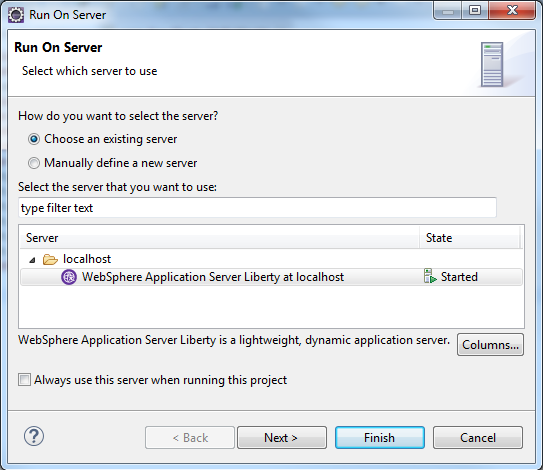
Figure 5-23 Select local server
l. Go to your web browser and open http://localhost:9080/com.ibm.liberty.HelloWorld/Hello. See Figure 5-24.

Figure 5-24 Result of running HelloWorld
You have now created and executed the HelloWorld application.
5.2.1 Local Liberty server
Development on a local Liberty server has many advantages and some disadvantages. The following list shows the advantages and disadvantages for a local installation:
•Advantages:
– Fast deployment: After your application is added to the local server, it is automatically updated.
– Debugging: The complete range of Java debugging functions is available.
– Set up by the developer: No need for a system programmer during the development process.
•Disadvantages:
– Performance: It is not valid to do performance tests on a local server.
– CICS API: The CICS features are not available, so it is not possible to use the JCICS API. Although, you can use the JCA via the CICS Transaction Gateway to invoke CICS programs, and then port the same application into a CICS Liberty JVM server.
5.3 Deploying the application to CICS
There are various ways to export and deploy your web application to CICS. The simplest option is to use the dropins directory, which is automatically scanned by the Liberty server. In this section, we describe the following three options:
1. Deployment of a WAR via the dropins directory
2. Deployment of an web-enabled OSGi bundle as an EBA via a CICS bundle
3. Scripting the building of an application by using the CICS Build Toolkit
5.3.1 Dropins directory
The dropins method is an easy way to deploy an application in your Liberty server and is ideal in a test environment, but is not recommended for a production environment.
The first step when using the dropins is to export your web application and copy it to the dropins folder of the Liberty server. Next, you must modify your server.xml file. The benefit of this option is that Liberty reloads your application automatically without requiring any further definitions.
The following steps illustrate the end-to-end flow for configuring and deploying applications using dropins:
1. Perform the following steps to create a WAR export from your web project:
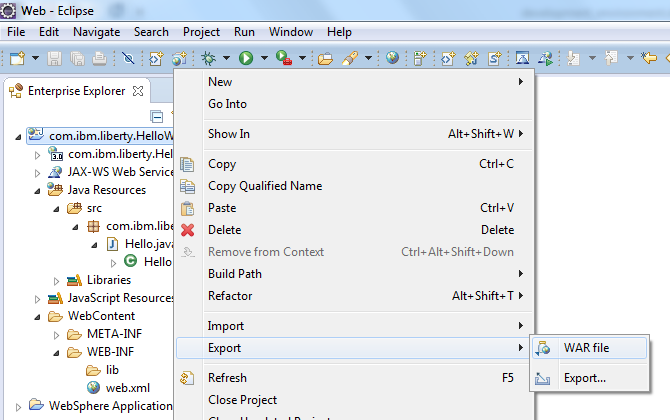
Figure 5-25 Export options on the right-click menu
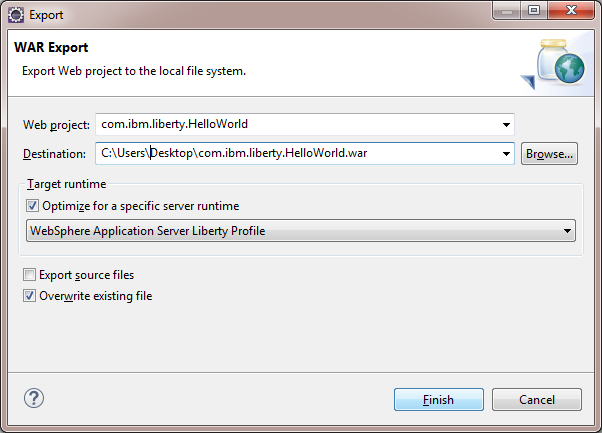
Figure 5-26 Export WAR file
2. Enable dropins in the Liberty JVM server
To use the dropins directory in a Liberty server, it must be enabled in the server.xml file by adding the following directive:
<applicationMonitor dropins="dropins" dropinsEnabled="true" pollingRate="5s"
updateTrigger="disabled"/>
|
Note: If you use the CICS autoconfigure defaults, the dropins directory is not automatically created. In this case, create the directory with this path: WLP_USER_DIR/servers/server_name/dropins, where server_name is the value of the com.ibm.cics.jvmserver.wlp.server.name property.
|
With dropins enabled, the Liberty server automatically detects deployed WAR, EBA, or EAR files in the dropins folder and automatically enables them.
3. Copy to zFS
Now you can copy your WAR file by using FTP to your dropins folder. For this step, you can use any FTP client. The following sample uses the Microsoft Windows command-line FTP tool. Perform the following steps:
a. Open a command line and connect to your host with the ftp HOSTNAME command:
C:UsersDesktop>ftp <hostname>
b. Log in with your user ID and password:
User (<hostname>:(none)): reds12
331 Send password please.
Passwd:
230 REDS12 is logged on. Working directory is "REDS12.".
c. Change your working directory to your dropins folder:
cd DROPINSFOLDER
ftp> cd /…/dropins/
250 HFS directory /…/dropins/ is the current working directory
d. Set the transfer type to binary:
ftp> binary
200 Representation type is Image
e. Send your WAR file in the dropins folder: send WARfile
ftp> send C:...com.ibm.liberty.HelloWorld.war
200 Port request OK.
125 Storing data set /…/dropins/com.ibm.liberty.HelloWorld.war
250 Transfer completed successfully.
FTP: 2977 Bytes gesendet in 0,42Sekunden 7,02KB/s
f. Close and exit the FTP connection:
ftp> close
ftp> bye
|
Note: Be sure to use a binary transfer mode. Otherwise, the Liberty cannot read the WAR file.
|
5.3.2 Deploying to CICS as an EBA
This section describes the conversion of the web project to an OSGi project, and the deployment in a CICS bundle project. The supported deployment artifact for OSGi bundles in Liberty is an enterprise bundle archive (EBA), which is created in Eclipse using an OSGi Application Project.
First, you need to create a new OSGi Application Project. Proceed as follows:
1. In the Enterprise Explorer view, select your dynamic web project com.ibm.liberty.HellowWorld, right-click, and select Configure → Convert to OSGi Bundle Projects.
2. Click OK on the next window, which warns about the modifications to the project classpath.
This converts the project to an OSGi bundle project, adding the OSGi bundle facet, and importantly adding the MANIFEST.MF file to the WebContent/META-INF folder, which contains the bundle dependencies. These are dynamically created for us so they do not need editing in our example.
3. Next, we need to remove the usage of the class path from the OSGi bundle manifest. To do this, follow these steps:
a. Double-click the MANIFEST.MF file to open the bundle manifest editor.
b. Click the MANIFEST.MF tab to edit the source and remove the highlighted Bundle-ClassPath statement shown in Example 5-2. Then, save the file.
Example 5-2 Remove the highlighted Bundle-ClassPath statement
Manifest-Version: 1.0
Bundle-ManifestVersion: 2
Bundle-Name: com.ibm.liberty.HelloWorld
Bundle-SymbolicName: com.ibm.liberty.HelloWorld
Bundle-Version: 1.0.0.qualifier
Bundle-RequiredExecutionEnvironment: JavaSE-1.7
Bundle-ClassPath: WEB-INF/classes
Import-Package: javax.el;version="2.0",
javax.servlet;version="2.5",
javax.servlet.annotation,
javax.servlet.http;version="2.5",
javax.servlet.jsp;version="2.0",
javax.servlet.jsp.el;version="2.0",
javax.servlet.jsp.tagext;version="2.0"
Web-ContextPath: /com.ibm.liberty.HelloWorld
Next, we need to create an OSGi Application Project, which references the OSGi bundle project.
4. Right-click in the Enterprise Explorer and go to New → OSGi Application Project. If this option does not appear, you can find it through New → Other by using the filter bar. See Figure 5-27.
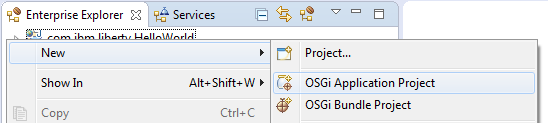
Figure 5-27 Creating the OSGI Application Project
5. Complete the project name. In this example, use com.ibm.liberty.HelloWorld.app. Click Next. See Figure 5-28.
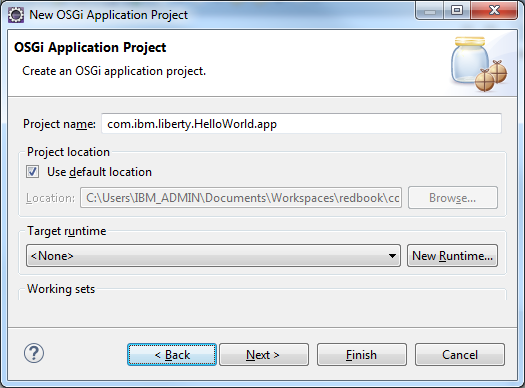
Figure 5-28 Define OSGI Application Project name
6. Now you should see the converted OSGi bundle that you created earlier. It is listed under the Contained Bundles and Composite Bundles (Application-Content) section. Select the check box next to the bundle name (com.ibm.liberty.HelloWorld 1.0.0) to add it to your OSGi Application Project content. Click Finish. See Figure 5-29.
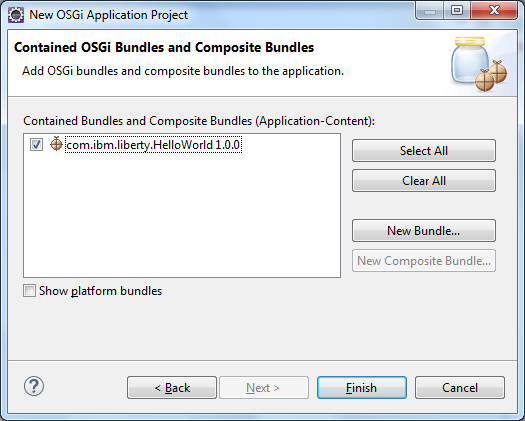
Figure 5-29 Add OSGi bundle and composite bundles to the application
Next, we need to create a CICS bundle project to reference the OSGi Application Project:
7. Click File → New → Other. Select CICS Resources → CICS Bundle Project and click Next. See Figure 5-30.
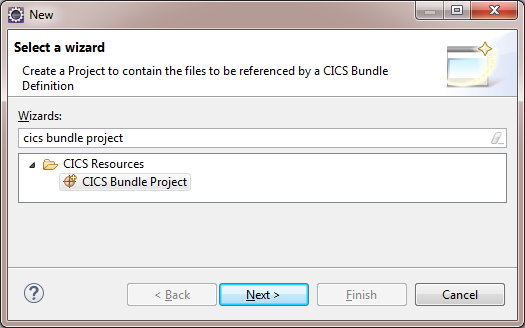
Figure 5-30 Selecting the CICS bundle project wizard
8. Specify the name of your project, in this case com.ibm.liberty.HelloWorld.cics, and modify the properties if wanted. Click Finish. See Figure 5-31.
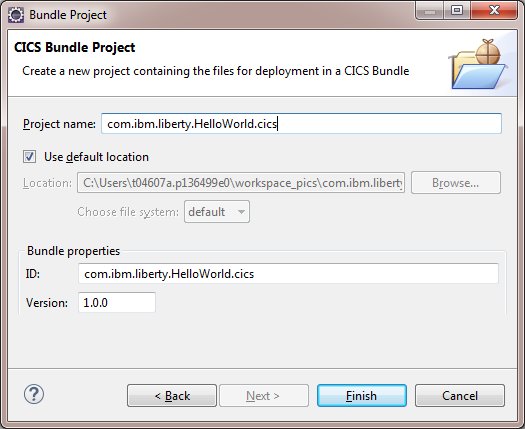
Figure 5-31 Defining the CICS bundle project name
9. Expand the newly created CICS bundle project, including the META-INF folder, then double-click the cics.xml file to open the CICS bundle manifest editor. This view shows some basic information about your bundle and gives you options for adding resources and applications to your CICS bundle. The section that we are interested in is Defined Resources. Click New to get a list of resources that you can add to the bundle. Then, select OSGi Application Project Include from the list. See Figure 5-32.
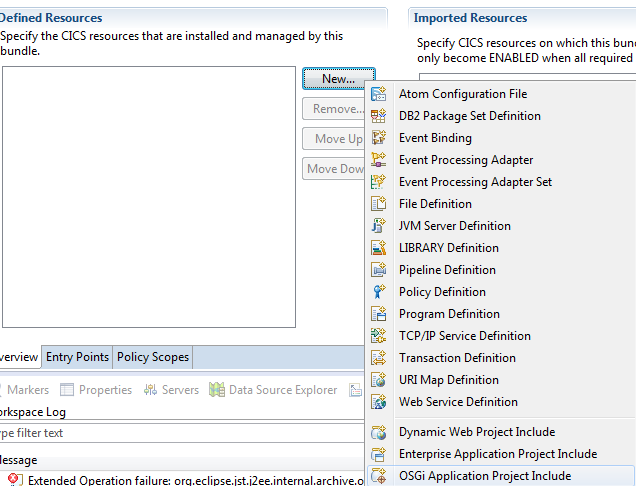
Figure 5-32 Adding the OSGi Application Project Include
10. Select your OSGi application project. Specify the name of your Liberty JVM server. Click Finish. See Figure 5-33.
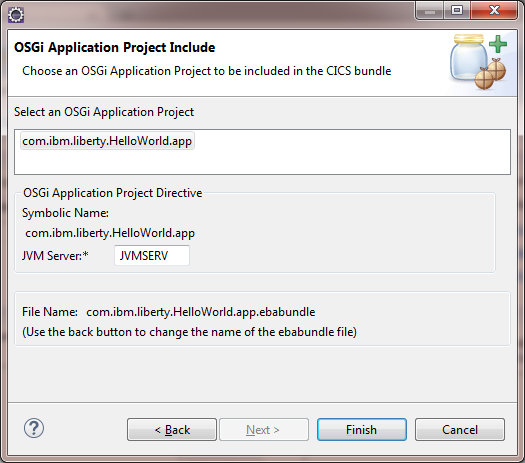
Figure 5-33 Selecting OSGi Application Project
5.3.3 Deploy CICS bundle with CICS Explorer
This section describes the deployment workflow with the CICS Explorer. Perform the following steps:
1. Right-click your CICS bundle project and select Export Bundle Project to z/OS UNIX File System. See Figure 5-34.
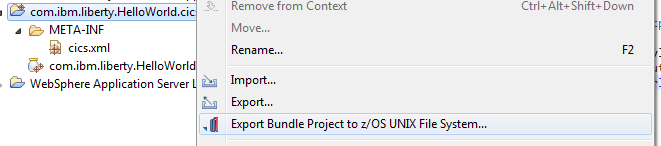
Figure 5-34 Export bundle project
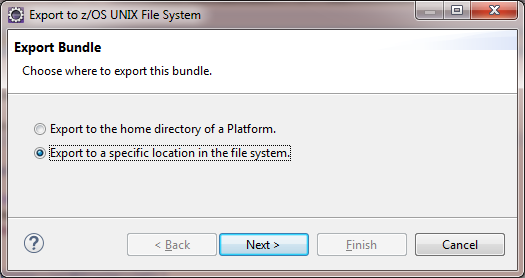
Figure 5-35 Export bundle project to a specific location
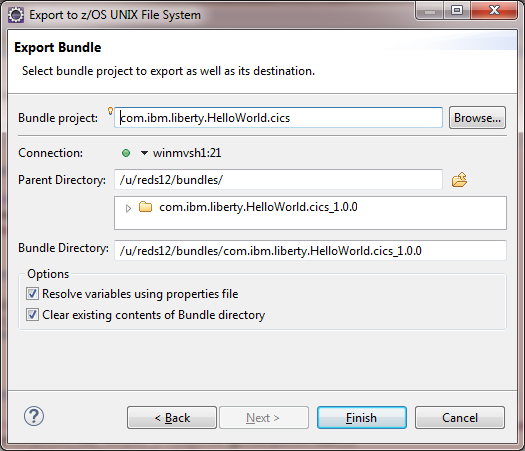
Figure 5-36 Specify the bundle to export
After you complete these steps, you need to install your CICS bundle by defining a CICS BUNDLE definition that refers to the export location on zFS. For more information, see Chapter 6, “Configuring a Liberty server in CICS” on page 103.
5.3.4 Using CICS Build Toolkit
The CICS Build Toolkit (CICS BT) provides a command-line interface for build automation of CICS bundle projects, such as web projects, OSGi bundles, CICS applications, and CICS application bindings and can take prebuilt OSGi bundles and Liberty applications as input.
In this section, we show a small sample of how to build a CICS bundle with a command line in Microsoft Windows. You can also run the Build Toolkit under Linux and z/OS because the only requirement is to have a Java Runtime Environment.
After you download and extract the CICS Build Toolkit, open a Microsoft Windows command line, change to the directory where you installed the CICS Build Toolkit, and type the following command:
cicsbt
--input path oyourproject*
--build my.bundle.name(1.0.0)
--target com.ibm.cics.explorer.sdk.web.liberty53.target
--output path oyouroutputdirectory
The parameter descriptions for the cicsbt command are as follows:
•input: Specifies the local path to the project source
•build: Specifies which project should be built from the input directory option
•target: Specifies the target runtime. We used the com.ibm.cics.explorer.sdk.web.liberty53.target to support CICS TS V5.3 web applications
•output: Specifies the directory for your deployable CICS bundle project
For more information about using the CICS Build Toolkit, see the following IBM Redbooks publication CICS and DevOps: What You Need to Know, at:
..................Content has been hidden....................
You can't read the all page of ebook, please click here login for view all page.