

Configuring a Liberty server in CICS
This chapter shows you how to configure the Liberty JVM server in CICS to run a web container. This can be used to deploy Java applications that use a range of web technologies including Java servlets and JavaServer Pages (JSP) technology. The web container is based on the WebSphere Liberty profile (WLP) technology.
In this chapter, we show you a simple way to set up a Liberty server in CICS Transaction Server (TS) and how to configure it in only a few steps. This chapter takes you through setting up CICS and zFS, including all the steps required to get you started with a JVM server in CICS, and to deploy a sample Hello World web application. For more information about how to create a Hello World example, see Chapter 5, “Developing and deploying applications” on page 69.
You can define all of the Liberty JVM server resources in a classic way by using these tools:
•Resource definition online (RDO) using the CEDA transaction
•Submitting offline batch jobs (using the DFHCSDUP program provided by CICS)
•Using CICS Explorer
This chapter describes the use of both CEDA and CICS Explorer.
This chapter describes the following topics:
6.1 Getting your CICS region ready
The first step to run Java in CICS TS is to ensure that the UNIX System Services and Java environment are enabled in CICS. To do this, follow these steps:
1. Add the SDFJAUTH library to the CICS region’s STEPLIB:
– Syntax //STEPLIB DD DISP=SHR,DSN=HLQ.CICS_VERSION.SDFJAUTH
– Example //STEPLIB DD DISP=SHR,CICSDPP.BETA14R.CTS53BT.CICS.SDFJAUTH
|
Note: In addition, you need to ensure that the SDFJAUTH library is APF-authorized, in the same manner as used for the SDFHAUTH library.
|
2. Set the USSHOME SIT parameter to the location where the CICS UNIX System Services libraries are installed. In this example, we use the following:
– Syntax USSHOME=</usr/lpp/cicsts/cicsts53|directory|NONE>
– Example USSHOME=/usr/lpp/cicsts/cicsts53
3. Determine where your Java runtime is installed. For the purposes of this example, we use:
Example </usr/lpp/java/J7.0_64>
6.2 zFS file system configuration
Several zFS files are used by the JVM server in CICS. There are two for configuration and logs. You need to copy a delivered JVM profile and edit it. This topic explains how to do this.
6.2.1 zFS configuration files
Only two mandatory configuration files are required to run a Liberty JVM server in CICS:
•JVM profile: This is the configuration file for the JVM server. It must be Extended Binary Coded Decimal Interchange Code (EBCDIC) encoded and contain the environment variables and JVM settings that are necessary to support the JVM server.
•server.xml: This is the configuration file for the Liberty run time. It is encoded in ASCII and is an XML-based configuration file. It is normally created on the first startup of the Liberty JVM server using autoconfigure support, and then it can be edited.
The JVM profile is located by using the JVMPROFILEDIR system initialization parameter for your CICS region. CICS provides a set of fully commented examples in the USSHOME/JVMProfiles zFS directory. In this example, we show you how to configure your Liberty JVM server using the sample JVM profile and editing it for a first startup. We used the JVMPROFILEDIR location /u/reds08/cicsts53/JVMProfiles as the JVM profile directory.
The server.xml file defines the Liberty configuration that you want to use for your Liberty JVM server. If you create a Liberty JVM server for the first time with the autoconfigure option turned on in your JVM profile, this file is created for you. We suggest that you start your Liberty JVM servers with this option turned on when you start it for the first time, and then turn it off for any subsequent restarts of that JVM server. This chapter uses autoconfigure to create a server.xml file.
6.2.2 zFS output files
Several output files are used by the JVM server, such as the stdout, stderr, JVM server trace and Liberty first-failure data capture (FFDC) and messages logs. These are in region-specific subdirectories based on the WORK_DIR setting in the JVM profile. We used the location /<home directory>/<version>/<workdir>. This means that for our example server called JVMWLP on our CICS region with applied CREDS08A, the zFS output files are in the following directory: /u/reds08/cicsts53/workdir/CREDS08A/JVMWLP.
|
Note: In a production environment, we suggest that the zFS configuration and output files be in a separate dedicated zFS file system to provide the best recoverability of the system.
|
6.2.3 zFS file permissions
Access to zFS files in a JVM server is controlled by using the CICS region user ID and the UNIX file permission bits. You must ensure that the CICS region user ID has a UNIX System Services segment, and either this user ID or a group it belongs to has the following permissions:
•Read and execute access to all directories in the tree so that entry is permitted to all directories
•Read access to the JVM profile, which is used for reading the configuration
•Read and write access to the working directory, for creating log files and the Liberty server configuration files
By using the examples, you can issue the following UNIX System Services commands to set these permissions where <CICSGID> is the group ID that the CICS region user ID belongs to:
•chgrp <CICSGID> /u/reds08/cicsts53/JVMProfiles
•chmod 750 /u/reds08/cicsts53/JVMProfiles
•chgrp <CICSGID> /u/reds08/cicsts53/workdir
•chmod -R 770 /u/reds08/cicsts53/workdir
|
Note: UNIX file permissions only allow for one owner and one group owner. This can make it difficult to grant access to multiple writers if the user IDs are not in the same group. As a solution to this, you can use UNIX System Service file ACLs, which provide a more flexible security model.
|
6.3 Setting up a Liberty JVM server
We are now ready to create and start the JVM server. This section shows what you must define, edit, and configure to set up a Liberty JVM server in CICS using the CEDA tool to create the JVMSERVER resource definition. If you prefer to use CICS Explorer to do this, refer to 6.6, “Setting up a Liberty JVM server using CICS Explorer” on page 124.
6.3.1 JVM profile
The JVM profile lists the options and system properties that are used by the CICS launcher for Java. Some of the options are specific to, and others are standard for the JVM runtime environment. For example, the JVM profile controls the initial size of the JVM storage heap and how far it can expand. The profile can also define the destinations for messages and dump output produced by the JVM. The JVM profile is named in the JVMPROFILE attribute in a JVMSERVER resource definition.
You can copy the sample JVM profiles provided by CICS and customize them for your own applications. The sample JVM profile supplied with CICS is in the USSHOME/JVMProfiles directory on zFS. Copy the sample from the installation directory to the directory that you specified in the JVMPROFILEDIR system initialization parameter. The sample JVM profile in the installation location is overwritten if you apply an APAR that includes changes to these files. To avoid losing your modifications, always copy the sample to a different location before adding or changing any options.
For reference material about all of the properties you can edit in a Liberty JVM server profile, see Options for JVMs in a CICS environment:
6.3.2 Tailoring the JVM profile
To begin, follow these steps:
1. Copy the sample JVM profile for a Liberty JVM server, which is delivered with your CICS installation and is at:
/USSHOME/JVMProfiles/DFHWLP.jvmprofile
2. Copy it to your JVMPROFILEDIR directory as defined in your SIT:
/u/reds08/cicsts53/JVMProfiles/JVMWLP.jvmprofile
|
Note: You can rename the JVM profile if you do not want to use the delivered default. In this example, we named it JVMWLP.
|
6.3.3 Java home directory
The JAVA_HOME directory specifies the installation location for the IBM Java SDK for z/OS. This location contains subdirectories and Java archive files that are required for Java support.
The supplied sample JVM profiles contain a path that was generated by the JAVADIR parameter in the DFHISTAR CICS installation job. The default for the JAVADIR parameter is java/J7.0_64/, which is the default installation location for the IBM 64-bit SDK for z/OS, Java Technology Edition. This value produces a JAVA_HOME setting in the JVM profiles of /usr/lpp/java/J7.0_64/:
JAVA_HOME</usr/lpp/java/J7.0_64
WORK_DIR
WORK_DIR is the working directory in zFS that the CICS region uses for activities that are related to the JVM server. The CICS JVM server uses this directory for both configuration and output. A period (.) is defined in the supplied JVM profiles, indicating that the home directory of the CICS region user ID is to be used as the working directory. If the directory does not exist or if WORK_DIR is omitted, /tmp is used as the zFS directory name. You can also specify your own zFS directory for the working directory. In this situation, you must also ensure that the relevant directory is created on zFS, and that access permissions are given to the correct CICS regions.
We specified the following pattern for our WORK_DIR, under which CICS dynamically creates subdirectories for each region and JVM server.
WORK_DIR=/u/reds08/cicsts53/workdir
|
Note: Do not define your working directories in the CICS USSHOME directory, as this is the home directory for CICS installation files and is typically mounted read-only.
|
Log files
Output from Java applications that are running in a Liberty JVM server can be written to either zFS or to JES. The destination for the logs is defined using the STDOUT, STDERR, and JVMTRACE options in the JVM profile.
•STDERR
STDERR specifies the location to which the stderr stream is directed from the JVM server, and often contains useful output such as Java exception messages. By default files are placed in the WORK_DIR/<applid>/<jvmserver> directory in zFS.
In our example, we left STDERR unset so that the output was written to the following default location in our working directory:
/u/reds08/cicsts53/workdir/CREDS08A/JVMWLP/Dyyyymmdd.Thhmmss.dfhjvmerr
•STDOUT
STDOUT specifies the location to which the stdout stream is directed from the JVM server. By default, files are placed in the WORK_DIR/<applid>/<jvmserver> directory in zFS. CICS JVM servers do not log output to this file, but it can be used by Java applications or other components.
In our example, we left STDOUT unset so that the output was written to the following location in our working directory:
/u/reds08/cicsts53/workdir/CREDS08A/JVMWLP/Dyyyymmdd.Thhmmss.dfhjvmout
|
Note: By default, there are multiple versions of the log files stored in the zFS, but the current version in use is easily identified using the symbolic link CURRENT.<file> for instance /u/reds08/cicsts53/workdir/CREDS08A/JVMWLP/CURRENT.STDOUT.
|
Redirection of log files to JES
In CICS TS V5.2 and above, JVM server log files can now be directed to JES instead of zFS.
For instance, to log output to the following JCL DD members
// LOGOUT DD SYSOUT=*
// LOGERR DD SYSOUT=*
Specify the following options for the STDOUT and STDERR in the JVM profile:
STDOUT=//DD:LOGOUT
STDERR=//DD:LOGERR
Maximum number of zFS log or trace files
The LOG_FILES_MAX value specifies the number of old log files kept on the system. A default setting of 0 ensures that all old versions of the log file are retained. This value can be modified to specify how many old log files you want to remain on the file system:
LOG_FILES_MAX=<n>
If STDOUT, STDERR, and JVMTRACE use the default scheme, or if it is customized, include the &DATE;.&TIME; pattern, then only the newest instance of each log type is kept on the system. If your customization does not include any variables that make the output unique, the files are appended to, and there is no requirement for deletion. This clean up function does not apply if the output variables have been customized to route output to JES.
|
Note: The USEROUTPUTCLASS, which can be specified in an OSGi JVM server in CICS, is not supported for Liberty JVM servers.
If the variable LOG_PATH_COMPATABILITY=TRUE, the output files are placed in the WORK_DIR directory, which is the same behavior as in CICS TS V5.2 and earlier releases.
|
6.3.4 Time zone
The time zone (TZ) environment variable specifies the local time of a system. You can set this for a JVM server by adding it to the JVM profile.
When setting the time zone for a JVM server, be aware of the following issues:
•The TZ variable in your JVM profile needs to match your local IBM MVS™ system offset from Greenwich mean time (GMT).
•If you do not set the TZ variable, the system defaults to Coordinated Universal Time (UTC).
•Customized time zones are not supported and result in failover to UTC or a mixed time zone output in the JVMTRACE file.
•If you see LOCALTIME as the time zone string, there is an inconsistency in your configuration. This can be between your local MVS time and the TZ you are setting, or between your local MVS time and your default setting in the JVM profile. The output will be in mixed time zones, although each entry will be correct.
•The short form of Portable Operating System Interface (POSIX) TZ can be used and reduces the chances of input errors.
Short format:
TZ=CET-1CEST
Long format:
TZ=CET-1CEST,M3.5.0,M10.5.0
6.3.5 Liberty-specific options
The variables described in this section are specific to the Liberty server environment:
•WLP_INSTALL_DIR
This environment variable is required if you want to start a Liberty JVM server. The Liberty profile installation files are installed in the CICS USSHOME directory in a subdirectory called wlp. The default installation directory is /usr/lpp/cicsts/cicsts53/wlp. Always use the &USSHOME symbol to set the correct file path and append the wlp directory:
WLP_INSTALL_DIR=&USSHOME;/wlp
If you set this environment variable, you can also supply other environment variables and system properties to configure the Liberty JVM server. The Liberty specific environment variables are all prefixed with WLP.
•WLP_USER_DIR
This specifies the directory that contains the configuration files for the Liberty JVM server. This environment variable is optional. If you do not specify it, CICS defaults to the following subdirectory of the JVM server: working directory:
WLP_USER_DIR=./&APPLID;/&JVMSERVER;/wlp/usr
We used this default location and so our Liberty user directory was as follows:
/u/reds08/cicsts53/workdir/CREDS08A/JVMWLP/wlp/usr
•WLP_OUTPUT_DIR
This specifies the directory that contains output files for the Liberty profile. By default, the Liberty profile stores logs, the work area, and configuration files for the server in a directory that is named after the server.
This environment variable is optional. If you do not specify it, CICS defaults to the following subdirectory of the JVM server working directory:
WLP_OUTPUT_DIR=./&APPLID;/&JVMSERVER;/wlp/usr/servers
We used this default location and so our Liberty output directory was as follows:
/u/reds08/cicsts53/workdir/CREDS08A/JVMWLP/wlp/usr/servers
The following system properties are specific to the Liberty JVM server environment:
•Encoding
A Liberty JVM server requires that JVM encoding be set to ASCII rather than the usual EBCDIC default for CICS. This is controlled by using the file.encoding JVM system property. You need to set your encoding as follows to start a Liberty JVM server.
-Dfile.encoding=ISO-8859-1
•Autoconfigure
For the first startup of the Liberty JVM server in CICS, enable autoconfigure, which builds the CICS Liberty server environment. This requires setting the following system properties:
-Dcom.ibm.cics.jvmserver.wlp.autoconfigure=true
This property instructs CICS to build the Liberty server and configuration file (server.xml) during startup. The default JVM profile already supplies this line and you need to remove the ‘#’ comment and set the value to true.
•HTTP/HTTPS port
Now change your default ports so that they do not conflict with any existing port usage. Delete the ‘#’ before the following two lines and change ‘9080’ and ‘9443’ to valid free ports:
-Dcom.ibm.cics.jvmserver.wlp.server.http.port=53088
-Dcom.ibm.cics.jvmserver.wlp.server.https.port=53089
This is a summary of all content that is configured and enabled in the DFHWLP.jvmprofile by default:
JAVA_HOME=/usr/lpp/java/J7.0_64
WORK_DIR=.
WLP_INSTALL_DIR=&USSHOME;/wlp
-Xms128M
-Xmx256M
-Xmso128K
-Xgcpolicy:gencon
-Xscmx128M
-Xshareclasses:name=cicsts530%g,groupAccess,nonfatal
-Dcom.ibm.tools.attach.enable=no
-Dfile.encoding=ISO-8859-1
This is how the JVMWLP.jvmprofile looked after editing:
JAVA_HOME=/usr/lpp/java/J7.0_64
WORK_DIR=/u/reds08/cicsts53/workdir
LOG_FILES_MAX=5
-Xms128M
-Xmx256M
-Xmso128K
-Xgcpolicy:gencon
-Xscmx128M
-Xshareclasses:name=cicsts530%g,groupAccess,nonfatal
-Dcom.ibm.tools.attach.enable=no
TZ=CET-1CEST
# WebSphere Liberty Profile server (WLP)
# --------------------------------------
WLP_INSTALL_DIR=&USSHOME;/wlp
-Dcom.ibm.cics.jvmserver.wlp.autoconfigure=true
-Dcom.ibm.cics.jvmserver.wlp.server.http.port=53088
-Dcom.ibm.cics.jvmserver.wlp.server.https.port=53089
#
-Dcom.ibm.ws.logging.max.files=5
-Dfile.encoding=ISO-8859-1
6.3.6 Creating a JVMSERVER
Now it is time for you to create the CICS JVMSERVER resource definition. This is used to define the JVM profile location and control the lifecycle of the JVM server within the CICS runtime environment.
Copy the sample JVMSERVER DFHWLP from sample CSD group DFH$WLP with a new name to a CSD group of your choice to enable it to be modified. We used the following values:
Table 6-1 Values for the new JVM server
|
ATTRIBUTE
|
DEFAULT
|
VALUE
|
Description
|
|
JVMSERVER
|
DFHWLP
|
JVMWLP
|
Name of the Liberty JVM server in CICS
|
|
Group
|
DFH$WLP
|
REDS08LP
|
Name of the CSD group defined in CICS
|
|
Jvmprofile
|
DFHWLP
|
JVMWLP
|
Name of the JVM profile in zFS
|
Create a JVMSERVER definition by using CEDA with your user-specific changes as shown in Example 6-1.
Example 6-1 Create a JVM server resource definition
OVERTYPE TO MODIFY CICS RELEASE = 0700
CEDA ALter JVmserver( JVMWLP )
JVmserver : JVMWLP
Group : REDS08LP
DEScription ==> CICS JVM server to run WLP samples
Status ==> Enabled Enabled | Disabled
Jvmprofile ==> JVMWLP (Mixed Case)
Lerunopts ==> DFHAXRO
Threadlimit ==> 015 1-256
DEFINITION SIGNATURE
SYSID=ISV APPLID=CREDS08A
PF 1 HELP 2 COM 3 END 6 CRSR 7 SBH 8 SFH 9 MSG 10 SB 11 SF 12 CNCL
6.3.7 Install a JVMSERVER
Install and enable the JVMSERVER resource into your CICS region using CEDA, and check the status of the Liberty JVM using CEMT:
•Syntax CEDA EXPAND GROUP(GROUP)
•Example CEDA EXPAND GROUP(REDS08LP)
See Example 6-2.
Example 6-2 Install JVM server resource
CEDA EX GR(REDS08LP)
ENTER COMMANDS
NAME TYPE GROUP LAST CHANGE
JVMWLP JVMSERVER REDS08LP install 28/10/15 19:28:14
SYSID=ISV APPLID=CREDS08A
RESULTS: 1 TO 7 OF 7 TIME: 17.38.09 DATE: 29/10/15
PF 1 HELP 2 SIG 3 END 4 TOP 5 BOT 6 CRSR 7 SBH 8 SFH 9 MSG 10 SB 11 SF 12 CNCL
•Check the status of the JVM server using CEMT:
CEMT INQUIRE JVMSERVER
CEMT INQUIRE JVMSERVER
See Example 6-3.
Example 6-3 Check JVM server status
CEMT I JVMS
STATUS: RESULTS - OVERTYPE TO MODIFY
Jvm(JVMWLP ) Ena Prf(JVMWLP ) Ler(DFHAXRO )
Threadc(011) Threadl( 015 ) Cur(61580456)
SYSID=ISV APPLID=CREDS08A
RESPONSE: NORMAL TIME: 17.49.26 DATE: 29/10/15
PF 1 HELP 3 END 5 VAR 7 SBH 8 SFH 9 MSG 10 SB 11 SF
If the status shows enabled, you know that your JVM environment is running. You completed your first step and have successfully validated the Java environment on CICS. If it fails to enable, check the CSMT log and the stderr log in the zFS working directory for further errors.
If you want to restart the Liberty JVM server in CICS, disable it by typing over Ena with Dis.
6.3.8 Manually tailoring server.xml
We show how you can manually configure your server.xml file and how to set up the parameters in it. Performing a manual configuration is especially important in a production environment, in which you might want to more tightly control the server configuration.
One of the major advantages of Liberty is its composability, based on features. You can add all the functionality that you need for your specific set of applications by choosing the features that they require. Being composable allows you to keep the server lightweight because you add only the features that you need.
Example 6-4 illustrates how to compose the server.xml to load specific features.
Example 6-4 Example of loading specific features on server.xml
<server description="ComposabilityIsTheKey">
<featureManager>
<feature>cicsts:core-1.0</feature>
<feature>jsp-2.2</feature>
<feature>servlet-3.0</feature>
<feature>restConnector-1.0</feature>
</featureManager>
</server>
6.3.9 Adding new features
You can add a wide variety of features in the <featureManager> list of features. These are the key features that we used in our initial configuration:
•The CICS feature cicsts:core-1.0 enables the CICS Liberty profile integration. This feature is required for the JVM server to start.
•The ssl-1.0 feature enables Secure Sockets Layer (SSL) support for the HTTP listeners, using either Java keystores or RACF key rings.
•The servlet-3.0 feature enables support for servlet applications written to the Java Platform, Enterprise Edition 6 web profile standard.
•The jsp-2.2 feature enables support for servlet and JavaServer Pages (JSP) applications. This feature is required by Dynamic Web Projects (WAR files) and OSGi Application Projects containing OSGi bundle projects with web support.
•The wab-1.0 feature enables support for Web Archive Bundles (WABs) that are inside enterprise bundles (EBAs). This feature is required by OSGi application projects containing OSGi bundle projects with web support.
See Example 6-5.
Example 6-5 Adding new features on server.xml
<featureManager>
<feature>cicsts:core-1.0</feature>
<feature>ssl-1.0</feature>
<feature>servlet-3.0</feature>
<feature>jsp-2.2</feature>
<feature>wab-1.0</feature>
</featureManager>
CICS supports a wide range of features from the WebSphere Application Server Liberty profile enabling Java Platform, Enterprise Edition web applications to be deployed into a Liberty JVM server. For more information about supported features, see Chapter 1, “Introduction” on page 1.
6.3.10 Configuring the HTTP and HTTPS endpoint
If you want to change the port or IP address that is used by the Liberty HTTP listener, update the httpEndpoint attribute with the host name and port numbers that you require, as shown in Example 6-6.
Example 6-6 HTTP and HTTPS port definition on server.xml
<httpEndpoint host="<hostname>" httpPort="53088" httpsPort="53089"
id="defaultHttpEndpoint"/>
Use a port number that is not in use anywhere else, for example, by a TCPIPSERVICE in CICS.
HTTPS is available only if SSL is configured.
|
Note: If you are using autoconfigure, the HTTP ports are configured by using a system property and should not be modified directly in the server.xml file.
|
6.3.11 CICS bundle deployed applications
If you want to deploy Liberty applications that use CICS bundles, the server.xml file must include the following entry. See Example 6-7.
Example 6-7 Set the resource location on server.xml
<include location="${server.output.dir}/installedApps.xml"/>
The included file is used to define CICS bundle deployed applications.
6.3.12 Bundle repository
Share common OSGi bundles between applications deployed in EBAs by placing them in a directory and referring to that directory in a bundleRepository element, as in Example 6-8.
Example 6-8 List file sets in the bundle repository
<bundleRepository>
<fileset dir="directory_path" include="*.jar"/>
</bundleRepository>
6.3.13 Global library
Share common Java archive (JAR) files between web applications (WARs and EARs) by placing them in a directory and referring to that directory in a global library definition, as in Example 6-9.
Example 6-9 Define path for common libraries
<library id="global">
<fileset dir="directory_path" include="*.jar"/>
</library>
The global libraries cannot be used by OSGi applications in an EBA, which must use a bundle repository.
6.3.14 Liberty server application and configuration update monitoring
The Liberty JVM server scans the server.xml file for updates. By default, it scans every 500 milliseconds. To vary this value, add an entry such as in Example 6-10.
Example 6-10 Set monitoring intervals
<config monitorInterval="5s" updateTrigger="polled"/>
The Liberty JVM server also scans the dropins directory to detect the addition, update, or removal of applications. If you install your web applications in CICS bundles, disable the dropins directory as shown in Example 6-11.
Example 6-11 Disable monitoring of dropins
<applicationMonitor dropins="dropins" dropinsEnabled="false" pollingRate="5s"
updateTrigger="enabled"/>
|
Note: If you disable configuration monitoring, CICS bundle installation does not work.
|
6.3.15 CICS default web application
The CICS default web application, CICSDefaultApp, illustrated in Figure 6-10 on page 123, is a built-in configuration service that validates the Liberty JVM server has started. To make the application available, add the following statement to your server.xml file. See Example 6-12.
Example 6-12 Enable the default web application
<cicsts_defaultApp deployed="true" />
6.3.16 JTA transaction log
When Liberty applications use the Java Transaction API (JTA), the Liberty transaction manager stores its recoverable log files in the zFS filing system. The default location for the transaction logs is ${WLP_USER_DIR}/tranlog/. This location can be overridden by adding a transaction element to the server.xml file, as shown in 6.3.17, “Sample server.xml” on page 115. You only need to consider setting this location if your application uses either EJB container-managed transactions or the Java Transaction API using the UserTransaction interface. See Example 6-13.
Example 6-13 Define directory of the transaction log
<transaction transactionLogDirectory="/cicsts53/CICSPRD/JVMWLP/tranlog/"/>
6.3.17 Sample server.xml
Example 6-14 shows what the server.xml file looks like when the configuration is complete.
Example 6-14 Sample server.xml with our updates
<server description="JVMWLP sample">
<featureManager>
<feature>cicsts:core-1.0</feature>
<feature>ssl-1.0</feature>
<feature>servlet-3.0</feature>
<feature>jsp-2.2</feature>
<feature>wab-1.0</feature>
</featureManager>
...
<httpEndpoint host="<hostname>" httpPort="53088" httpsPort="53089"
id="defaultHttpEndpoint"/>
...
<include location="${server.output.dir}/installedApps.xml"/>
...
<cicsts_defaultApp deployed="true" />
...
<bundleRepository>
<fileset dir="/u/user/bundles/" include="TESTBUND.jar"/>
</bundleRepository>
...
<library id="global">
<fileset dir="/u/user/bundles/global/" include="GLOBUND.jar"/>
</library>
...
<config monitorInterval="5s" updateTrigger="polled"/>
...
<applicationMonitor dropins="dropins" dropinsEnabled="false" pollingRate="5s"
updateTrigger="enabled"/>
...
<transaction transactionLogDirectory="/u/cics/CICSPRD/JVMWLP/tranlog/"/>
...
</server>
6.3.18 Check welcome page
A quick way to check your Liberty JVM server status is to use the home page created by the Liberty server. This page is a simple welcome page, which is displayed by Liberty when a browser attempts to access its HTTP or HTTPS port without a valid URI. You can access this page by visiting the URL <hostname>:<port>.
In our example, we used: http://<hostname>:53088/, which displayed the following page. For more information about how to verify your configuration, see 6.5, “Verifying the configuration” on page 122.

Figure 6-1 Liberty welcome page
For more information, see this site:
Configuring a Liberty JVM server:
6.4 Defining and installing a CICS bundle
A CICS BUNDLE resource definition is required to install Liberty applications via a CICS bundle project. The BUNDLE resource definition then refers to the deployed versions of these components in a zFS directory. This directory simply contains the deployable artifacts and a manifest that describes the bundle and its potential dependencies. CICS bundles provide a useful way of grouping and managing related resources and providing a versioning schema and the ability to declare dependencies on other resources outside the bundle. CICS does not dynamically create prerequisite systems, but can check that they exist in the CICS region. Application developers can use CICS bundle project for packaging Java and Web applications, and for creating cloud-based applications and business events. System programmers need to use CICS bundles for system events and policies.
In this section, we install CICS bundle projects using both the CEDA transaction server and CICS Explorer. We use the bundle project to install our sample Hello World web application into the Liberty JVM server and control its availability. For more information about creating this application, see Chapter 5, “Developing and deploying applications” on page 69.
6.4.1 BUNDLE resource definition
We are ready to create the BUNDLE resource definition. You have to copy the sample BUNDLE definition ‘WLPHELLO’ from sample group ‘DFH$WLP’ with a new name to a group of your choice. These are the settings that we used. See Table 6-2.
Table 6-2 Values for the new bundle resource definition
|
ATTRIBUTE
|
DEFAULT
|
VALUE
|
Description
|
|
BUNDLE
|
WLPHELLO
|
HELLOWO
|
Name of the BUNDLE definition in CICS
|
|
Group
|
DFH$WLP
|
REDS12LP
|
Name of the CSD group defined in CICS
|
|
BUndledir
|
/u/reds12/bundles/com.ibm.liberty.HelloWorld.cics_1.0.0
|
zFS directory of the deployed CICS Bundle
|
|
Create a BUNDLE definition using CEDA and set the system-dependent attributes (Group, BUndledir), as shown in Example 6-15.
Example 6-15 Create a bundle definition with CEDA
OVERTYPE TO MODIFY CICS RELEASE = 0700
CEDA ALter Bundle( HELLOWO )
Bundle : HELLOWO
Group : REDS12LP
DEScription ==> CICS BUNDLE FOR LIBERTY HELLO TEST
Status ==> Enabled Enabled | Disabled
BUndledir ==> /u/reds12/bundles/com.ibm.liberty.HelloWorld.cics_1.0.0
(Mixed Case) ==>
BAsescope ==>
(Mixed Case) ==>
DEFINITION SIGNATURE
+ CHANGETime : 30/10/15 18:40:12
PF/PA KEY UNDEFINED SYSID=ISV APPLID=CREDS12A
PF 1 HELP 2 COM 3 END 6 CRSR 7 SBH 8 SFH 9 MSG 10 SB 11 SF 12 CNCL
6.4.2 Install a BUNDLE resource definition
Install and enable the CICS bundle into your CICS region using CEDA, and check the status of the Liberty JVM server using the CEMT transaction, as follows:
•- Syntax CEDA EX GR(GROUP) BUNDLE(BUNDLENAME)
•- Example CEDA EX GR(REDS12LP) BUNDLE(HELLOWO)
See Example 6-16.
Example 6-16 Install and enable CICS bundle into CICS region
CEDA EX GR(REDS12LP) BUNDLE(HELLOWO)
ENTER COMMANDS
NAME TYPE GROUP LAST CHANGE
HELLOWO BUNDLE REDS12LP install 30/10/15 18:42:48
SYSID=ISV APPLID=CREDS12A
RESULTS: 1 TO 1 OF 1 TIME: 20.35.20 DATE: 30/10/15
PF 1 HELP 2 SIG 3 END 4 TOP 5 BOT 6 CRSR 7 SBH 8 SFH 9 MSG 10 SB 11 SF 12 CNCL
•- CEMT INQUIRE BUNDLE
See Example 6-17.
Example 6-17 Check bundle status
CEMT I BUNDLE
STATUS: RESULTS - OVERTYPE TO MODIFY
Bun(HELLOWO ) Ena Par(00001) Tar(00001)
Enabledc(00001) Bundlei(com.ibm.liberty.HelloWorld)
SYSID=ISV APPLID=CREDS12A
RESPONSE: NORMAL TIME: 20.38.33 DATE: 30/10/15
PF 1 HELP 3 END 5 VAR 7 SBH 8 SFH 9 MSG 10 SB 11 SF
If the status shows enabled, that means that the bundle resource is enabled. Check the Liberty messages.log file to see whether the Liberty application has deployed and is available.
To check that the Liberty application is running, access it by using the HTTP or HTTPS port of the Liberty JVM server. For example:

Figure 6-2 Hello World application
6.4.3 BUNDLE definition by CICS Explorer
The next steps explain how you can define a CICS Bundle with CICS Explorer. Switch to the CICS SM perspective in your Eclipse Environment:

Figure 6-3 Open Perspective window

Figure 6-4 Select your CICS region
3. Go to Window → Show View → Other and select Bundle Definitions. Click OK. See Figure 6-5 on page 120.

Figure 6-5 Bundle definition

Figure 6-6 New bundle definition menu
5. Now you can edit the details of your CICS bundle. We use the same parameters as defined in Chapter 5, “Developing and deploying applications” on page 69. Create your bundle by clicking Finish. See Figure 6-7 on page 121.

Figure 6-7 Create Bundle Definition window
6.4.4 BUNDLE installation by CICS Explorer
The next step explains how to install the CICS Bundle with CICS Explorer. Switch to the CICS SM perspective in your CICS Explorer.

Figure 6-8 Install CICS Bundle window

Figure 6-9 Select CICS region
6.5 Verifying the configuration
The default web application is a built-in web application that is activated in the server.xml file. It delivers helpful information about the Liberty JVM server, such as:
•Reports on runtime configuration
•Provides access to log files
•Defaults to SSL if security set-up
You can run the application by using the following style of URL:
Figure 6-10 on page 123 shows the results of entering the following URL:
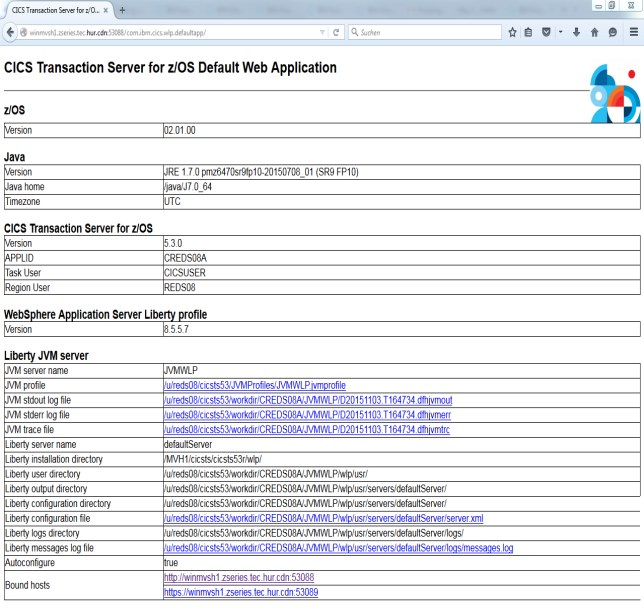
Figure 6-10 CICS TS default web application
6.5.1 Log file analysis
The most important log file created by each startup of Liberty JVM server is the messages.log file. The messages.log file can be found by default in the logs directory in the same zFS directory as your Liberty server configuration. To locate this directory, the root directory for your Liberty JVM server log files is in the working directory used by the JVM server.
In our example, the CICS APPLID is CREDS08A. The Liberty JVM Server is called JVMWLP. And the Liberty log files can be found in this location:
/u/reds08/cicsts53/workdir/CREDS08A/JVMWLP/wlp/usr/servers/defaultServer/logs
Liberty outputs useful information about application and system activity to this messages.log file. This file serves as one of the main ways to monitor your Liberty JVM server. This section briefly shows several generated messages written to the messages.log file. See Figure 6-11.

Figure 6-11 Sample from messages.log
For more information about logs, see Chapter 12, “Troubleshooting” on page 211.
6.6 Setting up a Liberty JVM server using CICS Explorer
In this section, we show you how to create and install a Liberty JVM server using CICS Explorer.
To start a Liberty JVM server in CICS, you need a JVM profile that describes your server. In our example, we use the example server provided with the CICS installation as the basis for our server. We are using FTP to connect to zFS on the hosting mainframe. This chapter requires a few technical requirements.
You need to install these items:
•CICS Explorer and FTP
The IBM Knowledge Center for CICS TS V5.3 has a section that shows you how to install and configure the CICS Explorer.
Open “IBM Knowledge Center for CICS Transaction Server 5.3.0” – “Installing” – “CICS Explorer installation.”
•SMSS CICS region or WUI Server
The IBM Knowledge Center for CICS TS V5.3 has a section that shows you how to set up an SMSS CICS region or a CICSPlex SM WUI Server.
Open “IBM Knowledge Center for CICS Transaction Server 5.3.0” – “Configuring” – “Setting up access for CICS Explorer.”
6.6.1 CICS Explorer connection
Ensure that your CICS Explorer is connected to the CICS system using a CMCI connection to CICS and an FTP connection to your z/OS FTP server.

Figure 6-12 CICS Explorer connections
6.6.2 Locate the zFS directories
CICS provides several example JVM profiles to help you get started with JVM servers. We used the Liberty sample profile to help us set up our profile. To locate the directories, locate the UNIX System Services home and the JVM profiles directory. The USSHOME and JVMPROFILEDIR system initialization parameters list these locations.
You can find out these values for any CICS region from the CICS Explorer Regions view using Show SIT parameters → Combined:
USSHOME=/usr/lpp/cicsts/cicsts53
JVMPROFILEDIR=/u/reds08/cicsts53/JVMProfiles/
6.6.3 Copy the JVM profile
In the z/OS UNIX Files view in your Eclipse environment, enter your USSHOME directory into the filter box, and then select the JVMProfile subdirectory. You will see a number of sample profiles listed. The one that we need is DFHWLP. Copy this file to your JVMPROFILEDIR location with an appropriate name. In our example, we named it JVMWLP.jvmprofile.

Figure 6-13 Default JVMPROFILE

Figure 6-14 Example JVMPROFILE
6.6.4 Edit the JVM profile
The default profile contains most of the settings that are required to run a Liberty JVM server in CICS. Here, we add in only the necessary options to enable the autoconfigure feature. For the remainder of the profile, retain the default values:
-Dcom.ibm.cics.jvmserver.wlp.autoconfigure=true
-Dcom.ibm.cics.jvmserver.wlp.server.http.port=53088
-Dcom.ibm.cics.jvmserver.wlp.server.https.port=53089
For more information about editing the profile, see 6.3.1, “JVM profile” on page 106.
6.6.5 Create the Liberty JVM server definition
We now need to create and install a JVM server definition in CICS. Follow these steps:

Figure 6-15 CICS region selected
2. Open the JVM Server Definitions view in Explorer, and select Window → Show View → Other. See Figure 6-16.

Figure 6-16 Show view menu

Figure 6-17 Choose JVM server definitions
4. In the newly opened JVM Server Definitions window, right-click anywhere and select New to open the New JVM Server Definition wizard, which is shown in Figure 6-18.
5. Complete the fields for the JVM server, pointing the profile to the one created in JVMWLP. Click Finish (Figure 6-18).

Figure 6-18 JVM server definitions
6.6.6 Install Liberty JVM server definition
You now see the JVM server definition that you created listed in the JVM Server Definitions view.

Figure 6-19 Select the JVM server to install
2. In the window that displays, select your CICS region and then click OK.

Figure 6-20 Install the chosen JVM server
3. CICS installs your JVM server definition.
4. To see your JVM server installation, open the JVM Servers view, and go to Window → Show View → Other. Type JVM Servers into the filter box and click OK.
Your JVM server is listed in this view with a status of Enabled. Liberty is now available for use. See Figure 6-21.

Figure 6-21 JVM server is ENABLED
6.6.7 Liberty JVM server log files
Liberty prints a message to its messages.log file when it is available for use. Having the status of Enabled confirms that the JVM server is ready for use. However, look at the logs anyway because logging is slightly different from other JVM servers in CICS. Liberty JVM servers still produce dfhjvmout, dfhjvmerr, and dfhjvmtr files when run. However, Liberty provides its own logging file named messages.log.
The messages.log file (shown in Figure 6-22 on page 131) can be found by default in the logs directory in the same zFS directory as your server configuration. To locate this directory, first open the z/OS UNIX Files view in your Explorer environment.
The directory for your Liberty JVM server output files is in the working directory of the JVM server. In our example, the CICS APPLID is CREDS08A and the Liberty JVM Server is named JVMWLP so our message.log is in this location:
/u/reds08/cicsts53/workdir/CREDS08A/JVMWLP/wlp/usr/servers/defaultServer/logs

Figure 6-22 Path to messages.log
Liberty outputs a large amount of useful information about application and system activity to the messages.log file. It serves as one of the main ways to monitor your Liberty JVM server.
For now, we are looking for a message that reads as follows and indicates that Liberty started successfully:
A CWWF0011I: The server defaultServer is ready to run a smarter planet.
For more information about verifying the configuration and analyzing the log file, see 6.5, “Verifying the configuration” on page 122.
..................Content has been hidden....................
You can't read the all page of ebook, please click here login for view all page.