

Porting a web application
In this chapter, we show how to take a presentation logic web application from a third-party Java EE web application server, and migrate it into the Liberty profile JVM server in CICS with minimal changes. This is sometimes referred to as lift and shift of an application to Liberty in CICS.
This chapter describes the following topics:
9.1 Lifting or shifting an application to Liberty
The application can be one that already uses CICS services remotely, using for example:
•JCA connectors
•CICS Transaction Gateway (CICS TG) ECI requests
•Web services (SOAP or JSON)
•HTTP or socket-based connectors
The application can also use other non CICS services such as:
•Web services (XML-based or JSON)
•JDBC database connections
•JMS or IBM MQ messaging
Alternatively, the application can be one that does not use CICS services, which are being migrated for platform consolidation, or perhaps with the intention of extending it to exploit integration with CICS applications in the future.
The following diagram illustrates the scenario that we walk through in this chapter. It is for an application using servlets and JavaServer Pages (JSP) and an external call interface (ECI) Java EE Connector Architecture (JCA) call to a CICS program using the CICS Transaction Gateway.

Figure 9-1 Application running on an external server before migration
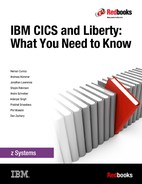
When this application is migrated into a Liberty JVM server, the application can remain unchanged and the function of the CICS Transaction Gateway can be replaced by the local JCA ECI feature running within CICS.
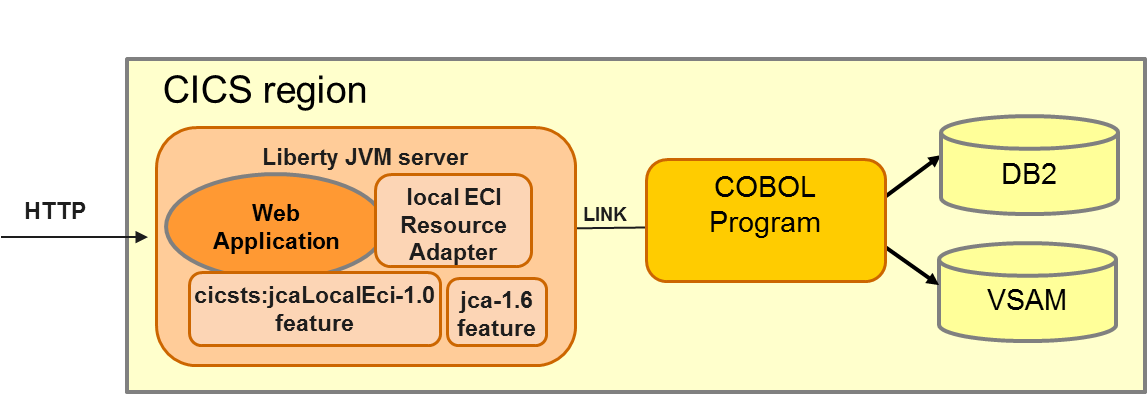
Figure 9-2 Application running in Liberty in CICS after migration
9.2 The migration process
There are potentially several stages to the application migration process, some of which are optional, depending on the level of feasibility validation, environment configuration, and deployment repackaging required. Following are the three main stages:
1. Validate the eligibility of the application for migration to Liberty in CICS. If issues are discovered, remediate the migration inhibitors. Toolkit support is available to assist with this validation.
2. Configure the Liberty in CICS environment for the application. Ensure that the features and resources required by the application are available, in addition to any other application-specific requirements. Toolkit support is available to assist with this configuration.
3. Deploy and test the application in Liberty in CICS.
This Redbooks publication uses an example web application (GenAppWeb), which is a front end to the CICS GenApp sample COBOL application. In the following sections, we walk through the process that we used to migrate the sample GenApp web application to run in Liberty in CICS. This is a fairly simple case of a stand-alone web application with no external dependencies, and in the real world, the process might be more involved, but you can still follow the same steps.
Figure 9-3 shows the initial page for the GenAppWeb application running on a local WebSphere Application Server, and connecting to CICS using a local CICS Transaction Gateway instance.

Figure 9-3 GenAppWeb running on a local application server
In the rest of this chapter, we assume that the GenAppWeb web archive (WAR) file containing just the complied Java classes is available on the local file system.
9.2.1 Validating the application for migration
A Java EE application is eligible for migration to Liberty in CICS if all of its environment requirements can be satisfied. That is, the Java EE features required by the application are supported by Liberty in CICS, and configured in server.xml. The significant items to consider in this process are:
•JDBC data sources
These are configured in server.xml, and you need to consider whether the associated database should remain in its current environment or should also be migrated to z/OS.
•JCA connection factories
These are configured in the server.xml file. If you are using the ECI resource adapter, it is simple to migrate using the local ECI JCA resource adapter supplied with CICS Liberty. If you are using another JCA resource adapter, such as WebSphere Optimized Local Adapter (WOLA), you need to determine if the resource adapter is portable to the CICS Liberty environment.
•JMS resources
JMS applications use connection factories for outbound calls and activation specifications for inbound calls, both of which need to be configured in the server.xml file. IBM MQ JMS connections are not currently supported in CICS Liberty.
•Java system properties
These are configured in the JVM profile for the Liberty JVM server, and are used by many applications to define specific properties.
•Vendor-specific application programming interfaces (APIs)
These must be removed from the application to run within Liberty, and so manual rework is required.
•Unsupported components from Java Platform, Enterprise Edition
These must be removed from the application, and you need to find an alternative for these components.
9.2.2 Using the dropins for validation
This section describes how to use dropins for validation:
1. As a first step in validating an application, a possible approach is simply to copy the WAR file into the dropins directory of a suitably configured Liberty JVM server. To use the dropins directory, add the following message to the server.xml file:
<applicationMonitor dropins="dropins" dropinsEnabled="true"
pollingRate="5s" updateTrigger="disabled"/>
The application might run without any further changes, although this is unlikely. However, any error messages that are produced can be useful in understanding further migration actions that might be necessary. When we copied our GenAppWeb.war file to the dropins directory, the following messages were produced in the messages.log file for the server, indicating that the web application could be loaded by Liberty:
CWWKZ0018I: Starting application GenAppWeb.
SRVE0169I: Loading Web Module: GenAppWeb.
SRVE0250I: Web Module GenAppWeb has been bound to default_host.
CWWKT0016I: Web application available (default_host): http://<hostname>:65432/GenAppWeb/
CWWKZ0001I: Application GenAppWeb started in 3.221 seconds.
2. The next step is to access the application from a browser by using the URL from the message CWWKT0016I produced:
The index.jsp page is displayed, showing that the application is accessible at that URL, but the customer list does not appear. The messages.log file reports an Exception: ja-va.lang.ClassNotFoundException: javax.resource.ResourceException. This indicates that the JCA feature is not available in the Liberty environment.
One approach to the migration is to correct this by adding the jca-1.6 feature to the server configuration, then disable, and re-enable the JVM server, and retry. The next error would then give a hint as to further migration action. However, we preferred to use a more targeted method by using the WebSphere Application Migration Toolkit.
9.2.3 Application Migration Toolkit
WebSphere Liberty provides a suite of tools to assist in migrating web applications from WebSphere Application Server full profile or other Java EE servers to the Liberty profile. In this section, we show how to use these tools to help migrate the example GenApp front-end web application to Liberty in CICS.
Migration report using application binaries technical preview
1. The first step is to use the application binaries technology preview to scan the application WAR file. Run the following command, assuming that the WAR file has been copied into the same directory as the scanner Java archive (JAR) file:
java -jar binaryAppScanner.jar GenAppWeb.war
The tool will produce command output similar to:
Scanning files.......................
The report was saved to the following file: /home/jlawrence/LibertyRedbook/MigrationToolkit/wamt/TechnologyReport.html
The report was saved to the following file: /home/jlawrence/LibertyRedbook/MigrationToolkit/wamt/TechnologyReport.html
2. When finished, the tool writes an HTML report file named TechnologyReport.html to the current directory and displays the file in your default browser, as shown below in Figure 9-4. Technologies used by the application are shown in the left column, and WebSphere product editions each have their own column. For Liberty in CICS, the most appropriate column is the one with the heading WebSphere Application Server for z/OS 8.5.5 Liberty profile.
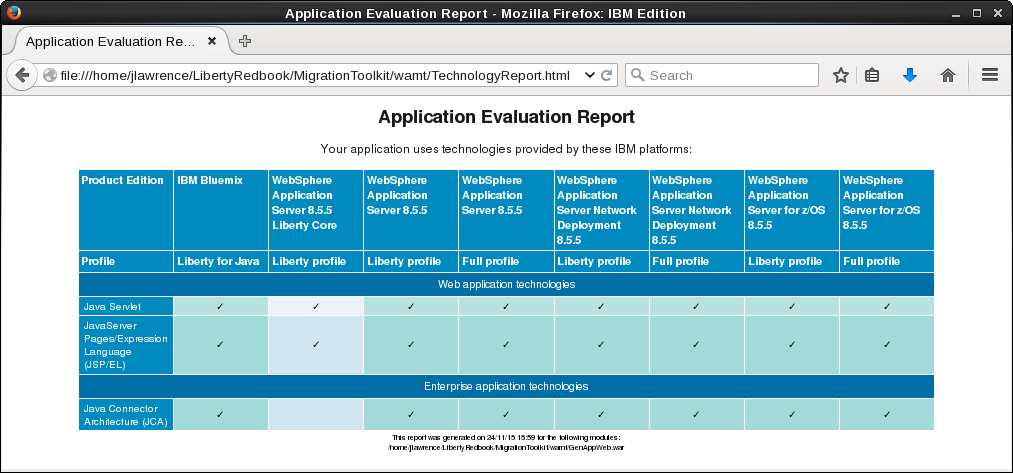
Figure 9-4 Output from the Technology Report tool
3. For GenAppWeb.war, the tool has determined that the application uses servlets, JSP technology, and JCA, and that all of these technologies are supported in WebSphere Application Server for z/OS 8.5.5 Liberty profile. The corresponding features must be configured in Liberty for the application to run.
Detailed migration report using the application analysis tool
The next level of analysis uses the same tool with the option to produce the more detailed form of migration report. Run the following command in the same directory: It is necessary to specify the full details (as shown) for the target server, because the defaults are Java 8 and Java Platform, Enterprise Edition 7:
java -jar binaryAppScanner.jar GenAppWeb.war --analyzeMigrationDetails --sourceAppServer=fullProfile855 --sourceJava=ibm6 --targetAppServer=libertyProfile --targetJava=ibm7 –targetJavaEE=ee6
The following output is displayed at the command line. The AnalysisReport.html file is written to disk and opened in your default browser:
Scanning files.......................
The report was saved to the following file: /home/jlawrence/LibertyRedbook/MigrationToolkit/wamt/AnalysisReport.html
In this case, a detailed report is saved to the AnalysisReport.html and displayed in the default browser as illustrated in Figure 9-5.

Figure 9-5 Output from the Application Analysis tool
The report shows that no rules were flagged for the migration to Liberty. That means that in principle, there is no obstacle to the migration. The application is suitable provided that the target server environment is configured appropriately.
For more information, see the following resources:
•Move applications to Liberty by using the Migration Toolkit, a blog about the Application Migration Toolkit, and links to download the tool:
•Migration Toolkit for Application Binaries to download the command-line tool:
•WebSphere Application Server Migration Toolkit to download the Eclipse-based tools:
9.2.4 Other migration considerations
There might be migration considerations that will not be detected by the tooling, but that will need to be addressed before an application can be migrated. For example, an application currently connecting to a local database using JDBC might need the database to be migrated so that the application can continue to access the data after migration. Such additional considerations are not detected by the toolkit and need to be determined by checking the existing application design.
9.3 Configuring the Liberty environment
For a migrated application to run in Liberty in CICS, the Liberty server must be configured to provide an equivalent environment for the application as the original server environment. The same facilities, APIs, and data must be accessible to the application.
9.3.1 Migrating Java Platform, Enterprise Edition resources
The Java Platform, Enterprise Edition resources required by the application must be added to server.xml for the CICS Liberty JVM server. You can see from the Application Migration Technology report that servlet, JSP, and JCA are required by the GenAppWeb application.
1. Add the following feature elements into the featureManager section of server.xml:
<feature>jsp-2.2</feature>
<feature>jca-1.6</feature>
<feature>jndi-1.0</feature>
The jsp-2.2 feature automatically includes servlet capability, so this does not need to be explicitly included.
2. Next, you need to configure instance elements for some of the features. This applies to JDBC, JCA, and JMS. Information on the required configuration can be extracted from the configuration of the original server environment.
For a WebSphere full profile server, this can be done by navigating the Admin console and copying relevant configuration parameters for the JCA resource adapter connection factories, and so on. However, this is inconvenient. An alternative is to extract the entire WebSphere configuration as a properties file and browse the properties to determine the parameters. The command to extract the configuration properties must be run while the WebSphere server is running:
wsadmin.(sh/bat) -lang jython -c "AdminTask.extractConfigProperties(['-propertiesFileName websphere.props'])"
The wsadmin command must be run as a Windows Administrator, and needs to be run from the <Profile_Home>in directory. On Linux, the command is suitable from any location, as follows:
sudo '/opt/IBM/WebSphere/AppServer/bin/wsadmin.sh' -lang jython -c "Ad-minTask.extractConfigProperties(['-propertiesFileName websphere.props'])"
The following output is produced and the websphere.props file is written to disk:
WASX7209I: Connected to process "server1" on node localhostNode01 using SOAP connector; The type of process is: UnManagedProcess
3. Next, we examine the contents of the websphere.props file to find the configuration parameters for the JCA connection factories required by the GenAppWeb application. By browsing the file, we locate the following entry:
#
#Properties
#
name=CICS ECI Connection Factory #required
.. .. ..
J2EEResourceProvider=ECIResourceAdapter #ObjectName(J2CResourceAdapter)
jndiName="eis/ECI" #required
.. .. ..
This tells us the Java Naming and Directory Interface (JNDI) lookup location for the connection factory. Another subsection with the title “J2CConnectionFactory Properties”, contains the connection factory-specific attributes. In this case, for a CICS TG ECI Connection Factory. This subsection reads as follows:
#
# SubSection 1.0.2.0.0.2 # J2CConnectionFactory Properties
#
.. .. ..
#
#Properties
#
keyRingClass=null
tranName=null
password=null
cipherSuites=null
portNumber=2006 #String
xaSupport=off #String
clientSecurity=null
serverName=winmvsh1 #String
ipicSendSessions=100 #integer
userName=null
tPNName=null
serverSecurity=null
socketConnectTimeout=0 #String
applidQualifier=null
connectionURL=tcp://localhost #String
requestExits=null
keyRingPassword=null
traceLevel=1 #integer
applid=null
These attributes need to be configured on the connection factory instance specification in the Liberty server.xml file, although with modification because tcp://localhost refers to the local host for the original server.
Continuing to search in websphere.props for “J2CConnectionFactory Properties” finds other hits, one for the builtin_rra resource adapter, and there might be other third-party resource adapters configured in the system. You need to determine which ones are being used by the application. A good way to do this is to match the JNDI lookup locations for the connection factories with those used by the application.
The manual process just described is one option. WebSphere Liberty provides a Beta tool, called the WebSphere Configuration Migration Tool, which is intended to read the configuration files for other servers and produce appropriate configuration fragments to include in the server.xml of a Liberty server.
For more information, see the following tools:
•WebSphere Configuration Migration Tool
•Making the move to the Liberty profile, Part 2: Migrating Java EE resources with the Configuration Migration Toolkit
9.3.2 External dependency migration
In the original environment, the J2C connection factory used by GenAppWeb is configured to connect to a CICS Transaction Gateway instance, in this case on the system local to the WebSphere Application Server. This continues to work after migration to Liberty in CICS, but would make little sense because JCA requests would be transmitted to the external Gateway, only to be forwarded back to CICS.
Therefore, we changed the parameters used for the J2C connection factory to use the new local ECI adapter provided with CICS TS V5.3. The following server.xml changes are required for this:
1. Add the JCA local ECI feature, which manages the local ECI resource adapter, to the featureManager list in server.xml:
<feature>cicsts:jcaLocalEci-1.0</feature>
2. Define a connection factory instance for the JCA local ECI adapter, published at the correct JNDI location, such as:
<connectionFactory id="eciLocal" jndiName="eis/ECI">
<properties.com.ibm.cics.wlp.jca.local.eci/>
</connectionFactory>
With these changes, JCA ECI requests from the application are processed within the CICS region where the Liberty JVM is running. CICS dynamic routing of the LINK request can then be used to forward these to other CICS regions if required.
|
Note: The CICS local ECI resource adapter provides a default connection factory that can be used without an instance configuration. This is always available when the cicsts:jcaLocalEci-1.0 feature is enabled, and is configured at the JNDI lookup location eis/defaultCICSConnectionFactory. Therefore, if the application is changed or can be configured to look up its ECI Connection Factory at this location, there is no need for a connection factory to be configured in server.xml.
|
For more information, see the following sites:
•CA local ECI support
•Porting JCA ECI applications into a CICS Liberty JVM server
9.3.3 Other configuration parameters
For a complex application or environment, it is possible that using the toolkit and general guidelines above might not be sufficient to guarantee that the application will be successfully migrated at the first attempt. Some additional configuration and migration actions might be required.
An example of such additional configuration is Java system properties. Some applications require specific system properties to be configured, and so these also need to be set in the Liberty JVM server environment. For Liberty in CICS, system properties are specified in the JVM profile for the Liberty JVM server with -D declarations.
If you are migrating from WebSphere full profile, system properties are reported in the configuration properties exported by the wsadmin AdminTask.extractConfigProperties tool. For example:
#
# SubSection 1.0.12.0.2 # Environment properties
#
.. .. ..
*#
#Properties
#
com.ibm.cics.genapp.jca.jndiname=eis/ECI
The GenAppWeb application uses the system property com.ibm.cics.genapp.jca.jndiname to determine the JNDI lookup location for the JCA connection factory, so this had to be configured in the JVM profile.
We added the following entry into the JVM profile for the Liberty JVM server:
-Dcom.ibm.cics.genapp.jca.jndiname=eis/ECI
This configures the JNDI lookup location for the JCA connection factory used by the GenAppWeb application. In fact, because of the default connection factory provided by the CICS Local ECI adapter, we can change this to the following property and remove the connection factory configuration from server.xml altogether:
-Dcom.ibm.cics.genapp.jca.jndiname=eis/defaultCICSConnectionFactory
9.4 Package and deploy the application
Having completed any necessary application remediation and configured the Liberty in CICS server as required, we are ready to deploy and test the migrated application in its new environment.
There are several possible deployment options for a Liberty application in CICS. Here, we choose the option to deploy as a CICS bundle, using CICS Explorer. There are several options to package an existing application as a CICS bundle. Two options are highlighted here:
•Option 1: Import the application including its source code into your development environment, then rebuild and package. This option is similar to the process described for the Hello World starter application in Chapter 5, “Developing and deploying applications” on page 69.
•Option 2: Package the existing application WAR file and deploy as-is. This is slightly different from the usual process because there is no source code in the WAR.
Option 1 is covered in detail in Chapter 5, “Developing and deploying applications” on page 69, so here we show how to package an existing binary WAR file for deployment by using CICS Explorer.
9.5 Package the existing application WAR file and deploy
To package an existing binary WAR file for deployment using CICS Explorer, we use the example of the GenAppWeb application. Following are the main stages:
1. Import the binary WAR file as a web project into your development environment.
2. Create a CICS Bundle project, and include the imported web project as a WAR bundle part.
3. Export the CICS bundle to the z/FS file system, then define and install a CICS bundle definition.
Perform the following steps:
1. In CICS Explorer, click File → Import.
2. In the Import Select dialog, select WAR file from the web section, as shown in Figure 9-6, and click Next.

Figure 9-6 Select the option to import a WAR file
3. Browse for your file and click Next.
4. Accept the default web project name, which is the same as the WAR file name. And clear the “Add project to an EAR” check box.

Figure 9-7 Importing a WAR file from the local file system
The .war file is imported and is displayed in your Eclipse workspace as a dynamic web project, including any Web App Library JAR files, in this case, GenAppBli.jar. However, there is no available source for the project.
|
Note: If you click Next instead of Finish at this point, you will have the option to import web library JAR files as separate projects. In our case, because this is a binary-only JAR file, there is no point in doing so because there is no source available in the .war or included .jar files.
|
If errors are displayed in the new project after importing the WAR file, this can be because the Liberty JVM server libraries are not in the build path for the project. These libraries provide both the web APIs for the Liberty features, and also the JCICS APIs, if these are needed. To add these libraries, right-click the web project, and select Build path → Configure Build Path → Add Library → Liberty JVM server libraries. Ensure that all errors are corrected before continuing.
6. In CICS Explorer, create a new CICS Bundle project by selecting File → New → Other, and then select the CICS Bundle Project from the CICS Resources section of the New Project wizard.
7. Click Next.
Figure 9-8 Create a new CICS Bundle project
8. Specify your new bundle project name, GenAppBundle, and click Finish, as shown in Figure 9-9. The new, empty bundle project is created in your workspace.
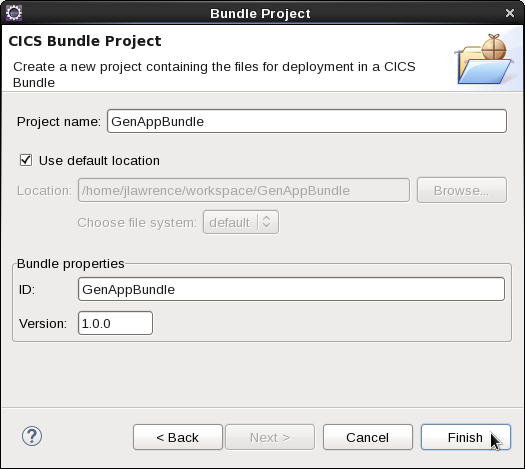
Figure 9-9 Specify the details for the new CICS bundle project
9. Add your previously imported GenAppWeb dynamic web project as a warbundle resource to the new CICS bundle project.
10. Expand the Bundle project and open the cics.xml Bundle definition file in the META-INF directory.
11. In the Defined Resources area, click New, then select Dynamic Web Project Include in the lower section of the list. A Dynamic Web Project Include dialog window opens, as shown in Figure 9-10.

Figure 9-10 Specify the name of the target JVM server for Dynamic Web Project Include
12. Specify the name of the JVM SERVER in which the web application is to be deployed (see Figure 9-10) and click Finish. The new GenAppWeb.warbundle include appears in the GenAppBundle project.
9.6 Complete deployment and test the application
The final stage of the migration is to complete the deployment to the target CICS Liberty JVM Server and then to test the application. For this, you need an active z/OS FTP connection to the zFS file system of the target. Ensure that you have a connected z/OS FTP connection to the target in the z/OS perspective.
From this point, the deployment procedure is the same as documented for deploying the Hello World CICS Bundle project, documented in Chapter 5, “Developing and deploying applications” on page 69, so the description is not repeated here. Follow the equivalent steps as for the Hello World example application to export the CICS bundle to the z/OS UNIX file system, then define and install a CICS bundle definition for the application.
9.6.1 Test the web application
Finally, test the migrated application by accessing its URL from a browser. This will be the host name for the CICS region, with the HTTP or HTTPS port for the Liberty JVM server, with a URL, depending on the deployment descriptor for the web application. The full URL is in the messages.log file of the Liberty server when the application is installed, for example:
A CWWKT0016I: Web application available (default_host):
Figure 9-11 shows the initial page of the migrated GenAppWeb application, running in the target CICS Liberty JVM server.

Figure 9-11 The migrated GenAppWeb application running in Liberty in CICS
In the case of unresolved build or deployment issues with the application, error messages are issued to indicate the cause, allowing you to resolve any problems.
For example, if you do not configure a JCA connection factory instance in server.xml, or if there is a mismatch between the JNDI lookup names used by the application and the connection factory instance definition, a javax.naming.NameNotFoundException is thrown, such as:
javax.naming.NameNotFoundException: eis/ECIJNDI
at com.ibm.ws.jndi.internal.ContextNode.lookup(ContextNode.java:218)
at com.ibm.ws.jndi.internal.WSContext.lookup(WSContext.java:295)
at com.ibm.ws.jndi.WSContextBase.lookup(WSContextBase.java:58)
at org.apache.aries.jndi.DelegateContext.lookup(DelegateContext.java:161)
at javax.naming.InitialContext.lookup(InitialContext.java:423)
at com.ibm.cics.genapp.bli.GenAppJCAImpl.<init>(GenAppJCAImpl.java:94)
... 35 more
This might be displayed in the messages.log file for the Liberty JVM server, depending on how the application handles exceptions from the JNDI lookup.
Or, if you are using the CICS JCA local ECI adapter, and an error occurs making the call to the CICS program, an exception is thrown, such as:
com.ibm.connector2.cics.CICSTxnAbendException:
CTG9638E Transaction Abend occurred in CICS: Abend Code=: AEI0, error code: AEI0
at com.ibm.connector2.cics.ECIManagedConnection.checkReturnCode
at com.ibm.connector2.cics.ECIManagedConnection.call
at com.ibm.connector2.cics.ECIConnection.call(ECIConnection.java:133)
at com.ibm.connector2.cics.ECIInteraction.execute(ECIInteraction.java:346)
at com.ibm.cics.genapp.bli.GenAppJCAImpl.invokeChannelProgram
... 36 more
Caused by:
com.ibm.cics.server.InvalidProgramIdException:
CICS PGMIDERR Condition(RESP=PGMIDERR, RESP2=2)
at com.ibm.cics.server.DTCProgram.LINK(Native Method)
at com.ibm.cics.server.Program.link(Program.java:477)
at com.ibm.ctg.client.LocalCICSJavaGateway.flow(JavaGateway.java:953)
at com.ibm.connector2.cics.ECIManagedConnection.flowGatewayRequest
at com.ibm.connector2.cics.ECIManagedConnection.call
... 39 more
The underlying InvalidProgramIdException is wrapped by an exception thrown from the CICS TG code used by the CICS local ECI adapter.
..................Content has been hidden....................
You can't read the all page of ebook, please click here login for view all page.