
CHAPTER 14 Introducing C
In recent chapters we have developed increasingly complicated programs; in doing this, it has become more and more difficult to apply Assembler programming. It was difficult to manage the complexity of the program, program errors were hard to find, program flow was difficult to control and even quite simple mathematical tasks (like the scaling in the light meter program) were laborious to implement.
The alternative is to change the programming strategy. Figure 4.1 showed the programmer's dilemma, and three alternative approaches were described. We initially adopted the third of these approaches, Assembler, as it represented a way of writing programs which very directly controlled the system hardware. Because of the problems just described, however, it is now sensible to explore another option. High-level languages were invented to cope with program complexity and simplify debugging. Can we apply one to the embedded environment? The answer is yes – for now we choose C, a language with outstanding credentials for our purpose.
This chapter, and the three which follow, aim to introduce C from first principles, leading to a working knowledge of its key features as they apply to the embedded environment. Not every aspect of C is covered, particularly not its more advanced features.
The Microchip C18 compiler, which is designed to work within the MPLAB™ environment, is used as a vehicle for this study. This can be purchased, or a free student version downloaded from the Microchip website. It is also on the book's companion website. It is assumed that readers have access to this.
Our study will operate at several levels. First of all, the language C itself is introduced. This knowledge is fairly independent of embedded systems and can be applied at the desktop computer or elsewhere. In parallel with this we explore how C is applied to the embedded system and particularly in the PIC® environment. To allow these two strands to move forward in parallel, the C18 compiler is introduced at an early stage in the chapter. The practice of writing C programs is then developed through graded examples, applied in part to the Derbot-18 AGV. It does not take long, in this introduction to C, to begin to recognise some of its advantages over Assembler.
At the end of this chapter you should have developed an understanding of:
Readers with experience of C may wish to skip the first three sections of the chapter and will find some of the later sections easy going.
14.1 The main idea – why C?
Section 4.1 of Chapter 4 briefly introduced the concept of the High-Level Language (HLL). An HLL is a programming language that makes use of language and structures that are easy for us human beings to understand. At the same time it has clearly defined rules, so that a program can be written which has the precision to be converted to machine code.
Whatever the HLL used, an intermediary computer program is required to convert the program as written into the computer machine code. If the program is converted before program execution, then the converting program is called a ‘compiler’. C is an example of a language that uses a compiler. If it is converted as the program executes, it is called an ‘interpreter’. Basic is an example of a language that uses an interpreter.
One great advantage of the HLL is that it allows ‘portability’. The program that the programmer writes does not depend on the computer that it is going to run on. It is the compiler or interpreter that is machine-dependent and creates the actual machine code. Thus, the same source code can (again theoretically – we must stress this) be used to run on entirely different computers. This is, of course, quite unlike the Assembler approach, which is entirely dependent on the target computer.
When adopting an HLL for embedded applications, we want the benefits that it can bring, of simpler and more reliable coding. At the same time, however, we want to retain as far as possible the benefits of working close to the hardware, which Assembler programming allowed us. C was written for the much simpler computers of the 1970s. While it has in many cases been overtaken by other languages for applications on desktops and workstations, it remains a very powerful language for working close to the computer hardware, as we do in embedded systems. It shows the features that we want of an HLL, but still allows hardware elements to be accessed.
14.2 An introduction to C
Although a comparatively simple language in today's terms, C can lead to complex and sophisticated programs. This section aims to provide the very basics of C, using a simple example program. The intention is that the reader can then move on as soon as possible to using the MPLAB C18 compiler and start writing simple programs for PIC 18 Series microcontrollers.
14.2.1 A little history
C was developed in the late 1970s at the Bell Labs in New Jersey, USA. Its first publicly available documentation was in a publication by Brian Kernighan and Dennis Ritchie in 1978. This became so well known that it is often called the ‘K&R’ version. In 1989 a version of C was adopted by the American National Standards Institute (ANSI), as standard X3.159-1989. It is important to recognise this standard, as it is the one that the Microchip C18 compiler is based upon. This standard became very widely recognised and adopted, and one finds many references to ‘ANSI C’. In 1990, the International Organisation for Standards (ISO) adopted the same version as an International Standard, with amendments made in 1995 and 1999. The 1999 version contains extensions which are not implemented in many compilers targeted at embedded systems.
14.2.2 A first program
A tradition has developed that books about C should start with an example program which outputs the words ‘Hello world’ to a display. In many embedded systems we won't have such a display to write to. As an alternative, an early need in almost any embedded system is to be able to output data to a port. Therefore, our first example program will just increment a number and output it to Port B of an 18 Series microcontroller. This program is seen in Program Example 14.1.
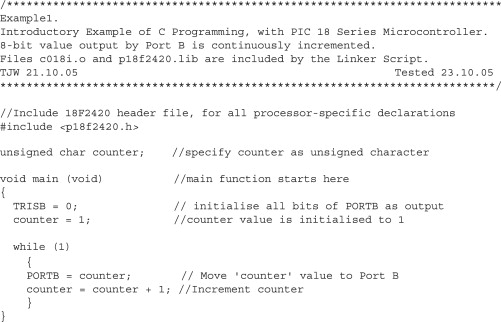
14.2.3 Laying out the program – declarations, statements, comments and space
C is a so-called free-form programming language. That means that there is not a strict layout format to which programs must adhere. This is unlike Assembler, where the position of a word on the line can be crucial.
Crudely speaking, a C program is made up of: ‘declarations’, which set the scene and initialise things; ‘statements’, where the programming action takes place; ‘comments’, which provide a commentary to the human reader on what is going on; and ‘space’, which provides essential gaps between the words and symbols used and is also used to improve clarity through the way the code is laid out. Let us look at each of these in turn.
Comments
Comments start with the combination /∗ and end with ∗/. In this form they can run over more than one line and can follow or precede statements or declarations.
It can be seen that the first seven lines of the program example are made up of comments, even though the comment delimiters merge somewhat with the lines of asterisks. Following the title block there is a blank line. This is not a problem with C – such lines can be used to improve the intelligibility of the program.
An alternative comment format is to precede the comment with a double slash, //. Such a comment lasts only for the remainder of the line in which it appears and needs no terminating symbol. It is convenient to use both comment styles, the first for major blocks of comment, the second for single lines. This is the practice adopted in this book; it can be seen in the example program.
As with Assembler programming, it is good to make liberal use of comments, indicating clearly but briefly what is meant to be going on in the program.
Declarations
Declarations are used in a number of ways to create program elements, like variables and functions, and to indicate their properties. This is important, as all variables and functions in C must be declared before they can be applied. Characteristics specified include the type of data element (for example, whether fixed or floating point), the allocation of memory storage or the characteristics of a function. A declaration is terminated with a semicolon.
In the example program, the line
unsigned char counter;//specify counter as unsigned character
is a declaration, whose meaning will shortly be explained.
In simple programs, declarations tend to appear as one of the first things in the program, which seems to make sense. As we meet more complex programs, however, we will see that declarations can occur within the program, with significance attached to the location of the declaration.
Statements
Statements are where the action of the program takes place. They perform mathematical or logical operations and establish program flow. Every statement which is not a block (see below) ends with a semicolon.
There are a number of different categories of statement. The commonest is the ‘expression’ statement, which includes mathematical manipulations. Example expression statements from Program Example 14.1 are:
TRISB = 0; //initialise all bits of PORTB as output
counter = 1;
//counter value is initialised to 1
Statements are executed in the sequence they appear in the program, except where program branches take place.
Code blocks
Declarations and statements can be grouped together into ‘blocks’. A block is contained within braces (curly brackets). An example block from Program Example 14.1 is seen here:
while (1)
{
PORTB = counter; //Move ‘counter' value to Port B
counter = counter + 1; //Increment counter
}
Blocks can be written within other blocks, each within its own pair of braces. Keeping track of these pairs of braces is an important pastime in C programming, as in a complex piece of software there can be numerous ones nested within each other. It is common, and very good, practice to indent them such that matching pairs fall directly below each other on the page, with each nested pair being indented deeper into the page. In this way it is possible to keep track of brace pairs.
Space
The judicious use of space in a C program can make a big difference to its clarity. A space is required to separate words which would otherwise merge into one, for example in the example declaration quoted above. Further space, including blank lines, is ignored by the compiler and is used by the programmer to optimise the program layout. This applies both to blank lines and to indents within lines. For example, in the example block seen directly above, the braces are separated out onto their own lines and placed directly above each other. The program would compile the same if it were written:
while (1){PORTB = counter; //Move 'counter' value to Port B counter = counter + 1;} //Increment counter
It would, however, be less clear to read, in particular when looking for where the code block ended. The need for good layout increases dramatically as program complexity increases.
14.2.4 C keywords
C has a set of just 32 ‘keywords’. These are shown in Tables A6.1–A6.3, each with a summary description. It can be seen that a good number relate to data type. In our example program, the declaration
unsigned char counter; //specify counter as unsigned character
declares a variable called counter and uses the keywords unsigned char to specify its type as an unsigned character.
Other keywords (Table A6.2) relate to program flow. In this example the while keyword sets up a continuous loop, as described in Section 14.2.8.
Keywords are recognised by the compiler, which expects them to be applied within a defined context. They cannot be used for any other purpose, for example as the name of a variable.
14.2.5 The C function
C programs are structured from ‘functions’. Every program must have at least one function, called ‘main’. Program execution starts with this function and the program is contained within it.
Apart from the main function, functions are in some ways similar to Assembler subroutines. They are used in a similar way, generally to contain an identifiable program action. Good program structures tend to have much of the program contained within functions, with the main function calling subsidiary ones. Any function may call another.
What distinguishes a C function from an Assembler subroutine is the control exercised in how data is passed between calling program and function. Data elements, called ‘arguments’, can be passed to a function. They must, however, be of a type which is declared in advance. Only one return variable is allowed, whose data type must also be declared. The data passed to the variable is a ‘copy’ of the original. Therefore, the function does not itself modify the value of the variable named. The impact of the function should thus be predictable and controlled. The terminology ‘parameter’ is often used in place of ‘argument’. Distinction between the two terms is made in detailed specifications of the C language. In these chapters we will, however, use them interchangeably.
A function is defined in a program by a block of code having particular characteristics. Its first line forms the function header. The function header from the example program, shown in Figure 14.1, illustrates the general format:
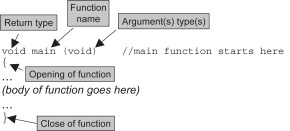
The return type is given first. In this example, the keyword void is used to indicate that there is no return value expected. This is common practice for the main function – after all, to where or what would it return a value? After the function name, in brackets, one or more data types may be listed, which identify the arguments which must be passed to the function. In this case (again as may be expected with main) there are no arguments transferred and the keyword void is again used to indicate this.
Following the function header, a pair of braces encloses the code which makes up the function itself. This could be anything from a single line to many pages. The final statement of the function may be a return, which will specify the value returned to the calling program. This is not essential if no return value is required.
It can be seen that, for clarity, the program is laid out so that the braces which enclose the main function are aligned fully left and the braces containing the while statement are indented.
In Program Example 14.1 the main function is the only one. A number of further issues arise when multiple functions are used. These are introduced in later chapters.
14.2.6 Data type and storage
Variables within a C program have four attributes: their name, type, value and storage location. It has already been said that the type (for example, whether signed or unsigned, fixed or floating point) must be declared before use. Once the type has been specified, the compiler can determine the amount of memory needed to store the variable. Its value can then, if needed, be initialised.
The words used to define data type are shown in Table A6.1. The actual memory size applied to each data type can vary between compilers. The data types available in the MPLAB C18 compiler, along with their storage size, are shown in Table A6.4. For example, in Program Example 14.1 the variable counter is defined as being an unsigned character. Table A6.4 shows that the C18 compiler will assign it an 8-bit memory location. Although the name implies it must be a character, in fact it can be used for any 8-bit number. This is a useful data type for the many single-byte variables that we use in the PIC environment. We will see later that PORTB and TRISB are also defined as unsigned characters.
Data names must start with a letter or underscore. When writing complex programs it is common practice to start the name with a letter or letters which identify the type of the variable, for example the name counter in the example program could be changed to uicounter, to remind the programmer that it is an unsigned integer. This helps the programmer remember its type and reduces programming errors. This practice is not, however, adopted in the example programs in this book.
When writing numbers in a program, the default radix for integers is decimal, with no leading 0 (zero). Octal numbers are identified with a leading 0. Hexadecimal numbers are prefixed with 0x.
14.2.7 C operators
C recognises a diverse set of operators, which are shown in Table A6.5. The symbols used are familiar, but their application is not always the same as in conventional algebra. For example, a single ‘equals’ symbol, ‘=’, is used to assign a value to a variable. A double equals sign, ‘= =’, is used to represent the conventional ‘equal to’. Thus, in Program Example 14.1, the line
TRISB = 0; //initialise all bits of PORTB as output
means that the variable called TRISB is assigned the value 0. This can be read as ‘the variable TRISB takes the value 0’. In the 18F2420 header file TRISB has been defined as an unsigned character, hence an 8-bit number. Due to the port action, the program line quoted above causes all bits of Port B to be set as outputs.
Operators have a certain order of precedence, shown in the table. The compiler applies this order when it evaluates a statement. If more than one operator at the same level of precedence occurs in a statement, then those operators are evaluated in turn, either left to right or right to left, as shown in Table A6.5.
As a very simple example, the line in the example program
counter = counter + 1;
contains two operators. Table A6.5 shows that the addition operator has precedence level 4, while the assign operator has precedence 14. The addition is therefore evaluated first, followed by the assign. The outcome is that the variable counter is incremented by 1.
14.2.8 Control of program flow and the ‘while’ keyword
All the keywords of Table A6.2 are associated with program flow, for example looping and branching. As a first example, the while keyword allows a statement, or block of statements, to be executed repeatedly, as long as a particular condition holds true. This is the first of a number of branching and looping structures that we will meet.
The general while structure is:
while (conditional expression) statement;
This will cause the statement to be executed repeatedly, as long as the conditional expression evaluates ‘true’ (i.e. non-zero). If it is no longer true, then program execution after the loop proceeds.
If more than one statement needs to be associated with the while, then a series of statements can be enclosed in curly brackets, as shown:
while (conditional expression)
{
statement 1;
statement 2;
statement 3;
}
Note that the while condition is evaluated at the beginning of loop execution. If it holds true, then the whole loop is executed, even if the condition changes as the loop executes.
In this example, a continuous loop is forced by putting ‘1’ for the conditional expression.
while (1)
{
PORTB = counter; //Move ‘counter' value to Port B
counter = counter + 1;
}
The two statements which fall within the while braces thus repeat indefinitely.
14.2.9 The C preprocessor and its directives
The process of compiling is made up of a number of distinct stages. The first of these is undertaken by the ‘preprocessor’. This responds to any preprocessor ‘directives’ which it finds. These act in a way similar to Assembler directives, giving instructions to the compiler itself. Example preprocessor directives appear in Table A6.6. The format of the preprocessor directive requires that each directive occupies a line to itself. It is not terminated with a semicolon.
The line in the example program
#include <p18f2420.h> //for all 18F2420 declarations
uses the #include directive to include a processor-specific header file. This file, specific to the C18 compiler, contains the declarations necessary for this particular 18 Series processor and saves having to spell them out in the source code. It contains declarations for all the SFRs (Special Function Registers), including those for Port B used in this program.
14.2.10 Use of libraries and the Standard Library
Because C is a simple language, much of its functionality derives from standard functions and macros which are available in the libraries accompanying any compiler. A C library is a set of precompiled functions, in the form of object files, which can be linked in to the application. The contents of the ‘Standard Library’ are defined in the ANSI standard. It includes functions for input and output, a range of mathematical functions (for example, all trigonometric functions) and other data handling functions.
In addition to the Standard Library, as we shall see, a compiler may have its own library of functions, intended specifically for its target environment.
14.3 Compiling the C program
When the C source code is complete, it is ‘compiled’. This process leads eventually to the production of a file containing the machine code equivalent of the source, which the target computer can execute.
We have already met the concept of header files and library files. These are extensively used, with the result that hardly any C source files are stand-alone. Once the ‘extra’ files are incorporated, the final executable program is built up from a number of contributing files, often in quite a complex way. In turn, the process of compiling a C program creates a range of output files.
The process of compiling, along with the files used and generated, is illustrated in a general way in Figure 14.2. The main program, the C source file, is written in the C language, in a file with the extension. c. This is very likely to include (using the preprocessor #include directive) other standard files, for example the processor-specific header file we have already seen. A source file, together with any included header files, is known as a ‘translation unit’.
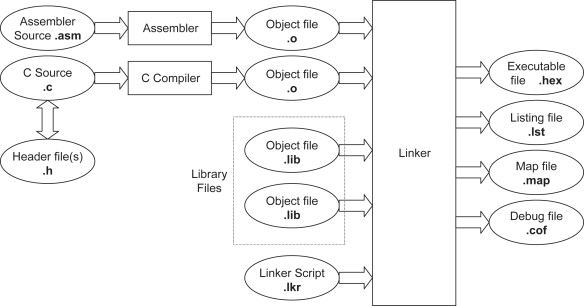
When the source program is complete, it is compiled using the C compiler to produce an ‘object file’. This consists of relocatable code, not yet fully mapped to the processor memory map. Other files can also be developed, including those in Assembler, and all compiled or assembled in a similar way, leading to object files containing (mainly) relocatable code.
At this stage, in all but the simplest programs, it is likely to be combined with other files, which already exist at the object file stage. These may be from the libraries which accompany the compiler or they may be previously developed files of the programmer or company. It is the task of the ‘Linker’ to combine these different files to create one single executable file. In doing this, it is guided by the ‘Linker Script’, a file which defines the processor memory map and provides other information, including the possibility of drawing in further precompiled files. The opening title block in Program Example 14.1 makes reference to two object files, c018i.o and p18f2420.lib, which are linked in to the program by the Linker. How this is done, and the role they play, is explained in Chapter 17.
After the linking process is complete, and assuming there are no errors in the process, a series of output files is produced. Those for the Microchip C18 compiler are detailed in Section 14.5.4.
14.4 The MPLAB C18 compiler
The MPLAB C18 compiler is Microchip's own C compiler, written especially for the PIC 18 Series microcontroller. It follows the ANSI X3.159-1989 standard, except that it also contains a number of extensions, designed to optimise its use with the PIC microcontroller. At the time of writing, Microchip are in the process of renaming the compiler ‘MPLAB C Compiler for PIC18 MCUs’. For simplicity, we will continue here using the earlier, shorter name.
The C18 compiler operates within the main MPLAB IDE environment, working alongside its Assembler, Linker and Librarian. Once installed, it can be linked in to this tool suite. Unlike MPLAB, the compiler must be purchased, at a cost in the region of $150. At the time of writing, a student version is available free, as a download from the Microchip website. There is also a copy on the book's companion website.
The compiler is reasonably well documented, primarily through References 14.1 and 14.2. These are available from the Microchip website. In the sections which follow, the compiler is introduced to a level adequate to run all the example programs given. Further details can then be found from this reference information.
14.4.1 Specification of radix
MPLAB C18 recognises the C radix specifications mentioned in Section 14.2.6. It also introduces the very useful ‘0b’ prefix for binary numbers. For example:
TRISA = 0b10000110; //initialise PORTA
TRISB = 0x86; //initialise PORTB
TRISC = 134; //initialise PORTC
14.4.2 Arithmetic operations
The ISO/ANSI C standard requires that all arithmetic operations are done at int precision (i.e. 16 bits) or higher. The C18 compiler, reflecting the 8-bit world it serves, steps outside this requirement and undertakes arithmetic with char data types.
In the sections which follow it is assumed that the reader has installed MPLAB IDE and the MPLAB C18 compiler, following the simple procedure given in Ref. 14.1. Version 3.22 of the student edition of the C18 compiler is used.
14.5 A C18 tutorial
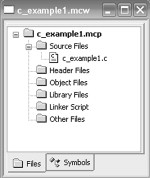
Having described a simple yet plausible C program, let us try to compile it and simulate. In MPLAB open a new project with a suitable name; the images which follow use c_example1 as the entirely unoriginal name. Whatever your habit in the past, it is best to use the Project Wizard from here, as this helps define the operating environment of the project from the beginning. Open a new file and enter into it the code of Program Example 14.1. Save this with a file name of your choice, identifying it as a C source file by using the. c extension, for example example1.c. Add it to the project, using Project > Add Files. The project window should now appear as Figure 14.3.
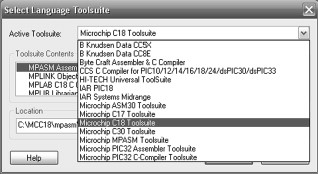
If you have not used the Project Wizard, ensure now that the C18 compiler has been selected as the toolsuite to be used; click Project > Select Language Toolsuite. When the dialog box of Figure 14.4 appears, open the pull-down menu as shown and select Microchip C18 Toolsuite. By using Configure > Select Device ensure also that the correct microcontroller, the 18F2420, is selected.
14.5.1 The linker, header and library files
The compile process automatically uses the Linker, and this needs a Linker Script. We examine the form of this in Chapter 17. In previous versions of MPLAB tools (and in the previous edition of this book) we used to have to specify the Linker Script. For standard scripts, this is no longer necessary; the compiler will find it automatically.
While we are only compiling a tiny program, it does invoke a header file, through the line
#include <p18f2420.h>
It is therefore important to ensure that the compiler knows where to find this. This is done by specifying the right ‘search path'. The Linker Script also calls up other library files, which must also be found. Check that these paths are set up correctly, using Project > Build Options > Project > Directories. The window of Figure 14.5 should then appear. The pull-down menu in this window allows you to see the search path setting for Include, Library and Linker Script files. Click through each of these. If all is already correctly set, and assuming the compiler is installed in the C drive, you will see:
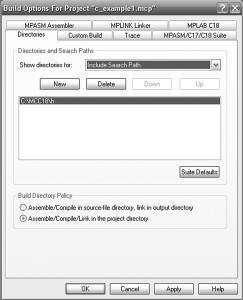
| Include Search Path | C:mcc18h |
| Library Search Path | C:mcc18lib |
| Linker-Script Search Path | C:mcc18lkr |
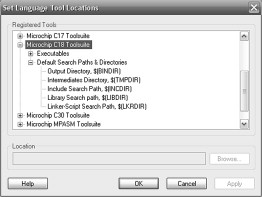
If this is not the case, you can set these manually, by clicking on New and entering the location for each. Alternatively, set up your defaults for all future projects by selecting Project > Set Language Tool Locations. This will show the screen of Figure 14.6. Make the selection shown in the figure and then enter in turn the settings listed above, for each search path. These can then be applied to the current project by clicking on Suite Defaults in the window of Figure 14.5.
14.5.2 Building the project
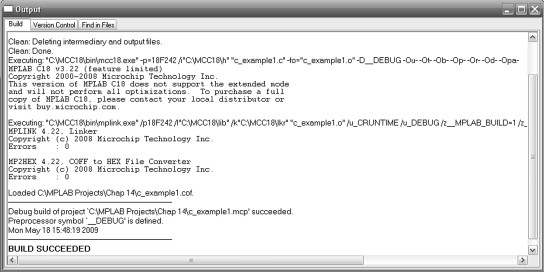
It should now be possible to build the project. As with Assembler, click on Project > Build All. If all is correctly entered and linked, the Build Succeeded message should ultimately appear in the Output window, as seen in Figure 14.7. Notice that the build process takes longer than Assembler, even for a tiny program like this, and that there are a number of distinct stages. These are shown in the figure. At the compile stage the window shows that a number of compile options, indicated by -Ou- -Ot- -Ob- and so on, are being implemented. These are the compiler defaults and are not of interest at this early stage of compiler use.
If the project did not build successfully, which is quite likely first time round, it will be necessary to explore the resulting error messages. The compiler first checks that the program has correct syntax, i.e. it is written to obey the formatting rules of C. Even if you did not get any errors, try removing a semicolon or inserting some other small error, and check the response of the compiler on build. If there is a syntax error, the compiler reports this in the Output window, with a line number. Line numbers may be switched on using Edit > Properties > Editor in the MPLAB window and clicking the Line Numbers box. It is worth noting that the line number where the compiler perceives the error may not be the exact one where correction is needed. As a simple example, try ‘commenting out’ the opening brace of main. You will see that the syntax error is reported as being in the line which follows – which on its own is a perfectly good piece of C code!
When all syntax errors are removed, the compiler checks for other errors and reports an error reference number. The error numbers, with brief descriptions of the error and possible solutions, are listed in Ref. 14.2.
A successfully built project yields the following files:
• Source file (.c). This is the original source file, written in C.
• COFF object module file (.cof). This file provides debugging information for MPLAB IDE v6.xx or later.
• Executable file (.hex). This is the actual program code, which can be downloaded to the microcontroller or used for simulation or emulation purposes.
• Listing file (.lst). This file shows the original source code alongside the object code. Symbol values, memory usage information, and error and warning information are also provided.
• Object file (.o). This file contains the relocatable code. It is the output of the compiler or Assembler, and forms the input to the Linker. Object files are also found in the library.
14.6 Simulating a C program
Explore now the simulation of Program Example 14.1. While the program itself is exceedingly simple, the simulation will reveal a number of interesting things about how the overall C program is built, and will bring us back again to Figure 14.2.
As in Section 4.6 of Chapter 4, select MPLAB's simulator by invoking Debugger > Select Tool > MPLAB SIM. Using View > Watch, open a Watch window and display the values of counter, PORTB and PCL (Program Counter, lower byte). Using the debugger toolbar (Figure 4.12), reset the program counter, noticing that it clears to zero in the Watch window, as expected. Another program window opens on the screen, however, entirely unasked! This is c018i.c, a start-up program which the Linker has invoked. It contains a certain processor initialisation essential for the correct operation of C. We return to it in Chapter 17.
Single-step through the program (or use Animate) and you will find that execution transfers ultimately to the source program. It is then possible to see in the Watch window the values of counter and PORTB being incremented. From here, program execution stays indefinitely in the while loop.
An interesting way of seeing how the C program has been created is by viewing the ‘Disassembly Listing’, by selecting View > Disassembly Listing. In this window (as seen in Figure 14.8) it is possible to see both the original C source code and the Assembler which replaces it. It can be seen that some lines of C code translate to a single line of Assembler. In most cases, however, a single line of C must be replaced by several lines of Assembler. This is an early indication that programming in C will lead to simpler source files. As more complex lines of C are introduced, the scale factor between the C code and the Disassembly Listing will become more marked.
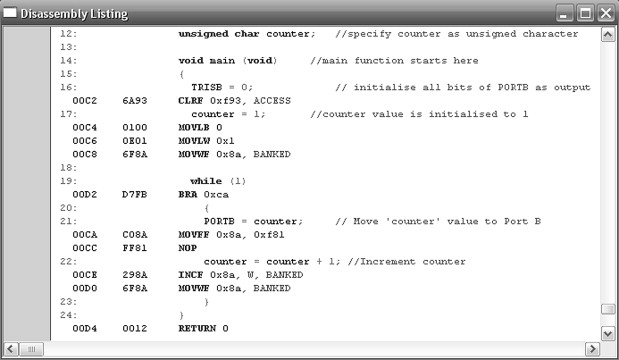
In Figure 14.8, it can be seen that the address of TRISB, 0F93H, is correctly applied, as seen in Figure 13.5. The memory location 8AH in Bank 0 has been allocated to counter. The transfer of the counter value to PORTB can be seen in the instruction
MOVFF 0x8a,0xf81
where 0xf81 is the address of Port B. The incrementing of counter can similarly be seen. Notice that the Assembler instructions, as indicated by their memory locations, are placed out of sequence. The branch instruction, at memory location 00D2H, actually forms the continuous loop and should lie at the end of the listing.
14.7 A second C example – the Fibonacci program
Let's now take our C programming a step further, with a program of slightly increased complexity. Program Example 14.2 provides a C version of a program already familiar to us, the Fibonacci series generator. This calculates a Fibonacci series, first by going up to a certain level and then working backwards again. This action is repeated indefinitely.
14.7.1 Program preliminaries – more on declaring variables
Following the opening comments, the early program lines declare five unsigned character variables, while the first three lines within main initialise three of these to certain values. There are certain ways in which this process can be shortened. Firstly, a declaration of one data type need not be confined to a single variable. Therefore, the five variables could all be declared together, as
unsigned char fib0, fib1, fib2, fibtemp, counter;
It would be up to the programmer to decide whether this format was preferable. One disadvantage is that it is less easy to add a comment per variable, should this be desired.
It is also possible to initialise a variable at the time of declaration. The following would be a possible format:
unsigned char fib0 = 0; //lowest number
unsigned char fib1 = 1; //middle number
unsigned char fib2 = 1; //highest number
Again, it would be up to the programmer to decide whether this format gave any advantage.
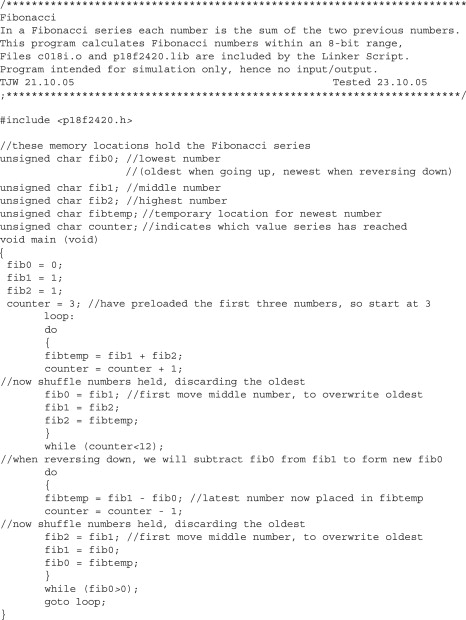
14.7.2 The ‘do–while’ construct
There are two loops in the Fibonacci program. These are constructed here using the do and while keywords. The block of code following the do word is executed as long as the while condition (counter < 12 for the first loop) is ‘true’, i.e. it has a non-zero value. In such a loop, the do code is always executed at least once before the while condition is tested. This is different from a while loop, which will not execute even once if its condition is not true on entry.
When reversing down the series, the loop is repeated until fib0 has been found to have reached a value of 0, using another test in a while statement.
14.7.3 Labels and the ‘goto’ keyword
Immediately before the first do loop there appears the expression loop:. This is a label, identified by its terminating colon. The last line of the program returns execution to loop:, using the keyword goto. The only application of such labels is as targets for goto instructions; they are not used for any other purpose. A goto causes unconditional branching within a given function; it cannot branch to another function. The goto branch is not much loved in C circles, as its uncontrolled use leads to unstructured programs. We will see a better way to construct continuous loops in Section 15.4.1.
14.7.4 Simulating the Fibonacci program
As always, it is worth simulating this program. Copy the program from the book's companion website into an appropriate project and simulate with MPLAB SIM. Open a Watch window, with PCL and all variables displayed. Single-step through the program and, once in main, observe how the looping is controlled. Notice that when counter reaches 12, the do code block is completed before execution moves to the lower loop. An alternative structure for this loop is explored in Chapter 15 and seen in Program Example 15.2.
14.8 The MPLAB C18 libraries
We close this chapter with a survey of the library functions available in the C18 compiler. The compiler has an extensive set of libraries, which reflects both the C Standard Library, as well as many functions specific to the PIC environment. Most programs written using the compiler will almost inevitably use at least one of these functions, if not many. Certainly, all example programs from this point on use library functions.
Each library function has its own entry in the libraries reference manual [Ref. 14.3]. This indicates the action of the function, the arguments to be passed, the return type and any header file which must be included. The functions fall into the categories described in the following sections.
14.8.1 Hardware peripheral functions
These are a set of functions which relate to the microcontroller peripherals. There are functions for enabling and configuring a peripheral, changing its mode of operation, reading it and disabling it. For the ADC, for example, the functions shown in Table 14.1 are available. It can be seen (by reference to Section 11.3 of Chapter 11 if necessary) that these provide all the functionality which would normally be required when using the ADC. The actual setting is conveyed in the function arguments, which are detailed in the libraries manual [Ref. 14.3]. A number of these functions are used in program examples in Chapter 16.
TABLE 14.1 C18 library analog-to-digital converter functions
| Function | Action |
|---|---|
| OpenADC( ) | Configures the ADC |
| SetChanADC( ) | Selects the channel to be used |
| ConvertADC( ) | Starts an ADC conversion |
| BusyADC( ) | Tests whether ADC is currently busy |
| ReadADC( ) | Reads the result of an ADC conversion |
| CloseADC( ) | Disables the ADC |
The peripherals can, of course, still be manipulated directly through their SFRs, but usually the library function makes programming easier, more visible and more reliable. Knowledge of the detail of the SFRs remains important and in some cases still essential. This helps to interpret how the function parameters should be set.
These functions are unique to the C18 compiler and do not exist in the C Standard Library.
14.8.2 The software peripheral library
This library provides drive functions for a number of external devices which can be included in a system. These include the Hitachi HD44780 LCD driver (see Chapter 8), the MCP2510 CAN (Controller Area Network – described in Chapter 20) interface, as well as functions for generating serial interchange in software.
Like the hardware peripheral library, these functions are unique to the C18 compiler and do not exist in the C Standard Library.
14.8.3 The general software library
The functions in this library are a mix of functions from the C Standard Library and ones specific to Microchip. They fall into the following categories:
Character classification
These functions match the requirements of the Standard C ctype Library and provide tests for characters to determine their nature. Examples are shown in Table 14.2.
TABLE 14.2 Example character classification functions
| Function | Action |
|---|---|
| isalnum( ) | Determines if character is alphanumeric |
| isalpha( ) | Determines if character is alphabetic |
| iscntrl( ) | Determines if character is control |
| isdigit( ) | Determines if character is decimal digit |
Data conversion
These functions provide conversion between one form of data representation and another. This can be extremely useful in the embedded environment, as we convert data from binary form to a string of characters for display, or alternatively read a string in from a keypad and convert to binary. Examples are shown in Table 14.3. They represent a mix of standard C functions and C18 ‘specials’.
TABLE 14.3 Example string/character conversion functions
| Function | Action |
|---|---|
| atop( ) | Converts string to signed byte |
| atof( ) | Converts string to floating-point value |
| atoi( ) | Converts string to 16-bit signed integer |
| atol( ) | Converts string to long integer |
| itoa( ) | Converts 16-bit signed integer to string |
Memory and string manipulation
This set of functions allows the manipulation of memory. Most are drawn from the C Standard Library, although there are some small differences. Example functions are shown in Table 14.4.
TABLE 14.4 Example C18 general software library memory functions
| Function | Action |
|---|---|
| memchr( ) | Searches for a value in a specified memory area |
| memcmp( ) | Compares the contents of two arrays |
| memcpy( ) | Copies a buffer from data or program memory to data |
| memset( ) | Initialises an array with repeated memory value |
Delays
All the delay functions available are listed in Table 14.5. The first is a fixed single-cycle delay, compiling just as a nop (no operation) instruction. All the others allow a programmable delay, based on the instruction cycle time of the microcontroller. This provides a very useful facility in the embedded environment.
TABLE 14.5 C18 general software library delay functions
| Function | Action |
|---|---|
| Delay1TCY( ) | Delay in one instruction cycle |
| Delay10TCYx( ) | Delay in multiples of 10 instruction cycles |
| Delay100TCYx( ) | Delay in multiples of 100 instruction cycles |
| Delay1KTCYx( ) | Delay in multiples of 1000 instruction cycles |
| Delay10KTCYx( ) | Delay in multiples of 10 000 instruction cycles |
Reset
These functions allow the programmer to test a source of reset, from information provided in the 18 Series RCON register (Figure 12.14). Example functions are shown in Table 14.6.
TABLE 14.6 Example C18 general software library reset functions
| Function | Action |
|---|---|
| isBOR( ) | Determines if brown-out was the cause of reset |
| isLVD( ) | Determines if low voltage was the cause of reset |
| isMCLR( ) | Determines if master clear was the cause of reset |
| isPOR( ) | Determines if power-on was the cause of reset |
14.8.4 The maths library
This library provides the mathematical functions required in the C Standard Library. Variables are generally floating point. Examples are shown in Table 14.7.
TABLE 14.7 Example C18 maths library functions
| Function | Action |
|---|---|
| sin( ) | Computes the sine |
| cos( ) | Computes the cosine |
| tan( ) | Computes the tangent |
| sqrt( ) | Computes the square root |
| log10( ) | Computes the log to the base 10 |
| pow( ) | Computes the exponential xy |
14.9 Further reading
When studying C, it is worth noting the different types of references that are available, which can be used to broaden one's knowledge of the language. Some, like Ref. 14.4, give a general introduction to C.
Often, these are very much in the context of programming with a desktop computer, with emphasis on data input from keyboard and output to computer screen. There are also a number of useful reference books, like Ref. 14.5. These give complete reference information on the language without attempting to structure the material as a teaching text. It can be very useful to have easy access to one of these, to check details of syntax and so on. There are also a number of books targeted at the embedded environment, such as Refs 14.6 and 14.7. These get much closer to our interest here. They do, however, tend to be microcontroller- or compiler-specific, and in their detail are somewhat less useful when applied to a different processor.
Summary
• Although it is a high-level language, C contains features that allow it to be extremely effective at the embedded system level. It remains the high-level language of choice for many embedded applications.
• The core features of C are comparatively simple and logical, and can be learned without too much difficulty.
• The MPLAB C18 C compiler is a powerful software tool, drawing on the strengths of the C language but optimised for the PIC 18 Series.
• The MPLAB C18 C compiler can be used as a tool within the MPLAB IDE. Thus, all the expertise that a developer has with this environment can immediately be applied to the development of C programs.
• Writing in C requires a combination of knowledge of the language itself, along with the library functions that are available for the compiler and processor that are in use. There is a rich collection of library functions in the C18 compiler, providing general utilities, peripheral control, data manipulation and mathematical functions.
14.1. MPLAB C18 C Compiler Getting Started (2005). Microchip Technology Inc., Document no. DS51295F.
14.2. MPLAB C18 C Compiler User's Guide (2005). Microchip Technology Inc., Document no. DS51288J.
14.3. MPLAB C18 C Compiler Libraries (2005). Microchip Technology Inc., Document no. DS51297F
14.4. Austin M., Chancogne D. Engineering Programming in C, Matlab and Java 1999 Wiley ISBN 978-0-471-00116-4
14.5. Prinz P., Kirch-Prinz U. C Pocket Reference 2003 O'Reilly ISBN 978-0-596-00436-1
14.6. Pont M.J. Embedded C 2002 Addison-Wesley ISBN 978-0-201-79523-3
14.7. Van Sickle E. Programming Microcontrollers in C, 2nd edn. 2003 Elsevier ISBN 978-1-878707-57-4