You have made a very important decision: You have selected to use Zend Studio for Eclipse as your PHP (Hypertext Preprocessor - a recursive acronym) development environment. This is a big step forward to you if you are not familiar with the workings of the Eclipse environment. Also, if you’re familiar with Eclipse, many enhancements to the basic environment can be brought to bear on the development effort.
This chapter introduces you to the overall workings of Zend Studio for Eclipse and gives you the basic foundation so that you become familiar with the terms used and the concepts that are common throughout. By the end of this chapter, you should know what a perspective is, what a view is, and what a project is. We first look at the basic terms used within Zend Studio for Eclipse; these terms are intermixed with some screenshots of what you should be seeing. After that portion of the chapter, we take you on a quick tour of the overall environment within Zend Studio for Eclipse (preferences) so that you will be able to be somewhat fruitful with this product by the end of the chapter.
A view is any subwindow that gives you information on a certain application development topic. For example, the PHP Explorer view is the view into the project management portion of the Zend Studio for Eclipse environment. Many different views are available within Zend Studio for Eclipse, and following is a partial list with a brief description of what each view is designed for so that you have an idea of what a view is all about:
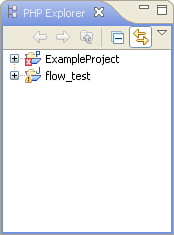
PHP Explorer View *—. This is the main project management view in Zend Studio for Eclipse. Here, you open new projects, import existing projects, create new files for a project, and so on.
Outline View—. This view outlines the objects, methods (class functions), properties, and user-defined functions and constants in the file that currently has focus. You can click on a certain item in this view and be taken directly to the code that is defined within the selected item (if the Link with Editor option is turned on).
PHP Project Outline View—. This view has the same functionality as the Outline view except that its scope is projectwide.
PHP Function View—. This view shows all the native functions within PHP in alphabetical order and allows you to import their syntax directly into your code by double-clicking on the function of your choice. It also allows you to look up any documentation on a selected function in PHP’s online manual by right-clicking on a function.
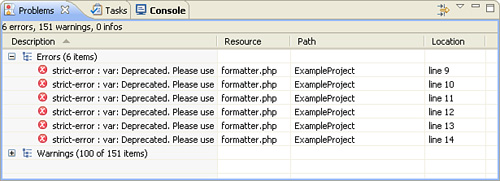
Problems View *—. Zend Studio for Eclipse constantly scans open code files looking for problems to report to the developer. It uses this view to report any problems that are encountered.
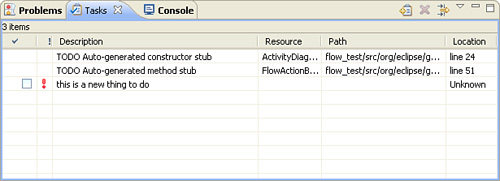
Tasks View *—. In this view you can assign tasks that need to be accomplished. There are three levels of status codes, and you can be specific about what section of code needs attention.
Browser Output View—. This view shows the output of a PHP file that is run within Zend Studio for Eclipse.
Now that you’re familiar with some of the views, let’s look at a few screenshots to see what they look like. The items with the asterisks in the preceding list are the views shown in Figures 1.1 through 1.3.
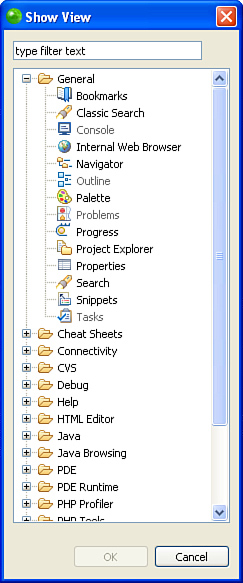
Zend Studio for Eclipse has many different views, and it would be difficult to show and discuss them all at this early stage. However, we discuss every view during the course of this book. If you want to see a list of all the available views, as in Figure 1.4, select the Window menu and then select Show View, Other.
Another aspect of views that you may find helpful at the outset of your relationship with Zend Studio for Eclipse is the concept of fast views. You can accomplish this by right-clicking on the view in question and then selecting Fast View from the pop-up menu. When you make this selection, the view that you’re working on minimizes itself to the taskbar at the bottom of the Integrated Development Environment (IDE). This action effectively takes that view out of the picture, but you can reactivate it quickly (thus the name) by clicking on its icon in the taskbar. It then becomes a toggle view of sorts, and you can restore it to its original setting as a normal view by turning off the Fast View property; to do this, you right-click on its Fast View icon in the taskbar.
You may have heard the saying that goes “Everyone has a different perspective.” This expression has great meaning and power within the Zend Studio for Eclipse environment. In the context of the Zend Studio for Eclipse product, a perspective is simply a collection of similar views that can be used to accomplish a specific task. In the typical opening of Zend Studio for Eclipse, you are presented with the default PHP perspective, which has nine different views distributed on the IDE screen. The PHP perspective (or collection of views) is predefined for you by Zend and is organized to help you develop PHP applications, write code, and manage development projects. Figure 1.5 shows you this perspective.

Many predefined perspectives are available to you within Zend Studio for Eclipse. There is a debugging perspective, Database Development Perspective, What You See Is What You Get (WYSIWYG) HTML perspective, and PHP Profile perspective, just to name a few. To see the whole list of perspectives predefined for you, select Window, Open Perspective, Other.
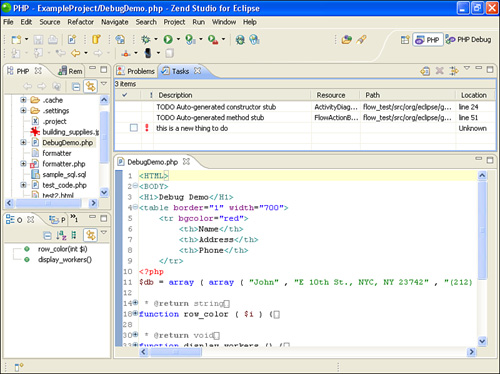
Another great thing about these perspectives is that you can adjust them to suit your own development styles. So if you want the Task and Problems views above the Code Writing view, you are free not only to move these views around, but also to save these adjusted perspectives and use them from that point on as your new default perspective. All you have to do is move the views around your Zend Studio for Eclipse IDE and when you have them where you want them, select Window, Save Perspective As and name your new perspective. Figure 1.6 shows the adjusted PHP perspective just described with the Problems and Tasks views moved to the top. Also notice that a toolbar, called the Perspectives toolbar, is available on the right side of the IDE; this is a collection of icons that allows you to quickly switch between recently used perspectives.
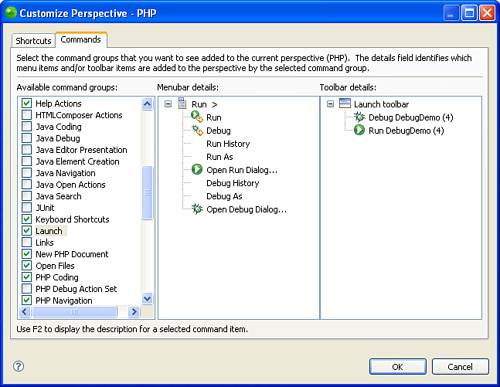
Perspectives are not only related to the collection of views that you have open, but are also able to manage (in a limited way) the menus and toolbar items that are associated with them. To see this level of customization control, select Window, Customize Perspective. A dialog similar to that shown in Figure 1.7 appears. Here, you can adjust certain menu items and toolbar icons that you may not want to appear within your personal perspective, or you may want to add some of these items to it.
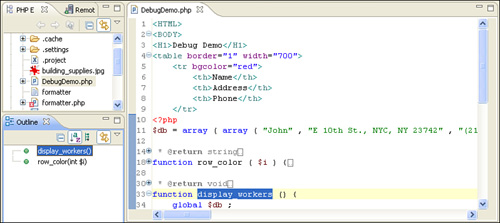
The next major portion of Zend Studio for Eclipse that you should be aware of is the Outline view. This view is like no other, and it will be of great import to you after you learn the ins and outs of it. The Outline view attempts to display a tree view of any entities that it can find within the file that currently has focus. So if a JavaScript file is open in the code editor and is in focus, the Outline view categorizes any functions or variable definitions that are found and organizes them in the aforementioned tree view. If the file is an object-oriented PHP code file, the outline view redefines itself to list any class definitions, methods (class functions), properties (class variables), functions, and defined constants. When these items are categorized and listed, if the Link with Editor option is turned on, clicking on any of these items brings them into focus within the code editor. Figure 1.8 shows the Outline view in action with a PHP class definition file open.
The Outline view is one of the views that you will use most often during your code development, so it would be in your best interest to become familiar with it as soon as possible. Imagine having a large object-oriented PHP project with lots of classes, methods, and properties and then having to locate a certain method to adjust its workings. The Outline view not only organizes the information for you, but also takes you to the code file and exact line of code in question after you locate it in that view.
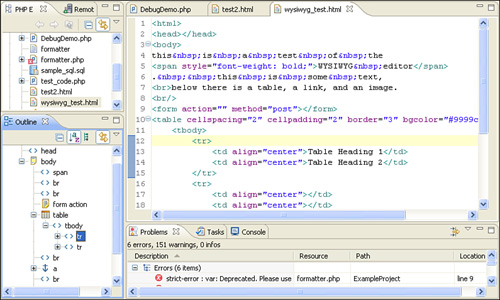
An interesting addition to this Outline view is that when you are looking at a “raw” HTML file, the view also lists every tag that it can and organizes them into a tree view, as in Figure 1.9.
The next concept or general-use approach to Zend Studio for Eclipse that you would be well served to become familiar with is that of working sets. A working set is merely a collection of files or open projects that you can arrange together and give a specific name. You can think of this collection as a perspective for projects or files. If you have a few files from two or more related projects that you want to work on, you can create a working set of them and then do what is required to those files without the clutter of having open all the files from all the projects.
To define a working set, select Window, Working Sets, Edit. If there are already defined working sets, you can select them here, or you can click on the New button and begin to define your own working set. Clicking on the New button starts a small wizard process. First, you select the type of working set that you want (for now, just select a PHP working set); next, you can select projects or individual files for inclusion into your working set that you will also have to name. Figure 1.10 shows a working set being defined and named.

You may find that over time it will make your work easier to define working sets when you’re working on large-sized projects. These working sets will help you to focus on the sections of the project that you want to deal with instead of taking up Zend Studio for Eclipse resources and desktop space loading in a large number of files for a project when you want to work only on a subset of a project.
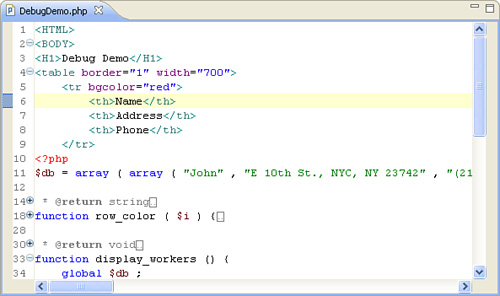
The most important part of Zend Studio for Eclipse is, quite possibly, the code editor. This is the main view in which you do all your code writing, editing, and debugging. It won’t take you long to become accustomed to seeing this editor because it is front and center in every perspective. This view is the actual hub of Zend Studio for Eclipse. Figure 1.11 shows a typical PHP file open and editable within the code editor.
Depending on the type of file being edited, the code editor adjusts itself to try to make as many editing options available to you. For instance, if you’re editing an HTML file, you are given a different toolbar than you see if you are just coding a PHP file. The HTML appearance gives you access to a WYSIWYG feature where you can design table layout and so forth. Because this is not within the context of a PHP file, the editor does not show this to you in that situation.
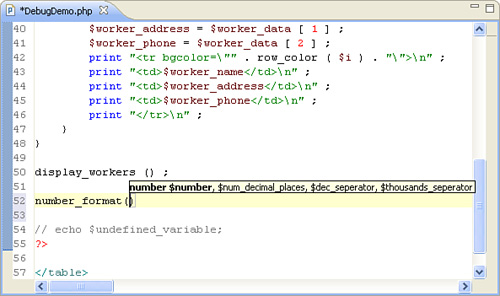
The code editor also has many subtle features; code completion is one of them. When you’re writing code, the code completion feature allows you to complete a command or tag by offering anything that is close in proximity to help speed up the writing process. Figure 1.12 shows the code completion offering made in the PHP context when only num was entered into the code editor. If you see this code assistant when there are many possible hits for it, a full pop-up list of all possibilities is displayed to you and is narrowed down to the more accurate selection as you continue to type your code.
The code editor also offers a number of features in the thin strip that runs top to bottom on its left side. Here, notice line numbers (unless the feature is turned off) and little icons that represent code errors, warnings, or even breakpoints (used in debugging). If you right-click while hovering over this vertical strip, a pop-up menu appears, showing you most of the options available to you. Also, in that same vicinity are little plus and minus icons that signify the capability of the code editor to “fold” code. Folding, in effect, reduces the code in view by collapsing it based on class and function definitions, similar in concept to collapsing and expanding a tree-view interface. You see the code that you want and are not bothered by code that you know is working fine yet may be taking up needed screen real estate.
Note
This code folding is also available to certain HTML elements like the head, body, and table tags.
Figure 1.13 shows a sample of some of these icons with an error(red x’s), plus a few break points (blue circles).

A lot more can be done with the code editor, and these tasks are covered in more depth throughout the book, more specifically in Chapter 4, “The Code Editor.”
Zend Studio for Eclipse has many different settings and options available within its overall environment. This means that you, as the software developer, also have many options available to you in the way you make Zend Studio for Eclipse perform. There are IDE appearance options, code editing options, file and project options, debugging options, and server definition options, just to name a few. To see these options listed in a tree-view layout and to be able to manipulate their values, you simply need to open the Preferences window, shown in Figure 1.14, by selecting Window, Preferences.

Note
Don’t worry about the details of the preferences for now because Chapter 3, “Environmental Settings,” is dedicated to managing preferences.
After you open the Preferences window, you can see all the options broken down for you by category in the tree-view format, as mentioned. There is also a Filter option available at the top of the window; if you know the general topic of the setting that you want to manipulate, you can filter for it here.
This chapter provided a brief overview of the major sections and concepts available to you in the Zend Studio for Eclipse environment. This information should get you operational or at least familiar with the Zend Studio for Eclipse environment so that you can begin using the IDE and become somewhat productive with it. We recommend that you read the next three chapters to get a much better handle on the code editor, project settings, and environmental settings so that your productivity can soar!