
What You’ll Do
Getting to know the Dreamweaver authoring environment makes you more effective and efficient as you create Web pages and manage Web sites. You’ll get to know the parts of the Dreamweaver window, which include toolbars and panels.
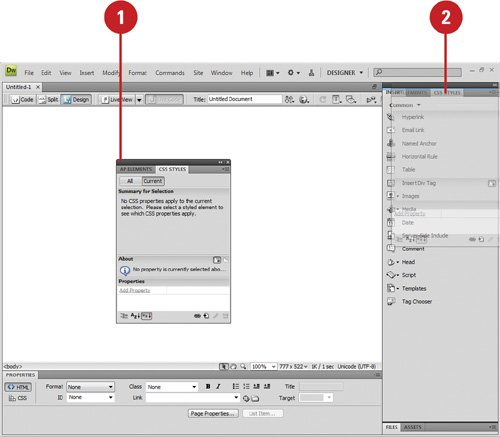
The Toolbars contain buttons that you can use to perform common tasks. Dreamweaver comes with four toolbars. The main one is the Document toolbar, which appear by default. The Document toolbar appears under an open document tab and allows you to change views, specify a title, manage files, preview pages, enable or disable page view options, and perform document validation. The Dreamweaver window also included panels. Panels are windows that allow you to view, organize, and change elements and related options in a document. The Insert panel provides the commands for inserting various types of objects. The Properties panel is a specialized panel that allows you to change object specific attributes and options. To work efficiently in Dreamweaver you need information about the active document. Dreamweaver displays current information about the active document and common display tools on the Status bar, located at the bottom of the document window. For example, working with the Zoom tool on the Status bar gives you one more way to control the view size to exactly what you see in Dreamweaver. In addition, you can use rulers, guides, and the grid to help you lay out artwork and objects with precision.
Dreamweaver uses built-in keyboard shortcuts designed specifically for Dreamweaver. The built-in keyboard shortcuts are organized into sets, which you can duplicate and customize to create your own personalized set. Dreamweaver allows you to set preferences to customize the way you work in the program.
When you start Dreamweaver, the program window displays several windows of varying sizes you can use to create Web pages. These windows include the Program window, Document window, various panels, and the Properties panel. Depending on your installation and previous program usage, not all of these windows may appear, or additional ones may be visible. You’ll do the bulk of your work in Dreamweaver with these windows.
In Dreamweaver, windows appear in the workspace with a title bar, such as the program window, a document window tab, or in a panel.

The Program window displays a Title bar with the program name Adobe Dreamweaver CS3 and the filename of the active open file in brackets. The Title bar also contains a Close button and resizing buttons to the far right.
A menu bar appears below the title bar with menu names. A menu is a list of commands that you use to accomplish specific tasks. A command is a directive that accesses a feature of a program. Dreamweaver has its own set of menus, which are located on the menu bar along the top of the Dreamweaver window. On a menu, a check mark identifies a feature that is currently selected (that is, the feature is enabled or on). To disable (turn off) the feature, you click the command again to remove the check mark. A menu can contain several check marked features. A bullet (Win) or diamond (Mac) also indicates that an option is enabled, but a menu can contain only one bullet-or diamond-marked feature per menu section. To disable a command with a bullet or diamond next to it, you must select a different option in the section on the menu.
When you perform a command frequently, it’s faster, and sometimes more convenient, to use a shortcut key, which is a keyboard alternative to using the mouse. When a shortcut key is available, it is listed beside the command on the menu, such as
![]() +F3 (Mac) or Ctrl+F3 (Win) for the Properties command on the Window menu.
+F3 (Mac) or Ctrl+F3 (Win) for the Properties command on the Window menu.
Below the menu bar is the Insert toolbar, which appears by default and provides tabs with a variety of different buttons. A Toolbar contains a set of commonly used buttons you can quickly access to help you to create Web pages. Dreamweaver comes with five different toolbars, which you can show or hide to customize the Program window
The Document window displays open Dreamweaver documents. Dreamweaver uses tabs to make it easier to switch back and forth between documents. Below a Document tab is the Document toolbar. Each document window includes a Minimize, Maximize, and Close button at the top, and a Status bar at the bottom, which displays current information about the active document and common display tools.
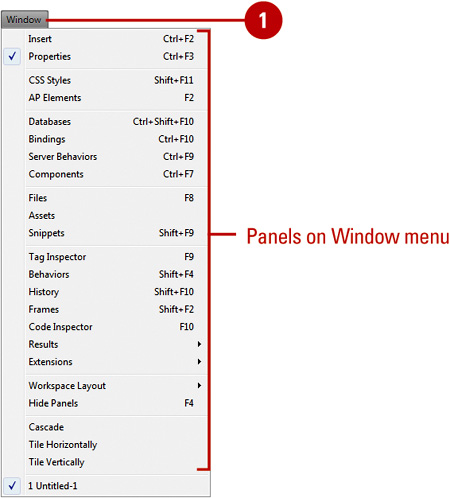
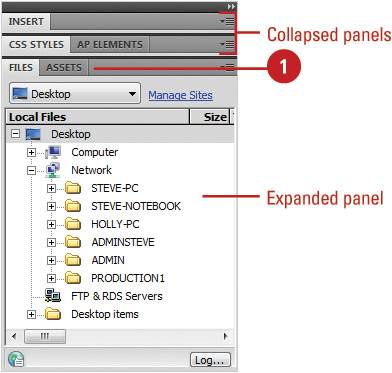
A panel is a window you can collapse, expand, and group with other panels, known as a panel group, to improve accessibility and workflow. A panel appears with a shaded header bar, which includes the window title and additional options. A panel group consists of either individual panels stacked one on top of the other or related panels organized together with tabs, such as the Files panel, to navigate from one panel to another. Dreamweaver provides a wide variety of panels you can use to work with different aspects of a Web page, including CSS Styles, Databases, Tags, and Frames, which you can open and close from the Window menu. As you open, close, and move around windows and panels to meet your individual needs, you can save the location of windows and panels as a custom panel layout set, which you can display again later.
The Properties panel, known more commonly as the Property Inspector, at the bottom of the Program window provides a convenient way to view and change attributes of any selected object or multiple objects, such as graphics and shapes, on a Web page. After you select an object, relevant commands and associated fields for it appear in the Property Inspector.
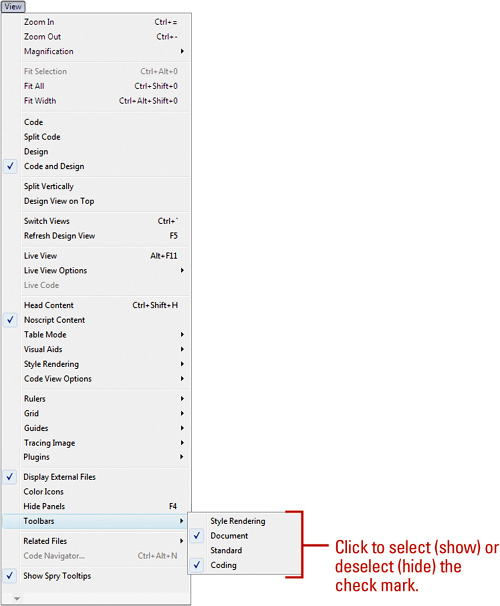
Toolbars contain buttons you can click to carry out commands you use frequently. Dreamweaver provides 4 different toolbars—Style Rendering, Document, Standard, and Coding—and the Insert panel for you to use to execute commands. The Insert panel provides the commonly used commands for inserting various types of objects. The Insert panel, displays subpanels, such as Common, Layout, Forms, Data, Spry, Text, and Favorites, you can use to access buttons. The Style Rendering toolbar allows you to work with different media types. The Document toolbar appears by default under an open document tab and allows you to change views, specify a title, manage files, preview pages, enable or disable page view options, and perform document validation. The Standard toolbar provides common file and editing commands, such as Open, Save, Print, Cut, Copy, Paste, Undo, and Redo. The Coding toolbar is available in Code and Split views and makes it easier to work with code. You can quickly show or hide the toolbars you need or are no longer using to customize the way you use Dreamweaver.
• To display a toolbar, click the View menu, point to Toolbars, and then click a toolbar to select the check mark.
Timesaver
You can also right-click (Win) or Control+click (Mac) any of the toolbars and then click a toolbar.
• To hide a toolbar, click the View menu, point to Toolbars, and then click a toolbar to deselect the check mark.
Timesaver
To display or hide the Insert toolbar, press Ctrl+F2, or click the Window menu, and then click Insert.
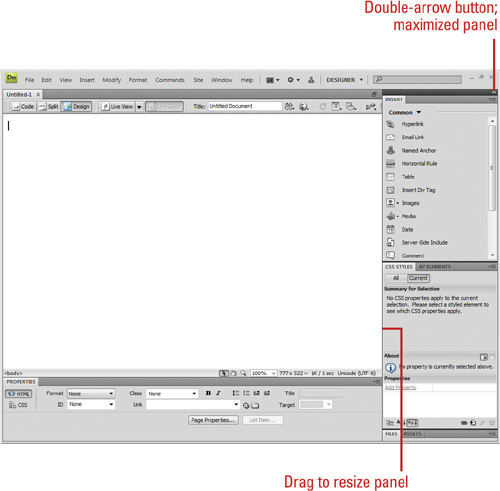
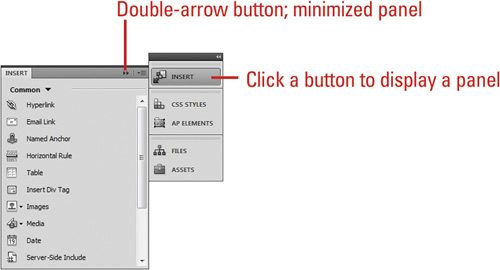
If you need more workspace, you can use the double-arrow button (at the top of a panel group) to quickly minimize a panel group, such as the one on the right side of the Dreamweaver window. When you click the double-arrow button, the panel group collapses to icons, which increases the size of the workspace. You can click the icons to display the panel. When you click the double-arrow button again, the panel group reopens. If you need to increase or decrease the size of a docking panel, you can drag the resize bar at the top-left side of the panel group to resize it as you would any window.
• To minimize or maximize a docking channel, click the Double-arrow button at the top of the panel group.
The double-arrow direction indicates whether the panel minimizes or maximizes.
For example, if the double-arrow points to the left of the Tools panel that means when you click it the Tools panel minimizes. If the double-arrow points to the right that means when you click it the Tools panel maximizes.
• To have an expanded panel icon automatically collapse or hide when you click away, right-click (Win) or control-click (Mac) a panel, and then click Auto-Collapse Icon Panels or Auto-Show Hidden Panels (New!).
Panels are windows that allow you to view, organize, and change elements and related options in a document. In Flash, you work with several panel windows at one time. Instead of continually moving, resizing, or opening and closing windows, you can collapse or expand individual panels within a window with a single click to save space. A panel appears with a header, which includes the tab titles and three accessibility options: the Minimize/Maximize button, the Close button, and an Options menu. The entire set of panels includes a double arrow you can use the collapse and expand the entire panel between icons with text and full panels. You use the Minimize/Maximize button to collapse or expand panels. The Options menu provides you with panel specific commands, including group, rename, maximize, close a panel, and use the Help system.
Timesaver
To close panels or panel group, right-click (Win) or option-click (Mac), and then click Close or Close Group.
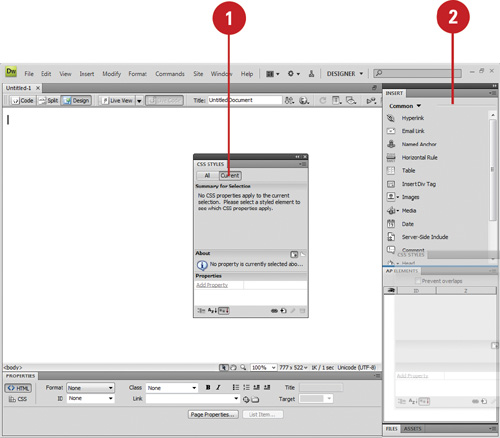
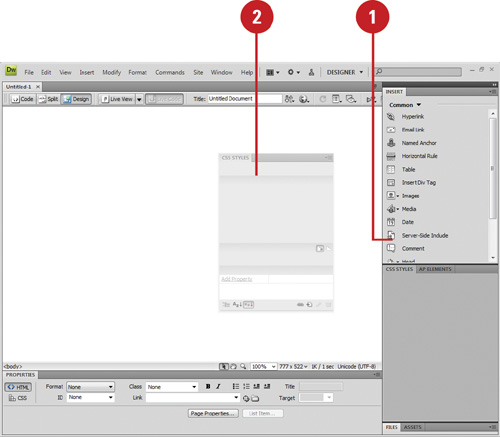
![]() To collapse or expand an open panel, click the header bar or double-click the title tab on the header bar of the panel.
To collapse or expand an open panel, click the header bar or double-click the title tab on the header bar of the panel.
Timesaver
To Auto-Collapse Icon Panels or Auto-Show Hidden Panels, right-click (Win) or option-click (Mac), and then select a command.
![]() Open or expand a panel.
Open or expand a panel.

![]() Click the Options menu on the right side of the panel header bar.
Click the Options menu on the right side of the panel header bar.
![]() Click a command from the list (commands vary). Common commands include:
Click a command from the list (commands vary). Common commands include:
• Help. Accesses Flash Help.
• Close. Closes the currently displayed tab in the panel.
• Close Group. Closes all the tabs in the panel.
You can dock and undock, or temporarily attach and detach, panels or panel groups. You can display panels using the Window menu, and then drag them around the program window to dock or undock them to other panels. You can even dock or undock the Properties panel. However, document panels cannot be docked. When you drag a panel over a dockable area, an outline around the target dock appears. When you release the mouse button, the panel snaps to the dockable area and stays there until you move it. You can even drag a panel tab to a new position. If you attempt to dock a panel over an undockable area, no outline appears.
![]() Position the pointer on the panel tab or panel set header bar.
Position the pointer on the panel tab or panel set header bar.
![]() Drag the window away from the panel to a panel.
Drag the window away from the panel to a panel.
• Add to Panel. Drag to a panel until a blue rectangle appears around the panel.
• Append to Panel. Drag to a panel until a blue line appears along the side of the panel.
![]() Position the pointer on the panel tab or panel set header bar.
Position the pointer on the panel tab or panel set header bar.
![]() Drag the window away from the panel to an empty area of the Dreamweaver window.
Drag the window away from the panel to an empty area of the Dreamweaver window.
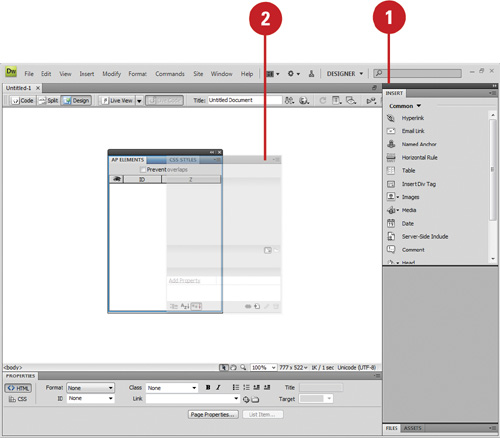
You can group panels together to improve organization and workflow. When you group panels together, you can stack one on top of the other, or group related panels together as a tabbed panel group, such as the Component Inspector panel. You can add a panel to an existing panel group or you can create a new panel group. If you no longer need panels grouped together, you can ungroup them. You can use the panel gripper to group or ungroup as well as dock or undock panel windows.
![]() Position the pointer on the panel tab or panel set header bar.
Position the pointer on the panel tab or panel set header bar.
![]() Drag the window away from the panel to another panel window.
Drag the window away from the panel to another panel window.
• Add to Panel. Drag to a panel until a blue rectangle appears around the panel.
• Append to Panel. Drag to a panel until a blue line appears along the side of the panel.
![]() Position the pointer on the panel tab or panel set header bar.
Position the pointer on the panel tab or panel set header bar.
![]() Drag the window away from the panel to an empty area of the Dreamweaver window.
Drag the window away from the panel to an empty area of the Dreamweaver window.
See Also
See “Working with Panels” on page 46 for information on using panels, or “Docking and Undocking Panels” on page 48 for information on moving panels around the screen.
As you work with Dreamweaver, you’ll open, close, and move around windows and panels to meet your individual needs. After you customize the Dreamweaver workspace, you can save the location of windows and panels as a custom workspace. You can create custom workspaces, or use the default ones provided by Dreamweaver (New!), such as Designer, Code, Dual Screen, and App Developer. If you no longer use a custom workspace, you can remove it at any time. You can also rename a custom workspace to better recognition and use.
![]() Open and position the panels you want to include in a panel set.
Open and position the panels you want to include in a panel set.
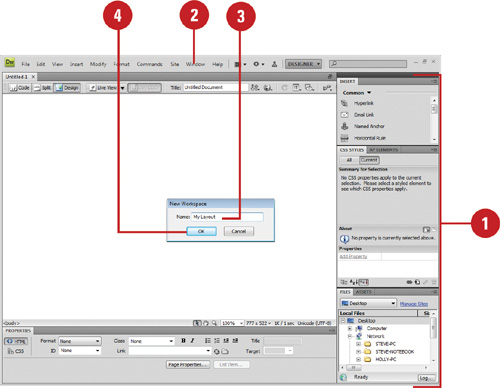
![]() Click the Window menu, point to Workspace Layout, and then click New Workspace.
Click the Window menu, point to Workspace Layout, and then click New Workspace.
Timesaver
Click the Workspace menu on the menu bar (Win) or title bar (Mac) to access workspace commands.
The New Workspace dialog box opens.
![]() Type a name in the Name box.
Type a name in the Name box.
![]() Click OK.
Click OK.
The panel set is now saved.
![]() Click the Window menu, point to Workspace Layout or click the Workspace menu (New!), and then select a panel option:
Click the Window menu, point to Workspace Layout or click the Workspace menu (New!), and then select a panel option:
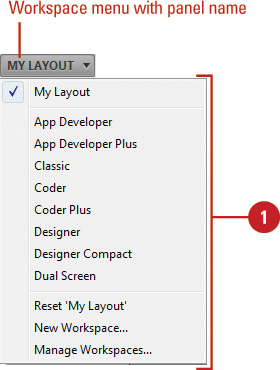
• Custom Panel Name. Displays a custom panel layout in which you created.
• Predefined Layouts. Displays the default panel layout (New!): App Developer, App Developer Plus, Classic, Coder, Coder Plus, Designer, Designer Compact, or Dual Screen.
![]() Click the Workspaces menu, and then click Manage Workspaces.
Click the Workspaces menu, and then click Manage Workspaces.
The Manage Workspace dialog box opens.
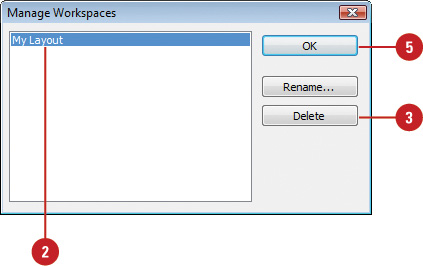
![]() Select the panel set you want to delete.
Select the panel set you want to delete.
![]() Click Delete.
Click Delete.
![]() Click Yes to confirm the deletion.
Click Yes to confirm the deletion.
![]() Click OK.
Click OK.
The panel set is now deleted.
Did You Know?
You can hide all panels. Click the Window menu, and then click Hide Panels to select the check mark.
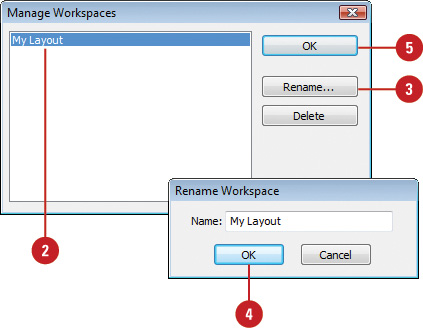
![]() Click the Workspaces menu, and then click Manage Workspaces.
Click the Workspaces menu, and then click Manage Workspaces.
The Manage Workspace dialog box opens.
![]() Select the panel set you want to rename.
Select the panel set you want to rename.
![]() Click Rename.
Click Rename.
![]() Type a new name, and then click OK.
Type a new name, and then click OK.
The panel set is now renamed.
![]() Click OK.
Click OK.
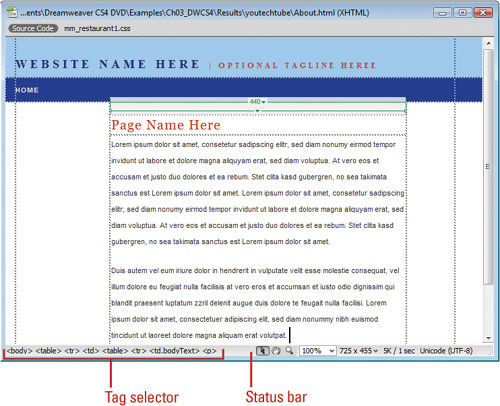
To work efficiently in Dreamweaver you need information about the active document. Details about the document’s size and estimated download time all help in the design and preparation of the page. Dreamweaver displays current information about the active document and common display tools on the Status bar, located at the bottom of the document window. The Status bar displays the Tag selector for the current selection and the estimated document size and download time, and allows you to use the Select, Hand, or Zoom tools, set document magnification, or resize the Document window.
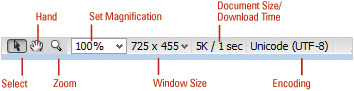
![]() View the display information or click a tool on the Status bar:
View the display information or click a tool on the Status bar:
• Tag Selector. Shows the hierarchy of tags surrounding the current selection.
• Select Tool. Use to enable or disable the Select tool.
• Hand Tool. Use to drag a document into the Document window.
• Zoom Tool. Use to increase or decrease the magnification level for a document.
• Set Magnification. Use to select a predefined magnification level.
• Window Size. Use to resize the Document window to a predefined value in Design view.
• Document Size And Estimated Download Time. Shows the estimated document size and download time for the page.
![]() Click the Dreamweaver (Mac) or Edit (Win) menu, and then click Preferences.
Click the Dreamweaver (Mac) or Edit (Win) menu, and then click Preferences.
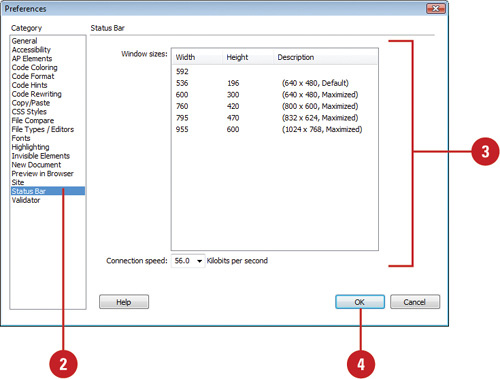
![]() Click the Status Bar category.
Click the Status Bar category.
![]() Set the options you want:
Set the options you want:
• Window Sizes. Specify the window sizes you want to appear in the Status bar.
• Connection Speed. Select the connection speed (in kilobits per second) you want to use to calculate the download size that appears in the Status bar.
![]() Click OK.
Click OK.
Did You Know?
You can display the download size for an image. When you select an image, the image’s download size appears in the Properties panel.
Working with the Zoom tool gives you one more way to control exactly what you see in Dreamweaver. The Zoom tool does not change the active image, it only lets you view the image at different magnifications. The Zoom tool is located on the Status bar, and resembles a magnifying glass. Increasing the magnification of an image gives you control over what you see and gives you control over how you work. Large documents are difficult to work with and difficult to view. Many documents, when viewed at 100 percent, are larger than the maximized size of the document window. When this happens, viewing the entire image requires reducing the zoom.
![]() Select the Zoom tool on the Status bar.
Select the Zoom tool on the Status bar.

![]() Use one of the following methods to zoom in:
Use one of the following methods to zoom in:
• Click On The Document. The image increases in magnification centered on where you clicked.
• Drag To Define An Area With The Zoom Tool. The image increases in magnification based on the boundaries of the area you dragged.
![]() To zoom out, hold down the Alt (Win) or Option (Mac) key, and then click on the screen to reduce the zoom of the active document.
To zoom out, hold down the Alt (Win) or Option (Mac) key, and then click on the screen to reduce the zoom of the active document.
The zoom reduction centers on where you click on the active document.
Carpenters know that precise measurements are essential to making things fit, so they have a rule: Measure Twice, Cut Once. In keeping with the idea that precise measurements are essential, Dreamweaver gives you ruler bars. Ruler bars are located on the top and left sides of the active document window. Rulers serve a very important role. Ruler guides help you correctly align design elements. As a matter of fact, if you’re not working on a flat glass or LCD monitor, the curvature of the monitor can give you a false impression of the vertical and horizontal. By using guides you have access to precise alignment systems.
![]() Click the View menu, and then point to Rulers.
Click the View menu, and then point to Rulers.
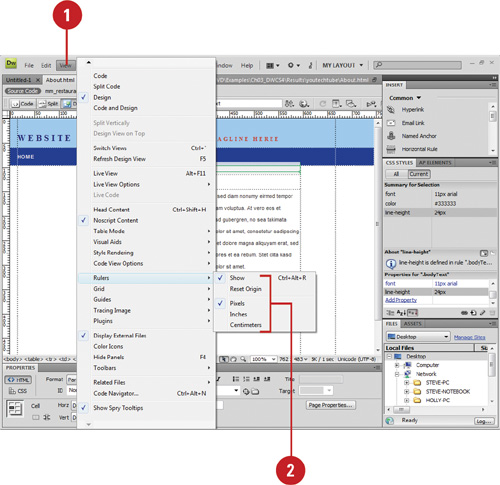
![]() Select the options you want:
Select the options you want:
• Show. Click to show or hide the ruler.
• Reset Origin. Click to set the ruler back to the default.
• Change the Origin. Drag the ruler-origin icon (at the upper-left corner) anywhere on the page.
• Pixels, Inches, or Centimeters. Click to select the type of measurement you want to appear on the ruler.
Dreamweaver comes with guides, grids, and rulers to help you lay out artwork and objects with precision. A grid is a series of crisscrossed lines that aid in aligning objects to each other on the Stage. A guide is a horizontal or vertical line you can position to align objects. Grids and guides are modifiable. You can change their visibility, position, color, and frequency. To align several elements to a grid or guide line, you first turn Snap to Grid or Snap to Guides on. Then you can drag the elements to align them to the grid or a guide. These items are invisible by default, but they can be easily turned on and adjusted. Though you see them in the Dreamweaver development environment, they are invisible on the viewable page. Use guides to align art and objects to each other on vertical or horizontal paths, or turn on the grid for use in designing a layout that is proportional and balanced.
![]() Click the View menu, and then point to Grid.
Click the View menu, and then point to Grid.
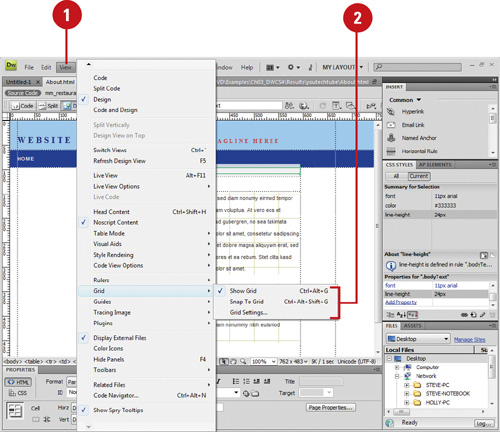
![]() Select the option you want:
Select the option you want:
• Show. Click to show or hide the grid.
• Snap To Grid. Click to enable or disable objects aligning to a grid line.
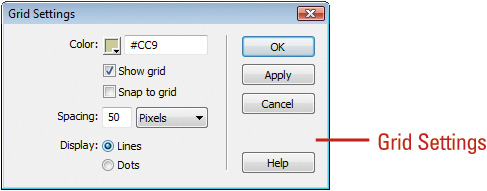
• Grid Settings. Click to open the Grid Settings dialog box, where you can set the grid color, settings, spacing, and display, either lines or dots.
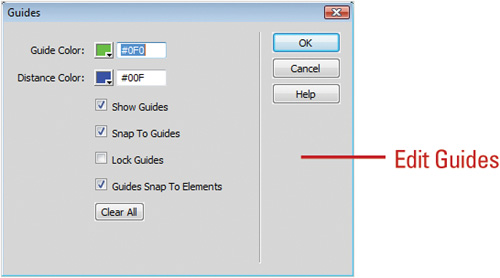
![]() Click the View menu, point to Guides, and then select the options you want:
Click the View menu, point to Guides, and then select the options you want:
• Show Guides. Click to show or hide the guides.
• Snap To Guides or Guides Snap To Elements. Click to enable or disable objects aligning to guides or guides to objects.
• Edit Guides. Click to set the guide color, distance color, and other settings.
• Lock Guides. Click to lock the existing guides in place.
• Clear Guides. Click to remove all guides.

![]() Move to the vertical or horizontal Ruler bar, and then click and drag into the document.
Move to the vertical or horizontal Ruler bar, and then click and drag into the document.
![]() Click the Select tool on the Status bar to drag existing guides to a new position (make sure Lock Guides is not selected).
Click the Select tool on the Status bar to drag existing guides to a new position (make sure Lock Guides is not selected).
Did You Know?
You can remove one guide at a time. Make sure Lock Guides is clear, and then click the Select tool. Drag the existing guide you want removed back to the corresponding Ruler bar.
You can use keyboard shortcuts to work with guides.
![]() +; (Mac) or Ctrl+; (Win) shows and hides guides, Option+
+; (Mac) or Ctrl+; (Win) shows and hides guides, Option+
![]() +; (Mac) or Ctrl+Alt+; (Win) locks and unlocks guides, Shift+
+; (Mac) or Ctrl+Alt+; (Win) locks and unlocks guides, Shift+
![]() +; (Mac) or Ctrl+ Shift+; (Win) to turn Snapping to guides on and off, and Shift+
+; (Mac) or Ctrl+ Shift+; (Win) to turn Snapping to guides on and off, and Shift+
![]() +/(Mac) or Ctrl+Shift+/(Win) to turn Snapping guides to elements on and off.
+/(Mac) or Ctrl+Shift+/(Win) to turn Snapping guides to elements on and off.
Dreamweaver uses built-in keyboard shortcuts designed specifically for Dreamweaver. A complete list of the keyboard shortcuts is available in the back of this book. The built-in keyboard shortcuts are organized into sets, which you can duplicate and customize to create your own personalized set. If you use other programs, such as Adobe Illustrator or Adobe Photoshop, and you are more comfortable using their keyboard shortcuts for common commands, you can select a built-in keyboard shortcut set from any of the graphics programs to use in Dreamweaver.
![]() Click the Dreamweaver (Mac) or Edit (Win) menu, and then click Keyboard Shortcuts.
Click the Dreamweaver (Mac) or Edit (Win) menu, and then click Keyboard Shortcuts.
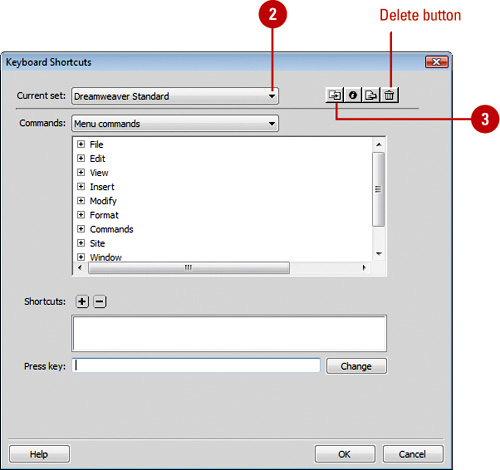
![]() Click the Current Set popup, and then select a set.
Click the Current Set popup, and then select a set.
![]() Click the Duplicate Set button.
Click the Duplicate Set button.
![]() Type a name for the new shortcut set.
Type a name for the new shortcut set.

![]() Click OK.
Click OK.
Did You Know?
You can delete a custom keyboard shortcut set. Click the Dreamweaver (Mac) or Edit (Win) menu, click Keyboard Shortcuts, select a shortcut set from the Current Set popup, and then click the Delete button. You cannot delete a built-in keyboard shortcut set that comes with Dreamweaver.
You can rename a custom keyboard shortcut set. Click the Dreamweaver (Mac) or Edit (Win) menu, click Keyboard Shortcuts, select a shortcut set from the Current Set popup, click the Rename Set button, enter a new name, and then click OK. You cannot rename a built-in keyboard shortcut set that comes with Dreamweaver.
![]() Click the Dreamweaver (Mac) or Edit (Win) menu, and then click Keyboard Shortcuts.
Click the Dreamweaver (Mac) or Edit (Win) menu, and then click Keyboard Shortcuts.
![]() Click the Current Set popup, and then select the set in which you want to change.
Click the Current Set popup, and then select the set in which you want to change.
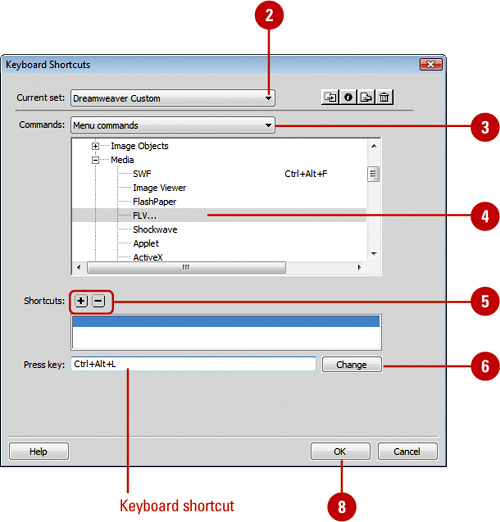
![]() Click the Commands popup, and then select a shortcut category, such as Drawing Menu Commands, Drawing Tools, Test Movie Menu Commands, and Workplace Accessibility Commands.
Click the Commands popup, and then select a shortcut category, such as Drawing Menu Commands, Drawing Tools, Test Movie Menu Commands, and Workplace Accessibility Commands.
![]() Select the command for which you want to add or remove a shortcut in the Commands list.
Select the command for which you want to add or remove a shortcut in the Commands list.
![]() Do the following:
Do the following:
• To add a shortcut, click the Add Shortcut (+) button, and then press the key combination to enter the new shortcut key in the Press Key box.
• To remove a shortcut, click the Remove Shortcut (-) button.
![]() Click Change.
Click Change.
![]() To add or remove additional shortcuts, repeat Steps 2-6.
To add or remove additional shortcuts, repeat Steps 2-6.
![]() Click OK.
Click OK.
Dreamweaver allows you to set general preferences to customize the way you work in the program. You can specify what you want to display or open when you launch Dreamweaver and how you want to edit content. Some of the preferences allow you to show or hide the Welcome Screen, allow multiple consecutive spaces when editing, use CSS or HTML tags when formatting, specify to the number of history steps (undo levels), and select a spelling dictionary.
![]() Click the Dreamweaver (Mac) or Edit (Win) menu, and then click Preferences.
Click the Dreamweaver (Mac) or Edit (Win) menu, and then click Preferences.
![]() Click the General category.
Click the General category.
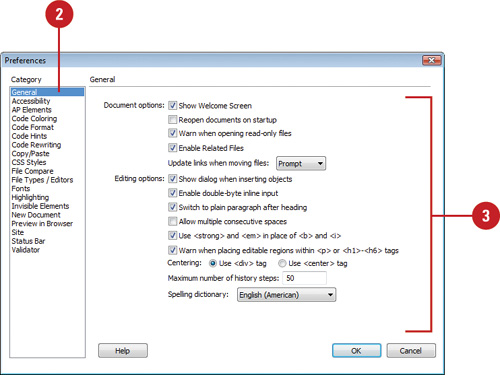
![]() Select from the following options:
Select from the following options:
• Open Documents In Tabs (Mac). Select to open all documents in a single window with tabs.
• Show Welcome Screen. Select to show welcome screen (Default on).
• Reopen Documents On Startup. Select to open any documents that were opened the last time you closed Dreamweaver (Default off).
• Warn When Open Read-Only Files. Select to get an alert when you open a locked file (Default on).
• Update Links When Moving Files. Specify the action you want: Prompt (Default), Never, Always.
• Show Dialog When Inserting Objects. Select to prompt you when inserting objects using the Insert bar or Insert menu.
Timesaver
To temporarily override this setting, Ctrl-click (Win) or
![]() -click (Mac) when creating and inserting objects.
-click (Mac) when creating and inserting objects.
• Enable Double-Byte Inline Input. Select to enter double-byte text, such as Japanese characters (Default on).
• Switch To Plain Paragraph After Heading. Select to press Enter (Win) or Return (Mac) after a heading paragraph to switch to a plain paragraph in Design view (Default on).
• Allow Multiple Consecutive Spaces. Select to allow typing two or more spaces in Design view to create nonbreaking spaces that appear as multiple spaces in a browser (Default off).
• Use <strong> And <em> In Place Of <b> And <i>. Select to apply <strong> instead of <b> and <em> instead of <i> (Default on).
• Use CSS Instead Of HTML Tags. Select to use CSS when you use the Properties panel’s Style option, except for bold and italic (HTML) (Default on).
• Warn When Placing Editable Regions Within <p> Or <h1><h6> Tags. Select to display a warning when you save a template when true (Default on).
• Centering. Select the option you want when you click the Align Center button in the Properties panel (Default <div>).
• Maximum Number Of History Steps. Specify the number of steps the History panel keeps.
• Spelling Dictionary. Click to select a dictionary language. The dialect is in parenthesis.
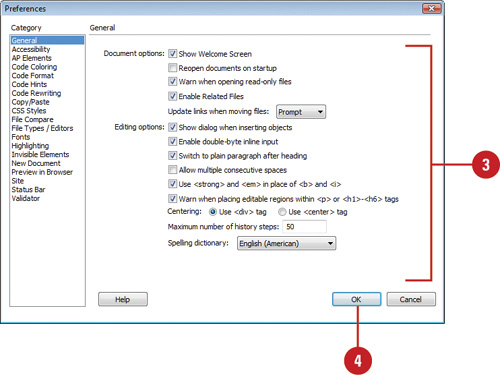
![]() Click OK.
Click OK.
When you create a new document, Dreamweaver allows you to set the default document type you want. The New Document preference options allow you to specify the default document, extension, document type definition (DTD), and file encoding. DTD allows you to select XHTML 1.0 Transitional or XHTML 1.0 Strict to make new Web pages XHTML-compliant. File encoding makes sure your Web browser and Dreamweaver use the right character set for the selected language.
![]() Click the Dreamweaver (Mac) or Edit (Win) menu, and then click Preferences.
Click the Dreamweaver (Mac) or Edit (Win) menu, and then click Preferences.
![]() Click the New Document category.
Click the New Document category.

![]() Select from the following options:
Select from the following options:
• Default Document. Select the type of document you want to use as default (Default HTML).
• Default Extension. Enter the file extension you want to use for the HTML extension, either .html or .htm. (Default .html).
• Default Document Type (DTD). Select to the XHTML document type definition (DTD) you want.
• Default Encoding. Specify the encoding you want to use for new documents and opened documents without any specified encoding. This makes sure your Web browser and Dreamweaver use the right character set for the selected language. The default for HTML encoding is Unicode (UTF-8), which safely represents all characters.
• Use When Opening Existing Files That Don’t Specify An Encoding. Select to apply encoding to when you open a file without encoding.
• Unicode Normalization Form. If you select Unicode (UTF-8) for encoding, select the form option you want: C, D, KC, or KD. Form C is the most common one used for the Web in the Character Model. The others are provided by Adobe.
• Include Unicode Signature (BOM). If you select Unicode (UTF-8) for encoding, you can select this option to include a Byte Order Mark (BOM), which is a 2-4 bytes at the beginning of a text file that identifies a file as Unicode, and order the bytes. This is optional.
• Show New Document Dialog Box On Control+N. Select to show the New Document dialog box or clear to automatically create a document with default settings when you use the shortcut key Ctrl+N (Win) or
![]() +N (Mac).
+N (Mac).
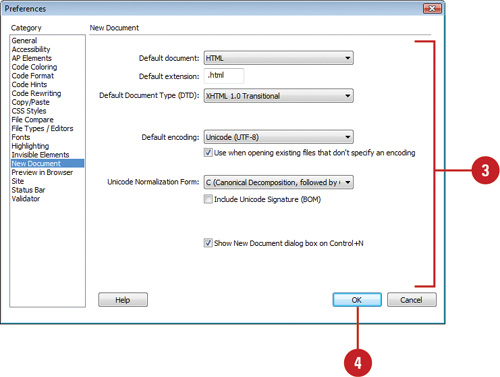
![]() Click OK.
Click OK.
Since Web pages appear in Web browsers, you want to use colors on your pages that are Web-safe, so they appear consistently on every browser. A Web-safe color appears the same in Microsoft Internet Explorer and Netscape Navigator on both Windows and Macintosh system when running in 256-color mode.
RGB (red, green, blue) is a set of color values that describe colors. RGB identifies a color by a set of hexadecimal numbers, an internal computer numbering scheme, that specify the amounts of red, green, and blue needed to create the color. RGB colors appear best over the Web (true color representation without dithers or substitutes) when you use only browser safe colors, which is a standard set of 216 color combinations. These RGB values are 0, 51, 102, 153, 204, or 255 in decimal or 00, 33, 66, 99, CC, or FF in hexadecimal. When you use the system color dialog boxes, you use decimal values. You use hexadecimal values in Code view, the Properties panel, and some dialog boxes, such as the Preferences dialog box.
When you want to change a color, you can click any color box available in many dialog boxes, such as the Preferences dialog box, and the Property Inspector to open the color picker. The color picker allows you to select a color for different page elements.
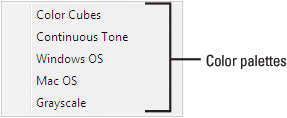
When you click a color box, the color picker appears, displaying the eyedropper cursor and a palette with a bar at the top and a swatch of colors at the bottom. The bar displays the currently selected color and its hexadecimal number. To the right is the Default Color button, which clears the current color without choosing a different color. Next to the Default Color button is the Color Wheel button, which opens the system color picker. The system color picker is the standard color selector provided by the operating system, either Windows or Macintosh. The popup menu in the upper-right corner of the color picker allows you to expand your color selection. You can select different color palettes, including Color Cubes, Continuous Tone, Windows OS, Mac OS, and Grayscale. The Color Cube (default color palette) and Continuous Tone palettes are Web-safe while the Windows OS, Mac OS, and Grayscale are not. If you are using a non Web-safe palette, you can use the Snap To Web Safe command to have Dreamweaver replace the selected color with the closest Web-safe color. You can use the eyedropper to select a color swatch from the palette or pick a color from anywhere on your screen inside or outside Dreamweaver.

When you click the Color Wheel button in the color picker, a system color picker dialog box opens. In Windows, you can use the Color dialog box, which displays basic and custom color squares and a color matrix with the full range of colors in the color spectrum, to help you select a color. You can enter RGB (Red, Green, Blue) values or hue, saturation, and luminosity (also known as brightness) values to specify a color. Hue is the color created by mixing primary colors (Red, Blue, and Yellow). Saturation is a measure of how much white is mixed in with the color. A fully saturated color is vivid; a less saturated color is washed-out pastel. Luminosity is a measure of how much black is mixed with the color. A very bright color contains little or no black. You can also change the hue by moving the pointer in the color matrix box horizontally, the saturation by moving the pointer vertically, and the luminosity by adjusting the slider to the right of the color matrix box. On the Macintosh, you click one of the color modes and select a color, using its controls. You can select RGB values by selecting the color sliders at the top of the dialog box; or by entering values (color numbers) to select a color. You can select hue, saturation, and brightness (or luminosity) values by selecting the color sliders at the top of the dialog box or entering values (color numbers). The color you select appears in the ColorSolid box.

You use the Highlighting section of the Preferences dialog box to specify the colors you want to use for the following items in Dreamweaver: Mouse-Over, Editable regions, Nested editable, Locked regions, Library items, Third-party tags, or untranslated or translated live data. You can select the color you want by using a color swatch or entering a color id number in Hexadecimal (Hex). In addition, you can also determine whether you can show or hide your color selection.
![]() Click the Dreamweaver (Mac) or Edit (Win) menu, and then click Preferences.
Click the Dreamweaver (Mac) or Edit (Win) menu, and then click Preferences.
![]() Click the Highlighting category.
Click the Highlighting category.
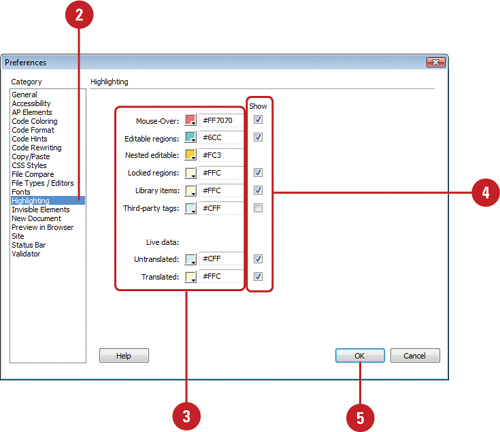
![]() Click the color box and select a color or enter a color Hex number for the options you want.
Click the color box and select a color or enter a color Hex number for the options you want.
![]() Select or clear the Show check box next to an option to show or hide the color selection.
Select or clear the Show check box next to an option to show or hide the color selection.
![]() Click OK.
Click OK.