
• The Importance of Correct Bank Balances in Your QuickBooks Data
• Reconciling a Bank Account for the First Time
• Troubleshooting an Incorrectly Reconciled Bank Account
• Reconciling with an Adjustment
• Bank Reconciliation Troubleshooting Checklist
You might wonder why I would have to point out the importance of having the correct bank balances in your QuickBooks data, yet incorrect bank balances are often one of the most common problems I find when troubleshooting a client’s QuickBooks data. One of the first questions I ask new clients is whether they have reconciled their bank account in QuickBooks. Most will tell me that they have. I then review any bank transactions that are not marked as cleared and I will usually find older dated transactions. (See the section “Review Uncleared Bank Transactions” in this chapter.)
One of the most important reconciliations that you should do in QuickBooks is matching your bank transactions recorded in QuickBooks with the same transactions reported by your bank on the monthly bank statement. Often just reconciling your bank account balances will fix many errors on the Profit & Loss Statement.
If your business is just starting, then it is a good time to make sure that you include reconciling your bank account in QuickBooks with the statement you receive each month as part of your regular routine. But what if you have been using QuickBooks for years or months and have never reconciled the bank account?
First determine how many months have gone by. Catching up with a few months of bank reconciliations takes much less effort than having to do several years or months of bank statement reconciliations.
If you are going to go back to the beginning of the business and reconcile each month, you need to start with the first month of your bank activity and work your way month by month to the current month. Completing your bank reconciliation for each month would be the most accurate and thorough process and would provide a separate report for each month.
However, it is often not practical to go back to the start of your business when you simply want to get the bank account reconciled in the current month.

As with any major task or adjustment you plan to make in your QuickBooks data, I recommend that you make a backup copy. You can easily create this backup by choosing File, Save Copy or Backup, and then following the instructions on the screen.
Complete the recommendations in the following sections before attempting to do a multiyear or multimonth bank reconciliation.
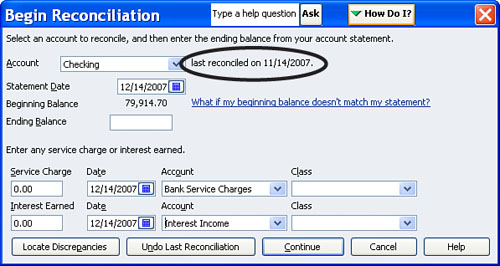
How can you tell whether your bank account has been reconciled? An easy method is to click Banking, Reconcile, and check the “last reconciled on (date)” in the Begin Reconciliation dialog. A month/day/year indicates that the account has previously been reconciled (see Figure 6.1). If you have a Beginning Balance amount but no “last reconciled on (date)” then no reconciliation has been completed. This beginning balance was most likely from entering your bank balance in the EasyStep Interview as was detailed in the section “Easy Step Interview—Overview” in Chapter 1, “Creating a New QuickBooks Data File.”
Ensuring that all checks, bill payments, payroll checks, customer payments, and any other banking-related transactions have been entered in the QuickBooks data file is critical to the success in correcting problems with your QuickBooks accounts. You don’t want to complete a multiyear or multimonth bank reconciliation if handwritten checks or other banking transactions have not been recorded in the data.
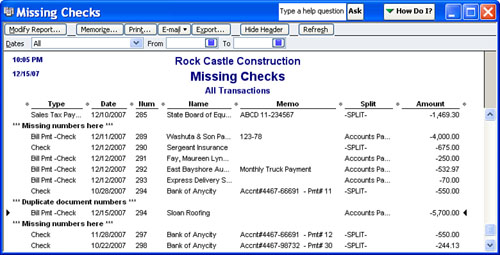
To help you determine whether any check transactions are missing, create a Missing Checks report:
2. Select the Missing Checks report.
3. Select the bank account in the drop-down menu dialog that opens.
The resulting Missing Checks report shows all check or bill payment check type transactions sorted by number (see Figure 6.2). You will look for any breaks in the detail with a *** Missing or *** Duplicate warning.
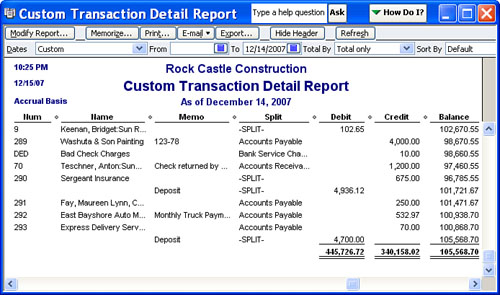
Another method used to verify that you have recorded all your transactions requires a bit more effort on your part. Manually add the total of all deductions and additions from the statements your bank provides you.
Create this report to help you manually verify that there are no missing transactions:
1. Click Reports, Custom Transaction Detail. The Modify Report dialog opens.
2. Remove the From date and enter the To date for the end of the month through which you are reconciling.
3. Click the Filters tab.
4. In the Choose Filter pane, with the Account filter highlighted choose the bank account from the drop-down menu.
5. Select OK.
This report totals all debits (money into your bank account) and credits (money out of your bank account). To these totals you will have to add back in checks and deduct deposits that have not yet cleared the bank. If the resulting totals are exact or close to your manual totals, you can feel confident reconciling multiple years or months at one time.
Make a list of all the uncleared bank transactions as of the month and year you are reconciling through. See the Digging Deeper at the end of this section for help with selecting this month. If you have been manually reconciling your bank account, simply find the paper statement for the selected month and look for the list of uncleared transactions.
For example, suppose it is April 2007 and you want to reconcile multiple years or months through December 31, 2006. Collect your bank statements for January through March of 2007. Identify any cleared transactions from these 2007 bank statements where the transaction date was on or before December 31, 2006, but did not clear your bank until year 2007.

If you are choosing to complete a multiyear or -month bank reconciliation consider reconciling through the last month of your previous fiscal year, which for most companies would be your statement ending December 31, 20xx. Choosing a month to reconcile through that is two to three months past will make identifying the transactions that had not cleared the bank as of the month you are reconciling much easier.
1. Click Banking, Reconcile. The Begin Reconciliation dialog box appears (see Figure 6.4).
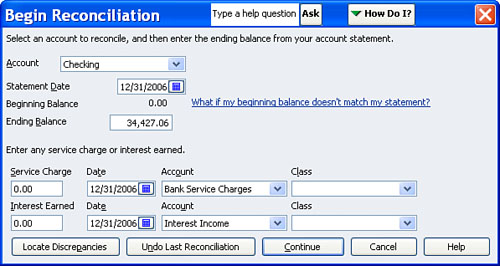
2. Select the correct Account from the drop-down menu, and type the Statement Date that you want to reconcile through. Enter the Ending Balance from the bank statement and click Continue. The Reconcile - Account dialog box appears. This example shows a reconciliation through December 31, 2006.
3. Click the Hide Transactions After the Statement’s End Date check box at the top right. Checking this box will make working with the remaining transactions easier.
4. Click the Mark All button. Now each transaction will be marked as if it has cleared. Remove check marks from any transaction you previously identified as uncleared (see Figure 6.5). Your work is complete when the reconciliation shows a Difference of 0.00 at the lower right of the Reconcile - Account dialog.
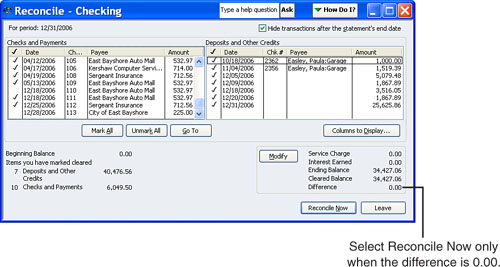
5. Click Reconcile Now; QuickBooks creates a bank reconciliation report you can print.
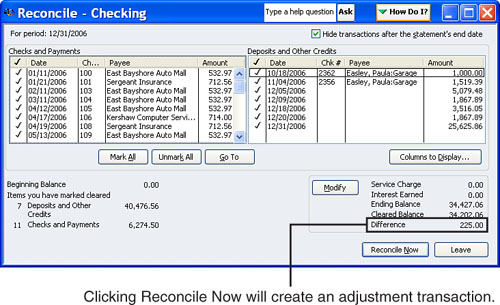
What if the reconciled difference is not 0.00? First, determine whether the amount is significant. If the answer is yes, then the best method for finding errors is to review each item marked cleared in QuickBooks with the transactions listed on your bank statements.
If the difference shown on the Reconcile - Account dialog is not significant, you can reconcile with an adjustment as in Figure 6.6. QuickBooks will place this adjustment amount into an automatically created Expense account called “Reconciliation Discrepancies.” (See the section titled “Reconciling with an Adjustment,” p. 138.)
Not all bank account reconciliations are this easy to troubleshoot and correct. Often you need to dig deeper into the possible causes of reconciliation errors. QuickBooks makes this task much easier by providing many different tools and reports to help with this important process.
A simple way to determine whether your bank account is correctly reconciled is to compare your bank statement beginning balance to the QuickBooks Beginning Balance amount in the Begin Reconciliation dialog. Click Banking, Reconcile and select the appropriate Account. If you find that your QuickBooks data does not agree with your bank statement you can use one, or a combination of several, of the methods listed in this chapter to figure out why.
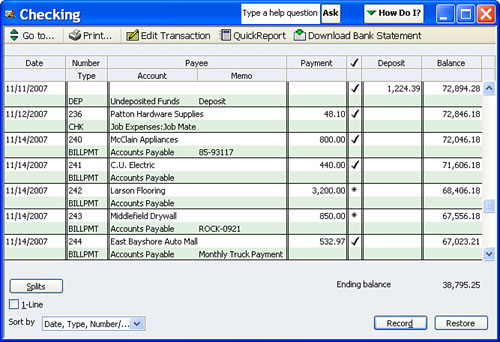
What makes up the Beginning Balance as shown in Figure 6.1? The beginning balance is the sum of all previously cleared checks, deposits, and other transactions. A check mark next to a transaction item in the bank account register indicates it has previously been cleared in the bank reconciliation in QuickBooks. An asterisk indicates the item is currently being reconciled, as shown in Figure 6.7. A lightning bolt (not shown) next to a transaction indicates that it has been downloaded and matched but has not yet been marked cleared.
If your bank account has previously been reconciled, then reviewing your uncleared bank transactions is the best place to start when troubleshooting an incorrectly reconciled bank account.
This report will be one of the most useful to you as you research your bank reconciliation errors. You might want to memorize this report so that it can be reviewed again if needed.
You can create an uncleared bank transactions report by following these steps:
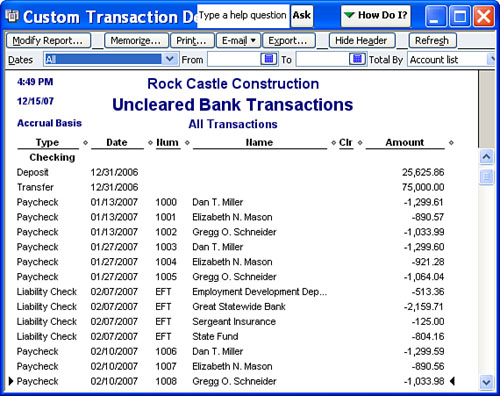
1. Click Reports, Custom Transaction Detail. The Display dialog opens. In the Report Date Range pane select All Dates. If you have more than one bank account, choose Total by Account list to keep each bank account with separate totals. From the Columns pane select the data you want to appear in the report.
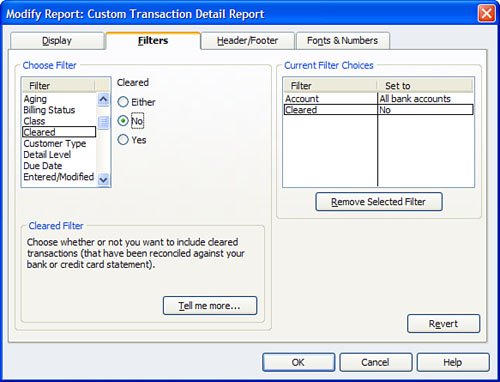
2. Click the Filters tab. In the choose filter pane, with Account highlighted, select All Bank Accounts. Scroll down the Choose Filter list and select Cleared, and then click No next to the pane, as shown in Figure 6.8.
3. This report will be useful to you in the future, so go ahead and give it a specific name by clicking the Header/Footer tab and changing the Report Title as desired.
4. Click OK to create the report (see Figure 6.9).
5. Optionally, click Memorize to have QuickBooks store the report for future use. QuickBooks will ask you to provide a name for the report.
6. Click OK to save the memorized report.
Another method for reviewing uncleared bank transactions is to open your bank register by choosing Banking, Use Register. On the lower left of the screen is a Sort By drop-down menu. Select the Cleared status. You can scroll through the register and view those transactions that are either cleared (check mark), in the process of being cleared (asterisk), or uncleared (no check mark or asterisk).
Often a transaction that is cleared and should not have been cleared or a transaction that is uncleared and should have been cleared can be the cause of the opening balance not matching.
If you need to unclear a transaction or two, use your mouse pointer and double-click on the check mark next to the item in the bank register. QuickBooks will replace the check mark with an asterisk. You can also click once more to remove the asterisk if desired.
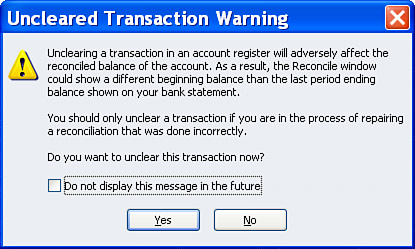
If you attempt to make a change to the cleared status of a transaction while in the bank register, QuickBooks will warn you, as shown in Figure 6.10.
Figure 6.10 QuickBooks warns you when you remove the cleared status (check mark) from a transaction.
Using additional reporting tools in QuickBooks can help you find changes made to previously reconciled transactions. You will find that using a combination of the following reports when troubleshooting reconciliation errors will be useful.
If you determine that the file has been previously reconciled but no paper copy was kept, no need to worry. Simply click Reports, Banking, Previous Reconciliation. In the Select Previous Reconciliation Report dialog box, select the Statement Ending Date to view (see Figure 6.11). QuickBooks will display a list of all prior stored bank reconciliation reports. Choose from the following view options: Summary, Detail, or Both.
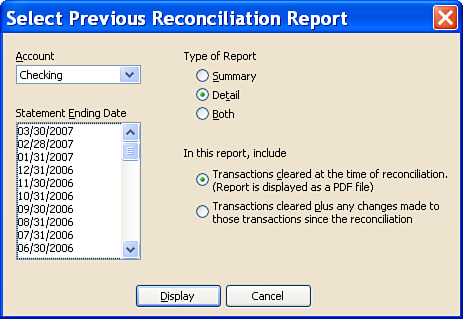
Additionally, you can view the reports in two ways:
• Stored PDF bank reconciliation—This stored report shows the bank reconciliation details as they were completed at the time the account was reconciled.
• Transactions cleared plus any changes—View this report to see how the bank reconciliation would look today, real-time.
Compare the stored PDF with the Transactions Cleared Plus Changes report. Any differences between the two should indicate what your discrepancies are. You might be able to find these discrepancies easily with the Reconciliation Discrepancy report, as discussed next.
Click Reports, Banking, Reconciliation Discrepancy to open the specify account dialog. Choose the bank account from the drop-down menu and select OK to create the report. This report identifies any transaction that was modified after being cleared in the bank reconciliation process. For each transaction on this report you will see the modified date, reconciled amount, type of change (amount added or deleted), and the financial effect of the change (see Figure 6.12).
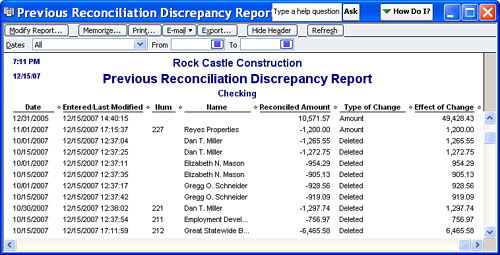
You can click Modify Report and add the user name that modified the transaction to help in identifying why the change was made to the transaction.
After you have found the reconciliation discrepancy, you can view the Voided/Deleted Report (discussed in the next section) to help re-create the transaction(s).
Troubleshoot your beginning balance differences with the Previous Reconciliation Discrepancy Report before completing the next month’s reconciliation. Doing so is important because QuickBooks removes all detail from the discrepancy report when you complete a new reconciliation. This is due to QuickBooks determining that you have solved the issue or you would not have completed the next month’s bank reconciliation.
This report will not track discrepancies caused by changing the bank account associated with a transaction.
Another reporting tool to help locate problem transactions is the summary or detail Voided/Deleted Report. This report is available in newer versions of QuickBooks. The one limitation is that these voided or deleted transactions were not tracked prior to the QuickBooks 2004 version.
To create the Voided/Deleted Transactions Summary report as in Figure 6.13:
1. Click Reports, Accountant & Taxes.
2. Select the Voided/Deleted Transactions Summary or Detail report.
Figure 6.13 Use the Voided/Deleted Transactions Summary to locate transactions that are possibly causing your reconciliation errors.
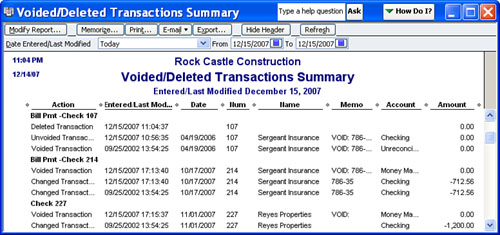
If you are having trouble finding the problem transactions, particularly when the beginning balance has changed, this report can help you find the transaction(s).
Use this report for recreating the voided or deleted transactions as part of the process of fixing your bank reconciliations.
If there are more than a few transactions in error, restarting or undoing the previous bank reconciliation might be easier than researching each transaction marked as cleared.
If your review shows a few minor issues with bank reconciliation accuracy, restarting your reconciliation might be the best action to take. To do so, click Banking, Reconciliation, Locate Discrepancies. The Locate Discrepancies dialog box appears. From this dialog box, click Restart Reconciliation.
Restarting your bank reconciliation will retain your check marks on the cleared transactions, but allow you to put in a new statement date and ending balance. You can only restart the last month’s banking reconciliation.
If you need to restart the reconciliation for more than one banking month, then click Undo Last Reconciliation; you can repeat this undo for several months in a row all the way back to the first reconciliation if desired.
If you have determined that the integrity of the completed bank reconciliations is in question, you can easily undo each reconciliation, one month at a time. Click Banking, Reconciliation, and click Undo Previous Reconciliation. QuickBooks opens a dialog box providing you with ample information about what to expect as well as recommending that you back up your company data file first (see Figure 6.14). As each month is undone, QuickBooks shows you the Previous Beginning Balance. You only need to undo bank reconciliations until you reach a statement where this amount agrees with the same bank statement beginning balance, so watch it closely.
Figure 6.14 Details of what you can expect when you complete an Undo Previous Reconciliation process.
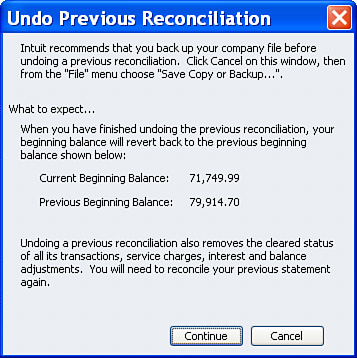
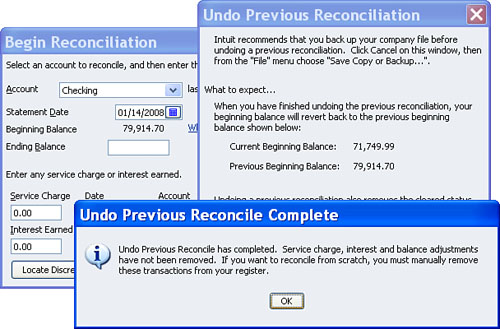
Click Continue after reviewing the message in Figure 6.14. You might undo the bank reconciliation one month at a time. You will know you are back to the first statement when the Undo Previous Reconciliation dialog shows the Previous Beginning Balance as 0.00. When you return to the Begin Reconciliation dialog you will no longer see a “last reconciled on date” or a “beginning balance” amount.
Use the Undo a Previous Bank Reconciliation feature when an incorrect statement date was entered on the bank reconciliation (refer to Figure 6.1 shown earlier). QuickBooks defaults the next bank statement date to 30 days from the last statement date. Before beginning the bank reconciliation in QuickBooks, verify that both the statement date and beginning balance are correct.
Now that all the bank reconciliations have been undone, you can begin reconciling the bank account each month. Match your reconciled activity each month in QuickBooks to your bank statement.
If your work is interrupted while you are reconciling a bank statement, you can click Leave in the Reconcile - Account dialog box; refer to Figure 6.6. Clicking Leave will keep the check marks you have assigned to transactions and let you finish your work at a later time.
QuickBooks will create an adjustment to your bank account and financials if you choose to reconcile a bank account that does not have 0.00 in the Difference row of the Reconcile dialog box.
When you decide to reconcile with an adjustment for the difference amount (see Figure 6.16) you need to first consider the following:
• Have you made every attempt to find the difference using those techniques and reports you have read in this chapter?
• Is the difference as reported on the QuickBooks Reconcile dialog not a significant dollar amount?
If you can answer yes to these two items then let QuickBooks make an adjustment to your financials for the difference.
To reconcile with an adjustment created by QuickBooks, click Reconcile Now in the Reconcile - Account dialog.
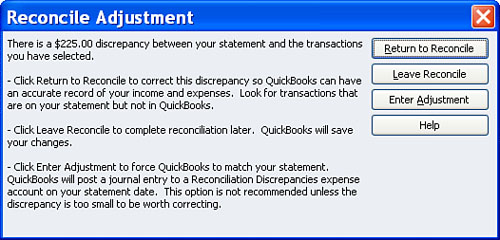
QuickBooks will detail the amount of the adjustment and limit your choices to
• Return to Reconcile—Click this option if you want to look for the difference.
• Leave Reconcile—QuickBooks will save your changes so you can return later and review your work.
• Enter Adjustment—This option will force QuickBooks’ accounting to match your bank statement.
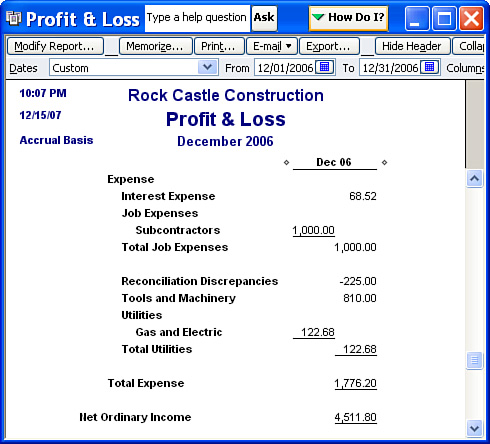
When you choose to Enter Adjustment, QuickBooks creates a journal entry and posts the difference to a Reconciliation Discrepancies expense account on your statement date as shown in Figure 6.17. This is a new expense account automatically created by QuickBooks, first introduced in the 2006 version. Prior versions of QuickBooks will find the adjustment posts to another QuickBooks-created account called Opening Bal Equity.
Figure 6.17 A journal entry reconciliation adjustment will be posted to a Reconciliation Discrepancies expense account on the Profit & Loss statement.
The Open Bal Equity account should not carry a balance after entering all startup balances. See Chapter 13, “Reviewing and Correcting the Opening Balance Equity Account,” for more detail.
I never recommend reconciling with an adjustment. Sooner or later you will have to identify what the adjustment was from and where it should be posted. However, making an adjustment for a small balance can often save time that would be better spent on activities that grow the business. Always put in place better processes so that these types of errors do not occur again.
Any Balance Sheet type account can be reconciled, not just bank account types. Reconciling credit card accounts provides the same control over the accuracy of your financials. Did you know that any account that transactions flow in and out of can be reconciled? Do you have a car loan? Have you reconciled your car loan account to the lending institution’s statement? Do you loan money to employees and then have them pay the loan back? These are all examples of accounts that would benefit from the same reconcile process used for bank accounts.

Review your data for the following:
• Is this the first bank reconciliation for the bank account? (Page 124)
• If this is your first bank reconciliation, has the business just started or have several years or months gone by without the completion of a bank reconciliation? (Page 128)
• Has the bank account been reconciled previously? (Page 125)
• Are there several old uncleared bank transactions that should not be uncleared? (Page 127)
What to look for:
• Does the Beginning Balance on the Begin Reconciliation dialog agree with your bank statement beginning balance for the month to be reconciled? (Page 135)
• If you are going to do a multiple year or month bank reconciliation at one time are all banking-related transactions entered? (Page 125)
• Do you have a list of uncleared bank transactions from your manually prepared bank reconciliation? (Page 127)
• Have you reviewed and compared the stored previous bank reconciliations? (Page 134)
• Have you reviewed the reconciliation discrepancies account report? (Page 135)
• Have you reviewed the voided/deleted transactions summary or detail report? (Page 136)
• Is it best to restart or undo your bank reconciliation? (Page 136)