
• Accounts Receivable Forms and Workflow
• Preferences That Affect Accounts Receivable
• Reports to Review When Troubleshooting Accounts Receivable Errors
• Correcting Accounts Receivable Errors
• Unique Customer Transactions
• Accounts Receivable Checklist
It is not surprising to me, and perhaps not to you either, that the Accounts Receivable process is usually the most organized and “taken care of” task in QuickBooks. Unlike reconciling a bank account, where no one needs to see the end result (so that task is often not completed), the process of producing a customer invoice is usually completed quickly because you have to provide a document to a customer to get paid.
What I have noticed over the years of consulting with clients is that many do not know the proper Accounts Receivable process. By following a recommended workflow some of the more common errors can be avoided rather than having to be fixed at a later date.
Within QuickBooks you have some flexibility in how you handle your company’s receivables workflow. Your company may use some or all of the forms listed in this chapter, depending mostly on the product or service that you sell. If you created your data file using the QuickBooks EasyStep Interview (see Chapter 1, “Creating a New QuickBooks Data File.”) QuickBooks enabled all or some of the features discussed in this chapter depending on your answers to a few questions.
In the section titled “Preferences That Affect Accounts Receivable” in this chapter, I discuss the preferences that you can define after you determine what sales form or feature you need. Some of the forms and features are enabled automatically when QuickBooks first creates the data file.
Table 7.1 details the forms that are used in the Accounts Receivable module and their primary purpose.

So whether you start with an Estimate or simply prepare an Invoice for a customer, generally the proper workflow for recording a sale has at least these four steps:
1. Create an invoice, sales receipt, or statement charge.
2. Receive the customer payment.
3. Place the payment (automatically via a preference setting) into an Undeposited Funds account.
4. Complete the Make Deposits form.
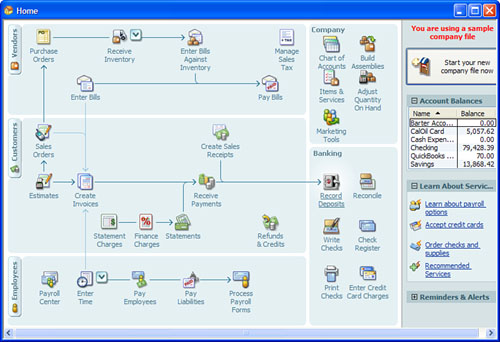
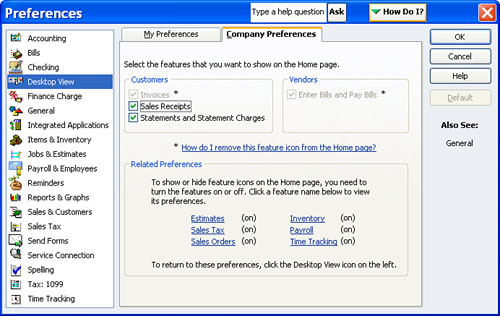
Performing these related tasks in QuickBooks is easy from the Home page as shown in Figure 7.1. Whether you are new to QuickBooks or are an experienced user, you will find the Home page useful in both getting around QuickBooks and in determining what the next transaction process should be. To modify the information on your Home page to match your company’s specific workflow, Click on Edit, Preferences and select the Desktop View preference. Click on the Company Preferences tab (must be logged into the data file as Admin and Single User), on the dialog shown in Figure 7.2 you can enable or disable features that will modify your Home page.
You can simplify your Accounts Receivable tasks by setting certain QuickBooks preferences. Some of these preferences save you keystrokes, which in turn save data entry time.
Not every preference that affects Accounts Receivable impacts your financials directly. Some preferences simply enable specific features. To set preferences in QuickBooks, select Edit, Preferences and choose the type of preference on the left.
Preferences in QuickBooks come in two forms:
• My Preferences are settings that are unique to the user logging into the data file and are not shared by other users.
• Company Preferences are settings that are common for all users. When a preference is selected in the Company Preference window, the change or setting affects all users.
To set Company Preferences, open the file as the Admin user and switch to single-user mode (if you are using the data file in a multiuser environment).

The Admin user is the default user that is created when you create a new data file. Proper controls should be in place to allow only certain individuals to log into the data file as the Admin.
The sections that follow outline the preference settings that will improve your QuickBooks Accounts Receivable workflow.
These preference settings allow you to customize your QuickBooks, particularly around the tasks you have related to Customers. You can also make it easy for your employees to do their daily tasks by customizing the Home page so that just the needed forms are available.
To make changes to the Company Preferences for customer activities, you must first be logged in to the data file as the Admin user and also be in single-user mode (File, Switch to Single User). Then click Edit, Preferences and select the Sales & Customers preference.
Here are the specific preferences that are set for all users:
• Sales Forms—These settings enable you to set a default shipping method and FOB that will appear on customer forms. Additionally, you can select to be warned when duplicate invoice numbers are detected.
• Miscellaneous—From the drop-down menu option select the default invoice form you want to use when creating new customer invoices.

You can copy the QuickBooks-provided invoice forms and then modify them for your specific business needs, including adding your company’s logo and rearranging the data fields on the invoice form.
To duplicate and then modify an invoice form provided by QuickBooks:
1. Click Lists, Templates. A list of current templates appears.
2. Right-click the template you want to duplicate.
3. The Template Type dialog opens; place a mark in the radial button for the appropriate form type, choosing from Invoice, Credit Memo, Sales Receipt, Estimate, or Sales Order.
4. You return to the Templates dialog. Double-click to edit the newly created Copy of: name of form.
5. The Basic Customization dialog opens, where you can assign such attributes as the font you use, place your logo on the form, and add additional business contact information to your invoice form.
6. Click the Additional Customization button to add or remove headers, columns, footers, and other font choices.
7. Click the Layout Designer to modify column widths and select where the data will print and what the printed copy will look like.
You also can download ready-made custom invoice forms. Simply click Lists, Templates. On the Template List dialog select the Templates button and choose Download Templates. Click OK to the optional message that you will need an Internet connection for the download. QuickBooks directs you to the QuickBooks Community Template Gallery for Forms, where you can download pre-made custom invoice forms as well as other types of forms.
• Price Levels—Click this box to enable the use of price levels. You create the price level by choosing Lists, Price Level and then associate this price level with a customer. Each time you sell a product or service to a customer with an assigned price level QuickBooks defaults the sales price to match the price level. (This feature is available only in the QuickBooks: Premier or Enterprise editions.)
• Sales Orders—Similar to the Sales Forms preference settings, these settings enable the use of Sales Orders. For a description of the forms used in Accounts Receivable processes, see the section earlier in this chapter titled “Accounts Receivable Forms and Workflow.” (This feature is only available in the QuickBooks: Premier or Enterprise editions.)
• Receive Payments—These settings make it easier for you to assign customer payments to the customers’ invoices.
• Automatically Apply Payments—When you select this option and open the Receive Payment form QuickBooks applies the recorded payment to an invoice of the same amount, or if no invoice amount matches exactly the payment is applied to the oldest invoice.
• Automatically Calculate Payments—When you select this option, you do not need to put a total in the Amount box on the Receive Payment dialog. QuickBooks calculates and pre-fills the amount as the sum total of each of the invoices marked as received.
• Use Undeposited Funds as a Default Deposit to Account—When selected, this preference causes QuickBooks to place all customer payments into a current asset account that is automatically created by QuickBooks.
Do you have a balance in your Undeposited Funds Account? Be sure to read Chapter 8, “Troubleshooting and Correcting Errors with the Undeposited Funds Account,” for more details on how to manage this account.
To make changes to the My Preferences for customer activities, click on Edit, Preferences and select the Sales & Customers preference. Click on the My Preference tab to select user specific settings. These settings affect only the current logged-in user.
The following are the specific My Preferences:
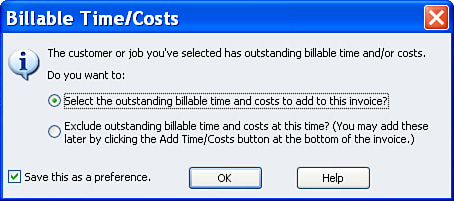
• Add Available Time/Costs to Invoices for the Selected Job—You can choose whether to prompt users for time/costs to add, choose to not add any time/costs, or choose to have users prompted as to what they want to do when creating an invoice for a customer who has outstanding billable time and costs.
Depending on the setting selected in My Preferences, you may see the message shown in Figure 7.3 displayed when you create an invoice for a customer who has outstanding billable time or costs.
The Checking Preferences are for defining specific bank accounts for sales related activities such as depositing a customer’s payment into a pre-defined bank account. Click on Edit, Preferences and choose the Checking Preference from the left.
There are not any Checking Company Preferences that would affect your workflow for Accounts Receivable.
The Open the Make Deposits form preference is optional; you use it to specify the default bank account selected for making deposits. If you have multiple bank accounts that you make deposits to, you may not want to set a default on this tab.
Does your company charge late paying customers a finance charge on open balances? If you do, you will want to set these preferences. Click on Edit, Preferences and choose the Finance Charge Preference from the left.
These preferences set your company’s annual interest rate, minimum finance charge, grace period, and income account you want to credit. You must first be logged in as the Admin user and in single-user mode (File, Switch to Single-User). Then to set the preferences, click on Edit, Preferences and choose the Finance Charge preference from the left and then click on the Company Preferences tab.
The additional subsettings for each preference impact your financials and should be predetermined before you select the setting:
• Assess Finance Charges on Overdue Finance Charges—When selected, this option includes unpaid finance charge amounts previously invoiced in the new amount used to calculate additional late fees. Most clients do not take the time to invoice finance charges. However, my experience has shown that when you do, you become the “squeaky wheel” that does get paid.
• Calculate Charges From—The choices are Due Date or Invoice/Billed Date. For example, if you create an invoice for a customer for $1,000.00 that is due in 30 days, and you select the Calculate Charges From Due Date option, the amount would not be considered overdue until 30 days from the invoice date when calculating the amount due.
• Mark Finance Charge Invoices “To Be Printed”—If this option is not selected, you can simply send a statement to the customer at the end of your billing cycle to communicate the amounts that are currently owed.
The preference settings found in this section will enable certain accounts receivable form types in QuickBooks. Click on Edit, Preferences and select the Jobs & Estimates Preference from the left.
These choices have to do with enabling specific features in QuickBooks as well as defining custom job status descriptions. There is no direct financial effect from these choices.
The Reminders Preferences can be useful if you want QuickBooks to prompt you on certain accounts receivable lists or tasks. To set this preference, click on Edit, Preferences and choose the Reminders Preference from the left.
The Company Preferences for Reminders as shown in Figure 7.4 sets the defaults for how QuickBooks shows reminders. Summary, List, or Don’t Remind Me are the options. If you want to see the reminders, be sure to select the My Preferences setting also.
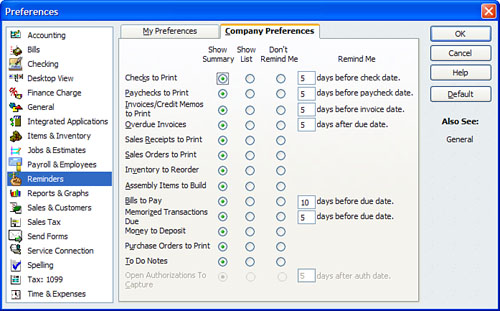
Users can specify whether they want to see the reminders when they open the QuickBooks data file. After the program is open, any user can click Company, Reminders at any time to review the reminder list entries.
Choose Edit, Preferences and select the Reports & Graphs Preference from the left. The primary preference for this setting is found on the Company Preference tab, so you will need to be sure to log in to the data file as the Admin user and in Single-User Mode (File, Switch to Single-User Mode) if you have multiple users that access the same data file.
Review each of the listed preferences; they will often impact how certain accounts receivable reports will calculate.
• Summary Report Basis—This preference is worth discussing because despite what you select on this pane, Accounts Receivable reports will always be in Accrual basis.
• Aging Reports—This option sets the default for calculating overdue invoices. You can choose to age from due date or from invoice date. Typically, aging from invoice date causes invoices to show as overdue earlier than if you aged from due date.
• Format—This option allows you to override the default header/footer and font for the report. You should not override the Report Title, Subtitle, or Date Prepared because QuickBooks will accurately fill in this information for you each time you prepare the report.
• Reports - Show Accounts By—This setting offers you the following options for displaying reports:
• Name only—Reports will display only the name and account number (if the preference to enable account numbers is selected).
• Description only—Reports will display the description typed in the New or Edit Account dialog (see Figure 7.5). No account numbers will be displayed on the reports.
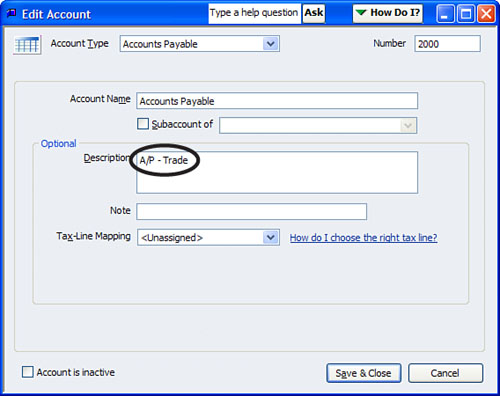
• Name and Description—Reports will display the account number (if enabled in preferences), the name, and in parentheses the description as typed in the New or Edit Account dialog (see Figure 7.6).
The My Preferences selections include
• Modify Report—Selecting this will automatically open the modify report dialog with each created report.
• Reports & Graphs—Refresh options for reports and graphs when data changes. They prompt the user to refresh or not to refresh.
New for QuickBooks 2008, users have the option to use Outlook to send emails from within QuickBooks. For users who do not use Outlook, you can still send emails of forms and reports using the QuickBooks email server accessed directly in QuickBooks. To edit these preferences, click Edit, Preferences and select the Send Forms Preference from the left pane.
This preference allows you to set email defaults when sending supported forms or reports.
New for QuickBooks 2008, users can define to use Outlook or the QuickBooks email server as the preferred method for sending reports and forms from within QuickBooks. The benefit of using Outlook is that a record of the sent email is stored in your Outlook sent folder.
Click Edit, Preferences and choose the Spelling Preference from the left pane to manage how QuickBooks can assist you with spelling on Accounts Receivable forms.
Users can set QuickBooks to check spelling before printing, sending, or saving supported forms.
The Sales Tax Preference shown in Figure 7.7 is very important if your business is required to collect sales tax on sales made to your customers. Make sure you have researched with your state tax authority what the proper guidelines are on collecting and remitting your sales tax in a timely manner.
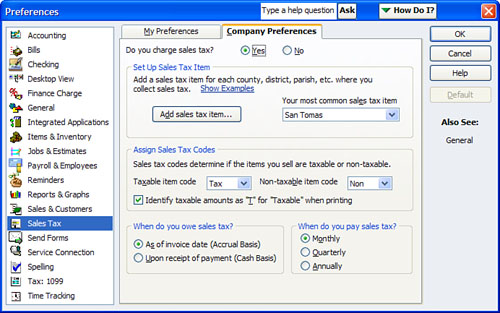
If your company charges and collects sales tax then you need to enable the sales tax tracking by selecting Yes for the Do You Charge Sales Tax? option.
• Set Up Sales Tax Item—When you click the Add Sales Tax Item button, QuickBooks takes you to the Add Sales Tax Item window where you create your sales tax items. You must also select your most common sales tax item.
• Assign Sales Tax Codes—This is the description you give to the code that is assigned to items you sell. Additionally, you can select to have a “T” print on your customer invoices for items that are taxable. This option is useful if on one invoice you sell both taxable and non-taxable items.
• When Do You Owe Sales Tax? If you are not sure what your state department of revenue requires, review its website or simply make a call to get the correct information.
• When Do You Pay Sales Tax? This setting simply tells QuickBooks what date range to select automatically when paying your sales tax. For example, if you select Monthly, QuickBooks will compute the amount owed for the previous month in the Pay Sales Tax Liability dialog.
The Time and Expenses Preference has been greatly improved for QuickBooks 2008. Time and Expenses is a specific method of invoicing common to the professional services industry, where customers’ sales are invoiced based on hours or costs of the project plus an agreed-to markup or overhead fee.
The Time and Expenses Preference is available in QuickBooks: Premier (all editions) and QuickBooks Enterprise (all editions). However, when creating a new data file only the QuickBooks: Premier Professional Services edition will default with the feature enabled. For all other editions you will need to enable the feature by following these steps:
1. Log in to the data file as the Admin user in single-user mode.
2. Click Edit, Preferences and select the Time and Expenses Preference from the left.
3. Click the Company Preferences tab. (More detail on the specifics of these settings is provided in the following section called “Company Preferences.”)
If your company needs to provide customers with an invoice showing your individual costs plus an added markup, you will want to enable this preference.
• Time tracking—select Yes if you want to enable the timesheet function in QuickBooks where you can record employee or vendor hours to specific tasks and jobs. Additionally, in this preference you also indicate which day is the first day of your work week.
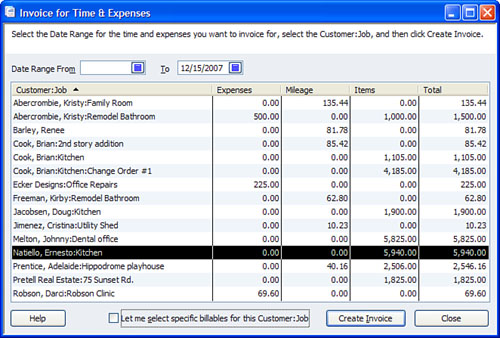
• Invoicing options—Create Invoices from a List of Time and Expenses will enable the newly designed feature. When users enable this preference there is a new menu option. You will find this menu option by clicking Customers, Invoice for Time and Expenses. This new feature for QuickBooks 2008 offers a single-screen view of each customer with billable time and expenses and the ability to create an invoice for the time with one click (see Figure 7.8).
Figure 7.8 The new preference enables an easy-to-use invoicing list of customers with time and expenses.
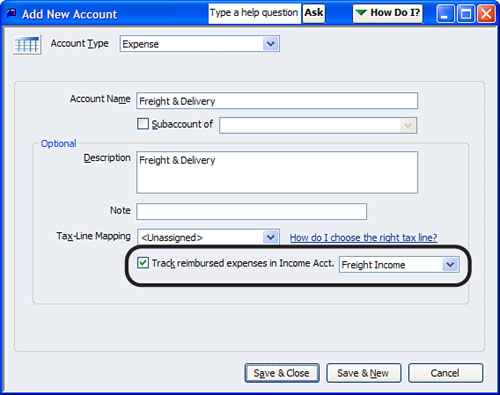
Additionally, you can select to track reimbursed expenses as income. When enabled, QuickBooks provides an additional field on the Add New or Edit Account dialog indicating the income account to be used when invoicing for costs associated with this expense account (see Figure 7.9).
Sometimes the most difficult task when troubleshooting data errors is not knowing exactly what you are looking for. This section details some of the more common reports used to identify whether or not your Accounts Receivable information is correct.
With QuickBooks you don’t have to worry that the Balance Sheet report and Accounts Receivable Aging Summary report will match because any transaction posting to the Accounts Receivable account must have a customer assigned. You will want to make sure that you always create your Balance Sheet with the Accrual Basis (click on Modify Report and select Accrual from the Display dialog that opens) because the A/R Aging Summary report will only provide details on an Accrual Basis.
1. Select Reports, Company & Financial, Balance Sheet Standard. The selected report is created. For the date, select the As of Date you want to compare to. To accurately compare your Balance Sheet report with the Sales Tax Liability report you must create your Balance Sheet in accrual basis. If your reporting preference default is for cash basis, you can change it temporarily to accrual basis—in the active report window just click the Modify Report button at the top of the report, and select Accrual as the reporting basis.
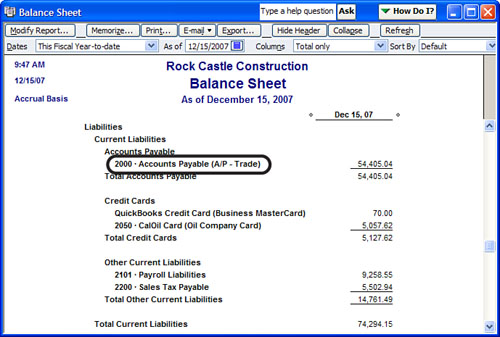
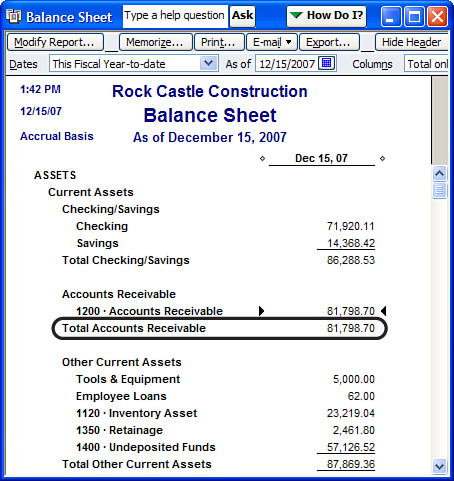
2. In the Balance Sheet report that appears, note the balance in your Accounts Receivable account(s) (see Figure 7.10).
Figure 7.10 Use your Balance Sheet report (accrual basis) to reconcile your Accounts Receivable report.
3. Select Reports, Customers & Receivables, A/R Aging Summary, making sure the field shows the same date as the date selected in step 1. Figure 7.11 has been “collapsed” to make viewing the information easier. To expand to see more detail, click on the Expand button at the top of the report.
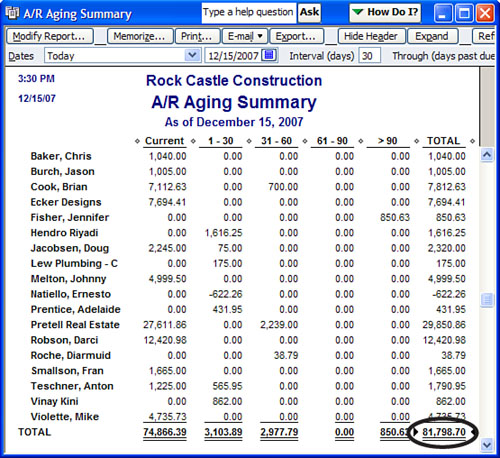
Your balance from the Balance Sheet report should match the total on the A/R Aging Summary. If it does not, the cause might be a “broken” transaction(s) link. You can detect these types of issues by choosing File, Utilities, Verify Data. If your Verify Data report comes back with a loss of data integrity, you should contact QuickBooks technical support to resolve it.
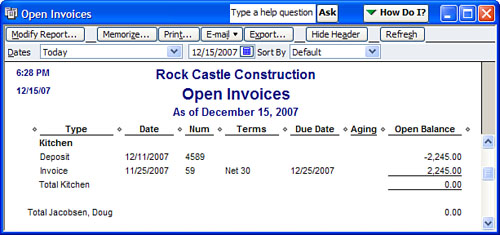
Unlike the A/R Aging Detail report, the Open Invoices report is useful because it shows individual lines for each open item grouped by customer and job. This report is a “dynamic” report, meaning it will only show open invoices as of today’s date and not some fixed time in the past without modifying as suggested below.
To create an Open Invoices report modified so that you can compare it to your Balance Sheet report for some specific date in the past:
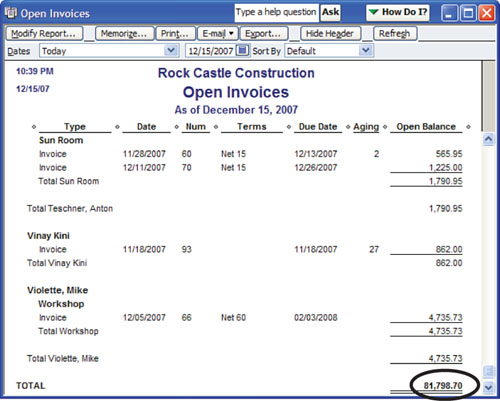
1. Click Reports, Customers & Receivables, Open Invoices. This report includes all payments made by your customer as of today’s computer system date. If you are creating this report for some date in the past, it is important that you click Modify Report, select the Display tab, and click Advanced. In the Open Balance/Aging section of the Advanced Options dialog, select the Report Date option (see Figure 7.12). This modification to the report allows you to see each invoice balance detail as of the report date. If you do not modify this report, QuickBooks will display the date on the report, but will also reduce the balances owed for payments made after the report date.
Figure 7.12 Open Invoices report, when modified, can be compared to the totals on your Balance Sheet report for some time in the past.

2. Compare your total from the Open Invoices report with the Balance Sheet Standard (Accrual Basis) Accounts Receivable total and make sure that it agrees (see Figure 7.13 and refer to Figure 7.10, shown previously). If it does not agree, refer to the Verify Data utility discussed at the end of step 3 in the previous section.
Most companies have some control over the process of creating customer invoices. One control, especially if invoices are created manually in the field and later entered into QuickBooks, is to maintain a numeric invoicing pattern. Usually each invoice is one number larger than the prior invoice. This method of invoice recordkeeping can be an important process to have if your company is ever audited and you are required to provide a list of all invoices.
To see whether your data has any missing numbers in the invoicing sequence, follow these steps:
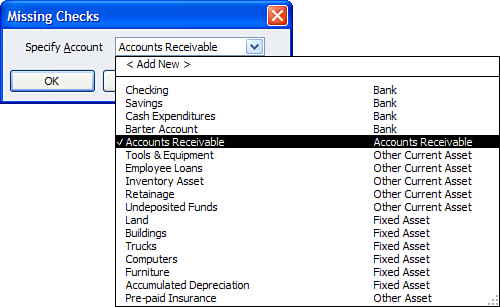
1. Click Reports, Banking, Missing Checks.
2. In the Missing Checks dialog, select Accounts Receivable from the Specify Account drop-down list, and click OK to generate the report (see Figure 7.14).
3. I also recommend that you rename the report by choosing Modify Report, click the Header/Footer tab, and typing a new title for the Report Title field, such as Missing Invoices.
The newly created Missing Invoices report makes the process of identifying missing or duplicated invoice numbers easy (see Figure 7.15). Use this information to determine whether you need better company practices to avoid this situation. By default this report only shows invoices that are greater than or equal to the value of -0-.
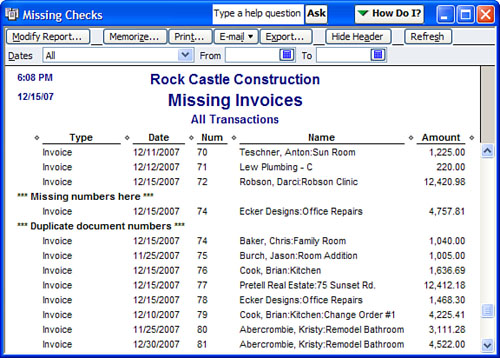
The customized Missing Invoices report filter omits credit memos and customer payments. If you use the same numbering scheme for credit memos you will want to set an additional filter for multiple transaction types and include both invoices and customer payments.
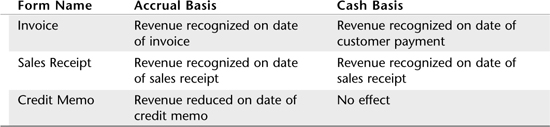
The very nature of Cash Basis reporting implies that you would not see an Accounts Receivable balance on your Balance Sheet. Table 7.2 describes how accounts receivable transactions are handled for both Accrual and Cash Basis reporting.
So why exactly do I see an Accounts Receivable balance on a Balance Sheet? Any of the following can be the cause:
• A/R transactions have items posting to other Balance Sheet accounts.
• Inventory items on an invoice or credit memo (typically inventory management should be done only in Accrual Basis reporting).
• Transfers between Balance Sheet accounts.
• Unapplied Accounts Receivable customer receipts.
• Payments applied to future-dated Accounts Receivable invoices.
• Preferences that contradict each other. (This situation can happen if you selected Cash Basis on your Summary Reports, but Accrual Basis as your Sales Tax preference.)
• Data corruption (click File, Utilities, Verify Data to check for data corruption).
When You Have Accounts Receivable Balances on a Cash Basis Balance Sheet
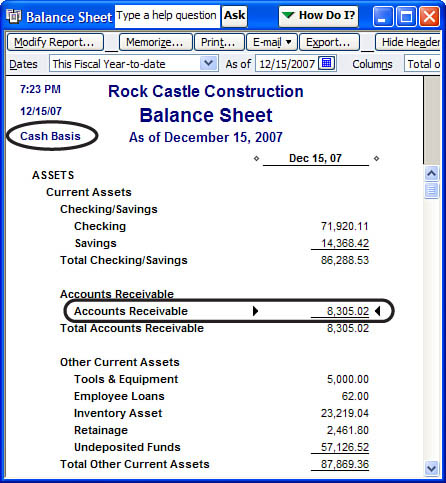
What can you do if you do have an Accounts Receivable balance on your Cash Basis Balance Sheet? First, modify the following report as shown in Figure 7.16 to help you locate the transactions making up this balance:
1. Click on Reports, Company & Financial.
2. Select Balance Sheet Standard.
3. Click on the Modify Report button.
4. The Display Tab opens, select Cash for the report basis.
5. Click OK.
6. With your mouse pointer, double-click the Accounts Receivable amount in question.
7. The Transaction by Account report is created.
8. Click on the Modify Report button. The Display dialog opens.
9. For the Report Date Range remove the “From” date and leave the “To” date.
10. Click on the Filters tab.
11. In the choose filters pane scroll down to select Paid Status.
12. Select the radial button Open for Paid Status.
13. Click OK.
Look for transactions that fall into any of the categories described previously. Figure 7.17 shows than an item was used on Invoice No. 69 that debited another Balance Sheet account named Retainage. Any item used on a customer invoice that is mapped to another Balance Sheet account will appear on a Cash Basis Balance Sheet report. (See Chapter 3, “Reviewing and Correctiong Item List Errors,” for a discussion of setting up items.)

So far I have identified preferences that affect Accounts Receivable and reports to identify common errors. The next section discusses how you can easily fix these errors.
After you have identified the errors in Accounts Receivable, you need to determine the best method to correct the errors. When deciding which method is best you should ask yourself the following:
• Are the errors in an accounting year that I have already filed a tax return for? If yes, then adjusting these transactions by dating the modifying entry in the current tax year and not modifying the original transaction is best. Some methods listed in this section will not allow you to select a date different from the original transaction date.
• Are the errors significant in the dollar amount, collectively or individually? If yes, you should obtain the advice of your accountant before making any adjustments so changes that will impact your tax status are carefully considered.
• Am I going to fix detail or summary information? Meaning, are you going to fix individual invoices, or correct a group of customer invoices with one adjusting transaction?
• Am I modifying an invoice with sales tax recorded on the invoice? If yes, refer to Chapter 12, “Reviewing and Correcting Sales Tax Errors,” for a detailed discussion on adjusting invoices with sales tax.
There are several reasons you might have open balances on your Accounts Receivable invoices. There are also several methods to correct overstated or understated balances, each with its own impact on your company’s financials.
The method of modifying the original customer payment form to write off a customer balance records the change as of the date of the receive payment transaction and only allows a write-off amount equal to the underpayment amount.
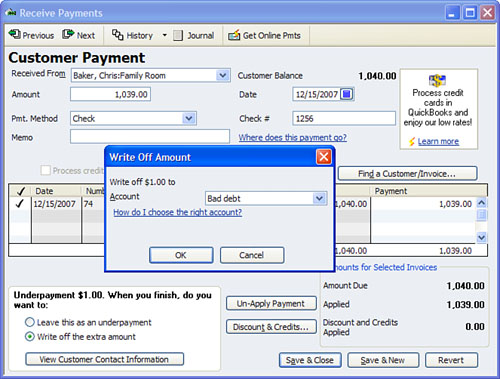
If the amount due is an insignificant amount, you might not want to take the time to collect it. The easiest method of dealing with it would be to write off the remaining amount at the time the receive payment is recorded. You can also use this method after the payment is recorded by returning to the receive payment document.
Click Customer Center from the Home page and select the appropriate customer, filter on the right to show Received Payments and any other date criteria you want to use, as shown in Figure 7.18.

Double-click the selected customer payment to open it. In this example, the customer paid $1.00 less than the amount due. Easily write off this amount by selecting Write Off the Extra Amount on the lower left of the Receive Payments dialog (see Figure 7.19). QuickBooks then asks you to identify the account to assign the write-off amount to.
Another way to remove an open customer balance is to record a discount. This method records the change as of the date of the receive payment transaction. A discount can be recorded initially when the customer’s short payment is recorded, or on a later date by creating a new receive payment document without placing any dollars in the Amount field and choosing the Discounts & Credits option. However, the discount amount cannot be in excess of the amount due.
Typically, the difference between a write off and discount is the placement on the Profit & Loss statement. A write off is usually used when the debt has gone bad and cannot be collected. In contrast, the discount is used when you decide not to collect the debt, or you are reducing the sale price.
To record a discount, from the Receive Payment window simply click the Discount & Credits button in the lower center. Similarly to the Write Off Amount window, you will be asked to identify an account to post the amount to (see Figure 7.20).

Caution When Adjusting Receive Payment Transactions
Before adjusting your Accounts Receivable, you should review the Open Invoices report by choosing Reports, Customers & Receivables, Open Invoices Report as of today’s date. If the amount due is not showing open now, but the report created for a prior date did, you might need to review the date recorded in the Receive Payment window.
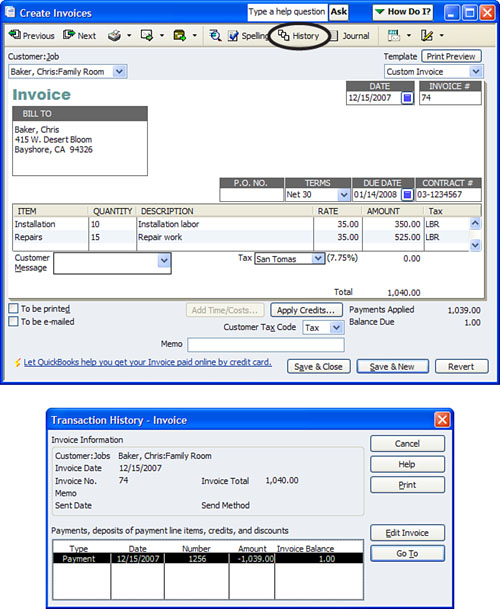
You can verify the accuracy of your recorded payment date by clicking History on the top center of any open invoice form, as shown in Figure 7.21. From the Transaction History - Invoice window you can highlight the payment in question and click Go To.
Figure 7.21 Select History from the top of any invoice form to see a list of the payments or credits applied to the invoice.
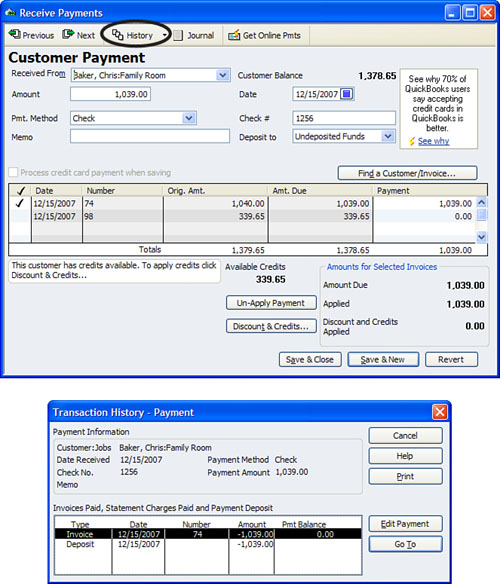
However, if the payment has been included in a deposit, you will not be able to modify it unless you first remove it from the deposit form. Simply use the same process of selecting History from the Receive Payment window, highlighting the deposit, and clicking Go To (see Figure 7.22).
The most accurate method for removing a balance due is to record a credit memo, because it creates a good audit trail. Additionally, you can date the credit in a period you want to reduce the appropriate income account and, if applicable, sales tax due.
1. From the Customer menu, select Create Credit Memos/Refunds.
2. In the dialog that appears, and using the same item(s) on the original invoice, create a credit memo that totals the amount being credited.
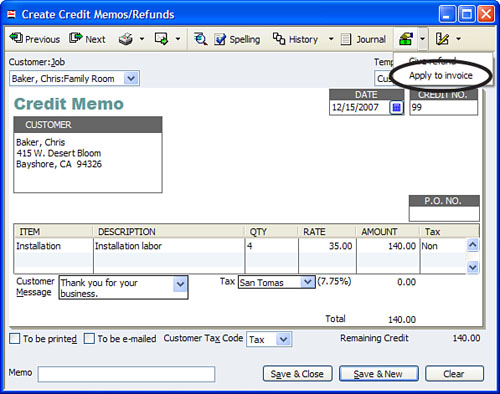
3. After the memo is created, select the Use Credit To icon on the top right as shown in Figure 7.23 to apply the credit to an invoice. QuickBooks then saves the credit memo and provides a list of all open invoices available to apply the credit to.
Another way to remove or increase a customer balance is to record a journal entry. This type of transaction is commonly used at tax time by the company’s accountant when making adjustments to Accounts Receivable.
If you are going to record a Journal Entry adjustment, you need to keep in mind the following:
• Only one customer is allowed per Journal Entry.
• If the General Journal Entry has other non–customer-related adjustments, the first line of the journal entry should remain blank.
• The date of the General Journal Entry is the date the transaction will impact your financials both for Accrual or Cash Basis.
• You can enter and apply one lump sum to multiple open customer invoices.
Did you know that if you use a customer on the first line of a journal entry, every other adjustment made—even non-customer adjustments—will appear on the Profit & Loss by Job report? This situation is due to the first line of any journal entry being a source line and causing a relationship with transactions below the first line.
To avoid this problem always leave the first line of a journal entry blank, as shown in Figure 7.24.
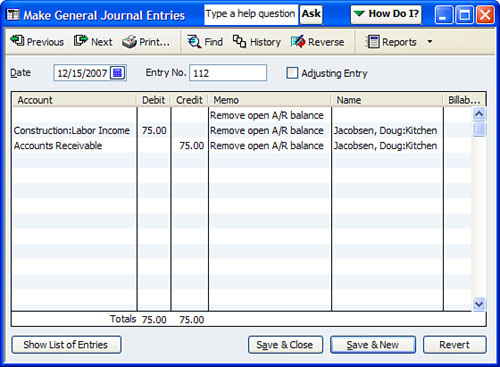
1. Click Company, Make General Journal Entries and in the form that appears, record a debit (to increase Accounts Receivable) or credit (to reduce Accounts Receivable), as shown in Figure 7.24. Be sure to assign the customer name to each line (except the first line, see the Rescue Me above) so that a Profit & Loss by Job report will accurately show the adjustment.
2. You now need to assign the General Journal Entry to the appropriate customer invoice. From the Home page, select Customer Center. Select the correct customer from the list on the left and in the Show drop-down menu select Invoices. Double-click on the appropriate invoice list item.
3. The Create Invoices dialog opens, select Apply Credits; QuickBooks then provides a list of available credits to choose from (see Figure 7.25).
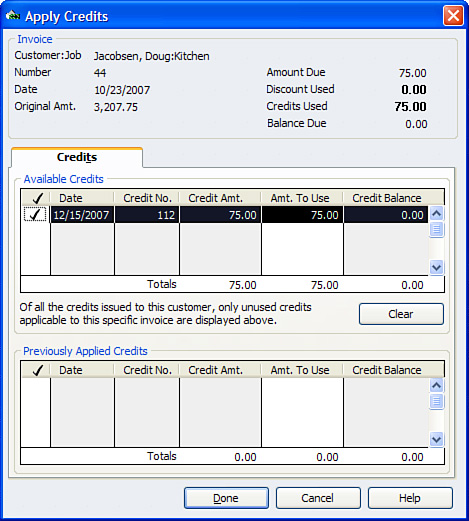
4. On the Apply Credits dialog that opens, select the appropriate credits by placing a check mark next to the credit. Click Done to assign the credit(s) to the customer invoice form.
5. Click Save & Close.
Applying the customer’s payments exactly as the customer intended is important. If you apply the customer’s payment to an invoice of your own choosing, communicating any discrepancies with open invoice balances can be more confusing than necessary.
However, many times your customer does not provide you with the correct invoice number and you apply it to an incorrect invoice. QuickBooks makes changing how you applied the invoice easy.
If after you review your customer’s records with yours you find you have applied the payment to the wrong invoice follow these steps to unapply the payment and then reapply to the correct invoice:
1. From the Home page click on the Customer Center.
2. On the list on the left, select the appropriate customer.
3. In the pane to the right of the customer list select the “Show” drop-down menu list, select Received Payments.
4. Optionally, choose specific payment methods or select a specific date range from the appropriate drop-down menus.
5. QuickBooks will list all Received Payment transactions for this customer.
6. Double-click the payment that was misapplied.
7. The Receive Payments dialog opens as shown in Figure 7.26. Remove the check mark from one invoice and place it next to the correct invoice. Be careful that the total amount of the payment total does not change.

From the Customer Center find the appropriate customer, filter for Received Payments, and locate the payment in question. See the previous section for specific steps to locating the payment.
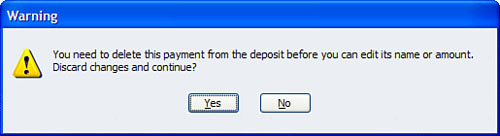
Determine whether the payment has already been included on a deposit form by clicking History in the Receive Payments screen. If you attempt to change the customer name on the payment screen, QuickBooks will warn you that the payment first needs to be deleted from the deposit (see Figure 7.27).
Figure 7.27 The warning that appears if you attempt to change a customer name on a customer payment already included in a deposit amount.
If the payment has been included on a deposit form, follow these steps to correct the customer or job assigned:
1. From the Receive Payments window click History.
2. From the Transaction History - Payment window, select the Deposit and click Go To. The deposit form opens.
3. Record on paper the total deposit amount and date. You will need this information later in step 8.
4. If multiple payments are on the deposit, go to step 5. If the payment amount being corrected is the only deposit line item then go to step 9.
5. Highlight the line item to be removed as in Figure 7.28 and press Ctrl+Delete on your keyboard. Click OK on the delete warning message. Then click Save & Close. This step removes the line item from the deposit form. QuickBooks will also warn you if the item has previously been cleared (see Figure 7.29). If you follow the steps carefully, you will restore your deposit back to the correct amount and you will not have any reconciliation differences.
Figure 7.28 Select the line item and on your keyboard use the Ctrl+Delete key to easily remove entire line.
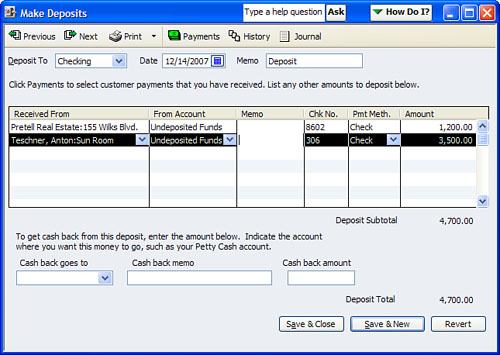
Figure 7.29 QuickBooks provides a warning message when you attempt to delete the customer payment from a deposit form.

6. Locate the customer payment that was in error and change the Customer or Job assigned.
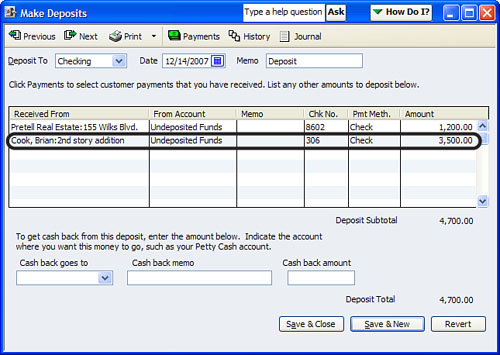
7. Return to the bank register and locate the deposit form. Double-click on the deposit. With the deposit form open, select Payments at the top and place a check mark next to the payment with the corrected Customer or Job (see Figure 7.30). Click OK to add the payment to the deposit form.
8. Verify that the total of the deposit agrees with the original amount you recorded on paper. When this transaction is saved with the same original amount, your bank reconciliation will not show a discrepancy. The process is now complete (see Figure 7.31).
9. If the payment you are correcting is the only deposit line item, then first create a Receive Payment by clicking on Customers, Receive Payments and record the information for the correct customer or job. Then follow steps 7 and 8 to assign your newly created payment to the existing deposit. Next, delete the incorrect line item and save the deposit.
10. From the Customer Center locate the incorrect payment and void or delete it.
It often happens that you create a credit memo and apply it to a specific invoice. Then when you communicate with the customer, you find out he or she applied it to a different invoice. When you are making those credit and collections calls, the discrepancy can end up costing you critical time in getting paid on invoices that you show as open. If in the end the total due from the customer remains the same, I usually find it easier to agree with the customer’s records when applying credit memos.
The steps that follow will help you easily reassign the credit memo to the correct invoice, or at least the same invoice your customer assigned it to. Without agreeing with the customer, your collections process would be delayed as both parties sort out what remains unpaid.
1. From the Customer Center locate the customer that had the credit memo applied incorrectly. If you are not sure, simply click the Customer Center’s Transactions tab and select Credit Memos from the list of available transactions. You can filter for Open or All credit memos as well as transaction dates to narrow your search, as shown in Figure 7.32.
Figure 7.32 Using the Transactions tab of the Customer Center can make it easy to see all transactions of one type.
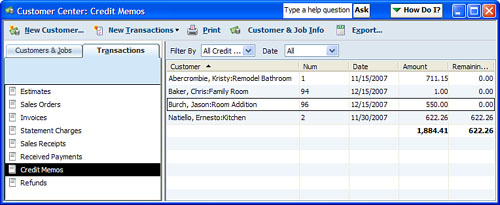
Did you know that you can click on the headers in any of the columns, as shown in Figure 7.32, and QuickBooks will sort the data by that column?
2. To reassign the incorrectly assigned credit memo to another invoice, open the credit memo and change the Customer or Job name. Click Save & Close to save the reassigned credit memo.
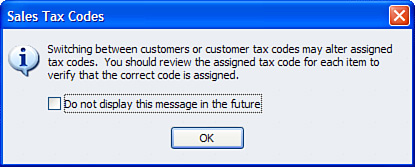
3. QuickBooks warns that switching between customers can have negative effects for sales tax. Click OK if you want to change anyway as in Figure 7.33.
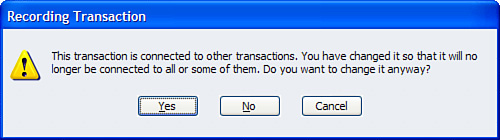
4. QuickBooks warns in Figure 7.34 that transaction is connected to other transactions. Click OK if you want to make the change.
Figure 7.34 QuickBooks warns that the credit memo was previously applied and saving these changes will affect those transactions.
The unassigned credit will now appear in the Customer Center and on the Open Invoices report (see Figure 7.35).
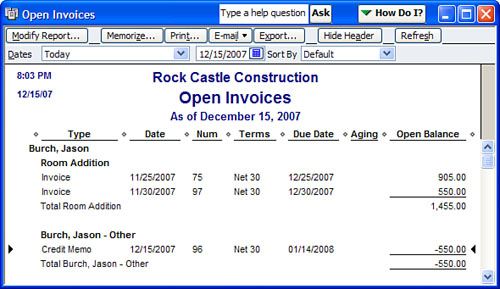
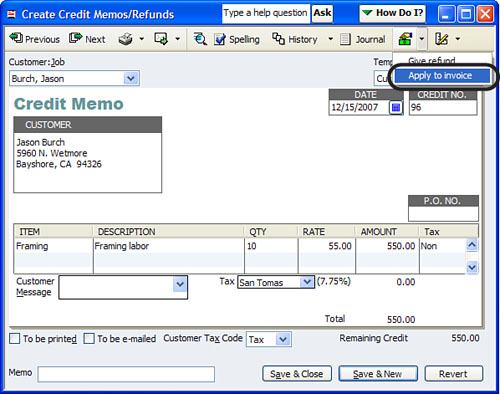
5. Use the instructions from step 1 previously to locate the unapplied credit memo. Double click on the unapplied credit and click the “Use credit to” icon at the top right of the Create Credit Memos/Refunds dialog and select Apply to Invoice, as shown in Figure 7.36.
6. The Apply Credit dialog opens. Place a check mark next to the appropriate credit amounts. QuickBooks will by default select the invoice with an exact match; you can override this selection and apply the credit as needed.
7. Select Done.
In the section of this chapter titled “Accounts Receivable Forms and Workflow” four steps were identified as basic to Accounts Receivable management:
1. Create an invoice, sales receipt, or statement charge.
2. Receive the customer payment.
3. Place the payment (automatically by preference setting) into the Undeposited Funds account.
4. Complete the Make Deposits form.
This section details how to correct your QuickBooks data when the receive payments step was skipped in recording deposits to the bank account.
How can you know when this situation happens? You need to do a little troubleshooting first to identify the problem:
• Do you have open invoices for customers who you know have paid you?
• Is your bank account balance correct?
• Have you reconciled the bank account to your bank’s paper statement?
If you answered yes to these questions, then you need to determine just how the deposits in the bank account register were recorded.
In QuickBooks, click Reports, Banking and select Deposit Detail. This report lists your deposits in date order as shown in Figure 7.37.
Figure 7.37 The Deposit Detail report; look for deposits that are recorded directly to your income accounts.
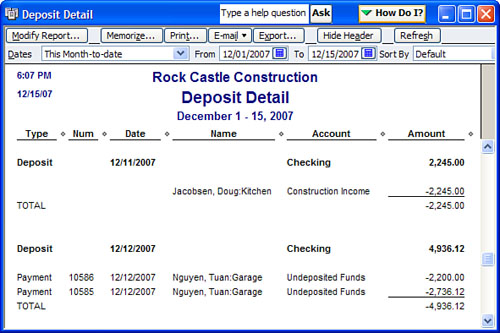
You are reviewing this report to see whether a pattern exists. For example, in Figure 7.37 you see a deposit correctly done for $4,936.12, which is comprised of two checks from customer Nguyen. In this situation, the Receive Payments form was applied to open invoices, and the payments were “sent” to the Undeposited Funds account (see the section “Preferences That Affect Accounts Receivable”). Next, a Make Deposit form was completed and totaled to agree with the actual deposit.
This process differs from the deposit for the Jacobsen customer. Instead of applying this deposit to the customer’s open invoice, a Make Deposit form was used and the amount was recorded directly to the Construction Income account.
Technically, in Cash Basis reporting, your reports would be correct. You could just void the open invoices. However, on Accrual Basis reports your income has been overstated because both the original invoice and the customer deposit increase income.
Assigning the Make Deposits form to the Customer Invoice is a two-step process. If you have the time to correct individual transactions, this method retains your bank reconciliation and identifies the payment with the customer’s open invoice. Be prepared for a bit of tedious work. You will need to have a good record of which deposit was paying for which customer invoice. Remember, these steps are only to correct transactions that have been recorded incorrectly.
1. Click Banking, Use Register.
2. The Use Register dialog opens. Select the bank account to which the deposit was made.
3. Locate the deposit in the checkbook register and double-click it to open the Make Deposits form. Change the account assigned in the From Account column from Income to Accounts Receivable. The effect of this step is to “credit” Accounts Receivable (see Figure 7.38). Click Save & Close.
4. Click Reports, Customers & Receivables, select Open Invoices, and double-click on the invoice form. (I like using this method simply because I can see both the credit and open invoice.)
5. Click the Apply Credits button and select the credit that pertains to this invoice.
6. Click Done to close the Apply Credits Dialog. Click Save & Close.
You have now corrected the deposit and assigned the amount to the open customer invoice, all without changing your bank reconciliation status of the item. This process works well, but can certainly be tedious if you have many transactions with this type of error.
Unless you take each and every check or cash payment made for your product or service to the bank on a separate bank deposit ticket, your customer payments should be grouped together with the total matching your bank deposit slip.
If you group your customer payments together on the same Make Deposits form and match the total deposited to your bank deposit ticket, your bank reconciliation will be much easier to complete each month.
You should not attempt this method if you have reconciled your bank account in QuickBooks. Also, if you are correcting years of unreconciled transactions, you will want to review Chapter 6 for methods to reconcile multiple months or years at one time.
Additionally, the section in this chapter titled “Preferences That Affect Accounts Receivable” details how you can avoid these errors for future transactions.
The easiest place to see the problem is in your bank account register. Click Banking, Use Register and select the appropriate bank account.
As shown in Figure 7.39, assume the deposit total per the bank statement was $5,464.78 but in the checkbook register you recorded two individual deposits.
Figure 7.39 Customer payments that were deposited directly into the checking account without being grouped together on a Make Deposits form.
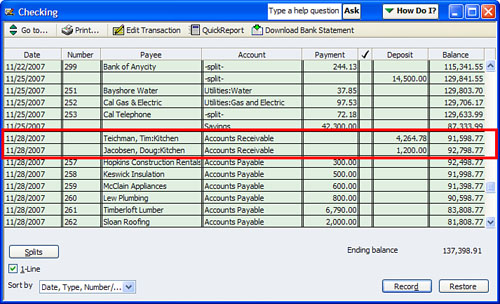
This situation was caused by choosing Checking as the Deposit To account when receiving the customer’s payment (see Figure 7.40). The preferred method would have been to select Undeposited Funds and group them together on one Make Deposit form.
Figure 7.40 Deposits were individually added to the bank account register because the account selected in the Deposit To field was the Checking account and not the Undeposited Funds account.
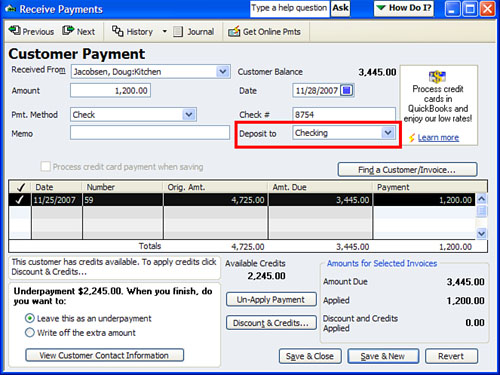
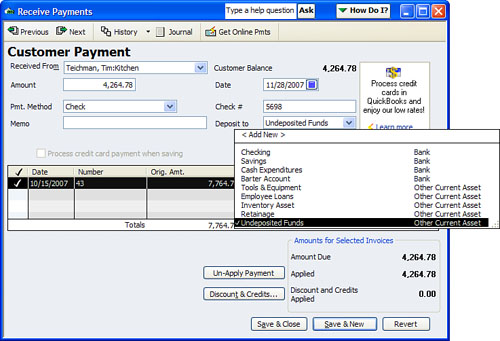
To correct this error, edit the Receive Payments form by selecting the Deposit To drop-down menu and choosing Undeposited Funds (see Figure 7.41).
Figure 7.41 Selecting the Undeposited Funds account as the Deposit To account will allow you to group deposited items together.
To complete the process, from the QuickBooks main menu click Banking, Make Deposits. QuickBooks displays a list of all the payments received, but not yet included on a deposit form. Click to place a check mark next to the grouped payments, verify that the total deposit agrees with your bank deposit, and then click OK (see Figure 7.42).
The Make Deposit form now agrees with the actual bank deposit recorded by the bank.
At the bottom left of each customer invoice form is the option to select the invoice to be printed. QuickBooks remembers the setting from the last stored invoice form, which can sometimes hinder your own company process.
If you find that you have many invoices selected to print and you don’t intend to print them, try this easy solution:
1. Place one or two sheets of paper in your printer. Click File, Print Forms, Invoices. The Select Invoices to Print dialog box displays the invoices that are marked to be printed (see Figure 7.43).
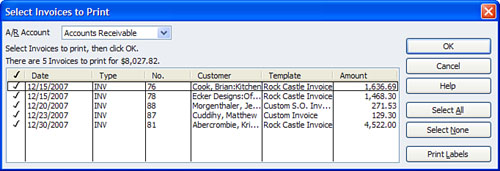
2. The check mark next to the invoice tells QuickBooks you want to print the invoice on paper. Click OK to send the forms to the printer.
3. After a couple of invoices print a message appears similar to Figure 7.44 showing a list of the forms that did not print. Because you don’t want to print them, click OK and each form will be marked in QuickBooks as if it were printed.

This chapter has provided a brief summary of the workflow for accounts receivable, provided ways you can review and troubleshoot your data, and provided instructions on how to fix many of the common Accounts Receivable errors.
This section of the chapter shares some ways to handle unique transactions; transactions you may come across but just are not sure how to enter.
Often adjustments at tax time may include adjustments to your Accounts Receivable account. This transaction is usually in the form of a General Journal Entry. What can make the entry more difficult for you is when no customer(s) are identified with the adjustment.
Preferably you can request a breakdown by customer of the adjustments made to the Accounts Receivable account. If that is not immediately available, and you simply need to enter the adjustment, you might want to consider using the following method:
1. From the Customer Center create a fictitious customer name—something like, Accountant YE Adj.
2. Use this customer to apply the line item to in the Make Journal Entry form. Do know that this is only a temporary fix and the balance will appear on your Open Invoices report.
Later, when you are able to collect the actual customer(s) who make up the adjustment, you can enter a reversing entry to the fictitious customer and new entries to the correct customers.
Often I am asked how to handle a transaction when you are selling your company’s product or service, but instead of getting paid, you are trading it for the products or services of your customer.
Before attempting these steps, be sure that you have created a customer for your “vendor.” You can easily add new Customers by selecting the Customer Center from the QuickBooks Home page.
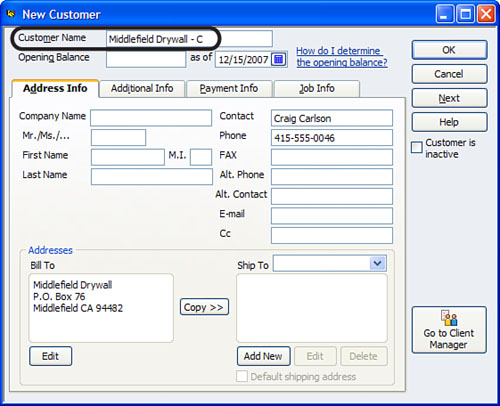
However, QuickBooks will not let you use the same name on the customer list as the vendor list. A little trick will help with this. When naming the new “fictitious” customer, enter a “- C” after the name as you see in Figure 7.45. This naming convention will not appear on invoices, but when selecting this name from lists, will easily bring to your attention that you are using the “customer” list item.
Follow these easy steps to keep track of both the revenue and costs:
1. Click Lists, Chart of Accounts to open the Chart of Accounts dialog.
2. Click the Account button. Select New and create an account named Barter Account as a bank account type following the instructions on the screen. Click Save & Close.
3. Click Customers, Create Invoices. Select the new customer you created (your vendor now added to the customer list). Enter the information as if you were selling your products or services to this customer. Click Save & Close.
4. Click Customers, Receive Payments. Select the new customer you created and record the amount of the payment, placing a check mark next to the appropriate “fictitious” invoice as shown in Figure 7.46.

5. Select the new Barter Account as the Deposit To account and click Save & Close and you are done with the revenue part of the transaction.
6. If your default preference is set to have all customer payments go to Undeposited Funds, continue on to steps 6 and 7.
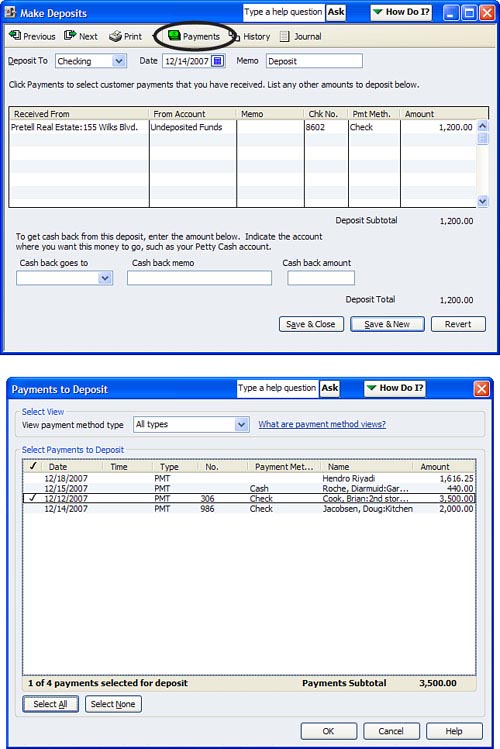
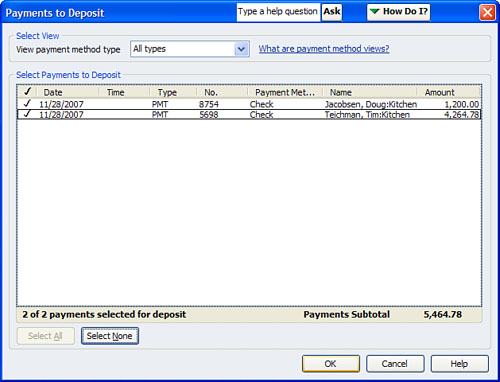
7. Click Banking, Make Deposits to open the Payments to Deposit dialog. Place a check mark next to the appropriate Receive Payment form(s), and click OK to advance to the Make Deposits form.
8. On the Make Deposits form choose the Barter Account as the Deposit To account and select the date you want this transaction recorded. Click Save & Close when done.
So we have recorded the “potential” revenue side as well as the “fictitious” payment of the invoice of the barter agreement. Now we need to record the expense side of the transaction.
I recommend that the transactions going in and out of the barter account are equal in value; if not, you will need to make an adjustment in the register (Click on Banking, User Register selecting the Barter Account and increasing or decreasing the amount to an income or expense account as determined by the amount left in the account).
To record the expense with a check form:
1. To create a check form, click on Banking, Write Checks.
2. Select the Barter Account as the checking account.
3. For the check number, use any number or alpha characters you want.
4. For the payee use the newly created vendor list item (a vendor record for your customer).
5. Record to the normal expense account and amount as if you were purchasing the goods or services.
6. Click Save & Close.
To record the expense with a vendor bill form:
1. Click on Vendors, Enter Bills.
2. Select the Vendor, enter a date, vendor reference number and amount.
3. Assign the expense to the appropriate expense account. When done click Save & Close.
4. To pay the bill click on Vendors, Pay Bills.
5. Place a check mark next to the appropriate bill that has really been paid by providing the vendor with your product or services.
6. In the payment method pane, select the choice to “assign check number” because we don’t expect to print a check to give to the vendor.
7. In the payment account pane select the newly created Barter Account as the payment account as shown in Figure 7.47.
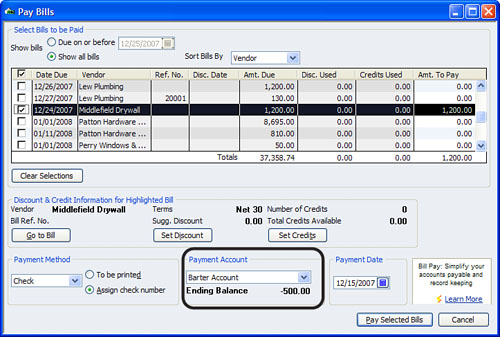
8. Click on Pay Selected Bills and the Assign Check Numbers dialog appears. Assign a fictitious check number of your choosing. You can even put the term “Barter” in for the check number. Click OK and QuickBooks provides a payment summary window, select Done.
When this process is finished, your Barter Account should have a zero balance. You may even want to perform a bank reconciliation of the Barter Account clearing both equal sides of the transaction.
If you have ever had a customer’s payment check bounce, you know how important correct accounting is. When a check is bounced, often your bank account will automatically debit your bank balance and may also charge an extra service fee.
So just how do you record these transactions and also increase the balance your customer now owes you? Follow these steps:
1. To create a bounced check item click Lists, Item List. Click on the Item button and select New.
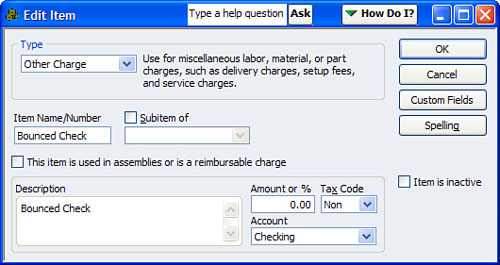
2. The New Item dialog box appears. Select an Other Charge Type. In both the Number/Name field and Description field type Bounced Check.
3. Leave the Amount field blank; assign Non as the Tax Code. For the Account select the bank account that was deducted for the returned check (see Figure 7.48).
Figure 7.48 This item will be used to record the deduction to your bank account for the bounced check amount.
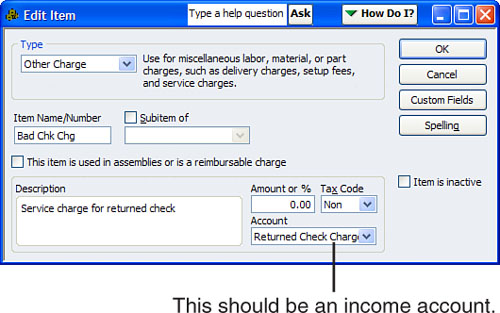
4. Using the preceding steps, create an additional Other Charge item type to be used to invoice the customer for the bank fee you incurred. Name the item Bad Chk Chg.
5. Leave the Amount blank, set the Tax Code as Non, and for the Account select an income account, such as Returned Check Charges, as shown in Figure 7.49.
Figure 7.49 This other charge item will be used to invoice the customer for the fee you were charged by the bank.
6. Click Customers, Create Invoices, and in the dialog that appears, select the customer with the bounced check. On the first line of the invoice use the Bounced Check item and assign the amount of the bounced check. On the second line of the invoice use the Bad Chk Chg item and assign the amount of the fee your bank charged you. (See Figure 7.50.) Click Save & Close.
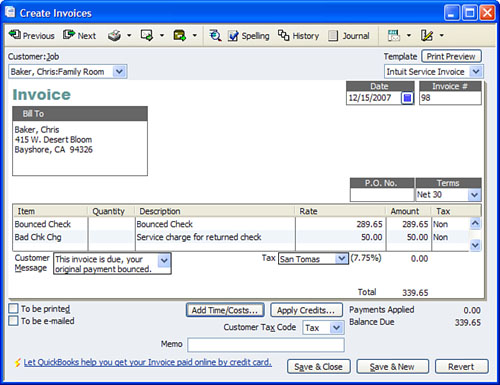
The impact is to increase Accounts Receivable (debit), increase Income for the bank fee (credit) and decrease your bank account (credit). The reduction in the bank account is to record the fact that the bank deducted the amount from your account.
When you reconcile your bank account, be sure to enter the service fee charged.
While this method provides a process to charge your customer again for the returned check as well as the bank fee, it does have one “symptom” you may want to consider. When you create a Balance Sheet on a Cash basis you may see this amount in Accounts Receivable. More information on this topic is provided in Chapter 4, “Easily Review Your QuickBooks Data.”

Review your data for the following:
• Follow the recommended workflow for Accounts Receivable from the customizable Home page. (Page 144)
• Use the appropriate forms offered in Accounts Receivable. (Page 144)
• Review your QuickBooks preferences that affect Accounts Receivable. (Page 146)
What to look for:
• Accrual Basis Balance Sheet Accounts Receivable total agrees with the A/R Aging Summary report total for the same date. (Page 158)
• Review your Open Invoices report for customer balances that have already been paid. (Page 160)
• Verify whether the data is missing invoice numbers that may be a concern if your company is audited. (Page 161)
• When a Cash Basis Balance Sheet has an Accounts Receivable balance. (Page 163)
• Removing small open customer balances as bad debt. (Page 166)
• When customer payments have been applied to the incorrect customer invoice. (Page 173)
• Correcting how a customer credit memo was applied. (Page 178)
• When the customer Receive Payment form was not used. (Page 178)
• Recording your accountant’s adjustments to Accounts Receivable. (Page 187)
• Removing old invoices from the printer queue. (Page 186)
Be sure to properly handle unique transactions:
• Barter arrangements when your customer is also a vendor. (Page 188)
• Bounced checks from your customers. (Page 191)