
• Purpose of the Opening Bal Equity Account
• Transactions in the Opening Bal Equity Account
• Reports to Review and Troubleshoot the Opening Bal Equity Account
• Closing Opening Bal Equity into Retained Earnings
• Setting a Closing Date and Password
• Opening Bal Equity Checklist
QuickBooks automatically creates the Opening Bal Equity account when you create a new data file. The Opening Bal Equity account serves the following purposes for a new data file:
• To keep your books in balance during the opening entries.
• To provide a common register so you can easily view your opening entries before “closing” to the Retained Earnings account.
• To function as the account used for bank reconciliation adjustments in QuickBooks versions 2005 and earlier. Beginning with QuickBooks 2006, bank reconciliation adjustments are posted to an expense account automatically created by QuickBooks called Reconciliation Discrepancies.
This chapter discusses all these purposes in detail.
Whether or not you choose to create the file using the QuickBooks EasyStep Interview (see Chapter 1, “Creating a New QuickBooks Data File,” for more details), QuickBooks creates this chart of account list item in the Equity section of your Balance Sheet report.
If you are creating a QuickBooks file for an existing business (one that has had transactions prior to your QuickBooks start date, see the section titled “Select a Start Date” in Chapter 1), you will most likely be using this Opening Bal Equity account when recording your beginning balances.
If you are creating a QuickBooks file for a new business without any historical transactions, you should not use this account for any of your opening balances. Instead, you will create your accounting transactions using the proper QuickBooks forms as presented throughout this book.
You will know that a QuickBooks file is properly set up when the Opening Bal Equity account balance on the Balance Sheet report is zero after you have entered all your opening balances.
QuickBooks automatically records the following transactions to the Opening Bal Equity account:
• Your ending bank statement balance transaction when you created a new bank account in the EasyStep Interview
• Opening balances for other Balance Sheet report accounts created in the Add New Account dialog
• Inventory total value balances entered in the New Item dialog
• Bank reconciliation adjustments for QuickBooks versions 2005 or earlier
Other common transactions that a user might assign to this account include
• Accrual basis opening accounts payable transactions as of the start date
• Accrual basis opening accounts receivable transactions as of the start date
• Uncleared bank checks or deposits (accrual or cash basis) as of the start date
One of the automatically generated transactions by QuickBooks that is recorded to the Opening Bal Equity account is the ending balance information you entered during the EasyStep Interview, discussed at length in Chapter 1 (see Figure 13.1).
Figure 13.1 The bank statement ending balance recorded in the EasyStep Interview offsets to the Opening Balance Equity account.
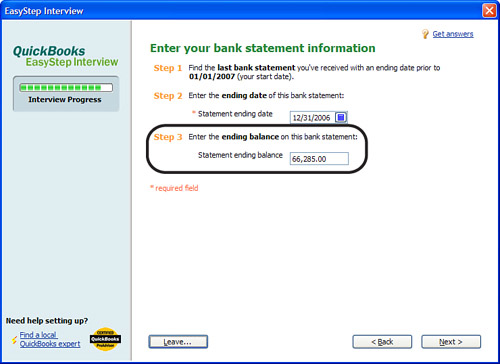
When you enter your ending statement balance, QuickBooks increases (in this example) your bank statement balance. In accounting terms, the increase is a debit to your Cash account. To complete the transaction QuickBooks needs an “offsetting” account to put the credit side of the transaction to, and rather than require the user to select an account, QuickBooks defaults the other side of the transaction to the Opening Bal Equity account, as shown in Figure 13.2.
Figure 13.2 QuickBooks increases Cash and Opening Bal Equity when you enter a bank statement ending balance in the EasyStep Interview.
One of the more useful features of QuickBooks is that you do not need to know debit and credit accounting; that is, that every transaction must have an equal amount in debits and credits. However, because the concept of debits and credits is a standard accounting principle, QuickBooks does the work behind the scenes.
Another transaction QuickBooks automatically enters into the Opening Bal Equity account happens when you enter an opening balance via the Add New Account dialog as shown in Figure 13.3.


If you have an existing business with prior accounting balances, you should consult your accounting professional before entering opening balances in QuickBooks. Your accounting professional can help guide you through this process.
If you are just starting with QuickBooks but you have transactions and account balances from before your QuickBooks start date, you can enter these beginning balances directly into the Add New Account dialog. You will not, however, be able to add the beginning balances with this method later when you edit the account.
To add a new account:
1. Click Lists, Chart of Accounts to open the chart of accounts dialog. Click the Account drop-down menu and select New.
2. The Add New Account: Choose Account Type dialog appears. Select the correct Account Type and click Continue. Note that only Balance Sheet account types will allow you to enter an opening balance into the Add New Account dialog. Income, Expense, Cost of Goods Sold, Other Income, and Other Expense types do not offer you the option to enter an opening balance due to those accounts not having forward balances.
3. The Add New Account dialog opens with the selected account type at the top as shown in Figure 13.3. Enter the Account Name.
4. Optionally, place a check mark in the Subaccount of check box and enter the appropriate account.
5. Enter an optional Description and Account No., and choose a Tax-Line Mapping.
6. Click the Enter Opening Balance button to open the Enter Opening Balance dialog, as shown in Figure 13.4.
Figure 13.4 Click the Enter Opening Balance button in the Add New Account dialog to open the dialog for entering the opening balance.

7. Enter the Opening Balance amount and the As Of date. This date should be one day before your start date. If you are entering a transaction dated after the start date you should be using one of the many common QuickBooks forms to record these “after start date” transactions. Refer to the chapter index in this book for specific chapters discussing the proper workflow and forms to use.
8. Click OK; the Add New Account dialog reappears.
9. Click Save & Close.
The example shown in Figure 13.4 results in an increase (credit) to the Long Term Liabilities account and a decrease (debit) to the Opening Bal Equity account. See Figure 13.5.
Figure 13.5 QuickBooks increased the Long Term Liabilities account and decreased the Opening Balance Equity account when an opening balance was entered via the Add New account dialog.

Did you know that you can control the dates in your file by setting the following date warning preference?
1. Click Edit, Preferences to open the Preferences dialog.
2. Select the Accounting preference.
3. Click the Company Preferences tab (you must be logged in as the Admin user and in single-user mode).
4. Specify the number of days in the past and into the future you want to be warned if the transaction exceeds this range of dates.
This preference helps prevent errors in the dates assigned to transactions, including these open balance transactions.
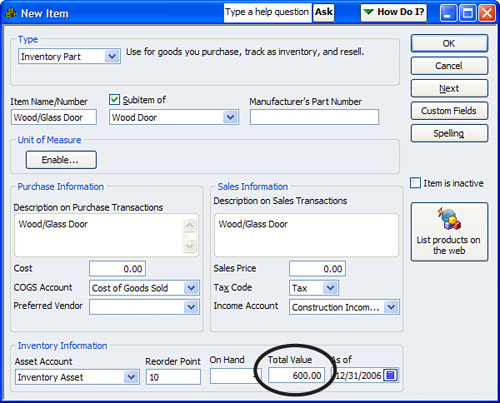
QuickBooks will automatically create an inventory adjustment transaction that records to the Opening Bal Equity account if you add a Total Value to your New Item dialog for inventory item types.
Figure 13.6 shows a new inventory item being created and a Total Value of $600.00 for the new item. In this example, QuickBooks will increase (debit) your Inventory Asset account and increase (credit) your Opening Balance Equity account.
Figure 13.6 Entering a Total Value for a new inventory item increases the inventory asset account and increases the Opening Bal Equity account.
These transaction types are named INV ADJ, and the memo line of the transaction includes the inventory part name with the term Opening Balance so that these entries are very easy to locate on a report or in the Opening Bal Equity register.
Entering Beginning Inventory Balances
Because you will often be creating your items days or weeks before you begin actually using your QuickBooks data file, rather than entering an opening balance for the inventory item when you create the inventory list item you should instead create an inventory adjustment to record the beginning balance quantities when your file is complete. Then, perform an inventory adjustment to record the on-hand quantity and value adjustment following these steps:
1. Click Vendors, Inventory Activities and select the Adjust Quantity/Value on Hand menu.
2. On the Adjust Quantity/Value on Hand dialog that opens, enter an Adjustment Date; if this entry is to put the original inventory quantity count into QuickBooks, the date selected should be one day before your QuickBooks start date.
3. Enter a Ref. No.
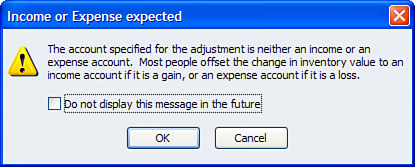
4. Enter an Adjustment Account; if this entry is to put the original inventory quantity count into QuickBooks, use the Opening Bal Equity account. QuickBooks warns you, as shown in Figure 13.7, that you are not using an income or expense account. For this beginning inventory adjustment only, you can ignore this warning.
Figure 13.7 The warning provided when you enter an inventory adjustment to a non-income or expense account.
You can learn more about inventory adjustments in Chapter 10, “Reviewing and Correcting Inventory Errors.” Look for the section titled, “Creating an Inventory Quantity Adjustment.”
If your data file was created with QuickBooks version 2005 or older, and if you let QuickBooks automatically make adjustments to reconcile your bank account, then you might find these adjustments in your Opening Bal Equity account, the default account set by QuickBooks.
QuickBooks version 2005 or earlier would have given a message similar to the one shown in Figure 13.8 when reconciling with an adjustment.
Figure 13.8 When reconciling with an adjustment in QuickBooks version 2005 or older, QuickBooks provides this warning.
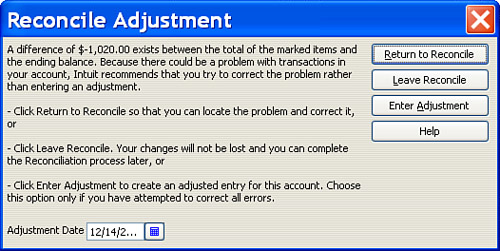
If you click Enter Adjustment in the warning dialog shown in Figure 13.8, QuickBooks makes the requested adjustment to the bank account (either an increase or decrease to your bank balance) and the offsetting entry to the Opening Bal Equity account.
QuickBooks then creates a General Journal Entries transaction; the memo will say “Balance Adjustment,” making the adjustment easy to identify in the Opening Bal Equity register.
Beginning with QuickBooks 2006, all bank account reconciliation adjustments are no longer recorded to the Opening Bal Equity account. Instead, QuickBooks automatically creates an expense account called Reconciliation Discrepancies. This account is an Expense type as compared to Opening Bal Equity, which is an Equity type account.
Because most companies review the Profit & Loss report more frequently than the Balance Sheet report for the business, it is more likely now that users will see the bank reconciliation adjustments.
Another type of transaction that might be recorded to the Opening Bal Equity account is one used strictly for accrual basis startup balances.
One method to enter individual customer invoices or vendor bills is to create an item that has the Opening Bal Equity account assigned to it, as shown in Figure 13.9.
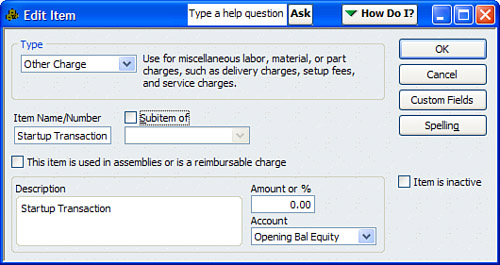
If your business reviews its financials only in accrual basis, this method is perfectly fine. It will, of course, cause transactions to also post to the Opening Bal Equity account.
Although this method for entering accrual basis startup transactions is easy and efficient, it can cause problems if it is used on transactions after the start date. So a good process would be to edit the item and make it inactive after all the startup transactions have been entered.
You can find a review of creating startup transactions in Chapter 1, in the section titled, “Setting Up a QuickBooks Data File for Accrual or Cash Basis Reporting.” The method discussed in that chapter provides details on how to set up your transactions for accrual or cash basis financial reporting.
Before you begin reviewing your data for transactions in the Opening Bal Equity account, verify that you do have a balance in this account.
To create a Balance Sheet Standard report:
1. Click Reports, Company & Financial and select the Balance Sheet Standard report.
2. Without adjusting the date, view the Equity section of the report to see whether a balance exists in the account, as shown in Figure 13.10.

Technically, the Opening Bal Equity account value should be equal to your prior year Retained Earnings. So, if you have a balance in your Opening Bal Equity account and if the balance is equal to your prior year’s Retained Earnings amount, you might simply be able to “close” Opening Bal Equity into Retained Earnings—a topic that is discussed in the next section.
If, however, a balance appears on the Balance Sheet report and you have completed your opening balances, including closing Opening Bal Equity into Retained Earnings, you can review the individual transactions by creating the following report:
1. Click Reports, Custom Transaction Detail Report. The Modify Report dialog appears, with the Display tab selected.
2. Select the Report Date Range you want to view. I recommend that you choose All from the Dates drop-down menu.
3. In the Columns section of the Display tab, click to place a check mark next to those data fields you want to see on the report, or click to remove the check mark from those you don’t want to see on the report. Be sure to include Type near the top of the list.
4. Click the Filters tab.
5. In the Choose Filter pane, select Account; from the Account drop-down menu select the Opening Bal Equity account, as shown in Figure 13.11.
Figure 13.11 Modify the Custom Transaction Detail report to filter for the Opening Balance Equity account.

6. Optionally, from the Sort By drop-down list select Type. This option groups the report by type of transaction, which might make reviewing the source of the transactions easier.
7. Click OK to create the report
With the report sorted by type of transaction, you can begin to determine whether errors in entries were made.
Some of the more common errors I see include the following:
• Users entered a bank ending balance in the EasyStep Interview and also created a deposit form for the same value.
• Users entered an opening balance in the Add New Account dialog and then later entered the opening balance on another transaction.
• Users in QuickBooks 2005 or earlier allowed QuickBooks to make a reconciliation adjustment to agree with the bank statement.
• Users entering inventory for the first time entered a Total Value in the New Item dialog and then later entered an inventory adjustment.
• Users inadvertently posted transactions directly or indirectly (using items) after the QuickBooks start date.
One of the most important things to know about the Opening Bal Equity account is that when a file is completely and successfully set up, no balance should remain in the Opening Bal Equity account.
I have mentioned a few times in this chapter that the Opening Bal Equity account should have a zero balance when a file is set up correctly.
When I refer to a correctly set up QuickBooks file I am assuming the following:
• You are not converting your data from Quicken, Peachtree, Microsoft Small Business Accounting, or Office Accounting. Each of these products has an automated conversion tool available free from Intuit that eliminates the need to do startup transactions if you convert the data and not just lists. (See the section titled, “Converting from Other Accounting Software to QuickBooks,” in Chapter 1.)
• Your company had transactions prior to the QuickBooks start date. If it did not, you are simply going to enter typical QuickBooks transactions with no need for unusual startup entries.
• If you did have prior transactions to the QuickBooks start date and you are not going to re-create these prior transactions in your QuickBooks data file.
• You have entered each of your unpaid customer invoices, unpaid vendor bills, and uncleared bank transactions and dated them prior to your QuickBooks start date. (See the section “Setting Up a QuickBooks Data File for Accrual or Cash Basis Reporting” in Chapter 1.)
• You have entered and dated your trial balance one day before your QuickBooks start date. (You might need to request the trial balance numbers from your accountant if you are not converting from some other financial software that provides you with a trial balance.)
• When you create a Trial Balance report in QuickBooks dated one day before your QuickBooks start date, it agrees with your accountant’s trial balance or with the trial balance from your prior financial software with the exception that you have a balance in the Opening Bal Equity account.
If you answered yes to each of these assumptions, then I would expect that your opening balance is equal to the Retained Earnings balance from your accountant’s financials or from your prior software.
If it doesn’t agree then you need to continue to review the data to determine what the errors are.
If it does agree you are prepared to make the final entry in your startup process.
To create this closing entry, use a General Journal Entries form:
1. Click Company, Make General Journal Entries to open the Make General Journal Entries dialog.
2. Enter a Date (it should be one day before your QuickBooks start date).
3. Type an Entry No.

Leave the first line of any Make General Journal Entries from blank because QuickBooks uses this line as the source line. Any list item in the name column on the first line (source line) of a general journal entries form will also be associated in reports with the other lines of the same general journal entries form. See the Sidebar in Chapter 11 on page 306 for more specific details.
4. Leaving line 1 of the form blank, on line 2 of the Make General Journal Entries form (using the example as shown in Figure 13.12), decrease (debit) Opening Bal Equity by $514,129.79 and increase (credit) Retained Earnings by the same amount. This action “closes” Opening Bal Equity to Retained Earnings. Click Save & Close.
Figure 13.12 Use a Make General Journal Entries form to close Opening Bal Equity to Retained Earnings.

5. Click OK to the QuickBooks warning dialog that appears; QuickBooks saves the transaction. The warning advises that you are posting to a Retained Earnings account and that QuickBooks has a special purpose for this account. It is appropriate to post this entry to Retained Earnings. This warning is a result of a preference setting that you can access by clicking Edit, Preferences and selecting Accounting from the list on the left. Click the Company Preferences tab and choose the option to enable the warning. (You must be logged in as Admin user and in single-user mode to access this preference.)
When the transaction is saved, create the Balance Sheet Standard report as explained earlier in this chapter and verify that your ending numbers are accurate; that is, that they match your accountant’s or your prior software trial balance for the same period.
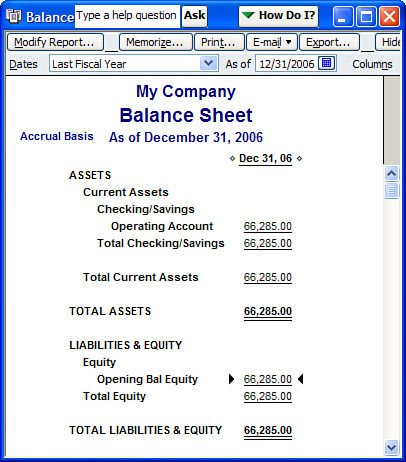
Figure 13.13 now shows the proper Retained Earnings balance, and you no longer have a balance in Opening Bal Equity.
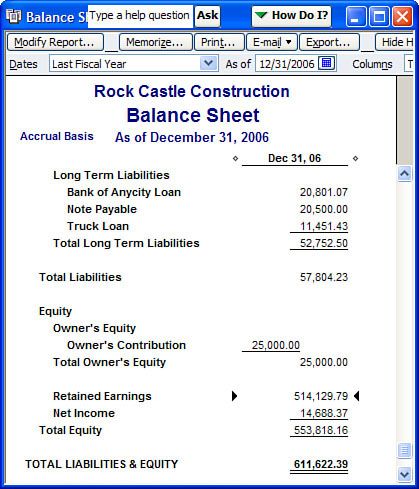
Congratulations—after all this work you now have a properly set up data file that matches the balances from your accountant or prior financial software.
The next and final step is to protect your work from users making changes to the transactions by setting a closing date password. Although modifying and adding transactions to prior dates can provide great flexibility in getting the file ready for tax time, this flexibility can be disastrous, potentially wasting all the effort that has been put into ensuring the numbers are correct.
To set a closing date password you must first be logged in as the Admin User (default user for a new QuickBooks data file) and in single-user mode then, follow these steps:
1. Click Company, Set Closing Date and the Accounting, Company Preferences dialog opens.
2. Click the Set Date/Password button to open the Set Closing Date and Password dialog.
3. In the Date pane, enter a closing date. Usually for a new data file it is the day before your QuickBooks start date, or ask your accountant for the date that should be selected. Enter an optional Closing Date Password confirming the password as shown in Figure 13.14.
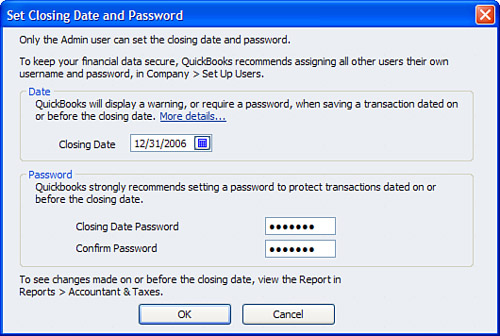
4. Click OK to save the closing date and password. The User List dialog opens again. Click OK to close the preferences dialog.
Now that you have set a closing date and optional password, you need to make sure that users are given permissions to change or not change closed transactions. (Transactions dated on or before the closing date.)
5. Click Company, Set Up Users and Passwords and select the Set Up Users menu option.
6. If your file has an Admin User password, a dialog opens where you will need to type the Admin password before continuing. Click OK to close the QuickBooks Login dialog and open the User List dialog.
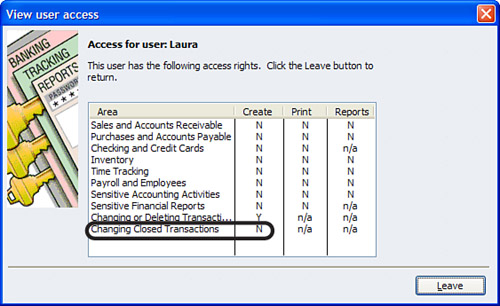
7. To view the details of users’ security, select a user from the list and click the View User button. The View User Access dialog opens, as shown in Figure 13.15.
Figure 13.15 View user access rights to see whether a user is or is not allowed to change closed period transactions.
If you need to edit the setting for a user see step 5 in the preceding list.
Here is how the closing date feature works depending on the Y or N in the Create column of the Changing Closed Transactions setting:
• “N”—The user will not be able to add or modify transactions dated on or before the closing date.
• “Y”—If only a closing date is set, the user will be warned when adding or modifying transactions dated on or before the closing date.
• “Y”—If both a closing date and closing date password were set, the user will be warned and required to enter the closing date password.
These are great controls to have in place, but remember that if a user has access to the Admin password, he or she can reset the closing date and closing date password.
Additionally, in Chapter 5, “Power Reports for Troubleshooting Beginning Balance Differences,” you can learn more about reports that show when a closing date was changed and when transactions were posted to closed periods.

Determine whether you need to use the Opening Bal Equity account:
• If you are a new business just starting. (Page 358)
• If you are an existing business with historical transactions. (Page 358)
Know which transactions QuickBooks records to the Opening Bal Equity account:
• QuickBooks automatically creates the Opening Bal Equity account. (Page 50)
• Open balance transactions when creating a new bank account in the EasyStep Interview. (Page 360)
• Open balances for other Balance Sheet report accounts. (Page 361 and Chapters 1 and 2)
• Inventory Total Value balances entered in the New Item dialog. (Pages 258 and 364)
• Bank reconciliation adjustments for QuickBooks versions 2005 or earlier. (Page 366)
• Accrual basis opening Accounts Payable and Accounts Receivable transactions as of the start date. (Pages 21 and 367)
• Uncleared bank checks or deposits (accrual or cash basis) as of the start date. (Page 32)
Review your Balance Sheet:
• Does QuickBooks have a balance in the Opening Bal Equity account? (Page 370)
• Does the balance equal the prior year’s Retained Earnings amounts? (Page 370)
• Review Opening Bal Equity transactions for errors. (Page 367)
Closing Opening Bal Equity to Retained Earnings:
• Is your data ready to close Opening Bal Equity to Retained Earnings? (Page 367)
Password protecting the prior year’s data:
• Setting a closing date and closing date password. (Page 372 and Chapter 15)
• Viewing a user’s access rights. (Page 372)