
• Defining an Other Current Asset
• Reviewing and Troubleshooting the Other Current Asset Accounts
• Troubleshooting and Creating Unique Other Current Asset Account Transactions
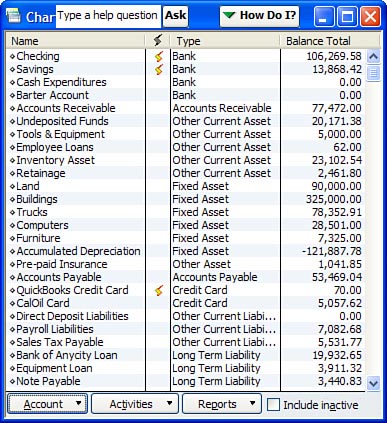
The Other Current Asset section on the Balance Sheet includes the value of noncash assets that are typically due within one year (see Figure 9.1). This section is appropriate for recording prepaid expenses and cash advances to employees. This section differs in purpose from the Fixed Asset section, which tracks the cost and depreciation of the land, equipment, and buildings your business owns (not rents) in the production of the service or product you sell.
Additionally, QuickBooks offers another asset section, Other Asset, which is typically used for those other assets that are not convertible to cash within one year.
All too often I see companies ignore the balances in these accounts. I think it is primarily due to the attention companies normally pay to their Profit & Loss statements and the lack of the same attention given to the Balance Sheet statement. However, often the balances in these accounts have a direct relationship to the company’s current period Profit & Loss statement. This is because other current asset accounts typically are for prepaid expenses, or expenses that are paid to the vendor in anticipation of the expense.
The next few sections detail ways in which you can accurately review these accounts and methods to correct the balances when you need to.
Just as you have taken care to review your cash and Accounts Receivable balances, you should also review the balances in your Other Current Asset accounts. These balances indirectly affect the Profit & Loss statement for your company. They represent expenses that have been paid but not recorded as a current expense to your company, or they might represent money that is owed to your company.
When possible, obtain a document outside QuickBooks to substantiate any balances you have in your Other Current asset accounts. If you have been using these types of accounts for recording your prepayments, it is important that you match their balances with the records of the vendor you have prepaid.
For example, if you have recorded a prepayment of your business insurance, you need to compare this balance to your insurance vendor’s records.

In the section of this chapter titled “Troubleshooting and Creating Unique Other Current Asset Account Transactions” you learn some preferred methods to properly record these special transactions.
One of the most common reports to use for reviewing the detail in your Other Current Asset accounts is the Custom Transaction Detail report available via the Reports menu. You simply modify and filter the report to view the details for the specific account or accounts.
The following steps show you how to get the Custom Transaction Detail report for an Employee Loans account. If your business loans money to your employees, review this report often and verify it with the employee’s own records.
To create the report, do the following:
1. Click Reports, Custom Transaction Detail.
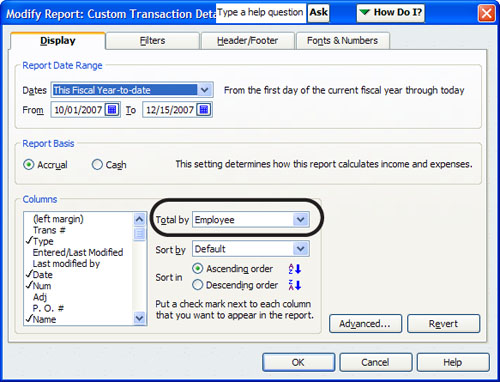
2. The Modify Report dialog opens. In the Report Date Range pane, select the appropriate date range you want to review.
3. From the Columns pane select the columns you want to see in the report.
4. To see the detail sorted and subtotaled by Employee, select Employee from the Total By drop-down (see Figure 9.2).
Figure 9.2 Total the report by Employee to see which employee balances make up the Employee Loans account total.
5. Click the Filters tab. In the Filter pane the Accounts filter is selected. From the Account drop-down menu select Employee Loans. You also might want to go to the Header/Footer tab and give the report a unique title.
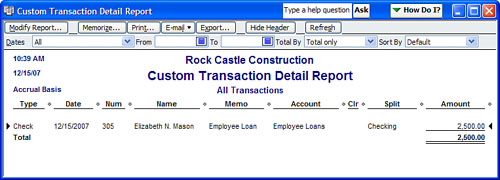
Figure 9.3 shows the finished report.
Figure 9.3 The report totaled by Employee organizes the information so you can easily verify balances by employee.

You can filter this report for other accounts and change the Total By option to organize the information according to your specific needs.
Over time, the Custom Transaction Detail report might become lengthy with lots of line item detail information that you no longer need to review.
In the earlier example of reviewing the balances in the Employee Loans account, you did not need to see the balance for employee Gregg Schneider because his loan was completely paid off.
The following steps show a method of removing this detail by reconciling the Other Current Asset account and then creating the Custom Transaction Detail report filtered for uncleared transactions:
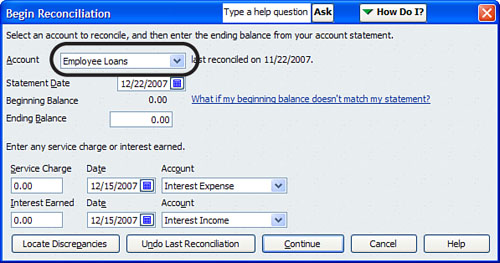
1. Click Banking, Reconcile.
2. The Begin Reconciliation dialog opens. From the Account drop-down menu select Employee Loans (see Figure 9.4) and click Continue. In this example, you will reconcile the account only when an employee has fully paid off the loan.
Figure 9.4 Reconcile the Employee Loans account so that you can filter the report for uncleared transactions.
3. Place a check mark next to the original loan payment (check) for each item that represents the complete repayment of the loan (deposit) (see Figure 9.5).
Figure 9.5 In the Reconcile dialog you will mark cleared both the payment of the loan and the employee’s repayment.
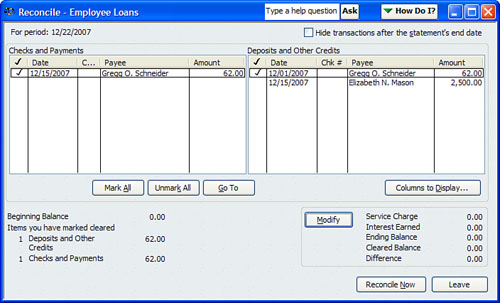
4. Click the Reconcile Now button when the cleared balance is -0-. Remember, you are reconciling the items only when the amounts going in and out of the account are equal.
5. Now when you create the Custom Transaction Detail report click the Modify button at the top of the report. In the Choose Filter pane, select Cleared and place a mark in the No radial button (see Figure 9.6). The report now shows only those transactions that make up the current balance.
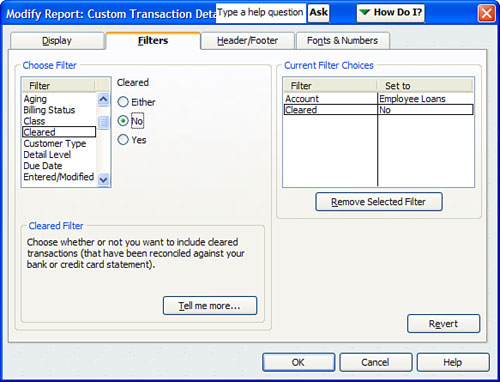
The important thing to remember about this method is that you are only marking cleared those list groups (that is, employees, customers, and so on) that are prepaid, or additional receivable is totally paid off. The resulting report only shows those transactions that are not cleared, making the report much shorter and easier to review (see Figure 9.7).
Often the Other Current Asset accounts are not reviewed periodically for accuracy. Typically it is because you might not have set up some process and procedures to review these numbers. This section is intended to help you correct any errors found in the Other Current Asset accounts in your QuickBooks data and to identify some ways to handle unique transaction types in these accounts.
After you review your vendor statements for prepaid balances or after you review the balances QuickBooks shows for employee loans, if you find errors, you can correct them via a simple process. Unlike some of the other account types you have learned about so far in this book, the Other Current Asset type account really has no restrictions.
The first step in correcting your data is to identify to which chart of account the original transaction was recorded so that you can reverse all or part of the transaction properly. Use these steps to identify and fix any errors:
1. Click Banking, Use Register and in the resulting drop-down account menu select the Other Current Asset account you are correcting. This opens the selected account in a register view.
2. Scroll up or down through the register view to find the transaction you want to correct. If it is a single transaction you need to correct, double-click the transaction and modify the account assigned to the correct chart of accounts list item.
Far more often, you will need to modify a total balance that is the result of several transactions, and the above method would just be too tedious. Take a note of the chart of account in the transaction you want to modify.
3. To make a correction to the total balance without modifying each individual transaction you can use a Journal Entries form. Click Company, Make General Journal Entries.
4. In the Make General Journal Entries dialog, enter the date you want to affect the balances, and enter an optional Entry No.
5. Leave the first line of the Make General Journal Entries blank. (See the Rescue Me discussed in Chapter 7, page XXX.)
6. On the second line of the Make General Journal Entries enter the Other Current Asset account balance you want to modify. Enter the dollar amount of the adjustment you determined from your review (see the previous section in this chapter).
• Debit Column—enter the amount here to increase this account balance
• Credit Column—enter the amount here to decrease this account balance
7. If the account is tracking employee, vendor, or customer names, be sure to include the appropriate list name in the Name column on the second line of the Make General Journal Entries. This is important if you want your resulting reports to sort or subtotal by the list name.
8. On line three of the Make General Journal Entries enter the chart of account list item (often an expense account) that you want to adjust. This is the same account you identified in step 2 previously. Enter the same amount as line 2, only enter it in the opposite column from the one selected in step 6.
9. Click Save & Close when you see that the debits column is equal to the credits column. If they are not equal, QuickBooks will not allow you to save the transaction.
10. To check your work, create the Custom Transaction Detail report as detailed in the previous section. The resulting balance should be the correct balance identified by your vendor statements or an outside QuickBooks source document you used to verify the balance.

Take care with the date you choose for the transaction; your correction impacts your financials on the date you assign to the transaction. The impact is the same for both cash- or accrual-based reports.
Tracking employee loans and repayments is just as critical as other types of other current asset account tracking. When you have employee loans for which you are tracking the repayment, make sure you periodically check your records with the employee’s record to verify the balances you have recorded.
Perhaps you loaned your employee money and the employee agreed to pay back the loan in equal amounts over several paychecks.
The method described in this section for deducting employee loan repayments from the employee’s payroll check assumes that you create your payroll checks in QuickBooks using one of Intuit’s Payroll Solutions, available at http://quickbooks.intuit.com/product/add_ons/payroll_software_and_services/.
Use these steps to create a loan repayment deduction payroll item:
1. To view your current list of payroll deduction type items, Click Lists, Payroll Items.
2. The payroll item list dialog opens. Review the contents of the list to make sure you do not already have an employee loan deduction type payroll item.
3. To create a new employee loan deduction item, click on the Payroll Item button at the bottom of the list. Select New.
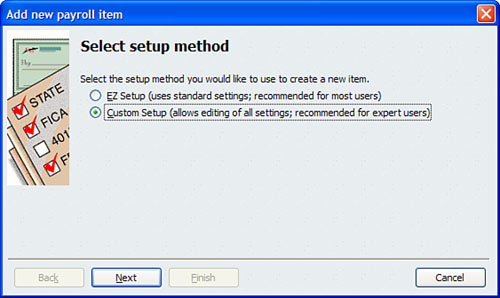
4. Click the Custom Setup button as shown in Figure 9.8, and click Next.
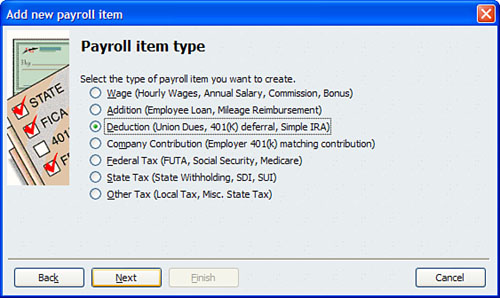
5. In the dialog that appears, click the Deduction payroll item type (see Figure 9.9) and click Next.
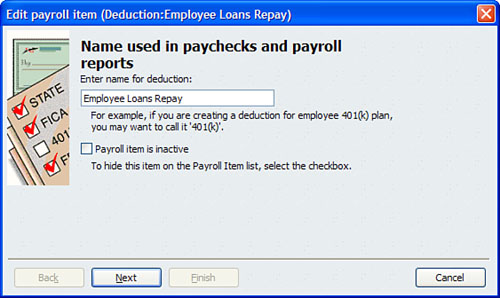
6. Name the deduction item Employee Loans Repay, as shown in Figure 9.10, and click Next.
7. You can leave blank the name of the agency and the number for the agency because you are not remitting this payment back to some other collection source.
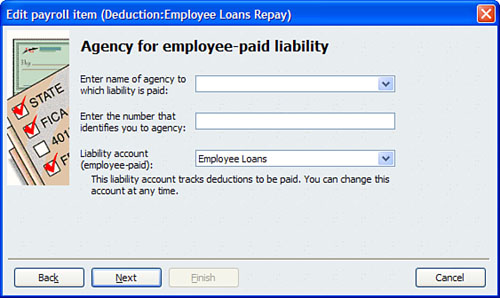
8. For the Liability Account assign the Employee Loans Other Current Asset account (see Figure 9.11) and click Next.
9. Leave the default Tax Tracking Type as None and click Next.
10. On the Taxes dialog, accept the default of none of the list items selected.
11. In the Calculate Based on Quantity dialog leave the default of Neither selected and click Next.
12. On the Gross vs. Net dialog leave the default of Gross Pay selected and click Next.
13. On the Default Rate and Limit dialog leave the default of 0.00 as well as the default check mark selected for this is an Annual Limit box, and click Finish.
Now you need to assign the deduction to the employee’s record, as described in the following steps:
1. From the Employee Center (accessible from the icon bar), select the employee to edit by clicking the employee name.
2. In the Edit Employee window, choose Payroll and Compensation Info from the Change Tabs list.
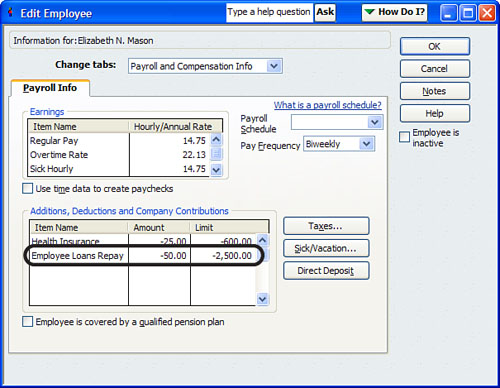
3. Assign the Employee Loans Repay item in the Additions, Deductions, Employee Contributions pane. Enter the amount to be deducted each pay period in the Amount column (see Figure 9.12). You can optionally put a limit amount in the Limit column. QuickBooks will stop the deduction when the limit is reached.
Often you will have expenses that must be paid in advance of the benefit of the service or product being purchased. An example is a business’s General Liability insurance. Typically you pay many months in advance for this type of insurance. To record this annual or semi-annual expense all in one month would make that month unfairly take on the total expense.
A preferred method is to record the expense in equal monthly increments. The following steps show you how to record the original prepaid expense and record the expense to the individual months.
To accomplish this task you will pay the insurance vendor as normal, but then create a recurring entry that QuickBooks uses to remind you to enter the expense; or QuickBooks will automatically enter the expense each month, depending on how you set up the reminder. This example shows how you would prepay a General Liability insurance bill of $12,000 for 12 months of coverage.
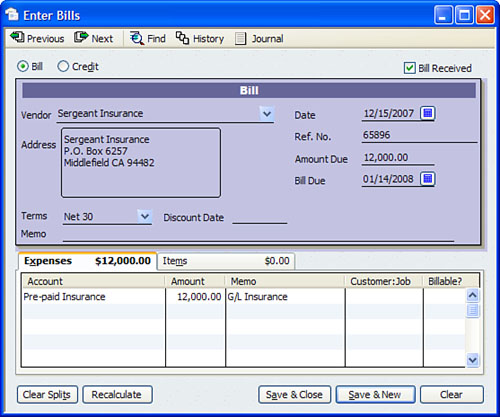
1. Create the vendor bill (or check form) to your insurance provider (or whatever type of prepaid expense you are recording). Instead of assigning the usual expense account on the form, assign the prepaid Other Current Asset type account. In this example, the account is Prepaid General Liab Insurance (see Figure 9.13).
Figure 9.13 Enter the prepaid expense and assign it to the Other Current Asset type account created.
2. Pay the bill to the vendor as normal.
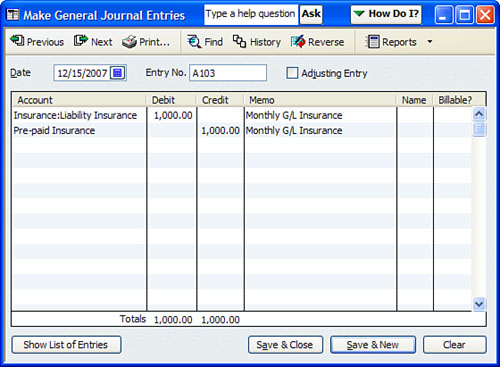
3. Set up a recurring transaction to charge 1/12 of the total to each month. If the amount remains the same from month to month, set up the recurring entry to automatically post to QuickBooks. To do so, select Company, Make General Journal Entries. Create a journal entry with a debit to your expense account and a credit to the prepaid Other Current Asset type account.
Did you know that you can memorize repeating transactions and let QuickBooks remind you or even automatically record them?
1. Create the transaction you want to memorize. In Figure 9.14 a Make General Journal Entries form is being used. However, this process can be used to memorize any of the QuickBooks forms, checks, bills, invoices, and so on.
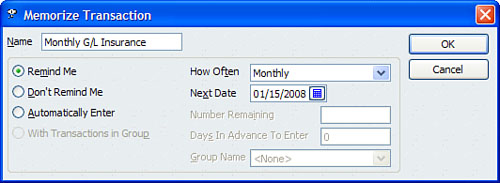
2. Press Ctrl+M on your keyboard to open the Memorize Transaction dialog box.
3. Choose to have QuickBooks remind you on a specific frequency, or choose to have QuickBooks automatically enter the transaction (see Figure 9.15).
QuickBooks will list memorized transactions on the Memorized Transaction List, available by selecting Ctrl+T. You also might want to check your reminders (select Edit, Preferences, Reminders) to be sure you include a reminder for showing your memorized transactions.
Another common use for the Other Current Asset range of accounts is to track amounts that are invoiced to a customer but are not due immediately and do not age. This practice is common in the construction industry and is referred to as retainage.
Basically, when an invoice is given to the customer, a percentage of the amount due (typically 10%) is held back until the project is completed. So while the money is due to you from your customer, the 10% retainage portion is not currently due and you do not want it to age in your receivables.
Using the method about to be described does have a trade-off. If you are a cash basis taxpayer, you would not expect to see a balance in your Accounts Receivable account when the Balance Sheet report is prepared on a cash basis. However, when you use this method, you will most likely see an Accounts Receivable balance on a cash basis Balance Sheet report. One of the causes of this is that QuickBooks reports an Accounts Receivable balance on a cash basis Balance Sheet report when items are used that map to other Balance Sheet accounts. You can find more detail about this in Chapter 4.
To properly use the Retainage Other Current Asset type account, you will need to create the necessary chart of accounts and items following these steps:
1. Click Lists, Chart of Accounts.
2. Click the Account button at the bottom of the screen and select New.
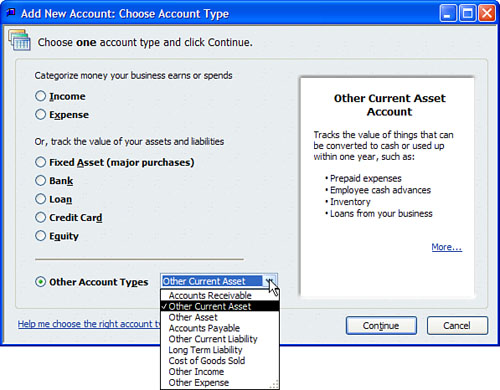
3. In the Add New Account dialog that opens, select Other Account Types. From the Other Account Types drop-down list select the Other Current Asset type account and click Continue (see Figure 9.16).
4. The Add New Account dialog opens. Type an account name of Retainage and optionally provide a description and tax line mapping. Click Save & Close.
5. Click Lists, Item Lists.
6. Click the Item button on the bottom of the list and select New.
7. From the New Item type drop-down menu select Other Charge.
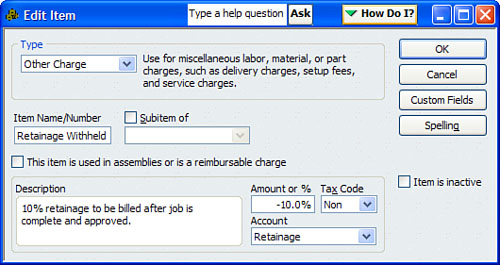
8. In the Item Name/Number field enter a name such as Retainage Withheld. Enter an optional description and select the Retainage account from the Account drop-down menu as shown in Figure 9.17. If your retainage is always 10% you can put a –10% in the amount; if the amount varies you can leave it blank. Optionally, you can create multiple retainage items for different percentages.
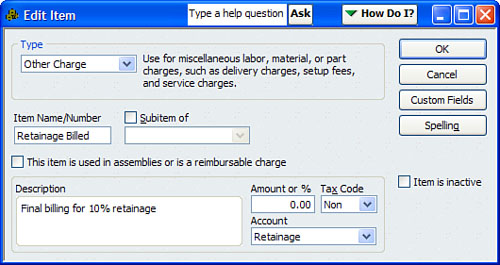
9. Follow steps 5 and 6 again to create another Other Charge list item and name it Retainage Billed (see Figure 9.18). Assign the Account the Retainage account you just created. No default amount needs to be entered here.
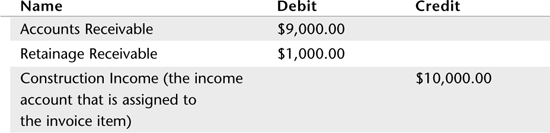
10. Prepare your invoice to the customer for the full amount (in this example, $10,000.00) and on the next available line enter the Retainage Withheld item (see Figure 9.19). Table 9.1 shows the financial effect.

11. When the project is completed and you are ready to collect payment on the retainage amount withheld, create your final invoice and use the Retainage Billed item with a positive amount.
12. Optionally, reconcile the Retainage Other Current Asset account and clear all the entries for the completed project. (See Chapter 6 for more information on properly completing a reconciliation.)
13. Review the report you created earlier in this chapter (in the “Creating a Custom Transaction Detail Report” section) to verify the correct amount was properly billed at the end of the project.
These are just some of the many ways you can use the Other Current Asset account to improve your financial recordkeeping. Feel free to use this type of process for other accounting needs such as tracking vendor prepaids or even tracking receivables between multiple legal entities that you may own.

Review your data for the following:
• Defining what an Other Current Asset account category is used for. (Page 218)
• Loans made to your employees. (Page 225)
• For expenses that are prepaid, such as insurance. (Page 228)
• Using the QuickBooks Other Asset Account types when you have some other software to track items such as your customer balances or inventory balances. (Page 230)
What to look for:
• Verify your Other Current Asset account balances with documentation outside QuickBooks. (Page 219)
• Properly recording prepaid expenses. (Page 228)
• Reviewing your loan balances for employees with the employee’s own records. (Page 225)
• The advantage of reconciling your Other Current Asset accounts. (Page 221)
• Do you have to track unique transactions such as customer retainage in your business? (Page 231)