
• Converting from Other Accounting Software to QuickBooks
• Setting Up a QuickBooks Data File for Accrual or Cash Basis Reporting
• Final Checklist: Creating a New QuickBooks Data File
Over the years I have helped hundreds of businesses troubleshoot problems they have with getting the proper financial and management information out of their QuickBooks data. In nearly every case I have found that improper setup of the data file was most often the primary cause, second only to judgment errors in posting transactions to the incorrect account.
The purpose of this book is to share with businesses and accounting professionals the many tools that QuickBooks provides for troubleshooting and correcting common data setup or entry errors. In QuickBooks, there are many preference settings and warnings that will help prevent many of these common mistakes. Each chapter identifies these settings so you can make sure your data or your client’s data is properly set up and maintained.
It is not my intention to offer any tax advice; I make comments throughout the text encouraging you to consult your accounting or tax professional before making any data corrections that might have a significant impact on a company’s financials.
Recent editions of QuickBooks makes properly setting up the data file easy thanks to the question-and-answer format built in to the QuickBooks EasyStep Interview. These easy-to-follow prompts assist new QuickBooks users with properly setting up the data file by asking basic questions about the business.
To access the EasyStep Interview, simply open QuickBooks and select File, New Company. (See Figure 1.10, which is the startup screen of the EasyStep Interview, later in the chapter.) You will have the option to Start Interview or Skip Interview. For accounting professionals, the option to skip the interview is particularly useful if you are going to be giving your client lists that you use commonly for all your clients.
When you choose the option to Skip Interview when creating a new data file, QuickBooks will still require the following:
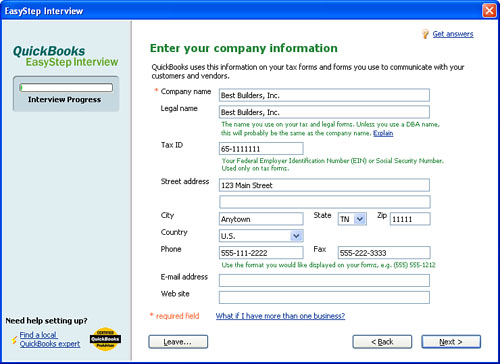
• The company name and address details (see Figure 1.1)
• The company’s financial structure (see Figure 1.3)
• The first month of your fiscal year (see Figure 1.5)
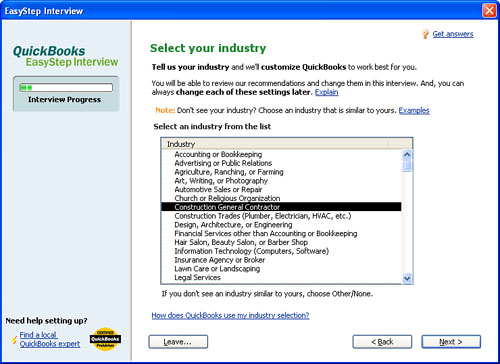
• An option to customize QuickBooks by selecting an industry-specific chart of accounts (similar to Figure 1.2)
• An option to create and store your data file on your computer
After you store your data file, QuickBooks will open the new data file and you will no longer have access to the EasyStep Interview. If you selected the Skip Interview option and you leave the EasyStep Interview before completing the required steps in the previous bulleted list, QuickBooks will not save your work. If you choose the option to Start the Interview, QuickBooks will provide a series of question-and-answer type choices to help you properly set up your data file and to default certain features. If you have to leave the interview at any time before finishing it, QuickBooks will remember where you left off in the process when you return.
Have the following information on hand before setting up your QuickBooks data file:
• Company Name—This should be the company name or a name that best describes the business. By default, this is the filename given to the data file (.QBW extension) on your computer.
• Legal Name—The legal name will appear on certain reports and federal tax forms.
• Tax ID—Although this ID is not required to begin using QuickBooks, it is required if you want to sign up for one of the QuickBooks payroll services.
• Remaining Information—This information can optionally be added to certain forms in QuickBooks, such as a customer invoice form (see Figure 1.1).
You also will want to be prepared to answer the following questions that are asked as part of the EasyStep Interview process:
• Selecting your Industry—QuickBooks recommends certain features that will be useful for the industry selected. QuickBooks also creates a Chart of Accounts list customized for the industry selected (see Figure 1.2). Beginning with QuickBooks 2007 you can choose from 32 industry-specific charts of accounts. These lists were reviewed and revised by a group of accounting consultants hired by Intuit. Additionally, some industry selections will also create industry-specific items that are used to prepare customer and job estimates, sales orders, and invoices.
• Identifying how your company is organized—This selection helps QuickBooks create the correct accounts, customizing for the legal type selected and assigning the proper tax form lines to those accounts (see Figures 1.3 and 1.4). These tax line assignments automate the process of creating tax documents with tax preparation software such as Intuit’s TurboTax, ProSeries, or Lacerte.
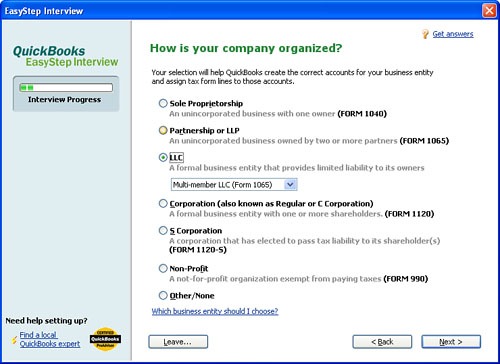
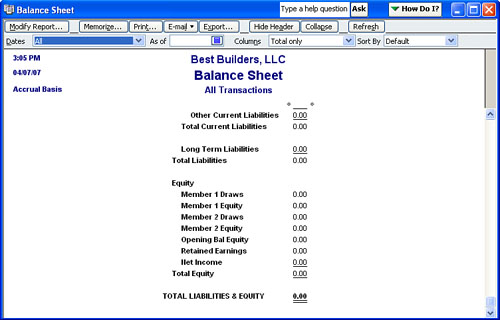
Figure 1.4 QuickBooks creates unique equity accounts when you select the company’s legal organization.
• Select the first month of your fiscal year—The answer to this EasyStep Interview question causes the reports that filter on fiscal year-to-date to know what month is the first month in the fiscal year (see Figure 1.5). For most companies, this is the first month of your income tax year.
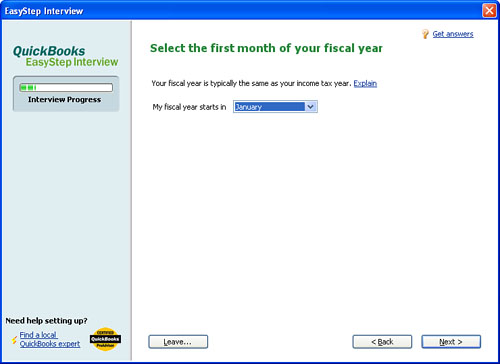

If the month selected as the first month of your fiscal year is incorrect, you can easily change it by choosing Company, Company Information. Changing this month does not affect individual transactions but does ensure that the reports that filter for fiscal year-to-date transactions are correct.
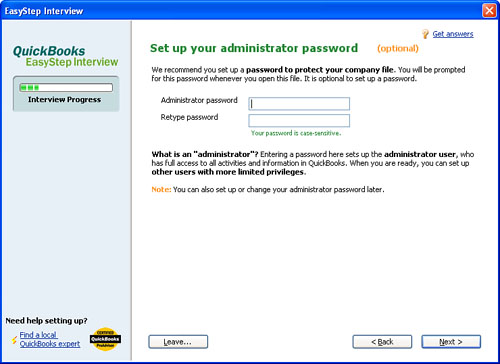
• Setting an administrator password—Setting an administrator password is always a good practice (see Figure 1.6). If you do not set one during the EasyStep Interview, you can open a QuickBooks file with the Admin username and leave the password blank. Using a blank password is perfectly fine during the initial setup but more security should be put in place after you enter sensitive information. You can also set up this password later.
At this point in the EasyStep Interview, QuickBooks asks where you want to store the company data file and what name you want to give it, if different than the default company name previously assigned.
Beginning with QuickBooks 2007, the default directory for storing a QuickBooks data file is Shared DocumentsIntuitQuickBooksCompany Files.
If you need to leave the Interview at any time, QuickBooks will return to the point you left off when you open the data file again.
The EasyStep Interview now prompts you for certain information based on what industry you selected. Your answers to the remaining questions will make certain features in QuickBooks the default. The purpose of this book is not to define each of these choices; most are self-explanatory. However, discussing the effect of a few of the choices will be useful.
One of the most important decisions you will make when beginning to work with QuickBooks is determining the start date (see Figure 1.7). You might want to discuss with your accountant what date to use. For most businesses, it is the day you want to begin entering data into QuickBooks. You select the start date during the EasyStep Interview, which defaults to the beginning of the current fiscal year; however, many companies begin using QuickBooks sometime during the year. The date you select will be assigned to any opening balance entries entered when you create a list item on the chart of accounts or when you enter an opening balance for a new Customer, Job, or Vendor.

The following are potential start dates:
• When you first begin your business activities (with no prior expenses or income). This date is the easiest one to work with because you have no historical balances or transactions to consider. You simply begin by paying vendors and invoicing customers. Everything else will fall into place.
• After you have established your business, but you decide to assign the start date as that of when your business began and enter historical transactions, thus re-creating the business accounting from the beginning. This practice is common when a company is only a few months old. You would follow the same advice as if your business were new. However, if the company is many months or years old, this method can be time consuming and difficult to manage.
• At the beginning of a calendar year such as January 1, 200x. This choice is common when the decision to begin using QuickBooks is at the end of a year or not long into the next year. Again, if the company has previously had business transactions there will be beginning balances to enter. This information is discussed in detail in the section of this chapter titled “Setting Up a QuickBooks Data File for Accrual or Cash Basis Reporting.”
• At the beginning of your fiscal year (for companies whose tax year does not coincide with the calendar year).
• The first day of a month during the current calendar year or your fiscal year.
For established companies that select a start date after the business has had activity, it is recommended that the start date be the beginning of a month. This practice makes reconciling balances to other software or to documents outside QuickBooks easier. If your bank statement ends within a month rather than at month end, request that the bank change your statement ending date to the end of the month for future statements if possible.
From your bank statement, tell QuickBooks the name of the bank account, the account number (optional), whether the account was opened prior to the QuickBooks start date, and the ending balance (see Figure 1.8).
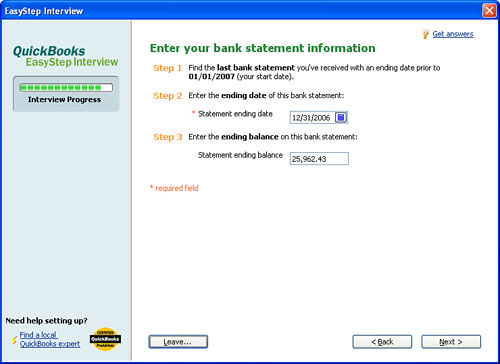
The bank account information you enter is necessary for you to properly reconcile your QuickBooks bank account. For the Statement ending date, use the last month’s bank statement date prior to your start date. For the Ending balance, use the amount the bank shows on your printed bank statement not including any uncleared checks or deposits in transit. You will enter these individually later.
You might find it easier to accept the QuickBooks default accounts because you can modify them at any time.
Even if you select None/Other when selecting a chart of accounts, specific accounts in QuickBooks will automatically be created when related forms are opened for the first time:
• Accounts Receivable
• Inventory
• Undeposited Funds
• Accounts Payable
• Payroll Liabilities
• Sales Tax Payable
• Opening Balance Equity
• Retained Earnings
• Cost of Goods Sold
• Payroll Expenses
• Estimates (non-posting)
• Purchase Orders (non-posting)
To identify which charts of accounts were created by QuickBooks:
1. Click Lists, Chart of Accounts.
2. Click once to select a specific account you want to verify whether it is one of the default QuickBooks accounts.
3. Once selected, click on Account, and choose Edit Account.
4. If the Account type field is grayed out, this is a QuickBooks defaulted chart of accounts and you should not create your own account for the same purpose. Instead, be sure to use this one.
These accounts are very important to the QuickBooks functions. If a user deletes these accounts, QuickBooks will re-create them when the related form is used.
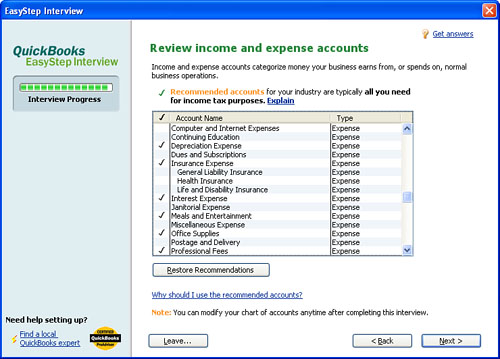
Although QuickBooks defaults certain chart of accounts list items, in the EasyStep Interview you can conveniently remove any of the predetermined income, cost of goods sold, or expense accounts that you don’t want in your file by removing the check mark next to the listed account name (see Figure 1.9).
See Chapter 2, “Reviewing the QuickBooks Chart of Accounts,” for methods to use if you inadvertently create an account type that duplicates a QuickBooks created account.
QuickBooks has automated the process of converting files from other financial software into QuickBooks files, including
• Quicken
• Peachtree by Sage
• Small Business Accounting by Microsoft
• Office Accounting
This section provides specific details about how QuickBooks handles these conversions and what you need to consider when making the choice to convert existing data from one of the listed financial software programs to a QuickBooks data file.
To begin the conversion, open QuickBooks, select File, New, and select Convert Data directly from the EasyStep Interview opening screen (see Figure 1.10). The Conversion tool copies your Quicken data to a new QuickBooks file, leaving your original Quicken data file unchanged.
Figure 1.10 Converting files from other software packages right from the EasyStep Interview opening screen.
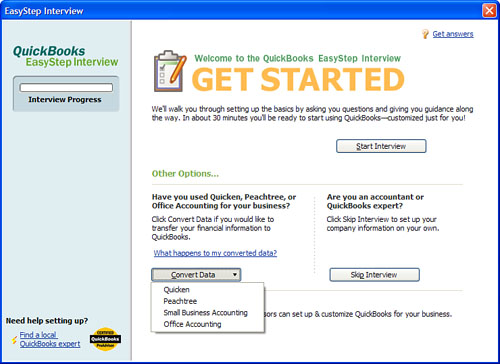
Table 1.1 shows you how the Quicken accounts are converted into QuickBooks accounts.
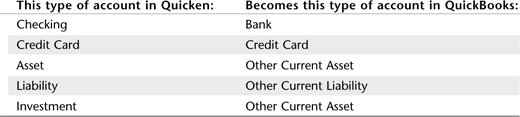
Because QuickBooks does not offer the Investment tracking feature that is in Quicken, you can choose whether to include or exclude the value of your investments in the resulting QuickBooks balance sheet. If you choose to include them, QuickBooks will convert the investment accounts into another current asset chart of account type.
If you choose to exclude the investments, you are given the opportunity to delete the accounts before converting to QuickBooks. Any transfers that were recorded to or from the deleted accounts will be recorded to your opening balance equity account. This is in keeping with the “debits equal credits” accounting that is going on behind the scenes in QuickBooks.
You will be asked whether there is a Quicken Accounts Receivable account with customer payments. If you click Yes, the QuickBooks Conversion tool asks you to identify your Quicken Accounts Receivable account. QuickBooks then begins converting the Quicken transactions to QuickBooks transactions. This process can take several minutes, so now might be a good time to walk away from the computer.
During the conversion you are informed of the following:
• QuickBooks creates an Opening Bal Equity account to compensate for deleted Quicken accounts.
• Memorized Invoices in Quicken might need to be reviewed.
• Duplicate check, invoice, or credit memo numbers are stored in a QBwin.log for review.
• Every payee name in Quicken must be on a QuickBooks list.
Because QuickBooks cannot determine which list an item belongs to, it places all items on the Other Name list (see Figure 1.11). In QuickBooks, users can then click Lists, Other Names List, Change Name Type for the one-time option to change the payee to a Vendor, Employee, or Customer.
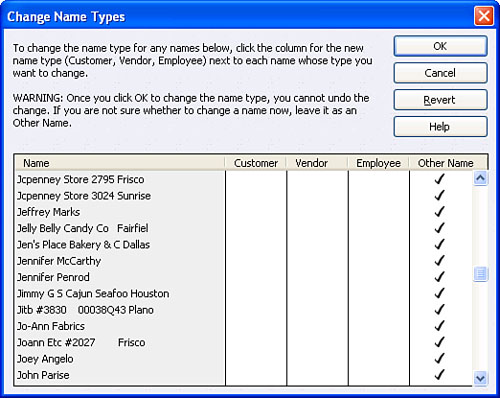

After you click OK to change the name type, you cannot undo the change. If you are not sure what list the payee belongs to, leave it as an Other Name.
Because Quicken allows for flexibility in how the accounting is documented—for example, allowing both business and personal funds to be co-mingled—my recommendation is for new QuickBooks users converting their Quicken data to hire a professional with accounting experience to make sure the resulting information is correct going forward.
Intuit offers a listing on the Internet of qualified QuickBooks Certified ProAdvisors in your area. Simply go to www.quickbooks.com/support and select the Find a ProAdvisor link on the left side of the window.
Just as in the Quicken conversion, QuickBooks can convert your Peachtree, Small Business Accounting, or Office Accounting data to QuickBooks data directly from the EasyStep Interview dialog. The conversion process leaves your original Peachtree, Small Business Accounting, or Office Accounting data untouched.
If you have not already downloaded the free Peachtree, Small Business Accounting, and Office Accounting QuickBooks Conversion tool, you will be directed from the EasyStep Interview dialog to do so. The free downloadable tool converts Peachtree (any version 2001–2007), Microsoft Small Business Accounting (2006–2007), and Office Accounting to QuickBooks Pro, Premier, or Enterprise Solutions 2006 or higher. The tool can be used to convert multiple company files from any of the named software.
The Conversion tool works with Windows 98 Second Edition, 2000, XP, and Vista operating systems. You must have both the prior financial software installed and the QuickBooks software installed and registered for the conversion to work.
The download link for the free Conversion tool is http://quickbooks.intuit.com/product/about_quickbooks/peachtree_conversion.jhtml.
In the conversion process you will be able to select the specific Peachtree, Small Business Accounting, or Office Accounting file and the QuickBooks product version to which you will be converting it. Additionally, you will be able to specify the conversion of Lists and transactions (including historical transactions) or Lists only.
Next, select a conversion date; any transactions dated after this date will not be converted.
Because of the differences between the two products, you are also given a choice to identify customers and vendors in QuickBooks with the name of the Peachtree, Small Business Accounting, or Office Accounting ID value. You must choose one or the other, so making this decision prior to performing the conversion would be best.
The following Peachtree, Small Business Accounting, and Office Accounting files are converted:
Key lists, including
• Chart of Accounts
• Customer/Prospects
• Jobs
• Employees/Sales Reps
• Vendors
• Inventory item
Custom fields
Balance Information
Open Transactions, including
• Open invoices
• Open vendor bills
Customer Transactions (New!)
• Estimates
• Sales Orders
• Invoices
• Payment Receipts
• Deposits
• Credit Memos
• Purchase Orders
• Bills
• Bill payments
• Checks
• Bill credits
With QuickBooks Online Edition, users can manage their business accounting information from anywhere—work, home, or on the road—at anytime. Monthly subscription fees are assessed for this product.
QuickBooks Online Edition allows a one-time conversion from QuickBooks Basic (no longer sold), Pro, or Premier for Windows. The process is simple and converts both lists and historical transactions.
Feature differences exist between the Online Edition and the Desktop versions; review the feature comparison chart at http://quickbooks.intuit.com/product/accounting_software/product_comparison.jhtml to see whether Online Edition is right for you and your business or your client’s business.
Users who are changing their operating system to Windows have the option to convert their QuickBooks Pro for Mac data, lists, and transactions to a QuickBooks Pro for Windows data file. Only QuickBooks Pro for Mac versions 6.0, 2005, 2006, 2007 and 2008 offer this capability. For version 6.0 click File, Create a File for QuickBooks for Windows.
In versions 2005–2007 click File, Back up to QuickBooks for Windows. In QuickBooks 2008 click File, Utilities, and select Copy Company File for QuickBooks Mac.
With each command a .QBB backup file is created; this file is restored in QuickBooks for Windows. It is recommended that you restore the same-year version of a Mac file to a same-year version of the Windows program; that is, restore QuickBooks Pro for Mac 2007 in a QuickBooks Windows 2007 file.
The conversion from QuickBooks Pro for Mac to QuickBooks for Windows is a very simple and worry-free process.
Although the purpose of this book is not to give definitive accounting or tax advice on any of the topics covered, it is worth discussing the nature of accrual versus cash basis reporting as it pertains to creating a new data file.
Understanding the basics of these two types of reporting is important. When filing a tax return, businesses must specify cash or accrual as their accounting method. However, for management purposes business owners may view one or both types of reports when making internal decisions. The ability to view reports in either accrual or cash basis is one of the features that sets the QuickBooks software apart from other accounting solutions.
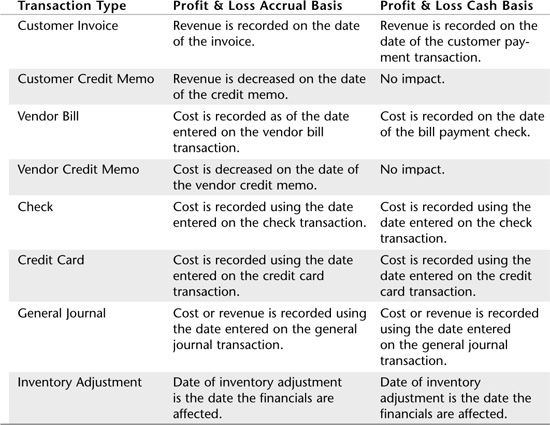
The difference between the two methods is in the timing of when income and expenses are recognized in your financials. Table 1.2 shows how QuickBooks treats the different types of transactions in both reporting methods on the Profit & Loss statement.
If you have just recently started a new business and QuickBooks is the first financial tracking software you have used, rest easy. QuickBooks makes it possible for you to do the daily tasks of paying vendors or employees and invoicing customers without any complicated startup procedures. Later you can view reports in either Cash or Accrual basis.
However, if you are converting to QuickBooks from some other software application other than those currently supported with the QuickBooks conversion tool (see the section titled “Converting from Other Accounting Software to QuickBooks”), you will be manually entering open customer, vendor, and bank balances as well as additional balance sheet balances.
Earlier, this chapter provided details on selecting a Start Date, the date that you first want QuickBooks to track your financial accounting. If the business had expenses or sold products and services prior to this start date, you most likely have open transactions.
The following is a brief list of what you need to collect when creating a new QuickBooks data file. These lists should represent their respective value as of the day before your QuickBooks start date.
• Accounts Receivable—List by Customer of what they owed you on the day before your start date, including any invoices where the payment was received but not deposited by the start date
• Accounts Payable—List by Vendor of those bills that you had not paid as of your start date
• Bank Ending Balance—Ending balance from your bank statement on the day before your start date
• Uncleared Checks and Deposits—List of all checks and deposits that have not yet cleared your bank account
• Other Balances—List of all other assets, liabilities, and equity you have in the business
• Payroll—Year-to-date totals for each employee (if using payroll in QuickBooks)
To get your QuickBooks data ready for entering current transactions you need to record these open balances. But before doing so, you need to have a few things already set up in QuickBooks. You might refer to the following items as “Master Lists.”
Before you begin entering these startup balances, make sure you have the following created in your QuickBooks data file:
• Chart of Accounts—This list is usually created automatically for you in the EasyStep Interview process discussed earlier in this chapter.
• Items List—These are the services or products that you sell and the sales tax that you collect on these sales. See the section titled “Using Item Types in QuickBooks,” (p.68) in Chapter 3 for a detailed discussion of setting up items. Be sure to take special consideration with Inventory items. This information is detailed in Chapter 10, “Reviewing and Correcting Inventory Errors.”
• Customer and Job Names—To assign to open (unpaid) invoices.
• Vendor Names—To assign to open (unpaid) vendor bills.
• Employee Names—To assign to current year payroll transactions.
• Payroll Items—To assign for year-to-date payroll totals.
The following options are available when you’re creating startup or opening transactions for a business that is beginning to use QuickBooks after using some other software or accounting method.
After you have completed the EasyStep Interview, you need to take some additional steps that are important to the successful setup of your new QuickBooks file.
To create a customer or job from the Customer Center, select New Customer & Jobs. You can enter an opening balance in the New Customer or New Job dialog (see Figure 1.12).
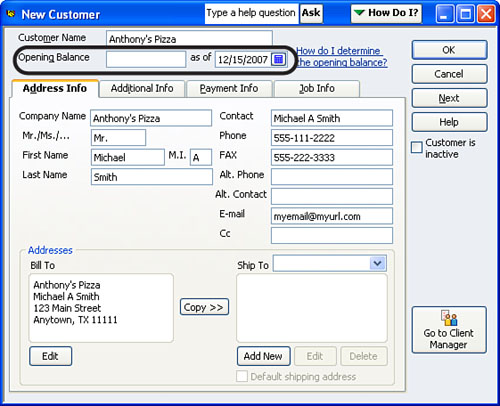
Entering an amount in the Opening Balance field causes QuickBooks to do the following:
• One invoice total—A lump sum open invoice total is created for each customer.
• Accrual Basis Reporting—For this type of reporting, the Opening Balance field increases Accounts Receivable (debit) and increases Uncategorized Income (credit) assigned the date in the “as of” field on the New Customer or New Job dialog.
• Cash Basis Reporting—For this type of reporting, the field has no effect until the date of customer payment. When the customer payment is received it increases (debits) the account you assign to customer payments (either the QuickBooks Undeposited Funds or the bank account) and increases Uncategorized Income (credits).
So you might well imagine that creating open customer invoices in the New Company or New Job dialogs is generally not recommended. Instead, follow these steps to create open customer invoices as of your start date:
1. Click Customers, Create Invoices (see Figure 1.13).

You can also use the shortcut key Ctrl+I or simply access the invoice form from the opening screen in QuickBooks known as the Home page.
3. Use the date navigator to enter the original invoice date (it should be before your start date).
4. Enter the originally assigned invoice number.
5. In the Item column, enter the item(s)—the products or services that were sold—if you want to accurately track your revenue from this item. It should be the same item(s) that appeared on the original invoice to the customer.
6. If applicable, enter a value in the Quantity column.
7. If the rate did not default (because it was not included when the list item was created), enter a value in the Rate column.
8. The correct tax status on the line should default if the list item was set to the proper tax status. If some customers pay tax and others do not, you must first indicate the taxable status of an item by clicking Lists, Item List. Highlight the item in question and select the Item button and choose Edit Item. The Edit Item dialog opens, and you can mark the item with the appropriate tax code.
QuickBooks first determines whether an item is taxable, and then it checks whether the customer is a tax-paying customer before assessing tax on a customer balance.
9. Make sure the To Be Printed and To Be E-mailed check boxes in the lower left are not selected. Remember to select the appropriate box here when you create your first new invoice in QuickBooks. QuickBooks will remember the setting from the last saved or edited invoice.
10. Check your Total balance due to make sure it agrees with the list item total you are working from.
11. Click Save & Close if you are done or Save & New if you have more invoice transactions to record.
Partially Paid Open Customer Invoices on Cash Basis Reporting
To properly prepare reports on cash basis and to properly report on sales by item, you should perform additional steps for those open invoices that had partial balances paid as of your startup date. These steps are required if you want to accurately track sales by item.
1. Click Lists, Chart of Accounts and select the Account button, choosing the New option. The Add New Account dialog opens. Place a mark in the radial button next to Bank to select that account type.
2. Click Continue. The dialog opens where you can name the new bank account Prior Year Payments Account. This temporary deposit account will later be closed to Opening Balance Equity, which will later be closed to Retained Earnings.
3. Click Lists, Item List and click the Item button, choosing the New option. The New Item dialog opens. Assign the type as Payment, and name it Prior Year Payments. Assign the Prior Year Payments account created in step 1 as the account to Deposit To (see Figure 1.14).

4. To create the open invoice click Customers, Create Invoices. Select the Customer:Job from the drop-down menu. Enter the original invoice date (it should be before your QuickBooks start date) and enter the invoice number that was originally presented to the customer for payment.
5. On line 1 (or more if needed) of the customer invoice enter your normal service or product item you sold to the customer. On the next available line use the new Prior Year Payments item you created, and enter the total of the customer’s prior payments as a negative amount (see Figure 1.15). Click Save & Close if you are done or Save & New to create additional open customer invoices.
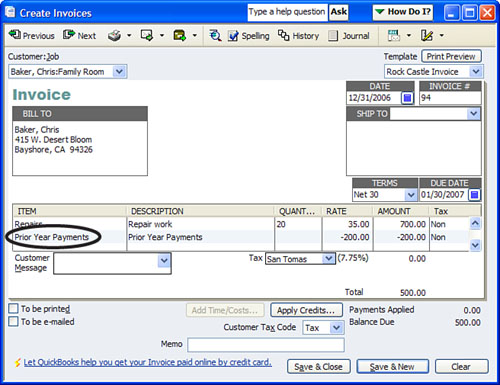
6. Verify that the Balance Due amount on the invoice form accurately matches the open invoice total from your prior accounting list or report.
7. Compare your QuickBooks A/R Aging Summary report to your open invoices startup list total. If the balances agree, go to step 8. If they do not agree, review either the Summary or Detail A/R Aging report and identify which customer(s) balances are incorrect.
8. When your totals agree, click Banking, Use Register and select the Prior Year Payments account. On the next available register line, enter the day before your startup date, for the number use the term Closing and in the Payment column enter the same dollar amount as the total that is shown in the account balance column of this register. In the Account field select the QuickBooks-created equity account named Opening Bal Equity.
9. Click Record to save the transaction.
Your Prior Year Payments register should now have a zero balance. (Refer to Chapter 13, “Reviewing and Correcting the Opening Balance Equity Account.”)
Accounts Payable startup refers to those vendor bills that were not paid as of your start date. Presumably these are the vendor bills that we would be paying out in our first month of using QuickBooks.
Correctly setting up the starting Accounts Payable is just as important to your financials as the setup in Accounts Receivable.
1. Click Vendor, Enter Bills to open a new blank bill form (see Figure 1.16).
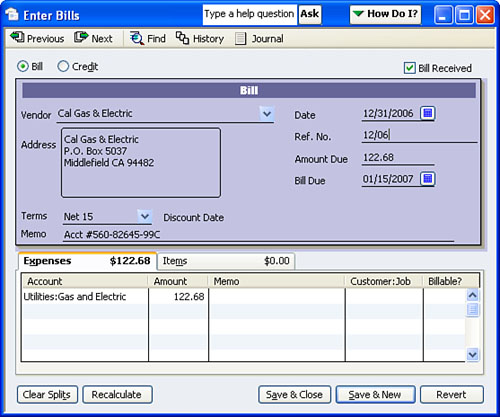
2. Enter the bill date. This date should be on or before your QuickBooks start date, and it is often the date on the vendor’s bill you received.
3. Enter the vendor’s bill number in the Ref. No field. This serves two important purposes: one is to optionally print the reference number on the bill payment stub that is sent to the vendor, and the other is that QuickBooks will warn you if a duplicate bill is later entered with the same Ref. No.
4. Enter a number in the Amount Due field, if you previously partially paid the bill; the amount should equal the balance remaining to be paid. (See the sidebar “Partially Paid Open Vendor Bills on Cash Basis Reporting.”)
5. QuickBooks defaults the Bill Due date to the terms specified on the Additional Info tab in the Edit Vendor dialog; however, you can also override the Bill Due date on this screen, if necessary.
6. Click the Expenses tab and assign the appropriate expense account. If you are tracking costs by items, use the appropriate item on the Item tab. In accrual basis the account or item selected is not as important because the expense was recorded on the vendor’s bill date in your previous software or accounting method. For cash basis, it is most important because the cost is recorded to the expense account or item not when the bill is dated, but on the date of the bill payment check transaction, which should occur after the start date.
Partially Paid Open Vendor Bills on Cash Basis Reporting
To properly prepare reports on cash basis you should perform additional steps for those open vendor bills that have partial payments as of your startup date. These steps are required if you want to accurately track your costs by item.
You will use the Prior Year Payments bank account that you created in the previous set of steps. This temporary payment account will later be closed to Opening Balance Equity, which will later be closed to Retained Earnings. (Refer to Chapter 13 on closing Opening Balance Equity to Retained Earnings.)
1. Click Lists, Item List. The Item List dialog opens. Click on the Item button and choose New. Select the Other Charge item type. In the Item Name/Number, type Prior Year Vendor Payments (see Figure 1.17). Assign it to the Prior Year Payments bank account by selecting it from the Account drop-down menu. (This account was created in the previous set of steps: see the sidebar “Partially Paid Open Customer Invoices on Cash Basis Reporting.”) Click OK to save.
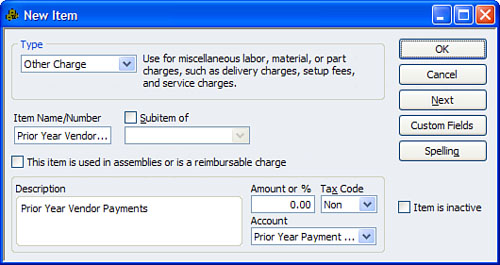
2. Follow steps 1 through 6 in the preceding section titled “Cash or Accrual Basis Startup Transactions: Accounts Payable” with the exception that you want to record the full amount of the original bill. You can use the Expenses tab and assign the appropriate expense account, or if you are tracking costs by item use the Items tab and assign the correct item.
3. On the Items tab, add the Other Charge type item called Prior Year Vendor Payments. Enter a negative amount equal to the total of all previous bill payments (see Figure 1.18).
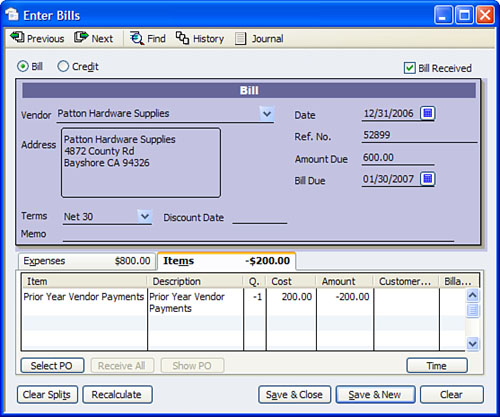
4. Verify that the Amount Due amount on the invoice form accurately matches the open invoice total from your previous software (or accounting method) report.
5. Compare your QuickBooks A/P Aging Summary report to the open vendor bill startup list total from your previous software. If the balances agree with each other, go to the next step. If they do not agree, review either the Summary or Detail A/P Aging report and identify which vendor(s) balances are incorrect and make the needed changes.
6. When the totals of your prior accounting Payables agree with the new QuickBooks A/P summary report, click Banking, Use Register and select the Prior Year Payments fictitious bank account.
7. On the next available register line, enter the day before your startup date and the word Closing for the number. In the Deposit column enter the total amount you see in the balance column of this register. In the Account field, select the QuickBooks-created equity account named Opening Bal Equity.
Click Record to save your transaction. When completed, your fictitious Prior Year Payments account will have a zero balance. (Refer to Chapter 13 on closing Opening Bal Equity to Retained Earnings.)
See Table 1.2, p. 21 for details on how a Profit & Loss statement is affected in both accrual and cash basis for each QuickBooks transaction.
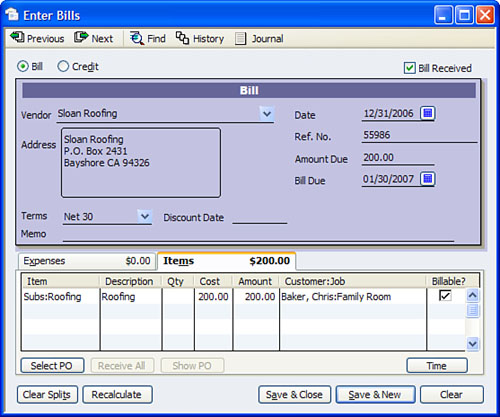
If your vendor bill, vendor credit, or check is for a Customer:Job for which you created an estimate and that you want to track using the Job Profitability reports, you need to enter your cost detail on the Items tab. You can access the Items tab on any New or Edit vendor bill, vendor credit, or check form by selecting the Items tab, as shown in Figure 1.19.
In addition to setting up the Accounts Payable and Receivable startup transactions, you also must record the balance the bank had on record as of the start date. Having accurate information is necessary when you are ready to reconcile the bank account in QuickBooks to the bank’s records.
If you completed the new bank information in the EasyStep Interview, you may have already entered your statement ending balance.
Click Banking, Use Register and select your bank account to open the register. If you have a balance in the register, check to see that it agrees with your bank balance as of the start date in QuickBooks. If the amount has a memo of Opening Balance, you can be sure it was probably created during the EasyStep Interview process.
If the amount is correct and agrees with your bank’s statement ending balance you are fine. If not, simply double-click the transaction and edit the amount. Otherwise, use the steps listed in this section for entering your opening bank balance.
To create your beginning bank balance:
1. Click Banking, Make Deposits to record your bank statement balance (if a positive balance).
2. In the Deposit To field, enter your bank account from your chart of accounts list. The Date should be the same as your bank statement ending date, usually the day before your QuickBooks start date.
3. Assign Opening Bal Equity to the From Account column (see Figure 1.20). The balance really belongs in Retained Earnings, but posting it here first gives you a chance to make sure the opening entries for your cash account are correct. (See Chapter 13 for a complete discussion on closing the Opening Balance Equity account to Retained Earnings.)
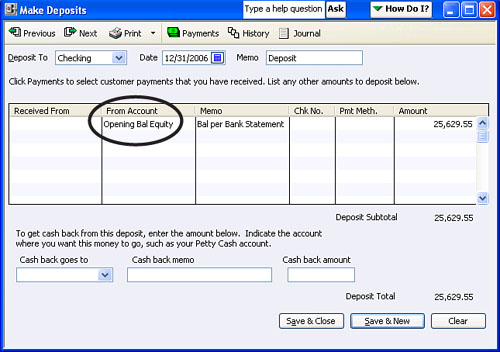
4. Enter an optional Memo.
5. Enter the Amount. The amount recorded here is the ending balance from the bank statement just prior to your QuickBooks start date. This amount should not include any uncleared checks or deposits that have not cleared the bank funds yet.
6. Click Save & Close to record the transaction.
If you have additional deposits that did not clear your bank funds (not often), the way you enter them depends on the basis of accounting used:
• Accrual basis users create the deposit(s) using the previous steps and date the transactions before the start date.
• Cash basis users click Customers, Receive Payment and apply the deposit to an open invoice, which you created earlier in this chapter. Date this transaction on or after your start date.
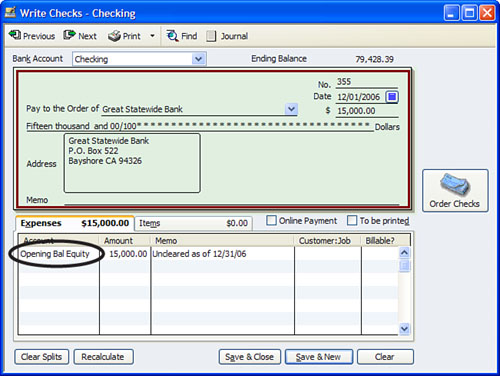
You are almost done with the startup entries. The last thing to do is to record the checking account’s uncleared checks and debits as shown in Figure 1.21. If your bank account had a negative balance as of your start day, you may also use a check form to record that amount.
1. Click Banking, Write Checks.
2. Enter the actual check number that was issued in the No. field.
3. Enter the date of the original check in the Date field, which should be before the start date.
4. Select the payee from the Payee drop-down menu.
5. Enter the amount of the check.
6. Enter the Opening Bal Equity account on the Expenses tab (see Figure 1.21). (This account is used because in both accrual and cash basis reporting, the check expense amount was included in our prior software or accounting method Profit & Loss totals.)
To verify the accuracy of the information click Reports, Company & Financial, Balance Sheet Standard and set the date to be one day before your start date. Your bank account balance(s) should be equal to Bank Statement Ending Balance plus Uncleared Deposits less Uncleared Checks.

After reading this chapter you should have made the following decisions and collected the necessary information to create your new QuickBooks data file.
Make these decisions first:
• Will you be creating the QuickBooks data file with the EasyStep Interview? Will you be skipping the EasyStep Interview? (Page 6)
• Are you converting existing data from Quicken? (Page 16)
• Are you converting from Peachtree, Small Business Accounting, or Office Accounting, and are you converting lists only or lists plus transactions? (Page 18)
• Are you converting from QuickBooks Pro for Mac to QuickBooks for Windows? (Page 20)
• Are you converting a QuickBooks for Windows edition to QuickBooks Online Edition? (Page 20)
• What Start Date have you selected to begin using your new QuickBooks data file? (Page 11)
• Will you be reviewing your data only in Accrual Basis or Cash Basis or both? (Page 21)
Documentation to collect:
• Before starting or skipping the EasyStep Interview. (Page 6)
• Specific financial information from your previous software. (Page 21)
Entering specific startup transactions:
• Accounts Receivable. (Page 23)
• Cash. (Page 21)
• Other types of Other Current Asset Accounts. (Page 219)
• Inventory. (see Chapter 10, “Reviewing and Correcting Inventory Errors”)
• Accounts Payable. (Page 28)
• Sales Tax Payable. (see Chapter 12, “Reviewing and Correcting Sales Tax Errors”)
• Open Balance Equity. (see Chapter 13, “Reviewing and Correcting the Opening Balance Equity Account”)