
• The Purpose of the Undeposited Funds Account
• Preference Settings that Affect Undeposited Funds
• Reviewing the Balance in the Undeposited Funds Account
• Fixing Errors with the Undeposited Funds Account
• Undeposited Funds Account Checklist
The Undeposited Funds account is part of the suggested workflow for Accounts Receivable. Recall from the discussion in Chapter 7, “Reviewing and Correcting Accounts Receivable Errors,” that there are typically four common steps to processing Accounts Receivable transactions:
1. Create an invoice, sales receipt, or statement charge.
2. Receive customer payments.
3. Optionally, place payments into the Undeposited Funds account (preference setting will automate this).
4. Complete the Make Deposits form, grouping the multiple customer payments onto a single Make Deposits form in QuickBooks.
This Undeposited Funds account is needed to hold payments received but not yet deposited. When you receive payment checks from your customers you put them in your safe and then later take them to the bank; your Undeposited Funds account serves a similar purpose to your safe.
Undeposited Funds also plays an important role in making the bank reconciliation process easier and potentially more accurate. For example, if you normally list multiple customer payments on one deposit ticket taken to the bank, you will want to match this total information in QuickBooks. By setting the preference to have QuickBooks automatically forward all your customer payments into a temporary Undeposited Funds account, you can then conveniently “group” these individual payments in QuickBooks using the Make Deposit form so that your bank register deposit total will match the records on your bank statement.
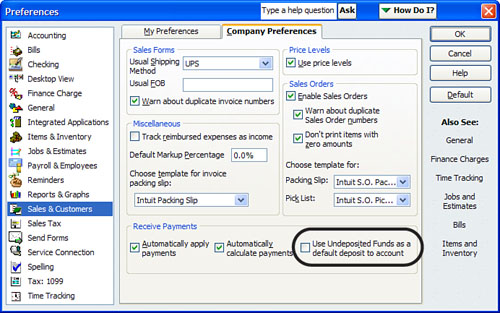
For several years QuickBooks users have been given the choice as to whether to use the Undeposited Funds account for all accounts receivable payment transactions. In version 2008 when you create a new data file, the preference to automatically use the Undeposited Funds account for customer payments is set. To view the preference for your own data, select Edit, Preferences, and click Sales & Customers. Click the Company Preferences tab, as shown in Figure 8.1. You must be logged in to the file as Admin to view the Company Preferences tab.
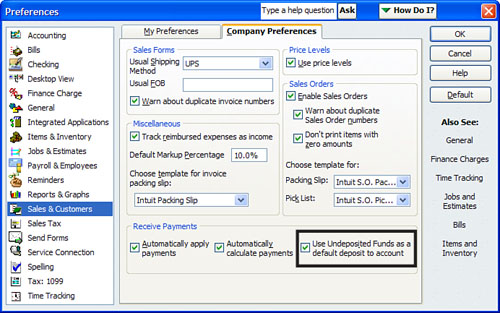
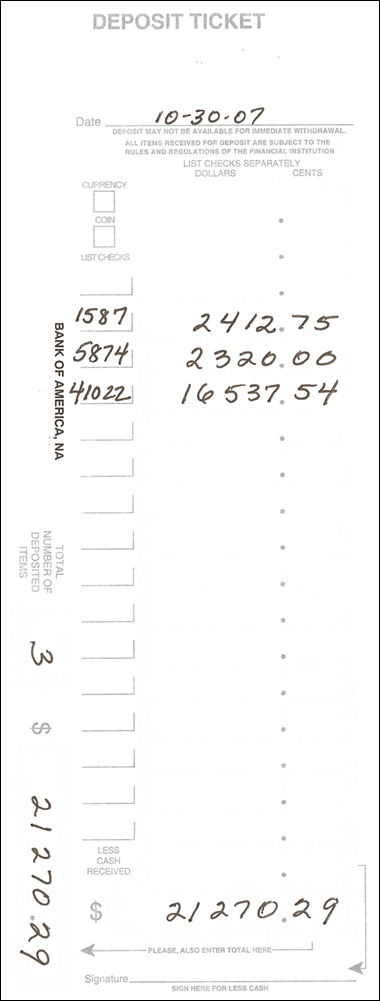
If you do not have the preference shown in Figure 8.1 selected, you will want to use the Undeposited Funds account on a customer’s receive payment transaction when you have the following type of deposit: In Figure 8.2 you are shown a deposit slip taken to the bank. Notice that there are three separate checks on the deposit ticket totaling $21,270.29. When you receive your monthly bank statement your bank will list one deposited line item for the total of the deposit slip and not the three individual deposited checks.
Figure 8.2 Your bank will show on the bank statement one line total for this multiple-check deposit ticket.
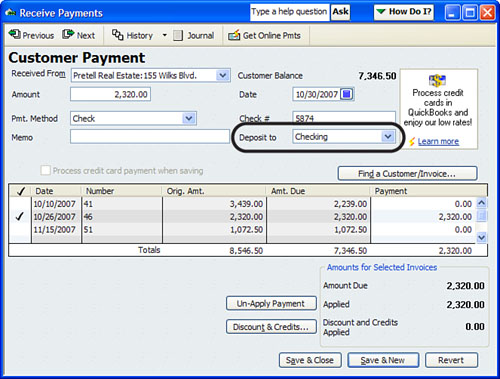
If you did not have the Undeposited Funds preference set, as shown previously in Figure 8.1, you might have selected to deposit the checks received directly to the Checking account, as shown in Figure 8.3.
When performing the bank reconciliation, the Deposits and Other Credits pane on the Reconcile–Checking pane would show three individual line deposits as in Figure 8.4. How likely is it that you will not clear the right number of deposited items? Multiply this effect by several deposits in a month and you can see the bank reconciliation process would certainly be more difficult.
Figure 8.4 Reconciling is more difficult for deposits that were individually deposited to the Checking account.
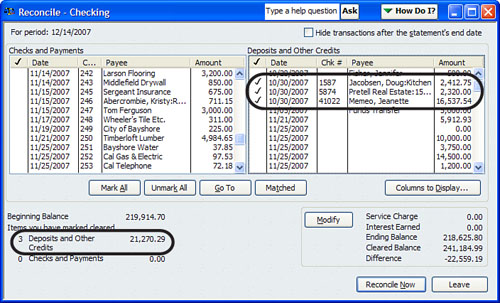
However, if the Reconcile–Checking pane showed only the total deposit amount it would be easier to identify it as the cleared bank account deposit.
By choosing to use the Undeposited Funds as the Default Deposit To Account preference, your bank reconciliation process will be less time consuming and your bank register will reflect the correct total deposit.
Before you can begin to agree or disagree with your Undeposited Funds account balance, it is best if you review your QuickBooks data, concentrating on certain reports that will help you simplify the review process.
This section provides instructions on creating specific reports that you can use for this task. The section “Fixing Errors with Undeposited Funds Account,” later in this chapter, gives specific easy-to-follow steps if you need to correct your Undeposited Funds account balance after completing your review.

Another task that should be completed before you troubleshoot your undeposited funds detail is to reconcile your bank account. It will help with the review process if you can identify what transactions have cleared your bank and which transactions have been recorded in QuickBooks but did not clear your bank in a timely manner.
More information about the bank reconciliation task can be found in Chapter 6, “Bank Account Balance or Reconciliation Errors.”
The first report I create for a client is a custom report I title Undeposited Funds Detail. This is not a ready-made report in QuickBooks but it is easy to create, as you will see.
This report is fundamental because you cannot troubleshoot a total balance for the undeposited funds you see on a balance sheet report not knowing the detail behind the numbers. If you print the register for the account you will see too much detail, making it hard to identify exactly what is not deposited.
How do transactions get to this account? When you select the Undeposited Funds account as the deposit-to account (or you set the preference to have QuickBooks automatically do this), QuickBooks will increase the balance in the Undeposited Funds account. Then, when you complete a Make Deposit form QuickBooks reduces the Undeposited Funds account balance and behind the scenes marks both the original increase and the new decrease as cleared (as indicated by a check mark in the account register). Table 8.1 shows the relationship of these forms to your accounting.

So before we dig too deep, let’s just see if you agree with the detail of the Undeposited Funds balance in your QuickBooks data. You also might want to memorize this report for the convenience of reviewing the detail often, avoiding any data entry errors this chapter might help you uncover (see Chapter 16, “Reporting Tips and Tricks”).
To create this report, which I call Undeposited Funds Detail, follow these easy steps:
1. Select Reports, Custom Transaction Detail. The Modify Report dialog automatically opens.
2. Display the date range as All. (Tip: Simply type an “a” without the quote marks to make the date range default to All.)
3. For Total by select Payment Type from the bottom of the list.
4. For Columns, select those that you want to view on the report.
5. Click the Filters tab. On the filter pane select Accounts, and choose the Undeposited Funds Account from the drop-down menu.
6. Also from the Filters tab select Cleared and click the No button.
7. Click the Header/Footer tab. Change the report title to Undeposited Funds Detail.
The modified custom report you named Undeposited Funds Detail will always show the present state of the transaction, which means that when a payment is received and is included on a Make Deposits form, the report for a prior date will no longer show that item as undeposited. Behind the scenes, QuickBooks is marking the transaction as “cleared” as of the transaction date; therefore, you cannot get a historical snapshot.
You can review a General Ledger report of the Undeposited Funds account balance that will agree with the ending balance on your Balance Sheet report, but without quite a bit of manual work, you really cannot identify each individual transaction that makes up the Undeposited Funds account for a specific prior period. This is because each time you deposit a Receive Payments form, QuickBooks marks the original dated line item as cleared. This is why we first create a custom report to see if the current (today’s date) detail is correct.
If you normally review your balances monthly, you will want to print out the Undeposited Funds Detail report you created earlier in this chapter on the last day of your accounting month. Save this report in your paper file for future reference because you cannot go back to a historical date and get the same information. This was discussed in the previous section titled “Creating an Undeposited Funds Detail Report.”
Additionally, if you take credit cards as payments from your customers, I recommend that you not complete the “Make Deposits” task until you view a bank statement showing the funds deposited into your bank account. This usually does not mean waiting a month, because most financial institutions now offer online account access to your account statements.
For those clients, particularly retail businesses, where there is often a large volume of customer receipts in any day, I simply recommend reviewing the modified report as part of the month, quarter, or year-end process. You are looking to see whether any old dated transactions are on the list. If you find none, you can assume that the Balance Sheet balance in Undeposited Funds as of the prior period date is probably correct.
To generate a General Ledger report, follow these steps:
1. Select Reports, Accountant & Taxes, and select the General Ledger report.
2. Select Modify from the report screen.
3. On the Modify dialog that opens, enter an appropriate Report Date Range.
4. From the Columns pane select those you want to see. (You might want to include Cleared.)
5. Click the Filters tab, choose to filter for Account, and select the Undeposited Funds account from the drop-down menu.
You can use this General Ledger report to see details for the Undeposited Funds account and to verify the running balance in this report agrees with your Balance Sheet report. However, you still cannot use this report to identify exactly which receive payments transaction was not deposited as of the report date because QuickBooks does not capture the information with an “as of” date.
After reviewing the custom-made Undeposited Funds Detail report, if you found some items on the report that have already been taken to your bank, you might need all or some of the following reports to identify why QuickBooks would show the amount as undeposited.
One of the important places to begin troubleshooting the balance in the Undeposited Funds account is to first review the Open Invoices report (click Reports, Customers & Receivables, and choose the Open Invoices report). See Figure 8.6.
Don’t just void or delete the incorrect transactions that should not be on the Undeposited Funds Detail report you created. First, review the Open Invoices report to identify what the appropriate correction should be. Corrections to transactions that affect the Undeposited Funds account is detailed in the section “Fixing Errors with Undeposited Funds Account.”
You are looking for any or all of the following on your Open Invoices report:
• Negative balance items—These balances represent customer payments or credits recorded but not applied to a customer invoice. You might see payment, credit memo, checks, and even journal entry type transactions. Review Chapter 7 for more detailed instructions on how to correct each different transaction type.
In Figure 8.5, customer Jennifer Fisher has a payment type transaction of –$500.00, which is “unapplied” to any open invoice.
Figure 8.5 Review the Open Invoices report before making corrections to the Undeposited Funds account.
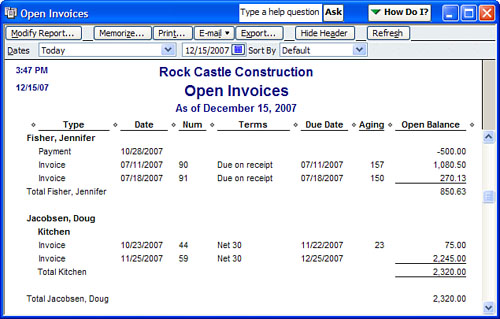
Ask yourself the following as you look at this transaction:
• Is this same $500.00 showing up on my Undeposited Funds Detail report?
• Is the invoice being paid by this check not showing on the Open Invoices report?
If you answered yes to these questions, you might have entered a duplicate customer payment. Follow the instructions given in the next section to remove this payment from your Undeposited Funds account balance.
If you answered no, you simply might need to associate the payment to the correct open invoice by clicking the payment transaction from the Open Invoices report. When the Receive Payments form opens, place a check mark next to the invoice being paid with the payment.
• Open invoices that you know your customer has paid—These open balances might be the result of making the customer funds bank deposit on some other form instead of the receive payments form.
If you see open invoices that you know your customer has paid, and if your bank account balance has the correct deposits, you must determine how you recorded the deposits in QuickBooks. To help with this task, you will want to review the checkbook register and/or the Deposit Detail report as discussed in the following two sections of this chapter.
An easy way to determine how deposits were made to the bank account is to view the deposits directly in your bank register. To open a bank register choose Banking, Use Register and select the appropriate bank account.
The deposits that were recorded directly to the bank account from the Receive Payments window will have Accounts Receivable visible in the Account field, as shown in Figure 8.6. The three deposits dated 10/31/07 were each individually recorded directly to the Checking account.
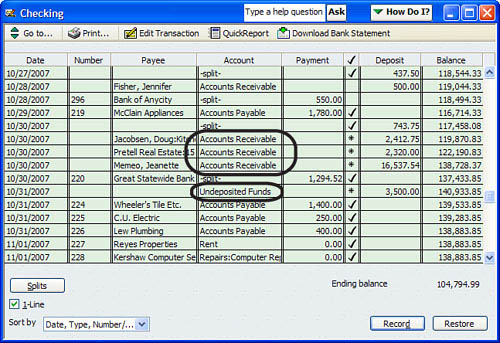
In the checkbook register view, the account shown represents the account from which the transaction originated. You may see your income account as the “account” or you will see “-split-,” which indicates that there are several lines of detail for this single transaction. To view the “-split-” detail just double-click on the transaction itself to open the originating QuickBooks form.
By contrast, look at the deposit dated 10/31/07 for $3,500.00. The account shown is Undeposited Funds, which is the account where the information originated.
So to summarize, you are looking for a “pattern” of how deposits were made to your QuickBooks data. The examples here show two types of deposits, ones that were recorded directly to the checking account and others that first went through the Undeposited Funds account. You might have others in your data where the account shown is your income account. This type of transaction is discussed in the next section, “Viewing the Deposit Detail Report.”
You are also looking to see which transactions have been cleared in the bank reconciliation and which deposits remain uncleared. Chapter 6 covers the bank reconciliation topic, and in fact, it would be best if the reconciliation task were completed before you begin fixing your deposit details. Why? If you see an uncleared deposit, it would help you identify your potential errors in the Undeposited Funds account.
This report will easily identify customer receive payment transactions that were directly deposited to the bank account without first going through the Undeposited Funds account.
1. Click Reports, Banking, and choose the Deposit Detail report.
2. Click the Modify Report button at the top of the report.
3. Click the Filters tab. In the Choose Filter pane the Account filter is already selected. From the drop-down menu select your bank account or use the default all bank accounts.
4. On the same Filters pane, select Transaction Type and choose Payment from the drop-down menu. As shown in Figure 8.7, the other filters are already defaulted with this report for you.
Figure 8.7 Modify the Deposit Detail report to show Receive Payment forms that were recorded directly to the bank account register.

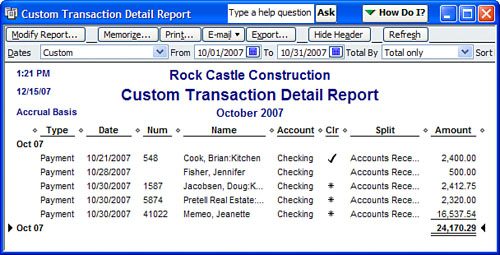
Creating a Payment Transaction List Detail Report
Do you find the Deposit Detail report too lengthy and hard to read? You can create a report that shows the detail in a list form and provides a total of the column detail.
Select Reports, Custom Transaction Detail Report. The report automatically opens with the Modify Report tab selected. Select the Report Date Range you want to view, as well as the columns you want to see on the report. From the Filters tab select the account and filter for your specific bank account. Set an additional filter for a transaction type of payment.
Now you can easily view in a list format all payments that were recorded directly to the Checking account (see Figure 8.8).
Did you make it through the review of each of the referenced reports in the earlier section of this chapter? You don’t want to jump into fixing transactions affecting accounts receivable without due diligence in researching what the correct balance should be. Without the review and troubleshooting time, you might hastily delete, void, or modify a transaction only to compound the problem.
This section details specific steps to correcting the errors you might have found. It was important to first discover why the error was made and then fix it so you can avoid the same error on future transactions.
Did your review of the data uncover old dated payment transactions still in the Undeposited Funds account? If so, you can use the method described in this section to correctly remove them without editing or modifying each transaction.
This method makes the following assumptions:
• Your bank account is reconciled before making these changes.
• You have reviewed and corrected your Accounts Receivable Aging reports as discussed in Chapter 7.
• You have identified which payment amounts are still showing in the Undeposited Funds account, and these are the same amounts that have already been deposited to your bank register by some other method.
• You have identified the specific chart of accounts (income accounts, presumably) to which the deposits were incorrectly recorded.
This method will allow you to remove the unwanted balance in your Undeposited Funds account with just a few keystrokes:
1. If the funds that remain in your Undeposited Funds account are from more than one year ago, you first must identify the total amount that was incorrectly deposited for each year. See the sidebar titled “Creating a Payment Transaction List Detail Report” in the previous section. Filter the report for the specific date range.
2. Now “remove” these identified Undeposited Funds items by clicking Banking, Make Deposits. The Payments to Deposit window appears. Do not sort the transactions; instead, leave the View Payment Method Type as All Types. QuickBooks will then list all payment types sorted by date within each payment type (see Figure 8.9).
Figure 8.9 To easily select the correct payments to deposit, leave the View Payment Method Type as All Types.
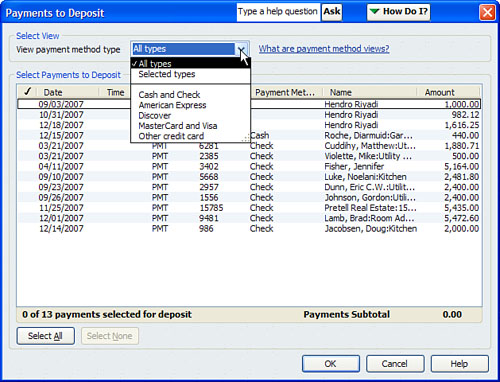
3. Select all the payments for deposit with dates in the date range you are correcting by clicking to place a check mark next to the payment item, as shown in Figure 8.10, and then click OK.
Figure 8.10 Select for deposit the payments that need to be removed from the Undeposited Funds account.

4. The Make Deposits dialog opens with each of the previously selected payments included on a new Make Deposits form. On the next available line enter the account to which the incorrect deposits were originally recorded. In this example, you discovered that the Construction Income account was overstated by the incorrect deposits. The effect of this new transaction is to decrease (debit) Construction Income account and decrease (credit) the Undeposited Funds account without any effect on the checking account, as shown in Figure 8.11.
Figure 8.11 Enter a line with a negative amount recorded to the account that was previously overstated.

The date you give the Make Deposits form is the date the impact will be recorded in your financials. You have several important considerations to take into account when selecting the appropriate date:
• Are the corrections for a prior year?
• Has the tax return been prepared using current financial information from QuickBooks?
• Has another adjustment to the books been done to correct the issue?
If you answered yes to any of these, you should contact your accountant and ask his or her advice on the date this transaction should have.
5. Make sure to reconcile this net -0- deposit in your next bank reconciliation.
You should now be able to review the Undeposited Funds Detail report and agree that the items listed on this report as of today’s date are those that you have not yet physically taken to your bank to be deposited or that the credit card vendors have not yet credited to your bank.
You might run into a situation where deposits in your bank register do not match the statements from the bank. There can be several reasons why the statement your bank gives you shows deposit totals that do not match those in your QuickBooks bank register.
Although technically this is not an error, it can be problematic when you perform the bank reconciliation. Refer to the section earlier in this chapter titled “Preference Settings that Affect Undeposited Funds.”
A quick reminder that it might be better to first reconcile your bank account and then make corrections to your Undeposited Funds account detail. Also, the process of fixing those payments that were not grouped in the past can be time consuming, so be sure that doing so makes sense. If your bank account has been reconciled I would not recommend making this type of correction.
Follow these steps to group customer payments that were previously recorded and deposited directly to the checkbook register:
1. Click Edit, Preferences, and then select Sales & Customers. Click the Company Preferences tab. Verify that there is no check mark in the Use Undeposited Funds as a Default Deposit To Account (see Figure 8.12). Removing this check mark in the Sales & Customers, My Company preference dialog enables the Receive Payments window to show a drop-down Deposit To account selection that otherwise is not available.
Figure 8.12 For this type of correction, make sure to remove the check mark from the Use Undeposited Funds as a Default Deposit To Account box.
2. Access the checkbook register by clicking Banking, Use Register and select your specific bank account.
3. Select the specific customer payment to be modified by double-clicking the transaction in the open register.
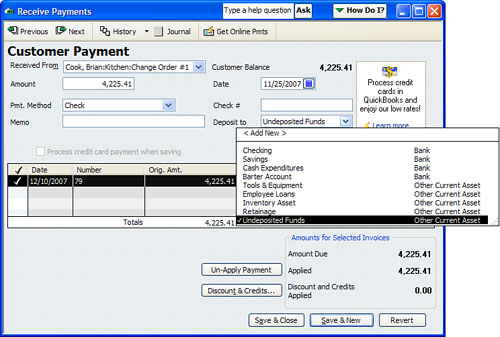
4. The Receive Payments dialog opens. Select Undeposited Funds from the Deposit To drop-down list (see Figure 8.13).
Figure 8.13 To group a payment with other payments from the same deposit ticket, select the Undeposited Funds account as the Deposit To account.
5. To group the payments together, select Banking, Make Deposits. In the Payments to Deposit dialog box, select the payments that belong together. Figure 8.14 shows that the two customer payments recorded with an 11/25/07 date belonged together on the same bank deposit ticket.
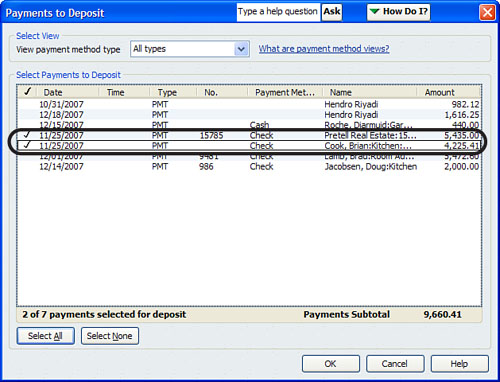
6. Click OK when the total of the Make Deposits agrees with your bank statement deposit. If the total does not agree with your bank statement, review your manually created bank deposit ticket to see what line information differs from your QuickBooks deposit form detail. Be sure to cancel out of the dialog to correct transactions if needed.
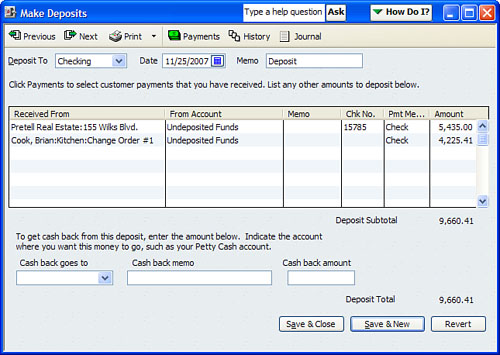
The Make Deposit form (see Figure 8.15) will now record to your bank account one deposit instead of two individual line deposits. This makes your bank reconciliation process easier to complete by showing in the Deposits & Credits pane of the Reconcile dialog window one transaction for the total instead of multiple individual transactions as displayed in Figure 8.4.
If you collect credit card payments from your customers, having a defined receive payment and make deposit process that you can consistently follow is important. Because you don’t physically hold the payment from your customer as you do with cash or check payments, tracking these credit card payments accurately and reconciling with the bank’s monthly statement helps you avoid some common mistakes.
Does your merchant vendor charge a discount fee by reducing the total amount that is deposited to your bank account? If so, during your review of the data you might have found that the credit card deposits were made to your bank register for the gross amount and did not deduct the credit card fee.
To correct this error, you can take either of two courses of action:
• Edit each Make Deposits form and make the correction (this is the most time consuming) detailed below.
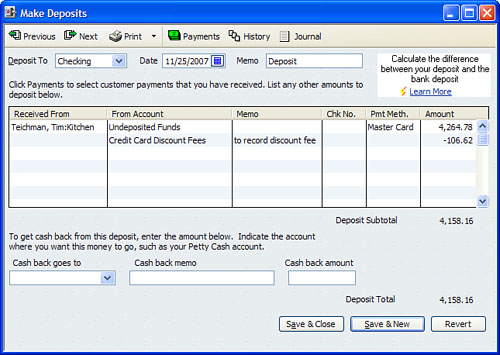
To edit a recorded Make Deposits form, open the form from the checkbook register and add an additional line to the deposit, assigning the Credit Card expense account with a negative amount equal to the credit card fee withheld (see Figure 8.16). Your net deposit should now agree with the bank’s deposit records.
• Create a journal entry with a debit to Credit Card expense and a credit to the Cash account. Click Company, Make General Journal Entries. Select a date for the entry and assign an Entry No. of your choosing. Leaving the first line blank, on the second line in the account column enter the credit card expense account and the amount of the discount fee in the debit column. You can also enter an optional memo. On the third line in the account column enter the bank account that was charged the fee and enter the discount amount in the credit column, again with an optional memo. Click Save & Close when done.

Review your data for the following:
• Have you set the Sales & Customers preference for using the Undeposited Funds account as the default Deposit To account? (Page 196)
• Have you reviewed your Open Invoices report for balances your customers owe you? (Page 202)
• Are you following the typical workflow for your Accounts Receivable transactions? (Page 196)
What to look for:
• Does your Balance Sheet show a balance in the Undeposited Funds account? (Page 199)
• When you go to Record Deposits are there old dated payment transactions that were not deposited to the bank account register in QuickBooks? (Page 207)
• Has your bank account been reconciled correctly but customer payments remain in the Undeposited Funds account? (Page 202)
• When you reconcile your bank account, are the deposits hard to match with the bank statement’s recorded deposits? (Page 210)
• Have you recorded credit card customer payments and deposited them to your bank account register without deducting the credit card discount fee? (Page 215)