

Currently, you can’t use Aperture to make adjustments to audio or video files beyond basic trimming.
Chapter 2: How Do I Import Images?

After you capture your images, the next step is downloading them onto your computer. The Import interface in Aperture 3 enables you to do far more than just copy the photos from a memory card to your computer’s hard drive. It gives you a head start on organizing and optimizing your images as well. You determine where the images should be stored, whether to simultaneously create a backup copy of them, rename them or modify a time stamp, apply keywords or other metadata, and apply any Effect Presets. You can even view each image nearly full-screen to determine whether to import it.
Importing from a Memory Card, Camera, or Hard Drive
Understanding Unified iPhoto and Aperture Libraries
Dragging and Dropping Files into Aperture
Importing from a Memory Card, Camera, or Hard Drive
We know that when you finish shooting you want to get your images into Aperture as quickly as possible so you can see the results and start editing. Aperture offers lots of ways to import files, all designed to give you as much control of the process as possible while simultaneously making it as efficient and painless as possible. Most of the time, the files you want to import will be on a memory card. You can also import images that are already stored on your computer but that are not yet in Aperture, or that are on an external hard drive that’s connected to your computer. You can even use Aperture to import video and audio clips in addition to your image files and keep them organized so they’re easily accessible. Then you can play the video and audio clips in the Browser and use them in Aperture-generated slide shows. By using Photo Stream, you can also wirelessly import images from your iPad or iPhone. (Photo Stream is covered in a separate section later in this chapter because doing so bypasses the Import panel.)
Currently, you can’t use Aperture to make adjustments to audio or video files beyond basic trimming.
If your files are on a memory card, you have the option to use a card reader attached to your computer or to directly attach your camera to the computer using the USB cable that comes with most cameras. Using card readers enables faster image downloading in many cases and means that you don’t need to rely on the camera’s battery. Some computers offer built-in card readers that are convenient and fast.
Touring the Import panel
After you attach your memory card, camera, or hard drive to the computer, you’re ready to use the Import panel. We recommend that you set up Aperture Preferences to automatically open Aperture when a camera is connected by following these steps:
1. Choose Aperture →Preferences to open the Preferences dialog.
2. Click the Import button. The import-related preferences appear, as shown in Figure 2.1.
3. In the When a camera is connected, open pop-up menu, select Aperture. Aperture’s import interface now opens automatically whenever you connect a memory card or camera.
4. Select the Camera Previews option to use the previews that are embedded in most RAW files. We recommend selecting this so that you can see and work with your images as quickly as possible. However, after Aperture loads the full RAW files, the colors and sharpness of the images may change. If you prefer to see accurate previews initially even though it may take longer for Aperture to import your images, choose Standard Previews.
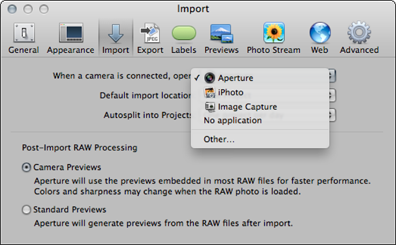
2.1 Set Aperture Preferences to automatically open the Import panel whenever a camera or memory card is connected to the computer.
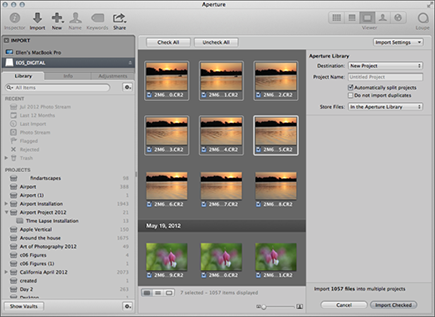
To access the Import panel manually, click the Import button at the top left of the main Aperture window, as shown in Figure 2.2.
The Import panel contains a lot of powerful options in a concise and well-laid-out interface that’s divided into several major sections. You specify where to look for the images in the upper-left section of the interface, and the Viewer displays the images found on the card or the content of the hard drive that you selected. If you don’t select a card, camera, or external drive, then the Browser appears beneath the Viewer and displays a directory to the files on your computer and any drives that are connected to the computer.
The Import Settings pop-up menu contains presets and options that determine how the files are imported, where they’re stored, how they’re named, and more. Those are covered in detail later in this chapter. To the right of the Import panel and beneath the Import Settings pop-up is the Aperture library area where you specify where to store the images when they’re imported. At the bottom right, the number of files to import is indicated followed by buttons to initiate the import or to cancel out of the Import interface.
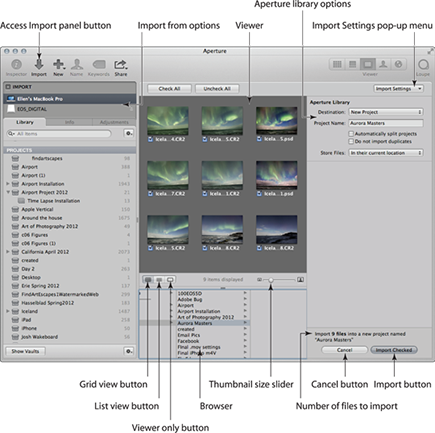
2.2 The Import interface is divided into well-organized sections.
Using the different views in the Import panel
When you first open the Import panel, it displays thumbnails of your images. This is the Grid view. You can control the size of the thumbnails by using the slider beneath the Viewer panel.
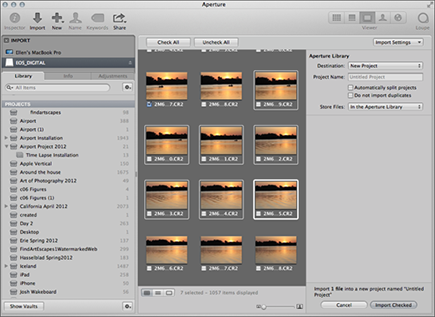
There are three icons beneath the Viewer that you use to control how the images are displayed. Choose the Grid view (refer to Figure 2.2) to see the images displayed as a series of thumbnails, choose the List view, shown in Figure 2.3, to view basic information about each file as well as a tiny thumbnail, or choose the Viewer only mode, shown in Figure 2.4, to display a single image at a time so that you can inspect it more closely.
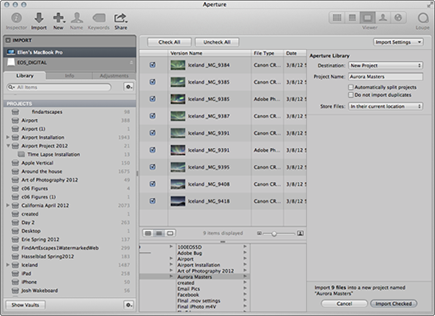
2.3 The List view displays information about each file.
If you’re in Grid view, double-clicking any image changes the Import panel to the Viewer mode. Double-clicking the image in the Viewer again returns it to the Grid view.

2.4 The Viewer only mode displays a single image at a time.
Each image has a check box that is selected by default to indicate that image should be imported. Selecting or deselecting the check box toggles the check mark on and off. You can quickly select or deselect all images by clicking the Check All or Uncheck All buttons at the top of the Import panel. While in Grid view or List view, to select or deselect a group of images, follow these steps:
1. If the images are contiguous, select the first image, press and hold the Shift key, and click the last image in the group.
2. If the images are not contiguous, select the first image, then ![]() +click each subsequent image you want to select.
+click each subsequent image you want to select.
3. With the images selected, click the check box of one of the images. All check boxes of the selected images will change accordingly, as shown in Figure 2.5.
2.5 Select a group of images and then toggle the check marks to choose the images to import.
Choosing Import Settings
In addition to selecting which images to import, you have a number of other choices to make about the import process, such as specifying a project for your images, choosing referenced versus managed files, renaming your images, changing the time stamp, applying Effect Presets, specifying what type files to import, deciding how to handle RAW+JPEG pairs, running actions immediately after import, and automatically backing up the import. These choices help you to keep your images organized and increase the efficiency of your workflow as you customize the settings for your individual needs.
Configuring a destination project for your images
You need to decide whether you want to import the images into an existing project or to create a new project for them. If you set the default import location in the Import Preferences to New Project, then by default the Destination pop-up chooses New Project even if you already have a project selected in the Library Inspector. However, if you specify Selected Item in the Import preferences, then by default the Destination pop-up in the Import panel reflects whatever project you’ve selected in the Library Inspector. If you have not yet selected a specific project or album, then the Destination pop-up automatically chooses New Project.
You can override the default setting in the Destination pop-up by selecting a specific project or album to import the images there, or by selecting New Project, as shown in Figure 2.6.
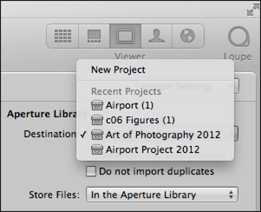
2.6 Choose whether to import your images into an existing project or to create a new project.
If you use a memory card to hold images that you take over an extended period, whether several hours, days, or weeks, the Automatically split project option is enabled in the Import interface.
Aperture can automatically split the import into several projects, one for each span of time. You can determine the timeframe by choosing Preferences →Import →Autosplit into Projects and choosing One project per day, One project per week, Two-hour gaps, or Eight-hour gaps, as shown in Figure 2.7.
As shown in Figure 2.8, the Viewer panel of the Import interface changes to show which images are in each project. The additional projects can be manually renamed in the Library Inspector after import.

If you opt to use an existing project for the import, you can create a new album within that project to further organize your images while in the Import panel by pressing ![]() +L. This opens a new dialog in which you name the new album by typing in the Album Name field. The images are imported within the selected project, but they are also visible within the new album, and that’s very handy. To import your images into a new album within a new project, you must first create the new project in the Library by choosing New →Project and naming it before using the Import interface.
+L. This opens a new dialog in which you name the new album by typing in the Album Name field. The images are imported within the selected project, but they are also visible within the new album, and that’s very handy. To import your images into a new album within a new project, you must first create the new project in the Library by choosing New →Project and naming it before using the Import interface.

2.7 Set Preferences to split the import into new projects according to the timeframe in which they were captured.
2.8 Aperture can automatically divide your images into additional projects based on when they were shot.
When you import into an existing project, select the Do not import duplicates check box to avoid importing multiple copies of the same file.
Using referenced or managed files
The next choice in the Aperture library section of the Import interface is one of the most important. You tell Aperture whether you want to use referenced or managed files. Before you choose the setting in the Store Files pop-up menu, you need to be certain that you understand the differences between referenced and managed files. Although the differences between referenced and managed files are covered in Chapter 1, the topic is important enough, and at times confusing enough, that it bears a little repetition.
When you choose to store your files in the Aperture library, you are specifying that you want Aperture to manage your files. This means that Aperture stores the managed files within the Aperture library. In addition, any versions of the image that you create are also stored in the library, which makes it easy to keep track of both your originals and the versions. You choose the location of the library, which can be on your hard drive or on an external drive or even on a backup device such as a Pegasus or Drobo.
A Pegasus or a Drobo is a type of external drive system containing two or more drives that creates automatic backups of each drive to protect against data loss in the event that a single drive fails. For more information, go to www.promise.com or www.datarobotics.com.
If you opt to use referenced files, your original files are not stored within the Aperture library. Instead, they can be wherever you specify, such as the hard drive, an external drive, or even cloud storage such as Dropbox (www.dropbox.com). Aperture imports thumbnails of the images and creates previews (according to your Preference settings) for the images and stores those within the Aperture library. In addition, any versions of the image that you create within Aperture are also stored in the Aperture library, including versions made using an external editor or plug-in. However, the originals remain in the separate location that you choose. As mentioned in Chapter 1, the primary difference is that you are in charge of organizing and keeping track of the originals. If you move them — for example, you decide to move the folder from your computer’s hard drive to an external drive — Aperture won’t know where to look for them, and you’ll have to spend time helping Aperture find them using the Locate Referenced Files command, which is covered in Chapter 3.
Because Aperture creates thumbnails (and previews if you’ve set Preferences to automatically create them, as mentioned in Chapter 1), you can view referenced files, create slide shows, and use the images in other iWork and iLife programs and not have the drive containing the originals attached to the computer (after you finish importing them, of course). However, to apply adjustments, e-mail, or export the images, the drive needs to be connected.
If you opt to have Aperture not generate previews automatically, you can create previews later manually by choosing Photos →Generate Previews.
Most people find it a little easier to use managed files, unless their workflow requires referenced files. Both approaches work well, but referenced files require a bit more caution. In addition, sometimes it can be frustrating when you see a referenced file in the library but you can’t export it or adjust it because the original isn’t available.

In an emergency, you can directly access your managed original files without using Aperture. Control+click on the Aperture library in the Finder and choose Show Package Contents. Then click the Masters folder and all the subfolders. Eventually you will find all the original files. However, we don’t recommend doing this except under dire circumstances because it’s extremely easy to accidentally corrupt the library by moving or deleting a file.
After you decide whether to use managed or referenced files, you specify that on the Aperture Store Files pop-up menu, as shown in Figure 2.9.
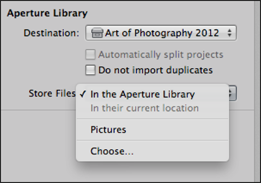
2.9 Use the Store Files pop-up menu to choose managed files or to specify where to store referenced files.
To use managed files, choose In the Aperture Library. This moves the files into Aperture so that it keeps track of all original files as well as any versions of them.
To use referenced files, choose one of the following:
![]() In their current location. This leaves the files where they are and points Aperture to them.
In their current location. This leaves the files where they are and points Aperture to them.
![]() Pictures. This places the files in a subfolder there; use the radio button beneath the pop-up to either move the files or to create a copy of them. Then choose a name for the subfolder. We recommend choosing Project Name so it’s easy to recognize which files belong to which projects.
Pictures. This places the files in a subfolder there; use the radio button beneath the pop-up to either move the files or to create a copy of them. Then choose a name for the subfolder. We recommend choosing Project Name so it’s easy to recognize which files belong to which projects.
![]() Choose. This places the files elsewhere on your hard drive or on an external drive. Specify whether to copy or move the files by selecting the radio button and then choose the name for the subfolder.
Choose. This places the files elsewhere on your hard drive or on an external drive. Specify whether to copy or move the files by selecting the radio button and then choose the name for the subfolder.
Renaming files on import
Most digital cameras assign filenames to your images that are a combination of letters and numbers that don’t offer any clues about the images, so it can be very helpful to rename your images as you import them. That way, when you see the filenames you have an idea which images they are. This is particularly true when working with referenced files.
To rename files as you import them, follow these steps:
1. Click the Import Settings button in the upper right of the Import interface and choose Rename Files. A Rename Files brick appears on the right side of the Import interface, as shown in Figure 2.10.

2.10 If you choose a preset with a custom field, add the text in the Name Text field.
2. On the Version Name pop-up menu, select one of the preset naming options that Aperture offers. If you choose Custom Name with an option, such as Custom Name with Index, a Name Text field appears in which you add the text for Aperture to use. (In our example we selected a custom preset, Custom Name with a Master, that we created.)
3. Select the Rename Original File check box if you want to rename the original files and not just the versions within Aperture. This is optional. If you select this option and then export an original file, the exported file shows the name you gave it rather than the name assigned to it in-camera.
To create a custom preset name to use for renaming your files, follow these steps:
1. On the Version Name pop-up menu, choose Edit from the preset options. The File Naming dialog, shown in Figure 2.11, appears in which you create a custom preset.
2. To add a new naming preset, click the Add button (+) on the bottom left, and type a name for the preset over the highlighted name in the list of presets.
3. Drag buttons into the Format field to customize the format. To remove a button from the format field, click and drag over it to select it, and press Delete on your keyboard. If you choose a custom button, a new field appears that you can leave blank or fill with text. If you add text, then that text automatically appears when you choose the preset in the Import options. If you leave it blank, you can add the text during the Import process.
4. Click OK.
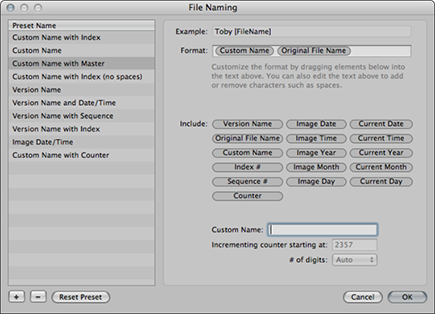
2.11 Create a custom File Naming preset to meet your needs.
We commonly rename our files with a Custom Name plus Original File Name. The Original File Name, which is the name assigned in-camera, provides a unique indexing number for the file as well as an easy way to identify the original filename in case you need to find it on a backup drive. The custom option enables you to add a meaningful name related to location or subject matter.
The same file naming presets are available when exporting images. So if you create a custom preset for use while importing, it appears in the file naming presets for use when exporting files as well.
Fixing time zone settings on your images
Most digital cameras record the time that you captured the file. The problem is that some photographers, including us, rarely take the time to change the time setting in the camera when they travel and photograph in different time zones. Admittedly, the time stamp is more important for some types of photographers than others. For photojournalists, it may be imperative; whereas for family photos, it may be purely optional. However, you never know when having the information will be useful, and Aperture makes it so easy to correct the time stamp that there’s no reason not to fix it.
To ensure that the correct time is associated with the image, assuming that the in-camera clock was accurately set for your home time zone, follow these steps:
1. Click the Import Settings button in the upper right of the Import interface and choose Time Zone. Two pop-up menus appear, as shown in Figure 2.12.
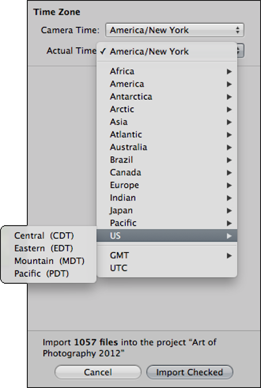
2.12 Use the Time Zone settings to correct the time associated with the image.
2. Specify the time zone the image is currently in, which is normally your home time zone, using the Camera Time pop-up menu.
3. On the Actual Time Zone pop-up menu, choose the time zone to associate with the images. It’s that simple.
An introduction to presets
You can use presets in many places in Aperture, including the Import panel, Adjustments Inspector, Info Inspector, and File Naming dialog. In each case, presets enable you to apply a predetermined combination of settings with a single click. That saves time.
The Apple engineers have created some default presets that they think will be useful to many photographers, but you can create your own as well, and we show you how to customize them. By taking advantage of presets, you spend less time on the computer.
The first place you encounter presets is in the Import interface. You can apply Metadata Presets and/or Effect Presets while you import your images, which means your images are already partially optimized and contain metadata when you initially begin working with them, and that’s efficient!
Setting up and applying a Metadata Preset on import
To apply metadata while importing, follow these steps:
1. Choose Import Settings and select Metadata Presets. This opens the Metadata brick in the right panel of the Import dialog, as shown in Figure 2.13.
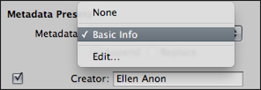
2.13 Use the Metadata Import Settings brick to choose a preset or to modify an existing one.
2. Choose None to apply no metadata.
3. Choose Basic Info to apply a default set of metadata options and then complete each field as you want.
4. Choose Edit to customize the fields in the Basic Info preset or to create an entirely new preset. Although you can use the Basic Info preset at the default settings, it is even more useful if you take the time to customize it. That way you can prefill some of the fields that remain constant, such as your contact information, as well as choose which fields to display.
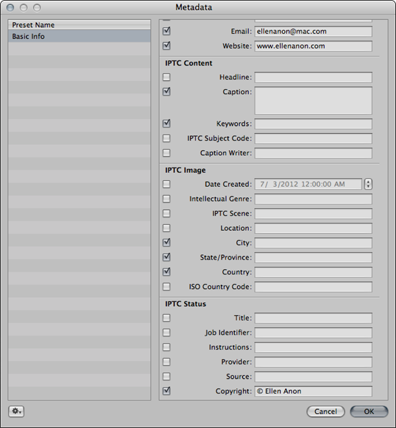
Choosing Edit opens the Metadata heads-up display (or HUD), as shown in Figure 2.14. On the left side is the list of current presets, and on the right are all the possible fields that you can include in the preset. Any field that you select is included in the preset and unselected fields are not visible in the preset. If you add text to any of the text fields, then the text becomes part of the preset. We fill in our personal information and any other fields that remain constant such as copyright so we don’t have to retype them each time we import images. We select other fields, such as Keywords, so that the fields appear within the preset, but we leave them blank so we can add text during import. Note that you can add fields that enable you to rate, label, or flag images as they’re imported.
Of course, it’s up to you to decide which fields to include, but we recommend completing at least some of the IPTC contact information as well as the Copyright field in the IPTC Status section. It’s important to include a way to reach you and information about the copyright with the file itself. Otherwise, it’s all too easy for an image to be used without your permission and/or become “orphaned,” meaning no one knows whose picture it is.
2.14 Create custom Metadata Presets to use while importing images.
To type the copyright symbol, press ![]() +G.
+G.
To create an entirely new preset, take these steps:
1. Click the Action pop-up menu (gear icon) at the lower left of the Metadata HUD and choose New Preset. A new preset appears called Untitled.
2. Type a name for the preset.
3. Select the fields to include and fill in any fields that remain constant. We created one called Contact and Copyright that contains just the copyright information and our contact information.
As shown in Figure 2.15, you can also duplicate or delete presets as well as import or export presets, which means you can create a preset on one computer and then export it for use on another.
2.15 You can manage your Metadata Presets via the Action pop-up menu and even export them for use on other computers.

To use a preset on another computer, take these steps:
1. In the computer containing the preset you want to use, access the Metadata Preset dialog from the Metadata HUD as just described, and choose Export. A new dialog appears in which you choose a name for the preset (although most likely you won’t want to change the name) and specify where to export the preset. We find it easiest to export to an external drive or thumb drive.
2. Connect the drive to the other computer.
3. Open Aperture and access the Metadata HUD.
4. Click the Action pop-up menu and choose Import. A new dialog appears containing a directory of your computer.
5. Select the drive containing the exported preset.
6. Click OK. Your preset is added to the list of presets. When you return to the Import dialog, your new preset or customized version of the Basic Info preset are available in the Metadata pop-up window.
Under the Metadata pop-up in the Import interface are radio buttons to Append or Replace the metadata. When you select Append, the metadata is added to the existing metadata in the image whereas Replace removes any metadata that already exists and replaces it with the information in the preset. Most of the time we opt to append the metadata.
You then need to add text to any blank fields. We often type the image location information as well as a few keywords that apply to all the images. You may want to add caption information, special instructions, or any other information you need, but not having to retype your contact and copyright information for each import session is very convenient. What’s even better is the knowledge that every image in your library has the basic metadata applied as it’s imported.
Setting up and applying an Effect Preset on import
RAW files often seem to be a little flat and may seem slightly less saturated, which can be a bit disconcerting when you first view your images and may make you hesitant to share your images with others until you’ve fully optimized them. At other times you may realize that your white balance is off in a series of images, or perhaps you want to view them as black and whites. Aperture 3.3’s Import Panel offers access to the default Adjustments Inspector Effect Presets as well as your custom Effect Presets by choosing Import Settings →Effect Presets. Figure 2.16 shows the Effect Presets that are available from the pop-up menu.
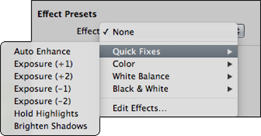
2.16 All the Effect Presets are available from within the Import panel although only one can be applied during the import process.
Only a single Effect Preset can be applied to each image during the import process, so one of the Quick Fix presets such as Auto Enhance, which has been significantly improved in Aperture 3.3, may provide a good starting place for optimizing your images. Auto Enhance applies a combination of different adjustments to optimize each image, but it’s smart enough to recognize if a particular image doesn’t need one of the adjustments, and then it doesn’t apply that adjustment to the image even if you’re importing numerous images. Of course, you can apply additional Effect Presets after the images are imported by using the Adjustments Inspector.
You may prefer to create customized Effect Presets containing several of the adjustments you routinely use and have Aperture apply that preset during import. That way your images will look better when you’re editing them and you’ll have less work to do to optimize them. Keep in mind that you can create a variety of Effect Presets, each containing different combinations of numerous adjustments.
To modify an existing Effect Preset containing more than a single adjustment, do the following:
1. Click the Edit Presets option in the Preset pop-up menu in the Effects Presets brick in the Import window. Doing so opens the Effect Presets Manager, as shown in Figure 2.17.
2. Select a preset. The adjustments it contains are listed in the panel on the right side of the dialog.
3. Click the minus radio button by each adjustment to remove one or more of the adjustments within the preset.
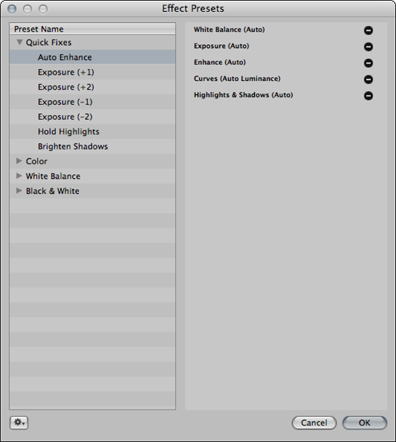
2.17 The Effect Presets Manager enables you to manage and customize your Effect Presets.
To create your own custom Effect Preset from scratch, follow these steps:
1. Create an Effect Preset by clicking on an image that’s already imported into Aperture. Choose an image that has only the adjustments applied that you want to use for your preset, or even better, an image with no adjustments applied at all.
2. Apply the adjustments you want as part of the preset. For example, we often apply a combination of a Curve adjustment to add a small amount of midtone contrast, along with some Definition and some Edge Sharpening. It’s a good idea to be fairly conservative as you set the sliders, although all adjustments that are applied via a preset can be tweaked by adjusting the sliders later in the Adjustments Inspector.
3. Go to the Effects pop-up menu that’s in the Adjustments Inspector, as shown in Figure 2.18, and choose Save as Effect. The Effect Presets Manager appears.
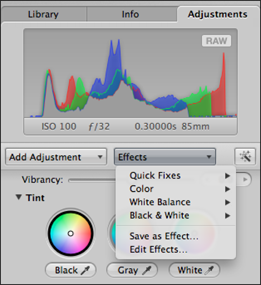
2.18 Create customized Effect Presets from scratch within the Adjustments Inspector in Aperture and apply them in the Import panel.
4. Assign a descriptive name in the Effect Presets dialog so that later you remember exactly what the preset does. Your customized presets will appear in the list of Effect Presets in the Import panel as well as the Adustment panel in addition to the default presets.
By taking advantage of the Metadata and Effect Presets in the Import panel, you’ll have considerably less work to do later.
Configuring what types of files to import
Because many digital cameras now include options to capture video and audio files as well as photos, Aperture 3.3 gives you the option to exclude certain types of files or to only include specific types of files while importing from your memory card. That way only the types of files that you’re interested in appear in the Import Viewer, making it easier to quickly choose the files that you want to import. You don’t have to wait while files that you’re not interested in are imported, or spend time individually deselecting files in the Import panel.
To limit the types of files that Aperture imports, choose Import Settings →File Types. In the File Types brick that appears, as shown in Figure 2.19, select any file types you want to exclude, or select the option to only include files that were flagged or locked in the camera.

2.19 Use the File Types options to control which type files are imported from your memory card.
Working with RAW+JPEG pairs
Some cameras offer the option to shoot in RAW+JPEG pairs so that each image is recorded as both a JPEG file and a RAW file. Aperture now offers more flexibility in how to deal with these image pairs.
Shooting in RAW+JPEG can be helpful in several types of circumstances. For example, if you’ve purchased a newly released camera and Apple has not yet updated Aperture to support that camera’s RAW file, you can still view and work with the files by using a RAW+JPEG workflow. Or perhaps you’ve applied a Picture Style in-camera to your JPEG files and want to view your images using those settings. You might also opt to shoot using both file types if you need to work extremely quickly initially to output files and want the convenience of using JPEG files, but you want the flexibility and power of RAW files to use later.
Begin by choosing Import Settings →RAW+JPEG. A new RAW+JPEG Pairs brick appears in the Import dialog. As shown in Figure 2.20, there are a variety of options for instructing Aperture how you want to import the image pairs.
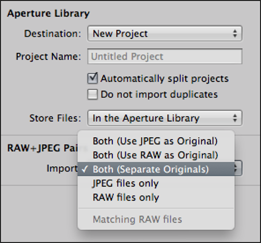
2.20 Aperture offers choices of how to import RAW+JPEG pairs as well as options to import just one type of file.
The first three options allow you to import both file types of each pair, while the other options import only one type of file.
![]() Both (Use JPEG as Original). Both files are imported, but you actually see the JPEG file in the Viewer. Adjustments are applied to the JPEG version but are maintained if you switch to the RAW file.
Both (Use JPEG as Original). Both files are imported, but you actually see the JPEG file in the Viewer. Adjustments are applied to the JPEG version but are maintained if you switch to the RAW file.
![]() Both (Use RAW as Original). Both file types are imported, but you actually see the RAW version in the Viewer, and any adjustments are applied to the RAW file. However, the adjustments are maintained if you switch to the JPEG version.
Both (Use RAW as Original). Both file types are imported, but you actually see the RAW version in the Viewer, and any adjustments are applied to the RAW file. However, the adjustments are maintained if you switch to the JPEG version.
![]() Both (Separate Originals). This option imports both the JPEG and the RAW files and treats each one as an original file. The advantage of this method is that you can easily remove either type of file later to save space. The disadvantage is that adjustments applied to one member of the image pair are not automatically applied to the other. Instead, you need to use the Lift and Stamp tools that are covered in Chapter 6.
Both (Separate Originals). This option imports both the JPEG and the RAW files and treats each one as an original file. The advantage of this method is that you can easily remove either type of file later to save space. The disadvantage is that adjustments applied to one member of the image pair are not automatically applied to the other. Instead, you need to use the Lift and Stamp tools that are covered in Chapter 6.
![]() JPEG files only or RAW files only. This is self-explanatory. If you choose one of these options and want to keep the mate, you need to store those files manually and remember where you put them.
JPEG files only or RAW files only. This is self-explanatory. If you choose one of these options and want to keep the mate, you need to store those files manually and remember where you put them.
![]() Matching RAW files. This is a good option if you initially import just the JPEG files and do your editing based on them, and later you want to import the RAW files associated with just the JPEGs that you’ve kept.
Matching RAW files. This is a good option if you initially import just the JPEG files and do your editing based on them, and later you want to import the RAW files associated with just the JPEGs that you’ve kept.
Matching RAW files is a fantastic feature because it enables you to automatically import just the RAW files that match the JPEGs that are in the project; the other RAW files are ignored without your having to manually select the files individually or reedit the project. In addition, you can specify whether you want to import all matching files that Aperture finds, just those files that are unrated or better (so Aperture doesn’t reimport images you’ve rejected but not yet deleted), or only the mates to the images that are visible in the project using the current filter. So if what you really want are the RAW files associated with just your five-star images, for example, those are the only RAW files that Aperture imports.
When you use either of the first two options, you can access the other files after you import them by selecting the file and choosing Photos →Set RAW as Original or Set JPEG as Original. Any adjustments you apply to one file type are applied to the other file type.
Unfortunately, there isn’t a way to delete just the JPEGs or just the RAW files from the pairs when they are imported as Both (Use JPEG as Original) or Both (Use RAW as Original). When you delete one, you delete the other, which means that if you’re looking to conserve storage space at a later time, you can’t delete just one type of file for image pairs. If you import as Both (Separate Originals) then you can use the filter to show a specific file type and then delete just those files.
When importing Matching RAW files you must select the project that contains the JPEG images rather than a specific album.
Running actions automatically after importing
In addition to being able to apply Effect and Metadata Presets while importing, you can instruct Aperture to run custom AppleScripts immediately after importing your images. Although many users will never need this feature, for others it can be a huge advantage, particularly for those with customized workflows using repetitive tasks. You can create custom actions using AppleScript so that your images can be uploaded to FTP servers automatically on import, sent to the web, inserted into a Keynote presentation, and so on. AppleScript can be used to automate just about any actions that you do repeatedly.
To apply an action, choose Import Settings →Actions. Then, as shown in the Actions brick in Figure 2.21, choose the AppleScript to use.
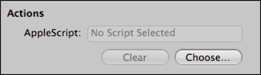
2.21 Use Actions to apply custom AppleScripts to your images immediately after import to save time.
Setting up an automatic backup on import
One of the disadvantages of digital images is that the media used to store them can fail. In fact, every hard drive will fail at some point, including the one in your computer. The hope is that day is far away, long after you no longer need that particular hard drive. But the harsh reality is that a hard drive failure can occur at any time. To protect against losing your images, you need to store them on at least two separate drives. We talk more about creating backups for your Aperture library in Chapter 10. However, you can create a backup of the files that you’re importing during the import process. That way when you reformat the memory card to reuse it, you still have your files stored in two places. We strongly recommend that you take advantage of this feature.
To automatically back up your files on import, take these steps:
1. Connect a backup drive to the computer and choose Import Settings →Backup Location. The drive appears in the Backup To pop-up menu, as shown in Figure 2.22.
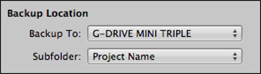
2.22 It’s smart to create a backup copy of your files on an external drive as you import them into Aperture.
2. Select the backup drive.
3. Use the Subfolder pop-up menu to create a folder for the backups on that drive. We recommend using the Project Name for the subfolder to make it easier to identify, but you can choose any of the presets, or click the Edit option to create a custom name for the folder. Aperture not only imports the files into the Aperture library, but simultaneously creates an external backup. That’s efficient!
When you finish choosing your import settings, click Import Checked. The Import interface disappears, and you see your images in the Viewer and/or Browser, ready for you to begin editing.
Understanding Unified iPhoto and Aperture Libraries
Prior to Aperture 3.3, if you were an iPhoto user and wanted to move up to Aperture, it was challenging because the two programs maintained separate image libraries. Similarly, it was awkward for an Aperture user to take advantage of some of iPhoto’s features such as cards and calendars. The new unified iPhoto and Aperture libraries make it easy to move back and forth between the two programs.
After you install the Aperture 3.3 upgrade, the first time you open Aperture you’ll see the message in Figure 2.23 and Aperture will modify your library. As you’d expect, if you have a huge library this can take some time. Similarly, when you open iPhoto 9.3 the first time, your iPhoto library is upgraded.
You must upgrade to OS 10.7.4 or later and iPhoto 11.9.3 or later to be able to take advantage of unified libraries.
To open an Aperture library in iPhoto, take these steps:
1. Open iPhoto.
2. Choose File →Switch to Library.
3. Navigate to the Aperture library you want to open and click Choose.

2.23 The first time you open Aperture 3.3 (or iPhoto 9.3) you see these messages.
4. A message appears (see Figure 2.24) asking if you want to switch libraries; click Relaunch to do so.
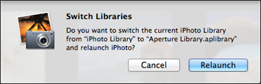
2.24 Click Relaunch to switch to your Aperture library.
To open an iPhoto library in Aperture, do the following:
1. Open Aperture.
2. Choose File →Switch to Library →Other/New.
3. Navigate to the desired library and click Choose. (Unlike iPhoto, Aperture does not need to relaunch.)
Your unified library cannot be open in Aperture and iPhoto simultaneously.
Overall, a unified library is a huge convenience. The organization of your Aperture and iPhoto images is maintained as are all the adjustments you’ve made and any keywords, ratings, and so on.
Albums and Smart Albums are maintained when you move between the two applications, as are any Faces and Places features that you’ve used, and any images that you’ve shared via Flickr or Facebook. If you create a slide show in one program, you can view it in the other. Of course, any changes you make to an image in one program are visible if you open the image in the other program.
There are, however, a few differences to be aware of between the two programs:
![]() iPhoto uses Events, whereas Aperture calls them Projects (see Figure 2.25).
iPhoto uses Events, whereas Aperture calls them Projects (see Figure 2.25).
![]() Aperture enables you to choose whether to create previews and at what size, whereas iPhoto always creates full-size previews. When you open the library in iPhoto, previews generated in Aperture remain unless you edit the image in iPhoto, in which case iPhoto generates a new full-size preview.
Aperture enables you to choose whether to create previews and at what size, whereas iPhoto always creates full-size previews. When you open the library in iPhoto, previews generated in Aperture remain unless you edit the image in iPhoto, in which case iPhoto generates a new full-size preview.
![]() Smart Albums created in one program are fully functional in the other program, but to change the “smart” criteria, you must use the application you used to create the album.
Smart Albums created in one program are fully functional in the other program, but to change the “smart” criteria, you must use the application you used to create the album.
![]() Photos that you’ve hidden using iPhoto’s hide command are not visible in Aperture until you return to iPhoto and unhide them. Similarly, photos that you’ve rated as Rejected in Aperture are not visible within iPhoto unless you first change the rating in Aperture.
Photos that you’ve hidden using iPhoto’s hide command are not visible in Aperture until you return to iPhoto and unhide them. Similarly, photos that you’ve rated as Rejected in Aperture are not visible within iPhoto unless you first change the rating in Aperture.
![]() If you have stacked images in Aperture, only the stack “pick” is visible in iPhoto although the full stack continues to be available in Aperture.
If you have stacked images in Aperture, only the stack “pick” is visible in iPhoto although the full stack continues to be available in Aperture.
![]() PDF files, audio files, and audio attachments are visible within Aperture but not within iPhoto.
PDF files, audio files, and audio attachments are visible within Aperture but not within iPhoto.
![]() If you’ve specified various criteria within Aperture’s Browser to determine what’s visible, iPhoto doesn’t recognize the criteria and instead displays all the images.
If you’ve specified various criteria within Aperture’s Browser to determine what’s visible, iPhoto doesn’t recognize the criteria and instead displays all the images.
![]() In Aperture you can opt whether to use Faces for each library, but iPhoto always uses Faces.
In Aperture you can opt whether to use Faces for each library, but iPhoto always uses Faces.
![]() Output that you create in iPhoto such as books, cards, and calendars are visible in Aperture in the Source list, but cannot be edited. Similarly, books, web pages, and web journals you create in Aperture are not visible in iPhoto.
Output that you create in iPhoto such as books, cards, and calendars are visible in Aperture in the Source list, but cannot be edited. Similarly, books, web pages, and web journals you create in Aperture are not visible in iPhoto.
![]() Slide shows you create in Aperture can be viewed but not edited in iPhoto. Slide shows created in iPhoto can be played as well as edited within Aperture and still played back within iPhoto, but once edited in Aperture they are no longer editable within iPhoto.
Slide shows you create in Aperture can be viewed but not edited in iPhoto. Slide shows created in iPhoto can be played as well as edited within Aperture and still played back within iPhoto, but once edited in Aperture they are no longer editable within iPhoto.
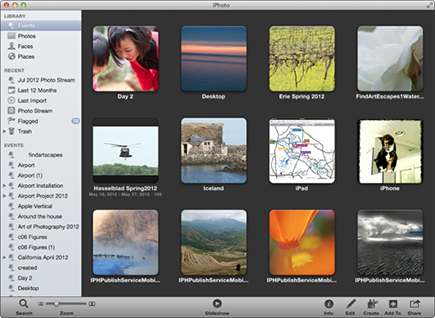
2.25 If you open your Aperture library in iPhoto, Projects are called Events and use iPhoto icons.
If you’ve been an iPhoto user and are just starting to use Aperture, you can switch to Aperture to make a few adjustments to your images that are unavailable within iPhoto — such as the selective brush tools (see Chapter 6) — and then return to iPhoto. That way you can transition gradually. (Remember that if you use an adjustment in Aperture that’s not available within iPhoto, the effect of the adjustment is visible within iPhoto, but obviously you can’t tweak that particular adjustment unless you return to Aperture.)
For iPhoto users who have several image libraries, another advantage of the unified libraries is that you can merge the iPhoto libraries using Aperture. To merge iPhoto libraries, open each of the libraries in iPhoto 9.3 at least once (so that the library is updated), and then do the following:
1. Open Aperture 3.3 or later.
2. Choose File →Switch to Library →Other/New and navigate to the iPhoto library you want to use as the main iPhoto library.
3. Choose File →Import →Library and select the iPhoto library you want to merge into the main iPhoto library.
4. Repeat Steps 2 and 3 as many times as needed to merge all your iPhoto libraries into a single iPhoto unified library.
The libraries you merged still exist independently. Once you are certain that all the content has been correctly imported into the unified library, you may want to delete the older libraries to conserve memory.
Dragging and Dropping Files into Aperture
There are times when you may be looking through your Finder or your desktop or other place on your computer and come across one or more files you want to import into Aperture. Although you can choose File →Import →Files or use the Import interface, it may be more efficient to select the images and drag them directly onto the Viewer, Browser, or a specific item in the Library. Aperture imports image, audio, and/or video files this way. This can be particularly helpful with files that didn’t originate within your camera. It’s also helpful if you use third-party software that functions as a free-standing program rather than a plug-in within Aperture, or if you accidentally choose Save As rather than Save when working on a file in your external editor. Dragging and dropping is a quick and easy way to get the files into Aperture.
Using Photo Stream
Photo Stream is part of iCloud. An easy way to visualize it is to imagine it as a digital shoe box in the sky. It can hold up to 1,000 photos from the last 30 days. Depending on your Photo Stream settings in Aperture’s Preferences, images that are initially on your mobile device, such as your iPhone or iPod, may be uploaded to Photo Stream and then automatically imported into Aperture when you are connected by Wi-Fi. Similarly, photos that you import into Aperture may be uploaded to Photo Stream and shared with your mobile devices.
To enable Photo Stream, choose Aperture Preferences →Photo Stream and select the Enable Photo Stream check box (see Figure 2.26). Then if you want Aperture to automatically import images from your iOS devices, select the Automatic Import check box. Photos will be imported into Projects, Photos, Faces, and Places.
To automatically share images that you import into Aperture with your iOS devices via Photo Stream, select the Automatic Upload check box. We recommend that you keep this option unselected and select it only at specific times when you want to share images. Otherwise it’s easy to accidentally upload the maximum number of images and unintentionally fill your mobile device’s memory. If you do not select this option, you can still upload images from Aperture to Photo Stream to share with your devices by selecting the image and then choosing Share →Photo Stream.
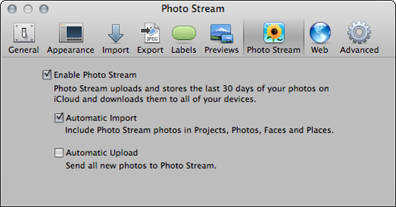
2.26 Enable Photo Stream to have Aperture automatically import images from your mobile devices and/or to send images from Aperture to your devices.