Chapter 11
Say Cheese! Photographing Your Wares
In This Chapter
![]() Picking a camera
Picking a camera
![]() Setting up your shoot
Setting up your shoot
![]() Exploring lighting options
Exploring lighting options
![]() Composing your shots
Composing your shots
![]() Focusing on your items
Focusing on your items
![]() Working some magic with photo-editing software
Working some magic with photo-editing software
Ever heard the saying “It’s a vision thing”? Nowhere is this more true than on Etsy. Because shoppers on Etsy can’t touch, smell, lick, or otherwise handle the goodies in your Etsy shop, they must evaluate each item based on sight. If you plan to sell on Etsy, it’s up to you to supply potential buyers with excellent images of your products — beautiful photos that not only convey the shape, size, color, and texture of your pieces, but also reflect you and your broader brand identity.
Your photos must elicit in potential buyers a deep, abiding thirst for your items that they can satisfy only with their purchase. Unfortunately, we can’t teach you everything you need to know about photography to make that happen; after all, you can find entire libraries of books on the topic of becoming an expert photographer (like the latest edition of Digital Photography For Dummies, by Julie Adair King [Wiley]). But this chapter does at least enable you to get your feet wet!
I’ll Take That-a-One! Choosing a Camera with the Right Features
In the following sections, we describe some essential features that your digital camera needs to have, as well as a few extras that you may find helpful.
Key club: Identifying key camera features
You don’t need some fancy camera that can do everything for you and draw you a bubble bath afterward. A trusty digital point-and-shoot in the 4-megapixel range will serve you well, especially if it offers a few key features:
![]() A macro setting: This setting, typically represented by a flower icon, enables you to shoot extreme close-ups — critical when photographing smaller pieces, such as jewelry, or when you want to reveal the texture of an item.
A macro setting: This setting, typically represented by a flower icon, enables you to shoot extreme close-ups — critical when photographing smaller pieces, such as jewelry, or when you want to reveal the texture of an item.
![]() Autofocus: These days, pretty much all cameras offer autofocus. In most cases, you use it by pointing your camera at your subject and pressing the camera’s shutter button halfway down; the camera automatically focuses on the subject. To capture the image, simply press the shutter button the rest of the way.
Autofocus: These days, pretty much all cameras offer autofocus. In most cases, you use it by pointing your camera at your subject and pressing the camera’s shutter button halfway down; the camera automatically focuses on the subject. To capture the image, simply press the shutter button the rest of the way.
 If you want the area of focus to be off center, just move your camera to the left or right while keeping the shutter button pressed halfway down; then, when you’ve achieved the desired composition, press the shutter button the rest of the way. (We talk about focusing your photos later in this chapter.)
![]() A white balance setting: With this setting, usually represented with a light bulb icon, you can help your camera identify pure white. The idea here is that if the camera can capture pure white correctly, it can correctly capture (and render) all other colors as well. Setting your camera’s white balance before you shoot can save you a bushel of time later trying to correct the color in image-editing programs. (You find out more about image-editing programs later in this chapter.)
A white balance setting: With this setting, usually represented with a light bulb icon, you can help your camera identify pure white. The idea here is that if the camera can capture pure white correctly, it can correctly capture (and render) all other colors as well. Setting your camera’s white balance before you shoot can save you a bushel of time later trying to correct the color in image-editing programs. (You find out more about image-editing programs later in this chapter.)
Feature story: Considering extra features
A few other camera features may serve you well (see the upcoming sidebar “Say what? Defining a few camera terms” if you need to brush up on technical camera talk):
![]() An aperture-priority mode: Although this feature is less “must have” and more “nice to have,” aperture-priority mode helps you achieve the photography equivalent of a mullet: an image that’s sharp in the front, blurry in the back. Simply engage aperture-priority mode, set your camera’s f-stop as low as it goes, press the shutter button halfway down to autofocus on your item, and then snap your photo. (You can read more about the benefits of blurry backgrounds later in this chapter, in the section “Focus, People! Focusing Your Image.”)
An aperture-priority mode: Although this feature is less “must have” and more “nice to have,” aperture-priority mode helps you achieve the photography equivalent of a mullet: an image that’s sharp in the front, blurry in the back. Simply engage aperture-priority mode, set your camera’s f-stop as low as it goes, press the shutter button halfway down to autofocus on your item, and then snap your photo. (You can read more about the benefits of blurry backgrounds later in this chapter, in the section “Focus, People! Focusing Your Image.”)
![]() A manual mode: Although you can certainly use the automatic settings on your digital camera, switching to manual mode gives you scads more control over your image’s exposure. With manual mode, you can set the camera’s aperture size, shutter speed, and ISO. In this way, you prevent the image from being underexposed (too dark) or overexposed (like Justin Bieber).
A manual mode: Although you can certainly use the automatic settings on your digital camera, switching to manual mode gives you scads more control over your image’s exposure. With manual mode, you can set the camera’s aperture size, shutter speed, and ISO. In this way, you prevent the image from being underexposed (too dark) or overexposed (like Justin Bieber).
 If your camera doesn’t offer a manual mode, see if it supports a feature called exposure compensation. This feature enables you to instruct the camera to expose more or less than it normally would, given the lighting conditions.
In Style: Styling Your Photos
Photographers who specialize in product shoots are no strangers to stylists — people who work closely with the photographer and other professionals to ensure that the shot contains all the necessary elements. Indeed, high-profile shoots — for example, shoots for magazine advertisements, brochures, and the like — may well have multiple stylists on set, including prop stylists, food stylists, and wardrobe stylists, not to mention full-blown set designers.
Chances are, the shoots you conduct for your Etsy shop won’t look anything like these affairs. But you can still adopt some of the style pros’ practices when you’re setting up your shoot. These extras include backgrounds, props, and live models to both complement and emphasize the pieces you photograph.
Background check: Using backgrounds
Although white is the background color of choice for many Etsy sellers — it’s crisp, simple, and neutral — it’s not your only option. When choosing a background for your photo shoot, keep these points in mind:
![]() Scout your environment for “everyday” backgrounds. Do you have a garden? If so, consider using a plant or flower as your background (see Figure 11-1 for an example). Or maybe your living-room wall is exposed brick, another excellent background. Really, just about anything works — wooden tables, tile floors, stone walkways, wicker baskets, wooden crates, whitewashed fences . . . the list goes on. These natural backgrounds can serve as excellent complements to your piece.
Scout your environment for “everyday” backgrounds. Do you have a garden? If so, consider using a plant or flower as your background (see Figure 11-1 for an example). Or maybe your living-room wall is exposed brick, another excellent background. Really, just about anything works — wooden tables, tile floors, stone walkways, wicker baskets, wooden crates, whitewashed fences . . . the list goes on. These natural backgrounds can serve as excellent complements to your piece.
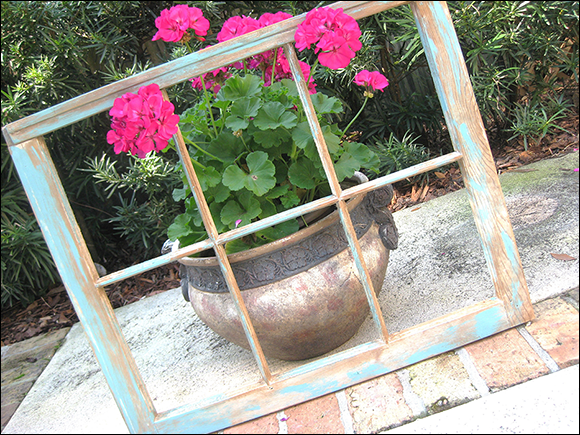
Photo courtesy of Angela Mahoney (www.etsy.com/shop/swede13)
Figure 11-1: Sometimes everyday backgrounds are best.
![]() Reflective surfaces can really shine. This advice is especially true if your items are delicate or finely made. Placing them on a mildly reflective surface, such as a sterling platter or a white ceramic plate, enables you to add interest, as well as improve lighting.
Reflective surfaces can really shine. This advice is especially true if your items are delicate or finely made. Placing them on a mildly reflective surface, such as a sterling platter or a white ceramic plate, enables you to add interest, as well as improve lighting.
![]() Avoid basic black. Although black is indisputably the color of choice if you’re attempting to hide those ten extra pounds, it’s not so great as a background color when you’re photographing goodies destined for your Etsy shop. Why? Because darker pieces get lost. Instead, opt for an almost-black background — charcoal works well — preferably with a bit of texture to add visual interest.
Avoid basic black. Although black is indisputably the color of choice if you’re attempting to hide those ten extra pounds, it’s not so great as a background color when you’re photographing goodies destined for your Etsy shop. Why? Because darker pieces get lost. Instead, opt for an almost-black background — charcoal works well — preferably with a bit of texture to add visual interest.
![]() Add pop with color. Pieces can really pop with a contrasting-color paper or fabric background. Subtle patterns that complement your piece also work well as backgrounds.
Add pop with color. Pieces can really pop with a contrasting-color paper or fabric background. Subtle patterns that complement your piece also work well as backgrounds.
 For inexpensive colorful backgrounds, check out your local craft store’s scrapbook section. There, you’ll find 12-by-12-inch sheets of paper in more colors and patterns than you ever dreamed possible. These papers make perfect backgrounds for smaller pieces. Just steer clear of patterns that are super-busy.
![]() Create a seamless background. Tape one end of a long sheet of thick paper — the kind you cut from a roll — to your wall, letting it drape down onto a table, where you can clamp the other end. You’ll get a seamless “runway” effect that’s especially useful for extreme close-ups or times when you don’t want anything distracting from your piece (see Figure 11-2).
Create a seamless background. Tape one end of a long sheet of thick paper — the kind you cut from a roll — to your wall, letting it drape down onto a table, where you can clamp the other end. You’ll get a seamless “runway” effect that’s especially useful for extreme close-ups or times when you don’t want anything distracting from your piece (see Figure 11-2).
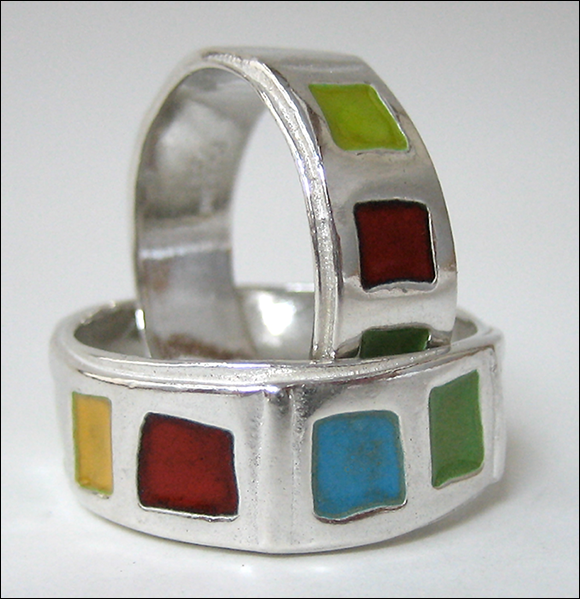
Photo courtesy of Mark Poulin
Figure 11-2: Call attention to your item with a seamless background.
![]()
 Avoid the “accidental” background. Heavens to Etsy! The last thing you want potential buyers to see is all your dirty dishes or that pile of newspapers you keep forgetting to recycle! Don’t taint your item by photographing it amid all your daily detritus. Make sure that any background you include in your product shots is there on purpose and complements your piece.
![]()
 Don’t give your background star billing. If your background is more noticeable than the piece you slaved over for days, don’t use it.
Prop it like it’s hot: Working with props
The swell thing about props is that they’re everywhere! You can find potential props in your garden shed, your craft closet, your grandmother’s attic, your nephew’s toy chest, or your uncle’s garage. Experiment with lots of different props to see what works best. For example, you can use props as follows:
![]() To convey the scale of your piece: Using a universal prop — something everyone recognizes, like a coin, a book, a pencil, a chair, a toy, food, or whatnot — is a great way to show potential buyers the size of your piece. (Figure 11-3 shows a necklace on a pile of beans.)
To convey the scale of your piece: Using a universal prop — something everyone recognizes, like a coin, a book, a pencil, a chair, a toy, food, or whatnot — is a great way to show potential buyers the size of your piece. (Figure 11-3 shows a necklace on a pile of beans.)
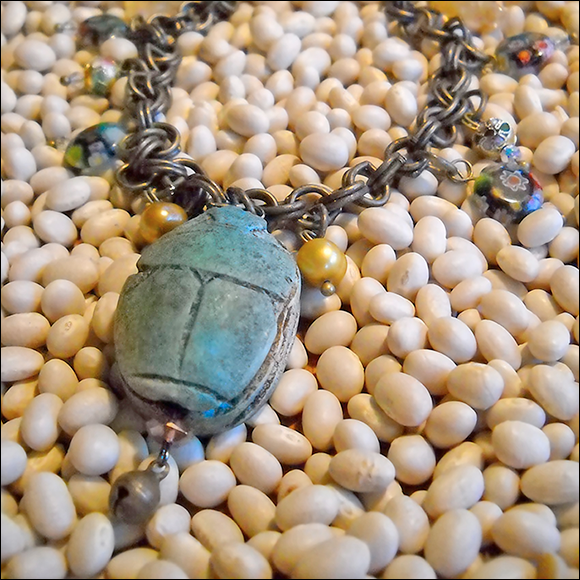
Photo courtesy of Jonathan Wilson
Figure 11-3: Using a universal prop can convey the scale of your piece.
![]() To show how your piece can be used: By putting your piece in its “natural environment,” you give potential buyers an idea of how they can use it. For example, if you make USB drives shaped like R2-D2, you may insert one into your laptop’s USB port. Or maybe you craft gorgeous place cards; in that case, you may position one atop a lovely vintage plate, to reinforce what your item is and does. (Figure 11-4 shows a colorful handmade pillow on a little girl’s bed.)
To show how your piece can be used: By putting your piece in its “natural environment,” you give potential buyers an idea of how they can use it. For example, if you make USB drives shaped like R2-D2, you may insert one into your laptop’s USB port. Or maybe you craft gorgeous place cards; in that case, you may position one atop a lovely vintage plate, to reinforce what your item is and does. (Figure 11-4 shows a colorful handmade pillow on a little girl’s bed.)
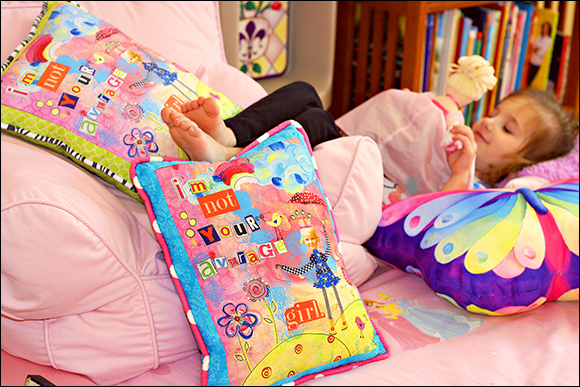
Photo courtesy of Elizabeth Wallberg, e photography
Figure 11-4: You can feature a prop that suggests how to use your piece.
![]() To reflect how your piece was made: Do you use special tools to construct your item? If so, consider using those implements as props. Knitting needles, embroidery hoops, pliers, cutters, paintbrushes, pencils, scissors, blowtorches — all these constitute excellent props; they add interest by conveying how the piece was made.
To reflect how your piece was made: Do you use special tools to construct your item? If so, consider using those implements as props. Knitting needles, embroidery hoops, pliers, cutters, paintbrushes, pencils, scissors, blowtorches — all these constitute excellent props; they add interest by conveying how the piece was made.
![]() To suggest what inspired your piece: Did the idea for your piece come to you while you were walking in the woods? Then a leaf, branch, or pine cone may make an excellent prop. Or if you had the epiphany for your piece while strolling along the seashore, a bit of sand or a seashell may serve as a prop. As another example, Figure 11-5 shows an orange soap set with a group of oranges.
To suggest what inspired your piece: Did the idea for your piece come to you while you were walking in the woods? Then a leaf, branch, or pine cone may make an excellent prop. Or if you had the epiphany for your piece while strolling along the seashore, a bit of sand or a seashell may serve as a prop. As another example, Figure 11-5 shows an orange soap set with a group of oranges.
![]() To complement your piece: A great way to create interest in your product shots is to place your piece alongside an object that complements it visually. Maybe the object you use as a prop is a complementary color — for example, the object is violet, and your piece is yellow. Or maybe the object reflects the genre of your piece in some way — say, the object is a vintage bowling pin, and your piece is a hand-sewn bowling shirt.
To complement your piece: A great way to create interest in your product shots is to place your piece alongside an object that complements it visually. Maybe the object you use as a prop is a complementary color — for example, the object is violet, and your piece is yellow. Or maybe the object reflects the genre of your piece in some way — say, the object is a vintage bowling pin, and your piece is a hand-sewn bowling shirt.
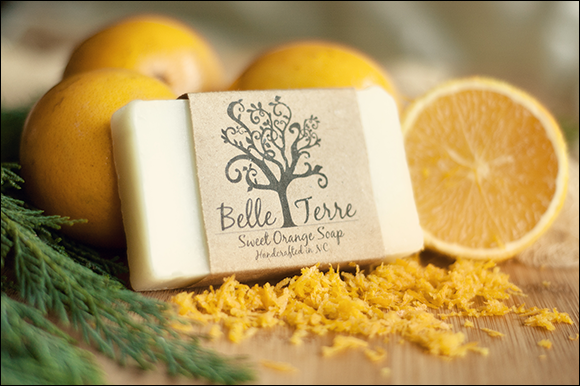
Photo courtesy of Whispering Willow (www.etsy.com/shop/WhisperingWillowSoap)
Figure 11-5: Try using a prop that suggests what inspired your piece.
Model citizens: Using live models
Yes, models can be terrible divas. But the fact is, when they’re not busy flinging cellphones at your head, models — whether they’re babies, kids, adults, or your pet hamster — can do wonders for your product photos. Why? For two reasons:
![]() Using a live model helps you convey the scale or fit of your piece. If you shoot your gorgeous necklace with a simple white background, potential buyers may not be able to get a handle on its length. Photographing that same necklace on a model, however, enables buyers to deduce at a glance how long it is, as well as how it rests on the décolletage (see Figure 11-6). Likewise, if you sell hand-sewn clothes in your Etsy shop, photographing your pieces on a live model shows potential buyers how they’ll fit.
Using a live model helps you convey the scale or fit of your piece. If you shoot your gorgeous necklace with a simple white background, potential buyers may not be able to get a handle on its length. Photographing that same necklace on a model, however, enables buyers to deduce at a glance how long it is, as well as how it rests on the décolletage (see Figure 11-6). Likewise, if you sell hand-sewn clothes in your Etsy shop, photographing your pieces on a live model shows potential buyers how they’ll fit.
![]() Using a live model makes your piece more relatable. Models humanize your piece. When potential buyers see a model wearing your item, they inevitably imagine it looking just as fantastic on themselves or their loved ones. The same is true when you show a model using your item: Potential buyers naturally imagine themselves or their loved ones using it in the same way.
Using a live model makes your piece more relatable. Models humanize your piece. When potential buyers see a model wearing your item, they inevitably imagine it looking just as fantastic on themselves or their loved ones. The same is true when you show a model using your item: Potential buyers naturally imagine themselves or their loved ones using it in the same way.
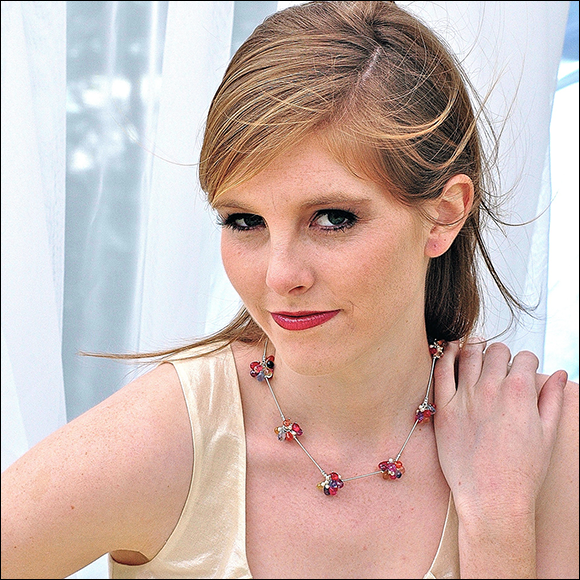
Photo courtesy of Rae Aldrich-Keisling
Figure 11-6: Using a live model can really bring your piece to, er, life.
Of course, you can’t use just any model. You want to choose models who enhance, not detract from, your piece. Be sure to select models who reflect your brand and your target audience. For example, if your brand and your target audience are on the edgy or punk end of the spectrum, your models need to be, too (think tattoos, piercings, mohawks, and so on). However, if your aesthetic is more romantic, your models need to look that way as well.
Lighting Bug: Lighting Your Shot
If you’ve ever seen Cybill Shepherd in Moonlighting, you know the importance of flattering lighting! No doubt about it, whether you’re photographing an aging actress or a tea towel on which you’ve embroidered the periodic table, good lighting is essential. Without it, your camera simply can’t capture the color and texture of your piece. The following sections note a few lighting-related points to keep in mind when photographing your pieces.
She’s a natural! Using natural light
Dark matter: Avoiding the dark
Unless you live with the Inuits and it’s that season when the sun never sets, shooting at night is a bad idea — most notably because simply not much natural light is available.
SPF 50: Avoiding direct sunlight
Direct sunlight can overexpose your photo, washing it out. If you can’t avoid direct sunlight (people in Nevada, we’re talking to you), try diffusing the light — for example, positioning a sheer curtain between the sun and the piece you’re photographing.
Figures 11-7 and 11-8 show the difference between an object photographed in full sun and one photographed in diffused light. Notice how the diffused light in the second image softens the whole shot.
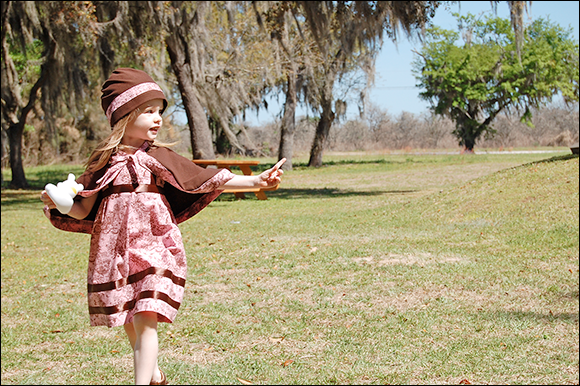
Photo courtesy of Angela at Teeny Bunny (www.etsy.com/shop/teenybunny)
Figure 11-7: Notice how shooting in full sun washes out an image.
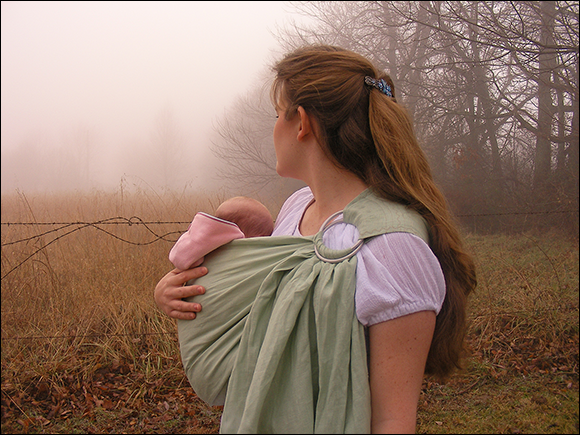
Photo courtesy of Rebecca Lang
Figure 11-8: Diffused light softens an image, making it much more appealing.
Time to reflect: Using reflectors
For the love of all that’s holy, if you can avoid it, don’t use your flash when photographing items for your Etsy shop — unless harsh shadows, glare, reflections, and a generally flat appearance will somehow enhance your item’s salability.
Even better, instead of using your flash, you can put reflectors to work. Use white walls or other home-grown reflective items (think white poster board, a hanging bed sheet, or, for a brighter reflection, a mirror) to “bounce” light onto your piece. Figures Figure 11-9 and Figure 11-10 show the difference between a shoot that didn’t use reflectors and a shoot that did. Notice that the first image, for which a reflector wasn’t used, is darker and a wee bit muddy; its colors just don’t stand out. In contrast, the face of the angel in the second image pops a bit more, for an overall brighter, happier look.
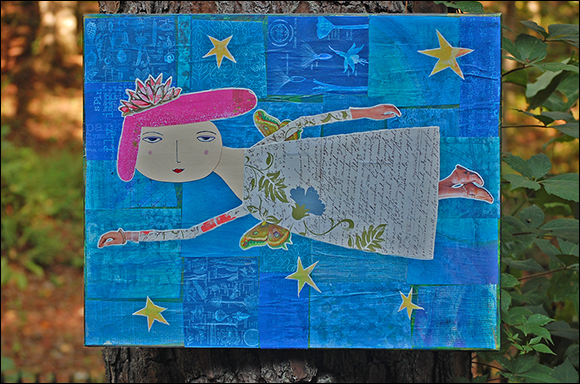
Photograph courtesy of Allison Strine
Figure 11-9: The photographer didn’t use a reflector for this shot.
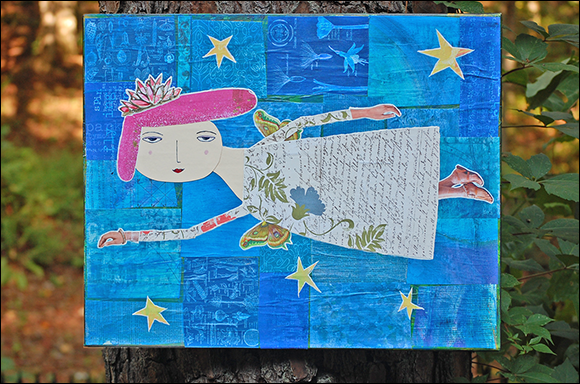
Photograph courtesy of Allison Strine
Figure 11-10: Notice how using a reflector really lights up the piece.
Compose Yourself: Composing Your Shot
Suppose you found yourself at the Statue of Liberty with Annie Leibovitz. And suppose further that both of you were photographing Lady Liberty. No offense, but her pictures would probably be way better than yours — more captivating, more vital, more powerful, more interesting. Why? Well, lots of reasons. One, Leibovitz probably has a camera that’s so good, it practically has super powers. But more than that, Leibovitz has a keen eye for composition — the arrangement of visual elements in an image.
Just because you’re no Annie Leibovitz doesn’t mean you can’t compose some really swell photos of your own for your Etsy shop. The pointers in the following sections can help.
For starters: Trying basic composition principles
As you shoot your pieces, keep these basic compositional points in mind:
![]() Angle the camera. Angling, or tilting, the camera puts the subject slightly off center and creates movement and flow. The result: a more dynamic, intriguing image, as you can see in Figure 11-11.
Angle the camera. Angling, or tilting, the camera puts the subject slightly off center and creates movement and flow. The result: a more dynamic, intriguing image, as you can see in Figure 11-11.
![]() Shoot tight. Filling the frame with your subject not only adds visual impact, but also enables potential buyers to see how well made your piece is (see for yourself in Figure 11-12).
Shoot tight. Filling the frame with your subject not only adds visual impact, but also enables potential buyers to see how well made your piece is (see for yourself in Figure 11-12).
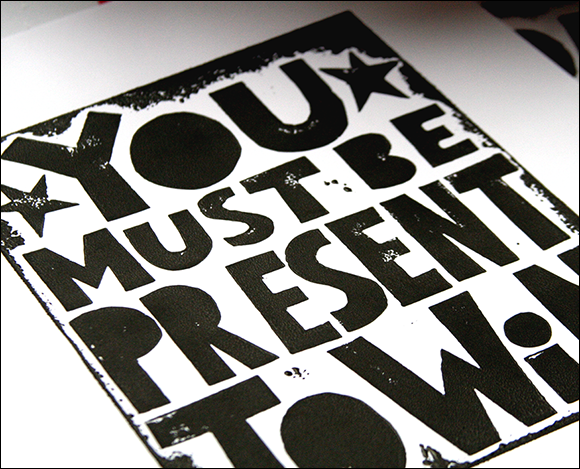
Photo courtesy of Colette Urquhart
Figure 11-11: Angling the camera produces interesting results.
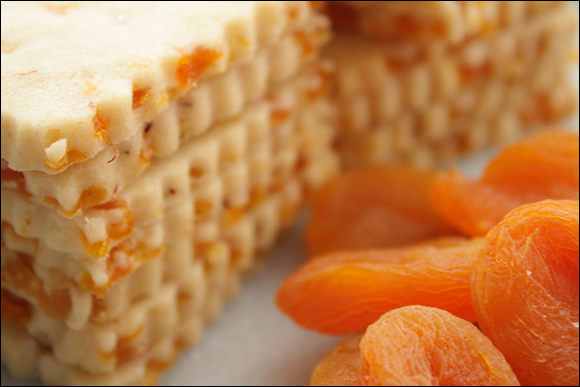
Photo courtesy of Kristen Timmers
Figure 11-12: Shoot tight, for added impact.
![]() Blur the background. Remember that photographic mullet we mention earlier, in the section “Feature story: Considering extra features”? It’s such a good idea, we’re bringing it up again. By using a shallow depth of field (read: a low f-stop setting), you can blur the background to dramatically highlight your piece, as shown in Figure 11-13.
Blur the background. Remember that photographic mullet we mention earlier, in the section “Feature story: Considering extra features”? It’s such a good idea, we’re bringing it up again. By using a shallow depth of field (read: a low f-stop setting), you can blur the background to dramatically highlight your piece, as shown in Figure 11-13.
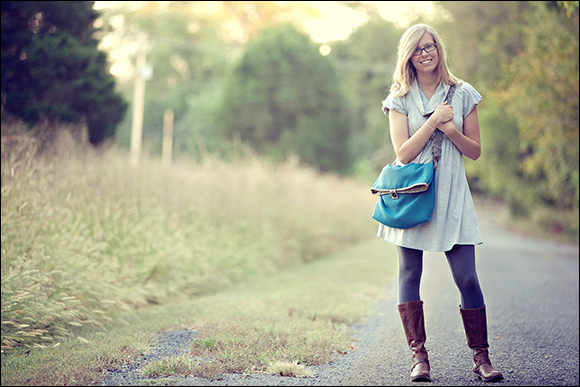
Photo courtesy of Betsy and Bess (Christopher and Adrienne Scott; www.etsy.com/shop/betsyandbess)
Figure 11-13: Blur the background to emphasize your item.
 When the background is blurred, you can shoot in almost any setting; just make sure that the background colors don’t clash with your subject. (For more on depth of field, see the later section “Focus, People! Focusing Your Image.”)
![]() Remember that less is more. Don’t crowd the scene with extraneous objects. Otherwise, potential buyers may not understand exactly which item in your photo is for sale.
Remember that less is more. Don’t crowd the scene with extraneous objects. Otherwise, potential buyers may not understand exactly which item in your photo is for sale.
![]() Frame your subject. One way to draw the viewer’s eye to your piece is to frame it — that is, place some darker element in the perimeter. This technique helps prevent the viewer’s eye from straying from your item.
Frame your subject. One way to draw the viewer’s eye to your piece is to frame it — that is, place some darker element in the perimeter. This technique helps prevent the viewer’s eye from straying from your item.
![]() Group pieces. Especially if you make itsy-bitsy goodies, you can try grouping them to catch a buyer’s eye. Not only does this strategy make for a more eye-catching photograph, but it also shows potential buyers how pieces in your collection work together. Just be sure to note in your listing description which one of the items in the group is actually up for grabs. Also, avoid groups that are too large; using three to five pieces does the trick.
Group pieces. Especially if you make itsy-bitsy goodies, you can try grouping them to catch a buyer’s eye. Not only does this strategy make for a more eye-catching photograph, but it also shows potential buyers how pieces in your collection work together. Just be sure to note in your listing description which one of the items in the group is actually up for grabs. Also, avoid groups that are too large; using three to five pieces does the trick.
Third’s-eye view: Applying the rule of thirds

Illustration by Wiley, Composition Services Graphics
Figure 11-14: Imagine a three-by-three grid.
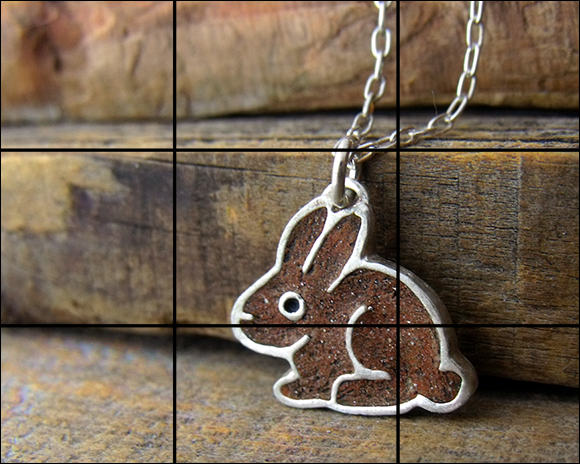
Photo courtesy of Heather Torre (www.etsy.com/shop/myselvagedlife)
Figure 11-15: Use the grid to compose your image.
Note: With some digital cameras, you can display a grid on the LCD viewfinder, enabling you to organize your image around the lines and cross points.
Focus, People! Focusing Your Image
It probably goes without saying, but in the interest of being thorough, we’ll say it anyway: A surefire way to turn off buyers is to include blurry images in your Etsy shop, especially if they’re close-ups. How’s a potential buyer supposed to view your piece in all its detailed splendor if your photos are as hazy as a Lindsay Lohan alibi? It’s imperative that your product photos be crisp and clear, as in Figure 11-16.
To ensure excellent focus if you’re shooting a close-up, use your camera’s macro setting. This setting (which, as mentioned in the earlier section “Key club: Identifying key camera features,” is usually indicated with a flower icon) ensures that your focus is sharp.
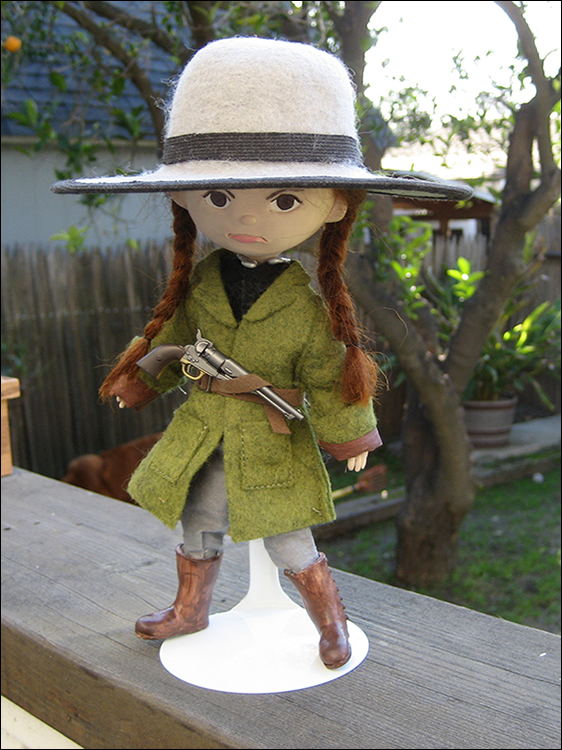
Photo courtesy of Becca Balistreri
Figure 11-16: Notice how crisp and clear this in-focus photo is.
Shoot, Shoot, and Shoot Some More: Taking Lots of Pictures
Back when film — not to mention the cost of developing it — put you back a pretty penny, you may have been justified in being stingy with your shots. But these days, it’s digital, dawg! You can — and should — shoot lots of shots. And by lots, we mean lots. Like, a whole bunch. A gazillion should do the trick.
The point is, your product photos have to be great — like, Muhammad Ali, Audrey Hepburn, Paul Newman great. As we say earlier in this chapter, they need to convey the shape, size, color, and texture of your piece, as well as reflect you and your broader brand identity. On top of all that, they need to be easy on the eyes. Unless you’re Helmut Newton (which would be amazing, given that he’s dead), you’re just not going to capture all that with a single click of the shutter button.
One more tip: As you shoot, make it a point to experiment. Swap out props and backgrounds. Try different angles, lighting, and depths of field. It’s the only way to ensure that you wind up with a winning picture.
Clean-up on Image Five: Tidying Up Your Photos with Image-Editing Software
Even the best photos can use a little tidying up. For example, you may want to adjust the image’s brightness or contrast, tweak the color in an image to make it really pop, or crop the image to make your subject stand out.
Fortunately, any number of image-editing programs are available to you, ranging in price from free to the cost of your arm and your leg. If you use a Windows PC, you can also use the Paint program, which came free with your computer. Yet another option is to use the software that came with your digital camera.
Unfortunately, we can't cover the ins and outs of using all these programs. But to give you a basic idea of how it's done, in the following sections, we step you through the process using Picasa, a free online photo-editing service, to fix your photos. (Note that the steps outlined here pertain specifically to Windows 7. If you use a different version of Windows, or a Mac, the steps may be slightly different.) To download and install Picasa, go to http://picasa.google.com. (Note that you must have an account with Google to download and install Picasa.)
Expose yourself: Adjusting your photo’s exposure and color
Suppose that your photo is a little bit dark. Or maybe your subject is slightly washed out. In either case, you can adjust its exposure. In addition, you can tweak the color. Here’s how:
1. Launch Picasa as you would any other program.
Picasa opens in Library view, displaying thumbnail versions of images on your hard drive.
2. Navigate the folders on the left side of the screen to locate the image you want to clean up (see Figure 11-17).
Alternatively, you can search for the image by typing its name in the Search field in the upper-right corner of the screen.
3. Double-click the image you want to open.
Picasa displays the image in an editing window, as shown in Figure 11-18.
The Commonly Needed Fixes tab (the one featuring a wrench) offers several tools for adjusting your image’s exposure and color.
4. For a quick fix, click the I’m Feeling Lucky button. Alternatively, click the Auto Contrast and Auto Color buttons individually. To adjust the fill light, drag the Fill Light slider.
If you don’t like how the image looks with the new settings applied, simply click the Undo button.
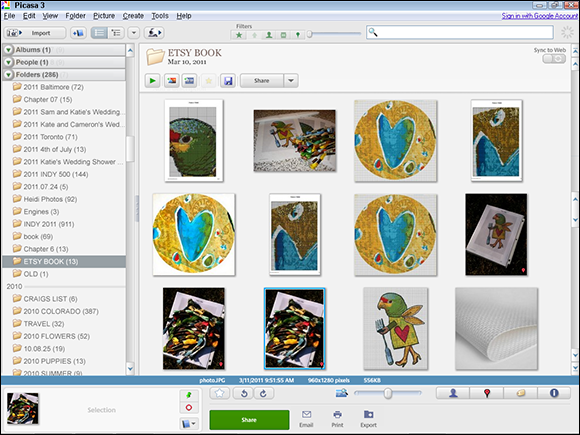
Figure 11-17: Open the folder containing the image you want to use.
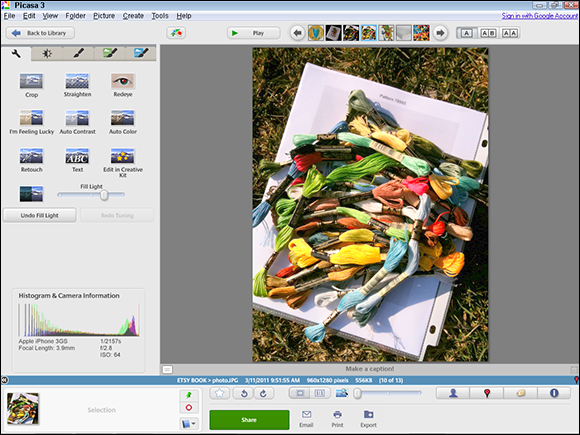
Figure 11-18: Picasa opens the image in an editing window.
Crop circles: Cropping your photo
If you’ve captured some extraneous items in your image, or you simply want to focus it more tightly on your piece, you can crop it. Here’s the drill:
1. Click the Crop button.
Picasa assumes you want to set the dimensions of the crop manually. To choose another option — for example, 4×6, 4×3, square, or what have you — choose it from the drop-down list that appears.
2. Click in the image and drag to create a box.
This indicates where the cropping should occur. The area of the image outside the box will be cropped from the image (see Figure 11-19).
3. To move the box, click inside it and drag it until it covers the part of the image you want to keep. To resize the box, click any of its four edges and drag inward or outward. To resize the box but keep its proportions intact, click any of its four corners and drag inward or outward.
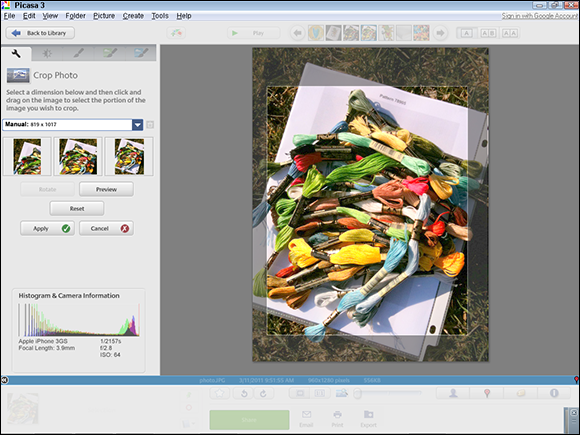
Figure 11-19: Picasa opens the image in an editing window.
4. Click the Apply button.
Picasa crops the image. If you don’t like how the image looks with the crop applied, click the Undo button.

 Especially if you craft wee things — jewelry, personalized guitar picks, pet portraits on grains of rice — you may want to consider using a light tent. A