Chapter 13
Selling Like (Burning Hot) Hotcakes: Listing Your Items
In This Chapter
![]() Listing an item
Listing an item
![]() Modifying a listing
Modifying a listing
![]() Duplicating a listing
Duplicating a listing
![]() Relisting an item
Relisting an item
![]() Removing a listing
Removing a listing
![]() Tidying up your Etsy shop
Tidying up your Etsy shop
Fish gotta swim. Birds gotta fly. Camels gotta spit. And an Etsy seller . . . well, she’s gotta sell. The first step to selling on Etsy — after setting up your Etsy store (and crafting the piece you want to sell) — is to create an item listing.
Simply put, an item listing is a page in your Etsy store that contains information about an item you have for sale. This item listing contains an item title and description, a list of materials you used to create your piece, a category and tags to help buyers find your item, images of your piece (you can include as many as five), pricing information, shipping details, and more.
In Chapter 11, you discover how to photograph your items. Chapter 12 is devoted to the ins and outs of composing item titles and descriptions. In this chapter, you put it all together and create your first Etsy listing!
Lister, Lister: Listing a New Item
Listing a piece in your Etsy shop is surprisingly painless — provided you’ve done all the necessary legwork first. (You’ve composed your item title and description, captured a few gorgeous pictures of your piece, set its price, established your shop policies, and so on.) Etsy steps you through the whole process, which we cover in the following sections.
Ready, set, go! Starting the listing process
After you log in to your Etsy account, follow these steps to begin the listing process:
1. Hover your mouse pointer over the Your Shop link along the top of any Etsy page.
As shown in Figure 13-1, a list of options appears.
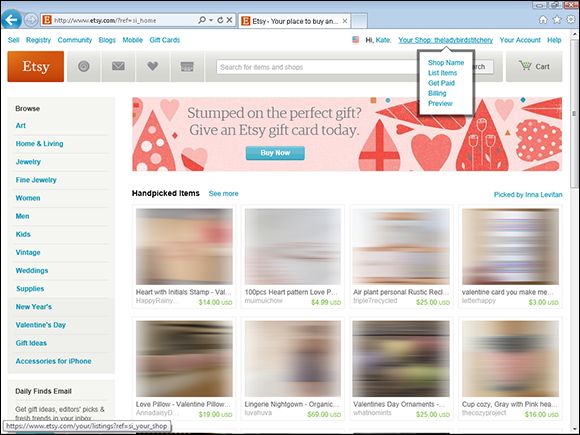
Figure 13-1: The Your Account page without any shop listings.
2. If this is the first listing you’ve created for your Etsy shop, click the List Items option. If you’ve created listings before, click Add New Item.
The List an Item page opens (see Figure 13-2). (Note that this page may look a little different depending on whether this is the first listing created for your shop, as shown here. Nevertheless, the options will be the same.)
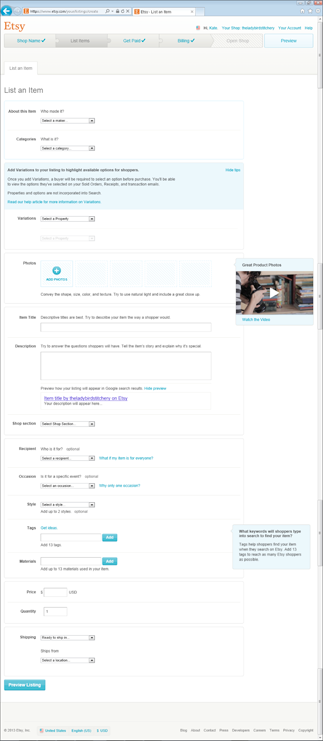
Figure 13-2: Use this page to create a listing.
About face: Filling in item information
Your first step is to enter some basic info about the item — who made it, what it is, when it was made, and under which category it should appear (see Figure 13-3). Follow these steps:
1. In the About This Item section, click the Who Made It? drop-down list and select the option that best reflects who made the item.
2. Click the What Is It? drop-down list that appears and indicate whether the item is a finished product or a supply or tool to make things.
3. Click the When Was It Made? drop-down list that appears and choose the option that best describes when the item was made.
4. In the Categories section, click the What Is It? drop-down list and choose a category for your item.
5. Click the What Type? drop-down list that appears and choose a subcategory.
6. Choose as many subcategories in the What Type? drop-down lists as necessary to categorize your item.

Figure 13-3: Add basic item info here.
Vary cool: Adding listing variations
If your item comes in different sizes, materials, colors, finishes, or what have you, you can indicate this in the Variations section (see Figure 13-4). You can choose up to two variations per item. When buyers purchase your item, they’ll need to choose from the options you set here. Follow these steps:
1. In the Add Variations section, click the Select a Property drop-down list and choose the correct property.
Examples include Size, Color, Finish, and more.
2. Add more information about the variation.
For example, choose the color from the drop-down list that appears; alternatively, type the relevant info when prompted and click the Add button. Repeat as needed.
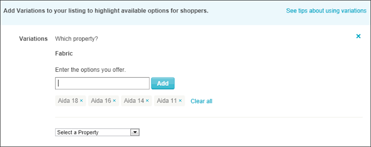
Figure 13-4: If you want, you can add variations.
Picture this: Uploading images of your item
Next up is adding photos to your listing. Here’s the drill:
1. In the Photos section, click the Add Photos button.
The Choose File to Upload (PC) or File Upload (Mac) dialog box opens.
2. Locate and select the first image you want to upload, and click the Open button.
 Any images that you upload must be at least 570 pixels wide (the height can vary) and no more than 1,000 pixels wide or high. Note, too, that image files must be of the JPG, GIF, or PNG variety.
3. Repeat steps 1 and 2 to add more images to your listing (see Figure 13-5).

Figure 13-5: Upload your product photos.
 Your listing can feature as many as five images — and that’s how many you want to include!
4. To change the order in which the images appear in your listing, click the image that you want to move and drag it either left to move it up in the order or right to move it down in the order.
Description prescription: Describing your item
To help convey your item’s fabulousness, you must include an item title and description, as shown in Figure 13-6. (Refer to Chapter 12 for help with composing your item title and description.) And if you’ve created sections for your shop, as discussed in Chapter 8, you can specify the section in which this item should appear. Here’s how:
1. In the Item Title field, type a title for your item.
2. In the Description field, enter a description of your item.
Notice that a preview of how your listing will show up in Google search results appears below the Description field (see Chapter 12 for details).
3. If you’ve created sections for your shop, click the Shop Section drop-down list and choose the section in which you want the listing to appear. (If you haven’t entered sections for your shop yet, you can do so later, and assign each of your listings to a section you create.)
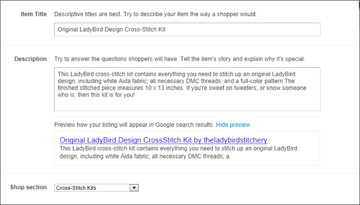
Figure 13-6: Enter a title and description for your item.
Getting specific: Adding the recipient, occasion, and style
Is your item made for a specific audience — say, babies or dogs? If so, you can indicate this in your listing. You can also specify an occasion for which your item is made (think wedding or birthday or Chinese New Year), as well as a style for your item (examples range from Goth to kitsch to tribal). Here’s how (see Figure 13-7):
1. Click the Recipient drop-down list and choose a recipient.
If your item is for everyone, it’s better to leave this option blank.
2. Click the Occasion drop-down list and choose an occasion.
As with the Recipient option, if your item is for all occasions, leave this option blank.
3. Click the Style drop-down list and choose a style.
If you want to add a second style, repeat this step.
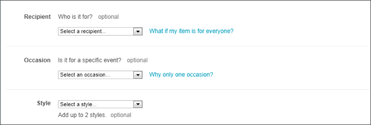
Figure 13-7: Optionally, add the recipient, occasion, and style.
It’s in the tag: Tagging your item
As you know, tagging is critical to Etsy’s search functionality. To tag your listing, follow these steps (see Figure 13-8):
1. Type a tag for your item in the Tags field and click the Add button.
2. Repeat Step 1 until you’ve added all appropriate tags.
 You can apply as many as 13 tags to your listing. To maximize the chances of buyers finding your item, you want to use as many tags as you’re allowed. If you run out of ideas for tags, turn to your trusty thesaurus for help. Also, it’s okay to use phrases. (Chapter 12 has the full scoop on tagging.)
3. To indicate the materials used in your piece, type a material in the Materials field and click the Add button.
4. Repeat Step 3 until you’ve added all appropriate materials.
You can apply as many as 13 materials to your listing. Enter as many materials as you can.
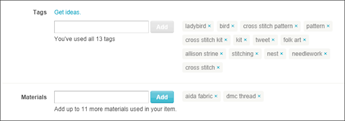
Figure 13-8: You tag your item in this section.
Sales figures: Adding selling information for your item
Follow these steps to enter the item’s price and quantity, as well as a few tidbits on shipping (see Figure 13-9):
1. Enter the item’s price in the Price field.
2. Type the item’s quantity in — you guessed it — the Quantity field.
Note that you will be charged 20¢ total for your item listing, regardless of quantity.
 3. Optionally, in the Shipping section, click the Ready to Ship In drop-down list and choose the option that reflects how much time you’ll need to prepare the order for shipping.
4. Click the Ships From drop-down list and choose your geographic location.
Etsy updates the Shipping section to enable you to indicate how much shipping will cost when the item is sent within the United States and elsewhere. Enter the appropriate info.
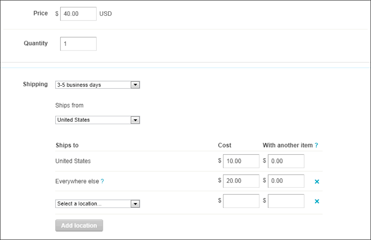
Figure 13-9: Enter the item’s price, quantity, and other details here.
The reviews are in! Reviewing your listing
You’re almost done! Follow these steps to review your listing one last time:
1. Click the Preview Listing button at the bottom of the List an Item page.
Etsy displays a preview of your listing (see Figure 13-10).
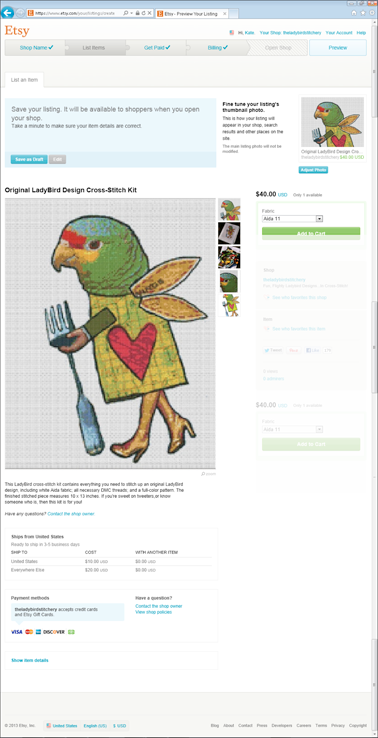
Figure 13-10: Review your listing.
2. Review your listing; if you notice something that you need to change, click the Edit button at the top of the page, make your change, and click the Preview Listing button again.
As you review your listing, note whether the listing’s thumbnail photo needs adjusting. If it does, click the Adjust Photo button and fix it as needed.
3. To submit your listing, click the Publish button at the top of the page.
The listing is submitted to Etsy and appears in the Currently for Sale page in Your Shop (see Figure 13-11).
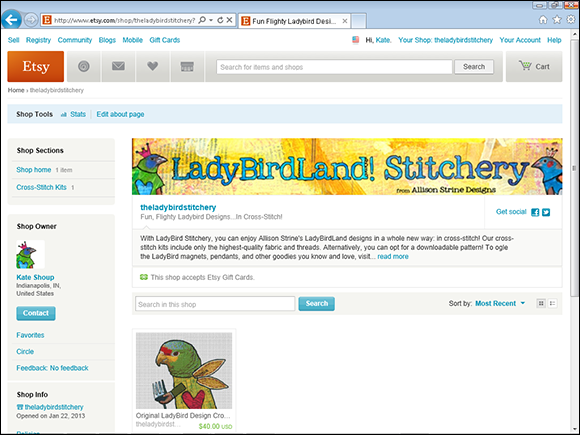
Figure 13-11: Your listing is posted.
If this is the first listing to be created in your shop, you won’t see a Publish button. Instead, you’ll see a Save as Draft button. Click that button instead. Then click the Open Shop button in the screen that appears. Finally, ensure the check box next to the listing is selected in the window that opens, and click the Publish Listings and Open Shop button (see Figure 13-12). Etsy opens your shop and publishes this as your first listing.
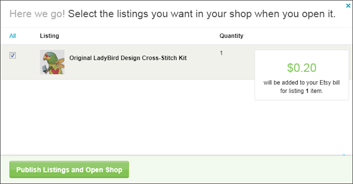
Figure 13-12: Click the Publish Listings and Open Shop button to publish your first listing and open your Etsy shop.
One more thing: Notice the message in Figure 13-12 that reads: “$0.20 will be added to your Etsy bill for listing 1 item.” This fee is your one-time listing fee, for which Etsy will bill you. (Note that this fee is nonrefundable, even if you unlist your item.) In addition to this listing fee, you’re charged a transaction fee when your item sells (not if — let’s be optimistic!). This transaction fee amounts to 3.5 percent of your total sale price (not including shipping). These fees are assessed at the end of each month. For more info on paying your Etsy bill, see Chapter 18.
Ch-Ch-Ch-Ch-Changes: Editing a Listing
Look, nobody’s perfect (although, obviously, you’re pretty close). You may make a mistake when creating your listing and need to change it. Or maybe a potential buyer asks a question about the item you have for sale, and you want to update the item’s listing to reflect your answer. Or you may want to add or change a listing photo.
Fortunately, regardless of why you need to change a listing, editing Etsy listings is a breeze (and free). You can edit any part of your item listing — the item title, item description, price, images, tags, materials, shipping information, you name it. To edit a listing, log in to your Etsy account and follow these steps:
1. Click the Shop icon in your Etsy header bar.
Your Etsy shop opens (refer to Figure 13-11).
2. Click the listing that you want to edit.
The listing opens (see Figure 13-13).
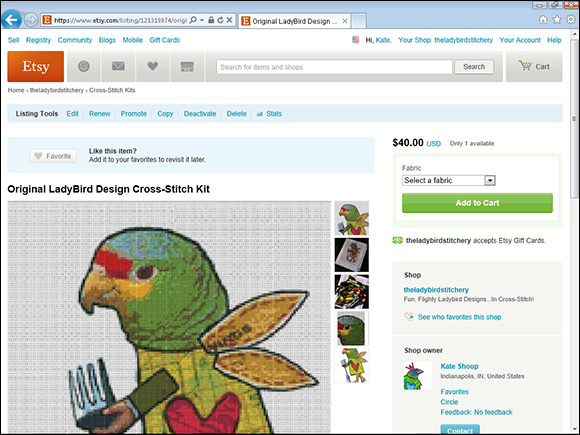
Figure 13-13: Your listing opens.
3. Click the Edit link in the Listing Tools toolbar along the top of the listing.
The Edit Listing page opens (see Figure 13-14). This page is nearly identical to the List an Item page shown earlier in this chapter (refer to Figure 13-2).
 You can also launch the edit operation from the Currently for Sale page (see Figure 13-15). To begin, hover your mouse pointer over the Your Shop link along the top of any Etsy page; then click the Listings link to open the Currently for Sale page. Next, click the Edit link on the right side of the listing that you want to edit.
4. Edit the listing using the same techniques you employed to create it.
5. Click the Preview Listing button to preview the listing.
6. Click the Publish button to publish the edited listing.
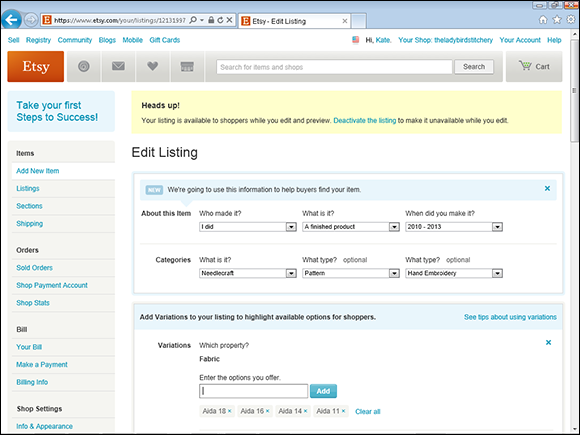
Figure 13-14: Edit your listing.
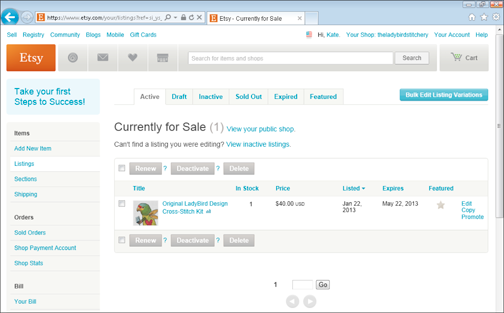
Figure 13-15: The Currently for Sale page.
Copycat: Copying a Listing
Suppose that you’ve created multiple items that are the same. In this case, instead of building a new listing for each item from scratch, you can create one listing and then copy it. Here’s how you do so (after you log in to your Etsy account):
1. Click the Shop icon in your Etsy header bar.
Your Etsy shop opens (refer to Figure 13-11).
2. Click the listing that you want to copy in your Etsy shop.
The listing opens (refer to Figure 13-13).
3. Click the Copy link in the Listing Tools toolbar along the top of the listing.
The List an Item page opens.
 Another way to launch the copy operation is to open the Currently for Sale page in Your Shop and click the Copy link on the right side of the listing that you want to copy.
4. Step through the listing-creation process, as described earlier in this chapter.
As you do, notice that the information in each section is entered for you, based on the listing you copied. You can change this information as needed.
5. Click the Preview Listing button to review your listing.
6. To post the listing, click the Publish button.
A new listing based on the one you copied is posted.
Renewable Resources: Renewing a Listing
In addition to copying listings, you can renew them. For example, you may renew a listing if it has expired, or if the item has sold and you want to restock your shop by offering a new, identical item.
You can also renew an active listing. When you do, the listing gets a new listing date and a new expiration date (four months from the date of renewal). A renewal can breathe new life into the listing, placing it closer to the top of item searches and briefly in the Recently Listed Items section.
Don’t be a sellout: Renewing a sold listing
To restock your shop by renewing a listing for a sold item, log in to your Etsy account and follow these steps:
1. Hover your mouse pointer over the Your Shop link along the top of any Etsy page.
A list of options appears.
2. Click the Sold Orders link.
The Open Orders page opens, as shown in Figure 13-16.
3. If the listing you want to renew appears in the Open Orders page, click it; if not, click the All tab and click the listing there.
A page for the listing opens, as shown in Figure 13-17.
4. Click the Renew Sold link.
A preview of the listing appears, much like the one shown in Figure 13-10.
5. Click the Renew button to renew your listing.
Etsy posts a new listing.
Stay active: Renewing an active listing
Here’s how you renew an active listing while you’re logged in to your Etsy account (it’s a cinch!):
1. Hover your mouse pointer over the Your Shop link along the top of any Etsy page.
A list of options appears.
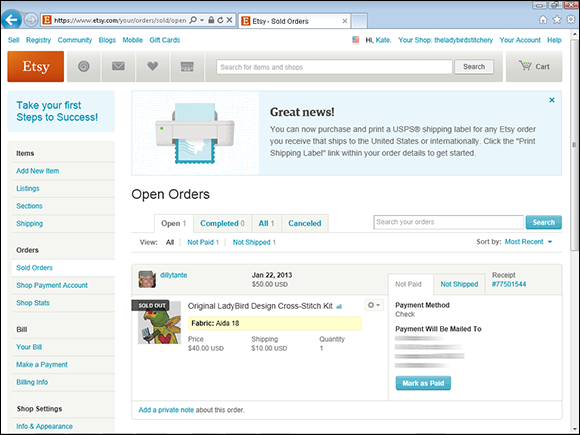
Figure 13-16: The Open Orders page.
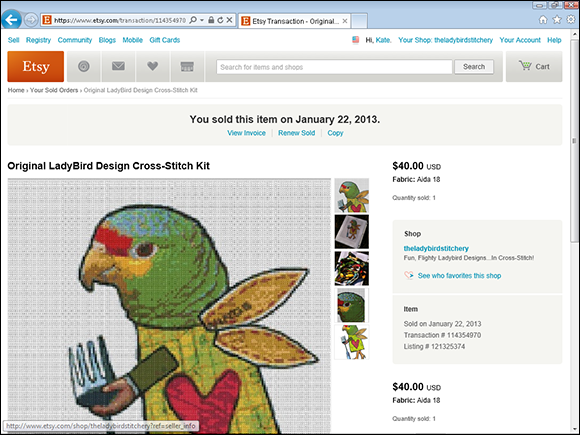
Figure 13-17: A page opens, indicating when the item was sold.
2. Click the Listings link.
The Currently for Sale page opens (refer to Figure 13-15).
3. Click the check box next to the listing you want to renew.
 To renew more than one active item at a time, click the check box next to each active listing that you want to renew. To select all your listings, click the check box just above or below the list. This same trick applies when you renew expired listings, covered in the next section.
4. Click the Renew button (there’s one at the top of the list of active listings and another one at the bottom of the list).
Etsy prompts you to confirm the renewal.
5. Click Renew again.
Etsy renews the listing.
Expiration mark: Renewing an expired listing
Renewing an expired listing is a lot like renewing an active listing:
1. Hover your mouse pointer over the Your Shop link along the top of any Etsy page and click the Listings link.
The Currently for Sale page opens (refer to Figure 13-15).
2. Click the Expired tab.
The Expired Listings page opens. This page looks a lot like the Currently for Sale page.
3. Click the check box next to the expired listing you want to renew.
4. Click the Renew button (there’s one at the top of the list of expired listings and another one at the bottom of the list).
Etsy prompts you to confirm the renewal.
5. Click Renew again.
Etsy renews the listing and directs you to the Expired tab.
Pull the Plug: Deactivating a Listing
Suppose that, after you crafted an item and listed it in your Etsy shop, your dog ate it. While you construct a replacement, you can deactivate the listing. You can deactivate listings in your Etsy shop for any reason, free of charge. When you deactivate a listing, it disappears from your Etsy shop. Note, however, that deactivating a listing doesn’t change its expiration date.
To deactivate a listing, log in to your Etsy account and follow these steps:
1. Hover your mouse pointer over the Your Shop link along the top of any Etsy page and click the Listings link.
The Currently for Sale page opens (refer to Figure 13-15).
2. Click the check box next to the listing that you want to deactivate.
 To deactivate more than one active item at a time, click the check box next to each active listing that you want to deactivate. To select all your listings, click the check box just above or below the list.
3. Click the Deactivate button (there’s one at the top of the list of active listings and another one at the bottom of the list).
Etsy deactivates the listing.
When you’re ready to reactivate the listing, again making it visible to people who visit your Etsy shop, here’s what you do:
1. Hover your mouse pointer over the Your Shop link along the top of any Etsy page and click the Listings link.
The Currently for Sale page opens (refer to Figure 13-15).
2. Click the Inactive tab.
The Inactive Listings page opens (see Figure 13-18).
3. Click the check box next to the listing that you want to reactivate.
 To reactivate more than one deactivated item at a time, click the check box next to each listing that you want to reactivate. To select all your listings, click the check box just above or below the list.
4. Click the Activate button (there’s one at the top of the list of deactivated listings and another one at the bottom of the list).
Etsy reactivates the listing, removing it from the Inactive Listings page.
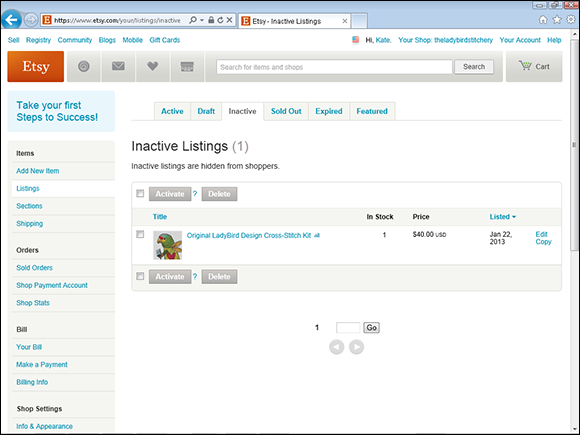
Figure 13-18: Renew an active listing.
Rearrange Your Face: Rearranging Your Etsy Shop
As you add more listings to your Etsy shop, you may decide that you want to rearrange the order in which they appear. For example, instead of having your items listed in the order you added them to your shop, with older items appearing farther down in the list (the default), maybe you want to group together all items of a certain color. Or put all items of a single type on one page. Or move all the most expensive items to the top of your store’s main page. Or move an older listing to the top of your list. Lucky you — rearranging your shop is simple, as you find out in the following sections.
Be an enabler: Enabling the Rearrange Your Shop feature
Before you make a move, you have to log in to your Etsy account and enable Etsy’s Rearrange Your Shop feature. Here’s how:
1. Click the Your Shop link along the top of any Etsy page.
2. Click the Options link on the left side of the page, under Shop Settings.
The Shop Options page opens (see Figure 13-19).
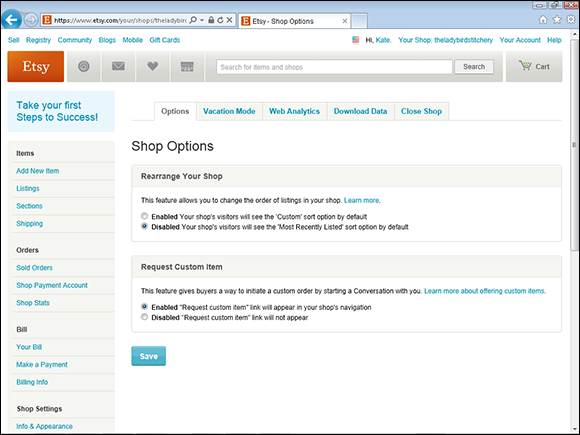
Figure 13-19: The Shop Options page.
3. Under Rearrange Your Shop, click the Enabled option button.
4. Click the Save button.
Etsy saves your changes.
Get moving! Moving your listings
Now you’re ready to get down to business rearranging your goodies. Here’s what you do:
1. Click the Shop icon in your Etsy header bar.
Your Etsy shop opens.
2. Click the Rearrange Your Shop link, under Your Shop, on the left side of the page.
Your shop changes to Rearrange mode.
3. To change the order of a listing, click the listing, drag it to the desired spot in the order, and release your mouse button.
The listing is moved.
 To move a listing to a different page in your Etsy shop, hover your mouse pointer over the item that you want to move. Then click the page you want to move it to.
4. Repeat Step 3 until the items in your shop are in the order you want.
5. Click the Save Changes button to save your arrangement.
Feature comforts: Featuring an item in your Etsy shop
When it comes to rearranging your Etsy shop, another option is to feature certain item listings. When you do, those listings appear in a special “Featured” section on your shop’s main page and across the bottom of your shop’s About page. You can feature as many as four item listings at a time.
To feature an item listing in your shop, follow these steps:
1. Hover your mouse pointer over the Your Shop link along the top of any Etsy page and click the Listings link.
The Currently for Sale page opens (refer to Figure 13-15).
2. Click the star in an item listing’s Featured column to feature that listing in your shop.
Voilà! The item listings that you selected appear at the top of your shop’s main page.
To change the order in which featured items appear on your shop page, follow these steps:
1. Hover your mouse pointer over the Your Shop link along the top of any Etsy page and click the Listings link.
The Currently for Sale page opens (refer to Figure 13-15).
2. In the Currently for Sale page, click the Featured tab.
The Featured Listings page opens.
3. To move an item up in the order, click its Up button; to move it down, click its down button.

 As you toodle around Etsy, you may notice the occasional listing whose title contains the word