Chapter 3
Program and Code File Structure
What’s in This Chapter
- Project files, including hidden files
- Changing project properties, references, resources, and assembly information
- Preprocessor directives
- The
usingdirective andnamespacestatements - End-of-line, multiline, and XML comments
Wrox.com Downloads for This Chapter
Please note that all the code examples for this chapter are available as a part of this chapter’s code download on the book’s website at www.wrox.com/go/csharp5programmersref on the Download Code tab.
A C# solution contains one or more related projects. A project includes all the files related to whatever output it produces. That output might be an executable program, a custom control, or a code library that other programs can use. The files relating to the output might include files full of C# code, documentation, data files, and any other files you want to include in the project.
This chapter describes the structure of a typical C# project and explains the purposes of some of the most common types of files you can find in a C# project. This chapter also describes the basic structure of C# source code files. It explains how you can use regions and namespaces to group related pieces of code. It also describes some typographic features such as comments, XML comments, and line labels that you can use to make C# code easier to understand.
Hidden Files
Figure 3-1 shows the Solution Explorer window for a solution named TurtleSolution that contains two projects named TurtleLib and TurtleTest.

Figure 3-1: A solution contains one or more projects that contain files related to the project.
Each project contains a Properties folder that represents the project’s properties. Each project also contains a References item that represents references to libraries used by the project.
In addition to the Properties and References items, the projects contain files related to the project. In this example, the TurtleLib project includes the class definition file Turtle.cs, and the TurtleTest project contains the form definition file Form1.cs.
In the TurtleTest project the Show All Files button has been clicked (the button third from the right at the top of the figure) so that you can see all the project’s files. The TurtleLib project has similar files, but they are hidden by default.
These files are generated by Visual Studio for various purposes. For example, the bin and obj directories contain files generated when the projects are compiled.
The following list describes the items contained in the TurtleTest project, as shown in Figure 3-1. The exact files you see for an application may be different from those shown here, but this list should give you an idea of what’s involved in building a project. Note that most of these files are generated automatically by Visual Studio, and you shouldn’t edit them manually. If you change them directly, you are likely to lose your changes when Visual Studio rebuilds them. You may even confuse Visual Studio so it can’t load the project.
- TurtleTest—This item represents the entire project. You can expand or collapse it to show and hide the project’s details.
- Properties—This item represents the project’s properties. To change the properties, either right-click this item and select Open or select Project ⇒ Properties. Figure 3-2 shows the TurtleTest project’s properties pages.
- AssemblyInfo.cs—This file contains information about the project’s assembly. Instead of editing this file directly, select Project ⇒ Properties to open the project’s properties page, and then on the Application tab, click the Assembly Information button. Figure 3-3 shows the TurtleTest project’s assembly information.
- Resources.Designer.cs—This file contains definitions of project resources such as strings and images. Instead of editing this file directly, select Project ⇒ Properties to open the project’s properties page and then go to the Resources tab.
- Settings.Designer.cs—This file contains definitions of project settings. Instead of editing this file directly, select Project ⇒ Properties to open the project’s properties page and then go to the Settings tab.
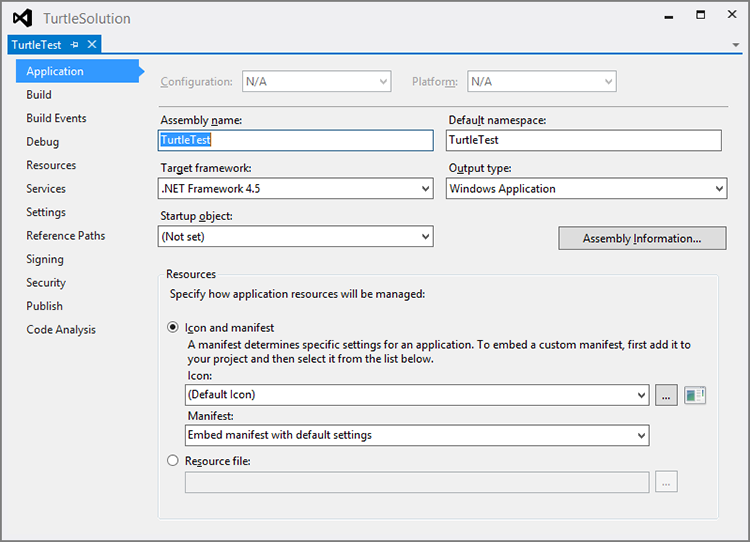
Figure 3-2: A project’s properties pages lets you set project properties, resources, and settings.
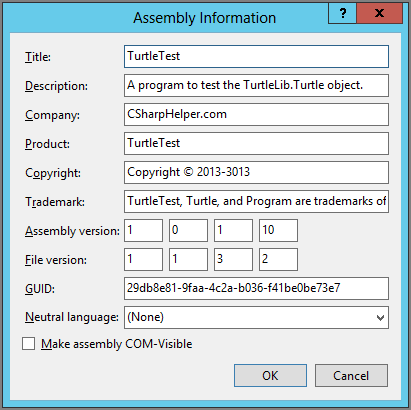
Figure 3-3: A project’s assembly information lets you specify values such as the project’s name, copyright information, and version.
- References—This item lists references to external components such as libraries and COM components. In this example, the TurtleTest project uses the
Turtleclass defined in the TurtleLib project, so its References section includes a reference to the TurtleLib library. (To add a reference, right-click the References item, and select Add Reference. Alternatively, you can select Project ⇒ Add Reference.) - bin—This folder is used to build the application before it is executed. The Debug or Release subfolder contains the compiled .exe file (depending on whether this is a debug or release build).
- obj—This folder and its Debug and Release subfolders are used to build the application before it is executed.
- App.config—This file contains configuration settings that the application reads when it starts.
- Form1.cs—This is a form code file. It contains the C# code you write that goes into the form. This includes event handlers for the form and its controls, and any other methods you add to the form’s code. If you double-click this file in Solution Explorer, Visual Studio opens the form in the Form Designer.
- Form1.Desginer.cs—This file contains designer-generated C# code that builds the form. It initializes the form when it is created, creates the controls you placed on the form in the Form Designer, and sets the controls’ properties. It also registers any event handlers that you have defined for the form and its controls. Instead of editing this file, use the Form Designer to modify the form and its controls.
- Form1—This entry represents the code behind Form1. If you double-click this file in Solution Explorer, Visual Studio opens the form’s code in the code editor.
- Program.cs—This file contains the automatically generated
Mainmethod that Visual Studio executes to start the program.
If you expand code items such as Form1 and Program, Solution Explorer lists the program elements contained inside. That includes variables, methods, event handlers, and other class-level items defined inside the class. You can double-click one of these items to open its definition in the Code Editor.
If you look closely at the bottom of Figure 3-1, you can see that the Solution Explorer window has three tabs. The first tab displays the Solution Explorer, which lists the files that make up the project. In Figure 3-1 that tab is selected so Solution Explorer is displayed.
The second tab opens Team Explorer, a tool that helps you manage your work in a team environment. For more information, see msdn.microsoft.com/library/hh500420.aspx.
The third tab opens the Class View. This tool enables you to view the classes defined by your projects. You can expand the classes to learn about their inheritance hierarchies. If you click a class, the bottom of the window shows you the class’s properties, methods, and events. If you double-click one of these items, Visual Studio opens the code that defines it in the Code Editor.
Figure 3-4 shows the Class View displaying information about the Turtle class defined in the TurtleLib project.
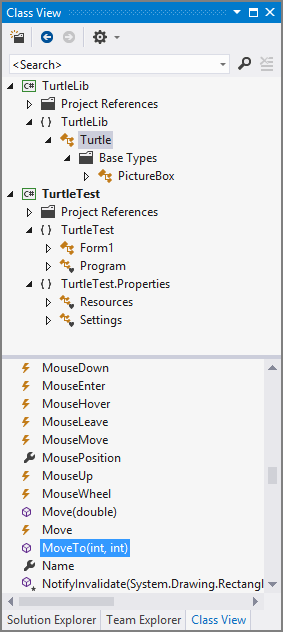
Figure 3-4: The Class View lets you examine the classes defined by a project.
Some projects may have other hidden files. For example, when you add controls to a form, the designer adds a resource file to the form to hold any resources needed by the controls.
Normally, you do not need to work directly with the hidden files, and doing so can mess up your application. At best, the changes you make will be lost. At worst, you may confuse Visual Studio, so it can no longer load your project.
Instead you should use other tools to modify the hidden files indirectly. For example, the files holding resources used by a form are automatically updated when you modify the form and its controls.
Preprocessor Directives
Preprocessor directives are commands for the C# compiler. They tell the compiler such things as which pieces of code to include in compilation and how the Code Editor should group lines of code.
The following sections describe the most useful C# preprocessor directives.
#define and #undef
The #define directive defines a preprocessor symbol that you can then use with the #if, #else, #elif, and #endif directives described next. Preprocessor symbols are either defined or not defined. They do not have values like constants inside the code do.
The #undef directive removes the definition of a defined symbol.
The #define and #undef directives must come before any programming statements including using directives. They apply for the entire file that contains them.
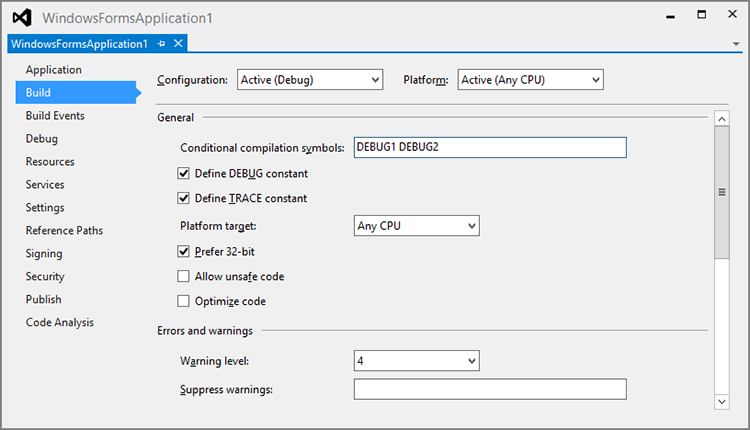
Figure 3-5: The Build property page lets you define conditional compilation symbols.
Visual Studio defines different sets of compilation symbols for different build configurations. The two standard configurations are Debug and Release. By default, Visual Studio defines the DEBUG and TRACE symbols for Debug builds and defines only the TRACE symbol for Release builds.
To change these values, use the Configuration Manager (found by selecting Build ⇒ Configuration Manager) to select the Debug or Release build. Then use the Build property page to determine which symbols are defined.
The DEBUG and TRACE symbols play a special role in program debugging. The Debug and Trace classes provide tools that make it easier to tell what a program is doing as it runs. The Debug class’s methods execute only if the DEBUG symbol is defined. Similarly, the Trace class’s methods execute only if the TRACE symbol is defined. By defining or not defining these symbols, you can easily turn the Debug and Trace methods on and off. Chapter 10, “Tracing and Debuging,” says more about these classes.
#if, #else, #elif, and #endif
These statements enable you to use compilation symbols to decide which code is included in the program when it is compiled.
For example, the following code displays a different message box depending on which symbols are defined.
        private void Form1_Load(object sender, EventArgs e)
        {
#if DEBUG_LEVEL1
            MessageBox.Show("Debug level is 1");
#elif DEBUG_LEVEL2
            MessageBox.Show("Debug level is 2");
#else
            MessageBox.Show("Debug level is undefined");
#endif

            ...
        }
In this example, if the symbol DEBUG_LEVEL1 is defined, the first message box displays. If that symbol is not defined but DEBUG_LEVEL2 is defined, the second message box displays. If neither of those symbols is defined, the third message box displays.
Visual Studio evaluates compilation symbols while you write code and grays out code that won’t be included in the compilation, so it’s easy to see what code will be used.
In addition to the simple tests shown in the preceding code snippet, the #if and #elseif directives can include parentheses and the !, &&, and || boolean operators. For example, the following code displays a message if SKIP_DEBUG is defined, or DEBUG_LEVEL1 and DEBUG_LEVEL2 are both undefined.
#if SKIP_DEBUG || (!DEBUG_LEVEL1 && !DEBUG_LEVEL2)
            MessageBox.Show("Don't display debugging messages.");
#endif
You can also use the != and == operators to compare symbols to the values true and false. For example, the following code displays a message box if the symbol SHOW_GREETING is defined.
#if SHOW_GREETING == true
    MessageBox.Show("Hello!");
#endif
The syntax #if SHOW_GREETING is simpler and usually easier to read, so most developers use that approach.
Note that the code not included by the conditional compilation statements is completely omitted from the executable program. That means excluded code doesn’t take up space in the executable program.
That also means Visual Studio doesn’t check the correctness of code that isn’t included. Visual Studio won’t warn you if excluded code contains typographical errors and invalid C# code.
#warning and #error
The #warning directive generates a level 1 warning. It is listed in the Error List but won’t stop the program from compiling. One reason to do this is to flag deprecated code so that developers know they are using old code, as in the following example.
#if OLD_VERSION
#warning You are using an old version of this library
#endif
The #error directive is similar to the #warning directive except it generates an error instead of a warning. An error prevents Visual Studio from compiling the program.
#line
The #line directive enables you to control the file’s line number and name for reporting purposes. This directive can take one of the three forms described in the following list.
#linenumber[file]—This sets the line number and optionally the filename for the following line. If a#warningor#errordirective follows this directive, it reports the given line number and file. If it is included, the file must be enclosed in double quotes.#line hidden—This hides the lines that follow from the debugger until the next#linedirective is reached.#line default—This restores the file’s line number and name to their true values.
The following example demonstrates the #line directives.
#if OLD_VERSION

#line 10 "Tools Module"
#warning This code is deprecated.
#endif

#line hidden
    ... lots of code omitted ...
#line default
If the symbol OLD_VERSION is defined, this code’s first #line directive sets the line number to 10 and the filename to "Tools Module". Then the #error directive displays a message in the Error List that says there’s an error on line 10 in the file Tools Module.
The #line hidden directive hides the omitted code from the debugger. If you try to step through the code in the debugger, the Code Editor skips over those lines. They are still executed, but you can’t step through them.
The final #line default directive restores the file to normal line numbering, name, and ends line hiding.
#region and #endregion
Some code constructs such as class and method definitions define regions that you can collapse in the Visual Studio Code Editor. If you look closely at a class statement, you can see a minus sign to the left in the Code Editor. If you click the minus sign, the editor collapses the class into a single line and changes the minus sign to a plus sign. Click the plus sign to expand the class again.
In Figure 3-6, the Person class and the PrintInvoice method in the Customer class are collapsed.
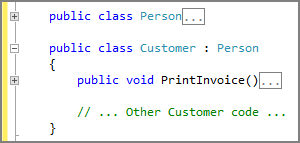
Figure 3-6: The Code Editor lets you expand and collapse blocks of code such as classes and methods.
The #region directive enables you define other sections of code that you can collapse and expand in a similar manner. The section of code extends to a corresponding #endregion directive.
The #region and #endregion directives can be followed by a string that identifies them. You can use that string to identify the region, so you can make sure the directives match up. However, the Code Editor completely ignores that string, so if a #region directive’s string doesn’t match the string used in the corresponding #endregion directive, Visual Studio doesn’t care.
For example, suppose an Employee class contains a lot of code for calculating payroll. You could place the payroll-related properties, methods, and other code in a region. Then you could hide that region so that it doesn’t get in the way while you work on other code in the class. The following code snippet shows how you could define this kind of region.
public class Employee : Person
{
    #region PayrollCode

    ... Payroll-related code here ...

    #endregion PayrollCode

    ... Other Employee code ...
}
Sometimes, it may be easier to move related pieces of code into separate files. For example, if a class becomes so large it’s hard to find things in it, it may be easier to move sections of the class into separate files. The partial keyword described in the section “Class Definitions’ later in this chapter enables you to place parts of a class in different files. For example, you could move the Employee class’s payroll-related code into a partial piece of the Employee class in a separate file.
#pragma
The #pragma directive gives special information to the compiler. This directive comes in two basic forms: #pragma warning and #pragma checksum.
The #pragma warning directive comes in the two forms described in the following list.
#pragma warning disable [warning_list]—This disables warnings for a comma-separated list of warning codes. If you omit the warning codes, this disables all warnings.#pragma warning restore [warning_list]—This re-enables warnings for a comma-separated list of warning codes. If you omit the warning codes, this re-enables all warnings.
For example, suppose you have XML documentation enabled. (This is described in the section “XML Comments” later in this chapter.) In that case, all public classes and all their public members should have XML comments describing them. If any of those comments are missing, Visual Studio displays an error message.
If you have XML documentation enabled, you should probably supply all those comments. If you want to omit a comment for a particular method, however, you can use #pragma warning disable to disable the warning on that method.
For example, consider the following Employee class.
    /// <summary>
    /// Represents an employee.
    /// </summary>
    public class Employee
    {
#pragma warning disable 1591
        public void PrintTimesheet()
        {
            ...
        }
#pragma warning restore 1591

        ...
    }
The class begins with an XML comment, so it doesn’t cause a warning. The PrintTimesheet method does not have an XML comment, so it would cause a warning if the #pragma warning disable directive didn’t disable the error.
After the PrintTimesheet method ends, the code restores the warning, so the compiler can report it for the class’s later public members.
The #pragma checksum directive has the following format.
#pragma checksum "file" "{guid}" "bytes"This directive is useful for debugging ASP.NET applications. It’s outside the scope of this book, so it isn’t described here. For more information, see msdn.microsoft.com/library/ms173226.aspx.
Code File Structure
The following code shows the file Form1.cs from a newly created program named WindowsFormsApplication1. This is a Windows Forms program created in Visual Studio Express 2012 for Windows Desktop.
using System;
using System.Collections.Generic;
using System.ComponentModel;
using System.Data;
using System.Drawing;
using System.Linq;
using System.Text;
using System.Threading.Tasks;
using System.Windows.Forms;

namespace WindowsFormsApplication1
{
    public partial class Form1 : Form
    {
        public Form1()
        {
            InitializeComponent();
        }
    }
}
The following sections describe three key pieces of this program that are typical of C# programs: the using directive, the namespace statement, and class definitions.
The using Directive
In .NET, namespaces are used to identify related classes, structures, interfaces, and other programming items. Namespaces can be nested within other namespaces, so they form a hierarchical system that categorizes programming items.
For example, the Form class is defined in the Forms namespace, which is inside the Windows namespace, which in turn is inside the System namespace. You can specify the complete path through a series of namespaces by separating them with dots. For example, the fully qualified path to the Form class is System.Windows.Forms.Form.
A using directive enables you to use a class without including its full namespace path. The previous code begins with a series of using directives that let the code refer to classes within the indicated namespaces without using the namespaces.
For example, the following statement shows the final using directive in the previous code.
using System.Windows.Forms;This statement enables the program to use classes defined in the System.Windows.Forms namespace without giving the namespace path. Later the code uses the following statement.
public partial class Form1 : FormThis statement refers to the Form class without providing its full namespace path.
The using directive can also create an alias for a namespace or type. For example, the following statement makes the alias d2d represent the System.Drawing.Drawing2D namespace.
using d2d = System.Drawing.Drawing2D;The code could then use the following statement to declare a variable named matrix that has type System.Drawing.Drawing2D.Matrix.
d2d.Matrix matrix;Usually using directives are placed at the beginning of a file, but you can also place them inside namespace statements. If you place a using directive in a namespace, it must come before all elements in the namespace and applies only to that instance of the namespace. If you have another piece of code that defines part of the same namespace, in the same file or in another one, then the using statement does not apply to the other piece of the namespace.
For example, the following code includes two namespace statements with some omitted code in between. Both declare statements that define classes that inherit from the Form class, so both include the using System.Windows.Forms directive.
namespace MyNamespace
{
    using System.Windows.Forms;

    class EmployeeForm : Form
    {
        ...
    }
}
... Omitted code ...

namespace MyNamespace
{
    using System.Windows.Forms;

    class CustomerForm : Form
    {
        ...
    }
}
The namespace Statement
You can use the namespace statement to create your own namespaces. You can use namespaces to group related classes and other program elements. By placing different classes in separate namespaces, you allow pieces of code to include only the namespaces they are actually using. That makes it easier to ignore classes that a piece of code isn’t using. It also allows more than one namespace to define items that have the same names.
For example, you could define an Accounting namespace that contains the AccountsReceivable and AccountsPayable namespaces. Each of those might contain a class named Invoice. The program could select one version or the other by using either Accounting.AccountsReceivable.Invoice or Accounting.AccountsPayable.Invoice.
The following example defines the Accounting namespace. That namespace defines the CustomerType enumeration and the two classes PayableItem and ReceivableItem. It also contains the nested namespace OrderEntry, which defines the OrderEntryClerk class. All the classes and namespaces could define other items.
namespace Accounting
{
    public enum CustomerType
    {
        CashOnly,
        Credit30,
        Credit90
    }

    public class PayableItem
    {
        ...
    }

    public class ReceivableItem
    {
        ...
    }

    namespace OrderEntry
    {
        public class OrderEntryClerk
        {
             ...
        }

        ...
    }
}
If a file includes a using directive to indicate that it is using a namespace, it does not need to explicitly identify the namespace to use the classes and other items it defines. You only need to explicitly use the namespace if multiple included namespaces define items with the same name.
All program elements in a C# program must be inside a namespace. By default, any code files you create include a namespace named after the project you initially created. For example, if you create an application named OrderEntrySystem, by default its code is contained in the OrderEntrySystem namespace.
You can view and modify the project’s default namespace by selecting Project ⇒ Properties and looking on the Application tab. Figure 3-7 shows the Application tab for the WindowsFormsApplication1 project. The default namespace is WindowsFormsApplication1.
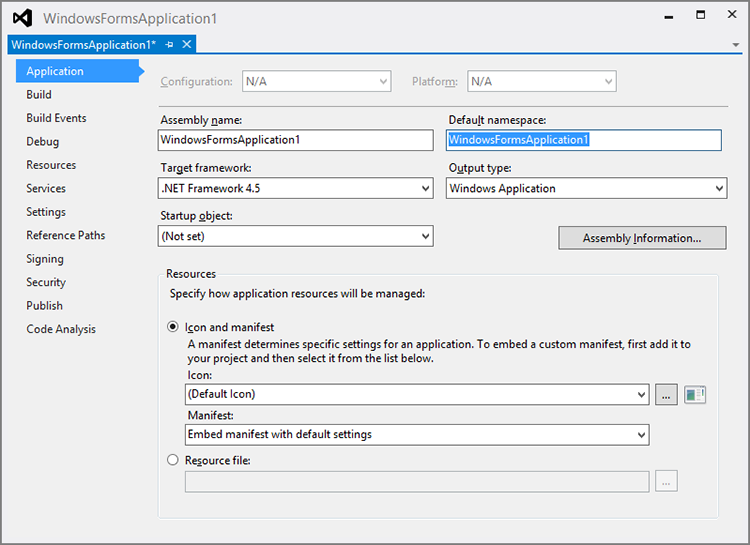
Figure 3-7: A project’s property pages let you view and change the project’s default namespace.
If you change the project’s default namespace, any classes that you create in the future are placed in the new namespace.
Class Definitions
The WindowsFormsApplication1 example program shown earlier included the following class definition.
public partial class Form1 : Form
{
    public Form1()
    {
        InitializeComponent();
    }
}
Chapter 12 has a lot more to say about classes. For now you should know that all classes (and structures, enumerations, and other program elements) must be declared inside some namespace.
One last fact about classes is worth mentioning here during the discussion of program and code file structure. If you look at the previous class definition, you see that it includes the partial keyword. That keyword means that this is only part of the class’s definition and that other class statements may contain more pieces of the class.
In this example, the form’s controls are defined in the file Form1.Desginer.cs. If you look at that file, you can see the following code (with some code omitted).
namespace WindowsFormsApplication1
{
    partial class Form1
    {
        ... Code omitted ...
    }
}
This code begins with the same namespace statement used in the file Form1.cs. That means the code in this file is in the same namespace as the code in the other file.
Inside the namespace statement is a partial class statement that adds more code to the Form1 class.
If a class is split into multiple pieces, then all the pieces must use the partial keyword. That means if you see a class declared with that keyword, you know there are other pieces somewhere.
Comments
Comments can help other developers (or you at a later date) understand the program’s purpose, structure, and method. Although comments aren’t executed by the program, they can make the code easier to understand. That makes the code easier to debug and modify over time.
C# provides three kinds of comments: end-of-line comments, multiline comments, and XML comments.
End-of-line and Multiline Comments
An end-of-line comment begins with the two characters // that are not inside a quoted string. This kind of comment extends to the end of the current line of code.
A multiline comment begins with the characters /* and ends with the characters */. The compiler ignores everything between those sets of characters.
The following code demonstrates end-of-line and multiline comments.
/* This class defines a student. It includes contact information,
 * billing information, past and current courses, and past and
 * current intramural activities.
 */
public class Student
{
    // The student's name.
    public string FirstName { get; set; }
    public string LastName { get; set; }

    // The student's contact information.
    public string Street { get; set; }
    public string City { get; set; }
    public string State { get; set; }
    public string Zip { get; set; }         // ZIP+4.
}
This code begins with a multiline comment containing a short paragraph describing the class. Many developers begin each line of a multiline comment with an asterisk, so you can tell that the line is part of a comment even if the /* and */ characters are scrolled off the screen at the time. Actually, Visual Studio automatically adds the asterisk if you press Enter while the cursor is inside a multiline comment.
After the class’s opening brace, the code includes an end-of-line comment that says, “The student’s name.” It then defines the FirstName and LastName properties.
Next, the code includes another end-of-line comment followed by the definition of the Street, City, State, and Zip properties. The line defining the Zip property also includes an end-of-line comment.
Although many developers begin each line in a multiline comment with an asterisk, that is not required, so you can use multiline comments to quickly comment out large sections of code. For example, the following code shows the previous example with all the code inside the Student class commented out with a multiline comment.
/* This class defines a student. It includes contact information,
 * billing information, past and current courses, and past and
 * current intramural activities.
 */
public class Student
{
    /*
    // The student's name.
    public string FirstName { get; set; }
    public string LastName { get; set; }

    // The student's contact information.
    public string Street { get; set; }
    public string City { get; set; }
    public string State { get; set; }
    public string Zip { get; set; }         // ZIP+4.
    */
}Visual Studio’s Standard toolbar also includes command and uncomment tools. Click and drag to select lines of code. Then click the Comment tool to add the // characters at the beginning of each of the selected lines. Click the Uncomment tool to remove the initial // characters from each line. (You can also find those commands in the Edit ⇒ Advanced menu.)
Use comments to make your code clear. Comments do not slow the executable program down (some superstitious developers think they must slow the code because they make the file bigger), so there’s no good reason to avoid them.
XML Comments
A normal comment is just a piece of text that gives information to a developer trying to read your code. XML comments enable you to add some context to a piece of code. For example, you can preface a method with a brief description of the method, its parameters, and the meaning of its return result.
If you want it to, Visual Studio can automatically extract XML comments to build an XML file describing the project. This file displays the hierarchical shape of the project, showing comments for the project’s namespaces, classes, and other elements. The result is not particularly easy to read, but you can use it to automatically generate more useful documentation such as reports or web pages. For example, third-party tools such as NDoc (ndoc.sourceforge.net) and Sandcastle (shfb.codeplex.com) can process the XML comments to produce documentation. You can also write your own programs to process XML comments, for example, by using XSLT as described in Chapter 24, “XML.”
You can place a block of XML comments before code elements that are not contained in methods. These include such items as classes, structures, enumerations, properties, methods, and events.
To begin a comment block, place the cursor on the line before the element you want to describe and type ///. Visual Studio automatically inserts a template for an appropriate XML comment block. If the element that follows takes parameters, it includes sections describing the parameters, so it is in your best interest to completely define the parameters before you create the XML comment block. (Otherwise you need to add the appropriate comment sections by hand later.)
The following code shows the XML comment block created for the CreateStudent method. It includes a summary section where you can describe the method and two param sections where you can describe the method’s parameters.
/// <summary>
///
/// </summary>
/// <param name="firstName"></param>
/// <param name="lastName"></param>
public void CreateStudent(string firstName, string lastName)
{
}
Note that XML elements can span multiple lines, as the summary element does in this example.
If you start a new line between XML comment entries, Visual Studio automatically adds /// to the beginning of the new line. If you then type <, IntelliSense presents a list of standard XML comment sections. You can select one or you can type a new section of your own. For example, the following code adds some content for the comments in the previous code and an extra WrittenBy element that contains a date attribute:
/// <summary>
/// Create a new student record in the database.
/// </summary>
/// <param name="firstName">The student's first name.</param>
/// <param name="lastName">The student's last name.</param>
/// <WrittenBy date="4/1/2020">Rod Stephens</WrittenBy>
public void CreateStudent(string firstName, string lastName)
{
}To allow Visual Studio to create XML documentation from the XML comments, select Project ⇒ Properties and go to the Build tab. If the whole tab isn’t visible, scroll to the bottom and check the XML Documentation File box, as shown in Figure 3-8. If you don’t want the documentation file to have its default name, you can change that, too.
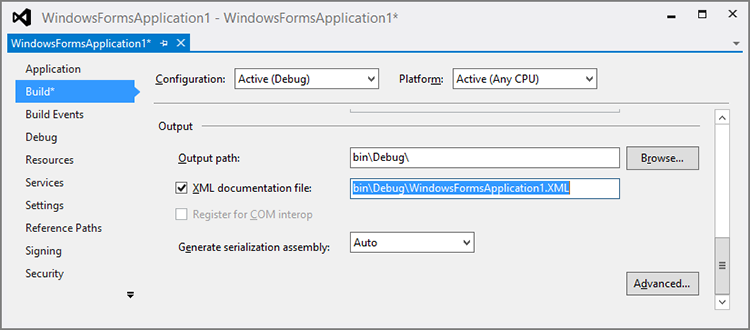
Figure 3-8: Check the XML Documentation File box to create XML documentation.
In addition to providing documentation for your use, XML comments let IntelliSense provide additional information about your code. Figure 3-9 shows IntelliSense displaying information about the CreateStudent method. At this point, I had typed the method call’s open parenthesis, so IntelliSense displays information about the firstName parameter.
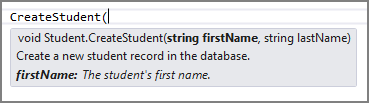
Figure 3-9: IntelliSense uses XML comments to display information about methods and their parameters.
When you compile the application, Visual Studio extracts the XML comments and places them in an XML file with the name indicated on the Build property page. The result isn’t readable, but you can use it to generate more palatable documentation.
The following text shows a sample result. (I’ve added a few line breaks in long lines.) The bold lines show the information defined by XML comments.
<?xml version="1.0"?>
<doc>
    <assembly>
        <name>WindowsFormsApplication1</name>
    </assembly>
    <members>
        <member name="F:WindowsFormsApplication1.Form1.components">
            <summary>
            Required designer variable.
            </summary>
        </member>
        <member name="M:WindowsFormsApplication1.Form1.Dispose(System.Boolean)">
            <summary>
            Clean up any resources being used.
            </summary>
            <param name="disposing">true if managed resources should be disposed;
                otherwise, false.</param>
        </member>
        <member name="M:WindowsFormsApplication1.Form1.InitializeComponent">
            <summary>
            Required method for Designer support - do not modify
            the contents of this method with the code editor.
            </summary>
        </member>
        <member name="M:WindowsFormsApplication1.Program.Main">
            <summary>
            The main entry point for the application.
            </summary>
        </member>
        <member name="T:WindowsFormsApplication1.Student">
            <summary>
            This class defines a student. It includes contact information,
            billing information, past and current courses, and past and
            current intramural activities.
            </summary>
        </member>
        <member name="M:WindowsFormsApplication1.Student.CreateStudent(
         System.String,System.String)">
            <summary>
            Create a new student record in the database.
            </summary>
            <param name="firstName">The student's first name.</param>
            <param name="lastName">The student's last name.</param>
            <WrittenBy date="4/1/2020">Rod Stephens</WrittenBy>
        </member>
        <member name="T:WindowsFormsApplication1.Properties.Resources">
            <summary>
              A strongly-typed resource class, for looking up localized
              strings, etc.
            </summary>
        </member>
        <member name="P:WindowsFormsApplication1.Properties.Resources.
         ResourceManager">
            <summary>
              Returns the cached ResourceManager instance used by this class.
            </summary>
        </member>
        <member name="P:WindowsFormsApplication1.Properties.Resources.Culture">
            <summary>
              Overrides the current thread's CurrentUICulture property for all
              resource lookups using this strongly typed resource class.
            </summary>
        </member>
    </members>
</doc>
Summary
A Visual Studio solution contains a hierarchical arrangement of items. At the top level, it contains one or more projects. Each project contains files that define such items as forms, application settings, and resources. This chapter explained the purposes of the most common of these types of files.
This chapter also explained preprocessor directives such as #define, #if, and #region that you can include in a C# source file to control the way Visual Studio and the C# compiler manage the file. It also explained some basic elements of code file structure such as the using and namespace statements, class declarations, and different kinds of comments.
Now that you understand the basic elements that make up a C# project and code file, you can start learning about the language itself. The chapters in the next part of the book describe the basic elements of the C# programming language. Chapter 4, “Data Types, Variables, and Constants,” begins by explaining data types, variables, and constants that hold information while a program manipulates it.
Exercises
The exercises for this chapter are actually things you should practice rather than questions to test your understanding. Take a few minutes to give them a try. These exercises and the rest of the book assume you use Visual Studio 2012 Express for Windows Desktop. If you prefer to use some other version of Visual Studio, you may need to adapt the exercises and their solutions somewhat.
For exercises 1 through 5, follow these steps to build a test application:
- Create a new Windows Forms application.
- Add a button and give it these property values:
Name=setBackgroundPropertyText= Set BackgroundAnchor=None- Make the button big enough to display its text.
- Use the Format ⇒ Center in Form menu to position the button in the middle of the form.
- Open Project ⇒ Properties and select the Resources tab. Open the Add Resources drop-down (click to the right on its drop-down arrow) and add a picture to the project. Use any picture you like.
- Create the button’s
Clickevent handler and insert the following line of code, replacingdogwith the name of the resource you added as it appears on the Resources tab.BackgroundImage = Properties.Resources.dog;
Use the program to answer the following questions.
- Resize the form.
- What happens to the button’s position?
- What happens if you change the button’s
Anchorproperty toTop, Left? (Experiment a bit with the graphical editor for setting this property.) - What if
AnchorisBottom, Right? - What if
AnchorisTop,Bottom, Left, Right?
- Set the button’s
Anchorproperty toTop,Bottom, Left, Right.- What happens to the button if you make the form small?
- Can you still “click” the button by pressing Enter?
- Change the button’s
MinimumSizeproperty to50, 15. Now what happens if you make the form small?
- Click the button.
- What happens when you click the button?
- What happens if you change the form’s
BackgroundImageLayoutproperty toNone? - What if
BackgroundImageLayoutisCenter? - What if
BackgroundImageLayoutisStretch? - What if
BackgroundImageLayoutisZoom?
- Add the following lines of code to the button’s
Clickevent handler. What happens when you click the button now?setBackgroundButton.BackColor = Color.Yellow; setBackgroundButton.ForeColor = Color.Red; - Use a multiline comment to comment out the code you entered for Exercise 4 and add the following code. What happens now when you click the button?
BackColor = Color.Red; ForeColor = Color.Blue; - Suppose you have the following code that includes nested multiline comments.
/*
Comment.

/*
Inner comment.
*/

*/
How do you think Visual Studio will interpret this code?
- Suppose you have the following code that defines two overlapping regions.
#region Region1 // Code Block 1 ... #region Region2 // Code Block 2 ... #endregion Region1 // Code Block 3 ... #endregion Region2- What happens if you collapse Region1? (Try to figure it out by using what you know about regions. Then try it to see if you’re correct.)
- What happens if you collapse Region2?