
Chapter 20
Ten Ways to Use an iPad with Logic Pro X
In This Chapter
![]() Playing and recording software instruments
Playing and recording software instruments
![]() Editing and mixing with your iPad
Editing and mixing with your iPad
![]() Navigating and commanding Logic Pro
Navigating and commanding Logic Pro
![]() Writing songs on your iPad
Writing songs on your iPad
Logic Remote is a free app for iPads running iOS 7.0 or higher. With Logic Remote, you can remotely control three Apple music apps on your Mac: Logic Pro, GarageBand, and MainStage. You connect Logic Remote to your music app with Wi-Fi or Bluetooth. Download Logic Remote at http://logicstudiotraining.com/logicremote.
When you open Logic Remote, it attempts to connect to the software running on your Mac, so you must have Logic Pro, GarageBand, or MainStage running. Otherwise, Logic Remote will shut down. If you have more than one of these applications running, you’re asked to choose the application you want to control. After you’re connected, you can control the application using your iPad.
In this chapter, you learn how to use your iPad to play software instruments, edit your tracks, mix your project, and write songs.
Playing Keys
The first thing you should check out in the Logic Remote app is the control bar at the top of the interface, shown in Figure 20-1. The center display shows the playhead location, the track name, and the track number. You can navigate through the track list with the arrows on either side of the display.

Figure 20-1: The Logic Remote library.
Tap the view icon to navigate to different views, including the touch instruments, mixer, smart help, and key commands. The View menu is dynamic and gives you options based on the selected track. For example, drummer tracks have a kit view while keyboard tracks have a chord strip view.
Tap the library icon to open the patch library. From the Patch Library menu, you can access your entire Logic Pro library and choose new patches for the currently selected track. Logic Remote does its best to recognize the instrument you load and give you the right tools for the job. Load a bass guitar patch, and Logic Remote will display a fretboard. Load a drum patch, and Logic Remote will display drum pads. The Logic Remote smart controls give you cool-looking interfaces that are easy to use and fun to play. Check out my favorite, the vintage keys.
Playing Guitar
If you’re a guitar player, you may prefer to play all Logic Pro software instruments by using a fretboard on your iPad. If you’re not a guitar player, the fretboard is easy to learn (tap the frets to play notes), and frets can inspire you to play differently. You can drag the strings up or down to bend notes, just like on a guitar. You can also play with chord strips, as shown in Figure 20-2.
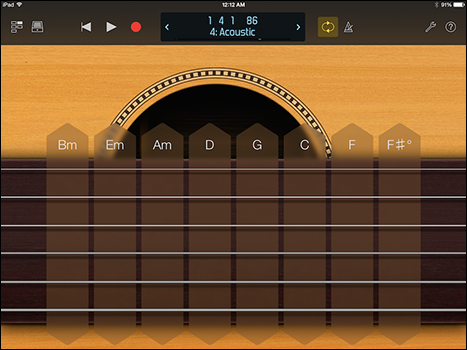
Figure 20-2: The acoustic guitar chord strips.
To view the chord strips, tap the view icon and choose the chord strips. Tap the top of the chord strip to play all six strings at once. You can tap any individual string to play it or swipe up and down along the chord strip to simulate strumming. The chord strips can be a wonderful songwriting tool. You can use them to quickly try out different chord progressions as you write. Even a musical virtuoso will find chord strips handy for focusing exclusively on harmony.
Playing Drums
Logic Remote turns your iPad into an easy-to-use beat maker. With an Ultrabeat track selected, you can view a large screen of 24 drum pads. With a Drum Kit Designer track selected, you can choose the kit view, as shown in Figure 20-3. The drums are touch-sensitive. If you tap a drum with two fingers, it plays repeating notes (great for hi-hat), and as you spread your fingers apart, the pattern gets faster (great for drum rolls).
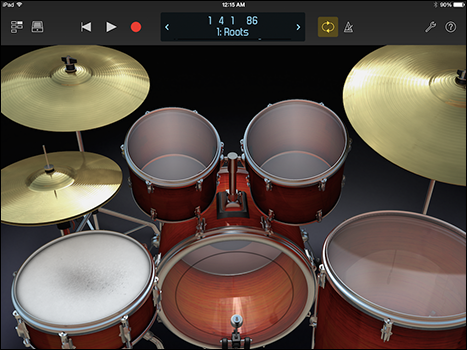
Figure 20-3: The drum kit view.
Both Ultrabeat and Drummer are tightly integrated in Logic Remote. The smart controls take on the look and feel of the instruments, helping you to quickly adjust as you change between tracks. But you’re not restricted to the controls Logic Remote gives you. You’re more than welcome to play drums using frets, a keyboard, or even chord strips. And while you’re thinking about it, you can use drum pads (but not the drum kit) to play keyboard and guitar parts. That should help you compose something new and different.
Editing Tracks and Your Arrangement
Editing is often filled with repetitive tasks. When you find yourself choosing the same menus and functions over and over again, open the key commands view, shown in Figure 20-4, and add a customized key command.
To add a key command, follow these steps:
- Tap the view menu and choose the Key Commands view.
The key commands view opens.
- Tap an empty key command space.
The key command search dialog opens.
- Browse or search for the key command.
- Tap the key command.
The key command is added to the space.
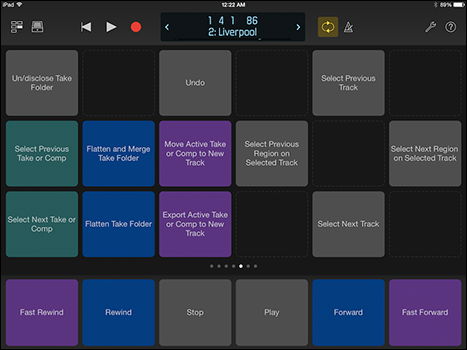
Figure 20-4: Logic Remote key commands.
 Several commands to split regions will save you from having to switch to the scissors tool. You can add key commands to set your locators, nudge regions, and go to markers so you can edit your arrangement and your tracks quickly.
Using Your iPad Mixing Console
Tap the view icon and choose the mixer. In my opinion, the mixer, shown in Figure 20-5, is worth the entire price of the iPad. I’ve spent a lot more money on various MIDI controllers and control surfaces to get the same functionality that I get from a simple and elegant free iPad app. And I never found a solution that was as easy to set up and use as Logic Remote.
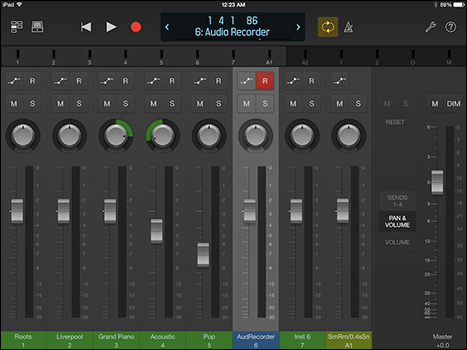
Figure 20-5: The mixer.
The mixer shows you level meters; icons for automation, record, mute, and solo; pan knobs; faders; and the track names and numbers. You can swipe across the track names or meters to show different groups of faders. To view effects sends in the mixer, tap the Sends 1-4 icon beside the master fader.
Many audio engineers like to listen to their mix from right outside the control room to test how it sounds from a distance. But not every engineer can listen from outside the room and make changes from an iPad. And with smart controls, you have the most important controls at your fingertips.
Recording Remotely
For many laptop artists, the computer is inseparable from the art. Unfortunately, so is the laptop fan noise. And as you add professional mics and preamps to your studio, they get better at picking up all the imperfections of your recording environment. With Logic Remote, you can leave the computer where it won’t impede the quality of your recording.
To begin recording on the selected track, tap the record icon on the transport. Tap the stop icon when you’re finished. Tap the cycle mode icon to record multiple takes, as described in Chapter 6.
Commanding Logic Pro
Tap the settings icon to open the edit and track submenus, as shown in Figure 20-6. On this menu, you can undo and redo edits, create and duplicate tracks, adjust the velocity range of the touch instruments, and open Logic Remote Help.
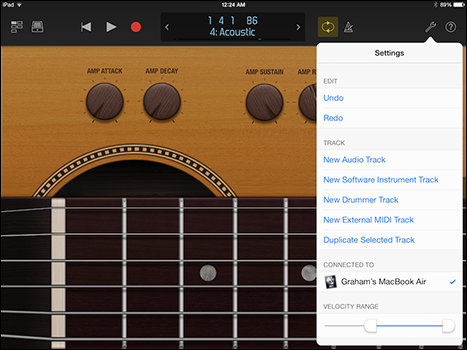
Figure 20-6: Logic Remote settings.
It’s probably a good idea to add a key command to save your project. (See “Editing Tracks and Your Arrangement” section to find out how to add custom key commands.) In addition to adding a key command to save your project, you can add other project commands such as New Empty Project, Close Project, and Close Project without Saving.
Navigating Logic Pro
The control bar display shows you the location of the playhead in musical time or clock time, depending on the general project settings. Tap the control bar display, and a ruler opens below the control bar, as shown in Figure 20-7. Swipe left or right in the ruler or display area to move the playhead.
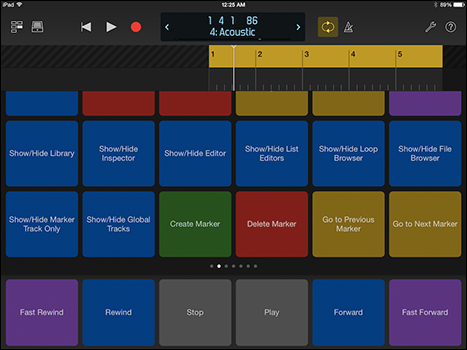
Figure 20-7: The ruler.
The benefit of having a computer keyboard with a numeric keypad is that the numeric keys are assigned to marker numbers. If you’re working on a laptop or with a keyboard that doesn’t have a numeric keypad, you can create key commands in Logic Remote that go to marker numbers. (See the “Editing Tracks and Your Arrangement” section for information on creating key commands.) If you want to edit a key command, tap it with two fingers to remove or replace the key command or give it a color.
Sketching Songs with GarageBand
You can start any project in GarageBand for iOS (iPhone, iPad, or iPod touch), import it to GarageBand on your Mac to work on it a little more, and then import it to Logic Pro. The workflow is smooth. One benefit of using all three apps is that you have a version of the project saved on your iOS device, in your GarageBand projects folder, and in your Logic Pro projects folder. Redundant backups will save the day.
GarageBand for iOS is a simple app to master. It has a limited feature set but gives you more recording and editing capabilities than The Beatles had in their early days. Plus, you can use its many auto-accompaniment features, such as smart drums, shown in Figure 20-8, to sketch new songs. Tap the settings icon (wrench) to open the GarageBand help system.
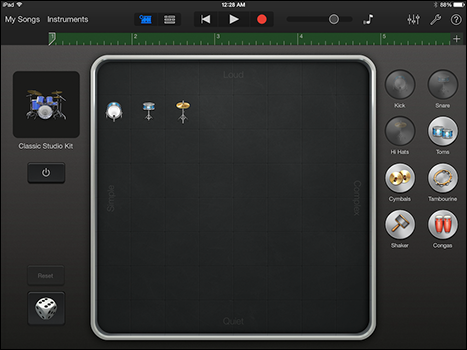
Figure 20-8: GarageBand smart drums.
GarageBand for Mac and iOS are both free apps. With your Logic Pro knowledge, I’m confident that you’ll master GarageBand quickly. To find out more about GarageBand for iOS and Mac, visit the following links:
Importing iPad Audio
GarageBand for iOS is capable of recording other music applications on your device through Inter-App Audio. Many iOS apps support the Inter-App Audio protocol. It’s a great way to get audio from your third-party synths and drum machines into GarageBand and, eventually, into Logic Pro. In GarageBand for iOS, here’s how to record audio from an app with Inter-App Audio capabilities:
- Tap the Instruments button, which is at the top of the interface.
The touch instrument browser opens, as shown in Figure 20-9.
- In the instrument browser, choose Inter-App Audio Apps.
The screen updates to show you apps capable of inter-app audio.
- Choose the app you want to add to your song.
An audio track is added to your song using the output of your inter-app audio app. You can now record audio from the chosen app within GarageBand.
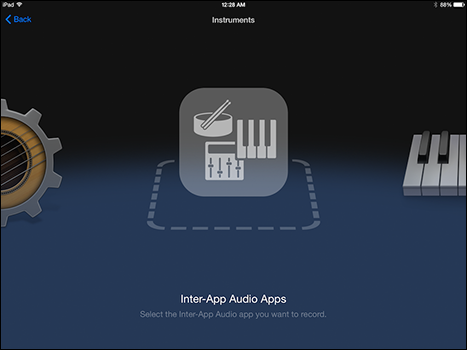
Figure 20-9: The GarageBand touch instrument browser.
You can also use third-party audio effects via Inter-App Audio. Some fantastic sounding guitar amp simulators can be used as an effect on your audio tracks. Recording apps into GarageBand for iOS and then importing projects to your computer is a simple and effective way to get the most from your iPad, GarageBand, and Logic Pro X.