
Chapter 11: How Do I Use My iPhone to Navigate My World?
Dedicated GPS devices have become gasp-inducingly popular over the past few years because it’s not easy finding your way around in a strange city or an unfamiliar part of town. The old way — deciphering hastily scribbled directions or scratching your head over a possibly out-of-date map — was just too hard and error prone, so having a device tell you where to go (so to speak) was a no-brainer. However, dedicated devices, whether they’re music players, ebook readers, or GPS receivers, are going the way of the dodo. They’re being replaced by multifunction devices that can play music, read books, and display maps. In this chapter, you take advantage of the multifunction prowess of your iPhone to learn about the amazingly useful Maps app.
Finding Your Way with Maps and GPS
Finding Your Way with Maps and GPS
When you’re out in the real world trying to navigate your way between the proverbial points A and B, the questions often come thick and fast: “Where am I now?” “Which turn do I take?” “What’s the traffic like on the highway?” “Can I even get there from here?” Fortunately, the answers to those and similar questions are now just a few finger taps away. That’s because your iPhone comes loaded not only with a way-cool Maps app but also a GPS receiver. Now your iPhone knows exactly where it is (and so, by extension, do you) and it can help you get where you want to go.
To get the Maps app on the job, tap the Maps icon in the iPhone Home screen. Figure 11.1 shows the initial Maps screen. (If you see a dialog letting you know that Maps would like to use your current location, say “But of course!” and tap OK.)
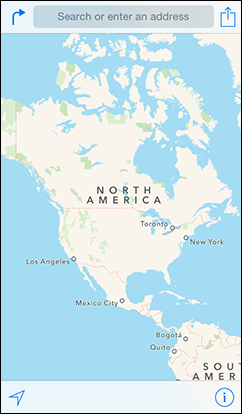
11.1 Use the Maps app to navigate your world.
Searching for a destination
When you want to locate a destination using Maps, the most straightforward method is to search for it:
- Tap inside the Search box at the top of the screen.
- Type the name, address, or a keyword or phrase that describes your destination.
- In the on-screen keyboard, tap Search. Maps locates the destination, moves the map to that area, and drops a pin on the destination, as shown in Figure 11.2.
Now that you have your destination pinpointed (literally), you can read the map to find your way by looking for street names, local landmarks, nearby major intersections, and so on. (You also can use the Maps app to get specific directions; I show you how that works later in this chapter.) The map is also rotatable so, for example, if you’re physically facing east, you can rotate the map so that it also faces east and you can more easily get your bearings. To rotate the map, place two fingers on the screen and rotate either clockwise or counterclockwise.

11.2 When you search for a destination, Maps displays a pin to mark its location on the map.
Getting info about a destination
Knowing where a destination is located is a good thing, but you might also want to find out more about that destination. Maps has you covered there, as well, because it not only provides you with general info such as a phone number, street address, and website address, but it also ties into Yelp, a service that offers user-generated content — particularly ratings, reviews, and photos — of millions of locations around the world. Tap the destination’s blue Info icon and Maps opens the Location screen. As you can see in Figure 11.3, the Location screen offers tons of data about the destination, including basic info, reviews, and photos.
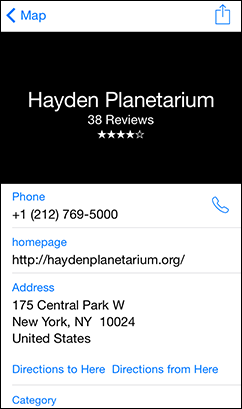
11.3 Tap the Info icon to open the Location screen and gain access to information about the destination as well as Yelp ratings, reviews, and photos.
Displaying your current location
When you arrive at an unfamiliar shopping mall and you need to get your bearings, your first instinct might be to seek out the nearest mall map and look for the inevitable You are here marker. This gives you a sense of your current location with respect to the rest of the mall, so locating Pottery Barn shouldn’t be all that hard.
When you arrive at an unfamiliar part of town or a new city, have you ever wished you had something that could provide you with that same You are here reference point? If so, you’re in luck because you have exactly that waiting for you right in your iPhone. Tap the Tracking icon in the lower left corner of the screen, as pointed out in Figure 11.4. (If this is the first time you’ve used the Tracking icon, Maps asks for permission to use your current location, so be sure to tap OK.)
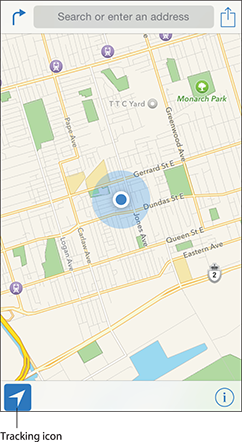
11.4 Tap the Tracking icon to see your precise location as a blue dot on a map.
That’s it! Your iPhone examines GPS coordinates, Wi-Fi hot spots, and nearby cellular towers to plot your current position. When it completes the necessary processing and triangulating, your iPhone displays a map of your current city, zooms in on your current area, and then adds a blue dot to the map to pinpoint your current location, as shown in Figure 11.4. Amazingly, if you happen to be in a car, taxi, or other moving vehicle, the blue dot moves in real time.
Displaying a map of a contact’s location
In the old days (that is, a few years ago), if you had a contact located in an unfamiliar part of town or even in another city altogether, visiting that person required a phone call or email asking for directions. You’d then write down the instructions, get written directions via email, or perhaps even get a crudely drawn map faxed to you. Those days, fortunately, are long gone thanks to myriad online resources that can show you where a particular address is located and even give you driving directions to get there from here (wherever here may be).
Even better, your iPhone takes it one step further and integrates with Maps to generate a map of a contact’s location based on the person’s contact address. So as long as you’ve tapped in (or synced) a contact’s physical address, you can see where he or she is located on the map.
To display a map of a contact’s location, follow these steps:
- In the Home screen, tap the Contacts icon. The Contacts app appears.
- Tap the contact you want to map. Your iPhone displays the contact’s data.
- Tap the address you want to view. Your iPhone switches to the Maps app and drops a pushpin on the contact’s location.
Mapping an address from an email
Addresses show up in all kinds of email messages these days. Most commonly, folks include their work or home addresses in their email signatures at the bottom of each message. Similarly, if the email is an invitation, your correspondent almost certainly includes the address for the event somewhere in the message.
If you need to know where an address is located, you might think that you need to copy the address from the message and then paste it into the Maps app. Sure, that works, but it’s way too much effort! Instead, just do this:
- In the Mail app, display the message that includes the address.
- Tap and hold on the address in the message to display a list of actions. If the address is displayed as a link (that is, underlined in a blue font), it means Mail recognizes it as an address, so you can just tap the address and skip the next step.
- Tap Open in Maps. The Maps app opens and drops a pushpin on the address.
Specifying a location when you don’t know the exact address
Sometimes you have only a vague notion of where you want to go. In a new city, for example, you might decide to head downtown and then see if there are any good coffee shops or restaurants. That’s fine, but how do you get downtown from your hotel in the suburbs? Your iPhone can give you directions, but it needs to know the endpoint of your journey, and that’s precisely the information you don’t have. Sounds like a conundrum, for sure, but there’s a way to work around it. You can drop a pin on the map in the approximate area where you want to go. The Maps app can then give you directions to the dropped pin.
Here are the steps to follow to drop a pin on a map:
- In the Maps app, display a map of the city you want to work with:
- If you’re in the city now, tap the Tracking icon in the lower left corner of the screen.
- If you’re not in the city, tap Search, tap the Search box, type the name of the city (and perhaps also the name of the state or province), and then tap the Search button.
- Use finger flicks to pan the map to the approximate location you want to use as your destination.
- Tap Info (i) in the lower right corner of the screen. The Maps app displays a list of map options.
- Tap Drop a Pin. The Maps app drops a purple pin in the middle of the current map.
- Tap and hold the purple pin until it’s released, then drag the pin to the location you want. The Maps app creates a temporary bookmark called Dropped Pin that you can use when you ask the iPhone for directions (as described next).
Getting directions to a location
One possible navigation scenario with the Maps app is to specify a destination (using a contact, an address search, or a dropped pin) and then tap the Tracking icon. This gives you a map that shows both your destination and your current location. You can then eyeball the streets to see how to get from here to there. Depending on how far away the destination is, you may need to zoom out — by pinching the screen or by tapping the screen with two fingers — to see both locations on the map.
“Eyeball the streets”? Hah, how primitive! The Maps app can bring you into the twenty-first century not only by showing you a route to the destination but also by providing you with the distance and time it should take and by giving you street-by-street, turn-by-turn instructions, whether you’re driving or walking. It’s one of the sweetest features of your iPhone, and it works like so:
- Use the Maps app to add a pushpin for your journey’s destination. Use whatever method works best for you: the Contacts list, an address search, a dropped pin, or a bookmark.
- Tap Directions in the menu bar (pointed out earlier in Figure 11.2). The Maps app opens the Directions screen. As shown in Figure 11.5, you should see Current Location in the Start box and your destination address in the End box.
- If you want to use a starting point other than your current location, tap the Start box and then type the address of the location you want to use.

11.5 Use the Directions screen to specify the start and end points of your trip, and to swap them.
- Tap the icon for the type of directions you want: car, walking, or transit.
- Tap Route. The Maps app figures out the three best routes and then displays them on the map in the Overview screen, which also shows the trip distance and approximate time.
- Tap the route you prefer to take.
- Tap Start. The Maps app displays the first leg of the journey.
Maps features turn-by-turn directions for driving and walking. This means that as you approach each turn, Siri tells you what to do next, such as “In 400 feet, turn right onto Main Street.” The Maps app also follows along the route, so you can see where you’re going and what turn is coming up. You can see your estimated time of arrival, remaining travel time, and distance remaining by tapping the screen.
After tapping the screen, you can also tap Overview to see the entire route. Instead of seeing the directions one step at a time, you might prefer to see them all at once. Tap the screen and then tap the List icon in the middle of the menu bar at the bottom of the screen.
Getting live traffic information
Okay, it’s pretty darn amazing that your iPhone can tell you precisely where you are and precisely how to get somewhere else. However, in most cities it’s the getting somewhere else part that’s the problem. Why? One word: traffic. The Maps app might tell you the trip should take 10 minutes, but that could easily turn into a half hour or more if you run into a traffic jam.
That’s life in the big city, right? Maybe not. If you’re on a highway in a major city, the Maps app can most likely supply you with — wait for it — real-time traffic conditions! This is really an amazing tool that can help you avoid traffic messes and find alternative routes to your destination. Maps can also show you traffic construction sites, and it gathers real-time information from Maps users to generate even more accurate traffic data. If you’re in the middle of turn-by-turn directions, Maps even recognizes an upcoming traffic delay and offers an alternative route around it!
To see the traffic data, tap the lower right corner of the screen, and then tap Show Traffic. As you can see in Figure 11.6, Maps displays an orange dotted line to indicate traffic slowdowns, a red dashed line to indicate very heavy traffic, and Roadwork icons to indicate traffic construction sites.
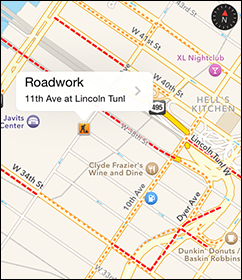
11.6 For most metropolitan roads and highways, orange dotted lines mean traffic slowdowns and red dashed lines mean stop-and-go traffic.
Controlling Maps with Siri voice commands
If you have an iPhone 4s or later, you can use the Siri voice-activated assistant to control Maps with straightforward voice commands. You can display a location, get directions, and even display traffic information. Tap and hold the Home button (or press and hold the Mic button of the iPhone headphones, or the equivalent button on a Bluetooth headset) until Siri appears.
To display a location in Maps via Siri, say “Show location” (or “Map location” or “Find location” or “Where is location?”), where location is an address, name, or a Maps bookmark. Similarly, to get directions from Siri, say “Directions to location,” where location is an address, name, or a Maps bookmark. To see the current traffic conditions, say “Traffic location,” where location can be a specific place or someplace local, such as “around here” or “nearby.” To get your current location, you can say “Where am I?” or “Show my current location.”
Configuring Location Services
On your iPhone, location services refers to the features and technologies that provide apps and system tools with access to location data. This is a handy thing, but it’s also something that you need to keep under your control because your location data, particularly your current location, is fundamentally private and shouldn’t be given out willy-nilly. Fortunately, your iPhone comes with a few tools for controlling and configuring location services.
Turning off location services
The next couple of sections show you how to turn off location services for individual apps as well as individual system services. That fine-grained control is the best way to handle location services, but there may be times when you prefer a broader approach that turns off location services altogether. For example, if you’re heading to a secret rendezvous (how exciting!) and you’re bringing your iPhone with you, you might feel more comfortable knowing that no app or service on your iPhone is tracking your whereabouts. On a more mundane level, location services use up battery power, so if your iPhone is getting low or if you just want to maximize the battery (for a long bus ride, for example), then turning off location services completely will help.
Follow these steps to turn off all location services on your iPhone:
- On the Home screen, tap Settings. The Settings app appears.
- Tap Privacy. The Privacy settings appear.
- Tap Location Services. The Location Services settings appear.
- Tap the Location Services switch to the Off position. If you have Find My iPhone activated (see Chapter 2), your iPhone asks you to confirm.
- Tap Turn Off. Your iPhone shuts off all location services.
Controlling app access to GPS
When you open an app that comes with a GPS component, the app displays a dialog like the one shown in Figure 11.7 to ask your permission to use the GPS hardware in your iPhone to determine your current location. Tap Don’t Allow if you think that your current location is none of the app’s business, or tap OK if that’s just fine with you.

11.7 When you first launch a GPS-aware app, it asks your permission to use your current location.
However, after you make your decision, you might change your mind. For example, if you deny your location to an app, that app might lack some crucial functionality. Similarly, if you allow an app to use your location, you might have second thoughts about compromising your privacy.
Whatever the reason, you can control an app’s access to GPS by following these steps:
- In your Home screen, tap Settings. The Settings app appears.
- Tap Privacy. The Privacy settings appear.
- Tap Location Services. The Location Services screen appears, as shown in Figure 11.8.
- Configure app access to GPS as follows:
- If you want to deny your current location to all apps, tap the Location Services switch to Off.
- If you want to deny your current location to specific apps, for each app tap the switch to Off.
Note that the Location Services screen uses three different icons (pointed out in Figure 11.8) to indicate what apps are using location services and how they’re using them:
- Solid purple Location Services icon. This is the app that is currently using your location.
- Gray Location Services icon. This tells you the app has used your location in the previous 24 hours.
- Outlined purple Location Services icon. This tells you the app has set up a geo-fence around your location. See Chapter 10 to learn how a geo-fence works.
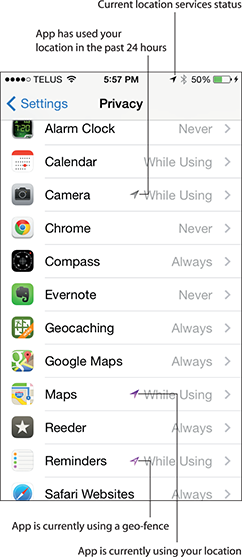
11.8 Use the Location Services screen to control what apps have access to your location.
The active location services status also appears in the status bar to the left of the battery status (again, see Figure 11.8).
Enabling or disabling system location services
Your iPhone also provides location services to various internal system services that perform tasks, such as calibrating the iPhone compass, setting the time zone, and serving up iAds that change depending on location data. If you don’t want your iPhone providing any of these services, you can turn them off this way:
- On the Home screen, tap Settings. The Settings app appears.
- Tap Privacy. The Privacy screen appears.
- Tap Location Services. The Location Services screen appears.
- Tap System Services. The Settings app displays the System Services screen.
- For any system service to which you don’t want to provide access to location data, tap its switch to Off.
Sharing Map Data
If you want to show someone where you live, where you work, or where you want to meet, you could just send the address, but that’s so last century. The more modern way is to send your friend a digital map that shows the location. With your iPhone this is a snap — you can send a map via email or text message, or post a map on Twitter.
Here are the steps to follow:
- Use the Maps app to add a pushpin for the location you want to send. Use whatever method works best for you: the Contacts list, an address search, a dropped pin, or a bookmark. If you want to send your current location, display it, and then tap the blue dot.
- Tap the location banner. Maps displays the Location screen for the location.
- Tap Share. Maps displays a list of ways to share the map.
- Tap the method you want to use to share the map: Message, Mail, Twitter, or Facebook. The Maps app creates a new email message, text message, tweet, or post that includes a Maps link to the location.
- Fill in the rest of your message and then send it.
Alternatively, if the other person is nearby (that is, within 30 feet or so) and is running iOS 7 or later on an iPhone 5 or later, a fourth-generation iPad or later, an iPad mini, a fifth-generation iPod touch or later, or a Mac running OS X Yosemite, you can use AirDrop to exchange the location wirelessly. Here’s how it works:
- Use the Maps app to add a pushpin for the location you want to send. Use whatever method works best for you: the Contacts list, an address search, a dropped pin, or a bookmark. If you want to send your current location, display it, and then tap the blue dot.
- Tap the location banner. Maps displays the Location screen for the location.
- Tap Share. Maps displays a list of ways to share the location.
- In the AirDrop section, tap the icon for the person with whom you want to share the location. The other person sees a dialog asking for permission to share the location, and when she taps Accept, her version of Maps loads and displays the location.