Chapter 13: How Do I Keep My Life in Sync with iCloud?
When you go online, you take your life along with you, of course, so your online world becomes a natural extension of your real world. However, just because it’s online doesn’t mean the digital version of your life is any less busy, chaotic, or complex than the rest of your life. The Apple iCloud service is designed to ease some of that chaos and complexity by automatically syncing your most important data — your email, contacts, calendars, and bookmarks. Although the syncing may be automatic, setting up is not, unfortunately. This chapter shows you what to do.
Understanding iCloud Device Support
Configuring iCloud on Your iPhone
Configuring iCloud on Your Mac
Configuring iCloud on Your Windows PC
Understanding iCloud
These days, the primary source of online chaos and confusion is the ongoing proliferation of services and sites that demand your time and attention. What started with web-based email has grown to a website, a blog, a photo-sharing site, online bookmarks, and perhaps a few social networking sites, just to consume those last few precious moments of leisure time. You might be sitting in a chair, but you’re being run ragged anyway!
A great way to simplify your online life is to get a free iCloud account. You get a one-stop web shop that includes email, an address book, a calendar, and 5GB of online file storage. (If you want more storage, you can get an extra 10GB for $20 a year, an extra 20GB for $40 a year, or an extra 50GB for $100 a year.)
The web applications that make up iCloud — Mail, Contacts, Calendar, Notes, Reminders, Find My iPhone, Pages, Numbers, and Keynote — are certainly useful and are surprisingly functional for online applications. However, the big news with iCloud is the “cloud” part of the name. This means that your data, particularly your email accounts, contacts, calendars, and bookmarks, is stored on a bunch of icloud.com networked servers that Apple collectively calls the cloud. When you log in to your iCloud account at icloud.com, you use the web applications to interact with that data.
That’s pretty mundane stuff, right? What’s revolutionary here is that you can let the cloud know about all the other devices in your life: your Mac, your home computer, your work PC, your notebook, your iPad, and, of course, your iPhone. If you sign in to your iCloud account and, say, add a new appointment, the cloud takes that appointment and immediately sends the data to all your devices. Fire up your Mac, open Calendar, and the appointment’s there; switch to your Windows PC, click the Outlook Calendar folder, and the appointment’s there; tap Calendar on your iPhone Home screen and, yup, the appointment’s there, too.
This works if you change data on any of your devices. Move an email message to another folder on your Mac, and the same message is moved to the same folder on the other devices and on your iCloud account; modify a contact on your Windows PC, and the changes also propagate everywhere else. In each case, the new or changed data is sent to the cloud, which then sends the data to each device, usually in a matter of seconds.
With iCloud, you never have to worry about entering the same information into all your devices. With iCloud, you won’t miss an important meeting because you forgot to enter it into the calendar on your work computer. With iCloud, you can never forget data when you’re traveling because you have up-to-the-moment data with you at all times. iCloud practically organizes your life for you; all you have to do is show up.
Understanding iCloud Device Support
iCloud promises to simplify your online life, but the first step to that simpler existence is to configure iCloud on all the devices that you want to keep in sync. The next few sections show you how to configure iCloud on various devices, but it’s important to understand exactly what devices can do the iCloud thing. Here’s a summary:
- iPhone (3Gs or later), iPad, and iPod touch (3rd generation or later). iCloud works with any of these devices as long as they’re running version 5.1.1 or later of iOS.
- Mac. You must be running OS X Lion (10.7.5) or later. To access the iCloud web applications, you need either Safari 3 or later, or Firefox 2 or later.
- Windows Vista. Any Vista version works with iCloud as long as you have at least Service Pack 2 installed. To access the iCloud web applications, you need Internet Explorer 7 or later, Safari 3 or later, or Firefox 2 or later. For push email, contacts, and calendars, you need Outlook 2007 or later.
- Windows 7 or 8. Any Windows 7 or 8 version works with iCloud. To access the iCloud web applications, you need Internet Explorer 9 or later, Safari 5 or later, Firefox 13 or later, or Chrome 19 or later. For push email, contacts, and calendars, you need Outlook 2007 or later.
Configuring iCloud on Your iPhone
iCloud is designed particularly with the iPhone in mind, because it’s when you’re on the town or on the road that you need data pushed to you. To ensure your iPhone works seamlessly with your iCloud data, you need to add your iCloud account and configure the iCloud sync settings on your iPhone.
Setting up your iCloud account on your iPhone
Start by setting up your iCloud account on your iPhone:
- On the Home screen, tap Settings. Your iPhone opens the Settings app.
- Tap Mail, Contacts, Calendars. The Mail, Contacts, Calendars screen appears.
- Tap Add Account. The Add Account screen appears.
- Tap the iCloud logo. Your iPhone displays the iCloud screen, as shown in Figure 13.1.
- Tap the Apple ID text box and enter your iCloud email address.
- Tap the Password text box and enter your iCloud password.

13.1 Use the iCloud screen to configure your iCloud account on your iPhone.
- Tap Next. Your iPhone verifies the account info and then asks what type of data you want pushed to your iPhone, as shown in Figure 13.2.
- If there are any data types you don’t want pushed to your iPhone, tap the corresponding switch to Off.
- Tap Save. Your iPhone returns you to the Mail settings screen with your iCloud account added to the Accounts list.
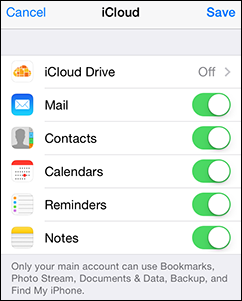
13.2 Use this iCloud screen to specify the types of data you want iCloud to push to your iPhone.
Setting up iCloud synchronization on your iPhone
No matter where you are, iCloud ensures that your email messages, contacts, and calendars get pushed to your iPhone and remain fully synced with all your other devices. Your iPhone comes with this push feature turned on, but if you want to double-check this or if you want to turn off push to concentrate on something else, you can configure the setting by following these steps:
- In the Home Screen, tap Settings. The Settings app appears.
- Tap iCloud. Settings displays the iCloud screen, as shown in Figure 13.3.
- If there are any data types you don’t want pushed to your iPhone, tap the corresponding switch to Off.
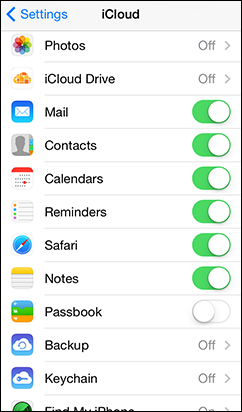
13.3 Use the iCloud screen to configure iCloud synchronization on your iPhone.
Setting up and using Family Sharing
iCloud means you have easy access to your email, photos, reminders, notes, and more. Similarly, if your spouse or kids also have iCloud accounts, then they have easy access to their personal content. What’s wrong with this picture? Right: Despite being a family, no one has access to anyone else’s cloud data. You can’t see your spouse’s reminders; he or she can’t see your photos; none of you can see your kids’ calendars.
This has long been a major drawback with iCloud because the only way to work around it was to share an account. Now, however, iOS 8 introduces Family Sharing, an iCloud feature that allows up to six family members share each other’s content, including photos, calendars, and reminders. And if purchases are made through the App Store, iTunes Store, or iBookstore using a single credit card, then each family member also gets access to purchased apps, songs, movies, TV shows, and ebooks.
Assuming you’ll be the Family Organizer (that is, the person who’ll be setting up and maintaining Family Sharing), follow these steps to get things started:
- Tap Settings to launch the Settings app.
- Tap iCloud. The iCloud settings appear.
- Tap Set Up Family Sharing. iCloud displays an overview of Family Sharing.
- Tap Get Started. iCloud explains your duties as the Family Organizer.
- Tap Continue. iCloud explains how purchases made with your Apple ID will be shared with other family members.
- Tap Continue. iCloud shows you the payment method that will be used for all Family Sharing purchases. (If you have multiple payment methods, you can change the default method a bit later in this process.)
- Tap Continue. The Family Sharing screen appears, as shown in Figure 13.4.

13.4 As the Family Organizer, you use this screen to add family members and set the default payment method.
- Tap Add Family Member then type the name or email address of the family member you want to add. If the person has an iCloud account, iCloud asks how you want the family member to confirm.
- Tap Ask Name to Enter Password (where Name is the family member’s first name) and then type the password for that person’s iCloud account. If you don’t know the password, tap Send an Invitation, instead.
- If you have multiple payment methods set up, tap the existing method shown under Shared Payment Method and then tap the payment you want to use for Family Sharing.
Setting up iCloud Keychain
A keychain is a master list of usernames and passwords that a system stores for easy access by an authorized user. iCloud Keychain is a special type of keychain that stores website passwords auto-generated by Safari. This means that you don’t have to remember these passwords because Safari can automatically retrieve them from your iCloud account. Even better, any other iOS device or Mac that uses the same iCloud account has access to the same keychain, so your website passwords also work on those devices.
Follow these steps to set up your iCloud Keychain on your iPhone:
- In the Home Screen, tap Settings. The Settings app appears.
- Tap iCloud to open the iCloud settings.
- Tap Keychain.
- Tap the iCloud Keychain switch to On. Settings prompts you to enter your iCloud password.
- Type the password and then tap OK. iCloud sets up keychain access, which usually takes a few moments.
- Allow your iPhone to use your iCloud Keychain:
- If you’re already using iCloud Keychain on another device, that device prompts you to allow your iPhone to access the iCloud Keychain, as shown in Figure 13.5 (this is an OS X notification). In this case, you’d click View, type your iCloud password, and then click Allow. If you need access to the Keychain sooner, use your iPhone to tap Approve with Security Code and then type the code that you entered when you originally set up iCloud Keychain. You’ll also need to enter a verification code that gets sent to your phone via text message.
- If you’re not using iCloud Keychain on any other device, iCloud asks if you want to use your phone’s existing passcode. Tap Use Passcode (or tap Create Different Code if you want to use something else, although why complicate things?), tap the passcode, then enter a phone where verification text messages can be sent. After you enter your iCloud password, you’re set to go.
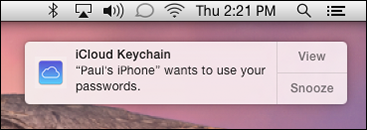
13.5 If you have already set up iCloud Keychain on another device (such as a Mac, as shown here), use that device to approve your iPhone.
Managing your iCloud storage
I mentioned earlier that your iCloud account comes with 5GB of storage free. That storage is used for your iCloud Photo Library, device backups, email, and app documents and data. If you find that you’re running low on storage space, follow these steps to remove data and free up some cloud headroom:
- In the Home Screen, tap Settings. The Settings app appears.
- Tap iCloud to open the iCloud settings.
- Tap Storage. The Storage screen tells you your total storage and how much is available.
- Tap Manage Storage. The Manage Storage screen appears and displays a list of the items in your iCloud storage as well as how much space each item takes up, as shown in Figure 13.6.

13.6 The Manage Storage screen shows you how much space each item takes up.
- To remove data from iCloud, tap an item and then use the following techniques:
- Your iPhone backups. Tap Delete Backup to remove the current backup. You can also tap the switch to Off beside any app you no longer want to include in future backups.
- Other device backups. Tap Delete Backup to remove the current backup.
- Documents. Tap Edit, tap the red Delete icon to the left of the document you want to remove, tap the Delete button that appears, then tap Delete to confirm.
Changing your iCloud storage plan
If, despite your best management efforts, you find that you’re still getting low on iCloud storage, then you should consider changing your storage plan to give yourself more cloud real estate. As I write, you can purchase an extra 10GB (for a total of 15GB) for $20 per year, an extra 20GB for $40, and an extra 50GB for $100. Follow these steps to upgrade:
- Tap Settings to display the Settings app.
- Tap iCloud to open the iCloud settings.
- Tap Storage. The Storage screen appears.
- Tap Change Storage Plan. The Buy More Storage screen appears.
- Tap the storage plan you want to use and then tap Buy. iCloud prompts you for your password.
- Type your password, tap OK, then tap OK again when iCloud tells you the purchase is complete.
Upgrading to iCloud Drive
Regular iCloud storage includes backups and email, as well as the documents and data used by individual apps. That’s a good feature, but it’s limited because it means you can access those documents and the app data only by using the associated apps. In other words, there is no "folder" on iCloud that you can view to see your saved documents and data.
If you’d prefer to see such a folder, as well as use iCloud to save a wider variety of documents and data, then you should consider upgrading to iCloud Drive, which provides all those features and even enables you to access your cloud data from any Mac or PC.
As with regular iCloud storage, iCloud Drive starts you off with 5GB free. If you need more room, you can upgrade to 20GB for 99 cents per month or 200GB for $3.99 per month. (As this book was going to press, Apple had also announced a 1TB plan, but had yet to announce pricing.)
Here are the steps to follow to set up Google Drive on your iPhone:
- Tap Settings to display the Settings app.
- Tap iCloud to open the iCloud settings.
- Tap iCloud Drive. The iCloud Drive overview appears.
- Tap Upgrade. The iCloud Drive settings screen appears.
- Tap the iCloud Drive switch to On. iCloud turns on iCloud Drive and then displays a list of apps that can use iCloud Drive, as shown in Figure 13.7.

13.7 Once you turn on iCloud Drive, you see a list of apps that can use the service to store documents.
- For each app that you don’t want to store documents in iCloud Drive, tap the app’s switch to Off.
- If you don’t want your iPhone to use a cellular connection to transfer data to and from iCloud Drive, tap the Use Cellular Data switch to Off.
Configuring iCloud on Your Mac
If you want to keep your Mac in sync with the iCloud push services, you need to add your iCloud account to the Mail application and configure iCloud synchronization on your Mac.
Setting up an iCloud account on your Mac
Here are the steps to follow to get your iCloud account into the Mail application:
- In the Dock, click the Mail icon. The Mail application appears.
- In OS X Yosemite or Mavericks, choose Mail ⇒ Add Account. In earlier versions of OS X, choose File ⇒ Add Account, instead. Mail displays the Add Account dialog.
- Select the iCloud option and click Continue. The iCloud dialog appears.
- Type your Apple ID address and password.
- Click Sign In. Mail verifies the account info and displays the account summary screen.
- Select the check box beside each type of data you want to set up.
- Click Add Account. Mail adds the iCloud account.
Setting up iCloud synchronization on your Mac
Macs were made to sync with iCloud, so this process should be a no-brainer. To ensure that is the case, you need to configure your Mac to make sure iCloud sync is activated, and that your email accounts, contacts, and calendars are part of the sync process. Follow these steps to set your preferences:
- Click the System Preferences icon in the Dock. Your Mac opens the System Preferences window.
- Click the iCloud icon. The first time you do this, your Mac prompts you to sign in to iCloud.
- Type your iCloud email address and password, and then click Sign In. If this is the first time you’ve launched the iCloud preferences, you run through a few dialogs to set your initial preferences. When that’s done, you end up at the iCloud preferences window.
- Select the check box beside each data item you want to sync with your iCloud account (see Figure 13.8).
- Click the Close button. Your Mac is now ready for iCloud syncing.
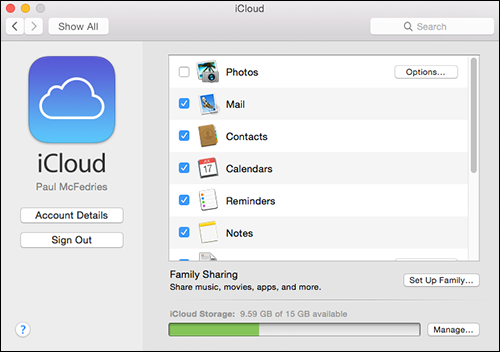
13.8 Select the check box beside each item you want to sync.
Configuring iCloud on Your Windows PC
iCloud is happy to push data to your Windows PC. However, unlike with a Mac, your Windows machine wouldn’t know iCloud if it tripped over it. To get Windows hip to the iCloud thing, you need to do two things:
- Download and install the latest version of iTunes.
- Download and install the iCloud Control Panel for Windows, which you can find at http://support.apple.com/kb/DL1455.
With that done, you can now configure iCloud to work with your Windows PC by following these steps:
- On the Windows PC that you want to configure to work with iCloud, open the Control Panel window:
- Windows 8. Press Windows Logo+X and then click Control Panel.
- Earlier versions of Windows. Choose Start ⇒ Control Panel.
- Double-click the iCloud icon. If you don’t see this icon, first open the Network and Internet category. The iCloud dialog box appears.
- Use the Apple ID text box to type your iCloud address.
- Use the Password text box to type your iCloud password.
- Click Sign In. Windows signs in to your account and then displays the iCloud Control Panel, as shown in Figure 13.9.
- Select the check box beside each type of data you want to sync.
- Click Apply.

13.9 Use the iCloud Control Panel to set up your Windows PC to work with iCloud.