
Chapter 3: How Do I Connect My iPhone to a Network?
As a stand-alone device, your iPhone works just fine, thank you, because you can make calls, listen to music, take pictures, record and edit video, work with your contacts and calendars, take notes, play games, and much more. But your iPhone was made to connect: to surf the web, exchange email and text messages, watch YouTube videos, navigate with maps, and on and on. To do all that, your iPhone must first connect to a network, and that’s what this chapter is all about. I show you how to make, monitor, and control network connections, set up your iPhone as an Internet hub, and more.
Setting Up Your iPhone as an Internet Hub
Keeping an Eye on Your Data Usage
Pairing Your iPhone to Bluetooth Devices
Connecting to a Wi-Fi Network
Connections to a cellular network are automatic and occur behind the scenes. As soon as you switch on your iPhone, it checks for an LTE signal. If it finds one, it connects to the network and displays the LTE icon in the status bar, as well as the connection strength (the more bars, the better). If your current area doesn’t do the LTE thing, your iPhone tries to connect to the slower 3G network. If that works, you see the 3G icon in the status bar and the connection strength. If there’s no 3G network in sight, your iPhone tries to connect to a slower EDGE network instead. If that works, you see the E icon in the status bar (plus the usual signal strength bars). If none of that works, you see No Signal, so you might as well go home.
Making your first connection
Things aren’t automatic when it comes to Wi-Fi connections, at least not at first. As soon as you try to access something on the Internet — a website, your email, a map, or whatever — your iPhone scours the surrounding airwaves for Wi-Fi network signals. If you’ve never connected to a Wi-Fi network, or if you’re in an area that doesn’t have any Wi-Fi networks that you’ve used in the past, you see the Select a Wireless Network dialog, as shown in Figure 3.1. If you don’t see this dialog, you can still connect to a wireless network; see the section about how to stop Wi-Fi network prompts later in this chapter.

3.1 If you’re just starting out on the Wi-Fi trail, your iPhone displays a list of nearby networks.
This dialog displays a list of the Wi-Fi networks that are within range. For each network, you get three tidbits of data:
- Network name. This is the name that the administrator has assigned to the network. If you’re in a coffee shop or similar public hot spot and you want to use that network, look for the name of the shop (or a variation on the name).
- Password-protection. If a Wi-Fi network displays a lock icon, it means that it’s protected by a password, and you need that password to make the connection.
- Signal strength. This icon gives you a rough idea of how strong the wireless signals are. The stronger the signal (the more bars you see, the better the signal), the more likely you are to get a fast and reliable connection.
Follow these steps to connect to a Wi-Fi network:
- Tap the network you want to use. If the network is protected by a password, your iPhone prompts you to enter it.
- Use the keyboard to type the password.
- Tap Join. The iPhone connects to the network and adds the Wi-Fi network signal strength icon to the status bar.
To connect to a commercial Wi-Fi operation — such as those you find in airports, hotels, and convention centers — you almost always have to take one more step. Usually, the network prompts you for your name and credit card data so you can be charged for accessing the network. If you’re not prompted right away, you will be as soon as you try to access a website or check your email. Enter your information and then enjoy the Internet in all its Wi-Fi glory.
Connecting to known networks
Your iPhone remembers any Wi-Fi network to which you connect. So, if the network is one that you use all the time — for example, your home or office — your iPhone makes the connection without so much as a peep as soon as that network comes within range. Thanks!
Connecting to a hidden Wi-Fi network
Each Wi-Fi network has a network name — often called the Service Set Identifier, or SSID — that identifies the network to Wi-Fi–friendly devices, such as your iPhone. By default, most Wi-Fi networks broadcast the network name so that you can see it and connect to it. However, some Wi-Fi networks disable network name broadcasting as a security precaution. The idea here is that if an unauthorized user can’t see the network, he or she can’t attempt to connect to it. (However, some devices can still pick up the network name when authorized computers connect to it, so this is not a foolproof security measure.)
You can still connect to a hidden Wi-Fi network by entering the connection settings by hand. You need to know the network name, its security and encryption types, and the network password. Here are the steps to follow:
- On the Home screen, tap Settings to open the Settings app.
- Tap Wi-Fi. You see the Wi-Fi Networks screen.
- Tap Other. Your iPhone displays the Other Network screen, as shown in Figure 3.2.
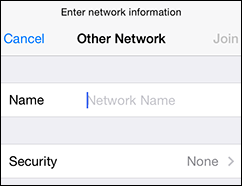
3.2 Use the Other Network screen to connect to a hidden Wi-Fi network.
- Type the network name in the Name text box.
- Tap Security to open the Security screen.
- Tap the type of security the Wi-Fi network uses: None, WEP, WPA, WPA2, WPA Enterprise, or WPA2 Enterprise. If you’re not sure, most secure networks use WPA2.
- Tap Back to return to the Other Network screen. If you chose WEP, WPA, WPA2, WPA Enterprise, or WPA2 Enterprise, your iPhone prompts you to type the password.
- Type the password in the Password text box.
- Tap Join. The iPhone connects to the network and adds the Wi-Fi network signal strength icon to the status bar.
Stopping incessant Wi-Fi network prompts
The Select a Wireless Network dialog is a handy convenience if you’re not sure whether a Wi-Fi network is available. However, as you move around town, you may find that dialog popping up all over the place as new Wi-Fi networks come within range (although iOS is smart enough not to prompt when you’re moving quickly — such as when driving). This constant tapping of the Cancel button can wear down your finger to the bone. However, you can just tell your iPhone to shut up already with the Wi-Fi prompting. Here’s how:
- On the Home screen, tap Settings. The Settings app appears.
- Tap Wi-Fi. iPhone opens the Wi-Fi Networks screen.
- Tap the Ask to Join Networks switch to Off. Your iPhone no longer prompts you with nearby networks. Whew!
Okay, I hear you ask, if I’m no longer seeing the prompts, how do I connect to a Wi-Fi network if I don’t even know it’s there? That’s a good question, and here’s a good answer:
- On the Home screen, tap Settings. Your iPhone displays the Settings app.
- Tap Wi-Fi. The Wi-Fi Networks screen appears, and the Choose a Network list shows you the available Wi-Fi networks.
- Tap the network you want to use. If the network is protected by a password, your iPhone prompts you to enter it.
- Use the keyboard to tap the password.
- Tap Join. The iPhone connects to the network and adds the Wi-Fi network signal strength icon to the status bar.
Sending a file from your Mac to your iPhone
In Chapter 7, “How Do I Synchronize My iPhone?,” you learn how to transfer data between your iPhone and your Mac. However, if you just want to pass along a single file from your Mac to your phone, the sync procedure is overkill. Instead, if your Mac is running OS X Yosemite and your iPhone is running iOS 8, and your Mac and iPhone are connected to the same Wi-Fi network, you can use a tool called AirDrop to send a file directly from your Mac to your phone. Here’s how it works:
- On your Mac, open Finder and click AirDrop in the sidebar. You can also click Go ⇒ AirDrop or press
 +Shift+R. You should see an icon for your iPhone in the AirDrop window.
- Open a second Finder window (click File ⇒ New Finder Window) and use it to locate the file you want to send to your iPhone.
- Drag the file from the Finder window and drop it on your iPhone icon in the AirDrop window, as shown in Figure 3.3. Your iPhone asks you to confirm the transfer as shown in Figure 3.4.
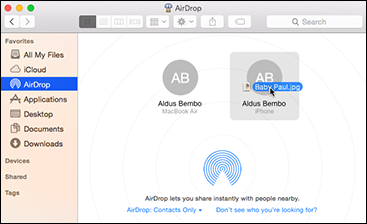
3.3 Drag the file into the AirDrop window and drop it on your iPhone’s icon.
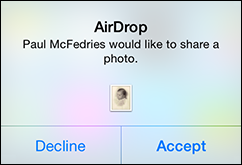
3.4 Your iPhone allows you to accept or decline the file transfer.
- On your iPhone tap Accept. Your iPhone initiates the transfer and saves the file.
Forgetting a Wi-Fi network
Having the iPhone remember networks you’ve joined is certainly convenient, except, of course, when it’s not. For example, if you have a couple of networks nearby that you can join, you might connect to one and then realize that the other is better in some way (for example, it’s faster or cheaper). Unfortunately, there’s a good chance your iPhone will continue to connect to the network you don’t want every time it comes within range, which can be a real hassle. Rather than threatening to throw your iPhone in the nearest trash can, you can tell it to forget the network you don’t want to use. Here’s how it’s done:
- On the Home screen, tap Settings. The Settings app appears.
- Tap Wi-Fi. The iPhone opens the Wi-Fi Networks screen.
- Tap the blue More Info icon to the right of the network you want to forget. Your iPhone displays the network’s settings screen.
- Tap Forget this Network. Your iPhone asks you to confirm.
- Tap Forget. Your iPhone discards the login data for the network and no longer connects to the network automatically.
Turning off the Wi-Fi antenna
The Wi-Fi antenna on your iPhone is constantly on the lookout for nearby Wi-Fi networks. That’s useful because it means you always have an up-to-date list of networks to check out and it makes the iPhone location services (such as the Maps app) more accurate, but it also takes its toll on the iPhone battery. If you know you won’t be using Wi-Fi for a while, you can save some battery juice for more important pursuits by turning off the Wi-Fi antenna. Here’s how:
- On the Home screen, tap Settings. The Settings app appears.
- Tap Wi-Fi. The Wi-Fi Networks screen appears.
- Tap the Wi-Fi switch to Off. Your iPhone disconnects from your current network and hides the Choose a Network list.
When you’re ready to resume your Wi-Fi duties, return to the Wi-Fi Networks screen and tap the Wi-Fi switch to On.
Setting Up Your iPhone as an Internet Hub
Here’s a scenario you’ve probably tripped over a time or two when roaming around with both your iPhone and your notebook computer along for the ride. You end up at a location where you have access to just a cellular network, with no Wi-Fi in sight. This means that your iPhone can access the Internet (using the cellular network), but your notebook can’t. That’s a real pain if you want to do some work involving Internet access on the computer. To work around this problem, you can use a nifty feature called Personal Hotspot, which enables you to configure your iPhone as a kind of Internet hub or gateway device — something like the hot spots that are available in coffee shops and other public areas. To do this, you connect your iPhone to your notebook (either directly via a USB cable or wirelessly via Wi-Fi or Bluetooth), and your notebook can then use the cellular Internet connection of your iPhone to get online. This is often called Internet tethering. Even better, you can connect up to five devices to your iPhone, so you can also share your iPhone Internet connection with desktop computers, tablets, other cell phones, and pretty much anything else that can connect to the Internet.
This sounds too good to be true, but it’s real, I swear. The downside (you just knew there had to be a downside) is that some providers will charge you extra for tethering. This is slowly changing (for example, AT&T in the United States offers tethering on many of its smartphone plans), but you should read the fine print on your contract to be sure.
Activating the Personal Hotspot
Your first step down the Personal Hotspot road is to activate the feature. Here’s how it’s done:
- On the Home screen, tap Settings. The Settings app appears.
- Tap Personal Hotspot. iPhone opens the Personal Hotspot screen.
- Tap the Personal Hotspot switch to On.
- Tap Wi-Fi Password, type a password, and then tap Done.
Connecting to the hotspot using Wi-Fi
With Personal Hotspot enabled, follow these steps to allow a device such as a Mac, a PC, or an iPad to use your iPhone Internet connection via Wi-Fi:
- On the device, display the list of nearby wireless networks.
- In the network list, click the one that has the same name as your iPhone. Your device prompts you for the Wi-Fi password.
- Type the Personal Hotspot Wi-Fi password and then click OK. Under the status bar, your iPhone displays Personal Hotspot: 1 Connection, as shown in Figure 3.5.

3.5 When you successfully set up a connection to the Personal Hotspot, the iPhone displays a banner showing you how many current connections you have.
Keeping an Eye on Your Data Usage
If you’re using your iPhone with a plan that comes with a maximum amount of monthly data and you exceed that monthly cap, you’ll almost certainly pay big bucks for the privilege. To avoid that, most cellular providers are kind enough to send you a message when you approach your cap. However, if you don’t trust that process, or if you’re just paranoid about these things (justly, in my view), then you can keep an eye on your data usage yourself. Your iPhone keeps track of the cellular network data it has sent or received, as well as the roaming data it has sent or received if you’ve used your iPhone out of your coverage area.
First, take a look at your most recent bill from your cellular provider and, in particular, look for the dates the bill covers. For example, the bill might run from the 24th of one month to the 23rd of the next month. This is important because it tells you when you need to reset the usage data on your iPhone.
Now follow these steps to check your cellular data usage:
- On the Home screen, tap Settings. The Settings app appears.
- Tap Cellular to open the Cellular screen.
- In the Cellular Data Usage section, read the Current Period and Current Period Roaming values.
- If you’re at the end of your data period, tap Reset Statistics at the bottom of the screen to start with fresh values for the new period.
Controlling Network Data
Your iPhone gives you fairly precise control over your network data. For example, you can toggle just the LTE data, all cellular data, data for individual apps, data roaming, or all your iPhone antennas. The next few sections provide the details.
Turning off LTE
Using the LTE cellular network is a real pleasure because it’s so much faster than a 3G connection (which in turn is much faster than a molasses-in-January EDGE connection). If LTE has a downside, it’s that it uses up a lot of battery power. That’s true even if you’re currently connected to a Wi-Fi network, because the LTE antenna is constantly looking for an LTE signal. If you’ll be on your Wi-Fi network for a while, or if your battery is running low and you don’t need an LTE cellular connection, you should turn off the LTE antenna to reduce the load on your iPhone battery. Here’s how:
- On the Home screen, tap Settings. The Settings app appears.
- Tap Cellular. The Cellular screen opens.
- Tap the Enable LTE switch to Off.
Turning off cellular data
If you’ve reached the limit of your cellular data plan, you almost certainly want to avoid going over the cap because the charges are usually prohibitively expensive. As long as you have a Wi-Fi network in range, or you’re disciplined enough not to surf the web or cruise YouTube when there’s no Wi-Fi in sight, you’ll be okay. Still, accidents can happen. For example, you might accidentally tap a link in an email message or text message, or someone in your household might use your phone without knowing about your restrictions.
To prevent these sorts of accidents (or if you simply don’t trust yourself when it comes to YouTube), you can turn off cellular data altogether, which means your iPhone accesses Internet data only if it has a Wi-Fi signal. Follow these steps to turn off cellular data on your iPhone:
- On the Home screen, tap Settings. The Settings app appears.
- Tap Cellular. The Cellular screen opens.
- Tap the Cellular Data switch to Off.
Controlling cellular data usage
Rather than turning off cellular data completely, as I described in the previous section, you can take a more targeted approach. For example, if you’re a bit worried about going over your cellular plan’s data ceiling, it makes sense to avoid relatively high-bandwidth items, such as FaceTime and iTunes, but not relatively low-bandwidth content, such as iCloud documents and the Safari reading list.
You could just police this yourself but, hey, you’re a busy person and you might forget the next time a FaceTime call comes in and you’re in a cellular-only neighborhood. I say leave the details to your iPhone by configuring it to not allow certain content types over a cellular connection. Here’s how:
- On the Home screen, tap Settings. The Settings app appears.
- Tap Cellular. The Cellular screen opens.
- In the Use Cellular Data For section, tap the switch to Off for each type of content you want to ban from cellular (see Figure 3.6).

3.6 You can configure your iPhone to not use certain types of content over the cellular network.
Turning off data roaming
Data roaming is an often-convenient cell phone feature that enables you to make calls — and, with your iPhone, surf the web, check and send email, and exchange text messages — when you’re outside of your normal coverage area. The downside is that, unless you’ve got a fixed-rate roaming package from your cellular provider, roaming charges are almost always eye-poppingly expensive. You’re often talking several dollars per minute or megabyte, depending on where you are and what type of service you’re using. Not good!
Unfortunately, if you have the Data Roaming feature on your iPhone turned on, you may incur massive roaming charges even if you never use your phone! That’s because your iPhone still performs background checks for things like incoming email messages and text messages, so a week in some far-off land could cost you hundreds of dollars without even using your phone.
To avoid this insanity, turn off the Data Roaming feature on your iPhone when you don’t need it. Follow these steps:
- On the Home screen, tap Settings. The Settings app appears.
- Tap Cellular. The Cellular screen appears.
- Tap the Data Roaming switch to Off.
Switching your iPhone to Airplane mode
When you board a flight, aviation regulations in most countries are super strict about cell phones — no calls in and no calls out. In fact, most of those regulations ban wireless signals of any kind. This means your iPhone is a real hazard to sensitive airline equipment because it transmits Wi-Fi and Bluetooth signals, even if there are no Wi-Fi receivers or Bluetooth devices within 30,000 feet of your current position.
Your pilot or friendly flight attendant will suggest that passengers simply turn off their phones. Sure, that does the job, but darn it, you’ve got an iPhone, which means there are plenty of things you can do outside of its wireless capabilities, such as listen to music or an audiobook, watch a show, view photos, and much more.
So how do you reconcile the no-wireless-and-that-means-you regulations with the multitude of no-wireless-required apps on your iPhone? You put your iPhone into a special state called Airplane mode. This mode turns off the transceivers — the internal components that transmit and receive wireless signals — for the phone, Wi-Fi, and Bluetooth features. With your iPhone now safely in compliance with federal aviation regulations, you’re free to use any app that doesn’t rely on wireless transmissions.
There are two methods you can use to activate Airplane mode:
- On the Home screen, tap Settings and then tap the Airplane Mode switch to On.
- Swipe up from the bottom of the screen to open the Control Center, and then tap the Airplane Mode button.
Your iPhone disconnects your cellular network and your wireless network (if you have a current connection). Notice, as well, that while Airplane mode is on, an Airplane Mode icon appears in the status bar in place of the Signal Strength and Network icons (see Figure 3.7).

3.7 When your iPhone is in Airplane mode, an Airplane Mode icon appears in the status bar.
Pairing Your iPhone to Bluetooth Devices
Your iPhone is configured to use a wireless technology called Bluetooth, which enables you to make wireless connections to other Bluetooth-friendly devices. Most Macs come with Bluetooth built in, and they use it to connect to a wide range of devices, including mice, keyboards, cell phones, printers, digital cameras, other Macs, and even the new iPhone-compatible game controllers that were about to come to market as this book went to press. Your iPhone can, at the very least, connect to a Bluetooth headset on which you can listen to phone conversations, music, and movies without wires and without disturbing your neighbors.
In theory, connecting Bluetooth devices should be criminally easy: You bring them within 33 feet of each other (the maximum Bluetooth range), and they connect without further ado. In practice, however, there’s usually at least a bit of further ado (and sometimes plenty of it). This usually takes one or both of the following forms:
- Making the devices discoverable. Unlike Wi-Fi devices that broadcast their signals constantly, most Bluetooth devices broadcast their availability — that is, they make themselves discoverable — only when you say so. This makes sense in many cases because you usually only want to connect a Bluetooth component, such as a headset, with a single device. By controlling when the device is discoverable, you ensure that it works only with the device you want it to.
- Pairing the iPhone and the device. As a security precaution, many Bluetooth devices need to be paired with another device before the connection is established. Usually, the pairing is accomplished by entering a multidigit passkey — your iPhone calls it a PIN — that you must then enter into the Bluetooth device (assuming, of course, that it has some kind of keypad). In the case of a headset, the device comes with a default passkey that you must enter into your iPhone to set up the pairing.
Making your iPhone discoverable
So your first order of Bluetooth business is to ensure that your iPhone is discoverable by activating the Bluetooth feature. It is usually on by default, but follow these steps to make sure your iPhone is discoverable:
- On the Home screen, tap Settings. The Settings app appears.
- Tap Bluetooth. The Bluetooth screen appears.
- Tap the Bluetooth switch to On, as shown in Figure 3.8.
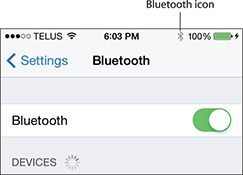
3.8 Use the Bluetooth screen to make your iPhone discoverable.
Also notice in Figure 3.8 that the status bar now shows the Bluetooth logo to the left of the Battery Status icon, which tells you that Bluetooth is up and running on your phone.
Pairing your iPhone with a Bluetooth keyboard
The iPhone virtual keyboard is an ingenious invention, but it’s not always a convenient one, particularly when you need to type fast or type a lot. Fortunately, iOS supports connections to a Bluetooth keyboard that, while paired, disables the on-screen keyboard. Follow these steps to pair your iPhone with a Bluetooth keyboard:
- On the Home screen, tap Settings. The Settings app appears.
- Tap Bluetooth. The Bluetooth screen appears.
- If the keyboard has a separate switch or button that makes the device discoverable, turn on that switch or press that button. Wait until you see the keyboard appear in the Bluetooth screen.
- Tap the name of the Bluetooth keyboard. Your iPhone displays a passkey, as shown in Figure 3.9.
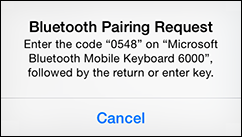
3.9 Your iPhone displays a passkey, which you then type on the Bluetooth keyboard.
- On the Bluetooth keyboard, type the passkey and press Return or Enter. Your iPhone pairs with the keyboard and returns you to the Bluetooth screen, where you now see Connected beside the keyboard.
Pairing your iPhone with a Bluetooth headset
If you want to listen to music, headphones are a great way to go because the sound is often better than with the built-in iPhone speakers (and no one else around is subjected to Radical Face at top volume). Similarly, if you want to conduct a hands-free call, a headset (a combination of headphones for listening and a microphone for talking) makes life easier because you can put the phone down and make all the hand gestures you want (provided you aren’t driving, of course). Add Bluetooth into the mix, and you’ve got an easy and wireless audio solution for your iPhone.
Follow these general steps to pair your iPhone with a Bluetooth headset:
- On the Home screen, tap Settings. The Settings app appears.
- Tap Bluetooth. The Bluetooth screen appears.
- If the headset has a separate switch or button that makes the device discoverable, turn on that switch or press that button. Wait until you see the correct headset name appear in the Bluetooth screen.
- Tap the name of the Bluetooth headset. Your iPhone should pair with the headset automatically, and you should see Connected in the Bluetooth screen. If you see this, you can skip the rest of these steps. Otherwise you see the Enter PIN screen.
- Enter the headset’s passkey in the PIN box. See the headset documentation to get the passkey (it’s often 0000).
- Tap Done. Your iPhone pairs with the headset and returns you to the Bluetooth screen, where you now see Connected beside the headset name.
Selecting a paired headset as the audio output device
After you pair a Bluetooth headset, your iPhone is usually smart enough to start blasting your tunes through the headset instead of the phone’s built-in speaker. If that doesn’t happen, follow these steps to choose your Bluetooth headset as the output device:
- Swipe up from the bottom of the screen to open the Control Center.
- Tap the AirPlay icon that appears below the playback controls (to the right of the AirDrop section). The AirPlay screen appears, as shown in Figure 3.10.

3.10 Use the AirPlay screen to select your paired Bluetooth headset.
- Tap your paired Bluetooth headset. Your iPhone starts playing the song through the headset.
Unpairing your iPhone from a Bluetooth device
If you no longer plan to use a Bluetooth device, you should unpair it from your iPhone. Follow these steps:
- On the Home screen, tap Settings. The Settings app appears.
- Tap Bluetooth. The Bluetooth screen appears.
- Tap the blue More Info icon to the right of the Bluetooth device name.
- Tap Forget this Device. Your iPhone unpairs the device.