
Chapter 5
Knowing Where You Are… and Where You’re Going
IN THIS CHAPTER
![]() Finding and setting position and direction
Finding and setting position and direction
![]() Adding randomness to position and direction
Adding randomness to position and direction
![]() Moving and turning an object
Moving and turning an object
![]() Coding an asteroid destroyer game
Coding an asteroid destroyer game
This chapter helps you acquire the skills you need to perform geometry tasks when programming. Specifically, you find out how to position an object and set it in motion onscreen. If your kid is writing code to create an animated game or build a model, then placing objects in different positions and moving them around is a key skill.
Here, you and your coder discover the basics of working with x and y coordinates, as well as how to point an object in any direction. We also show you how to make objects move, set the speed of objects, code some practical programs that include using randomness to scatter many objects into different positions, and determine whether two objects collide.
Acting Out Position, Unplugged
Finding out “where you are” is fundamental to creating any kind of program that involves objects onscreen. In the real world, you use a wide range of descriptions to indicate where you’re located (see Figure 5-1).

FIGURE 5-1: Everyday signs indicate your position.
Coding uses systems and rules similar to mathematics to determine position. These rules identify where you are in two directions: the x-direction and the y-direction.
- x-direction identifies position left to right, horizontally across the screen
- y-direction identifies position top to bottom, vertically across the screen
The x-direction and the y-direction are each specified by a number. The two numbers are written together to form an (x, y) coordinate pair, or coordinates, such as (4, 20) or (100, 200).
 Some programming languages and certain applications, such as electronics projects, also include the z-direction. When three dimensions are involved, the z-direction is the vertical direction — the direction in which gravity acts in the real world.
The coordinate (0, 0) may identify a different position from one programming language to another (see Figure 5-2). When your coder is working in Scratch, (0, 0) the location is the center of the stage. This means that there are coordinates with negative values for x positions to the left of (0, 0), and coordinates with negative values for y positions lower than (0, 0). In JavaScript, (0, 0) is the location at the top-left corner of the screen. As you move down the screen in Scratch, y values decrease, but as you move down the screen in JavaScript, y values increase.

FIGURE 5-2: Scratch places the (0, 0) coordinate in the center of the screen (left) while JavaScript places (0, 0) in the top-left corner (right).
One way you can understand the big picture of a computer program is to act it out, unplugged. Try playing a classic game of Battleship! (See Figure 5-3). The game, played by you and your young coder, involves each player hiding plastic ships of various sizes on a game board. Alternatively, you can draw a game board on a piece of paper, as a 10 by 10 grid, and then draw ships on the board. Create a variety of ship sizes from two to five grid blocks in size. Label each ship location by its horizontal coordinate, a letter of the alphabet (A through J); and its vertical coordinate, a number (1 through 10). Take turns attempting to “hit” an opponent ship by calling out a location on the game board. The goal is to hit and sink all enemy ships. Again, a key understanding of Battleship is that you can represent position on the two-dimensional game board by a coordinate pair, such a A-5, or H-10.

FIGURE 5-3: Designating position using a coordinate pair in Battleship.
Another fun way to explore coordinates is to play a city scavenger hunt by providing your kid with a number pair that represents the geolocation — the latitude and longitude in degrees — of a famous city. (See Figure 5-4.) You can find these geolocations on the Internet in advance. Then provide the list of coordinate pairs to students and invite them to use a traditional map, a globe, or Google Maps to locate the cities. For example, type 36.17° N, 115.14° W into Google Maps to reveal Las Vegas!

FIGURE 5-4: Geolocating the position of a city using latitude and longitude.
 The key takeaway is that you can locate any place in two dimensions using a coordinate pair.
Setting and Finding Position
Setting the position of an object means assigning it coordinates to put it in a specific place onscreen. Finding the position of an object means identifying its coordinates to know where it’s located.
Using pseudocode
While each programming language uses its own structure for setting and finding coordinates, a typical pseudocode expression you may write to set the position of an object looks like this:
setx x-coordinate
sety y-coordinate
Or
setposition (x-coordinate, y-coordinate)
To find the current position of an object, you can write pseudocode for each separate coordinate: x-position for the x-coordinate of the object, and y-position for the y-coordinate of the object. You can also write position to describe the object position as a coordinate pair.
Using Scratch to set position
To set the x-coordinate of an object in Scratch, use the set x to number command in the Motion category (see Figure 5-5). The minimum value of the x-coordinate ranges is -240, and the maximum value is 240.

FIGURE 5-5: Use set x to number command to set the x-coordinate of an object in Scratch.
To set the y-coordinate of an object in Scratch, use the set y to number command in the Motion category (see Figure 5-6). The minimum value of the y-coordinate ranges is -180, and the maximum value is 180.

FIGURE 5-6: Use set y to number command to set the y-coordinate of an object in Scratch.
To set both the x-coordinate and y-coordinate of an object in Scratch, use the go to x: number y: number command in the Motion category (see Figure 5-7). The range of the x-coordinate value is -240 to 240, and the range of the y-coordinate value is -180 to 180.

FIGURE 5-7: Use go to x: number y: number command to set the position of an object in Scratch.
 In Scratch, you can set the size of an object using the
 set size to number % command in the Looks category as shown in Figure 5-8. This sets the size of the object as a percentage of its original size. Percentages smaller than 100 shrink the object. Percentages larger than 100 grow the object.
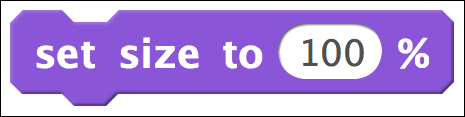
FIGURE 5-8: Use the set size to number % command to set size of an object in Scratch.
Using Scratch to find position
To find the x-coordinate of an object in Scratch, use the x position command in the Motion category. To find the y-coordinate of an object in Scratch, use the y position command in the Motion category. You and your coder can use these commands in your programs when you need to write commands that require information about an object's position.
As you code, sometimes you want to position an object (sprite) onscreen and then get its coordinates. You can do this for any sprite using either of these methods (see Figure 5-9):
- Select the checkbox next to the
x positioncommand and they positioncommand in the Motion category to show these values onscreen. - On the thumbnail of the sprite, click the “i” icon to expand its information center and then view the x: and y: values displayed there.

FIGURE 5-9: Two ways to view the current x- and y-coordinates of a sprite.
In both methods, the coordinates of Scratch Cat are (60, -18).
Using JavaScript
To set both the x-coordinate and y-coordinate of an object in JavaScript, identify the object you want to position, and then use the setPosition command.
Here are the steps for how to position an image of a mouse onscreen in the Code.org App Lab, using JavaScript.
- In App Lab, click the Design button above the emulator of the mobile device.
-
In the Workspace, select Image ⇒ Choose.
The Choose Assets dialog box opens.
- Click the Upload button.
-
Select the file you want, and then click the Choose button.
The uploaded file appears in the dialog box as shown in Figure 5-10. The name of the uploaded image file shown here is
mouse.png. - In the App Lab program workspace, type these commands:
image("character", "mouse.png");setPosition("character", 160, 225, 100, 100);

FIGURE 5-10: The Choose Assets dialog box for uploading an image for display in App Lab.
Here is what these commands do: The first command creates an image reference identification, character, and links the file, mouse.png, to this identification. The second command displays the image in character according to four quantities: the x-coordinate of the object, the y-coordinate of the object, the width of the object in pixels, and the height of the object in pixels.
In App Lab, the range of the x-coordinate value is 0 to 320, and the range of the y-coordinate value is 0 to 450. When using JavaScript to program images displayed on a webpage, these values have larger maximum values, representing the larger size of a computer screen.
Figure 5-11 shows the mouse positioned at the coordinates (160, 225), which is the exact center of the screen. You can see that the mouse is positioned by its upper-left corner where the tip of its tail is located. The mouse has a width of 100 pixels and a height of 100 pixels.

FIGURE 5-11: Use the setPosition command to set the position of an object in JavaScript.
To find the x-coordinate of an object in JavaScript, use the getXPosition("character"); command where character is the identification reference of the object. To find the y-coordinate of an object in JavaScript, use the getYPosition("character"); command where character is the identification reference of the object.
You and your coder can write the following code to find and display onscreen the coordinates of an object named character. This assumes you have uploaded an image file and assigned it to the reference identification, character. Type this code in the App Lab program workspace.
var x = getXPosition("character");
var y = getYPosition("character");
textLabel("xcor");
textLabel("ycor");
setText("xcor", "x-coordinate is " + x);
setText("ycor", "y-coordinate is " + y);
Here is how this code works:
- The
var xvariable gets the x position and thevar yvariable gets the y position of the object. - The two
textLabelcommands create locations onscreen, calledxcorandycor, to display information. - Each
setTextcommand displays a value in a text label. The value ofxdisplays in thexcorlabel and the value ofydisplays in theycorlabel.
Figure 5-12 shows the output of this code.
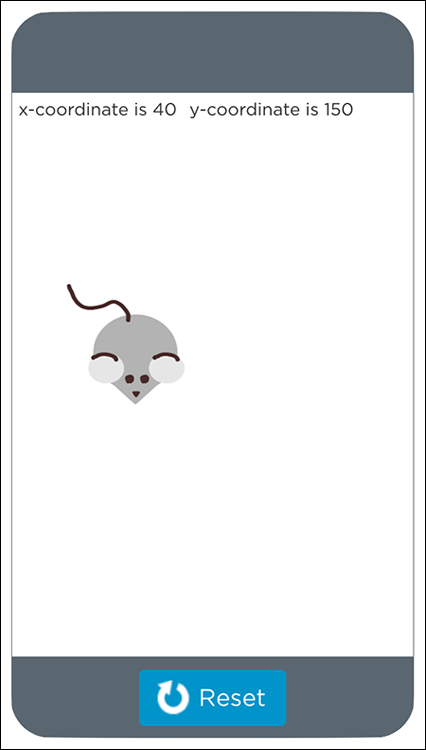
FIGURE 5-12: Use the getXPosition and getYPosition commands to get the position of an object in JavaScript.
Positioning Objects Randomly
Your coder can position an object at a random position onscreen. She can use a random position for the x-coordinate, the y-coordinate, or both.
Using Scratch
To set a random x-coordinate for an object in Scratch, use two commands: the set x to number command in the Motion category and the pick random number to number command in the Operators category. Assemble the commands as shown in Figure 5-13. The minimum value for the random command is -240, and the maximum value is 240.

FIGURE 5-13: Set a random x-position of an object in Scratch.
Set a random x-coordinate and a constant y-coordinate when you want to create a game in which objects fall from changing locations at the top of the screen. For example, your coder can create a game in which “it's raining cats and dogs” such that the cats and dogs appear to fall from all over the sky, dropping down from the top of the screen at random x positions.
To set a random y-coordinate for an object in Scratch, use two commands: the set y to number command in the Motion category and the pick random number to number command in the Operators category. Assemble the commands as shown in Figure 5-14. The minimum value for the random command is -180, and the maximum value is 180.

FIGURE 5-14: Set a random y-position of an object in Scratch.
Set a constant x-coordinate and a random y-coordinate when you want to create a game in which an objects launches from a random position at the side of the screen. For example, your coder can create a Paddle Bounce game in which the ball enters the playfield from the left side, and the paddle moves vertically along the right side. Your coder wants the ball to enter from different positions up and down the screen to create variety for the player during the game.
To set a random position, including both x-coordinate and y-coordinate, for an object in Scratch, use the go to random position command in the Motion category (see Figure 5-15). Note that the go to command tile can toggle between mouse-pointer and random position.

FIGURE 5-15: Use go to random position to place an object in a random position onscreen in Scratch.
Your coder can position many objects into random positions at one time to create a scattering effect. This is a common technique for creating a game app that scatters things for a player to collect. This technique also works for creating real-world models when you want to scatter people in random positions in a location, such as shoppers in a mall. See the Asteroid Blaster project at the end of this chapter for a simple game that uses this technique.
Using JavaScript
To set a random x-coordinate of an object in JavaScript, identify the object you want to position, and then use the setPosition command along with a randomNumber command to identify the range of x-values that you want. The minimum of the x-coordinate value is 0 and the maximum is 320.
To set a random y-coordinate of an object in JavaScript, identify the object you want to position, and then use the setPosition command along with a randomNumber command to identify the range of y-values that you want. The minimum of the y-coordinate value is 0 and the maximum is 450.
Here are the steps for setting a random position of an image of a mouse onscreen in the Code.org App Lab, using JavaScript. (See the JavaScript example in the previous section, “Setting and Finding Position” for details on adding an image to the screen.) This code sets both a random x-coordinate and a random y-coordinate for the image:
image("character", "mouse.png");
setPosition("character", randomNumber(0, 320),
randomNumber(0, 450), 100, 100);
Figure 5-16 shows the mouse positioned at randomly selected coordinates. The Run button is pressed three times, with the result of each press shown.

FIGURE 5-16: Randomly selected position of a mouse on three execution cycles of code in JavaScript.
Setting and Finding Direction
Setting the direction of an object means pointing it at any angle around a circle. Finding the direction of an object means determining the angle at which it is pointed.
The starting angle for direction is measured as 0 degrees, and there are 360 degrees of measurement as you rotate around the circle. The 360 degree direction represents a full rotation, and identifies the same direction as 0 degrees. The headings of a compass are each separated by 90 degrees. If you start at North and rotate 90 degrees clockwise, you are facing East; if you rotate another 90 degrees clockwise, you are facing South.
The 0 degree position for direction may identify a different compass heading from one programming language to another.
Using pseudocode
A typical pseudocode expression you can write to set the direction of an object is:
setHeading angle
Here, angle can be any value from 0 degrees to 360 degrees.
In some programming languages, angle is measured in a unit called radians. Two pi radians equals 360 degrees — an entire circle.
Using Scratch
When your coder is working in Scratch, use the point in direction angle command to set the angular direction of an object. A direction of 0 degrees is North; measurement around the circle is clockwise so that 90 degrees is East, 180 degrees is South, and 270 degrees (also called -90 degrees) is West. Figure 5-17 shows a command that sets the heading to 120 degrees (which is southeast).

FIGURE 5-17: Use point in direction angle command to set the heading of an object in Scratch.
You and your coder can find setdirection commands in programming languages that are geared towards video game creation. This includes GameSalad and Swift. LOGO-based languages and Python, through the Tkinter module, also include directional commands. JavaScript and Java are not especially well-suited to exploring setdirection commands at an introductory level as this type of content is the not the main programming focus of these languages.
To find the direction of an object in Scratch, use the direction command in the Motion category (see Figure 5-18). Your coder can use this command in her programs when she needs to write commands that require information about an object's direction.
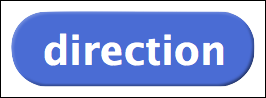
FIGURE 5-18: Find the direction of an object using direction in Scratch.
As you code, sometimes you want to find an object’s current direction. You can do this for any sprite using either of these methods (refer to Figure 5-9):
- Select the checkbox next to the
directioncommand in the Motion category to show this value onscreen. - On the thumbnail of the sprite, click the “i” icon to expand its information center and then view the direction value displayed there.
Setting values and finding values of variables is a common activity in programming. In languages such as Java, coders often perform “set” and “get” tasks through small subprograms called methods (see Chapter 15). For example, a programmer writing code for a veterinary office may create an object that represents a pet. The program includes a setter method that allows the vet to create a record for a new client by setting the name, breed, and age of the pet. The program also includes code allowing the vet to get the name, breed, and age of the pet (from the saved information) using a getter method.
Setting Object Direction Randomly
Your coder can point an object at a random angle onscreen. He can rotate an object any degree angle to create variation in the heading at which the object points.
Using Scratch
When your coder is working in Scratch, use two commands to point an object in a random direction: the point in direction angle command in the Motion category and the pick random number to number command in the Operators category. The random number range is 0 to 360 degrees (see Figure 5-19).

FIGURE 5-19: Set a random direction of an object in Scratch.
Because 0 degrees and 360 degrees are the same position, angle measure is often set as 0 to 359, or as 1 to 360. The random number picker only produces whole numbers, so limiting the range this way prevents duplication of the 0 angle position.
You and your coder can set object direction randomly for each object when you want to create multiple objects onscreen that can move in different directions.
Turning
Turning means changing the direction that an object is pointing it. You can turn an object left or right. You can also code repeated turning to create rotation, like a spinning top.
Using pseudocode
A typical pseudocode expression you can write to turn an object is:
turn angle
Here, a clockwise turn angle can be any value from 0 degrees to 360 degrees. Similarly, a counterclockwise turn can be any value from 0 to –360 degrees.
A typical pseudocode expression you can write to make an object rotate continuously is:
forever [turn angle]
This command causes the object to keep turning forever. Use a small turn angle to make the object rotate slowly. Increase the turn angle to make the object turn faster. For example, turn 10 creates a faster turn rate than turn 5. You can also add a wait, or delay command inside the forever command to give additional control over the turn speed.
Using Scratch
When you and your coder are working in Scratch, use a turn angle degrees command to turn an object. There are two command tiles for the turn: a turn right command (clockwise) and a turn left command (counterclockwise). Use any number of degrees, including decimal values if needed, from 0 to 360 (see Figure 5-20).

FIGURE 5-20: Use turn angle degrees commands to turn an object in Scratch.
When combining the random command with turns, set the range of whole numbers from 0 to 359 to avoid duplication of the 0 angle position.
See Figure 5-21 to see how you can combine the turn command with forever (in the Control category of commands) to make the object spin without stopping.

FIGURE 5-21: Use forever with turn angle degrees to make an object spin without stopping in Scratch.
Acting Out Motion, Unplugged
Moving an object means changing its position onscreen. You and your young coder can move an object whenever you want to code a car to drive or a ball to bounce.
Get up out of your seat, gather some friends, and play a little game of Traffic Light (see Figure 5-22) to set the stage for working with motion! Traffic Light is an updated version of the game Red Light, Green Light that includes a Yellow Light and turn signals. It requires players to move at different speeds, change directions, start and stop, and occasionally move backwards.
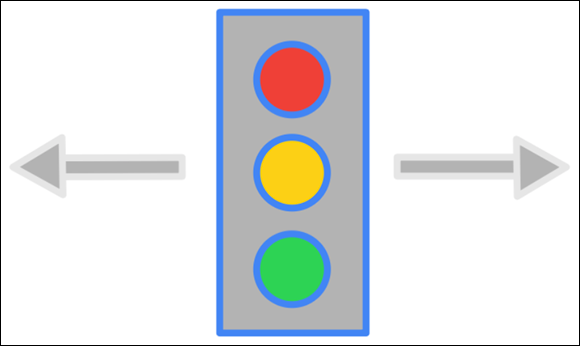
FIGURE 5-22: Play Traffic Light to set the stage for working with motion.
Here are the rules:
- The person who is the commander stands at one end of a gym or field. All the players stand at the opposite end of the field.
- Players are motionless until the commander calls out a command.
- At any time, and in any time interval, the commander calls out a command indicating the color of the light.
- When the commander calls out “Green Light” players run towards the commander. When the commander calls out “Yellow Light” players walk towards the commander. When the commander calls out “Red Light” players stop.
- When the commander calls out “Right Turn” players must make one square turn (a 90-degree turn) to the right, relative to their current position. When the commander calls out “Left Turn” the players must make one square turn (a 90-degree turn) to the left, relative to their current position.
- When the commander calls out “Reverse” players must continue facing their current direction, but move backwards on the commands that follow.
- Any player who doesn't follow the direction issued by the commander is out and must return to the starting line to re-enter the game.
The goal is to be the first player to reach the commander — the person calling the commands.
Ask your coders to discuss the role of sequence with regard to the commands issued by the commander. Encourage her to draw parallels between the execution of this game and the execution of a computer program!
 Remind Traffic Light players to move carefully and watch out for other players, especially when they are moving backwards, to avoid collisions.
Making an Object Move
An object moves when it changes position over time. You can program an object to move in your program using a few different commands.
Using pseudocode
Each programming language uses its own special command to move an object, and you can write different pseudocode expressions to represent the process of moving an object onscreen. The move number (measured in number of pixels) pseudocode command represents moving an object some distance in the direction in which the object is pointing. An example is move 5 or move 15, with the larger number representing a larger distance moved.
Another way to make an object move is to change its x-coordinate or its y-coordinate.
changex number
changey number
Changing the x-coordinate forever creates horizontal motion. Changing the y-coordinate forever creates vertical motion.
To make an object move constantly, place a motion command inside a forever command:
forever [move number]
forever [changex number]
forever [changey number]
Move forever commands are useful for making games and models. For example, coding several cars to move forever in the horizontal direction allows your coder to create traffic for a Crossy Road-style game.
Using Scratch
To make an object move in Scratch, set the direction of the object using two commands: the point in direction angle command in the Motion category, and the move number steps in the Operators category (see Figure 5-23). The range of point in direction is 0 to 360 degrees. For the move command, use any number; negative numbers move the object backwards. The larger the number, the bigger the move. Note that move makes the sprite object move in a straight line, not spin in place.

FIGURE 5-23: Use the point in direction angle command and the move number steps number command to move an object in Scratch.
To create horizontal motion, use change x by number using any number; negative numbers move the object to the left and positive numbers move the object to the right. See Figure 5-24.

FIGURE 5-24: Use the change x by number command to move an object horizontally in Scratch.
To create vertical motion, use change y by number using any number; positive numbers move the object up and negative numbers move the object down. See Figure 5-25.

FIGURE 5-25: Use the change y by number command to move an object vertically in Scratch.
To make an object move constantly, place any motion command inside a forever command. Figure 5-26 shows the shows the move number steps inside forever.

FIGURE 5-26: Place any move command inside the forever command to create constant motion in Scratch.
Scratch doesn't have a wrapping feature on its stage. When a moving object reaches the edge of the screen, it stops. You can counteract this by making an object bounce off the side of the screen. To do so, add an if on edge, bounce command as shown in Figure 5-27.

FIGURE 5-27: Add a if on edge, bounce command to make an object bounce off the edge of the stage.
Another way you can keep an object moving at the edge of the stage in Scratch is to create your own code for wrapping. You can make an object leave one edge of the stage, and then appear at the opposite edge of the stage. Figure 5-28 shows code for an object that moves right and when it reaches the right side of the stage instantly repositions itself on the left side of the stage. You can find the inequality operators in the Operators category. See Chapter 10 for additional information on forever and repeat until loops.

FIGURE 5-28: Create stage wrapping so that an object appears to continue moving when it reaches the edge of the stage.
Using JavaScript
To make an object move in JavaScript, you code the starting position of the object and then make the position change a small quantity during a time interval.
The following code moves a mouse object left to right, across the screen in the Code.org App Lab, using JavaScript. (See the JavaScript example in the previous section, “Setting and Finding Position” for details on adding an image to the screen.) The mouse x-coordinate begins at 0. Its y-coordinate stays constant at 150.
image("character", "mouse.png");
var xpos = 0;
timedLoop(250, function () {
xpos = xpos + 1;
setPosition("character", xpos, 150, 100, 100);
});
Here's what each line of code does in this program:
- Line 1 identifies the object you want to move. For example,
image("character", "mouse.png"); - Line 2 creates a variable for x-position of the object (
xpos) if you want to make the object move horizontally. Alternatively, create a variable for the y-position of the object (ypos) if you want the object to move vertically. (For more information on working with variables, see Chapter 7.) Initialize the variable by setting it equal to the starting value for the object. For example,var xpos = 0;. - Line 3 creates a timed loop to indicate how often the object will move. In a timed loop, 1000 equals 1 second. A time loop set at 250 executes one time every quarter-second. (See Chapter 10 for more information on loops.)
- Line 4 increments the position variable inside the timed loop. (For more information on working with variables, see Chapter 7). This causes the position of the object to change a little each time the loop executes. For example,
xpos = xpos + 1;. - Line 5 uses a
setPositioncommand inside the timed loop to set the object x-coordinate toxpos.
Asteroid Blaster
You can combine scattering, motion, and direction code to create a simple scene of objects flying and bouncing around onscreen. Adding an event such as clicking an object to make it disappear can help your coder turn the scene into a game!
Figure 5-29 shows an example of code, in Scratch, for a simple Asteroid Blaster game you can code using the commands and concepts in this chapter. All commands are on the Rocks sprite (which looks a lot like an asteroid!).

FIGURE 5-29: Scattering, motion, and direction codes are combined to build an Asteroid Blaster game.
Here are some tips for writing this code:
- Use the scissors tool to cut Scratch Cat from the stage.
- At the Stage thumbnail, choose New Backdrop ⇒ Choose Backdrop from Library icon and select Stars from the library
- In the Sprites area, choose New Sprite ⇒ Choose Sprite from Library icon and select Rocks from the library. The Rocks sprite serves as one asteroid.
-
On the Rocks sprite, assemble the code tiles in Figure 5-29. Note that the
clonecommand creates copies of the Rocks sprite to make it appear that many asteroids are located on the stage. Adjust the number of asteroid rocks you want to create in therepeatcode. For more information on repeats and other loops, see Chapter 10. The Asteroid Blaster program uses a clone command to create clones of the Rocks sprite. Each clone possesses the same attributes and behaviors of the original Rocks sprite. When the program is not executing, the clones do not exist and are not visible. The when green flag clickedandwhen this sprite clickedcommands are event handlers. Event handlers react to an action by the user, such as a click, by executing some code.
The finished game looks like Figure 5-29. The user starts the game by clicking the green flag. She then tries to blast all the asteroids by clicking each one with her mouse. Try creating your own version of the game, modifying commands and the sprite object to create your own custom version!