
Chapter 2
Understanding the Big Ideas
IN THIS CHAPTER
![]() Coaching for coding
Coaching for coding
![]() Thinking algorithmically
Thinking algorithmically
![]() Commenting to plan and document programs
Commenting to plan and document programs
![]() Understanding sequencing, repetition, and selection
Understanding sequencing, repetition, and selection
This chapter helps you better understand the big concepts in coding, or computer programming: giving instructions to a computer so that it can perform a task. You see the big picture of writing a program before you focus on the specific details of writing lines of code.
Seeing the Big Picture in Coding
Learning to program a computer is similar in many ways to playing football. You have to first think about the goal of the program. Then you focus on the big picture, or game plan, to develop the key parts of the program.
For example, the goal of football is outscoring your opponent. The big picture of football may include kicking the football, running with the football, avoiding getting tackled, and moving the football to the end zone. Drilling down into special plays and perfecting fancy footwork comes after players cement their understanding of the goal and the big picture.
In coding, the goal is to complete a process that would not easily be accomplished without a computer. This may be providing an airplane simulation game or a tool for searching for a home overseas. The big picture involves all the large parts of the program that contribute to achieving the goal. Creating an airplane simulation may consist of providing a user a virtual airplane, giving controls to fly the plane, providing environments for the plane to fly in, and making the plane react according to user input. Creating a tool for searching for a home overseas may consist of providing the user a map, building areas onscreen to enter information about the desired attributes of the home, and creating a search mechanism based on user-input attributes.
How can you represent the big picture? You can act it out, or draw pictures, or write words to describe the important parts. Each of these activities is unplugged — they don’t require the use of a computer — and each one helps you plan out your computer program before you sit down to begin coding.
 Ask your young coders to think of something they’re good at, such as baking cookies, playing Minecraft, or taking care of the family pet. Then ask them to think about their special skill and how they would explain it, in very simple terms, to an alien who has just stopped in to visit Earth. What are the most important parts of understanding how to go from ingredients to yummy baked cookies? What are the big picture ideas you need to know to complete a successful dog walk?
Acting Out the Big Picture, Unplugged
Too many times, people dive into a project by focusing on the details before mapping out the big picture. Camille once had a scary assignment in fifth grade in which she made this mistake! When asked to write a summary of The Red Badge of Courage, she panicked and tried to write a detail from every page of the book, somehow stitching them together, but not making any sense at all. It was an awful three hours of tears at the dinner table. What she should have done was take a step back and write a 30-second movie trailer version of the book, hitting the highlights and the most important parts that captured only the main ideas.
 Thinking about coding in terms of typing commands on a computer without stepping back to consider the big picture of what you want the program to do is a recipe for disaster. Plan before you code!
Dramatizing a noncoding process
One way of understanding the big picture of a computer program is to act it out, without any computer at all. Invite your young coder to try acting out an everyday activity that is not computer related.
One possibility is dramatizing the process of washing socks (as if asking a kid to wash her own socks wouldn’t be drama enough!). For example:
- Ask your young coder to take off her socks (or dig them out of the laundry basket!).
- Put the socks in the washing machine and pretend to wash them.
- Take them out of the wash and move them to the dryer where you pretend to dry them.
- Remove the socks from the dryer (all clean and dry!) and ask her to put them on her feet.
Although you call this process “doing laundry” or “washing socks,” you can have her act it out so that she can see the process actually involves more steps (see Figure 2-1).
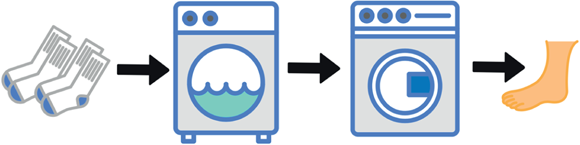
FIGURE 2-1: Acting out a process, such as washing socks, helps kids better understand steps in a process.
“Drive to the intersection and turn right” is an example of a similar task you may perform when writing code for a car race video game. Although this single phrase describes the big picture, you need to drill down to more specific steps in order to accomplish the bigger task. For example, you need to move forwards 150 pixels and then make a square turn (also called a 90 degree turn) to the right (or to the left). When coding these actions in a programming language, you can use a sequence of commands that looks something like forward 150 right turn 90.
Acting out a big picture doesn't have to involve props, but it’s often helpful to use them with new programmers. Making concrete connections to everyday objects and processes can help your kid form a mental model that she can refer to when she writes a computer program.
Walking through some daily tasks
You can step through a number of daily tasks to help a young learner grasp the concept of process. Brainstorm a list of everyday processes with your child and then ask him to demonstrate the big picture of each process. Here are some you can try:
- Get up in the morning.
- Alarm clock rings.
- Wake up.
- Swing legs over the side of bed.
- Stand up.
- Feed the dog.
- Call the dog.
- Scoop the dog food from the bag.
- Place food in the bowl.
- Perform a cannonball.
- Stand at the edge of the pool with arms outstretched.
- Leap up and out over the water while tucking legs into your chest.
- Hit the water, tushie first.
- Cheer with joy as displaced water booms into the air, splattering everyone in a 3-meter radius.
- Make a smoothie.
- Gather the fruit.
- Put fruit into the blender.
- Add ice.
- Mix.
- Pour into a glass.
Get creative and see how many processes you can act out! Remember, you don’t have to actually use the real materials to act out a process. As in charades, you can use your imagination!
Creating an Algorithm
Think about the steps you use to perform any type of process — for example, getting up in the morning, performing a layup in basketball, or washing socks in the laundry. You probably perform the same actions every time. That’s because a specific set of steps, from start to finish, define that process. Anyone who performs the same process probably uses those same steps, or a series of steps, that are nearly identical. Those steps are called an algorithm.
An algorithm is a step-by-step set of instructions to be followed in completing a task, especially by a computer.
Computers are fast, and they don’t get bored or annoyed with doing complicated math or performing the same tasks over and over again. But they aren’t especially smart, and they don’t think for themselves (yet!), so it’s up to the human operator of the computer to give it an algorithm so that it knows how to perform a process.
Turning a picture into words
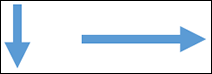
One algorithm kids have likely performed in the household (or that adult family members wish they would perform!) applies to vacuuming. Unless you are living with a random vacuumer — someone who uses no specific pattern when attacking the carpets with the household Hoover — then you probably see a pattern used to vacuum rooms. What does the vacuuming algorithm look like? As a picture, it probably looks something like Figure 2-2.
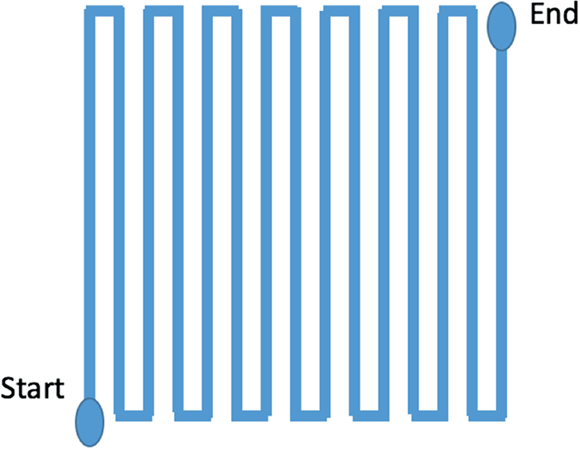
FIGURE 2-2: A visual representation of a common vacuuming algorithm.
Turning the picture into words requires thinking about each step, from start-to finish, that the designated vacuumer needs to do to clean the room. These words, in order, may look like the following steps:
- Position the vacuum in one corner of the room.
- Plug in the vacuum.
- Turn on the vacuum.
- Push the vacuum in a straight line.
- If you hit a wall, make a corner turn towards unvacuumed area.
- Push forward a little.
- Make a corner turn towards unvacuumed area.
- Repeat Steps 4 through 7 until you reach the wall opposite your starting point.
- If you’ve reached the wall opposite your starting point, then turn off the vacuum.
- Unplug vacuum.
The step-by-step vacuuming process is a common algorithm for cleaning up your carpet, but the zigzag pattern isn’t the only possible one. What other vacuuming patterns can you think of? What about patterns that start with the vacuum in the center of the room, such as a spiral pattern, or a pattern that looks like the spokes of a wheel?
What would the algorithm look like for each of these vacuuming patterns in Figure 2-3? Try to write them!

FIGURE 2-3: A spiral or a starburst pattern can be the basis for alternative vacuuming algorithms.
One possible vacuuming algorithm in code
Your young coder may already be asking, “So how can I turn this picture algorithm into code?” Here is a simple program in Scratch that shows one possible vacuuming algorithm. (For more on Scratch, see Chapter 3.)
The Scratch stage shows the room where the vacuuming takes place. On the stage are three objects: a front wall, a back wall, and a vacuum. The vaccum is initially positioned in the lower-left corner of the stage. Vaccuming progresses from the left wall (where the x-coordinate is large and negative) to the right wall (where the x-coordinate is large and positive). The front and back walls are used as indicators to know which direction to turn the vacuum. The vacuuming algorithm executes in a forever loop: If the vacuum touches the front wall, it turns right; if the vacuum touches the back wall, it turns left. The following command is used to find out whether the vacuum has reached the wall opposite the starting point:
if x position of vacuum > 220
When it does, the vacuuming process is complete, and the program ends by executing a stop all command, as shown in Figure 2-4.
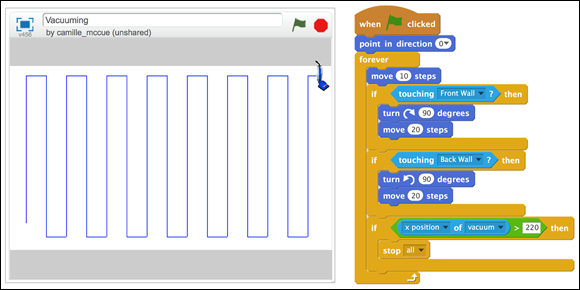
FIGURE 2-4: The vacuuming algorithm written in Scratch.
Don’t worry about the details of how to write the code; just see whether you can trace the algorithm. Notice at the start of the program that the vacuuming event begins when the green flag is clicked and that the starting conditions of the vacuum are also set at the start of the program: The vacuum points in the direction of 0 degrees — the front of the room — and (outside of the program) the user manually positions the starting point of the vacuum.
In later chapters, you can work more on translating algorithms into code. This chapter focuses on helping your coder assemble different types of commands together into a larger program that performs a task.
Representing Algorithms
Constructing an algorithm is an important step in creating a program that can run on a computer. As you work out the steps of an algorithm, you need to have some organized way of writing it down.
You can represent an algorithm before you translate it into code for use on a computer in many different ways, including
- Acting it out
- Drawing a picture
- Creating a storyboard
- Building a flowchart
- Writing pseudocode
- Coding the bones and comments in a programming language
Acting it out
Getting up on your feet and acting out an algorithm as you plan it is a fun, physical way to work through each step. Some algorithms lend themselves better to this method than others. Anything dealing with motion naturally fits well with acting it out. For example, creating a vacuuming algorithm is easily done by moving your body (and a real or imagined vacuum) across a carpet.
Another algorithm that is well-suited to this method is planning the navigation of a maze: Pretend you’re a mouse and then work through your options of moving forward; turning when you bump into a wall; and keeping your general heading aimed towards the cheese. You can act out these actions with or without props, determining how you must construct your algorithm as you try different possibilities you may encounter in the maze.
Drawing a picture
Drawing a picture is a good, visual method for working through the steps of an algorithm. This method works especially well when a fairly simple, start-to-finish path defines the algorithm. For example, the path followed by a rollercoaster is the same every time the riders board the coaster and participate in the ride. The coaster follows the same set of climbs, falls, loops, and twists every time — there are no conditions that determine a course that deviates from the same pattern on every run. A single picture, like the one in Figure 2-5, can depict the entire algorithm, as long as you identify the start and end points.

FIGURE 2-5: A rollercoaster requires a single picture to understand the algorithm describing the coaster’s path.
A simple vacuuming algorithm is also something you can represent well by drawing a picture. A single picture easily shows the structure of the up-and-down motion, moving across the room. Refer to Figure 2-2.
Creating a storyboard
Sometimes, drawing a single picture (see preceding section) isn’t enough to show all the steps of an algorithm. An algorithm that has multiple paths may require more than one drawing to map all its steps. One way to map these paths is create a storyboard. A storyboard is series of pictures showing the different screens that appear in your program (usually an app) and the sequence in which they can appear. For example, a kid creating a Choose Your Own Adventure app needs several pictures to map the possible routes in a story he wants to create, similar to the example shown in Figure 2-6.

FIGURE 2-6: A storyboard shows drawings or example photos of the screens to appear in your app.
You can make your own version of the cool app shown in Figure 2-6. Code.org provides a free and easy-to-use interface, called App Lab, for kids to design and code (using JavaScript in both text and tile/block editors) their own Choose Your Own Adventure app! The interface allows you to add your own images and construct as many paths through the story as can be dreamt. Check out App Lab at https://studio.code.org/projects/applab.
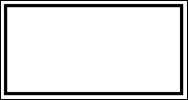
Building a flowchart
A flowchart is a diagram that shows the steps of an algorithm, in order, including decisions that need to be made that lead to different paths through the algorithm. A flowchart has a few shapes, connected with arrows, that outline the program from start to finish. Figure 2-7 shows a simple flowchart your child may write for an after-school homework algorithm.
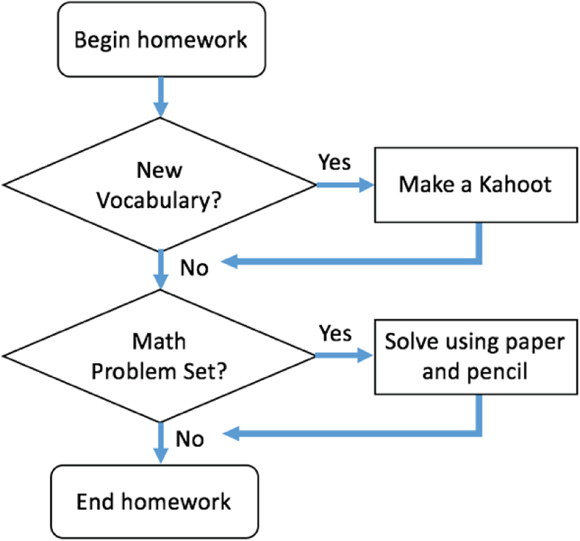
FIGURE 2-7: Flowchart of a homework algorithm.
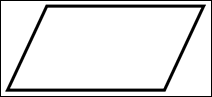
Unlike creating a list of steps using only text (see the section “One possible vacuuming algorithm in code,” earlier in this chapter), most flowchart text goes into its own special shape, and each shape has a unique meaning. Shapes are also connected in special ways depending on what job they do. Table 2-1 shows some of the most common shapes and what they represent.
TABLE 2-1 Symbols Used In Flowcharts
|
Flowchart Symbol |
Example |
What It Means |
|
Arrow |
|
Shows the order in which the program runs |
|
Terminal |
|
Starts or ends the program, or process in the program |
|
Process |
|
Performs a task or set of operations |
|
Decision |
|
Makes a decision, such as yes or no or true or false |
|
Input/Output |
|
Accepts input to or gives output from the program |


Draw.io is a free and easy-to-use tool for drawing your own flowcharts. It provides all the symbols you need, along with a handy grid for arranging them and lining everything up just the way you want. Help your young coder practice flowcharting by playing with draw.io to plan a program for something fun, such as building a pizza. You can even ask him to work through how a pizza franchise might flowchart a pizza-building app: The app asks users for input regarding topping and crust choices and then gives output regarding cost. Your coder can make the flowchart activity as easy or as challenging as she wants!
Writing pseudocode
One strategy for planning a program is to write the big picture in a simplified form of computer code, called pseudocode, which means “fake code.” Pseudocode is similar to shorthand for a computer. It’s not code that the computer can actually run, but it is written similarly.
You can write pseudocode from the outset when working on your program, or you can write it after using another technique, such as drawing a picture. Pseudocode can often speed up the process of translating a program into functional code because it allows a programmer to think in code without getting bogged down in details, such as syntax (coding punctuation).
For example, if your coder is asked to add the numbers from 1 to 10, he can write pseudocode to represent this addition algorithm:
create variable total
create variable counter
set total to 0
set counter to 1
for counter = 1 to 10
set total to the previous total + counter
increase counter by 1
end for loop
Then, he can add print statements (in pseudocode) before and after the addition algorithm to create a complete program:
print "Adding up numbers from 1 to 10"
addition algorithm
print "The total is " + total
Pseudocode can appear in many different ways, so encourage your young coder not to worry about perfecting the language. Ultimately, it’s only the code itself that must be perfect to execute.
Commenting the bones
Comments are special words you can include in computer code that aren’t executable — they don’t do anything. If comments don’t do anything, why use them? Because they allow you to build the bones of a computer program — the structure that describes all the parts of the big picture — as part of the code itself. They also serve additional purposes, such as helping you remember later how you built the program and helping others (such as members of a team) understand the different sections of your program.
Commenting code in Scratch
In Scratch, each comment is attached to a code tile. Comments can be as short or as long as you want. Long comments can be collapsed to a single line. Scratch Comments appear light yellow in color when shown onscreen. Figure 2-8 shows comments for the complete vacuuming program in Scratch. (For an introduction to Scratch, see Chapter 3.)
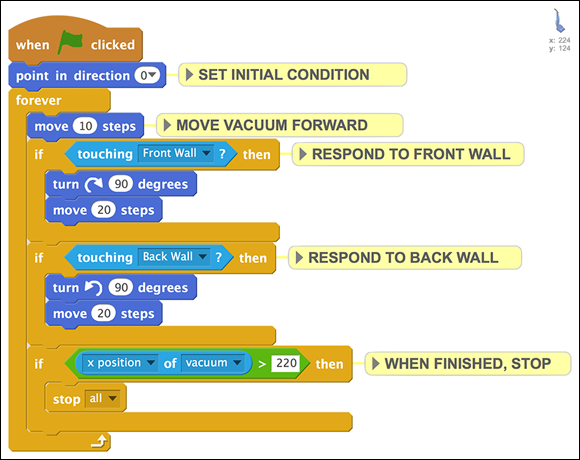
FIGURE 2-8: Commenting code in a Scratch program.
Commenting code in JavaScript and Java
In JavaScript and Java, a short comment is indicated by two forward slashes. Everything that follows the two slashes (on the same line) is a comment and is not executed as code. A long comment is called a block comment. Every line begins with an asterisk. The first line precedes the asterisk with a forward slash, and the last line includes a slash after the asterisk.
In the Code.org Choose Your Own Adventure app shown in Figure 2-9, code lines 1 through 3 show a block comment, while line 5 and line 14 each show a short comment.
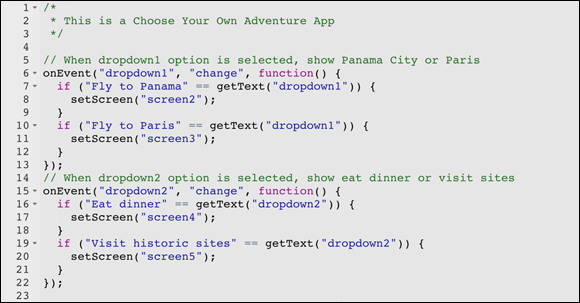
FIGURE 2-9: Commenting code in a JavaScript program.
Organizing with Sequence, Selection, and Repetition
Infrastructure is something adults hear a lot in the grown-up world. Infrastructure is the physical plan of the world. It consists of the same components in any city on earth: roads, water pipes, electricity grids, and other items that give structure and organization to designed human habitats. Without infrastructure, daily life would appear chaotic!
Just like cities, computer programs possess infrastructure. At a very basic level, infrastructure consists of three key components:
- Sequence
- Selection
- Repetition
These components provide the general plan for designing and executing a computer program.
Sequence
Sequence is the order in which a process is conducted. Every computer program must be organized so that steps are executed in a logical order. For example, ask your coder to order the steps in Figure 2-10 in a simple algorithm. The steps include answering Rocky; saying Rocky, roll over!; and asking What is the name of your dog?

FIGURE 2-10: Unsequenced steps in an algorithm.
Your coder should be able to recognize that you must first ask the name of the dog (query); then receive the answer (input); and then, remembering that Rocky is the name, say, Rocky roll over (output).
As a Scratch program, the algorithm looks something like Figure 2-11.

FIGURE 2-11: Steps sequenced in a logical order in a Scratch algorithm.
Understanding the order in which input and output must occur is just one example of sequence in a computer program. This books tackles many other sequences throughout the coding activities.
Invent some other sequencing tasks for your kid to try. What about gardening, baking brownies, or washing the car? What are the most important steps of each task, and how must they be sequenced?
Selection
Selection means choosing a path based on certain conditions. For example, when choosing a university to attend, you may decide between West Coast or East Coast. The decision you make then directs you to new sequences — and consequently, other selections — that relate to your choice. If you choose West Coast, then Stanford is on your list of potential universities, but not Harvard. Program commands associated with a decision that you didn’t make aren’t executed.
When coding, selection allows the programmer to create as many paths as needed to respond to the conditions of the program. Selection often involves conditional statements that are structured this way: if [condition occurs] then [execute consequence]. Conditional statements can be structured in different ways, depending on what the program needs to accomplish. Figure 2-12 shows three conditional command structures your coder can use in Scratch.
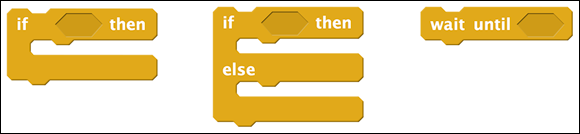
FIGURE 2-12: Conditional commands in Scratch.
Here are some everyday examples, in standard English, that match the structure of the Scratch conditional commands:
ifeveryone completes homework by dinnertimethenwe'll eat at Olive Gardenifyou eat orangesthenyou are a healthy pirateelseyou have scurvywaituntil countdownequalszero
Conditional statements that use an if-then-else statement evaluate whether the if condition is true or false: true determines the selection of one command sequence, while false determines the selection of a different command sequence. Conditional statements that use a wait until statement run when the condition (the statement following until) is true.
The Choose Your Own Adventure app makes frequent use of conditionals. Can you and your coder think of other examples in which conditional statements are used in everyday life?
Repetition
Repetition is the process of repeating something. You may have said to your kid, “How many times have I told you to take out the trash — I just keep repeating myself again and again, arrghh!” Unlike grownups, computers are happy to repeat themselves over and over. In fact, repetition is an important task when coding, and understanding how to write code blocks that repeat is critical to structuring your computer programs.
Using a repeat command is one way your coder can create a loop in his code. A loop is a structure that tells the computer to run the same commands multiple times, without writing those same commands over and over. Like a traffic circle (which we've all been stuck on many times!), you can continue looping around, again and again until there’s a reason to eventually exit the loop. Creating a loop is similar to creating a chorus in a song: You can provide a notation that indicates a lyric should be sung eight times without writing it eight times:
repeat 8 ["Come on, be my baby, come on"]
Actually writing this bridge from Ed Sheeran’s “Shape of You” requires eight lines, but using code, your kid can produce the same result in a single line. Repetition rocks!
Depending on the programming language your coder is using, loops are handled somewhat differently. Figure 2-13 shows some loop structures you use in Scratch.

FIGURE 2-13: Loop commands in Scratch.
Following are some examples, in standard English, that match the structure of the Scratch loop commands:
repeat2 [apply shampoo, lather, rinse]repeat4 [drive to the end of the block, turn right]forever[move forward 10 steps, wait 1 second, move backward 10 steps, wait 1 second]repeatuntil[the value of the jackpot exceeds $100 million]
In the first example, the repeat command indicates that the steps, “apply shampoo, lather, rinse” repeat two times. The second example demonstrates how to drive a square-shaped path in your neighborhood, ending up at your starting point. Example three shows a forever command that results in a bouncing motion that continues endlessly, until the program itself terminates or some other commands stop its execution. In the final example, the repeat until command is a hybrid command consisting of a repeat loop and an until conditional. The until conditional triggers a break out of the loop structure.
You can explore many other loop structures in Chapter 10. For this chapter, just remember that repetition is a fundamental structure that you're helping your young coder include in many programs.
Find some favorite songs or dances that include repeated sections. Work with your kid to identify the repeated lyrics or steps, as well as how many times the repetition occurs. Can you say, “Heyyyyyy, Macarena!”
Including Randomness in Your Coding
You and your coder may know that writing computer programs requires precision and attention to detail. But you both also know that the world is often imprecise and messy. So how can you write a precise program that models something in the imprecise world? The key is including some randomness in your program.
Randomness is found in a wide range of circumstances, from the outcomes of flipping coins to the path of a bug trekking across a wall. Using a random command in your programming is somewhat prevalent — keep this thought in mind every time you help your young coder get started on a program that involves variation or real-world problem-solving.
Here is a simple example of using a random command. This little program is created to work on a micro:bit electronics board (microbit.org). You don’t need the actual board to write and test programs. You can see the programs function onscreen in an emulator, a digital version of how the program will work on the hardware.
In this tiny program, shown in Figure 2-14, on button A Pressed is the start event. Pressing button A causes two lines of code to run in sequence. The first line sets a secret_number variable to a random number: pick random 0 to 9. This second line shows the secret_number on the LED display.

FIGURE 2-14: A micro:bit emulator and a simple JavaScript block program for generating and showing a random number.
Your coder could use this little sequence of commands as part of a larger program, perhaps a game, that requires a number to be pulled from a hat or a game piece to be moved according to the outcome of multisided dice roll. Ultimately, you and your coder can find that having some randomness is a good thing in your programs!
 Recently, one of Camille’s students was creating a program that models the number of people moving into and out of an apartment building. The student wanted to incorporate some randomness in the variables representing the number of people moving in each month and in the number of people moving out each month. Using a random number generation command and identifying a minimum and maximum value for each of her variables, the student produced a model that featured the randomness — and realism — that she hoped for.