
Chapter 4
Working with Words
IN THIS CHAPTER
![]() Coding text-based information to appear onscreen
Coding text-based information to appear onscreen
![]() Accepting text input
Accepting text input
![]() Combining text input and other text
Combining text input and other text
![]() Creating a simple Mad Libs game
Creating a simple Mad Libs game
This chapter guides you through a simple but fundamental task in coding — placing text-based information onscreen. Whether you and your coder are building an app, constructing a webpage, or coding some other type of computer program, you need to show information, instructions, or messages onscreen to your user. This information may be text, symbols, or numbers presented in human language, to allow communication between people and computers.
The first program that almost every new coder writes is one that displays the words, “Hello world!” It’s a good way to get started as it takes little time to write such a program — a program that provides immediate gratification with its welcoming message. So say “Hello world!” (and a few other things) as you begin coding communications to display text.
Communicating with Text
On or off the computer, information and conversations use alphanumeric text and symbols to communicate. Before the days of ubiquitous laptops and smartphones, parents and teachers employed paper and pencils to write. The writings created (by hand!) took many forms: song lyrics, essays, and computations, even recipes! And each of these forms required a variety of characters, assembled in specific patterns, to make meaning. While all these characters can now be transmitted digitally via a keyboard and screen, you still use old-school methods of “working with words” — and doing so can help shape your understanding of how to code such text in your programs.
 Play a quick game of “Pass the Note” with your coder. Without speaking, write a simple phrase on a piece of paper, then pass it to your kid. Statements such as, “Today is Tuesday,” or “Sloppy Joes are my favorite meal!” are easy prompts to get the game underway. Your coder should write a new statement on a new line that continues the conversation. Take turns exchanging statements on paper, but resist the temptation to ask a question. Wrap up the game by looking at the paper and discussing the phrases together. What is the purpose of starting phrases on a new line? Are you limited in what information can be exchanged by not asking questions? What is different about making statements versus asking questions?
Showing Text Onscreen
Try showing a little bit of text onscreen in a few different programming languages. Most programming languages provide some way to display text so that you can convey information or directions to the user. Each language has its own unique way of issuing this command, which is generically called a print command. The text isn’t printed on a printer, but is instead displayed on a computer screen or mobile device screen.
Using pseudocode
Every programming language is different, but a typical pseudocode expression for a print command looks something like this:
print ("words to be printed")
Some languages use single quotes, others use double quotes, and still others use no quotes surrounding the words to be printed, but this is the general structure.
Using Scratch
Scratch’s version of print is the say command — it's used whenever you want to make a sprite speak or think text phrases. Figure 4-1 shows an example of a command block using say, and the resulting output.
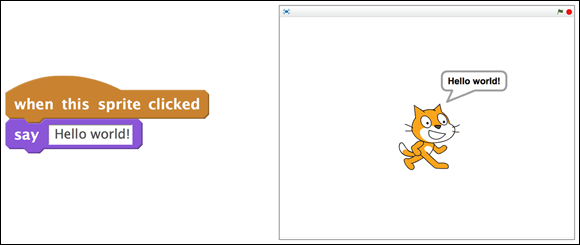
FIGURE 4-1: Use the Scratch say command to convey a simple message onscreen.
When the sprite is clicked, anything your kid types into the say field is displayed in the speech bubble by its sprite object. The think command performs the same task using a thought bubble instead of the speech bubble.
 In Scratch, you can type titles or other text directly onto the background in much the same way a theatrical scene designer would paint a backdrop for a stage production. In Bitmap mode, the text cannot later be edited, while in Vector mode, the text retains its editability. In this regard, text appears more as a graphic object than printed text. For additional information on working in bitmap and vector graphics modes in Scratch, see Scratch for Kids For Dummies by Derek Breen.
Using Python
In Python, you can show some text onscreen by using a print() command, followed by the phrase in single or double quotes inside the parentheses. Figure 4-2 shows an example of a command block using print(), and the resulting output.
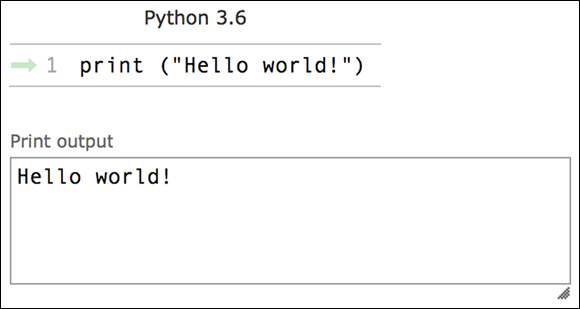
FIGURE 4-2: Python's print() command outputs text onscreen.
Python requires you to use quotes (single or double) around the phrase you want to print. The phrase and quotes are enclosed inside a set of parentheses.
Your ability to use the print command in Python might allow you to do more than send this happy greeting! Among the many uses of Python, you and your coder may discover, the print command may be instrumental in conveying the status of a robotic arm you might build, or some data in a GIS (Geographic Information System) — both common applications of Python.
Using HTML
When building a simple webpage, a great deal of what you show onscreen is text. Webpages use HTML (Hypertext Markup Language) to display that text. HTML is more of a formatting language than an actual coding language. But because you and your kid likely want to tinker a bit with HTML, take a look at a simple example of how you can display Hello world! in a web browser:
<html>
<body>
<h1> Hello world! </h1>
<p>I live a fascinating life, how about you?</p>
</body>
</html>
Use Notepad (Windows) or TextEdit (Mac) to type the short text file — or “program” — shown here. Don't focus too specifically on the details at this point; just note a couple of key ways in which you can place text on a webpage. Any text you type between the <h1></h1> tags, called Level 1 heading tags, appears as a large heading. Any text you type between the <p></p> tags, called paragraph tags, appears as standard text. Save the file with an .html extension.
Double-click a .html file; it opens in a browser similar to the one shown in Figure 4-3. Now you can see your words on a webpage! For step-by-step instructions on building a simple webpage in HTML, see Chapter 14.

FIGURE 4-3: HTML code viewed in a web browser.
Using JavaScript in an app
In JavaScript, there are a few different ways to show text. One way is to place text into a text label for display in an app. The App Lab at Code.org provides a fun and easy way for your kid to tinker with using JavaScript to display a bit of text on a mobile device emulator. As shown in Figure 4-4, the JavaScript command tells the textLabel named greeting to display the text phrase Hello world!
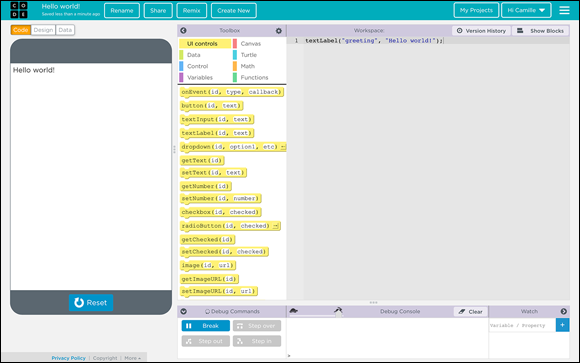
FIGURE 4-4: JavaScript code showing text in a smartphone emulator.
An emulator is a GUI (Graphical User Interface) that shows, on your computer screen, how the computer program will run on the actual device. The Code.org App Lab allows you to test your app in its onscreen emulator, and then send your app to your smartphone for operation on your mobile device!
Another way that JavaScript is used for displaying text is in webpage programming. You and coder kid have already seen that you can put text on a webpage using HTML, but JavaScript can do so as well. Which do you choose? The choice depends on the purpose of the text information on the webpage. Is the text literal, used for information such as headings, labels, and general textual content? If so, then HTML formatting commands are the better choice for displaying text. Or is the text dynamic, used for interaction (as in a button), or used in a way that changes depending on user input (as in messages)? In this case, you can write scripts — blocks of code — in JavaScript to show the desired text.
Using Java
Someday, your coder might take AP Computer Science A, perhaps as a high school student in the near future. What that day comes, he or she will likely use Java as the programming language in the course. The first programming command taught will most likely be a print command:
System.out.println ("Hello world!")
To test this, you need to install an IDE (Integrated Development Environment) for the Java programming language. That is a mouthful, and not something you have to worry about just yet, but it’s good to know that the introductory skills you’re helping your child build now are leading up to some real-world programming skills she can use in the future!
BlueJ is a free and fabulous IDE for beginners just getting started with learning Java. BlueJ provide tools for editing in both graphical and text-based modes, a debugger, compiler, and a virtual machine (so you can test your programs), along with user documentation. See Chapter 3 for more information on using the BlueJ IDE to program in Java.
Words In, Words Out
So far, you’ve only seen how to display text onscreen to communicate information to the users of your program. Text you “put out” from your program is called output. But how do you create interaction using text? Accepting text into a program is an important way to create interactivity in your code. The term input is used to describe “putting in” text (as well as other content, such as numbers). Your coder can write a program that asks for a person’s name, saves that name, and then displays the name later in another part of the program.
Play an “Interview” game with your kid. Ask an easy question, such as, “What is your name?” and have your kid reply. Discuss with your kid the difference between a statement and a question (see Figure 4-5). After your child gives an answer to the question, discuss what you could do with that answer. Could you use that answer in a new phrase? Could you create a greeting with that answer? Could you transform the name input into a printed output?
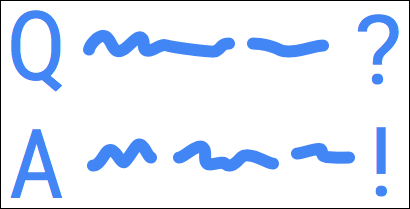
FIGURE 4-5: Play a question-and-answer interview game on paper.
You’ll need a variable to store any piece of information the user inputs to your program. A variable is something that can change its value. For example, the variable name could store the value “George” at one time, and “Maria” at another time. Think of this storage process in the same way that your brain stores a snippet of information that is input through your eyes or your ears. We cover variables in much greater depth in Chapter 7. At this introductory stage, just know that your coder needs to include in his program the code for a variable to store a piece of information input by a user.
Using Scratch
In Scratch, you can accept user input using a simple built-in variable called answer. Scratch pairs the answer code tile with an ask code tile because the two commands form a natural pair. For example, the code block shown in Figure 4-6 asks the user, “What's your name?” and then waits for a response. The user types her name into the input field at the bottom of the GUI, and this input is stored in the variable answer. The answer variable is a temporary variable — it contains the user’s name until the user inputs something else in another ask and answer code pair. Then, this value of this new input replaces the value previously stored in answer.
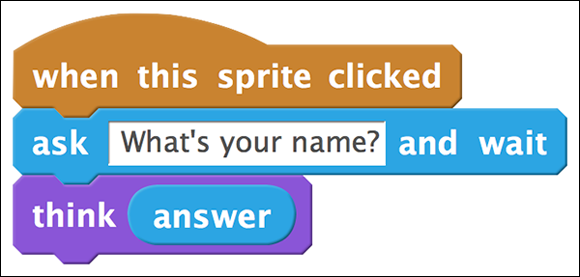
FIGURE 4-6: Scratch code block using ask and answer to get user input.
After you get an answer, you can use the value stored in answer. For example, you can now show the stored name or words onscreen: Figure 4-7 shows how Scratch Cat can think the answer as though he's pondering your name deeply.
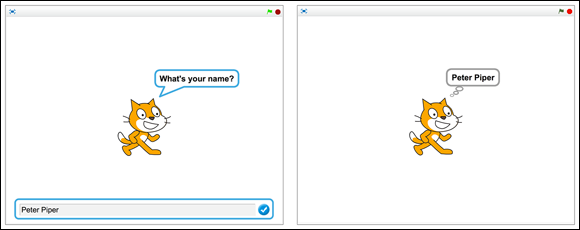
FIGURE 4-7: Scratch output showing Scratch Cat think the value of the answer variable.
One neat aspect of the answer temporary variable, is that it comes “built-in” to Scratch — you don't have to declare, or create, this variable. Later on, you create and use other variables — but you need to create those variables yourself. This process is covered in Chapter 7.
Using Python
In Python, you accept user input by creating your own variable to store the input. You can investigate additional details about Python variables in Chapter 7. But for now, just open a Python editor, such as the one available at pythontutor.com (see Chapter 3). Then type the simple code shown in Figure 4-8 to accept a word in and print a word in Python.
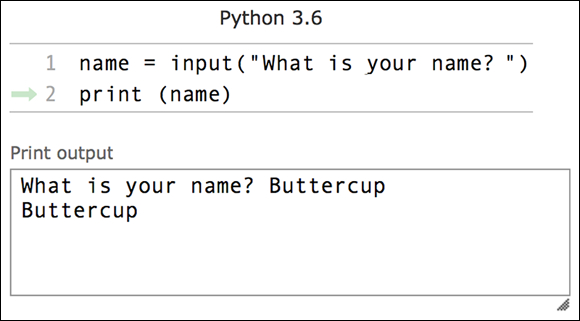
FIGURE 4-8: Code for a “word in, word out” program in Python.
In this code, you create a variable called name and ask for the user to input a value to name by asking, 'What is your name?' Then, you print the value of name as output.
 When naming Python variables, start with an alphanumeric letter or underscore symbol. Do not use any spaces in the variable name. Python variables are case sensitive, so
 name is a different variable than Name.
When you execute this code, you obtain the results shown in Figure 4-8: a console asking you to submit the name, followed by a printout of the name.
Using HTML and JavaScript
To create an interactive webpage that accepts user input, use HTML and JavaScript together. The following code shows how you can ask a user for their name, submit the name with a button, then show the name onscreen:
<!DOCTYPE html>
<html>
<body>
<p>What is your name?</p>
<input id="userInput"> </input>
<button onclick="submitname()"> Submit </button>
<p id="demo"></p>
<script>
function submitname()
{
var name=document.getElementById("userInput").value;
document.getElementById("demo").innerHTML = name;
}
</script>
</body>
</html>
Use Notepad (Windows) or TextEdit (Mac) to type the code shown here. The JavaScript code is located inside the <script></script> tags, as shown in Figure 4-9. The code outside these tags is mostly responsible for formatting the information on the page and for calling the JavaScript code. Save the file with an .html extension. For additional details on coding webpages, see Chapter 14.

FIGURE 4-9: Execution of the “word in, word out” program in HTML and JavaScript.
At first glance, you and your coder may feel the little program looks somewhat scary. That's because this program requires code covered in other sections of the book. Don’t panic! Learning to program is like learning any other foreign language. Sometimes a vocabulary word or symbol is used that you don’t yet know. Don’t let this trouble you; just keep working with the new commands and in time, you’ll be coding like a pro!
Using JavaScript in an app
Using JavaScript in the App Lab at Code.org, you and your coder can write a simple program that asks a user to type his name and then press a button to submit. The program then shows the name onscreen in a smartphone emulator. Figure 4-10 shows the code.

FIGURE 4-10: JavaScript code for a “word in, word out” program in the Code.org App Lab.
The code consists of two parts: “set up display” and “set up button event to produce name.”
The “set up display” part is comprised of two text labels, a text input field, and a button. Line 2 shows a text label called intro that displays the text “What is your name?” This label is positioned by default in the top-left corner of the screen. Line 3 shows a text input field called nameField that displays “ ” (blank space); this the where the user types his name. The Line 4 code creates a text label called greeting that displays “ ” (blank space). This label is positioned in the location where the greeting is placed later. In Line 5, the command setPosition("greeting", 10, 150, 100, 100) places the greeting label 10 pixels to the right and 150 pixels down from the top-left corner of the screen; it also makes the size of the label 100 pixels wide and 100 pixels high. Lastly, the code in Line 6 creates a button called submitBtn that shows the word Submit. This code is followed by a setPosition command in Line 7 that positions and sizes the button.
The “set up button event to produce name” part begins on Line 9 with an onEvent event handler, which causes the function makeName to execute when clicked. The function makeName creates (in Line 10) a variable name and sets it to the value of the text entered into nameField. In Line 11, nameField is hidden so that the user's entry is removed from the screen. Finally, in Line 12, the textLabel greeting field displayed the value of the name variable.
Figure 4-11 shows the operation of the word in, word out program in the smartphone emulator.

FIGURE 4-11: Operation of the JavaScript code for a “word in, word out” app.
A default setting is a setting that is automatically used when the user doesn’t take any action, or write any code, to change or override that setting.
An event handler is a coding command that, when triggered, accepts inputs and runs a block of code. The event handler is triggered when it is clicked, swiped, shaken, or otherwise activated.
Combining Text Onscreen
Your kid likely wants to write code that combines the processes of accepting text input and printing text onscreen. Now that you know how to perform each of these tasks separately, you can put them together!
Using pseudocode
One common example of combining text from different sources is to ask a user for his name, store it in a variable, and then print a greeting that includes the name in the text, along with some other words. A pseudocode expression for this combined print command looks something like this:
print ("Congratulations " + name + ", you won a million dollars!")
Connecting text together, whether it’s individual characters or complete words, is called concatenation.
To understand how concatenation works, play an “Idiom Charades” game with your coder using familiar idioms. For example, “Bark up the wrong tree,” “Don’t cry over spilt milk,” “Kill two birds with one stone,” “Rain cats and dogs,” and “Elvis has left the building.” The rules of this charade game are that you inform your partner of how many words in the phrase, then act out each word one at a time. Many kids won’t know the idioms, so they have to work one word at a time to complete the phrase. After you finish playing, help your coder to understand that the phrase is comprised of four or five separate words, concatenated together, to create a new, complete phrase.
Using Scratch
In Scratch, you can concatenate text using the join command tile as shown in Figure 4-12. The join command is located in the Operators category. Note that you can concatenate both variable names and literal text, adding as many join tiles as you want! The output shows how join allows you to make your program say complete sentences, customized for the user!
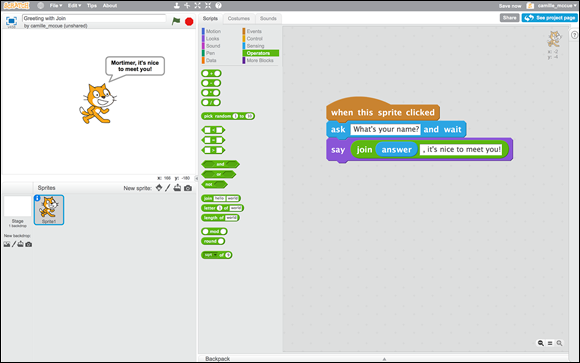
FIGURE 4-12: Code using join to concatenate variables and literal text in Scratch.
 It can be frustrating to join extensive sections of text using the
 join command in Scratch. Every new chunk of text you concatenate requires an additional join command. Think carefully before you attempt to create a giant text paragraph using concatenation in Scratch — it's better to create several small paragraphs to keep the joining manageable.
Using Python and other languages
In Python, you can concatenate text using the + command shown in Figure 4-13. Variable names and literal text can be put together, adding as many + commands as needed. Literal text requires quotation marks around the text, while variables do not.

FIGURE 4-13: Code using + to put together variable values and literal text in Python.
Most other languages your kid encounters use the + code to concatenate text for print output. Follow this format shown here!
When concatenating words and numbers, most programming languages require that you convert a number to a type of word, called a string. This removes the property of working with the number mathematically, such as ordering it with other numbers, or doubling its value. For example, the following Python code converts an integer variable, age, to a string as it's concatenated with literals and other string variables (such as a person’s name) for printing:
age = input("How old are you? ")
print(name + " is " + str(age) + " years old")
Formatting Text Onscreen
Your coder may be expressing an interest in formatting text onscreen to give it a more organized appearance, or even some flashy and fun flair! Some programming languages, such as Scratch, don’t provide this option. But most programming languages, such as Python, provide codes for special characters and for creating line breaks. For example, this Python command uses a
code to indicate where a line break occurs:
print("To be
or not to be,
that is the question.")
This line of code prints like this:
To be
or not to be,
that is the question.
When formatting text for display in web pages, HTML — the “language of the web” — provides a wide ranges of options. Here is an example of HTML code demonstrating some of these formatting options:
<!DOCTYPE html>
<html>
<head>
<title>Greetings from the Web</title>
</head>
<body>
<h1>Formatting Text on the Web</h1>
<br>
<h2>You can use simple HTML tags to format your text.</h2>
<i>Are we having fun yet?</i>
<b>I'm glad you are!</b>
</body>
</html>
Figure 4-14 shows how the HTML appears when viewed in a web browser.

FIGURE 4-14: Viewing the HTML code, featuring a variety of text formats, in a webpage.
Table 4-1 presents several text formatting codes, or tags, your coder can use when creating her HTML code.
TABLE 4-1 Some HTML Text Formatting Codes
|
Code |
Example |
What It Means |
|
<b> Howdy! </b> |
Howdy! |
Bold text |
|
<i> Howdy! </i> |
Howdy! |
Italicize text |
|
H <sub> 2 </sub> O |
H2O |
Subscript text |
|
E = mc <sup> 2 </sup> |
E=mc2 |
Superscript text |
|
<h1> Big Idea </h1> |
Big Idea |
Heading Level 1 (there are 6 levels) |
|
They lived happily ever after. <br> The End. |
They lived happily ever after. The End. |
Insert line break |
When placing text on a webpage, you set font, text color, and text size — as well as many other attributes — using CSS (Cascading Style Sheets). CSS is a language that works with HTML, but is independent of HTML. CSS adapts the display of the webpage for viewing on a wide range of devices small and large. See Chapter 14 for additional information on building webpages.
A Mad Libs Example
Now that your coder has learned the basics of writing code to input, format, and output text in a computer program, he undoubtedly wants to do something fun with his new skills. Creating a Mad Lib story is the perfect culmination of the skills acquired in this chapter. A Mad Lib is a short, silly story that is missing a few words. Two players play Mad Libs together, with one player asking the other player for words that are used to fill in the missing words. However, the player supplying the words doesn’t know “the rest of the story” or how those words will be put together.
Get the hang of playing Mad Libs! Using a Mad Lib you find online or in a Mad Libs booklet, complete a story with your coder. Bonus: Because Mad Lib stories usually ask for missing words as parts of speech, working on this project reinforces grammatical concepts such as nouns, verbs, adjectives, and more!
First, as outlined in Chapter 2, invite your kid to “think aloud” with you about the big picture of creating a Mad Lib. Here are some steps you and she might brainstorm:
- Find or create a short paragraph from which you’ll remove a few words.
- Note the part of speech or a description of each word type removed, for example, proper noun, small animal, adverb, or other.
- Write code that presents simple text instructions for the user to follow.
- Write code that invites the user to input a word for the first word type, stored as a variable.
- Repeat Step 4 until the list of missing words is exhausted.
- Write code to concatenate the input words with literal text to create the complete Mad Lib.
- Print the complete Mad Lib onscreen for the user to view.
After you and your coder have brainstormed the process for designing and creating the Mad Lib program, your coder might choose to devise a flowchart for the program code. Chapter 2 provides guidance in creating such a flowchart.
Finally, your coder may choose to translate the flowchart into pseudocode (see Chapter 2), or else jump right into writing code for the Mad Lib program. You and your coder can write the Mad Lib program in any language. Figure 4-15 shows an example of the code written in Python.
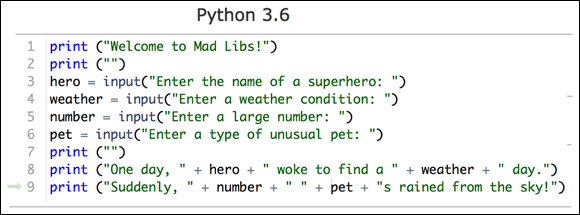
FIGURE 4-15: Mad Lib code in Python.
Figure 4-16 shows the output and result of the Mad Lab program in operation. Invite your coder to get creative by adding new variables and literals to her program. The program can be as short and silly, or as long and laughable, as she wants it to be!

FIGURE 4-16: Mad Lib program in operation.
It’s a good idea to write and test incrementally. As you program, test code often to make sure that each line (or each block, consisting of several lines) does what you want it to be doing before writing additional lines.
When writing code, it make take a little time, and several attempts, for your coder to get the program operating just as she intends. This process is called debugging, or removing the errors from, the code. Encourage your coder to stick with it and use logical strategies for getting her code fully functional. Chapter 13 offers a variety of troubleshooting techniques to debug code.