
Chapter 6
Getting Fancy with Graphics and Sound
IN THIS CHAPTER
![]() Finding the right images and sound
Finding the right images and sound
![]() Using images in your programs
Using images in your programs
![]() Using sound in your programs
Using sound in your programs
![]() Coding a simple sound board
Coding a simple sound board
Using graphics (images, animations, and videos) and sound in your programs can make them more exciting, personal, and bring them to life. This chapter helps your young coder find the graphics and sounds you’re looking for, and gives you tips on knowing which file types and sizes are best for the program you’re trying to write. A lot of graphics and sounds are available online for free, but finding ones that are safe, legal, and appropriate is important.
Aside from image or sound sizes, this chapter also shows how to combine images and sounds in your programs to make them come to life. For example, in video games when the player clicks a chicken, they might hear a “squawk-A!”. And when the player walks through mud they might hear “squish-squish.”
You and your coder can use graphics and images to go beyond the built-in assets that some programming environments provide, and make each program you write unique. This is a great way to lead a group of young coders in a similar activity, while enabling them to each be creative and create something different!
Sizes of Images and Sounds, Unplugged
Images and sounds are both represented in digital forms. Images, for example, are represented by pixels, which are tiny dots that can display light. Each pixel can have one color, and an entire image can have any number of pixels. For example, a simple black-and-white image of a smiley face could be 10 pixels by 10 pixels and each pixel is either black or white, similar to the left image in Figure 6-1.
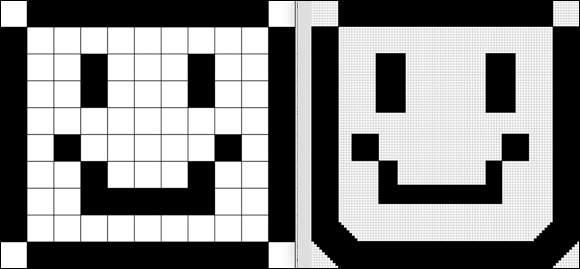
FIGURE 6-1: More pixels in the same space create a smoother looking smiley face!
But you could also make an image a black-and-white smiley that was 100 pixels by 100 pixels in the same amount of physical space. Imagine if each of the large squares, either black or white, were really 100 squares each. You could make your image more precise because each pixel, still restricted to only one color, is smaller. The right image in Figure 6-1 shows how the bottom of the face could be more rounded if you had more pixels. You can imagine spending the time to make each of the 10,000 pixels either black or white to create an overall image which appears to have rounded edges and circular eyes.
Sound files are stored similarly, using small chunks of information. Instead of pixels, each sound has a certain number of samples per second. Each sample can represent a tone. So a low sample rate sound doesn’t have a lot of details in the music compared to a high sample rate sound. You can hear an example of this on YouTube (https://www.youtube.com/watch?v=96jFvdteqWI).
Activities surrounding images and sounds
A fun activity to do with young coders to introduce them to digital media is a pixel art challenge. Give them two different pieces of grid paper; one where there are 10x10 squares and one where there are 100x100 squares. Then give them an image and ask them to re-create the image on each sheet of paper, but each square can only be ONE color. This shows them how, with more pixels, you can have more detail in your image.
Another activity you can do with your coder is to set up the room with simple, drawn images of different things that would make different noises: animals, different terrains, even objects like cars. Place the images around the room and when you touch one, have your coder make a noise that would make sense for that image. Then switch who is walking around touching images, and who is making the noises. This activity can help your young coder understand that images can be associated with noises. This is a fun project to do when you transition from an unplugged activity to a coding activity, a sound board of sorts!
Knowing your sizes
Knowing the right sizes of images and sounds to use for your programs is going to be important for making your programs run quickly, smoothly, and look and sound good. It’s also useful to learn for other applications as well, such as social media profile images and storing songs on your iPhone. For example, if you want to upload an image to Twitter for your profile picture, the image must be at least 400 pixels by 400 pixels. If the image has fewer pixels, then Twitter stretches your profile picture to fill the space and it looks pixelated and blurry. The image also must be less than 2MB.
Although the number of pixels or sample rate of an image or sound is important for looks, the size of the actual file (in K or MB) is important as well. Most images you work with should be under 500K and most sounds you work with should be around 1MB — these are short sounds like a knock at the door. A typical song that is about 3.5 minutes long is around 3.5MB.
 The smaller the files, the easier downloading and uploading your media is, and the faster your programs can load your media. Anyone using your programs will appreciate how fast they run!
Using Graphics in Your Programs
Finding, downloading, and using graphics in your program is fast and easy, as long as you know how to find ones that are the right size, legal to use, and in the right format for the application you are using. The next few sections guide you through what you need to know to successfully make your programs more unique with pictures!
Image file types
There are two main types of image file types: raster and vector.
Raster file types essentially define each pixel in the image, specifically the placement of pixels to form the image, and the percentage of red, green, and blue that the pixel displays. You’re most likely to encounter raster file types in your everyday interactions with digital images. Raster file types don’t re-size as well as vector file types. To double the size of a raster file type image, the computer essentially creates new pixels, giving it the color of the average color of the pixels surrounding the location of the new pixel. This is why if you download a raster file type image, and make it bigger, it becomes blurry.
The three types of images that you mostly likely work with are JPEG, PNG, and GIF. JPEG images use a compression algorithm to store the information about each pixel that typically makes the file size smaller, but can cause the quality of the image to deteriorate after saving and re-saving the image many times. JPEG images are saved as .jpg or .jpeg, interchangeably. PNG and GIF images use a lossless compression algorithm to store the information about each pixel, making the file sizes larger, but keeping the quality of the image. Both have transparency, meaning that if you find a PNG or GIF online that you want to use, you can remove a solid background from the image for use in your programs. The animation capabilities of GIF files have made them popular in sharing simple animations with few colors. PNG images are saved as .png and GIF images are stored as .gif. You can easily convert an image from one file type to another, as shown in Figure 6-2.
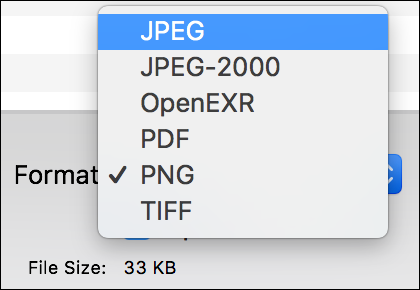
FIGURE 6-2: Exporting images to another type.
Vector file types contain more information than raster files, such as geometric shapes found within the image. Vector file types your coder is likely to encounter are SVG and CGB, and are often used with complex image applications (for example, Photoshop). Some programming languages, such as Scratch, contain assets that include vector images. The geometric shapes in these images can be selected and altered individually to create new composite images.
Creating images
Using images in your programs makes the programs you write more unique and personalized. So creating your own images to use in your programs can be rewarding. One easy way your young coder can create his own images is to take a picture with a digital camera or mobile phone, and save the image onto your computer. Images from digital cameras and mobile phones often are JPEG or PNG, and most programming applications allow you to use both formats.
Other than taking real photos with a camera, you can also create digital images on your computer. You can use high-end image applications such as Photoshop or Illustrator, but you can also use free apps like Microsoft Paint (Windows) or Google AutoDraw. Recently, a lot of online applications make it relatively easy to make images that you might often use on social media. Your coder may also want to check out Canva.com — a great, free option, especially for making background images for the programs he writes.
Another great way to get young coders involved in creating their own characters and images for their programs is to have them draw on paper, and either scan the image or take a picture with your digital camera or mobile phone. This can make a program even more unique and creative! After an image is on your hard drive, you can often remove any white space to make the character more realistic. Figure 6-3 shows how to get rid of unwanted white space in a PNG image using the Preview application on a Mac: Use the magic wand to select the background, delete it, and re-save the image. The same process can be used to remove a background when working in Paint.

FIGURE 6-3: Removing unwanted white space using Preview on a Mac.
Finding images on the web
Finding images on the Internet can be fairly easy, but finding the right images that are legal to use, and the right format and size, can be tricky. One of the first places to search is Google Images; go to google.com in your web browser, and enter a search term, and in the list of results click Images at the top.
 Searching through Google Images can yield great results; however, if your coder is young, you might want to consider turning on the Safe Search feature, just in case a search query displays something inappropriate. It's also always advisable to conduct searches with your coder, to make sure you know what he’s looking at and what he’s downloading. To turn Safe Search on, choose Settings ⇒ Search Settings and check the box next to the Safe Search option. Figure 6-4 shows these steps.
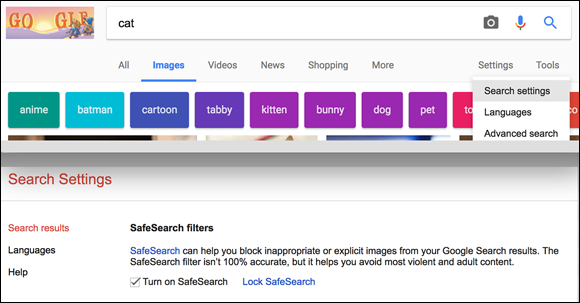
FIGURE 6-4: How to enable Safe Search on Google Image search.
The next, most important thing to do is to make sure you’re downloading images that you’re legally allowed to use. Google Images has made this a lot easier with a Usage Rights option. Click the Tools button and a new menu bar appears above the image results. Choose one of the options on the Usage Rights menu that is appropriate for you (see Figure 6-5):
- Labeled for Reuse with Modification: Choose this one if you plan to publish the image elsewhere where you expect to make money.
- With Modification: Choose this option if you think you might want to make any changes to it; for example, remove white space, crop the image, or add annotations to it.
- Labeled for Noncommercial Reuse with Modification: This option is probably the one that suits you best. You can edit the image if you’d like and use it in your programs.

FIGURE 6-5: Choosing the right usage rights on Google Image search.
It’s important to make sure that your young coder understands why it’s important to find and use images that she’s legally allowed to use. Many people make careers on creating digital media for others to use. Some of these people have opened their creations for free, public use, while others rely on the income they receive from selling these creations. Just like your coder wouldn’t want someone taking the program that she writes and using it for free, without any credit to her, these artists have made specific decisions regarding how they want to share what they have made.
After you find an image that you like, click it to get more information about it, such as the size of the image in pixels, the website where you can get the image, and the link directly to the image. Google also provides you with other images that are similar to the image you have chosen. See Figure 6-6.
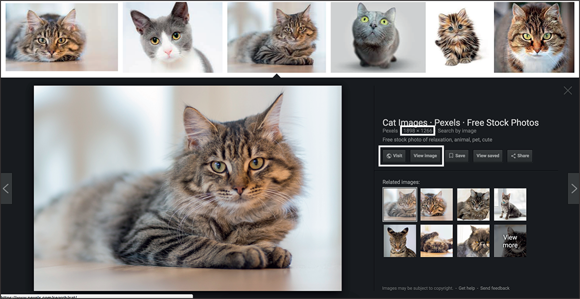
FIGURE 6-6: Google Images provides helpful information including image size, image source, and related images.
If you click View Image, a new tab opens with a URL directly to the image. This is useful if you want to import images into App Lab, for example. If you click Visit, a new tab opens to the website where this image originates. You can typically find other images on the same site and might end up finding a good source of images for future projects, too. Some of the most popular are pexels.com and pixelbay.com. From the website, you can often download different sizes of the same image, and sometimes even different file types.
 Sometimes you find a free image on a website like pexels.com that is legal to use within your programs. However, a lot of these websites also sell images. So if you decide to find images on a website, make sure that each image you download and use is either free and legal to use, or that you pay for them.
Importing a JPEG or PNG in Scratch
Using custom images in Scratch is very easy and can be rewarding for your young coder. This section shows how to get your own image into Scratch instead of using a sprite or costume that Scratch provides. After you find and download the image you want to add into Scratch as a new sprite, follow these instructions for getting it into your program. Open Scratch and follow these steps:
-
Click Create in the upper-left corner.
The Scratch editor now opens.
-
In the Sprites area in the bottom-left corner of the editor, click the File Upload button (see Figure 6-7), and choose your image.
You now see an “Uploading Image” message in the stage area.
- (Optional) When your image is uploaded, make any alterations you want to it.
- Remove the background: Click the magic wand and outline the part of the image you want to keep, as shown in Figure 6-8.
- Resize the image: Click the Selector, and then click and drag around the entire sprite. Let go of your mouse, and you can use the squares on the corners of the blue selection square to re-size the image.
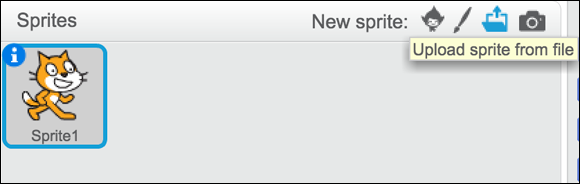
FIGURE 6-7: File upload on Scratch for new sprites.
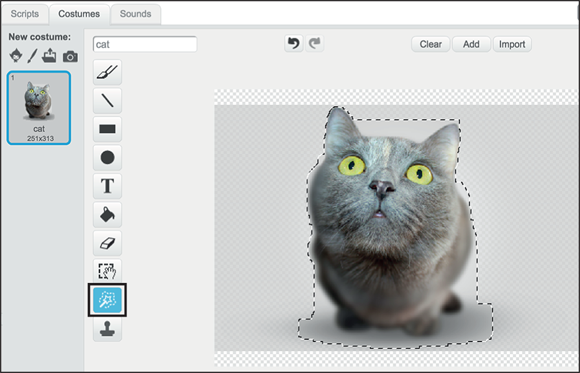
FIGURE 6-8: Remove the background of a sprite in Scratch.
Now your sprite is on your stage, and you can select it and add code to it, just like you do with the sprites that Scratch provides!
When you resize any sprite in Scratch, always make sure that you center the sprite. Though it can be hard to see, a small crosshairs is at the center of the Costume editor, as shown in Figure 6-9. If your sprite is not centered on this crosshair, then when you write code for your sprite to turn right 90 degrees, for example, the sprite turns about the crosshair, not the center of the sprite, making it look like the sprite isn’t turning correctly.
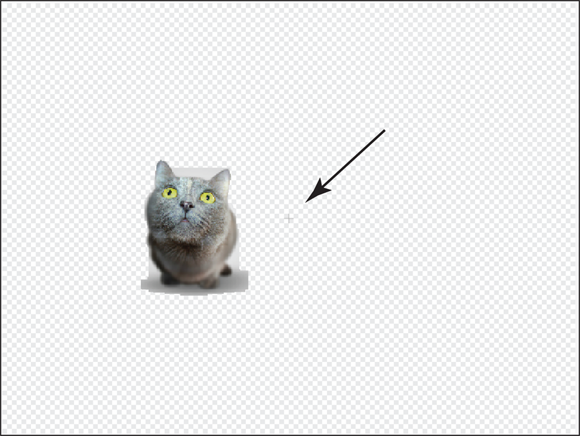
FIGURE 6-9: Ensure your sprites are centered on the crosshairs in Scratch’s Costume editor.
In Scratch, your coder can also import an image as a costume to be worn by a sprite.
Importing a GIF in Scratch
To import a GIF in Scratch, you follow the exact same instructions as the previous section for importing a JPEG or PNG. The neat thing about using a GIF is that if you find an animated one (like the GIF found at https://upload.wikimedia.org/wikipedia/commons/7/72/Sleeping-cat.gif) Scratch automatically imports each frame of the animation as a new costume for your sprite! Figure 6-10 shows the sleeping cat GIF imported into Scratch.
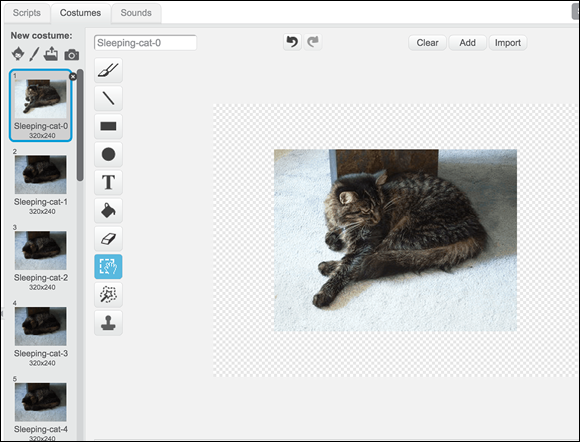
FIGURE 6-10: Costumes created for each frame in an animated GIF when in Scratch.
And then you can write a small program to make the animation play! Figure 6-11 shows this program.

FIGURE 6-11: A simple program to animated a GIF in Scratch.
Importing a JPEG, PNG, or GIF in JavaScript
Importing images into Code.org’s App Lab using JavaScript is very easy. All you need to know is the URL of the image to load it into the program. You should make sure you find an image that is about 200 pixels by 200 pixels. If you’re using Google Images to find your images, click the View Image button on the image that you choose, and copy the URL of the image. After you have the URL of the image you want to use, follow these steps to put the image in your app:
-
Click the App Lab button under the Start a New Project heading.
Under the UI Controls category of blocks is an
imageblock.image("ID", "URL");If you don't see this placeholder code, simply type it yourself.
-
Replace
IDwith the name you want to use to reference this image andURLwith the URL of the image you want to use.Your URL might be really long, which is okay!
image("cat", "https://upload.wikimedia.org/wikipedia/commons/thumb/c/c5/PEO-smiling_cat_face_with_heart_shaped_eyes-7.svg/200px-PEO-smiling_cat_face_with_heart_shaped_eyes-7.svg.png"); - Click Run on the phone emulator on the left of your App Lab environment to see your picture!
If you decide to use an animated GIF in App Lab, the animation automatically plays when you click Run. Try it out! Just replace the URL with one like https://upload.wikimedia.org/wikipedia/commons/7/72/Sleeping-cat.gif and click Run.
If you want to upload an image that you've saved on your computer into App Lab, you can do that too! Just make sure you’re in Blocks View by clicking Show Blocks in the top right of your App Lab coding environment. Then, click the down arrow that is directly to the left of the URL string, and select Choose. A dialog box opens where you can choose the image file you already have on your computer, and it uploads directly to Code.org!
Adding Sound to Your Programs
Using images to make your programs more interesting is fun, but adding sound to your programs really brings them to life. Just a fair warning, after you teach your young coder how to add sounds, he may never want to stop playing the silly fart noise that he found! It might be helpful to have headphones for this next section, especially if you’re leading a group of young coders.
Sound file types
Just like with images, sound files are broken into three categories; uncompressed, lossless compression, and compressed (lossy compressed).
- Uncompressed audio file types such as WAV (the audio file type most used on Windows computers) have no compression at all. These files are therefore larger, but have a high quality of playback, because every tone is represented within the file as it was originally recorded. Sound effects including creaky doors and howling wolves are usually WAV files.
- Lossless compression audio file types do some compression, which allows the file to be a bit smaller, but the data is still 100 percent represented within the file.
- Compressed audio files such as MP3 (the audio file type most used on devices universally) are the smallest of the audio files because information is removed from the file such as parts of sound that have the least effect on what humans can hear. This can cause MP3 audio files to have a reduction in quality compared to WAV audio files. This is how most music files are stored.
You most likely encounter WAV and MP3 file types in the digital sounds your coder works with, and in this chapter we focus on using MP3 files.
Creating original sounds
Creating original sounds can be a lot of fun for you and your coder. You can create song clips that you sing yourself, or make silly noises that only you know how to make. Capturing those sounds digitally isn’t too difficult either.
One of the easiest ways is to use a mobile phone. Most mobile phones have a recorder app available in the app store. For example, on the iPhone you can use the free Voice Recorder and Audio Editor app to easily record something you say, and then share the MP3 that gets created either through AirDrop, email, or some other app that you use to get data from your phone to your computer.
If you’re writing a program in Scratch and want to create an original sound, you can choose the sprite that the sound is available to, then click the Sound tab, and click the microphone at the top center of the programming environment. A recorder opens, and as long as you have speakers on your computer, you can record an audio sound.
The first time you try creating a sound on Scratch, you have to give your web browser and Flash access to your microphone. You most likely see two popup windows asking for permission to use the microphone. Make sure that you do this with your young coder.
Finding sounds on the web
When you want to find high quality MP3 audio files on the Internet to use in your programs, it’s important that you only use audio files that you’re legally allowed to use. One of the best places to find sounds is on soundbible.com. soundbible.com has thousands of audio clips available completely for free, as well as some that you can pay for. If you go directly to http://soundbible.com/royalty-free-sounds-1.html you find audio clips that you can download that either have Attribution 3.0 or Public Domain licenses.
Attribution 3.0 simply means that you’re allowed to use the file (non-commercially), but you have to give credit to the original creator of the sound. So, if you use one of these sounds in a Scratch project, for example, include an attribution to the original sound creator in the description of your program when you publish it, as shown in Figure 6-12.

FIGURE 6-12: An example of giving credit to an audio file creator in Scratch.
Public domain audio files means that the audio file is free to use and you don’t have to give credit to the original creator of the sound.
It’s important to be careful what your young coder does regarding audio files. We have had many students who have wanted to use a popular song, so they record the song on a mobile phone and then upload the recording to their programs. Though this may be innocent, it’s important to teach your young coders about licenses and why they’re important. Encourage them to sing the song themselves or try playing the music on an instrument they’re learning.
Importing sounds into Scratch
Importing sounds into Scratch is very simple and can make the programs you write so much more exciting! After you have an MP3 file that you have legally downloaded onto your computer, open an existing project or start a new one in Scratch. Then, follow these steps to get your sound into your program:
-
Choose a sprite that you want the sound to be associated with.
For example, you can have a GIF of a sleeping cat and a sound of sawing wood. You can make the cat sound like it was snoring with the sound of sawing wood.
-
Click the sprite that you chose, and then click the Sound tab in the center of the programming environment.
You should already see a “pop” sound, which is the default sound that gets added to any sprite you upload. (If you want, you can delete this sound by clicking the x on the pop sound icon.)
- Click the folder with the up arrow (see Figure 6-13) and choose the MP3 file that you had previously downloaded.
-
(Optional) Add a snippet of code to play the sound until it’s done, and then insert the sound command into a forever loop.
Figure 6-14 shows the code to do that.
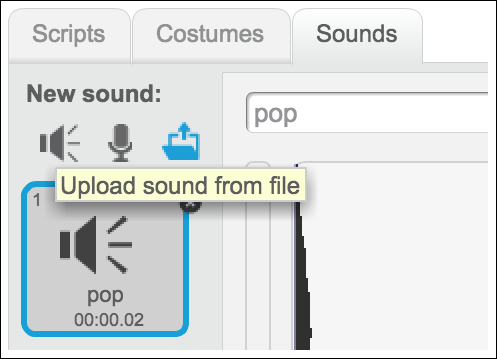
FIGURE 6-13: The upload button for adding a sound to a sprite in Scratch.

FIGURE 6-14: The code you can use to make sounds repeat forever in Scratch.
Importing audio into JavaScript
Importing sounds into App Lab can be done in just three easy steps:
-
Click the App Lab button under the Start a New Project heading or open an existing project.
Under the UI Controls category of blocks is a
playSoundblock.playSound("URL", true);If you don't see the placeholder code, you can write it yourself.
-
Replace
URLwith the URL of the sound you want to use and then either leave thetrueas true, if you want your sound to keep repeating, or change it tofalse, if you want your sound to play once and then stop.If you're getting your sounds from soundbible.com, then you have your sound downloaded on your computer. Just click the Show Blocks button at the top right of your programming environment, click the down arrow to the left of the URL in the
playSoundblock, select Choose, and upload the sound file to Code.org. After you’ve done that, the URL is replaced with the file’s name:playSound("sawing-wood-daniel_simon.mp3", true); - Click Run on the emulator on the left of your App Lab environment to hear your sound play.
Creating a Sound Board
The first few sections in this chapter guided you through getting images and sounds into your programs in Scratch and in JavaScript via App Lab. In this section, you combine all that work into one program: a simple sound board! This is a great project for young coders, because each one can be completely unique, while the code and process is the same. This makes leading a group of coders in this activity easy for you as a coding mentor, but still fun for the coders because they have creative control!
This section walks you through creating the simple sound board in Scratch, though with the guidance in the earlier chapters, you can adapt these instructions to work in App Lab as well. Your coder can even do a similar project in other programming environments such as GameSalad (see Chapter 3) if he’d like.
Remember, before starting to code, you and your coder should have a plan for what you want to make. Because this project requires a lot of Internet searching and/or image and sound creating, it’s best to know what you want to do first.
- Start with five images and five sounds that you want to have in your sound board. List them on a piece of paper.
-
Sketch where you want each image to go on your screen.
It doesn’t have to be in a grid-like pattern. For example, you could have an entire scene of animals in a forest.
-
Find all the images (JPEG, PNG, or GIF) and sounds (WAV or MP3) and download them onto your computer.
Put all the files you need into one folder to make them easier to find and upload later. - In Scratch, create a new project called “Simple Sound Board.”
- Upload each image as a sprite into Scratch. Edit the images in the Costume tab if you need to get rid of backgrounds or you want to resize them.
- Arrange the sprites how you want them onscreen.
- For each sprite, upload one sound using the Sounds tab for that sprite.
-
Write the code for each sprite to wiggle and play the sound when they’re clicked.
Each sprite has the same code, shown in Figure 6-15, but the sound filenames are different.

FIGURE 6-15: The code needed for each sprite in your simple sound board.
Congratulations! You have used images and sounds to create an interactive sound board! An example of a sound board is shown in Figure 6-16. You can check out the one we built for this book at https://scratch.mit.edu/projects/195810761/.
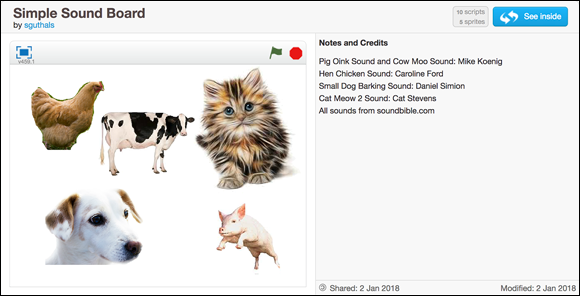
FIGURE 6-16: A sound board you can build, too!