
Chapter 14
Creating a Webpage
IN THIS CHAPTER
![]() Starting your website
Starting your website
![]() Beginning with a basic layout
Beginning with a basic layout
![]() Adding color and graphics
Adding color and graphics
![]() Adding hyperlinks
Adding hyperlinks
![]() Getting interactive
Getting interactive
![]() Viewing the page
Viewing the page
Making a website can be a really fun way to get your coder showing off his skills. Though websites can be easily created on sites like Wix.com or Squarespace.com without any coding, having the flexibility and knowledge to be able to create something unique and personalized cannot be replaced. Websites are written using three main languages: HTML, CSS, and JavaScript.
This chapter guides you through making a website where you and your young coder can showcase some of your favorite things — animals, programs you have written, video games, you name it! This chapter is written to be read in order; however, if you’re looking for specific guidance on how to add something to a webpage, you can navigate directly to that section.
If your young coder shows a special affinity for creating websites, check out Creating a Web Site: Design and Build Your First Site!
Getting Set Up
To start making a website, you should get your programming environment set up. This chapter walks you through making your first webpage by using a very simple programming environment — TextEdit. The examples in this chapter are on a Mac; however, the instructions are almost the same if you’re coding on a Windows machine using Notepad.
 Don’t use a word processor (such as Word) to create the code for your HTML page; only use a text editor — TextEdit or Notepad — and edit in plain text mode.
Follow these steps to get your programming environment setup:
-
Create a new folder called “Website.”
You can create this on your desktop, or inside of any other folder on your computer.
-
Open TextEdit.
Leave the pop-up window open while you complete the next couple setup steps.
-
Choose TextEdit ⇒ Preferences, and select the New Document tab at the top of the dialog box that appears.
Make sure that new documents will be created in plain text, not rich text (see Figure 14-1).
-
Continuing in the Preferences dialog box, click the Open and Save tab and make sure the Display HTML Files as HTML Code Instead of Formatted Text box is checked, as shown in Figure 14-2.
This ensures that your HTML code appears as a formatted webpage (as opposed to your code appearing as code on a webpage).
- Close the Preferences dialog box.
-
At the TextEdit window that appeared when you first opened the program, navigate to the new Website folder that you created in Step 1 and click New Document, as shown in Figure 14-3.
A new, blank document opens, as shown in Figure 14-4.
-
Save this blank document by pressing ⌘ +s or choosing File ⇒ Save.
In the Save dialog box, as shown in Figure 14-5, name your file
websiteand change the file type to Webpage (.html), make sure you're saving the files to your Website folder, and click Save.

FIGURE 14-1: New documents should be created as plain text.
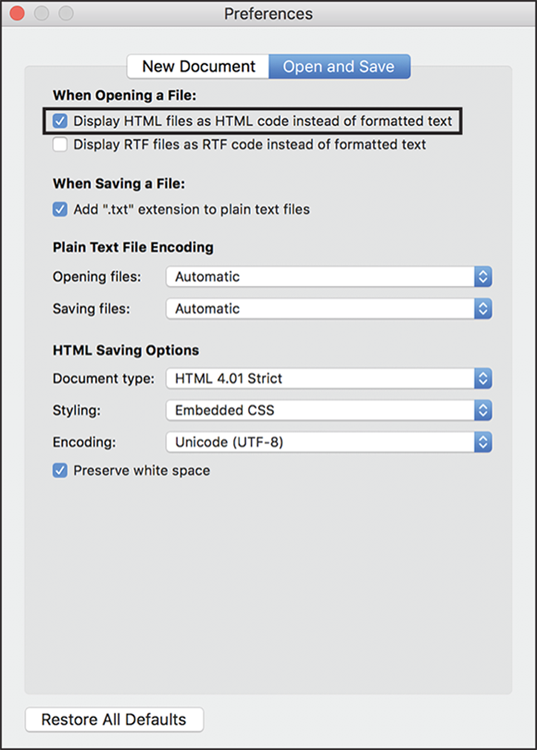
FIGURE 14-2: Opening HTML documents should show code, not formatted text.

FIGURE 14-3: An example of opening a new TextEdit document into the Website folder.

FIGURE 14-4: An example of the new TextEdit document.
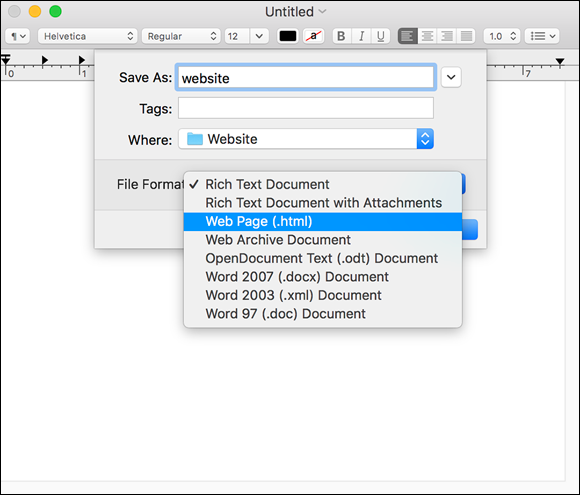
FIGURE 14-5: An example of how to save your TextEdit document as HTML.
You now see a new file in your Website folder called website.html. This folder is where you put any companion files, such as images, that you want to include on your website. If you double-click the website.html file, a new blank web browser window opens and displays your (currently empty!) page as shown in Figure 14-6. The URL of this website is the file path of where your website.html file is located on your computer.
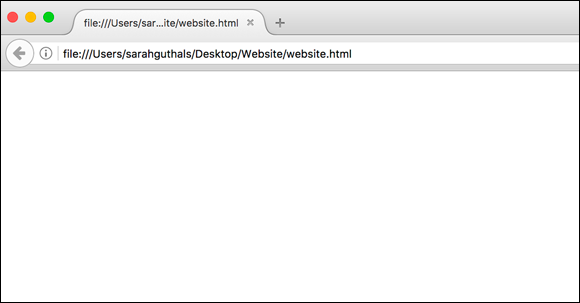
FIGURE 14-6: Blank website after creating your website.html file.
Now you are all set up to create your first webpage. Setting yourself up like this makes it significantly easier to get everything working after you start adding in graphics and maybe even other HTML files!
 If you close your
 website.html file and need to open it again, you have to make sure to open it with TextEdit. You can do that by opening TextEdit and finding the file. You can also find the file in your finder, right-click it, and choose Open With ⇒ TextEdit, as shown in Figure 14-7.

FIGURE 14-7: To open an HTML file in TextEdit, right-click and choose Open With.
Creating a Basic Webpage Layout
Almost every website uses two main languages: HTML and CSS. HTML is basically the structure of your page; details like where different parts show up and how big their areas are. CSS is basically the look and feel of your page; details like specifying fonts and sizes of your text and how sections are aligned. The next two sections walk you through the basics of both of these languages and how to incorporate them into your website.
The skeleton: HTML basics
Making a webpage always starts with a very basic skeleton. HTML is considered a “markup” programming language, as opposed to a true coding language. You can think about HTML as the skeleton or frame of a building. HTML is a set of tags that are written with the symbols < and > with specific words between them to tell the web browser what goes in that area of the site.
Almost every section of a website has an open and close tag. Open tags are written as <tagName> and close tags are written as </tagName>. This tells the web browser where the start and end of the section is.
 Indenting everything within an open and close tag helps you and your young coder keep track of what sections are embedded in other sections.
In these next sections, we show the basic tags that you use throughout your website, and where it is appropriate to put them.
HTML tag
The HTML tag is required for every website and is always surrounding everything else that is in your website.
<html>
…
</html>
Head tag
The head tag contains metadata. This chapter doesn't go into details about metadata, but it’s basically additional information about your website that you might want the web browser to know.
<head>
…
</head>
Body tag
The body tag indicates everything that is inside of the window of the web browser. All the text for the webpage goes inside the body tag.
<body>
…
</body>
Title tag
The title tag is used within the head tag to give your website a title. The title of a website appears on the title bar in the web browser.
<title>
…
</title>
Header tag
Header tags make large headers for your website. Header tags have different levels, starting with h1 as the biggest header and going down to h6 as the smallest. Any header you use goes inside the opening and closing body tags.
<h1>
…
</h1>
Paragraph tag
Paragraph tags are used to write smaller text, typically below a header.
<p>
…
</p>
Break tag
Break tags are used to force something onto a new line. Break tags don't have an open and close tag; there is only one. This is because it just creates a new line and there is nothing that can be embedded within the tag.
<br>
Div tag
Div tags are used to create sections within your webpage. You can embed any other tags within a div tag. They basically let you separate your page into sections, making it easier to stylize entire parts of your webpage, which you can read about in the next section on CSS.
<div>
…
</div>
Putting all the HTML tags together
Now that you have had an introduction to each of the basic HTML tags, you can put it all together in your website.html file in TextEdit to create a simple, first version of your website.
<html>
<head>
<title>My First Website</title>
</head>
<body>
<h1>Your Name Here</h1>
<div>
<p>
A short paragraph describing the kinds of things
you like to do and what your favorite programming
language is.
</p>
<p>
Paragraph two has a line break. So this is on
the first line
<br>
and this is on the next line, but it is all
within one paragraph tag.
</p>
</div>
</body>
</html>
If you open your website.html file in a web browser, you see a webpage similar to the one in Figure 14-8.
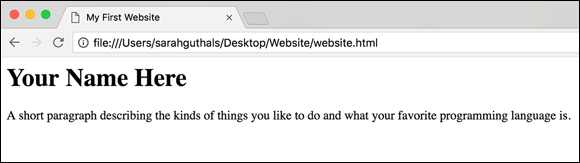
FIGURE 14-8: The HTML code creates this website when you open it in a web browser.
Take note of these few things about the HTML code and the displayed website:
- The title can be seen on the tab in Figure 14-8.
- The title and header tags have the text on the same line as the tags, while the html, head, body, and paragraph tags have the text (or sub-sections) on separate lines, indented. Either way is valid for all tags, the decision to put everything on the same line is for clarity for the coder.
- Even though the text in the code for the first paragraph is on multiple lines, when it is displayed in the web browser everything is displayed on one line. This is because the text is within one paragraph tag with no break tags.
- The div tag in this example doesn't change anything, but it keeps both paragraphs in the same section. Later in this chapter you might want to make sure that everything within the div tag has a blue background color, which would be much easier if they were all within one tag.
- The difference between separating text with paragraph tags and with a break tag is similar to what you would expect in a word document. The paragraph tag gives a larger space between the two sets of text, while the break tag is just like a new line within a paragraph.
- Though not shown in this example, you can use multiple break tags to create more space between the two lines of text.
One of the best websites to reference when making a website is w3schools.com. For example, on https://www.w3schools.com/html you can find a menu with a sample of how to do almost anything in HTML! It also includes information about CSS and JavaScript, the other two languages you read about in this chapter!
The aesthetics: CSS
Webpages aren't just sections with simple formatting; you can do so much with formatting and styling! CSS (Cascading Style Sheets) is almost always included in website coding. CSS is basically an additional formatting language used to describe the style of HTML code. Sometimes CSS code is written in a separate file with a .css extension, but you can also embed it in your HTML file either in the head tag, or within each individual tag.
This section shows how to use CSS to add a style tag to your HTML file within the head tag of your HTML code. To get started, make sure your HTML code matches this code here:
<html>
<head>
<title>My First Website</title>
<style>
</style>
</head>
<body>
<h1>Your Name Here</h1>
<div>
<p>
A short paragraph describing the kinds of things
you like to do and what your favorite programming
language is.
</p>
<p>
Paragraph two has a line break. So this is on
the first line
<br>
and this is on the next line, but it is all
within one paragraph tag.
</p>
</div>
</body>
</html>
You add all the code in the examples in this section between the open and close style tags. After you add the CSS to the style tag, you need to tell the HTML sections which classes of CSS styling they should be following. Each example also includes HTML code that you would need to include. The bolded section of the HTML code is the portion required to apply a certain style to that section.
Fonts
You can specify the font of the text for different sections. When specifying a font, you need to let the viewer’s browser have alternative options if the exact font you want isn’t available. You do this by adding a comma between each alternative font that the browser can choose. You also have the option of just giving the browser a type of font and let it choose the best font in that category. If the font name is more than one word, the name needs to be enclosed in quotes.
CSS examples:
p.serif {
font-family: "Times New Roman", Times, serif;
}
p.monospace {
font-family: "Courier New", monospace;
}
HTML examples including CSS:
<p class="serif">This paragraph is Times New Roman"</p>
<p class="monospace">This paragraph is Courier New"</p>
Font styles
You can also specify the style of font you want to use. These examples show normal, italic, and bold.
CSS examples:
p.normal {
font-style: normal;
font-weight: normal;
}
p.italic {
font-style: italic;
font-weight: normal;
}
p.bold {
font-style: normal;
font-weight: bold;
}
p.italicBold {
font-style: italic;
font-weight: bold;
}
HTML examples including CSS:
<p class="boldItalic">This paragraph will be bold and italic</p>
Font size
Font size can be measured in pixels.
CSS examples:
p.big {
font-size: 40px;
}
p.normal {
font-size: 14px;
}
p.small {
font-size: 5px;
}
HTML examples with CSS:
<p class="small">The text in this paragraph will be really
small! Might be good for a caption under an image.</p>
Text alignment
Text in your webpage can be aligned differently within the section that it’s in.
CSS examples:
p.left {
text-align: left;
}
p.center {
text-align: center;
}
p.right {
text-align: right;
}
HTML examples with CSS:
<p class="left">This paragraph will be left-aligned, just like
words in a book.</p>
<p class="center">This paragraph will be center-aligned, might
be good for titles and headers.</p>
<p class="right">This paragraph will be right-aligned.</p>
Combining multiple styles in one section
You can combine multiple styles within a single style category or you can apply multiple style categories to one section.
CSS examples:
p.italic {
font-style: italic;
font-weight: normal;
}
p.serif {
font-family: "Times New Roman", Times, serif;
}
p.fancyParagraph {
font-style: italic;
font-weight: bold;
font-family: "Courier New", monospace;
}
HTML examples with CSS:
<p class="italic, serif">This paragraph will be italic and Times
New Roman</p>
<p class="fancyParagraph">This paragraph will be italic, bold,
and monospace</p>
Applying styles to entire categories
For every example in this section, the style can be applied to an entire category of tag instead of just a specific class.
CSS examples:
p {
font-style: normal;
font-weight: normal;
font-family: "Times New Roman", Times, serif;
font-size: 14px;
text-align: left;
}
h1 {
font-style: normal;
font-weight: bold;
font-family: "Times New Roman", Times, serif;
font-size: 30px;
text-align: center;
text-decoration: underline;
text-transform: uppercase;
}
HTML examples with CSS:
<h1>Every header that is H1 will be bold, Times New Roman, 30px,
centered, underlined, and all uppercase letters.</h1>
<p>Every paragraph will be normal text, Times New Roman, 14px
and aligned to the left.</p>
Organizing sections on the webpage
You can do more than just modify text on a page; you can also organize entire sections with margins, alignments, and position. Typically, you use organizational styles in div tags, described in the HTML section earlier in this chapter.
CSS examples:
p.hidden {
display: none;
}
h1 {
font-weight: bold;
font-size: 30px;
text-align: center;
text-decoration: underline;
text-transform: uppercase;
}
div.header {
width: 100%;
position: fixed;
top: 0;
margin: auto;
height: 75px;
}
div {
margin: auto;
top: 75px;
position: fixed;
text-align: center;
}
HTML example with CSS:
<div class="header">
<h1>My Awesome Website</h1>
</div>
<div>
<p>My favorite programming language is Java!</p>
<p class="monospace">System.out.println("Hello world!");</p>
<p>
One of my favorite things to do is write the
<p class="monospace">Hello World!</p>
program!
</p>
<p class="hidden">No-one knows I'm here!</p>
</div>
This CSS and HTML code displays a website similar to Figure 14-9.
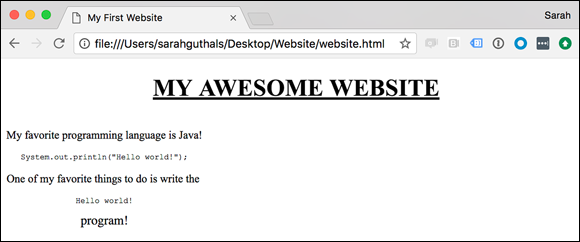
FIGURE 14-9: This is the example of a website that has structure added to it with div tags.
The “hidden” attribute added to the final paragraph in this code example can be particularly useful when you have a portion of the website that you want to have hidden at first, and then revealed after the user does something (such as click a button). An example of this is when you enter your username and password incorrectly on a website. A new div tag appears, typically with red text, that lets you know that the username or password are incorrect. This div tag with the text is there all along; it’s just hidden and only made visible when you input the wrong credentials.
You can find additional text styling and more at W3Schools; specifically go to https://www.w3schools.com/css where you find a list of all the categories of styles on the left, with the ability to test a number of styles within each category.
Getting Fancy with Color and Graphics
Most websites are more than just a white background and black text. When you add color and graphics to your webpage, you can really make the page unique and your young coder can start to get very creative.
Adding color to your page
You can add color to your webpage in a couple ways: text color and background color. This section shows how to do both of these.
If you ever want to do something specific when building a website, search online for an example. For example, if you want to specifically have a header that has a red line underneath it, and a blue background color, you can start searching for “html header color underline and color background” in Google and you would find examples! For example, the first result for that query is a W3Schools link with how to create a red underline.
Text color
You can specify a text color in one of three ways: color name, hex value, and RGB value. One of the best ways to choose a color is to use W3Schools’ color picker at https://www.w3schools.com/colors/colors_picker.asp. You can either choose a color from the wheel at the top or click the color bar under Or Use HTML5 to bring up a pop-up window with even more specific colors. After you choose a color, the website shows you what different text looks like on that color, as shown in Figure 14-10. You get the color name (red), hex value (#ff0000), and RGB value (rgb [255, 0, 0]). If you continue to scroll down the page, you find colors that are slightly lighter and darker than the one you chose.

FIGURE 14-10: W3Schools.com offers an extensive color picker.
The following code shows how to incorporate color into your webpage.
CSS examples:
div {
color: MediumSeaGreen;
}
h1 {
color: #ff6347;
}
p {
color: rgb(255, 165, 0);
}
HTML example with CSS:
<h1>Red Header</h1>
<div>
Green Text
</div>
<p>Yellow Paragraph</p>
Figure 14-11 shows what these look like.
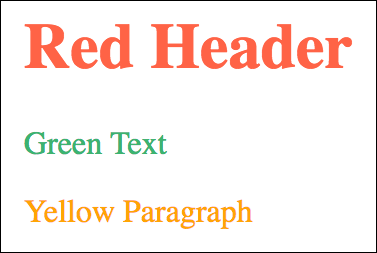
FIGURE 14-11: Three different ways of specifying text color.
Background color
Background color in different sections on your website can be really useful, not only for allowing you and your young coder to get creative and unique with your webpage, but also for debugging! Adding a different background color to each section can help you determine whether a section is in the right place on the page. The background color style supports color name, hex value, and RGB value, similar to text color.
CSS examples:
div {
color: MediumSeaGreen;
background-color: rgb(0, 0, 255);
}
h1 {
color: #ff6347;
background-color: lightblue;
}
p {
color: rgb(255, 165, 0);
background-color: #000000;
}
body {
background-color: yellow;
}
HTML example with CSS:
<h1>Red Header, light blue background</h1>
<div>
Green Text, blue background
</div>
<p>Yellow Paragraph, black background</p>
Figure 14-12 shows what these look like.
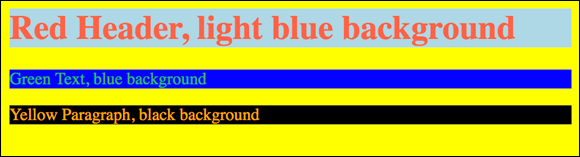
FIGURE 14-12: Three different ways of specifying background color.
Introducing graphics
Having colors and text styles can make your webpage unique, but a lot of the creativity comes with adding graphics!
 When you add graphics, you have to make sure the graphics you’re including are in the same folder as your HTML file. Remember, you should be using images that are legal to use. See Chapter 6 if you have any questions about finding and downloading graphics.
Images can be sized with CSS or directly in the HTML tag. If you use CSS, you need to specify the image size; that overwrites the size that you specify within the tag. For example, in the following code, the kitten.jpeg image is 100x100 pixels if the CSS code is present, and 150x150 pixels if the CSS code is removed.
You can also add background images to your webpage. In your CSS, you simply add the code:
body {
background-image: image.png
}
However, background images can be tricky! Oftentimes they're dark and make it hard to read text on the page. You can make background images stretch to the size of your webpage, or have them repeat over and over to fill the space. For a full list of what you can do with images and background images, visit w3schools.com.
CSS examples:
img {
height: 100px;
width: 100px;
}
img.seeThrough {
opacity: 0.5;
}
HTML examples with CSS:
<img class="seeThrough" src="smile.gif"/>
<img src="puppy.jpg"/>
<img src="kitten.jpeg" width="150" height="150px"/>
The code in this example creates the webpage shown in Figure 14-13.

FIGURE 14-13: Example of a webpage with images in your page.
Notice that the image tag in HTML doesn’t require an open or close tag. Instead, it’s all just one tag. That is because the data for the image is all within the tag itself. It doesn’t make sense to put text, or other sections, within an image. If you want to have text overlaid on an image, you can do that using the z-index (a process in which you can stack images and text on top of each other). You can find out more at https://www.w3schools.com/howto/howto_css_image_text.asp.
Adding Hyperlinks
Hyperlinks from your page to any other page on the Internet are actually pretty simple to include! Basically you use one new HTML tag:
<a href="url">…</a>
Oftentimes you have text between the two anchor (a) tags; however, you can also put images or even entire sections there! You can also stylize hyperlinks on your website with CSS. For example, you can have the color of the link change when the page visitor has clicked the link, or change color when the page visitor hovers over it. You can also specify if you want the hyperlink to open into a new tab in the web browser.
CSS examples:
a:link {
color: blue;
text-decoration: none;
}
a:hover {
color: blue;
text-decoration: underline;
}
a:visited {
color: red;
text-decoration: none;
}
HTML examples with CSS:
<div>
<p>My favorite programming language is Java!</p>
<p class="monospace">System.out.println("Hello world!");</p>
<p>
One of my favorite things to do is write the
<a href = "https://en.wikipedia.org/wiki/%22Hello,_World!%22_program">
<p class="monospace">Hello world!</p>
</a>
program!
</p>
<a href="https://en.wikipedia.org/wiki/Dog" target="_blank">
Open the Wikipedia article on puppies in a new tab!
</a>
<a href="https://en.wikipedia.org/wiki/Cat">
<img src="kitten.jpeg"/>
</a>
</div>
This code creates the website shown in Figure 14-14. Notice that the Wikipedia page on dogs has already been visited and the page visitor is hovering over the Hello World link.
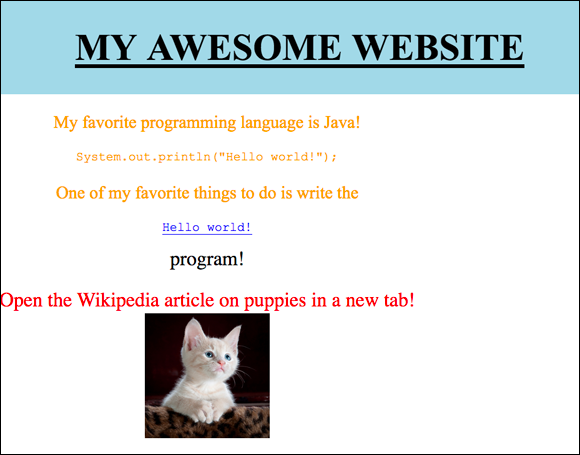
FIGURE 14-14: Example of a webpage with hyperlinks.
Going Interactive with JavaScript
Adding JavaScript to your webpage is just as simple as adding CSS! First, you add a new script tag:
<script>…</script>
This script tag can be placed in the head tag or the body tag. For consistency and to ensure any JavaScript functions you create are available, keep them in the head tag.
You can write simple one line JavaScript commands within a script tag, or you can create functions that are called from the HTML. You can affect the HTML and CSS with JavaScript, as well as other examples presented throughout this book. If you get stuck, W3Schools has examples of almost everything you and your young coder would want to do with JavaScript and a website!
Adding buttons
One of the best ways to make your website interactive is to add buttons! This section gives a few examples of incorporating buttons into your site to cause information to pop up on the screen.
<html>
<head>
<title>My First Website</title>
<script>
function sayWinston() {
window.alert("My name is Winston");
}
</script>
</head>
<body>
<h1>My Awesome Website</h1>
<img src="puppy.jpg" width="100" height="100"/>
<br>
<button onclick="sayWinston();">
Get the puppy's name
</button>
</body>
</html>
This example creates the website shown in Figure 14-15. When the button is clicked, the pop-up window appears.

FIGURE 14-15: Example of a webpage with a button that creates a pop-up window.
You can change the body of the HTML code from the previous example to make it so that your visitors click the image instead of the text.
<body>
<h1>My Awesome Website</h1>
<button onclick="sayWinston();">
<img src="puppy.jpg" width="100" height="100"/>
</button>
<br>
Get the puppy's name by clicking on the picture
</body>
This example creates the website shown in Figure 14-16. When you click the image of the puppy, the pop-up window appears.
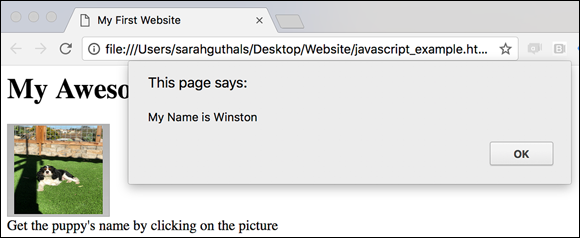
FIGURE 14-16: Example of a webpage with a picture that, once clicked, opens a window.
Changing your page with buttons
Not only can you add buttons that create pop-up windows, but you can also have your buttons change what is actually being shown on your webpage! Here is an example of changing text, images, and buttons.
<html>
<head>
<title>My First Website</title>
<script>
function showCat() {
document.getElementById('kitten').style.display = "block";
document.getElementById('noKitten').style.display = "none";
document.getElementById('title').innerHTML = "My Puppy and Kitten!";
}
function hideCat() {
document.getElementById('kitten').style.display = "none";
document.getElementById('noKitten').style.display = "block";
document.getElementById('title').innerHTML = "My Puppy!";
}
</script>
</head>
<body>
<h1 id="title">My Puppy!</h1>
<img src="puppy.jpg" width="100" height="100"/>
<br>
<div style="display:none" id="kitten">
<img src="kitten.jpeg" width="100" height="100"/>
<br>
<button onclick="hideCat();">
Click to hide the kitten!
</button>
</div>
<div id="noKitten">
<button onclick="showCat();">
Click to show the kitten!
</button>
</div>
</body>
</html>
This code creates the website shown in Figure 14-17. On the left is what the page looks like when first opened. On the right is what the page looks like after the Click to Show the Kitten! button is clicked.

FIGURE 14-17: Example of a webpage that uses JavaScript to change the page.
Combining HTML, CSS, and JavaScript
Using everything presented in this chapter, you and your coder can create a simple website similar to the one shown in Figure 14-18. If you get stuck, don’t forget to check out W3Schools.com!

FIGURE 14-18: Example of a webpage you could create with this chapter.
The entire HTML file (with the HTML, CSS, and JavaScript code) is here:
<html>
<head>
<title>My First Website</title>
<style>
p.monospace {
font-family: "Courier New", monospace;
font-size: 20px;
}
p.aboutCode {
color: green;
}
p {
font-size: 20px;
}
h1 {
font-family: "Times New Roman", Times, serif;
font-style: normal;
font-weight: bold;
font-size: 50px;
text-align: center;
text-decoration: underline;
text-transform: uppercase;
}
h2.code {
font-family: "Courier New", monospace;
font-style: normal;
font-weight: bold;
font-size: 30px;
text-align: center;
text-decoration: underline;
text-transform: uppercase;
color: green;
}
h2.animals {
font-family: "Arial", sans-serif;
font-style: normal;
font-weight: bold;
font-size: 20px;
text-align: center;
text-decoration: underline;
text-transform: uppercase;
}
div.header {
width: 100%;
top: 0;
height: 75px;
margin: auto;
background-color: lightblue;
}
div.codeArea {
width: 49%;
top: 200;
height: 50%;
float: left;
text-align: center;
background-color: black;
}
div.petArea {
width: 49%;
top: 200;
height: 50%;
float: right;
text-align: center;
background-color: pink;
font-weight: bold;
font-size: 15px;
margin-left: 2px;
}
div.petName {
font-size: 30px;
}
img {
height: 200px;
width: 150px;
}
</style>
<script>
function showPrincess() {
document.getElementById('petName').innerHTML = "You clicked on Princess!";
document.getElementById('petName').style.fontSize = "30px";
document.getElementById('petName').style.color = "black";
}
function showLuke() {
document.getElementById('petName').innerHTML = "You clicked on Luke!";
document.getElementById('petName').style.fontSize = "30px";
document.getElementById('petName').style.color = "grey";
}
function showWinston() {
document.getElementById('petName').innerHTML = "You clicked on Winston!";
document.getElementById('petName').style.fontSize = "30px";
document.getElementById('petName').style.color = "brown";
}
</script>
</head>
<body>
<div class="header">
<h1>Welcome to My Website!</h1>
</div>
<div class="codeArea">
<h2 class="code">Coding</h2>
<p class="aboutCode">
My favorite programming language is Java!
</p>
<p class="monospace aboutCode">
System.out.println("Hello World!");
</p>
<p class="aboutCode">
One of my favorite things to do is write the
</p>
<a href= "https://en.wikipedia.org/wiki/%22Hello,_World!%22_program">
<p class="monospace">Hello world!</p>
</a>
<p class="aboutCode">
program!
</p>
</div>
<div class="petArea">
<h2 class="animals">Pets</h2>
<p>
I have three pets, two cats and one dog!<br>
Click on their pictures to reveal their names.
</p>
<div>
<button onclick-"showPrincess();">
<img src="princess.jpg">
</button>
<button onclick-"showLuke();">
<img src="luke.jpg">
</button>
<button onclick-"showWinston();">
<img src="winston.jpg">
</button>
<br>
<div id="petName"></div>
</div>
</div>
</body>
</html