
Chapter 12
Coding Subprograms
IN THIS CHAPTER
![]() Organizing code via subprograms
Organizing code via subprograms
![]() Using subprograms in programming languages
Using subprograms in programming languages
![]() Creating a Spirograph-style program using subprograms
Creating a Spirograph-style program using subprograms
![]() Using parameters to make code flexible
Using parameters to make code flexible
As your coder has probably noticed, writing code can result in a long sequence of instructions that can become complicated and hard-to-follow. One key to coding is to simplify code as much as possible, making it efficient and reusable. Efficient means that the program uses only as many commands as necessary to accomplish a task. Reusable means that, for a group of commands that is used more than one time in a program, the group can be defined once and then used many times without writing all the commands each time.
To accomplish these goals, your coder writes subprograms — small chunks of code that form just a part of the program and can be reused simply by naming the subprogram, and invoking its use by calling its name. Using subprograms makes programs more efficient by reducing redundancy (doing the same thing over and over again) and simplifying code.
Subprograms, Unplugged
What could be more delicious that an unplugged activity that involves dessert? Whether you act it out, or actually get cooking in the kitchen, this activity helps your coders better conceptualize the idea of a subprogram. Begin by inviting your coder to help you create a cake and ice cream dessert (see Figure 12-1). Following are the steps she can consider, along with suggestions for you to help her think about the role of subprograms in the dessert:
-
Write the steps for making the dessert.
These steps make up the main program, sometimes called just main: making cake, making frosting, making ice cream, and assembling (plating) the dessert.
Each component — making cake, making frosting, making ice cream — are subprograms that require their own set of steps.
-
Write the steps for the making cake subprogram.
Cake requires you to gather ingredients, specifically flour, eggs, butter, sugar, milk, and baking powder. It also includes a variable ingredient for flavor; for example, chocolate, vanilla, or strawberry. Because different cakes use ingredients in different proportions, your coder may point out that a variable accompanies each ingredient to indicate the quantity of each. (See Chapter 7 for details on variables.) Then you measure and mix ingredients in a specific sequence of steps, and bake the cake in the oven at a specific temperature for a specific time period. You can increase the level of detail of this process as you feel necessary to convey the process of baking a cake.
-
Write the steps for the making frosting subprogram.
Apply the process used in Step 2 to convey the process of making frosting.
-
Write the steps for the making ice cream subprogram.
Apply the process used in Step 2 to convey the process of making ice cream.
-
Write the steps for assembling (plating) the dessert.
List, in order, the steps for putting together the dessert on the plate.
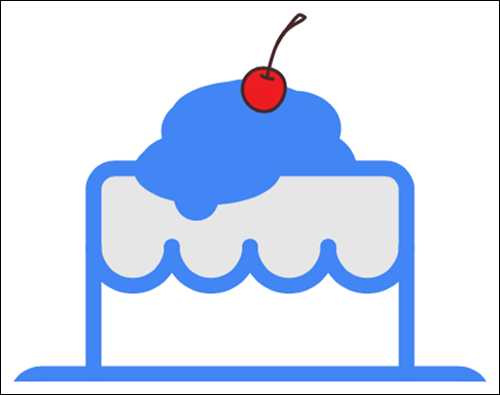
FIGURE 12-1: Making dessert is a program comprised of subprograms for making cake, making frosting, making ice cream, and plating the dessert.
Starting with Pseudocode
Writing a program and its subprograms involves naming each of the parts, defining each part, and calling it (asking it to execute) when you need it.
Here is the unplugged, dessert program written in pseudocode:
main dessert
makeCake
makeFrosting
makeIceCream
plateDessert
end
Here are the subprograms to make the dessert program work:
to makeCake
constant flour
constant eggs
[more constants]
var flavor
[more variables]
preheat oven to 375 degrees
add flour to bowl
add eggs to bowl
[more instructions]
beat together
pour batter into pan
place pan in oven
cook for 40 minutes
remove pan from oven
end
to makeFrosting
[constants and variables]
[instructions]
end
to makeIceCream
[constants and variables]
[instructions]
end
to plateDessert
slice cake
place cake on plate
frost cake
place ice cream on cake
place cherry on top
end
Notice that this format is also how most cookbooks and chef shows are structured: the main program explains the overall process of cooking the dessert, while the subprograms drill down to more specific details about specifically how to make each component.
Creating a Spirograph with Subprograms
Coding coaches, do you remember playing with a Spirograph when you were a kid? If so, you may recall using a pen, some paper, and some gear-like plastic pieces to draw some beautiful geometric art. Spirograph-style art is a simple shape drawn many times, in slightly different positions, to create a new, more complex shape. See Figure 12-2.

FIGURE 12-2: A Spirograph toy helps kids think about main programs and subprograms in the creation of beautiful, geometric art.
Your coder can create computer programs that draw designs similar to those you create with a Spirograph. Encourage her to think about how to create a main program, art, and the subprograms that comprise art.
Pseudocode
Her pseudocode programs could look something like these:
Main Program
main art
clear off previous drawing
put the pen down
repeat number
draw square
rotate angle
end
Subprogram
to square
repeat 4
forward 100
right turn 90
end
end
Your coder can easily write her own program and subprograms in a programming language. Each programming language has its own specific way of formatting programs, formatting subprograms, and calling subprograms. Here’s how this is accomplished in some common programming languages your coder may use.
Scratch
Scratch calls a subprogram a block. To make a block, complete these steps:
-
At the More Blocks category of tiles, click the Make a Block button.
A New Block dialog box opens, as shown in Figure 12-3.
-
At the New Block dialog box, type a name for the block.
Scratch allows any name, including spaces, although it’s a good idea to adhere to camelCase naming practices.
-
Click OK.
A define block tile appears in the Scratch workspace. Additionally, a call subprogram block tile appears in the tile bin of the More Blocks category. See Figure 12-4. (Note also that Scratch Cat has been cut from the stage, and a pencil sprite has been added. The code is being constructed on the pencil sprite.)
-
Attach code tiles to build your define code block.
See Figure 12-5 for an example of command tiles for drawing a square of size 100.
-
Use the call subprogram block in your main program.
See Figure 12-6 for a program that draws a Spirograph-style pattern. The figure also shows the program after it has executed. Note that the main program, activated by pressing the green flag, calls the square subprogram to execute 24 times! Yet the program is very short — now that’s efficient code.

FIGURE 12-3: The New Block dialog box allows you to create a subprogram in Scratch.
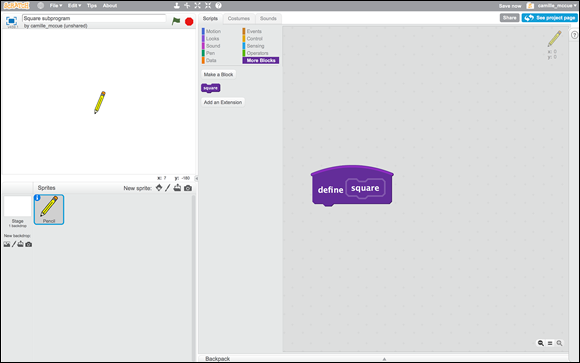
FIGURE 12-4: Define block and call block tiles in Scratch.

FIGURE 12-5: Defining a code block, square, to draw a square of size 100 in Scratch.
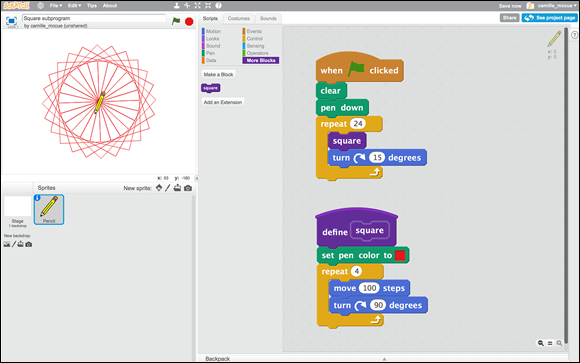
FIGURE 12-6: The call subprogram tile in the main program runs the square code block.
 Only place inside a block the code that actually needs to be reused. In a drawing program, if the pen color doesn’t change, don’t place it inside the draw shape block. Otherwise you end up executing lines of code over and over again that don’t need to execute. Try to be as efficient as possible in defining a code block.
JavaScript
JavaScript calls a subprogram a function. To create a function in Code.org’s App Lab, using JavaScript, complete these steps:
- At the Functions category of tiles, drag a function
myFunction()tile into the program workspace. -
Replace the
myFunction()placehoder by typing a name for the function. Use camelCase naming conventions for JavaScript. See Chapter 7 for an explanation of why camelCase is important in JavaScript.
 - Attach commands to define your function.
- Use the function name to call it from your main program.
See Figure 12-7 for a JavaScript program featuring functions, written in the App Lab, which draws a field of twenty flowers, all the same size and pink color, randomly distributed in the display. Note that there are two functions: one to draw oneFlower(), and one to draw onePetal() of the flower. Here, the main program calls the oneFlower() function, and the oneFlower() function, calls the onePetal() function. The emulator shows the result of executing the program. The empty parentheses at the end of each function name indicates that the function has no parameters.
FIGURE 12-7: Using JavaScript in the App Lab to create a field of flowers using two functions: oneFlower() and onePetal().
Functions should be placed towards the bottom of your program, and function calls should be placed as needed, in the main body of the program.
Java
The name for a Java subprogram is a method. While exploring the intricacies of Java methods is a bit beyond the scope of this book, here is an example that shows your young coder that working with methods is somewhat similar to working with other types of subprograms.
Figure 12-8 shows a program (called a class in Java) named Product, written in the BlueJ IDE (see Chapter 3 for details in working in this Java editor). Product has a main program and a multiply method.

FIGURE 12-8: Code a method — a subprogram in Java.
- Code the class name:
public class Product {. -
Code the
mainprogram.This is the section labeled
main. Themainprogram calls themultiplymethod. -
Code the
multiplymethod.The
multiplymethod defines three variables,a,b, andtotal. It computestotaland prints its value. - Close the class with a curly bracket.
Figure 12-9 shows the execution of Product. Notice that the numbers a and b can be changed inside the multiply method to result in a new product for total. However, there's no easy way to reuse this subprogram without manually changing the variable values inside of it. In the next section, your coder finds out how to apply parameters to make the method more flexible and better suited for reuse.

FIGURE 12-9: Execution of a program, including one method, in Java.
Coding Subprograms with Parameters
Your coder can provide flexibility to her programs by adding parameters to subprograms. For example, coding a square subprogram allows the program to draw a square of a defined size each time the subprogram is called. But what if you want the square subprogram to draw squares of differing sizes? By adding a parameter to the subprogram you can do just that. A parameter is a variable that you pass into a subprogram, which the subprogram uses as it executes. You can pass a parameter into the square subprogram that tells the code how big to draw the square.
Scratch code block with parameters
Scratch allows you to add one or more parameters to any subprogram block you create. Your coder can begin by making a simple block (see the earlier section “Creating a Spirograph with Subprograms” for the steps on Scratch). Then, your coder can add parameters when she first creates the block, or she can edit the block after it has been created — the process is essentially the same. Here are the steps for editing the square code block previously created:
- In the More Blocks category, right-click (Windows) or control+click (Mac) the instance code block tile that you previously created.
-
Select Edit from the pop-up menu which appears.
The Edit Block dialog box appears.
- At the Edit Block dialog box, click the Options tab to expand the options for adding parameters.
-
Click the icon for any of the parameter options shown to add that parameter to your block.
You can choose Add Number Input, Add String Input, Add Boolean Input, or Add Label Text. When you click an icon to add that parameter, a blank field is added to your instance code block tile. You can add more than one parameter. Figure 12-10 shows the addition of a number input parameter.
-
Inside the blank field on the instance code block tile, type the variable name of the parameter(s) you’re adding.
Figure 12-10 shows that the new number input parameter is named size.
-
Select the Run without Screen Refresh check box.
This allows for faster execution of your program.
-
Click OK.
The dialog box closes and the code block tile now shows the added parameter(s).
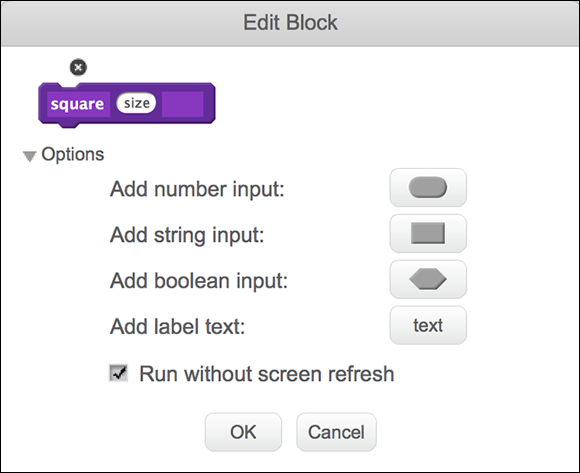
FIGURE 12-10: Editing a Scratch block definition to add parameters.
 In Scratch, parameters added to code blocks play the same role as variables. When the parameter is added, you can use it just like a variable in your program — although be aware that it doesn’t appear in your list of variables in the Data category.
Using your edited block with parameters is easy! Just drag the parameter tile from the code block definition (the big “hat” tile) into your code when you want to use the parameter. The parameter replaces code which you previously defined outright. Instead of the code tile for move 100 steps, you now have a code tile for move size steps. This allows for more flexible usage of the code block because it can now accept a number for the size, sent by the main program, and execute the code block with that size as the side length.
Your main program then calls the parameterized block, sending it a number to use for the size: square 30 draws a square with side lengths of 30 pixels (see the top figure in Figure 12-11); square 110 draws a square with side lengths of 110 pixels (see the bottom figure in Figure 12-11).
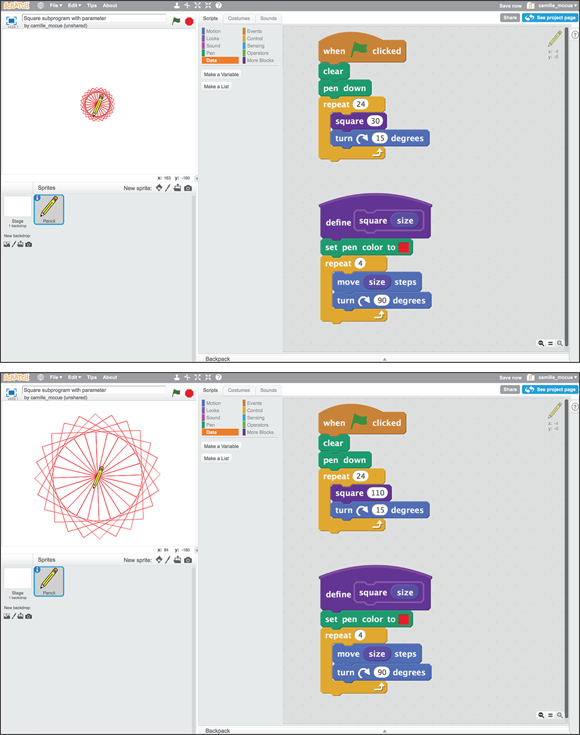
FIGURE 12-11: Executing Spirograph-style Scratch code using a square block with parameter size passed as 30 (top); or with parameter size passed as 110 (bottom).
JavaScript, with parameters
You can add parameters to your JavaScript functions to add flexibility to your programs. To create a function with a parameter in Code.org's App Lab, using JavaScript, complete these steps:
-
At the Functions category of tiles, drag a function
myFunction(n)tile into the program workspace.The
nis a parameter. If you already added amyFunction()command without a parameter, you can add the parameter by typing the parameter inside the parentheses. (Or, if you are working in tile mode, press the little horizontal arrows to add or remove parameters from your function.) In text mode, separate multiple parameters using a comma and a space following each parameter. -
Replace the
myFunction(n)placehoder, by typing a name for the function, and a name for your parameter(s).Use camelCase naming conventions for JavaScript. Each parameter is a variable in your program.
-
Attach commands to define your function.
The parameters are referenced by their variable names inside the function.
-
Use the function name and parameter values to call it from your main program.
The parameters values are passed into the function. Parameter values are assigned to the parameter variables and used inside the function.
See Figure 12-12 for a JavaScript program with functions and parameters, written in the App Lab. This program draws a field of twenty flowers of different sizes and pink color, randomly distributed in the display. Note that there are two parameterized functions: one to draw oneFlower(size), and one to draw onePetal(size) of the flower. Here, the main program calls the oneFlower(size) function that has been defined to include a size parameter. The oneFlower (randomNumber(5, 20)) function call sends a random number, from 5 to 20, to the oneFlower(size) function; size takes on a new value between 5 and 20 each time the function is called. The oneFlower(size) function then calls the onePetal(size) function. The onePetal(size) function receives whatever value its parent subprogram received for size. The effect is that flowers of different sizes are drawn onscreen. The emulator shows the result of executing the program.

FIGURE 12-12: Generating a random number and assigning it to a size parameter in a JavaScript function creates variation in the sizes of the resulting flowers.
Java, with parameters
Figure 12-13 shows a Java class named Product, written in the BlueJ IDE (see Chapter 3 for details in working in this Java editor). The class contains one method, Product, which has two parameters, a and b.
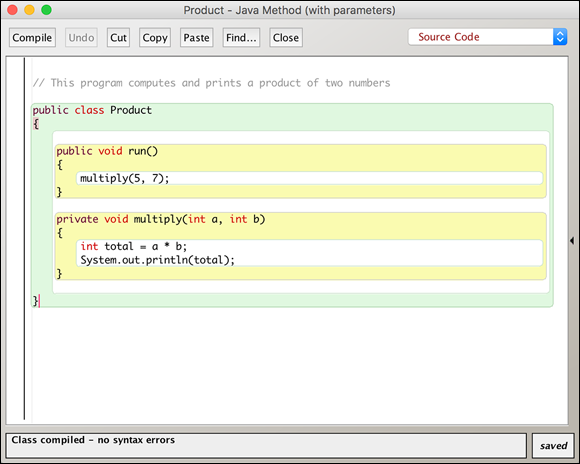
FIGURE 12-13: Code a method with parameters in Java.
Here's how to code this program:
- Code the class name:
public class Product {. -
Code the main program.
This is the section labeled
main. Themainprogram calls themultiplymethod, which receives two parameters. -
Code the
multiplymethod, which has two parameters,aandb.The
multiplymethod defines three variables,a,b, andtotal. Variablesaandbare parameters defined as integers. Their values, 5 and 7, are received from the call located in the main program. Themultiplymethod computestotaland prints out its value. - Close the
classwith a curly bracket.
Figure 12-14 shows the execution of Product. Notice that the values of the variables a and b can be changed outside of the multiply method to result in a new product for total. This makes the multiply method modular and easy to reuse with different variable values on each use. Parameterizing methods build a more flexible program.

FIGURE 12-14: Execution of a program, including one method with parameters, in Java.
 Subprograms can also generate information that they pass onto other subprograms or back to the main program. In Java, your coder sometimes sees the code
 void. This means that, when the subprogram is called, it's not sending anything back to the program that called it. In other cases, your coder sees a variable type and name following the name of the main program or of a subprogram. That type and name tells you what type of information is going to be received by the program making the call. The subprogram contains a return command indicating what variable value is being returned (passed back to) the program that called it.