
Chapter 12
There’s a Map for That
IN THIS CHAPTER
![]() Exploring your world with Maps
Exploring your world with Maps
![]() Choosing a different map type
Choosing a different map type
![]() Saving a map for later
Saving a map for later
![]() Finding your location
Finding your location
![]() Sharing your location
Sharing your location
![]() Searching for places
Searching for places
![]() Getting directions and navigation
Getting directions and navigation
The group were all stunned and disoriented. Dr. Cornelius explained it would happen. The room rocked, and gravity tugged left and right instead of down.
Eventually, Ira righted himself; his nausea abated. “They’re never going to sell teleportation to the masses with this kind of aftereffect,” he grunted.
Phyllis agreed. Holding a hand to her spinning forehead, she asked, “Where are we? And where is a good Hungarian restaurant?”
That’s when Dan whipped out his Android. “I’ll let you know in just a second,” he said proudly. “And the reader will know as well, thanks to the marvelous information in this chapter.”
Map 101
To find your location, as well as the location of things near and far, summon the Maps app. Good news: You run no risk of improperly folding the Maps app. Better news: The Maps app charts the entire country, including freeways, highways, roads, streets, avenues, drives, bike paths, addresses, businesses, and various points of interest.
Unfolding the Maps app
To start the Maps app, tap its launcher on the Home screen. You might find the launcher inside a Google folder. And, like all apps, it can be located on the Apps drawer.
If you’re starting the app for the first time or it has been recently updated, you can read the What’s New screen; tap the OK or GOT IT button to continue.
Your Android uses its own GPS radio to communicate with global positioning system (GPS) satellites to hone in on your current location. That location appears on the map, as illustrated in Figure 12-1, which shows the Maps app running on an Android phone.
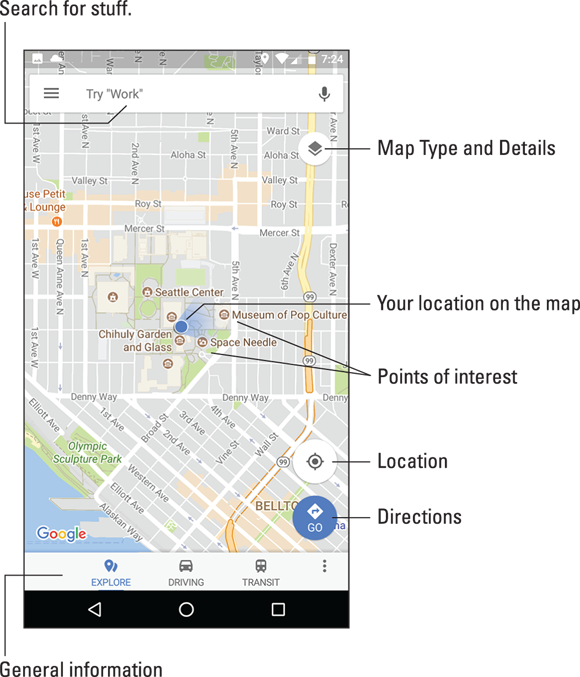
FIGURE 12-1: The Maps app on a phone.
Android tablets are afforded a larger canvas, so the Maps app’s gizmos are relocated, as illustrated in Figure 12-2. Despite this difference in presentation, both versions of the app offer the same features.
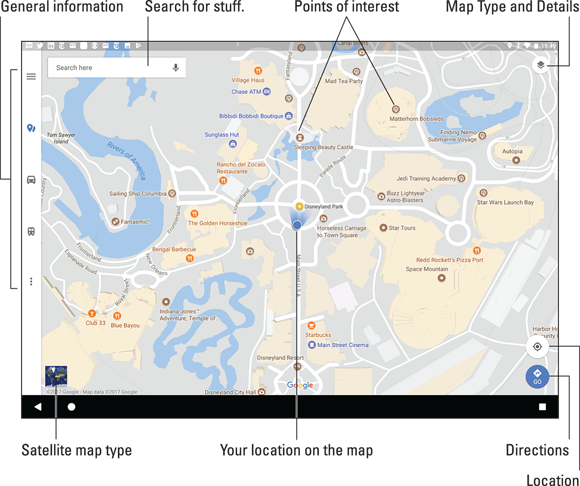
FIGURE 12-2: The Maps app on a tablet.
Your position appears as a blue dot, illustrated in Figures 12-1 and 12-2. This location is accurate to within a given range, shown by a blue circle around your location. The Android’s direction, if detected, is shown by the blue fuzzy triangle that pokes out from under the circle.
Here are some fun things you can do when viewing the map:
Zoom in: To make the map larger (to move it closer), double-tap the screen. You can also spread your fingers on the touchscreen to zoom in.
Zoom out: To make the map smaller (to see more), pinch your fingers on the touchscreen.
Pan and scroll: To see what’s to the left or right or at the top or bottom of the map, swipe your finger on the touchscreen. The map scrolls in the direction you swipe.
![]() View your current location: Tap the Location icon, as shown in the margin, to see your location (the blue dot). This feature is handy for those times you pan and scroll too far away.
View your current location: Tap the Location icon, as shown in the margin, to see your location (the blue dot). This feature is handy for those times you pan and scroll too far away.
![]() Rotate: Using two fingers, rotate the map clockwise or counterclockwise. Tap the Compass Pointer icon, shown in the margin, to reorient the map with north at the top of the screen.
Rotate: Using two fingers, rotate the map clockwise or counterclockwise. Tap the Compass Pointer icon, shown in the margin, to reorient the map with north at the top of the screen.
Perspective: Touch the screen with two fingers and swipe up or down to view the map in perspective. You can also tap the Location icon to switch to Perspective view, though that trick works only for your current location. To return to flat-map view, tap the Compass Pointer icon.
The closer you zoom in on the map, the more detail you see, such as street names, address block numbers, businesses, and other sites — but no tiny people.
- See the nearby sidebar “Activate location technology!” to confirm that the device’s GPS radio presents your location accurately.
 When the location icon is blue, you’re viewing your current location on the map. Tap the icon to enter perspective view. Tap the Perspective icon, shown in the margin, to return to flat view.
- When all you want is a virtual compass, similar to the one you lost as a kid, get a compass app from the Google Play Store. See Chapter 17 for more information about the Google Play Store.
Changing the map type
The standard map type is the street map. Two other types are available: Satellite and Terrain. To change the view, follow these steps:
-
 Tap the Map Type and Details icon.
You see the Map Type and Details card.
-
Choose another map type.
The Satellite map type is shown in Figure 12-3.
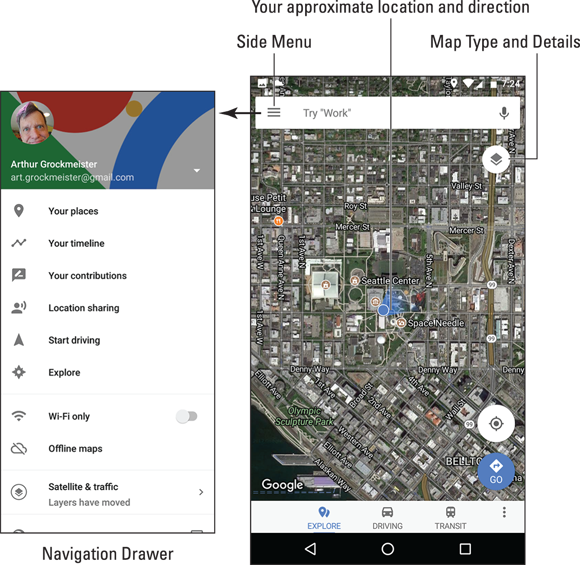
FIGURE 12-3: The Satellite map type.
The map type can also be combined with details, such as mass transit, traffic, and bicycle paths. Tap the Map Type and Details icon to choose one of those layers to apply over the map type.
- The standard street map is called the Default map. Choose it from the Map Type and Details icon to return to that view.
- To remove a layer, choose it again from the Map Type and Details card.
-
 You can quickly switch between Satellite and Default (street) map types on an Android tablet: Tap the Preview icon located in the lower left corner of the screen, illustrated earlier, in Figure 12-2.
Saving an offline map
For times when an Internet connection isn’t available (which is frequent for a Wi-Fi-only tablet), you can still use the Maps app, though only in a limited capacity. The secret is to save the portion of the map you need to reference. Obey these steps:
-
View the map chunk you desire to save.
Zoom. Pan. Square in the area to save on the screen. It can be as large or as small as you need. Obviously, smaller maps occupy less storage.
- Tap the Side Menu icon.
-
Choose Offline Maps from the navigation drawer.
Any maps you’ve previously saved appear in the list.
-
Tap the button SELECT YOUR OWN MAP.
Because you’ve already selected the map in Step 1, you can move on with Step 5:
-
Tap the DOWNLOAD button.
The map’s details are downloaded. Eventually, it appears in the list of offline maps.
To use an offline map, display the navigation drawer and choose Offline Areas. Tap the offline map to view, and it shows up on the screen, even when an Internet connection is unavailable. You can browse the map, but you cannot search or use navigation features while the device is offline.
- Offline maps remain valid for 30 days. After that time, you must update the map to keep it current. A notification reminds you to update.
- To update an offline map, choose it from the Offline Maps screen and tap the UPDATE button.
- To name a map something better than MAP1, tap Action Overflow by the map’s entry and choose Rename. Be descriptive.
- To remove an offline map, choose it and tap the DELETE button. Tap YES to confirm.
-
If you’re out traveling and the Android’s Wi-Fi is on, the offline map may display your location. Don’t count on this feature to work properly for navigation.
It Knows Where You Are
Many war movies have this cliché scene: Some soldiers are looking at a map. They wonder where they are, when one of them says, “We’re not even on the map!” Such things never happen with the Maps app. That’s because it always knows where you are.
Well, unless you’re on the planet Venus. I’ve heard that the Maps app won’t work there.
Finding a location
The Maps app shows your location as a blue dot on the screen. But where is that? I mean, if you need to contact a tow truck, you can’t just say, “I’m the blue dot on the gray slab by the green thing.”
Well, you can say that, but it probably won’t do any good.
If you desire more information about your location, or any spot on the map, long-press the screen in the Maps app. Up pops a card, like the one shown in Figure 12-4. The card gives your approximate address.
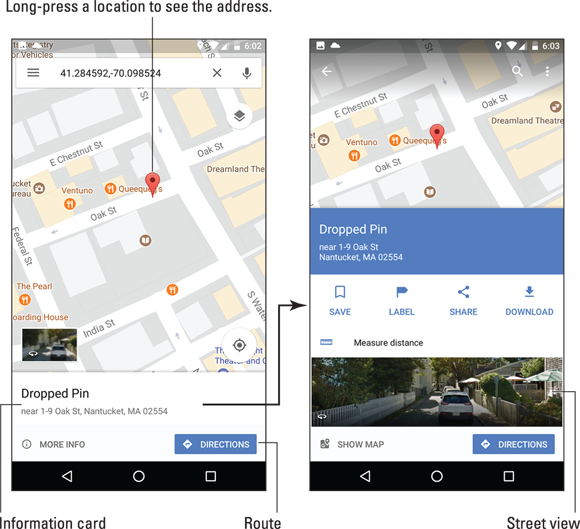
FIGURE 12-4: Finding an address.
On an Android phone, tap the card to see a screen with more details and additional information, as shown on the right in Figure 12-4. Android tablets show the card on the left side of the screen — no need to tap.
- Use the DIRECTIONS button to get directions to the location. See the later section “Android the Navigator.”
-
When you have way too much time on your hands, play with the Street View command. Choosing this option displays the location from a 360-degree perspective. In Street view, you can browse a locale, pan and tilt, or zoom in on details to familiarize yourself with an area, for example — whether you’re familiarizing yourself with a location or planning a burglary.
Helping others find your location
It’s possible to use the Maps app to send your current location to a friend. If your pal has a mobile device with smarts like your Android phone or tablet, he can use the coordinates to get directions to your location. Maybe he’ll even bring some tacos!
To send your current location, obey these steps:
-
Long-press your current location on the map.
 To see your current location, first tap the Location icon in the lower right corner of the Maps app screen.
After long-pressing your location (or any location), you see a card displayed, showing the approximate address, like the card shown on the right in Figure 12-4.
- Tap the card’s Share icon.
-
Choose the app to share the location.
For example, choose Messages or the phone’s text messaging app; Gmail to send the location data in an email message; Hangouts to instantly chat with someone; and so on.
- Continue using the selected app to complete the process of sending your location to someone else.
When the recipient receives the message, he can tap the link to open your location in the Maps app — provided he has an Android device. When the location appears, he can buy this book and follow my advice in the later section “Android the Navigator” for getting to your location. And don’t loan anyone this book, either; have them purchase their own copy. Thanks.
Find Things
The Maps app can help you find places in the real world, just like the Google Search app helps you find places on the Internet. Both operations work the same: Open the Maps app and type something to find in the Search box. What can you type? Keep reading this section.
Looking for a specific address
To locate an address, type it in the Search box. For example:
1313 N. Harbor Blvd., Anaheim, CA 92803
You may not need to type the entire address: As you tap the keys, suggestions appear onscreen. Tap a matching suggestion to view that location. Otherwise, tap the onscreen keyboard’s Search key, and that location is shown on the map.
After you find a specific address, the next step is to get directions. See the later section “Android the Navigator.”
- You don’t need to type the entire address. Oftentimes, all you need is the street number and street name and then either the city name or zip code.
- If you omit the city name or zip code, the Maps app looks for the closest matching address near your current location.
 Tap the X button in the Search box to clear the previous search.
Finding a business, restaurant, or point of interest
You may not know an address, but you know when you crave sushi or perhaps the exotic flavors of Manitoba. Maybe you need a hotel or a gas station, or a combination hotel-and-gas-station. To find a business entity or a point of interest, type its name in the Search box. For example:
Movie theater
![]() This search text locates movie theaters on the current Maps screen. Or, to find locations near you, first tap the Location icon (shown in the margin) and then type the search text.
This search text locates movie theaters on the current Maps screen. Or, to find locations near you, first tap the Location icon (shown in the margin) and then type the search text.
To look for points of interest at a specific location, add the city name, district, or zip code to the search text. For example:
Asian market San Diego
After typing this command and tapping the onscreen keyboard’s Search key, you see the assortment of Asian markets located in the San Diego metropolitan area, similar to the results shown on the left in Figure 12-5.
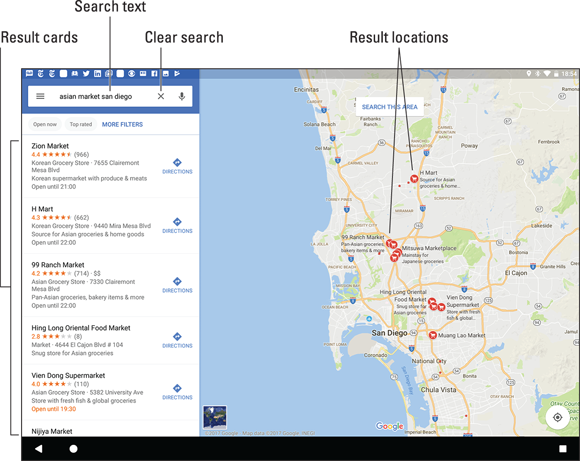
FIGURE 12-5: Finding a Japanese market near San Diego.
Tap a card from the list to view more details, including the exact address, hours of operation, phone number, website, and so on.
- Figure 12-5 shows the results on an Android tablet. On a phone, the DIRECTIONS button is replaced by a Call icon. Tap the icon to phone the business.
- Every letter or dot on the search-results screen represents a matching location. For each dot, a card is available, as shown in Figure 12-5.
- Spread your fingers on the touchscreen to zoom in on the map.
Marking a favorite place
For locations you visit frequently, consider adding them to your favorite places list. To do so, follow these steps:
-
 Tap the SAVE button on a location’s card.
A card appears, showing location lists available to you. The three preset lists are Favorites, Want to Go, and Starred Places.
-
Choose a list, such as Favorites.
The location is saved.
No difference exists between Favorite, Want to Go, and Starred locations. All are saved, just in different lists. See the next section.
Searching for favorite or recent places
Places that you’ve marked as favorites, as well as all locations you’ve visited recently, are memorized by the Maps app. To review these locations, heed these steps:
- Tap the Side Menu icon.
- On the navigation drawer, choose Your Places.
The Your Places screen features multiple tabs across the top of the screen. The SAVED tab lists places you’ve marked as favorites, categorized by lists.
The VISITED tab records locations you’ve wandered through.
Other tabs list relevant information related to the tab title. For example, the LABELED tab shows your home and work locations, if you’ve set those (as covered in the next section).
To access any location on the Your Places list, tap its card.
Setting your Home and Work locations
Two places that you frequent most in the real world are where you live and where you work. The Maps app lets you create shortcuts for these locations. They’re called, logically enough, Home and Work.
To set the Home and Work locations, follow these steps in the Maps app:
 Tap the Side Menu icon to display the navigation drawer.
- Choose Your Places.
-
On the LABELED tab, choose Home.
If a home location isn’t set, you see the text Set Home Address appear below the Home label.
- Type your home address.
- Repeat Steps 3 and 4 for your work address.
You can use the Home and Work shortcuts when searching for a location or getting directions. For example, type Home into the Search box to instantly see where you live, or whichever place you call home. To get directions from your current location to work, type Work as the destination. Keep reading in the next section.
- If you choose Home or Work from the Your Places menu, you see that location displayed on the map.
- To reset your home or work locations, display the Your Places screen (refer to Steps 1 and 2), but tap the Action Overflow icon and choose Edit Home or Edit Work, respectively.
Android the Navigator
The real point of having a map and finding a location is to get somewhere else. In the old days, you’d use your eyeballs to plot your route or rely upon directions from an acquaintance or friendly local, or you’d struggle with a folding map you bought at a gas station.
Things are better now. With your Android mobile gizmo, you tap the DIRECTIONS button and you’re on your way. In case you need specifics, here are the steps involved:
-
Tap the DIRECTIONS button on a location’s card.
You see a screen similar to the one shown in Figure 12-6. A card lists your starting and ending points. Methods of travel are listed with estimated arrival times. The route is plotted in blue on the screen, with alternative routes shown in gray.
-
Set a starting point.
The starting point is listed as Your Location, which is the Android’s current location. You can type in another location or use the Home or Work shortcuts, as described in the preceding section.
If the starting point and destination are reversed, tap the Action Overflow and choose Reverse. -
Choose a mode of transportation.
The available options vary, depending on your location. In Figure 12-6, the items are (from left to right) Car, Public Transportation, On Foot, Ride Services, and Bicycle. Ride-services options, including Uber and Lyft, appear only where available.
-
If necessary, tap the alternative route.
Alternative routes appear in gray (refer to Figure 12-6). You might choose that route because it’s faster, avoids slow traffic, skirts toll roads, and so on. You can also drag the route lines on the map to set your own directions.
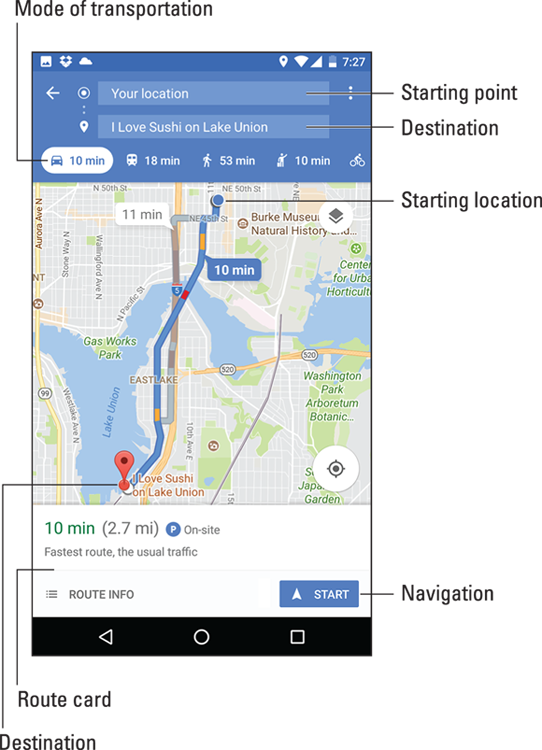
FIGURE 12-6: Planning a journey.
Tap the ROUTE INFO button to view turn-by-turn directions and potentially see Street View previews as you go.
Tap the START button to begin voice navigation, where the Android narrates directions as you proceed to your destination.
- The map shows your route, highlighted as a blue line on the screen. Detailed directions also appear. Traffic jams show up as red, with slow traffic as yellow.
 While the Android is navigating, the Navigation notification appears on the status bar, as shown in the margin. This icon is important to note because:
-
 Turn-by-turn navigation consumes a lot of battery power, especially when the device’s screen is on and the voice is narrating.
 - I recommend plugging the Android into the car’s 12-volt power receptacle while navigating. Car adapters are available at any electronics or phone store.
 If you tire of hearing the voice, tap the Speaker icon on the screen and set the Mute option.
 The Speaker Mute icon is shown in the margin.
- Navigation works best on Android phones and LTE tablets. Wi-Fi-only tablets can’t use navigation without Internet access. Even with a saved or offline map, navigation isn’t possible.
- To exit from Navigation mode, tap the Close icon on the screen.
- The START button appears as PREVIEW whenever you get directions not involving your current location.
-
The Android stays in Navigation mode until you exit. A navigation notification can be seen atop the touchscreen while you’re in Navigation mode.