
Chapter 22
Android Security
IN THIS CHAPTER
![]() Adding or changing a screen lock
Adding or changing a screen lock
![]() Setting a secure screen lock
Setting a secure screen lock
![]() Exploring unusual screen locks
Exploring unusual screen locks
![]() Setting lock screen notifications
Setting lock screen notifications
![]() Locating a lost Android
Locating a lost Android
![]() Erasing your data
Erasing your data
As more and more of your life is surrendered to the digital realm, the topic of security grows in importance. This concern extends directly to your Android mobile device, which is often home to your email, social networking, and other online accounts — including, potentially, important files and financial information. Don’t take Android security lightly.
Lock Your Android
The first line of defense for your Android is the screen lock. It can be simple, complex, or nonexistent. The choice is up to you.
Finding the screen locks
All screen locks on your Android are found in the Settings app, on the Choose Screen Lock screen. Heed these steps to visit that screen:
- Open the Settings app.
-
Choose Security & Location.
This item may have another name, such as Security or Lock Screen and Security. If you see both items in the Settings app, choose Lock Screen.
On some Samsung gizmos, choose the Lock Screen item on the Device tab in the Settings app.
-
Choose Screen Lock.
The item might also be titled Screen Lock Type, Set Up Screen Lock, or Change Screen Lock.
-
Work any existing secure screen lock to continue.
Eventually, you see the Choose Screen Lock screen, which might instead be called Select Screen Lock.
The Choose Screen Lock screen lists several types of screen locks. Some are unique to your device, and others are common Android screen locks, which include
- None: This choice is no screen lock at all. You unlock the device by pressing the Power/Lock key or swiping the screen.
- Swipe: Unlock the device by swiping your finger across the touchscreen. This item might also be titled Slide.
- Pattern: Trace a pattern on the touchscreen to unlock.
- PIN: Type a personal identification number (PIN) to unlock the touchscreen.
- Password: Type a password to unlock.
Some devices feature additional lock types, including face unlock, signature, and so on. Also see the later section “Using a fingerprint lock.”
-
 The most secure lock types are the PIN and password. Either screen lock type is required if the Android has multiple users, has a kid’s account, or accesses a secure email server.
 - The fingerprint lock is also considered secure, though it often uses a secondary lock as a backup.
- The screen lock doesn’t appear on an Android phone when you answer an incoming call. You’re prompted, however, to unlock the phone if you want to use its features while you’re on a call.
- The screen lock appears when you first power-on the device or after an update to the Android operating system.
- If you’re in a panic, you can tap the EMERGENCY CALL button on the phone’s lock screen to bypass the screen lock and dial 911 or another emergency number.
-
 I know of no recovery method available should you forget your Android’s PIN or password screen locks. If you use either one, write it down in an inconspicuous spot, just in case.
Removing a screen lock
You don’t remove the screen lock on your Android. Instead, you replace it with a non-lock, such as Swipe or None. Follow the directions in the preceding section to get to the Choose Screen Lock screen. Then switch from the Pattern, PIN, or Password screen lock to Swipe or None.
- You may be prompted for confirmation if you’re opting to reset a secure screen lock to one that’s less secure.
- You’re prohibited from removing a secure screen lock if the device is encrypted or accesses secure email or when other security features are enabled.
Setting a PIN
The PIN lock assigns a 4- to 16-digit code to the lock screen. You must type the PIN, or personal identification number, to gain access to the device. This type of screen lock is also employed as a backup for the less secure screen-unlocking methods, such as the pattern lock.
- To set the PIN lock, follow the directions in the earlier section “Finding the screen locks” to reach the Choose Screen Lock screen. Select PIN from the list of locks.
-
 The Android requires you type the PIN twice — once to set it and again to confirm. I also recommend that you write down the PIN elsewhere in a secure location.
Applying a password
The most secure way to lock an Android is to apply a full-on password. Unlike a PIN, a password contains more than digits, including a combination of numbers, symbols, and uppercase and lowercase letters.
Choose Password from the Choose Screen Lock screen to set the password; refer to the earlier section “Finding the screen locks.” The password must be at least four characters long, though keep in mind that longer passwords are more secure.
You’re prompted to type the password whenever you unlock your Android, initially turn on the device, restart, or try to change the screen lock. Tap the OK button to accept the password and use your gizmo.
Creating an unlock pattern
Perhaps the most popular, and certainly the most unconventional, screen lock is the Pattern lock. You must trace a pattern on the touchscreen to unlock the device. To create a Pattern lock, follow these steps:
-
Summon the Choose Screen Lock screen.
Refer to the earlier section “Finding the screen locks.”
-
Choose Pattern.
If you haven’t yet set a pattern, you may see the tutorial describing the process; tap the NEXT button to skip merrily through the dreary directions.
-
If you’re prompted for Secure Start-up, tap the YES button.
I strongly recommend using the Secure Start-up feature.
-
Trace an unlock pattern.
Use Figure 22-1 as your guide. You can trace over the dots in any order, but you can trace over a dot only once. The pattern must cover at least four dots.
- Tap the CONTINUE button.
- Redraw the pattern.
-
Tap the CONFIRM button.
You may be required to type a PIN or password as a backup to the Pattern lock. If so, follow the onscreen directions to set that lock as well.
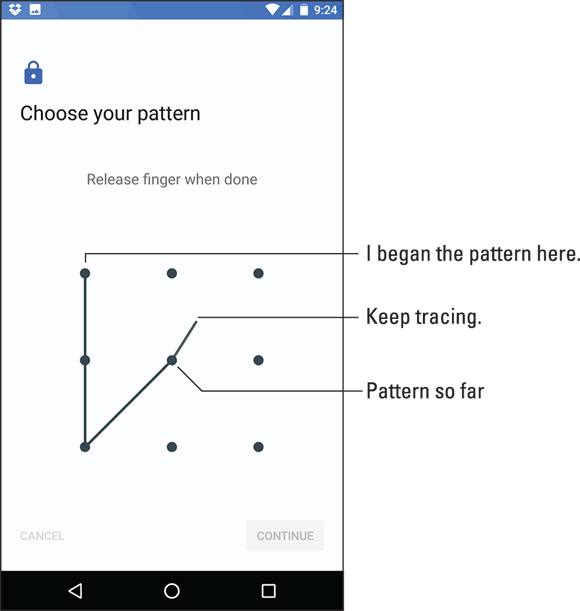
FIGURE 22-1: Set the unlock pattern.
After the Pattern screen lock is set, you see it shown as selected on the Security & Location screen in the Settings app. A Settings icon appears to the right of the Screen Lock option. Tap that icon and ensure that the setting Make Pattern Visible is chosen. For even more security, you can disable this option, but you must remember how — and where — the pattern goes.
Also: Clean the touchscreen! Smudge marks can betray your pattern.
Using a fingerprint lock
It’s trendy for a smartphone to feature a fingerprint scanner. Usually found on the back of the device, right near where you can smudge the rear camera lens, you tap the scanner to instantly unlock the phone. Android tablets lack this handy feature, probably due to their larger size.
The fingerprint scanner is usually configured when you first set up the device. As part of the initial setup, you’re prompted to tap the fingerprint scanner a few times to register a specific digit.
With some Androids, you can register additional fingers: Open the Settings app and choose Security & Location or the Lock Screen item to peruse options. For example, on the Nexus 5 phone, the feature is called Nexus Imprint. Samsung refers to the feature as Fingerprint Scanner, located on the Lock Screen and Security item’s screen.
- To work the fingerprint scanner, tap your finger. Sometimes, you may need to do it twice to fully register input.
- Backup security is required for the fingerprint scanner, such as a pattern, PIN, or password.
- Older Samsung devices used the physical Home button as the fingerprint scanner.
-
The Fingerprint screen lock is not considered secure.
Setting unusual screen locks
Many Android device manufacturers offer other screen locks, beyond the conventional locks described in this chapter. These include silly or fancy locks — perhaps not that secure but fun and different.
Among the more unusual screen lock types are Face Unlock and Signature Lock. Choose these screen locks from the Choose Screen Lock screen. Work through the setup process. You may also need to set a PIN or password as a backup to the less secure and unusual screen lock types.
- The face unlock uses the Android’s front camera. To unlock the device, you stare at the screen. So long as it’s not Halloween and you’re wearing zombie makeup, the device unlocks.
- The Signature lock is unique to the Samsung Galaxy Note line of phones and tablets. Use the S Pen to scribble your John Hancock on the touchscreen. The device unlocks.
Eschewing the lock screen
Your Android has a few tricks to keep security applied to the device, but avoid the screen lock under certain circumstances. This utility is called Smart Lock, and it includes several features:
- On Body Detection: After initially unlocking the Android, it stays unlocked while you’re moving. Once you stop, the device locks again.
- Trusted Places: The screen lock isn’t applied while the Android is near one of the locations listed as a trusted place; you swipe the screen to unlock the device.
- Trusted Devices: While connected with a specific Bluetooth device, such as a smartwatch or your car, the phone or tablet stays unlocked.
- Trusted Face: This item activates the face unlock, covered in the preceding section.
- Trusted Voice: When this one is active, you can utter “OK, Google” to unlock your Android and perform certain actions.
To set one or more of these items, follow these steps:
- Open the Settings app.
- Choose Security & Location.
-
Choose Smart Lock.
If this item isn’t listed, your Android may lack these features, though they could be found under a different heading.
- Work any existing screen lock.
-
Select a Smart Lock feature to activate.
For example, Trusted Places.
Follow the directions onscreen to set up the Smart Lock feature. For example, add a trusted place such as your home or office or choose a trusted Bluetooth device.
Even with a Smart Lock feature enabled, a screen lock still appears whenever you haven’t used your Android for a while.
Other Security Features
Beyond locking the screen, other tools are available to help you thwart the Bad Guys and keep safe the information in your phone or tablet. Tools are also available to help locate a lost or stolen device and to wipe your personal data, should you ever need to depart with your Android.
Controlling lock screen notifications
Lock screen notifications can be handy — unless you’re haggling over the price of a used car and the seller sees a notification from your bank showing how much you can spend. Some notices are innocent, but some are sensitive. To control how all notifications appear on the lock screen, follow these steps:
- Open the Settings app.
-
Choose Apps & Notification.
Some devices may title this item Sound & Notification or something similar.
- Choose Notifications.
-
Choose On the Lock Screen.
This item may be titled When Device Is Locked or Notifications on Lock Screen.
-
Select a Lock screen notification level.
Up to three settings are available:
- Don’t Show Notifications at All
- Show All Notification Content
- Hide Sensitive Notification Content
The names of these settings may be subtly different on your device.
- Choose a notification level.
On some Samsung devices, lock screen notifications are set by the app: In the Settings app, choose Notifications. Then choose an app and select On Lock Screen to set notification preferences.
- The Hide Sensitive Notification Content option (refer to Step 5) appears only when a secure screen lock is chosen.
- Double-tap a lock screen notification to open its related app and view more details. You must unlock the screen first, and then the app opens.
Adding owner info text
Suppose that you lose your phone or tablet. A kind person finds it, and they look on the touchscreen to see whether they can determine who owns the device. How would they know? Because you followed these steps to set the owner info text on the lock screen:
- Open the Settings app.
-
Choose Security & Location.
This item might be titled Security. On Samsung devices, choose the Lock Screen and Security category. Also look for a Lock Screen category.
-
 Tap the Settings icon by the Screen Lock item.
If you don’t see a Settings icon, skip to Step 4.
On Samsung devices, choose Information and FaceWidgets.
-
Choose Lock Screen Message.
This item might also be titled Contact Information, Owner Info, or Owner Information.
-
Type text in the box.
For example, type This phone belongs to Arius Sterling — if your name is Arius Sterling.
You can type more than one line of text, though the information is displayed on the lock screen as a single line.
- Tap the SAVE or DONE button.
Whatever text you type in the box appears on the lock screen. Therefore, I recommend typing something useful: your name, address, another phone number, an email address, or similar vital information. This way, should someone find your Android, he or she can easily contact you.
The owner info may not show up when None is selected as a screen lock.
Finding a lost device
Someday, you may lose your beloved Android. It might be for a few panic-filled seconds, or it might be for forever. The hardware solution is to weld a heavy object to the phone or tablet, such as an anvil. Alas, that strategy kind of defeats the entire mobile/wireless paradigm.
To quickly locate your Android, follow these steps while using a computer:
- Open a web browser, such as Google Chrome.
- Visit the main Google search page:
www.google.com - Type find my phone or find my tablet and press the Enter key.
-
If prompted, sign in to your Google (Gmail) account.
Your phone or tablet’s location appears on the screen.
To ensure that this system works best, complete these steps on your phone or tablet:
- Open the Settings app.
- Choose Security & Location.
- Choose Find My Device.
-
Ensure that both master controls are set to the On position.
The first item activates the remote-locate feature; the second allows you to remotely lock and erase the device.
Other locator services are available, through your cellular provider or Android manufacturer or as a third-party app. Look for such apps in the Apps drawer or search on Google Play. One that I recommend is Lookout Mobile Security.
Encrypting storage
I find the step of encrypting an Android’s storage to be drastic, but it’s highly secure. The process ensures that if someone finds your phone or tablet, and somehow manages to bypass all the device’s security features, he still can’t access any information.
It’s not currently possible to remove encryption. After encryption is applied, it’s stuck forever like a regrettable, drunken tattoo.
To start the encryption process, follow these steps:
-
Ensure that the device has a secure screen lock — a PIN or password.
Refer to the first part of this chapter for details.
-
Connect the Android to a power source, or ensure that it’s fully charged.
Encryption can take as long as several hours if your device’s storage is rather full.
- Open the Settings app and choose Security & Location.
-
Look below the heading Encryption & Credentials.
If the text reads Device encrypted, you’re done; the device is already encrypted. Otherwise, continue with Step 5.
- Choose Encryption & Credentials.
-
Choose Encrypt Phone or Encrypt Tablet.
This item may be titled Protect Encrypted Data.
- Tap the ENCRYPT PHONE or ENCRYPT TABLET button.
- Wait.
On Samsung devices, choose the Lock Screen and Security item in the Settings app. Then choose Secure Folder. Follow the directions presented.
Performing a factory data reset
The most secure thing you can do with the information on your Android is to erase it all. The procedure, known as a factory data reset, effectively restores the device to its original state, fresh out of the box.
A factory data reset is a drastic thing. It not only removes all information from storage but also erases all your accounts. Don’t take this step lightly! In fact, if you’re using this procedure to cure an ill, I recommend first getting support. See Chapter 24.
When you’re ready to erase all the device’s data, follow these steps:
- Open the Settings app.
-
Choose System.
On older devices, choose Backup & Reset.
On Samsung devices, choose the General Management item in the Settings app.
-
Choose Reset.
If you don’t see this item, skip to Step 4.
- Choose Factory Data Reset.
-
Review the data presented.
Everything gets wiped, so the reminder screen reinforces the extreme measures taken in a factory data reset.
- Tap the button RESET PHONE or RESET TABLET.
-
If prompted, work the screen lock.
This level of security prevents others from idly messing with your beloved gizmo.
-
Tap the ERASE EVERYTHING or DELETE ALL button to confirm.
All the information you've set or stored on the device is purged, including all your accounts, any apps you've downloaded, music — everything.
Practical instances when this action is necessary include selling your Android, giving it to someone else to use, and upgrading to a new phone or tablet.
This process doesn’t erase removable storage data. You must reformat the microSD card or otherwise subject it to some form of erasure. Refer to Chapter 19 for details on formatting external storage.
Erasing all the data from an Android phone doesn’t reset the phone number. You must remove the SIM card to disassociate the phone number from that phone. Or you can replace the SIM card to add another phone number to the phone.