
CHAPTER 10
Security Assessment Tools
This chapter presents the following topics:
• Network tool types
• Host tool types
• Physical security tools
Spend enough time in the security career field and at some point you will either conduct an assessment, create an RFP (Request for Proposal) for assessments, respond to an assessment RFP, or examine the results of an assessment. Assessments play a large role in security because they can be one of the best tools you have to find issues and vulnerabilities before the “bad guys” do. On a more frequent basis, as a security professional you might be presented with a scenario and need to choose the appropriate approach or tool for the job.
The previous chapter focused on security assessment methods and types, but not much on the tools themselves. In this chapter, we’ll explore some common tools and methods for conducting assessments and other security tasks.
Network Tool Types
Network tools are a vital part of any security professional’s skillset. You may not be an assessment professional who spends most of your career examining networks looking for vulnerabilities––but you can use many of the same tools for internal assessment activities, tracking down infected systems, spotting inappropriate behavior, and so on. Knowing the right tool for the job can be critical to performing effectively. Although some tools are described as “Swiss army knives” that perform several functions, you will typically use a variety of tools throughout security assessment duties. The tools in this section use the network to scan, collect, analysis, and distribute data for intelligence purposes.
Port Scanners
A port scanner is a tool designed to scan one or more systems to determine which TCP/UDP ports are “open,” “closed,” or “filtered.” The most important port status is open since it indicates that a service is actively listening for, and will accept, incoming connections from other systems. Port scanners are available for all modern desktop/server OSs, smartphones, and tablets. Having a good port-scanning tool in your toolset––and knowing how to use it––is beneficial for routine systems administration, penetration testing, and vulnerability assessments.

EXAM TIP Nmap is unquestionably the most popular and acclaimed port-scanning tool in the industry. If you want to practice port scanning, Nmap is a great first choice.
Port scanners can be used for the following:
• Live systems Search for “live” hosts on a network. This is sometimes known as a “ping sweep” since you’re pinging groups of systems. Most port scanners give you the ability to perform a quick scan using ICMP, TCP, or UDP packets to search for active hosts on a given network or network segment. ICMP is still very popular for this task, but with the default blocking of ICMP in many modern operating systems, such as Windows 10, users are increasingly turning to TCP or UDP scans for these tasks.
• Open ports Port scanners are most often used to identify any open ports on a host, group of hosts, or network. By scanning a large number of ports over a large number of hosts, a port scanner can provide you (or an attacker) with a very good picture of what services are running on which hosts on your network. Scans be done for the “default” set of popular ports, a large range of ports, or every possible port (from 1 to 65535).
• Specific ports Only looking for web servers? Mail servers? Port scanners can also be configured to just look for specific services.
• Identify services Some port scanners can help identify the services running on open ports based on information returned by the service or the port/service assigned (if standards have been followed). For example, a service running on port 80 is likely to be a web server.
• TCP/UDP services Most port scanners can perform scans for both TCP and UDP services, although some tools do not allow you to scan for both protocols at the same time.
When you find open ports with running services, you’ll need to determine the following:
• If those services should be running at all
• If they should be running on the system(s) you found them on
• If anything can be done to limit which connections are allowed to those services
For example, you may want to scan your network for any system accepting connections on TCP port 1433 (Microsoft SQL Server). If you find a system accepting connections on TCP port 1433 in your Sales group, chances are someone has installed something they shouldn’t have (or someone installed something for them).
Three-Way Handshake
So, how exactly does a port scan work? Typical port scans are really just TCP 3-way handshakes being repeated over and over again. However, before we get into port scans, some background on TCP––and the TCP 3-way handshake––is in order.
TCP is a connection-oriented protocol that relies upon handshakes, acknowledgements, flow control, traffic resubmissions, and graceful tear-downs of communication. All of these characteristics reflect TCP’s desire for a perfect connection. The initial handshake (formally known as the TCP 3-way handshake) is TCP’s first step in a connection. This is not only critical to network connectivity but also to port scanning. See Figure 10-1 for a visual representation of the TCP 3-way handshake, followed by an explanation of its steps.
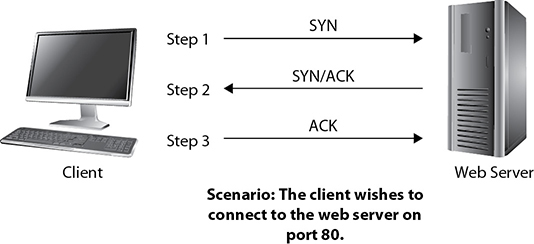
Figure 10-1 TCP 3-way handshake (a successful connection established)
• SYN The client sends a TCP segment to the web server with its SYN flag turned on and the destination port field set to 80. The SYN flag and port 80 indicate the client’s intention to establish a connection with the web server on port 80. In other words, the client is saying, “Hello, I would like to connect with you on port 80. Are you open?”
• SYN/ACK The web server responds to the client by sending a TCP segment with its SYN and ACK flags turned on. The ACK flag acknowledges the receipt of the client’s SYN flag, and the web server’s SYN flag indicates the desire to have a connection with the client. What the server is saying is, “Yes, I am open on port 80 and I would like to connect with you, too.”
• ACK The client responds to the web server with its ACK flag turned on to acknowledge receipt of the web server’s SYN flag. Assuming the web server receives this final ACK flag, the client and the web server are now officially connected.
Every time a TCP-based application wishes to establish a new connection to an application on another computer, the 3-way handshake is attempted. However, what if the connection attempt fails due to the destination port number being closed? See Figure 10-2 for an example.

Figure 10-2 TCP 3-way handshake rejection (port closed)
• SYN The client sends a TCP segment to the web server with its SYN flag turned on and the destination port field set to 80. The SYN flag and port 80 indicate the client’s intention to synchronize (connect) with the web server on port 80. In other words, the client is saying, “Hello, I would like to connect with you on port 80. Are you open?”
• RST The web server responds to the client by sending a TCP segment with its RST flag turned on. The RST flag indicates that the web server is not open on port 80 and therefore will not allow a connection on this port. This is a normal and acceptable response to a connection request for a closed port.
Do not be surprised at the abundance of closed ports on systems. Most ports will be closed by default with only a handful of them open. This is not only normal but a security best practice.

TIP Know the handshake steps by heart. They are important for most information security exams.
Now that you understand the TCP 3-way handshake, let’s circle back to port scans. Port scans perform either the TCP 3-way handshake for each port to determine port status or some variation of this. For example, let’s assume we’re running a standard TCP connect scan against 192.168.1.20 for ports 1–10000. The scanner will attempt to create a TCP connection to each port in the range 1–10000 on 192.168.1.20. When the scanner sends out a SYN packet, it waits for the responding SYN/ACK. If a SYN/ACK is received, the scanner will attempt to complete the 3-way handshake and mark the port as “open.” If the sent packet times out, or an RST packet is received, the scanner will likely mark that port as “closed.” If an “administratively prohibited” message or something similar comes back, the scanner may mark that port as “filtered.” Filtered means that the port scanner cannot definitively determine whether the port is open or closed due to the likely presence of a firewall protecting the port. When the scan is complete, the scanner will present the results in a summary format—listing the ports that are open, closed, filtered, and so on. By examining the responses from each port, you can typically deduce a bit more information about the system(s) you are scanning, as detailed here:
• Open Open ports accept connections. If you can connect to these with a port scanner, the ports are not being filtered at the network level. However, there are instances where you may find a port that is marked as “open” by a port scanner that will immediately drop your connections if you attempt to connect to it in some other manner. For example, port 22 for SSH may appear “open” to a port scanner but will immediately drop your SSH connections. In such a case, the service is likely being filtered by a host-based firewall or a firewall capability within the service itself.
• Closed You will typically see this response when the scanned target returns an RST packet.
• Filtered You will typically see this response when an “ICMP unreachable” error is returned. This usually indicates that the port is being filtered by a firewall or other device.
• Additional types Some port scanners will attempt to further classify responses, such as dropped, blocked, denied, timeout, and so on. These are fairly tool specific and you should refer to any documentation or help file that accompanies that port scanner for additional information.
In general, you will want to run your scanning efforts multiple times using different options to ensure you get a better and more accurate picture. Not to mention, if you’re looking to perform scans that give you the results you want, while minimizing your risk of being detected by intrusion detection systems (IDSs) or intrusion prevention systems (IPSs), more customized port scans may be in order. The different types of port scans include the following:
• TCP full connect scan This completes the 3-way handshake.
• SYN scan Also known as a stealth or half-open scan, this sends a TCP segment to the target with the SYN flag turned on. Since it doesn’t complete the 3-way shake, no connections are recorded, which reduces its visibility to tracking tools.
• NULL scan Sends a TCP segment to the target with zero flags turned on.
• FIN scan Sends a TCP segment to the target with the FIN flag turned on.
• XMAS scan Sends a TCP segment to the target with the FIN, URG, and PUSH flags turned on.

NOTE Tools like Nmap and Hping are well known for their implementations of the preceding port scan types. The most popular port scan is the SYN scan due to it being nearly as good as a TCP full connect scan while reducing visibility.
The point of varying port scans is to simultaneously elicit responses from stubborn computers while also minimizing the risk of detection. Evading IDS or IPS tools is an important goal for hackers; therefore, it should be for us as well.
You’ll want to run both TCP and UDP scans as well. You may need to alter your scanning approach to use multiple techniques at different times of the day/night to ensure complete coverage. The bad guys are doing this against your network right now, so you might as well use the same tools they do to see what they see. Port scanners can also be very useful for testing firewall configurations because the results of the port scans can show you exactly which ports are open, which ones you allow through, which ports are carrying services, and so on.
So, how do you defend against port scans? Well, it’s tough. Port scans are pretty much a part of the Internet traffic landscape now. Although you can block IP addresses that scan you, most organizations don’t because they run the risk of an attacker spoofing source addresses as decoys for other scanning activity. The best defense is to carefully control what traffic you let in and out of your network, using firewalls, network filters, and host filters. Then carefully monitor any traffic that you do allow in.
Unfortunately, there is far more information concerning port scanners, port scanning techniques, defenses, and so on than we have room for in this chapter. This is merely a small introduction to the topic, and we highly recommend you do additional research if the topic interests you.
TIP The key to effective use of port scanners is to run them multiple times at different times and on different days. Your network looks different in the early hours of the morning than it does later in the afternoon. Run port scans on weekends, at night, during lunch, on holidays, and so on. Most scanners have a machine output option that makes it easy to import results into a database for easy comparison between scans.
Figure 10-3 shows a screenshot of an Nmap port scan.
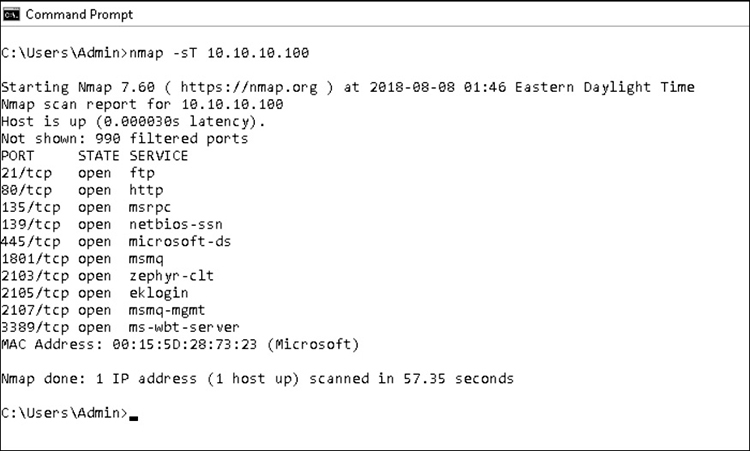
Figure 10-3 Nmap port scan
Vulnerability Scanners
A vulnerability scanner is a program designed to scan systems for weaknesses. These weaknesses can include misconfigurations, outdated software, missing patches, default user accounts, and so on. There are essentially three main categories of vulnerability scanners: network, host, and application. A network vulnerability scanner scans hosts for issues across their network connections. Typically, a network scanner will either contain or use a port scanner to perform an initial assessment of the network to determine which hosts are alive and which services are open on those hosts. Each system and service is then scanned.
Network scanners are very broad tools that can run potentially thousands of checks, depending on the OS and services being examined. This makes them a very good “broad sweep” for network visible vulnerabilities. Due to the number of checks they can perform, network scanners can generate a great deal of traffic––and a large number of connections to the systems being examined––so care should be taken to minimize the impact on production systems and production networks. Network scanners are essentially the equivalent of a Swiss army knife for assessments. They do lots of tasks and are extremely useful to have around—they may not be as good as a tool dedicated to examining one specific type of service, but if you can only run a single tool to examine your network for vulnerabilities, you’ll want that tool to be a network vulnerability scanner. Figure 10-4 shows a screenshot of Nessus from Tenable Network Security, a very popular network vulnerability scanner.

Figure 10-4 Nessus vulnerability scanner
Bottom line: if you need to perform a broad sweep for vulnerabilities on one or more hosts across the network, a network vulnerability scanner is the right tool for the job.
TIP Selecting the right type of vulnerability scanner isn’t that difficult. Just focus on what types of vulnerabilities you need to scan for and how you will be accessing the host/services/applications being scanned. It’s also worth noting that to do a thorough job, you will likely need both network-based and host-based scanners—particularly for critical assets. Host- and network-based scanners perform different tests and provide visibility into different types of vulnerabilities. If you want to ensure the best coverage, you’ll need to run both.
Application vulnerability scanners are designed to look for vulnerabilities in applications or certain types of applications. Application scanners are some of the most specialized scanners—even though they contain hundreds or even thousands of checks, they only look for misconfigurations or vulnerabilities in a specific type of application. Arguably the most popular types of application scanners are designed to test for weaknesses and vulnerabilities in web-based applications. Web applications are designed to be visible, interact with users, and accept and process user input—all things that make them attractive targets for attackers. As such, a relatively large number of web application scanners is available, ranging from open source products like OpenVAS to subscription products such as Nessus.
To be an effective web application scanner, the tool must be able to perform thousands of checks for vulnerabilities, misconfigurations, default content, settings, issues, and so on, with a variety of web technologies, from IIS to Apache to PHP to ASP and everything in between. Application scanners are usually capable of performing advanced checks, such as SQL injection or JavaScript injection, which require interacting with the web application being examined and modifying requests and responses based on feedback from the application. Figure 10-5 shows a screenshot of Acunetix WVS (Web Vulnerability Scanner), an application scanner specifically for web technologies.
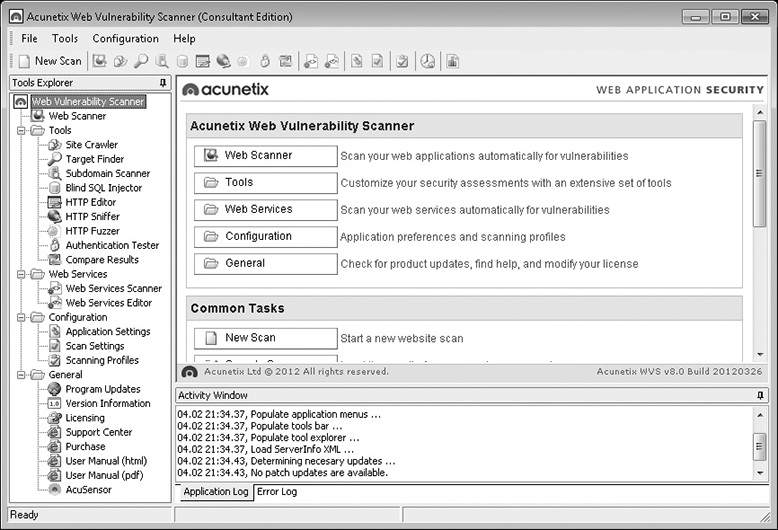
Figure 10-5 Acunetix Web Vulnerability Scanner
Bottom line: if you want to examine a specific application or multiple instances of the same type of application (such as a website), an application scanner is the tool of choice.

CAUTION Scanners are not perfect. Sometimes they will erroneously report things as an issue when they really are not a problem—and other times they won’t report an issue at all. A false positive is an incorrect finding—something that is incorrectly reported as a vulnerability. The scanner tells you there is a problem when in reality nothing is wrong. A false negative is when the scanner fails to report a vulnerability that actually does exist—the scanner simply missed the problem or didn’t report it as a problem.
Database vulnerability scanners are another type of specialty scanner—as the name suggests they are designed to look for vulnerabilities and misconfigurations with databases. Software version, user permissions, poor passwords, accounts with no passwords, table permissions, database permissions, and so on can all be closely examined by a database scanner such as Scuba or AppDetective.
If your organization does any application development, you may also wish to integrate the use of a source code scanner such as Fortify 360 SCA. A source code scanner actually looks through the source code of a program to identify potential vulnerabilities, such as input fields that are not filtered, improper or a lack of bounds checking, possible buffer overflows, and so on. These tools are fairly specialized because you must have the actual source code of the application to test—a source code scanner does you no good on a finished, compiled product.
Protocol Analyzers
A protocol analyzer is a tool (hardware or software based) that can be used to capture and analyze traffic passing over a communications channel, such as a network. Although protocol analyzers exist for many types of communication channels, such as telecommunications traffic and system buses, the most common use of a protocol analyzer is for the capture and examination of network traffic. In the networking world, this is most commonly referred to as a packet analyzer or sniffer. Sniffers can be used to capture and analyze wired or wireless traffic and can be software based (most common) or a dedicated hardware/software platform.
Wired
Although there are many popular packet sniffers to use on wired networks, such as Tcpdump, Windump, and EtherApe, Wireshark is on a different level. Books written for Wireshark? Check. Wireshark courses? Check. International conventions attracting worldwide audiences? Check. Yes, it’s that popular. Although Wireshark is not limited to wired packet sniffing, it is unquestionably the most popular tool, and a very good one to start with. It certainly doesn’t hurt that it is open source and free to download and use too. See Figure 10-6 for a screenshot of Wireshark.
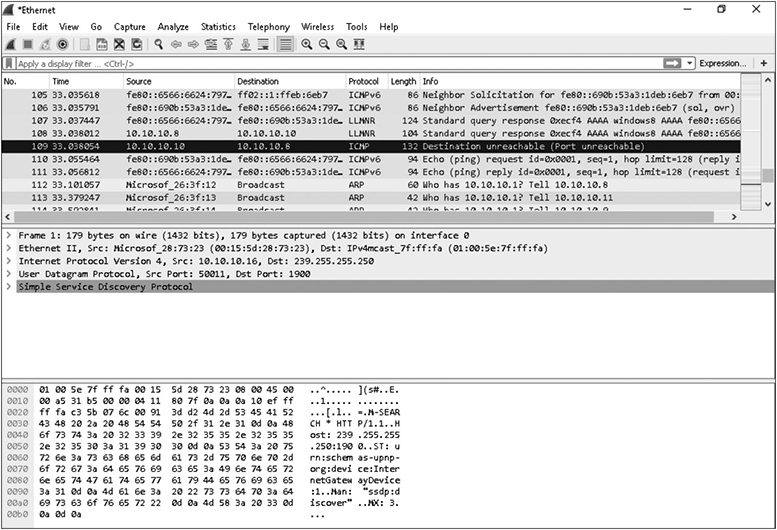
Figure 10-6 Wireshark capture
There are two different types of packing sniffing on wired networks. The first is passive sniffing, and the other is active sniffing. Although extremely unlikely, passive sniffing occurs when the attacker is sniffing traffic sent over a legacy Ethernet hub. Since hubs unintelligently forward all traffic to all systems all the time, sniffers can very easily capture all traffic regardless of which port the sniffer is plugged into.
Active sniffing occurs when sniffers are capturing traffic sent through Ethernet switches. Since switches only forward traffic to intended machines, a sniffer will only see traffic sent directly to or from its NIC, or any multicast and broadcast traffic sent through the switch. In other words, there will be a gaping hole regarding all the unicast traffic that the sniffer doesn’t see. As a result, the sniffer would have to be connected into a mirrored or SPAN port on the switch to receive that traffic.
Malicious hackers probably won’t have the luxury of connecting their sniffer to such generous ports on the switch; therefore, they may have to perform “active sniffing” attacks on the network. Some of these attacks target the switch so that the switch unknowingly forwards traffic to the attacker’s computer for capturing. Here are several examples of active sniffing attacks:
• ARP poisoning
• ARP spoofing
• MAC flooding
• DHCP starvation
• Rogue DHCP server
• DNS poisoning
• Switch port stealing
Capabilities of packet analyzers vary greatly—some do nothing more than simple packet capture whereas others attempt to reconstruct entire TCP/IP sessions with decoded packets and color-coded traffic streams. From a security perspective, protocol analyzers are very useful and allow us to discover what’s transpiring on the network:
• Are any systems on the network transmitting traffic on a specific port?
• Are any packets being sent to an address at a rival company?
• Are any employees streaming YouTube videos all day?
• Want to find the system that’s flooding the local network with broadcast traffic?
A protocol analyzer can help you discover all these issues and more—if you have the analyzer plugged into the right location of your network and can “see” the traffic you are concerned about. Most organizations will have multiple points in the network where traffic can be sniffed—in the core switch, between the user base and the server farm, between remote users and the core network, between the organization and any link to the Internet, and so on. Knowing how to ensure the sniffer can “see” the traffic you want to analyze, knowing where to place the analyzer, and knowing how to use the analyzer are all keys to getting the best results from a protocol analyzer.
NOTE Protocol analyzers come in many variants—from free to costing many thousands of dollars. All protocol analyzers do essentially the same thing—capture network traffic. The differences between them are typically performance related, although some analyzers may have additional capabilities, such as being able to reconstruct specific TCP sessions from a traffic capture.
Wireless
Whereas switched Ethernet networks have certain challenges when it comes to sniffing—most of which are solved through switch SPAN or mirrored ports––wireless networks are an inherently easier variety to sniff due to their tendency to broadcast signals in all directions. Since wireless networks move traffic around like hubs, anyone in range with a sniffer has the potential to capture the traffic. On the other hand, if wireless isolation mode is enabled on the wireless access point or router, packet capturing will be restricted due to the inability for wireless devices to see one another.
Even though Wireshark’s namesake gives the appearance of being a wired-only tool, it is perfectly capable of capturing wireless traffic. This is especially true if the Wireshark device is equipped with the expensive but fabled AirPcap adapter, which is the crème de la crème of wireless capture devices. Your packet capturing, injection, analysis, and performance capabilities will be unmatched with this device.
When you run packet sniffers, it’s important to keep an eye out for important and potentially dangerous traffic, including the following:
• Wireless authentication traffic such as probe requests and probe responses. WPA/WPA2 hacking techniques like to exploit wireless handshakes.
• Wireless beacon frames sent by wireless access point or routers. These may advertise SSIDs, which can be intercepted by hackers.
• Reverse DNS traffic (may indicate a sniffer, port scanner, or ping sweeper nearby) profiling the network.
• RST packets may indicate port scans.
• Customized TCP segments with unusual patterns of SYN, ACK, RST, FIN, PSH, URG flags. These are signs of port scanners.
• Packet fragmentation is a sign of a port scanner or a possible attempt at evading IDS or IPS tools.
• Unexplained encrypted traffic.
• Rogue or evil twin access points. Rogue access points are unauthorized hacker access points, whereas evil twin access points are a type of rogue access point that impersonates a well-known access point such as one found at a coffee shop, hotel, or book store.
• Unexplained surges or sags in traffic levels. Could be a sign of DOS or DDOS conditions.
SCAP Scanners
The Security Content Automation Protocol (SCAP) is a protocol that employs existing open security standards in order to conduct vulnerability scans––while measuring and ranking the discovered vulnerabilities according to predetermined baselines. SCAP utilizes the following standards:
• Common Vulnerabilities and Exposures (CVE) Published list of cybersecurity vulnerabilities
• Common Configuration Enumeration (CCE) Published list of configuration issues
• Common Platform Enumeration (CPE) Standardizes the naming of various software platforms
• Common Vulnerability Scoring System (CVSS) Standardizes the scoring of vulnerabilities
• Extensible Configuration Checklist Description Format (XCCDF) XML format used to standardize methods of describing system configuration policies, evaluation of systems, mitigations, and policy compliance
• Open Vulnerability and Assessment Language (OVAL) Standard for vulnerability assessments, reporting, and delivery mechanisms of system vulnerabilities
OpenSCAP is a well-known collection of open source tools for applying the standards and methods of SCAP. Using the OpenSCAP scanner, you’ll be able to conduct vulnerability assessments and assign criticality rankings to discovered vulnerabilities while measuring a system’s compliance––or deviation––from OpenSCAP’s built-in security policies. The following is a high-level process of utilizing OpenSCAP on Kali Linux:
1. Download and deploy OpenSCAP onto a Kali Linux VM.
2. Download latest OVAL definitions for scanner.
3. Use OpenSCAP to evaluate a target based on OVAL definitions.
4. Create and view a report based on the evaluation results.
Network Enumerators
Pinging tools will tell us if a system is up or down––port scanners will tell us about port status, services, and maybe the OS––but network enumerators can tell us about the users, groups, shares, auditing options, and other finer details about systems. It is a deeper level of scanning that often comes just as we gain access to a target system.
On insecure systems, this type of information can be pulled from anonymous queries to LDAP services, anonymous connections to Windows systems, Active Directory searches, scans to determine what service is actually running on a given port, and so on. This type of information is very useful to would-be attackers, and your job as a security professional is to prevent attackers from accessing this type of information. An easy way to start that process is to run network enumeration tools yourself to see what your network might look like to an untrusted outsider or trusted insider. Using network enumeration tools can show you how much information is available on your network and highlight which systems need to be secured, what services need to be disabled/restricted, and so on. Most general vulnerability scanners, such as Nessus, will perform network enumeration as part of their “default” scan settings, and port scanners, such as Nmap, will attempt to identify the operating system and application running on examined systems. Here are some examples of popular enumeration tools:
• NetScanTools Pro
• SuperScan
• Nsauditor
• OpUtils
• Finger
TIP NetScanTools Pro is one of the more impressive network-scanning tools you will ever see. You can download a trial version of it and get a good sense of how many different things it can do.
Fuzzers
Have you ever looked at a web page and thought, “Wonder what happens if I enter a bunch of random characters for my password?” If you’ve actually tried this, then you’ve “fuzzed.” A fuzzer is a testing tool used to find implementation bugs in software by submitting malformed or semi-malformed data to an application in an automated fashion. For example, if you have a web application with a login field, a fuzzer would send random (or semi-random) strings of data to the username and password fields and examine the application’s reaction to that data. Did the application crash? Did it report an error back? What kind of error? Was it a buffer overflow? A denial-of-service condition?
From a security standpoint, fuzzers are typically used to examine web applications, custom applications, or any other system that accepts and processes user input. Fuzzers can be run at any time, but ideally they would be used during application development where the cost of detecting and correcting bugs is typically cheaper. A fuzzer can’t replace a good quality-control process, code walkthrough, debugging, and so on, but it can be a very powerful automated tool that augments these classic software assurance techniques. The primary issue with fuzzing is it tends to find only the simpler faults within software, although sometimes those bugs turn out to be serious, exploitable bugs.
TIP Fuzzers are available from both open source and commercial sources such as OWASP’s ZAP, Burp Suite, W3af, and WebScarab.
HTTP Interceptors
An HTTP interceptor is, quite simply, a tool that captures web traffic between the source (usually a browser) and the destination (usually a website). HTTP interceptors are usually called web proxy tools because they serve as an on-host proxy, capturing web traffic after it passes out of and before it passes in to the browser. Most interceptors run on the local host using a local port (such as 8080) and require the user to configure their browser or connection settings to point to the interceptor as the proxy for HTTP/HTTPS traffic. Most interceptors will also handle certificate and SSL negotiations for any sessions passing through them.
Interceptors are great tools for examining web applications because they allow the examiner to do things the browser would not. Let’s say the client-side code for a website limits the length of a client-supplied username to 20 characters. The browser would help enforce that limit and would reject any username longer than 20 characters. When the user clicks Submit on their browser, the request passes to the interceptor first, and now the user has a chance to modify the submitted data free from any restrictions the browser might try to enforce. Using the interceptor, the examiner could manually modify the submitted username and make it 200 characters in length—or even 2,000—before passing it off to the web server. If the developers haven’t done a good job of filtering user input on both the client and server sides of their application, then an unexpected input of 2,000 characters in a 20-character field could cause a problem. Interceptors can also be used to modify URLs, change cookie values, modify data fields, and so on, with any web traffic passing through the proxy. Interceptors give you a tool to examine almost every aspect of how a web application processes traffic passing between the browser and web server. Figure 10-7 shows a screenshot of Burp Suite, a popular HTTP interceptor.
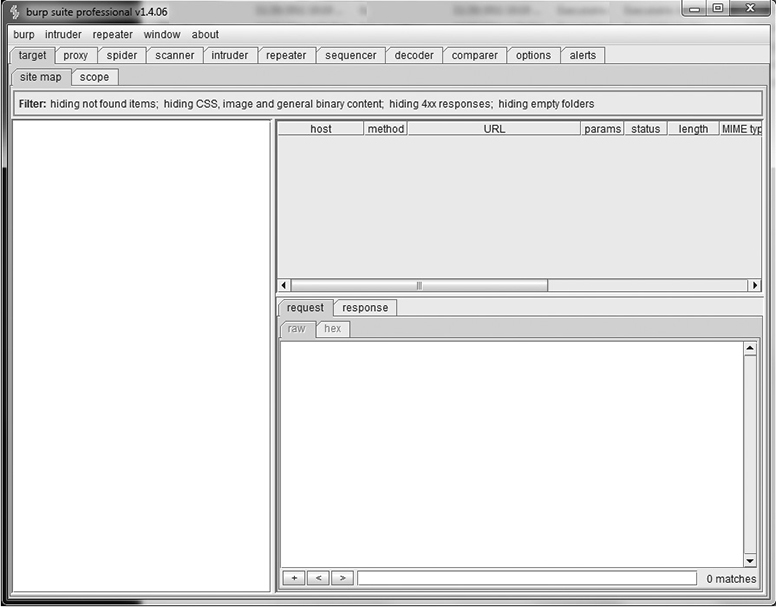
Figure 10-7 Burp Suite
Exploitation Tools/Frameworks
Attack tools/frameworks typically go one step beyond a vulnerability scanner. Whereas a vulnerability scanner can tell you about a possible issue or where a definite issue exists, an attack tool will allow you to try and exploit that discovered vulnerability. For example, a vulnerability scanner might tell you that your remote system is vulnerable to a certain buffer overflow attack, but an attack tool/framework will actually launch an attack against the vulnerable target and attempt to exploit the buffer overflow (possibly giving you a remote shell on the vulnerable system). Attack tools and assessment frameworks typically have some type of limited vulnerability-scanning capability—usually to just verify vulnerabilities that the attack tool can exploit.
From a security standpoint, attack tools and frameworks are sometimes avoided because they actually use buffer overflows and such to exploit vulnerabilities; therefore, they can have unintended consequences, such as crashing the service being examined or corrupting data. However, they can still be useful for taking the data in a vulnerability scan from a discussion about what an attacker might be able to do into a discussion about what an attacker definitely could do and would have access to. Sometimes showing the access that can be gained by exploiting a vulnerability is far more powerful than simply talking about it. Many different attack tools are available from both public and commercial sources, such as Metasploit (available in both open source and commercial versions) and Core Impact (commercial only).
EXAM TIP Attacking tools/frameworks can be used for assessment purposes, but they’re typically used for penetration tests, where the testers are looking to move beyond the “it looks like this vulnerability exists” approach and into the “here’s the access I can gain and what I can do when I take advantage of this vulnerability” approach.
One common issue associated with attack tools is the level of knowledge required to use them effectively. Anyone can download and run the tools, but you definitely need more than a rudimentary level of knowledge to be able to first identify a vulnerability and then select an appropriate exploit to test/validate that vulnerability. Selecting the wrong exploit or payload could result in crashing the service (or system) being examined, corrupting data, or having a similarly undesirable impact. Some attack tools (including Core Impact and Metasploit) make this process much easier because they pair vulnerability tests with appropriate exploits and payloads that can usually be executed with minimal damage. Attack tools/frameworks are also available now in live CD format and in pre-built distributions. For example, Kali Linux is a bootable live CD that contains a large variety of packaged assessment, scanning, and exploit tools. The live CD format allows you to boot from the CD into a functional assessment environment using almost any available platform.
Visualization Tools
The only thing more difficult than finding a needle in a haystack is finding specific needles in stacks of needles. If organizations are going to make sense of all the raw data they generate daily, they’ll be greatly aided by the many visualization tools that specialize in converting raw data into visual formats. Utilizing tools that provide visual aids, analysis, and interpretations of raw data will simultaneously expedite and deepen our level of understanding of the data we’ve collected. We’ll more quickly grasp key performance indicators regarding clients, servers, and network appliances––in addition to data flow patterns at the LAN, WAN, Wi-Fi, and Internet levels.
Although no tool is perfect, there are certain visualization types to look for in a tool, including the following:
• Dashboards
• Reports
• Business intelligence
• Data mining
• Filters
• Pivoting
• Analytics
• Classic and modern data charts
Tcpdump is a good command-line packet sniffer for capturing and displaying raw packet data, but SteelCentral Packet Analyzer can comb through millions of packets and provide hundreds of detailed graphical views on the captured traffic. SteelCentral Packet Analyzer is shown in Figure 10-8.
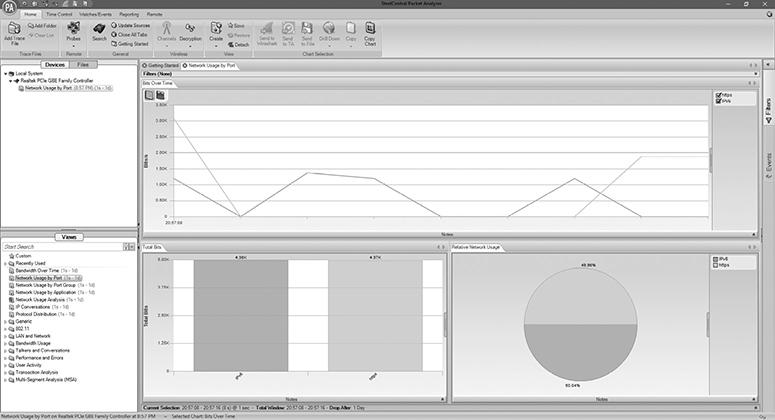
Figure 10-8 SteelCentral Packet Analyzer
An example of an open source monitoring and visualization tool is Cacti, which uses SNMP to collect data about various network appliances. SolarWinds has a laundry list of networking and security tools, including its popular Network Performance Monitor (NPM).
Log Reduction and Analysis Tools
Although visualization tools are important for assimilating raw network data into visual formats, organizations must also have tools and processes for eliminating or ignoring data they don’t care about. Log reduction simultaneously filters out junk data while ensuring important data is brought into focus and analyzed. This could mean earmarking only certain data types for logging, or combing through the logs after the fact and eliminating anything superfluous or unnecessary.
Since data is generated from various sources across the network, organizations are increasingly turning to security information and event management (SIEM) log analysis tools for the trifecta of automated data aggregation, event correlation, and detailed reporting. SIEM tools have connections to various network appliances and servers in order to build a more complete picture of network and host activities. Such logs stem from applications, operating systems, antimalware, security logs, and others.
For example, LogRhythm’s NetGen SIEM––according to the company’s website––focuses on capturing forensic data and machine learning (ML) data, performing threat intelligence, and integrating security orchestration, automation, and response workflows.
For more information about SIEM, see Chapter 5.
Host Tool Types
Whereas the previous sections discussed network tool types in relation to security assessments, the sections that follow focus on host tool types and their role in helping organizations perform security assessments on host systems.
Password Crackers
Part of security assessments is testing the strength of user passwords on a given system. Password crackers are specialized tools designed to essentially “guess” passwords. If you have a password file and know how it was created (what operating system it came from, how the passwords are stored, and so on), then you simply feed that password file into the appropriate password cracker, set the options, and let it run. Password crackers essentially “guess” passwords by taking a hash the cracker has created and comparing it against the hash in the password file to see if they match. Password crackers typically can operate in four common modes:
• Dictionary file The cracker uses a dictionary file—a list of words that can range from the very broad (the entire Oxford dictionary) to the very specific (NFL teams). The password cracker takes each word in the file, computes a hash for that word, and then compares the calculated hash to the value stored in the password file.
• Hybrid mode The cracker uses a dictionary file but then performs common substitutions on the words such as replacing the letter o with a zero. Some crackers also do permutations of dictionary words and letters or add special characters to the end of each dictionary word (for example, password123).
• Brute force You tell the cracker the max length of the password and the set of characters you’d like it to use, and the cracker tries every possible combination of characters (a, aa, aaa, aaaa, b, bb, bbb, and so on). Brute-force attacks can take a very long time to execute.
• Rainbow tables Rainbow tables are precomputed hashes. Essentially these are huge files with possible passwords and their corresponding hashes. Rainbow tables can potentially save an enormous amount of time because the password cracker is now simply attempting to match the hash of the password being cracked and a value it pulls from the rainbow table—the cracker doesn’t have to compute the hash anymore because it has already been done and is stored in the rainbow table.
Password crackers have benefited more than any other assessment tool by the increase in readily available computing power. Multicore processers are now able to crack passwords in a fraction of the time it took three or four years ago. The advent of cloud computing has added a whole new level of speed to the practice of cracking passwords. Most cloud services allow you to rent massive amounts of computing power by the hour. Now any attacker can run massively parallel password-cracking operations at speeds that were previously only available to government entities.
As a security professional, you might use password crackers to test the strength of user passwords or test compliance with company policy. You will likely not want to run an exhaustive password-cracking effort where you attempt to crack every single password in a massive brute-force attack. A cracking effort that uses a dictionary attack or hybrid attack up to 14 characters will likely be sufficient to reveal any weak passwords that might comply with company policy—just enough to be allowed but still weak enough that they might be guessed by an attacker and should be changed. There are several good password crackers, such as John the Ripper, THC-Hydra, Cain and Abel, Brutus, and L0phtCrack. See John the Ripper in Figure 10-9.
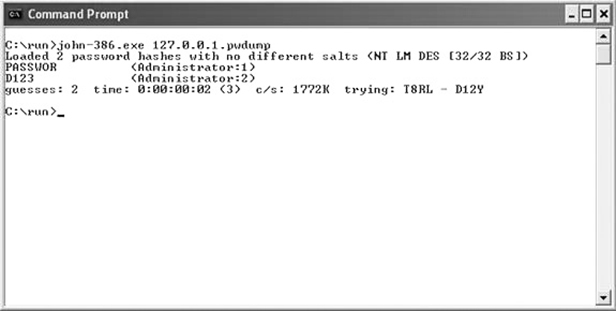
Figure 10-9 John the Ripper
Password cracking can be performed against pretty much anything that contains a stored password—such as a configuration file or database. A side note worth examining is the use of brute-force tools. In traditional password-cracking efforts, you have the encrypted or hashed passwords and are trying to determine what they are by calculating your own hashes and making comparisons to what’s stored in the file. In brute-force efforts, you’re also trying to match the password, but it’s typically done through a login mechanism and without the computation of any hashes. Many brute-force tools, such as THC-Hydra, can perform multithreaded, brute-force attacks against a variety of protocols, such as SSH, FTP, HTTP, HTTPS, SMB, and so on. Other tools such as Cain and Abel can capture password hashes as they are transmitted across the wire (or through the air) and then perform cracking efforts.
Vulnerability Scanners
Host vulnerability scanners are designed to run on a specific host and look for vulnerabilities and misconfigurations on that host. Host scanners tend to be more specialized because they’re looking for issues associated with a specific operating system or set of operating systems. A good example of a host scanner is the Microsoft Baseline Security Analyzer (MBSA), shown in Figure 10-10.
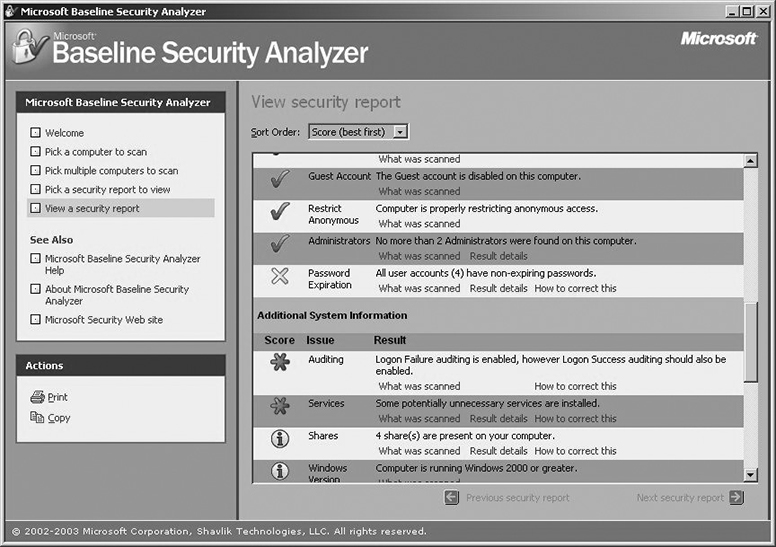
Figure 10-10 Microsoft Baseline Security Analyzer
MBSA is designed to examine the security state of a Windows host and offer guidance to address any vulnerabilities, misconfigurations, or missing patches. Although MBSA can be run against remote systems across the network, it is typically run on the host being examined and requires you to have access to that local host (at the Administrator level). The primary thing to remember about host scanners is that they are typically looking for vulnerabilities on the system they are running on.
Bottom line: if you want to scan a specific host for vulnerabilities, weak password policies, or unchanged passwords, and you have direct access to the host, a host vulnerability scanner might be just the tool to use.
It’s worth noting that some tools (such as Nessus) really cross the line between network- and host-based scanners. If you supply Nessus with host/login/domain credentials, it can perform many checks that would be considered “host based.”
Command-Line Tools
The return to our centralized computing roots brought about by the cloud computing and virtualization revolutions is not the only example of history repeating itself. The command line has also come back with a vengeance. In certain management respects, the command-line interface (CLI) has already overtaken the graphical user interface (GUI). The CLI’s popularity is apparent with the global proliferation of Linux solutions, various scripting languages, and tools; plus, Microsoft’s PowerShell, Server Core, and Nano Server products continue to make waves with their minimalist approaches. Today’s CLIs have become central to our management of servers, network appliances, and the implementation of automation and orchestration solutions.
Despite the depth of tasks that can be handled by today’s CLIs, this section will focus on certain command-line tools that can help us perform security assessments, in addition to routine network troubleshooting.
Ping
We do basic two-way communication tests all the time with our cell phones (“Hi, can you hear me?” “Yes, can you hear me?”) just like we do with computer networks. The ping tool allows hosts to send test communication packets to one another and measure the success rate and performance of the responses. Ping is generally the first tool we use for basic connectivity troubleshooting. Here is an example of the ping process using the TCP/IP model:
• Someone types “ping www.google.com” at the CLI.
• Ping resolves the www.google.com name to an IP address.
• Ping uses an application layer protocol called Echo to generate an Echo Request. Echo Requests are requests to ping a target such as www.google.com.
• Ping does not use a transport layer protocol; therefore, the Internet layer protocol ICMP is used to encapsulate the Echo Request inside of an ICMP packet. The ICMP packet header contains the crucial connection characteristics about ping, such as round trip (milliseconds), time to live (TTL), and so on.
• The ICMP packet gets encapsulated inside a frame from the Ethernet, Wi-Fi, or some other network access layer protocol.
• The frame gets sent to the target, which then responds to the Echo Request with an Echo Reply.
See Figure 10-11 for a ping example.
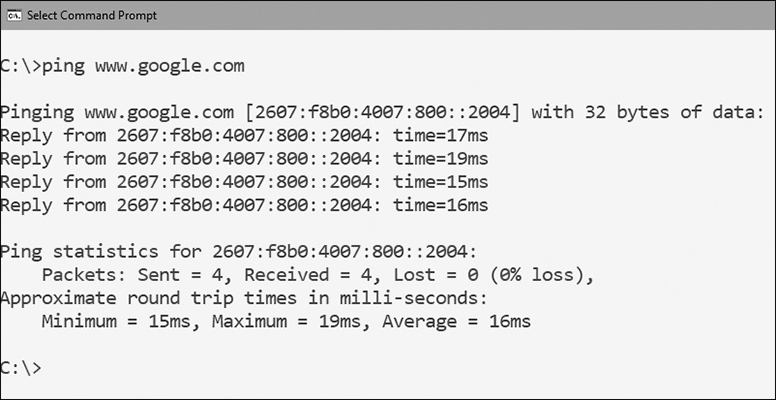
Figure 10-11 Ping
Ping uses several switches, including -t for continuous pinging, -l for specifying packet size, and -4 or -6 to choose which version of IP to ping with. The important skill in working with ping is understanding the output:
• Reply Indicates a reply to the original sender’s Echo Request.
• Bytes The size of the ping packet.
• Time (latency) Time measured in milliseconds (thousands of a second) it takes for the combined Echo Request and Echo Reply to complete. Also known as round trip, only the total latency between source and destination is calculated.
• TTL The number of routers (hops) a packet can cross before it expires.
• Requested Timed Out Indicates the ping communication failed.
• Destination Unreachable Ping could not locate a route to the destination network.
• Jitter Variation of latency between ping packets. For example, packet 1 has a 10ms latency, and packet 2 has a 75ms latency. This gap is an example of high jitter.
• Packet Loss Indicates one or more packets were dropped in route to their destination.
For assessment purposes, security professionals will frequently perform “ping sweeps” by pinging an entire range of IP addresses. This is an easy way to determine all of the live hosts available on a particular subnet. A well-known ping sweeper is Angry IP Scanner, which can also perform reverse DNS lookups to determine hostnames. Although not specifically a ping sweeper, Nmap is perfectly capable of performing them, too. Here is the command for a Nmap ping sweep:
Nmap -sn 192.168.1.1/24
If you’re running the tool on Linux, remember to use nmap and not Nmap; Linux commands are case-sensitive.
Tracert/Traceroute
Although ping is great for performing basic connectivity tests, its quick results come at the expense of details. For example, ping is not good at narrowing down the sources of issues such as the following:
• Request timed-out errors
• Jitter
• High latency
• TTL expired in transit
In all these cases, ping is unable to determine if an issue stems from the source, destination, or something in between. All ping can tell us is requests are timing out, there’s jitter, replies have high latency, and the TTL for a packet is expiring for some reason. Windows Tracert or Linux traceroute (hereafter loosely described as trace route for simplicity) can help us isolate issue sources by digging deeper with the Echo and ICMP protocols. Here are the features of trace routing:
• Traces the route taken by packets from each router in sequence until traffic reaches the destination
• Pings each router three times in sequence
• Shows the hostnames and IP addresses of the routers
See Figure 10-12 for a trace route example.
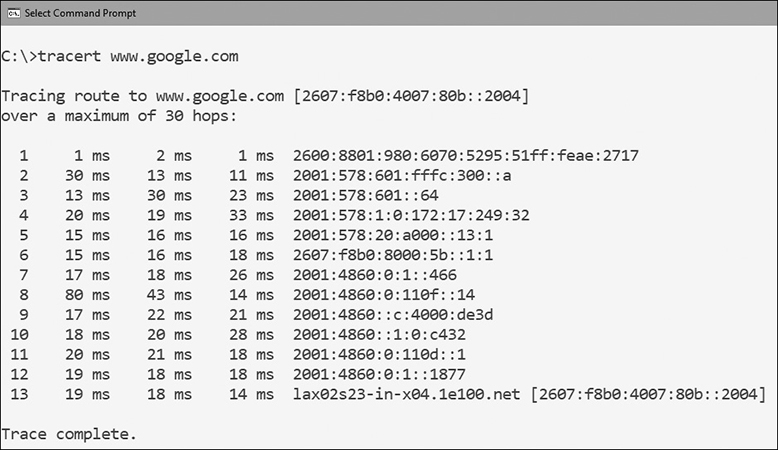
Figure 10-12 Windows trace route
Since trace route shows the latency between the source and each sequential router, you can reasonably deduce that the first router to show high latency or jitter is the likely culprit of a bad connection. Since Windows trace route commands can take 30–60 seconds to complete, you can speed things up by using the -d switch to suppress reverse DNS lookups. You won’t see the hostnames of routers anymore, but the trace route results will speed up significantly.
For more powerful trace route tools, check out the graphical Path Analyzer Pro and VisualRoute products.
Pathping
Just like trace route is a more thorough ping tool, pathping is a more thorough trace route tool. Pathping digs even deeper by pinging all routers in a path 100 times, shows the round trip in addition to individual latencies for the Echo Request and Echo Replies, plus it indicates packet loss statistics. The individual latencies feature helps us to understand if a connectivity problem is caused by our route to the target or the target’s route to us.
Despite pathping’s obvious strengths, its scans can take a while. Due to all the diagnostics, it can take several minutes for some pathping commands to complete. Not to mention, not all routers tolerate pathpings due to the abundance of ICMP packets mimicking the appearance of ICMP flood attacks. See Figure 10-13 for a pathping example.
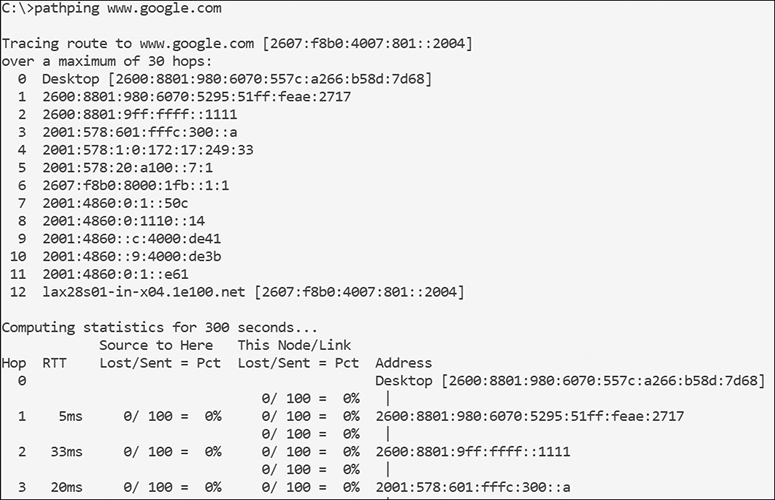
Figure 10-13 Pathping
In the pathping figure, you’ll notice that the command output defaulted to IPv6. In the increasingly common circumstance where the sender, receiver, and the network in between all fully support IPv6, Windows will “prefer” IPv6. This is also true for regular pinging and trace routing as well.
Ipconfig/Ifconfig
Ipconfig (for Windows) and ifconfig (for Unix/Linux) allow us to view our IP configuration. Based on which switches we use with Ipconfig, we can view the following IP configuration data:
• IP address
• Subnet mask
• Default gateway
• DNS servers
• WINS servers
• MAC address
• DHCP lease period
In addition to viewing all of the IP configuration (/all), we can also release the IP configuration back to the DHCP server (/release), renew the IP configuration from the DHCP server (/renew), flush the DNS cache (/flushdns), display the DNS cache (/displaydns), and register our hostname/IP with the DNS server (/registerdns). See Figure 10-14 for an Ipconfig example.

Figure 10-14 Ipconfig
On the other hand, ifconfig (which stands for interface configuration) is available on Unix/Linux-based operating systems and displays the IP address, subnet mask, default gateway, broadcast address, and a few network transmission error types. It also gives you the ability to disable/enable the NIC as well as change the MAC address of the NIC. The most common command you’ll run with this tool is ifconfig -a.
Nslookup/Dig
Nslookup and dig are tools that we can use in both Windows and Linux for performing DNS lookups. They can help us verify DNS server functionality, the presence of records on a DNS server, possibly allow updating of records on a DNS server, and even transfer a DNS zone from the server to a client (if allowed). By allowing us to observe the availability of certain records in the DNS zone files, we can enumerate or footprint DNS servers to assess their relative security. See Figure 10-15 for an nslookup example.

Figure 10-15 Nslookup
Netstat
Netstat (short for network statistics) allows us to view connection statuses, port availability, protocol statistics, and routing table data for Windows, Unix/Linux, and macOS. Its most common usage is to check for open ports for TCP/UDP and connection statuses. Figure 10-16 shows a Netstat example. Otherwise, here are some common switches:
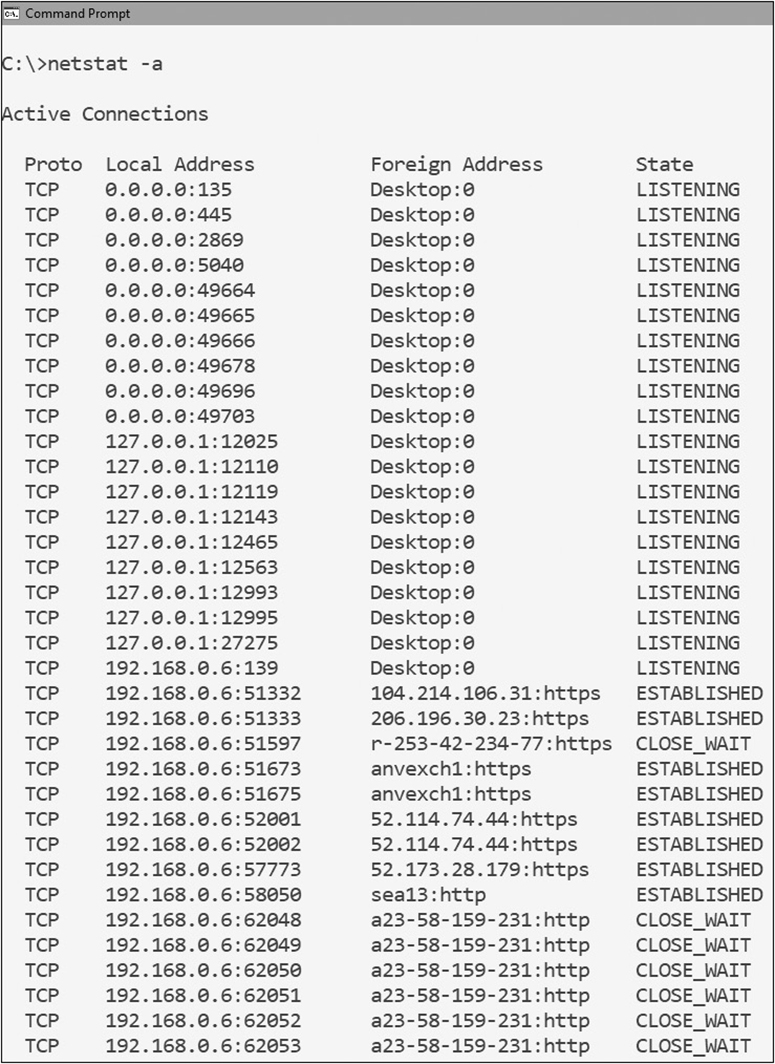
Figure 10-16 Netstat
• Netstat /a Shows connections and listening ports
• Netstat /e Shows Ethernet statistics
• Netstat /f Shows fully qualified domain names (FQDNs) for connected targets
• Netstat /r Shows the local routing table
Netstat can benefit security assessments by determining our open ports, daily connections to other hosts, and whether any ports or connections deviate from the norm. Unrecognized ports or connection addresses can indicate the presence of a backdoor trojan horse.
Local Exploitation Tools/Frameworks
As discussed in a previous section regarding exploitation tools/frameworks, security assessments can go beyond searching for vulnerabilities and start to physically penetrate them. The most well-known exploitation framework is Metasploit, which is made of various modules, including the following:
• Payloads
• Exploits
• Encoders
• NOPS
• Auxiliary
Although it is capable of common things like fuzzing, launching buffer overflow attacks, and escalating privileges on specific host computers, Metasploit is a complete penetration testing tool. It is also both popular and extensive enough to be the subject of many technical books (and the personal obsession of many hackers). Despite its penetration-testing leaning, it is equally effective as a vulnerability scanner due to all the information it can discover about host systems.
SCAP Tools
As discussed earlier, SCAP is all about utilizing existing security standards for a unified approach to vulnerability assessments and measurements. SCAP tools tend to support both network and hosts due to vulnerability assessments usually being broad in scope. Since SCAP tools should be NIST approved, a glance at NIST’s SCAP validation program website will show you all of the accredited SCAP tools, including Rapid’s Nexpose 6, Red Hat’s OpenSCAP 1, and Microsoft’s System Center Configuration Manager SCAP extensions.
File Integrity Monitoring
File integrity monitoring (FIM) ensures that operating system, application, and data files maintain their intended state. To verify that files are accurate and tamper-free, a popular tool like Tripwire can use hashes, modification dates, file sizes, or other file attributes to determine what a file’s “baseline” condition should look like. It’ll then attempt to detect and remediate any unauthorized changes. FIM tools like Tripwire, and others, utilize policies to determine which files to monitor, baselines to compare before/after state changes to files, alerts to notify us of changes, and reports for demonstrating regulatory compliance.
Windows also has a built-in FIM tool called System File Checker (SFC) that allows us to scan key operating system files for integrity violations. The most common SFC command to run is SFC /scannow. If it finds any issues, it’ll attempt to revert the file (or files) back to its original condition.
Log Analysis Tools
The previous section “Log Reduction and Analysis Tools” described log analysis from a more global organizational scope. Although SIEM tools are great for aggregating and analyzing log files from various networks, network devices, and hosts, tools can also have a stronger focus on individual host log analysis. For example, the Windows Event Viewer provides a local logging and basic analytical capability for security assessments. Event Viewer has a nice feature called “Subscriptions” that allows administrators to hand-pick which hosts to “subscribe” to, and then which events IDs and sources to collect and have forwarded to the administrator’s host. These events can also be filtered and collected based on their status as being “Critical,” “Error,” “Warning,” or “Information” events. This is, in a sense, like a poor-man’s SIEM tool due to the aggregation capabilities.
Other tools that perform log analysis include SolarWinds Event & Log Manager, ManageEngine’s EventLog Analyzer, and LOGalyze, NetVizura’s EventLog Analyzer.
Antivirus
Although antivirus software was already covered in Chapter 6, it was discussed as a security control rather than as a method of security assessment. Whether we’re discussing antivirus, anti-spam, or anti-spyware tools, it’s important that we assess the functionality of these tools’ alerting and logging systems. Previous or current malware may be suppressing the capability of our antimalware tools to notify us and log detected threats. As a result, we should double-check the configuration of these tools to ensure there are no signs of tampering. Also, be sure to verify that the real-time protection feature is set, and that scheduled quick or full scans are still set to their original values.
Even if real-time protection doesn’t turn up anything, it’s important to do manual quick and full virus scans once in a while to catch malware missed by scheduled scans. You may also want to consider switching up tools once in a while. At the time of this writing, you should be able to research the top antimalware solutions according to studies published by AV Comparatives and AV Test, as well as PCMag by visiting their respective websites.
Reverse Engineering Tools
Reverse engineering is the process of disassembling a finished product or process into its building blocks in order understand how the outcome was achieved from start to finish. Whether we’re discussing reverse engineering an operating system, application, hardware device, or a security breach, we’re trying to figure out which steps lead to the completed outcome.
Sometimes the hardest thing for a security professional to do is to think like a hacker. Oftentimes we get so wrapped up in locking down, restricting, and patching that we forget to take a second to look at our solutions from the opposite perspective. If you step back and think about it, the most important question you can ask yourself is likely to be, “How would I defeat this security solution?”
You’ve probably heard the term reverse engineer applied to things such as malware (taking it apart to see what it does and how it works), but how often have you thought about reverse engineering your own security solutions? It might be difficult for you to do if you helped design, construct, and implement the solution, but if you’ve inherited systems or security solutions, it shouldn’t be as difficult. Here are a few steps to help get you started:
• Look at what the system does What does the system you’re examining actually do? What inputs does it take? What are the outputs?
• Determine how the solution impacts network traffic Assuming the solution does interact with traffic, how does it do this? What types of traffic will it let in? What does it block? Does it matter which direction the traffic is flowing?
• Encryption How does the system handle encrypted traffic? Does it handle encrypted traffic at all? Or does it just pass encrypted traffic through without looking at it?
• Determine what the system tells you about itself Does it have services running? Does it have banners on those services? Can you connect to the system remotely?
• Communication Is the system a single entity or a group of resources? If it’s a group, do the resources communicate? Can you tell how they communicate? If you try and interfere with the communications, what happens?
• Reactive capabilities Although it’s a bit trickier to test without actually generating some suspicious/malicious traffic, does the system have any capability to react to traffic that you generate? Does it block your source address after a port scan? Does it block your source address after multiple port scans? Does it block your source address after multiple failed login attempts? Does it block your activity after SQL injection attempts? Do you get blocked after attempting to execute DoS attacks?
If you can take an objective look at your system and how it functions, you should be better able to understand its possible weaknesses (and correct them).
But what practical use is reverse engineering in the security field? How about creating an attack tree/plan for a penetration test? Imagine you are being asked to perform a penetration test on your organization or another organization. To perform a thorough test, you need to understand the environment you’ll be examining. What are the entry points? How many network links are there? Are there wireless access points? Are there dedicated links to other organizations? Remote sites? The chances of you (as a tester) getting a detailed map and a full description of the environment—including firewalls in use, use or lack of IDS/ IPS, and so on—are slim to none (unless you are performing the test against your own organization and already have access to those items).
If you try to look at your organization from a purely external perspective, you can start to piece together bits of information to build your own picture. IP blocks can be pulled from DNS and Whois records. Perhaps you can drive around or walk the facility looking for access points. When you’ve built your own “picture” of what you think the entry points are, you can start to build out a testing plan. External IPs you’ve uncovered can be scanned and probed. Tracing to those IPs may give you an idea of where the firewall is. Walking the firewall will help you determine what services are allowed through. Finding the e-mail servers may allow you to attempt a phishing attack (if permitted). Reverse engineering the solution in that case is really just an attempt to “discover” how your organization works and connects so that you can then flip that around and try to find a way to break in through one of those paths.
EXAM TIP Reverse engineering or deconstructing existing security solutions is an excellent way to identify entry points and weaknesses. If you can break down your own systems and correct the issues you find, you will be that much more effective against actual attackers.
There are also the software considerations for reverse engineering. Although closed source applications often tout the benefits of being “closed,” various reverse engineering tools exist in order to reverse engineer the compiled code into its original source code. This helps us to better understand not only how the application works, but also its security posture and how vulnerabilities may be exploited.
Although a previous topic already talked about malware sandboxing, such sandboxing is actually a form of malware reverse engineering. By isolating the malware into a safe place, we’re able to execute a formal malware analysis process to determine the malware’s origin, functionalities, and system impact. This includes static malware analysis, which focuses on the malware code, and dynamic malware analysis, which focuses on the malware’s behavioral aspects––or the effect the code has on the machine.
Popular software reverse engineering tools include IDA-Pro, Jad Debugger, Olly Debugger, and Immunity Debugger.
Physical Security Tools
All this stuff about assessing operating systems and applications is great, but physical security is the most important security there is. It is critical that we perform security assessments of our physical security environment. Let’s take a look at a few examples of physical security tools for assessment purposes.
Lock Picks
Although lock picks are used to unlock or “pick” a lock on a door, we can also use the lock picks to test a lock’s resistance to lock picking. Although this could work, it is advisable you hire a locksmith to test your locks rather than save money and risk damaging the locking mechanisms yourself. Hiring a locksmith will give you the answers you seek and spare you the trouble.
If you would rather avoid the attacking and assessment risks of lock picking altogether, consider using some of these more modern alternatives to door locks:
• Radio frequency identification (RFID) lock Door unlocks via a key fob or card.
• Cipher lock Door unlocks by entering in a code.
• Biometric lock Door unlocks by using a variety of biological characteristics, including fingerprint, handprint, iris or retina scan, and voice activation.
• Bluetooth lock Door unlocks through a Bluetooth signal sent to/from a certain smartphone.
RFID Tools
RFID uses electromagnetic fields to track virtually anything, including technological assets, employees, patients, children, animals, smart appliances, and even car key fobs. Anyone or anything installed with an appropriate tag or chip can be traced by sensor devices in walls, doors, cameras, or even handheld scanning equipment. Although RFID was designed with these laudable goals in mind, attackers may use RFID against us by unlawfully reading and stealing information from an RFID tag or chip. Today’s generation of pickpockets are performing electronic pickpocketing just by walking by people at a grocery store or train station. As a result, some people have resorted to buying RFID-blocking wallets and other RFID-blocking devices.
Part of our security assessments should include the testing of our RFID sensor devices, in addition to the tags and chips throughout the environment an attacker may attempt to compromise. Our assessments should investigate any privacy and authentication features of any RFID equipment since those are the two most important and, by extension, vulnerable of RFID features.
Last but not least, research the latest trends, vulnerabilities, and exploits on the Internet in order to get a leg up on the competition.
IR Cameras
Infrared radiation (IR) cameras use infrared energy to form an image so that the camera can “see” in the dark. Since attackers may use the cover of darkness to stealthily walk around a physical area, IR cameras are used to detect motion in dark areas. Smarter IR cameras have the ability to adjust the intensity of their LEDs so that a person’s face doesn’t turn overly bright when he or she approaches the camera. Assessing the effectiveness of IR cameras is as simple as walking around near them when the room is dark to see how the device functions. If possible, you may be able to fine-tune the IR camera’s settings in order to get better black/white contrast.
Chapter Review
This chapter is the second of two chapters that addresses enterprise security operations but in the context of analyzing a scenario or output and selecting the appropriate tool for a security assessment. Although there are many methods of conducting security assessments, there are also a considerable number of tools to choose from. Without knowing which tools to use, and how to use them, the security assessment method chosen will not matter.
The first section of this chapter began with network tool types such as port scanners. Port scanners are needed to determine which ports are open on a target. Once we know which ports are open, we run vulnerability scanners to determine which vulnerabilities exist on the open ports. We also provided coverage on protocol analyzers––wired and wireless varieties––in order to ascertain who is talking to whom, and what are they saying to each other. SCAP scanners were discussed due to the automation and standardization benefits they bring to vulnerability assessments. Network enumerators help us to get more information about targets such as network shares, audit policy settings, user accounts, services, and so forth. Fuzzers allow us to send random commands to a target to see how it responds. The responses are often indicative of specific software or operating system platforms, in addition to possible vulnerabilities. HTTP interceptors provide vulnerability assessment staff with the ability to intercept and modify web requests so that they can test for any possibly misconfigurations or vulnerabilities of web server applications. We also talked about exploitation tools/frameworks that can help us from an assessment perspective. We discussed visualization tools in the context of data collection so that we have visual interpretations of otherwise massive quantities of raw data.
We ended this section with log reduction and analysis tools that allow us to reduce logs to manageable sizes by eliminating or preventing the accumulation of junk data. The log data that remains can be analyzed for clues about normal and abnormal network behaviors.
The second section focused on host tool types, beginning with password crackers. Password crackers make it possible to “guess” seemingly random passwords that would be too difficult for a human to figure out on their own. We discussed vulnerability scanners again but in the context of scanning individual hosts for vulnerabilities as opposed to network-level scanning. We discussed various command-line interface tools like ping, trace route, pathping, netstat, ipconfig, ifconfig, nslookup/dig in order to learn more about a host’s connectivity qualities, states, open ports, and so forth. We looked at local exploitation tools/frameworks with a stronger focus on Metasploit, considering its notoriety as both an assessment and full-block penetration testing toolkit.
We talked about SCAP tools in a prior section; therefore, we followed that up with coverage on a few popular SCAP tools. We then went over file integrity monitoring capabilities from Tripwire and Microsoft’s SFC to ensure that critical files maintain their integrity. Host log analysis tools were discussed with the focus being on the Windows Event Viewer, given its popularity and value to the majority of computers out there. Coverage was provided on recommended antivirus solutions and best practices regarding assessments. We also talked about reverse engineering tools for malware and applications so that we can better learn how applications and malware work.
We ended the section talking about physical security tools because physical security is still king. Lock picks can be used to pick a lock as well as to assess the resistance a lock has to picking. We talked about RFID tools and how they need to be assessed given how the modern generation hacker can exploit RFID tags and chips that are scattered throughout our organizations. The last topic we discussed was IR cameras and how they need to be assessed to provide assurances that they can detect people walking around restricted areas in the dark.
Quick Tips
The following tips should serve as a brief review of the topics covered in more detail throughout the chapter.
Network Tool Types
• Port scanners are tools designed to scan one or more systems to determine which TCP/UDP ports are “open,” “closed,” or “filtered.”
• The TCP 3-way handshake is the handshaking process conducted by the TCP protocol just before it connects to another computer. It is composed of a SYN, SYN/ACK, and then ACK.
• Vulnerability scanners are programs designed to scan systems for weaknesses.
• Protocol analyzers are tools (hardware or software based) that can be used to capture and analyze traffic passing over a communications channel, such as a network.
• Security Content Automation Protocol (SCAP) is a protocol that employs existing open security standards in order to conduct vulnerability scans––while measuring and ranking the discovered vulnerabilities according to predetermined baselines.
• Network enumerators scan systems and give us more details such as usernames, groups, shares, and audit options.
• Fuzzers are testing tools used to find implementation bugs in software by submitting malformed or semi-malformed data to an application in an automated fashion.
• HTTP interceptors capture web traffic between the source web browser and the destination website.
• Exploitation tools/frameworks can exploit discovered vulnerabilities.
• Visualization tools specialize in converting raw data into useful visual aids.
• Log reduction filters out junk data while ensuring important data is brought into focus and analyzed.
• Log analysis tools can help aggregate data, correlate it, and perform detailed reporting.
Host Tool Types
• Password crackers are specialized tools designed to essentially “guess” passwords.
• Host vulnerability scanners are designed to run on a specific host and look for vulnerabilities and misconfigurations on that host.
• Command-line tools can be used to perform routine network troubleshooting in addition to security assessments.
• Local exploitation tools/frameworks can exploit the vulnerabilities located on specific host computers.
• SCAP tools utilize existing security standards for a unified approach to vulnerability assessments and measurements.
• File integrity monitoring (FIM) ensures that operating system, application, and data files maintain their intended state.
• Host log analysis tools focus on analyzing the logged content stored on a local computer.
• Antivirus tools must be assessed for signs of tampering by malware aiming to disable the alerting/notification/real-time protection features of antivirus tools.
• Reverse engineering is the process of disassembling a finished product or process into its building blocks in order understand how the outcome was achieved from start to finish.
Physical Security Tools
• Lock picks can be used both to pick a lock and to test a lock’s resistance to lock picking.
• RFID uses electromagnetic fields to track virtually anything, including technological assets, employees, patients, children, animals, smart appliances, and even car key fobs.
• Infrared radiation (IR) cameras use infrared energy to form an image so that the camera can “see” in the dark.
Questions
The following questions will help you measure your understanding of the material presented in this chapter. Read all the choices carefully because there might be more than one correct answer. Choose all correct answers for each question.
1. Two of the main types of vulnerability scanners are:
A. Host-based and port scanners
B. Network-based and password crackers
C. Switch port analyzers and host-based scanners
D. Network-based and host-based scanners
2. When discussing protocol analyzers with your colleague, which of the following points are true? (Choose all that apply.)
A. Are software based
B. Are hardware based
C. Place network interfaces in promiscuous mode
D. Only work on switched networks
3. Which of the following are common purposes for using protocol analyzers? (Choose all that apply.)
A. To examine network traffic for duplicate IP addresses
B. To find the source of an ARP spoofing attack in your network
C. To look for unauthorized computers connected to your network
D. All of the above
4. Which of the following is a dedicated network vulnerability scanner?
A. Nmap
B. Nessus
C. Tripwire
D. Iptables
5. After performing basic footprinting and fingerprinting exercises, you are ready to enumerate the network. Network enumerators scan the network and collect which of the following?
A. Visible shares
B. User accounts
C. Visible services
D. All of the above
6. As part of a security assessment, you want to test the strength of your passwords by using password crackers. Which of the following will try all possible combinations of characters up to a certain length?
A. Brute-force attack
B. Birthday attack
C. Dictionary attack
D. Rainbow table
7. Password crackers will get the most benefit from which of the following?
A. Available memory
B. Long dictionary files
C. Solid-state drives
D. A fast multicore processor
8. Before compromising a web application, you decide to perform a fuzzing attack first. What is the purpose of fuzzers?
A. Sending random strings of text to input fields
B. Forking multiple requests to test load-balancing capabilities
C. Testing the strength of SSL ciphers in use
D. Validating user-supplied input
9. An HTTP interceptor will allow you to modify:
A. Web requests on the server
B. Data passing from the browser to the web server only
C. Data passing from the web server to the browser only
D. Data passing between the browser and the web server in either direction
10. Which of the following is a popular attack framework?
A. Acunetix
B. Metasploit
C. Nmap
D. John the Ripper
11. Which of the following is the correct sequence in the TCP 3-way handshake?
A. SYN, ACK, SYN
B. SYN, SYN/ACK, SYN
C. SYN, SYN/ACK, ACK
D. SYN, ACK, ACK
12. Which of the following is the typical sequence of a failed TCP 3-way handshake?
A. SYN, FIN
B. SYN, RST
C. SYN, ACK, RST
D. SYN, ACK, FIN
13. In order to conduct a port scan without the visibility of typical TCP connect scans, we will use Nmap’s SYN scan. The SYN scan is also known as which of the following? (Choose all that apply.)
A. Stealth scan
B. Smart scan
C. Covert scan
D. Half-open scan
14. Which protocols are used by ping and Tracert? (Choose all that apply.)
A. UDP
B. ECHO
C. ICMP
D. TCP
15. Before capturing traffic on a wired network with a protocol analyzer, which of the following are good practices? (Choose all that apply.)
A. Installing the AirPcap adapter
B. Putting the NIC in promiscuous mode
C. Using a protocol analyzer that is compatible with your NIC’s chipset
D. Injecting traffic as needed to trigger responses from network targets
16. IR cameras are most useful for which of the following scenarios?
A. Discovering attackers in bright rooms
B. Discovering attackers in dark rooms
C. Discovering attackers through walls
D. Discovering attackers through sound
17. Rainbow tables aid a password-cracking tool by providing which of the following capabilities?
A. Brute-force cracking
B. Dictionary cracking
C. Reversing hashes into plaintext
D. Birthday attacks
18. Which of the following are examples of file integrity monitoring tools? (Choose all that apply.)
A. Tripwire
B. System file checker (SFC)
C. Nmap
D. Event Viewer
19. To reduce the risk of lock picking, which mitigations could you consider implementing? (Choose all that apply.)
A. Use lock picks to test your lock’s resistance to lock picking.
B. Have a locksmith test the locks for you.
C. Switch lock to a biometric door lock.
D. Switch lock to a Bluetooth door lock.
E. All of the above.
20. SIEM tools are designed to provide which of the following benefits? (Choose all that apply.)
A. Aggregate logs from multiple sources
B. Correlate logs from multiple sources
C. Encrypt logs
D. All of the above
Answers
1. D. Network-based and host-based are the two main types of vulnerability scanners.
2. A, B, C. Protocol analyzers can be hardware or software based, plus they put NICs in promiscuous mode so they can capture more data.
3. D. Protocol analyzers can be used for all of these purposes.
4. B. Nessus is the only product here that is dedicated to vulnerability scanning.
5. D. Network enumerators may discover shares, user accounts, and services.
6. A. Brute-force attacks try all possible combinations of characters up to a certain length.
7. D. A fast multicore processor will provide the most benefit.
8. A. Send random strings of text at input fields.
9. D. Data passing between the browser and the web server in both directions.
10. B. Metasploit is the most well-known attacking framework.
11. C. SYN, SYN/ACK, ACK.
12. B. SYN, RST.
13. A, D. Stealth scan and half-open scan.
14. B, C. ECHO and ICMP.
15. B, C, D. Putting the NIC in promiscuous mode, using an analyzer compatible with your NIC’s chipset, and using carefully planned traffic injection.
16. B. Discovering attackers in dark rooms.
17. C. Reversing hashes into plaintext.
18. A, B. Tripwire and SFC.
19. E. All of these are good ideas.
20. A, B. Aggregate logs from multiple sources and correlate them.