four
shop spaces
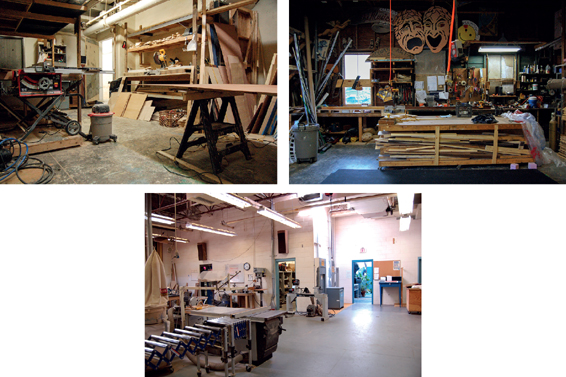
Figure 4-1 to 4-3: Three different types of facilities show some of the variety prop shops can take. The first (top left) is the basement of Urban Stages, an off-off-Broadway theatre in New York City. The second (top right) shows the combination scenery/prop shop at Monomoy Theatre, a summer stock in Massachusetts. The third (bottom) is the shop at University of North Carolina School of the Arts.
Every prop shop is as unique as the artisans who work in it. Perhaps the only thing which is universal to prop shops is that they are too small for all the work that needs to be done.
The shop you work in will limit what kinds of props you can build. Look at the entrances and exits into the shop; how big are they? You can only build things that can fit out of the door to the shop; anything bigger will need to be built in several pieces. Once it leaves, where does it go? Can you pull a full box truck right up to your shop? Or do you have to carry your prop down a flight of stairs into an alley where your compact car is parked?
How you set up your prop shop will have a great effect on how quickly, efficiently, and safely you will build your props. Kitchens are set up to take care of a “work triangle” of the three most-used areas: food storage, preparation and cooking area, and cleanup. A prop shop can be set up with its own series of work triangles. Some examples include lumber rack/table saw/chop saw and sewing machine/cutting table/ironing board.
Keep dedicated stations for core processes and transformable stations for other tasks. Many prop shops will keep some tables or tools on wheels so they can roll around to accommodate the constantly fluctuating project sizes. One show might have a ton of upholstery projects, while the next will have a lot of carving and painting. Even the size of your staff may vary depending on the current work load. The ability to quickly transform your shop is extremely helpful.
Some prop shops share space with other departments. They may work in another department’s shop on a project-by-project basis, or even have a small area set aside on a more permanent basis. Sharing space is especially helpful when the shops are in close proximity to each other. If the costume shop is next door, it may be useful to do fabric cutting and sewing there. The same is true of doing carpentry projects in the scene shop; some prop shops carve out a little corner of the scene shop to do all their carpentry so wood dust and noise stay out of the main prop shop. Sharing the space of another department takes a lot of negotiating. A good relationship with other departments requires constant attention, and if you or your coworkers start to take that relationship for granted, it may soon turn sour, and you will find the others are less willing to share with you in the future.
Prop shops benefit from separating processes and creating distinct areas for certain materials and processes. Many theatrical prop shops will have a “dirty room” and a “clean room.” The dirty room is where dust-generating tasks take place, such as woodworking and sanding. The clean room is where jobs such as working with soft goods, gluing, and sculpting with clay happen.
Painting may also happen in the clean room to keep dust from getting on the surface before it dries, though spray painting and other tasks that release fumes and toxins will happen in their own distinct areas, such as a spray booth. A paint area needs its own sink for cleaning paint, often called a slop sink. Molding, casting, and sculpting may require a slop sink as well. A prop shop needs another sink for food preparation, cleaning old props from storage, and other “household” tasks. It is unsanitary to use the same sink for all the different duties a prop shop has.
Paper projects, drafting, and computer work may also happen in the clean room, though many prop shops have a third room where computer equipment is sequestered; this may be in the prop shop office, where reference books, props bibles, and other important office paperwork and paraphernalia are kept.
Metalwork may have its own separate area as well, if space allows. OSHA requires any area where welding and grinding of metal are done to be a distinct room with separate ventilation from carpentry and other flammable dust-creating areas, or for it to be thirty-five feet from said areas. A metalwork area is another feature a prop shop may choose to share with the scenery shop rather than investing in a duplicate set of tools and machines.
Finally, a prop shop needs some room for completed projects which are not currently in use. When a shop is doing a package deal for a show, they finish all the props and then send them out at the same time. Likewise, a theatrical prop shop will hold on to all of the props until they are sent to either rehearsal or the stage. It would be a shame to finish a prop and then have it get dinged up and covered in paint spatter because it had to live in your shop for a week and you had no place to put it.
Theatrical prop shops have a prop stock of common items they pull for various shows; most shops have at least some prop stock storage located next to the shop, while many will also have additional storage spaces located farther away (sometimes several miles away). Shops also need storage for molds, forms, and patterns of commonly built props. They may want storage for extra supplies and materials bought in bulk. Infrequently used machines for specialty jobs can also be stored so they do not take up room on the shop floor.
Tables and Benches
You need a table to work on. A table raises your project so you can work while sitting or standing rather than having to bend over. A table also gives you a surface to clamp materials or attach tools to. Your table needs to be sturdy so it does not collapse under the weight of your props, and so it can withstand any sort of pounding, striking, bending, or other forces you subject your materials to while working with them; it is no use having a sturdy bench vise to hold steel while you bend it if the whole table will move before the steel will bend.
Different tasks require different kinds of tables. A fabric-cutting table wants to be as tall as your elbows when you stand at it so you do not have to bend while cutting. It needs a smooth surface without any sharp edges to catch the fabric. A carpentry table can be a bit lower so you can have some leverage for doing heavier tasks. It needs to be sturdy for both up and down and side to side forces. The top should have an overhang so you can attach clamps. Tables for painting, molding, and casting and other “wet” tasks will slowly build up residue on their surface. It is helpful to have a table that you can cover with paper, or even have a table where the whole top is replaceable.
If you have your own table, it is easy to modify it to fit your height. When a shop has multiple prop builders, especially if they are a mix of different heights, it is helpful to have a way to accommodate all of them. I worked in a shop where one of the shorter employees had a small platform built so she could use the same cutting table as the other workers. You can also build platforms for the top of the table to hold your work at a different height when needed.
If space allows, set your tables away from the wall so you can work on the prop from all sides. Putting the table on wheels is helpful in smaller shops where you need to move things around to create space for different projects, but a way to lock the table in position is essential for many projects.
Underneath the table is a useful storage area, though what you choose to store there varies greatly between prop builders and prop shops. Some use it to store longer materials that do not fit elsewhere. In shops where each prop builder has a personal table, personal tools are often kept under it. Projects in process may also be kept there during the build of a show, along with drawings and notes.
Temporary tables can be made with sawhorses and sheet goods or lengths of lumber. Temporary tables are useful when a large project needs to sit for a few hours or overnight for glue, paint, coatings, or some other substance to dry. Keeping it on a separate temporary table allows you to continue working on other projects on your real table.
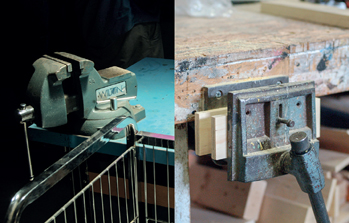
Figure 4-4: A bench vise is a type of clamp mounted to a work table meant for securely holding material as you work on it. Two main types of bench vises are the engineer’s vise (left), mounted to the top of a table, and the woodworker’s vise (right), which is attached to the side of a work bench. Notice how the woodworker’s vise has two scrap pieces of wood inside; these are used to protect softer materials from being marred by the metal jaws.
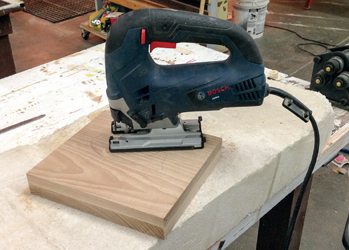
Figure 4-5: A thick block of scrap foam is a useful surface for cutting smaller pieces with a tool whose blade extends down, like a jigsaw or circular saw.
Positioning
Medical professionals talk about positioning when performing medical or surgical procedures. The goal is to find the optimal position of the patient to view and access the site. It also involves planning and anticipating all the moves they will have to do throughout the procedure, and avoiding last-minute troubleshooting. This includes anticipating what tools and equipment they will need, making sure they can get to all of them, and confirming they are all in working order. They ensure everything will fit together. If it is a team project, they make sure each team member knows their duties. Communication and cooperation are important.
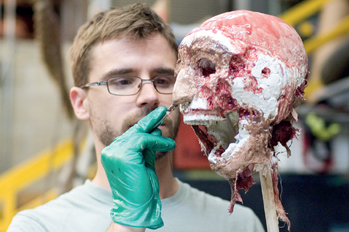
Figure 4-6: When working on this severed head, I mounted the skull on a wooden pole so that I could paint any side—even the bottom—without having to touch it and disturb the wet paint. The Bacchae, the Public Theater, 2009. Scenic design by John Conklin.
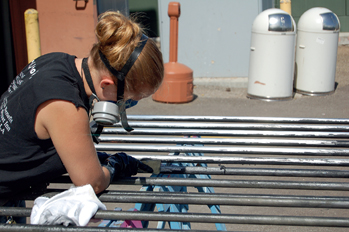
Figure 4-7: This gate was positioned horizontally across two sawhorses, making it easier to scrape the paint than if it remained vertical. As a bonus, it was set up outside so the fumes from the paint strippers would not bother the other prop builders.
You can apply the idea of positioning to prop making. First, position your prop so it is easy to get to all the parts you need to work on. Make sure you are not stretching or straining to reach parts of it. Sometimes it is better to place it on your table, other times on the floor; sometimes, you need an in-between height and you should take the time to find or build a platform or holder to place it on. Remember in Chapter 2 how we broke our prop into smaller pieces and tasks? You don’t need to anticipate every step you will take from start to finish; you just need to set up to be able to complete each piece or task on the prop.
If you need to apply force to your prop, it helps to have a way to clamp or secure it in place. If you are applying a paint or glue, it is useful to position the prop so the liquid does not drip or run on other parts.
Have all the tools you will need ready to go and close at hand. It really stinks when you finally get two pieces of your prop glued and lined up perfectly and then realize you have to run across the shop to grab a clamp. Also, put away tools and materials from previous projects so you are not digging around your table trying to find that one tiny drill bit.
Sometimes you have one of those projects where you need to use a stationary machine a lot, but you cannot do everything on it at once; you need to make a stitch on the sewing machine or make a cut on the table saw, then bring that piece back to your project to make some marks and measurements before going back to the machine. Try to set up your project as close to the machine as possible so you do not have to make a long trek across the shop multiple times throughout the day.
Finally, anticipate what needs to happen to your project when you are finished with the current step. If it needs to sit undisturbed to dry, figure out beforehand where you will store it and how you will get it there. It is not helpful to paint the entire surface and then realize you need to pick it up where the paint is wet.
Infrastructure
Setting up a professional shop is different from setting up a home hobby shop; if you work for a company or have employees working in the shop, you will have to adhere to rules, regulations, and laws pertaining to ventilation, lighting, electrical power, fire extinguishers, sprinklers, signage, and more. What follows is more of a general guide for setting up a well-run shop. As an employee, if you ever feel your shop is unsafe, you likely have legal grounds to make them fix it. Even if the lighting is bad or the ergonomics of the tables and tools are poor, you may be protected by law.
While clear fire exits are mandated by law, maintaining clear pathways around your shop is also useful for moving materials and supplies. A cluttered shop is highly inefficient. Pausing work to step around and over clutter is a waste of time; putting things in their proper place is not.
The general need for proper ventilation in a shop includes extraction systems at the source of all dust and fume creation; this means dust collection hooked up to the woodworking machines and fume extractors near welders and soldering stations. Spray booths and fume hoods are useful when working with paints, casting materials, and other substances that off-gas toxins when in use.
A shop needs to be able to introduce clean air and extract dirty air. Clean air is usually brought in through the building’s ventilation system, though an open window or door can assist when more fresh air is needed. Dirty air should not be exhausted where it can reenter the shop. The shop should be set up so that the fresh and clean air moves from the person to the material and then to the exhaust; it is no good if the fresh air picks up the toxins and dust and carries them to the worker. Shops should have electric fans of various sizes that can be positioned to move air around depending on the task at hand.
You can find air filtration units that hang from the ceiling of a shop. These can be good in some cases for cutting down on dust in the air, but be aware they are not a substitute for ventilation; they neither introduce clean air to the room nor do they exhaust dirty air. They also do not remove gases and fumes, just dust and particulates.
A professional shop has to adhere to applicable rules and regulations guiding the setup of ventilation and exhaust systems, and often requires a trained professional to set up and test the actual system. My words here are meant simply to remind professional shops to double-check whether their ventilation system is up to snuff.
Pay attention to the floor. In some areas, you want a clean and smooth floor, such as a waxed tile floor, so you can keep static electricity from building up and to make cleaning easier. These same floors are inadvisable in carpentry and other dusty areas, where a thin layer of sawdust can turn the floor into a slippery nightmare. Concrete floors can be a killer after a full day of working on your feet. Padding and floor mats, even just a small mat directly under your feet, can keep chronic pain and fatigue in your legs from developing. Mats can also keep you dry in areas used for dyeing and other wet processes.
Poor lighting can cause eye fatigue, as well as create dangerous situations where you cannot see potential hazards. A good prop shop will have adequate overhead lighting as well as area lighting that can be turned on or positioned over specific work areas. Some machines benefit by having their own dedicated lights mounted directly on them so you can illuminate the material as it comes into contact with the cutter. Inadequate lighting can also make you bend and strain to inspect your project up close.
Fire extinguishers should be located near potential ignition sources and at regular intervals around the shop. First aid kits containing bandages, gauze, disinfectant, and other supplies should also be close at hand. Eye wash stations and deluge showers around the shop will also come in handy (and are required in professional shops).
The accessibility of items such as fire extinguishers, first aid kits, and eye wash stations, as well as fire alarms, breaker boxes, and emergency cut-off switches cannot be overemphasized; they do no good if you stack material over them or store tools in front of them, even if it is “just this once.” Nobody schedules an emergency.
Supplies
Where can you buy supplies? Lumber stores, and timber and builders’ merchants are obvious places to purchase lumber products as well as the tools and accessories needed to work with them. Hardware stores will have some of these tools and accessories as well. You can find metal and metalworking tools at these stores too, though you can find a bigger selection at specialized steel suppliers. For metal pipes, plumbers’ suppliers are a great bet; they will also have selections of PVC pipes and fittings. Smaller metal pieces and tools can be found at jewelers’ suppliers. Artists’ suppliers and craft shops are a great source for all sorts of materials and tools when you can find them. These stores stock not only paints and brushes, but everything from sculpting materials and tools, printing supplies, ceramics, small wood and metal pieces, plastic sheets, rods and tubes, various foams, casting supplies, etc. Some resins and reinforcing materials such as fiberglass can be found at car accessory shops and boat suppliers. For fabrics and soft goods, search for fabric stores, upholstery suppliers, leather stores, haberdashery shops, and cane suppliers. Department stores often have small selections of craft supplies, fabrics, and tools among other items. Hobby stores can be helpful, whether for general hobbies, or specific ones such as model railroad shops. Antique restorers will carry a number of cleaners and finishes for wood, leather, metal, and fabrics, as well as some tools. If you are interested in leather or vinyl, you may have luck at small shoe repair shops; they often carry polishes, spray paints, and other supplies you can’t find at more general stores. Pharmacists and drug stores carry useful materials, some of which are hard to find elsewhere: mineral oil and glycerin (both sold in the “laxative” section), plaster bandages, shoe polish, acetone (nail polish remover), alcohol, etc. Grocery stores will also carry some needed supplies, such as aluminum foil, gelatin, and various containers, cups, and mixing implements.
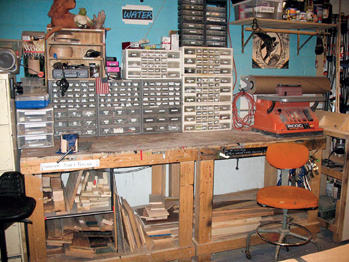
Figure 4-8: The prop shop at Chicago Shakespeare Theatre manages to organize countless supplies and hardware in a small space. Photo courtesy of Cassandra Westover.
These are just the general sorts of stores that most people can find nearby. There are many specialized shops too; it is not always readily apparent what they can supply you with until you check them out. For example, signmaker shops may have corrugated plastics and cutting tools for you to purchase, while fishing shops carry hot-melt vinyl for making fishing lures. Finally, theatrical suppliers carry all sorts of specialized materials and tools for prop builders, though these are rarely found outside the larger cities. Companies that make the products you want will often provide the names and addresses of retailers who sell their products either on their website or when you call them up. You can discover all sorts of alternative sources for your supplies in this way, such as school supply stores for clays.
When all else fails, you can have nearly anything shipped to you. You certainly have to watch out for shipping charges and delivery times (though picking things up yourself costs gas and time). In some cases, though, the cheaper prices you find online, or the discounts you get for buying larger quantities, when combined with the time you save driving around, can make up for the extra costs in shipping. A good prop builder is always developing his or her vendor list to find the most economical source for tools, supplies, and materials depending on the situation.
The Internet is the prop builder’s friend. You can find suppliers—including local suppliers—for almost anything. If you do not know what kind of store sells the material you want to find, you can research that as well. You can even compare prices and see if local stores currently have your materials in stock. With further searching, you can find Safety Data Sheets (SDS) on potential materials as well as tutorials and videos on how to use them (which will also inform you about whatever tools and additional materials or supplies you might need).
Machines and Tools
A tool is brought over to the material you are working on, while you bring the material to a machine. A tool can be hand-powered, pneumatic, or electric. An electric tool can be corded or battery powered.
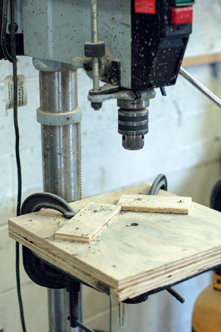
Figure 4-9: Jigs and attachments, whether bought in a store or built in your shop, can augment and extend the features of a machine. This auxiliary table clamped to the table of the drill press above is meant to position multiple pieces of material so that a hole can be drilled in precisely the same place in all of them.
Choosing whether to use a portable tool or a stationary machine depends on a number of factors. The biggest is whether or not you can move your material to a machine and maneuver it within the machine. A portable tool is needed when your material is too big or heavy to manipulate through a machine, or when it is shaped in a way that a machine cannot reach all the parts.
Many machines have fences, rails, and tables that allow you to manipulate your material with more precision and accuracy than with a hand tool alone. If you need precision and accuracy with a hand tool, you often need to construct jigs or use commercial attachments.
Power tools offer the advantage of speed. Ripping a long board on a table saw can be done far quicker than hand-sawing through it. On the flip side, the slow and deliberate nature of unpowered hand tools is often needed in more exacting work. A rasp can shave off just a bit of material at a time to coax a delicate curve into place, where a belt sander might remove the material before you realize you did not want to remove it. A sewing machine cannot close up the last stitch on a pillow the way a hand stitch can.
A well-equipped prop shop will have a healthy mix of hand tools, power tools, and stationary machines. A good props artisan will understand when and why to use each tool or machine to perform the tasks needed to manipulate his or her materials into a prop. Never feel bad about using technology to solve a problem. Likewise, do not feel old-fashioned for using a low-tech or even childish solution. You have to use the best solution for the problem at hand. When faced with a problem, you choose a tool to solve it. You do not choose a tool first and then try to figure out how to solve a problem with it.
Choosing Your Tools
Artisans have a wide range of opinions on how to choose their tools. Some feel the cheapest tools are good enough, while others feel only the most expensive tools are worth their time. I believe it’s better to have the right tool for the job, rather than trying to improvise with the wrong tool. If that means you have to buy the cheapest one because your budget is small, so be it. It’s better to pound in a nail with a cheap hammer than with the end of your cordless drill. If you find yourself replacing a cheap tool on a regular basis, it may be time to invest in a higher quality one.
Prop making is built from a number of craft traditions, each with their own distinct set of tools and machines. Sometimes these tools remain necessary for certain tasks; a wood lathe is really the only way to make turned wooden spindles, legs, and balustrades. There is no hand tool or machine that can shape wood the way a lathe can. Other times, more general tools can be used in a number of different crafts. A mat knife can be used to mark wood, skive leather, and cut plastic almost as well as the specialized tools unique to each of those materials. Since it is impossible, even with the largest of budgets, to buy a unique tool for every material and technique, it is better to outfit yourself with more general tools, and buy the more specialized ones when you find yourself using a material or technique on a regular or semiregular basis.
Types of Tools
It is useful to introduce you to some general categories and types of tools, even though more specific tools will be discussed in the chapters that deal with individual materials. This will be by no means an exhaustive list of all the kinds of tools that one might use (for that, it would be better to have a book such as The Backstage Handbook as reference).
Cutting Tools
Cutting tools may use a blade or a knife edge. Some tools cut by shearing, such as scissors, snips, or shears. You can also find tools that cut through abrasion or heat.
Choosing a blade depends on what kind of material you are cutting, how thick it is, and what kind of cut you are making (such as rough versus smooth, or straight versus curved)
The number of teeth on a blade is measured in teeth per inch (or TPI). The general rule of thumb is that you want three teeth in contact with your material at all times to keep it from chattering or catching. The more TPI a blade has, the smoother the cut will be. It will also make the cut slower and make it more likely that the blade will clog up with waste material. Every material has an ideal TPI that will make a smooth cut without clogging the blade up too quickly.
The area between the teeth is the gullet. Thicker materials require a larger gullet to help carry the waste material away, otherwise the blade will clog up.
The blade width is the thickness of the blade (though for band saws, the blade width is used to indicate the distance from the tip of a tooth to the back of the blade, which determines how tight a radius you can cut with that blade). The kerf is the width of the cut that the saw blade makes (in Chapter 6, we will also see how the kerf affects how you measure your materials). The set of a blade is the angle at which the teeth are bent away from the blade to the side. A blade with the teeth set to the sides will create a kerf that is wider than the width of the blade.
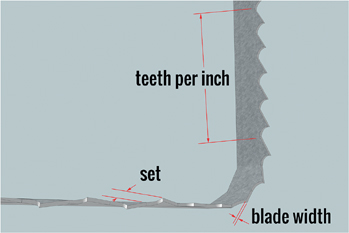
Figure 4-10: Illustration showing the teeth per inch, blade width, and set of a saw blade.
A knife blade is a blade without distinct teeth that cuts by slicing or splitting material. These are useful for cutting through soft foams, rubbers, paper, and fabric. You can outfit power tools such as jigsaws and band saws with knife blades.
For the prop builder, it is helpful to have a number of knives with different forms, shapes, and blade thicknesses to accomplish any number of cutting tasks (they can be handy for marking materials as well). You can find an endless variety of knives with names that often overlap.
A utility knife has a straight blade sharpened on one edge and is suitable for general craft tasks. You may also hear them called box cutters, carpet knives or mat knives (though they are not the best choice for cutting mat board).
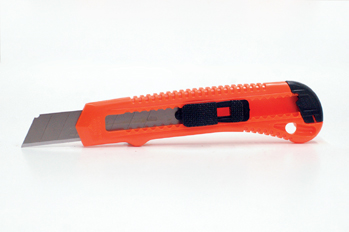
Figure 4-11: Snap knives are similar to utility knives, but with a long blade scored at regular lengths. When the edge gets dull, you “snap” that portion off, and you can then cut with the next section. A snap knife is also helpful because it gives you a very long but razor-sharp cutting edge; materials such as thick foam rubber can be sliced with fully extended snap knives.
Familiar to many props builders is the X-ACTO knife (actually a trade name), otherwise known as a hobby knife, razor knife, or scalpel. These are useful for making more precise cuts on thinner materials, such as foam core, closed-cell foam, and cardstock. Though a variety of blade shapes and sizes are available, many prop builders stick with a #11 blade for every task.
Shearing tools include scissors, metal snips, and guillotine-style paper trimmers. You can also find large machines such as hydraulic metal shears that can shear plate metal much thicker than what is possible with hand snips. Shearing does not create chips or dust-like blades, but it can only be done on thin materials; the edges on thicker materials become deformed through the process.
Some tools use cutting edges that are mounted to a rotating spindle. These tools include routers, milling machines, die grinders, and rotary tools (like the eponymous Dremel). They also include planers and jointers.
Tools that cut with heat include plasma cutters and cutting torches for metal, or hot-wire cutters for Styrofoam.
Abrasive cutters work well with metal because they do not have teeth that can catch or grab the material. They do not work well with many plastics because the high speed will melt and deform the material; likewise, using them on wood will burn the material.
Don’t put an abrasive metal cutting disk on a wood saw and vice versa. The operations may seem similar, but the tools are not designed to be interchangeable. Wood saws use a lot of plastic which will melt from the sparks generated by cutting metal. The forces placed on the spindles of the machines are different, and so the tools are designed differently. In general, you should avoid working with wood and metal on the same power tools because sparks plus sawdust are not a happy mix.
Gripping and Turning Tools
Tools capable of gripping and turning are usually used on fasteners (you can read more about fasteners in Chapter 5). These include all manner of wrenches, screwdrivers, and pliers. They may also be utilized on materials you wish to bend or twist: materials that become plastic when heated, materials that become flexible when wet and rigid when dry, or materials that are pliable but hold their shape such as thin metals. Some types of pliers are also useful for gripping and holding hard-to-reach or hard-to-hold materials that need to remain in place while you perform some sort of task on them that would otherwise move them from position.

Figure 4-12: An adjustable wrench, also known as an adjustable spanner, is one tool that everyone working in the entertainment, live performance, or display industry should own. It may also be called a “crescent wrench,” which is a generic term for a Crescent brand adjustable wrench, and is sometimes shortened to “C wrench.”
Striking Tools
Hammers and mallets are used in nearly every type of craft. Mallets are designed to deliver a solid blow without marring the surface of your material, or to impart force to tools such as awls and chisels without damaging their handles. Ball peen hammers are designed to shape metal through repeated hammering. Tack hammers have their shape to make it easier to drive in upholstery tacks and finish nails.
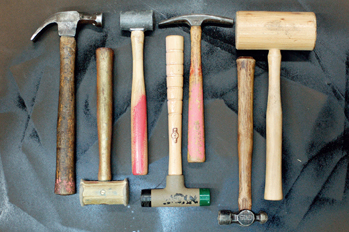
Figure 4-13: Just a few of the thousands of varieties of hammer. From left to right: claw hammer, rawhide mallet, lead mallet, dual head assembly mallet, tack hammer, ball peen hammer, and wooden mallet.
If you spend a lot of time using specific techniques with certain materials, you may find it helpful to use a hammer designed solely for that task. You should also have the right size and weight hammer for your task and physique. A small person with an overly heavy hammer will tire easily and create messier work and a dangerous situation. Using a hammer too small for the task at hand will cause endless hammering when one or two blows with a bigger hammer may have done the job.
Prying and Pulling Tools
Prying and pulling tools are used to separate materials and remove fasteners, among other things. As with striking tools, you should not use tools such as screwdrivers or chisels for prying. The steel in these tools is formed and hardened differently from a pry bar; a screwdriver will bend with too much force, and a chisel may actually snap apart. Only tools designed for the purpose should be used for prying.
Prying and pulling tools include crowbars, pry bars, upholstery staple removers, pincers, and the back of a claw hammer. Many pliers can also be employed for pulling tasks.
Abrading and Scraping Tools
Abrading and sanding uses sharp particles to randomly cut bits of material from a surface. Tools include files, grinders, rasps, and sanders. When you look at files and rasps, they are actually made up of hundreds or thousands of tiny cutting edges.
Scraping tools include planes and chisels, as well as scrapers. Scraping tools differ from cutting tools in that they have a single wide cutting surface that is drawn along a material at a fairly oblique angle so it shaves a bit of material off the top to smooth or straighten it.
Boring Tools
Boring tools are tools that make holes in a material. This category also includes any tool that pierces or cuts the hole in the material rather than boring into it.
Drill bits can put holes in many materials, including wood, metal, plastic, foam, plaster, fiberglass, and stone. Many variations of drill bits exist, such as twist, brad point, spade, Forstner, and auger. Twist bits, the most common kind, can be used on the widest variety of materials. The angle of the tip and the rake of the cutting head are different for twist bits intended for use on different materials. Using wood bits on metal will quickly dull the drill bit, while using wood or metal bits on plastic can crack it or leave a messy exit hole.
A spade bit, also called a paddle bit, is shaped to quickly cut larger holes though a piece of material. A Forstner bit also cuts larger holes of various sizes, but it leaves a much flatter bottom than a spade bit, making it useful for drilling only partly through a piece of material. Both spade bits and Forstner bits can only be used on wood and some plastics and never on ferrous metals.
An auger bit has a threaded point that helps pull it into the material; it should only be used on wood and only with hand-powered drills, never with electric ones. I mention them here only because you still find them lying around in some shops.
Hole saws are another type of drill bit that can cut larger holes in woods, metals, and plastics.
Other tools create holes by shearing the material between two surfaces, such as hole punches, grommet punches, die punches, and leather hole punches. These tools are better for textiles because a drill bit will catch the individual threads as it spins around, wrapping them up in a huge mess. You can also use piercing tools, such as awls, to poke a tiny hole in fabrics, leather, and thin wood and plastic.
Spreading Tools
Tools for spreading material are optimized for taking a viscous liquid or paste-like material and applying it to a surface in a controlled manner. These include paint brushes and putty knives, as well as all manner of other painting and plastering tools. These will be discussed in more detail in Chapter 16.
Heating Tools
Heating tools do a number of things. In plastics and metals, when the material is heated to a certain point, it becomes flexible and pliable. The material can be easily shaped at this point, and when it cools back down to the ambient temperature, it becomes rigid again. For plastics, a hot air gun, strip heater, or oven are the common tools for this, while with metal you would use a torch or a forge (though forges are typically rare in prop shops). Ovens are also used for hardening many types of clay or for curing foam latex.
Welders, for both metal and plastic, and soldering tools also use heat to accomplish their goals.
Digital Fabrication
Digital fabrication refers to tools and machines that use computer files to automatically cut or shape material. In most cases, the operator simply sets up the machine and loads the material; the tool does all the cutting, heating, or other tasks to manipulate the material to its final shape.
An oven used for plastics should never be used for heating food. The chemicals released from the heated plastic become ingrained in the surface of the oven itself and are released every time you turn the oven on again. It is the same reason you should not heat your food in the same pot used to dye fabric. No amount of cleaning will remove chemicals that have leeched into the surface.
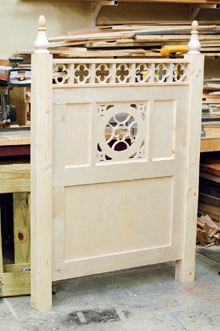
Figure 4-14: The quatrefoils and center emblem on this headboard were cut on a CNC router, while the rest of was cut and assembled using conventional carpentry. Henry IV, Playmakers Repertory Company, 2012. Scenic design by Jan Chambers.
CNC (computer numerical control) routers can cut or even carve shapes out of wooden and plastic sheet goods. Laser cutters cut and engrave similar sheet goods. CNC milling machines can mill shapes out of metal. While these are the most common, you can also find computer-controlled lathes, plasma cutters, hot-wire foam cutters, and more.
Another class of digital fabrication tools are 3D printers. These add materials together to make shapes rather than cutting larger materials apart. Some work by extruding a stream of heated thermoplastic, such as ABS, into a shape (kind of like a CNC hot glue gun), while others selectively harden powdered resin in a process called laser sintering.
Even if these tools are too expensive or take up too much room in your prop shop, you can find Maker Spaces in many cities that will let you use theirs for a fee. You can also send your digital files to companies that will fabricate your object out of a variety of materials and ship it to you.
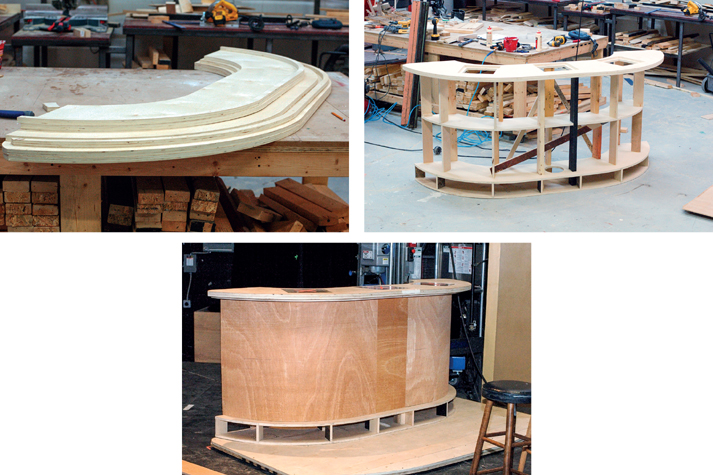
Figure 4-15 to 4-17: A CNC machine let me quickly cut out many different sizes of this same curved shape, each one allowing for a different amount of overlay, or inset to compensate for the thickness of the skin material that was applied. Wild Party, Elon University, 2013. Scenic design by Natalie Taylor Hart.
Making the digital files requires a whole different set of skills not covered in this book. However, you can purchase ready-to-print files for all sorts of ornamentation and shapes, and once you have a file, you can reuse it indefinitely.