two
needs and means
Can I tell you how to build a prop without knowing what prop you want to build? In other words, can a single approach be used for both a chair and a treasure chest? I find myself using the same mental processes for any prop I need to build, and working alongside other prop builders has shown me that they share a similar thought pattern. You have to figure out what a prop needs to do, and then you need to consider the means available to you to achieve those needs.
By articulating a prop’s needs, you gain a clearer picture of how it should be built. More complex props can be broken down into simpler parts. Any object can be subdivided until each part has its own distinct set of needs.
These needs can be met with any number of materials, methods, tools, and techniques. The second part of building a prop is looking at what means are available to you. Time and money are your most important resources, but other considerations include the size and layout of your shop space, what tools and machines you can use, and your skills in working with certain materials. Your means will limit and inform the choice of materials and techniques for your prop.
All props will follow this same process: determine all the needs, and then meet them with the means you have available.
What a Prop Needs to Do
What does your prop need to do? It’s actually a fairly involved question.
For starters, your prop needs to have a certain look. Often, a prop builder’s job involves building an object out of one type of material and making it look like another material. This mimicry needs to be placed within the context of the production; a piece of actual gold may not look like gold under stage lights. Likewise, it may need to match other elements of the production rather than having a realistic appearance. If the scenery department has painted large pieces of plywood to imitate mahogany, and you need to build a treasure chest out of mahogany, it may be more visually cohesive for you to use a similar paint treatment rather than building the chest out of actual mahogany.
Other tactile and perceptive properties often need to be replicated. Dropping gold coins into a metal plate has a distinctive sound which cannot be faked by dropping gold-painted poker chips into a painted wooden plate. A silk flag carried across the stage moves differently from a muslin flag.
If the visual appearance was the only need, then we would simply make every prop out of the material it was meant to be made out of. Gold statues would be made of gold, and a fancy desk would be made of mahogany with ivory inlay and bronze hardware. When we look at the further needs of the prop, like strength, weight, and durability, we will see that props cannot always be made out of their intended material. We must determine what exactly the visual needs of the prop are so we can match it with a material that is best able to mimic our intended material within all our other constraints. It is helpful to remember an old saying used by art directors: “All the camera sees is the last coat of paint.” Many materials can have their color and even texture manipulated.
Choose a material that is easy to make the shapes and forms you need; if it is a complicated three-dimensional form, you may wish to use a material that is easily sculpted or carved. If the form is more geometrical, you may wish to construct it out of something that comes in a variety of geometric shapes. Wood, for example, comes in boards, sheets, and dowels. If you need a wooden rod, it is easier to use a dowel than a rectangular piece of wood that needs to be shaped into a rod.
Size and weight are two more needs of a prop. Size is related to the visual appearance and will typically be determined by the designer or art director, but practical considerations will also clarify the limitations on size. An end table may need to be large enough to hold a certain vase, while a dagger may need to be small enough to fit in the pocket of an actor’s costume. Ask questions during production meetings whenever a prop needs to interact with another department’s elements.
While prop builders generally strive for the lightest possible prop, you can find situations where more weight is desired. In outdoor locations, props must be heavy enough to keep from blowing away. Weight may also aid in realism; an actor looks silly when she lifts a large, fully packed suitcase with one finger. Actors already have to summon all of their focus to imagine the life and emotion of their character in that moment; don’t distract from that by making them have to pretend that a carved piece of foam weighs as much as a solid gold statue.
Figure 2-1: This dead lamb prop was built with a flexible neck so when it was carried around, it would flop like a real dead lamb rather than remain stiff like a piece of taxidermy.
The balance of the weight may be more important than the overall amount. Swords and other stage combat weapons are helped by having most of the weight located near the hands so they can be moved and stopped more quickly and precisely. A tall item can be kept from toppling over by shifting the weight as close to the bottom as possible.
Many of a prop’s needs can be determined by focusing on how it will be used. Props will be stood on, stepped on, sat on, thrown, dropped, ran into, and generally abused in ways even the director might not foresee. Find out what the actor is supposed to do with the prop, and extrapolate that to the worst possible scenario. If you are told the actor will stand on a table, assume they will jump on it. If you hear that a vase is supposed to be dropped, you can bet they will be throwing it to the ground with all their might.
For particularly prop-heavy scenes, it is helpful to sit in on those rehearsals. If no one from the props department can be there, you might request the stage manager to video the action and send it to you.
It is better to overbuild a prop once than to have to rebuild it three times. A prop that does not hold up to its usage in a scene is a prop that is not properly made. Even in the most carefully choreographed sequences, the actors will still veer from their blocking or treat the props more violently during a performance than they did in rehearsals. You need to anticipate the worst-case scenario based on your knowledge of the script and the context of the show.
Initially, the director, stage manager, designer, and props master will develop the props list, with notes on the functions of every prop. This will change as the production progresses, and even more so once rehearsals begin. Even actors will start to chime in about what a prop needs to do. Maybe it’s too heavy for the actor to lift every single night. Maybe the actor decides she wants to hide the prop behind her back during a scene, and it’s too big for that. Whenever you are unsure of how a prop will be used, or the production team wants to “discover” things during rehearsal, providing them with a rehearsal prop as soon as possible will quickly allow them to hone in on how they wish to use the prop, giving you a better idea of how to build it.
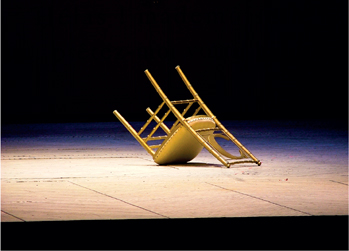
Figure 2-2: A chair that is tossed to the ground every night will have different structural needs than a chair that is simply sat on. Photo courtesy of Natalie Taylor Hart.

Figure 2-3: This “bear trap” worn by Anna Faris in Scary Movie 4 uses a number of materials to fulfill its various needs. The majority of the body is cast in a rigid polyurethane plastic; real metal would be too heavy to be worn comfortably. The straps are made from leather, which is a strong, but thin and flexible material that can wrap around the body, as well as being comfortable and providing cushioning on the shoulders. The nails are cast in a soft foam so they appear sharp and pointed, but will not cause injury if they come into contact with skin.
Consider the backstage and offscreen needs of a prop as well. Your prop may need to be transported from your workshop to the stage or set, which can be miles away. It must be able to fit through the smallest opening in whatever path it takes. This is often a door or elevator, though it may be a car trunk or your airplane carry-on bag. Find out ahead of time where the prop is going so you can either build it to fit or design it to disassemble.
In theatres and television studios, you may also need to anticipate fitting the prop backstage when it is not in use. Often it is the designer or house crew who is responsible for this, and what is needed for proper storage may not be determined until the prop is in the space, but occasionally you can anticipate the needs. The weight is also important to consider for backstage purposes, particularly in theatre where stagehands or running crew move the prop around every night.
Specific Needs in Theatre
Theatre and live performance props have their own specific needs. Because productions have multiple performances over a period of time, theatrical props need to be able to stand up to the repeated demands of each show and not break or fall apart in the middle of a run. For props that show their wear and tear, they should be easy to clean and freshen up, or even made with replaceable parts.
In live performance, the audience may be located quite a distance from the actual prop. Subtle details may be lost and the visual appearance may need to be exaggerated in some respects (it may also mean, thankfully, that intricate details seen only up-close can be faked to some extent). In many cases, some audience members will be close while others are far away, so the props artisan must find the right balance between how subtle or exaggerated the prop is.
Of course, “theatre props in a movie world” have increased the audience’s demand for realism, so even a prop seen far away may need more detail than is strictly necessary. Furthermore, playwrights, designers, and directors today may be more familiar with TV and film and expect a prop to have all the intricate detail it would have in real life, even if parts of it are facing away from the audience. Actors may also expect details that are invisible to the audience. A poorly-made prop may inhibit an actor from fully inhabiting the world of the play, so while the prop itself may be unseen by the audience, the quality of the actor’s performance will be experienced by everyone in the theatre.
Theatre has sightlines, which are the unobstructed views of each audience member. In thrust stages or theatre-in-the-round, tall props block part of the action for certain seats. Props, particularly furniture, are frequently shortened or otherwise altered to allow good visibility no matter where you sit. To improve sightlines on proscenium stages, the playing floor may be raked, or sloped so it is taller in the back than in the front. Props that sit on a raked floor need to be counter-raked, or built on an opposite slope, so that when they are placed on the rake, they will sit flat and not tip over. Other props may need to be altered to prevent them from rolling or sliding down the slope.
Props in the theatre need to be made with the safety of the performers, technicians, and audience in mind. Unlike in film, scenes cannot be shot behind protective glass, stunt doubles cannot be switched in, and shots cannot be edited to create the illusion that actors are involved in dangerous events. Everything on stage happens right then and there, and a piece of a prop that comes loose can hit an old lady sitting in the front row.
A theatre production is an organic process; although you receive drawings and models at the beginning, changes happen throughout rehearsal, and can continue even through technical rehearsals and previews. That means an audience may watch the show one night, but you may have to change or alter the prop before another audience sees the show the following night.
Finally, for props used in front of any type of live audience, there may need to be a certain amount of flameproofing involved. This differs depending on the area of the world you are performing in and even the type of venue the production takes place in. You may need to limit your prop’s construction to flame-retardant materials, or treat the surfaces with a chemical or substance that will make it more flame resistant. The appearance and properties of some materials are altered when treated, and some materials resist such treatments, so consider how much flameproofing your prop needs before you start down a path that will give you trouble later on.
Needs in Film
Making props for film can be different from making them for theatre. In film, props may need to be built quickly and then used for only one day. Theatre needs much sturdier props, or at least props that are more easily repaired. Still, during a film shoot, you do not want your props to break while on set. Every minute wasted costs money, and if filming has to be put on hold for a few minutes to make a repair, it is logged by the assistant director. You do not want the producers to read “waited seven minutes while the prop was glued back together” in the daily logs.
Film shows the prop much closer than one can ever get in a theatre. Subtle details become much more important. An item that fits in the palm of your hand can be filmed so that it appears to be thirty feet tall when projected on a movie screen. On home video, people can pause the film and examine the props with excruciating clarity.
A props artisan for film needs to understand how the use of lighting and camera lenses can affect the look of the prop. Shooting a scene with different focal lengths can change the distance from background to foreground and distort how a prop shows up (as you will see in Chapter 6).
Film has no “backstage”; the camera can point in any direction, so film props need to be finished on all sides. In theatre, if the director decides to restage a scene so an unfinished side of a prop will now be visible, you can alter it in between rehearsals. In film, the director makes that decision on the spot, with the expectation that filming can continue immediately. This is not a hard and fast rule; some directors plan and storyboard every shot, and stick with that. In any event, the more you know how the individual filmed sequences will add up to the visual concept, the better. A film shoot feels like a nonstop tech week; props that can be altered quickly or easily are preferable.
Needs in Television
When a television show is filming, they may be making a new episode every week, giving the props team only three or four days from the time the script appears to the day filming begins to construct a prop. While major props can be planned ahead and prop builders given a few weeks to construct them, changes can still happen only a few hours before the prop is needed.
Like props in film, props for television need to look really good when the camera is close. High-definition televisions show the props in greater clarity than ever before, so every detail must be perfect. Before high-definition, prop masters used to say if it is not bigger than a two-inch circle, you will not see it. Now it is down to an eighth of an inch.
Like props in theatre, television props may need to be able to survive week after week during filming, as well as being stored during the off-season safely enough so they could be brought back out for the next season’s shooting.
Complex Shapes into Simple Parts
At first glance, a prop may look difficult. Break it down into simple geometric shapes, and its construction becomes more self-evident. Very few props are constructed from a single piece of material. Almost every prop is the assemblage of a variety of pieces and parts. When planning the construction of a prop, it is helpful to break down its most characteristic features into basic components, and determine the needs of each of those components.
Some prop builders like to jump right in and start cutting and assembling materials, figuring it out as they go along. Others like to plan everything out on paper to the point where building the prop is just a matter of following the steps they’ve laid out. I often like to work somewhere in the middle; I plan out as much as I can, and then I build what I know needs to be built. At a certain point, I then reevaluate my steps and make a revised plan for the next steps.
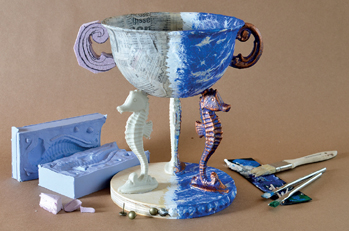
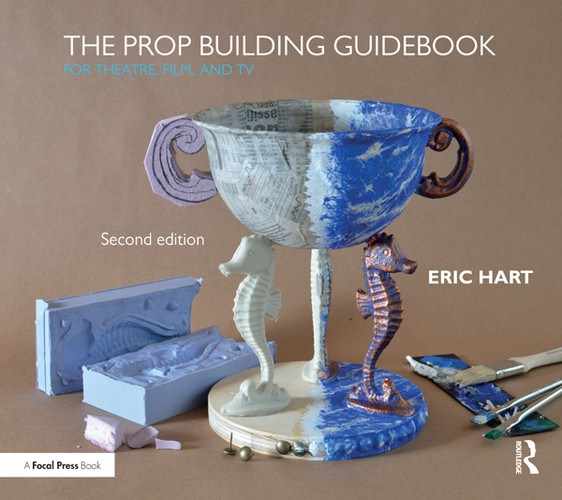
Figure 2-4: The fanciful chalice from the cover is just a collection of simple parts: a papier-mâché bowl, foam handles, cast seahorses, a plywood disk, and furniture tacks.
You can expend a lot of brain power trying to visualize a three-dimensional prop from beginning to end in your head; it becomes far easier to complete the picture once you have started building it, as you now have something real to hold and measure. When your prop is broken down into simple parts, it is simpler to figure out what steps to take for each part.
Form versus Texture
In props, as opposed to real items, it is usually only the outermost layer we see. It can often be a simple form with a more complicated texture attached. When breaking apart a prop into simple parts, think about what needs to be the actual constructed form, and what can be an applied texture. Texture can mean a simple pattern like tree bark or pitted metal, or it can be a more complicated façade hinting at moving parts underneath.
Reference and Research
The needs of your prop initially come from the writer, the designer, and the director. You may have drawings, photographs, and other reference material. Further research may be required to flesh out the needs of your prop. You may need to gather or generate your own drawings and photos to get approval for the desired process and final finish. In some cases, you will experiment and build samples that show different paint treatments, textural effects, or other physical information that the production team will choose from.
Even the most fantastical and imaginary prop has some basis in reality. One of the biggest shortcomings of a prop builder is the assumption that they know what something looks like; we all know what a dog’s head looks like until the time comes to sculpt one. As a prop builder, it is impossible to err on the side of too many reference pictures. The reality of an object is conveyed by the shapes and textures of the parts, how the components fit together, how they respond when handled and manipulated, how light dances off their surfaces, how the pieces sound when moved, and other subtle properties that you have never needed to think of before.
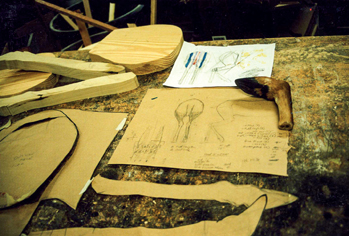
Figure 2-5: To construct this deer carcass for a production of A Lie of the Mind, Natalie Taylor Hart not only generated drawings and patterns based on a real deer, she also had a real deer foot to reference for the color and texture of the fur. Photo courtesy of Natalie Taylor Hart.
The Successful Prop
A successful prop is one that is built to do exactly what it needs to do. The appearance and other physical properties serve the production. It is built to withstand the stresses of its use in a scene as well as not being overly inconvenient when backstage or offscreen. There is no “wrong” way to build a prop; if a prop fulfills all its needs, then it was built correctly. The vocabulary of tips and tricks we have discovered over the years becomes a language of best practices that fulfill our needs in the majority of prop projects; foam, wood, papier-mâché, plaster, thermoplastics, resin, steel, and leather are used time and time again because we already know they will fulfill the needs of the prop.
You may find more elegant ways to build the prop, either using better-quality materials or methods that show expertise in more advanced skills. These are not the most important considerations though; as long as a prop fulfills the needs of the production, then it is a properly made prop. Yes, the situation occasionally arises for something different; in The Lord of the Rings films, the One Ring was an important enough prop to warrant hiring a jeweler to actually forge several copies out of gold, but that is the exception rather than the rule.
Your Means
After determining all the needs of your prop, you need to figure out what materials can conceivably meet your needs. Obviously, if you need a transparent panel, you cannot build it out of wood. You should have a rough grasp of the properties of the different materials: what they are capable of, how they can be shaped and formed, how strong you can make them, how they will affect the weight, and what they will look like. You should also know the amount of time it takes to do comparable tasks with different materials. For example, cutting through a 1″ bar of steel will take far longer than cutting through a 1″ piece of wood. That may make a big difference when you have to cut a hundred pieces.
The wealth of materials available to you comes in an infinite variety of shapes and sizes. After you break your prop down into smaller components, it makes sense to build them out of materials that are already close in size and shape, or which can easily be manipulated into the correct size and shape. When you need a tabletop to be ½″ thick, use ½″ plywood; using ¾″ plywood and trying to thin it down is just silly.
Some materials are stronger than others. Strength comes in different forms. One type is compression strength, or how strong it is when it is pushed together and crushed. Tensile strength is how strong it is when pulled apart, or stretched. Shear strength is how much force it can withstand when pushed or moved from the side. For example, a drywall screw snaps in half when pushed from the side, whereas a nail will bend.
Materials may be strong in one way while being weak in another, and the strength also needs to be considered when determining how materials connect to each other and with what type of fastener.
It is also important to look at what happens to a material when its strength is pushed past the limit. A material may break, such as when Styrofoam is crushed or sheared. A material may bend or buckle, such as when a lot of shear strength is applied to a metal rod. The material may bend and become deformed, or it may return to its original state when the weight is removed. An upholstery pad will be crushed under a small amount of compressive strength, but it will reform to its original state when the weight is removed.
The Ways Materials Can Be Manipulated
You may have your prop broken down into smaller parts and know the needs for each of those parts, but how you get from a pile of raw materials to there can be the real challenge. It can be helpful to look at how different materials can be manipulated. I have taken all the myriad parts of prop making and divided them into five basic types: cutting, assembling, bending, modeling, and hardening.
Cutting means the removal of material. You can use a saw, a knife, an abrasive disk, or other tools to separate material into two pieces. You can also cut into a material to create grooves and holes, or carve into it to make three-dimensional designs and shapes. A special type of cutting is known as machining, which is the precise removal of material from a solid piece (usually done by machines).
Assembling means attaching two or more materials together. In some cases, the two materials become one material, and in other cases, the materials remain distinct but inseparable. Assembly can also be temporary, such as when you bolt two things together.
Bending means deforming a piece of material so that it takes on a new shape without the addition or loss of any material. A bend can be a simple change in direction, such as a coat hanger made from a bent rod. It can also be a much more complex series of deformations over a surface, such as when you mold a sheet of leather into a mask.
Modeling is the shaping of amorphous materials like clay or some types of heated plastic. These materials do not have a specific size or shape, but are more like a lump. You can add more material to build up shapes, remove material, or push, pull, and smear the material to alter the surface.
Hardening is when a liquid or paste becomes a solid shape or surface. Shapes can be created through the hardening of liquids, semiliquids, or pastes into a solid. Some materials dry over time, such as joint compound, Sculpt or Coat, or clay. Some cure through a chemical process, such as resin and other mold-making and casting compounds. Other materials become liquid when heated and resolidify when cool, such as metal, wax, and Friendly Plastic. Besides creating shapes, this is also how a lot of coatings, textures, and paints are added to the surface of a material.
Many familiar processes are just a combination of one or more of these basic shaping methods.
Fabrication refers to the construction of items from rigid materials. It is a combination of cutting, bending, and assembling. Metal and plastic can be fabricated. Wood is also fabricated, though we refer to that as “carpentry,” “furniture making,” or “cabinet making.”
Sculpting is a combination of cutting, modeling, and assembly.
Laminating or “sheet molding” is the process used with papier-mâché or fiberglass. Sheets of paper or fiberglass are cut and bent into a shape, and then resin or glue hardens it into a continuous skin.
When you come across new or unfamiliar materials, it may be helpful to think back to these five classes of manipulation to determine the best way to shape this new substance.
Budget Estimates
The final step in determining which materials and methods to construct your prop with is determining what makes the most sense economically and practically. You have a budget in the things you are limited in: time, money, and expertise. For every prop, or for all the props in a production, you need to figure out how much of each you have and how best to allocate them so you stay within your limits.
The Project Triangle
Prop shops frequently point to the project triangle for help with deciding on the materials and methods for accomplishing something. I’ve seen a number of variations, but the most common has a triangle with the three points labeled “fast,” “cheap,” and “good.”
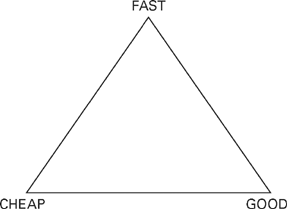
Figure 2-6: The Project Triangle. Fast, cheap, and good: you can have any two.
You can pick two of these points, but you can never have all three. If you want something fast and cheap, it will not be good (in terms of quality). If you want something good and fast, it won’t be cheap. Hollywood is a place where they do not ask “how much,” just “how soon.” Most productions require more of a juggling act though, as a single prop can vary drastically between “expensive, fast, and good” or “cheap, slow, and good.” (I find it hard justifying making a “bad” prop just because time or money is scarce. These are not discrete points, but a spectrum. You can have a lower-quality, but still acceptable, prop if you need to save time or money.)
When you start dealing with several materials or methods, the comparisons become more of a gradation than a distinct choice. For instance, solution A and solution B may result in the same quality; solution A is faster but more expensive than solution B. Is it worth it to spend the money to save the time? It depends on the specifics; if solution A costs twice as much and only saves an hour, then probably not. But if solution A costs ten dollars more and saves a whole day, then yes.
In most cases, your prop does not exist independently, but has to fit within the budget of an entire production. Every change in the cost and labor of one prop can have ripple effects for all the other props. If you save enough money on one prop, it may make possible a more expensive, but preferable, solution for another prop. On the flip side, unexpected costs on one prop means you need to cut costs on the other props. Boo.
The results you can achieve with the project triangle (fast, cheap, and good) correspond with the resources you are limited in (time, money, and expertise). These three resources are a balancing act. Say you need a smooth, flat surface. CDX plywood is very cheap but has a rough surface. It will take a lot of time to sand and coat it to make a smooth surface. Nicer plywood or MDF is more expensive, but you need far less labor to make it smooth. When you factor in the cost of labor, a labor-intensive process with cheaper materials may actually cost more than more expensive, but nicer, materials. If you decide to go with the cheap material and do not spend the time on sanding and coating it, you will end up with a bad prop. As you can see, when it comes to fast, cheap, and good, you can only have two at a time. Now let us look at each of the three resources in turn.
Money
When estimating the price of materials and supplies, it is helpful to be as precise as possible. Include every little bit and piece, even if you already have the materials in stock; after all, you will want to replenish your supply. For some materials, you can check catalogs, websites, or even call vendors for quotes to get exact prices. For other goods, such as lumber or steel, prices fluctuate, so you should develop a list of average prices just for estimation purposes.
Include everything, no matter how minor it may seem. I once had to estimate a chandelier for the Broadway version of Merchant of Venice. I needed electrical cords to connect all the bulb sockets to the main plug, and I figured it would only be a couple of bucks. When I actually calculated how much I would need, it turned out to be a grand total of 700 feet, which would cost $350 to buy. You certainly don’t want to miss something like that in your estimate. So count everything, even the screws, nuts, and bolts.
Figure 2-7: When making multiples of an object, you may want to create a separate budget for prototypes and one for copies. The first one will cost more and take longer because you are figuring it out, building models and jigs, experimenting with the finishing process, and generally coming up with the best materials and process for the job. Additional copies will be cheaper and quicker both because you solved all the problems and because you have patterns and templates for the new pieces.
Do not forget about taxes, delivery charges, or other fees. You do not want to max your budget on a prop only to discover an $85 shipping fee on top of the cost.
Even after adding everything together, factor in a contingency. Typically, props people add 20 percent to 25 percent to the final estimate. So if you estimate a prop will cost $100 in materials and supplies, and you want a 20 percent contingency, that would be $20, so the total estimate would be $120. This is to cover all the things that cannot be accounted for, or for emergencies and unseen events.
If a properties director or lead artisan is doing the budgeting for all the props in the show, he or she may begin to take shortcuts with the simpler props, based on past experience. If they have upholstered a wingback chair in a previous show, they can check the records to see how much it cost in time and materials, and use that as the estimate to upholster another wingback chair.
Often there is not enough time to accurately calculate the cost of everything, and designs and needs change and evolve during the preproduction process after the budget has already been set. This may mean the budgeting may happen in reverse; a maximum cost is determined for a prop, and then a method to achieve that prop within that cost limit needs to be found.
Time
It can be helpful to keep a daily journal of what you work on and how long it takes. After several months, you have a good set of data for how long certain tasks take to accomplish. A properties director or shop foreman who maintains records of how long different items took to build in the past will be able to anticipate the build schedule for future productions. For example, I used to ignore the time it took to put casters on the bottom of a piece of furniture when estimating how long it would take to build. When I finally timed myself, I realized my mistake. Gathering the materials, drilling sixteen holes (four per caster, four casters per piece of furniture), and attaching and tightening sixteen nuts and bolts ended up taking between thirty minutes and an hour—not a length of time you want to ignore.
We are usually lousy at predicting how long a task will take; many of us are overly optimistic, especially when trying to impress the boss. It will make your life simpler to break the estimate down into smaller tasks. You may not know how long you need to construct a dead goose, but you can probably make an accurate guess to how long it takes to glue on twelve hackle pads, or paint two goose feet.
As with materials, you want to add a contingency to your labor time. This covers all those unforeseen circumstances. Sometimes you start a project and realize you left your hammer in another building. Or you open up the can of paint you want to use and realize it has completely dried up.
Labor is not the only thing that adds time to a process. Some products, particularly paints and adhesives, require time to dry, while others, such as resins and plaster, need time to cure. Again, this is a balancing act. Products that take longer to dry or cure tend to have better properties than those that are ready faster. Alternatively, the products that dry or cure faster are frequently more toxic than the slower ones.
Turnaround time means the sum total of hours, days, or weeks it will take before your prop is ready. With labor, you are only figuring out the hours you actually work on a prop so that you can estimate the labor cost. You are not counting the time it takes to wait for paint to dry or the hours you spend at home sleeping. You need to factor in the time it takes for materials to be shipped to you, the time it takes to go out shopping for materials, setup time, drying and curing time, cleanup time, and delivery time. You also have to estimate how much time you or the other artisans can work on the project each day. If you only have two hours a day to work on an eight-hour project, the turnaround time will be four days.
Turnaround time should be built into any schedule you make. Figuring out how long it will be before a prop is ready is important to the stage managers, the director, the designers, the other departments if the prop needs to be integrated in some way, and the actors. When you calculate the turnaround time for all the props in a production, you can also see whether it is possible to meet all your deadlines or if you will need to hire more help (or simplify the props list).
Focus on the most critical deadlines and backtrack from there. You may know, for instance, if you do not order certain materials by Friday, you will not get them until Monday, and then you lose a whole weekend’s worth of work. Or you may know that the final coat of paint will take three hours to dry, so you must be finished painting at least three hours before the curtain rises. If you can backtrack enough, then you may get to a point where you can tell your designer that she needs to submit the final drawing for a certain prop by a certain date if she wants it to be ready by the first day of technical rehearsals.
When managing several artisans, it is helpful to assign a few tasks of varying scale to each person. This way, if one of the artisans is waiting for paint to dry on her major project, she can cut out paper props in the meantime. Otherwise, she will be asking you for another project while you are trying to work on something else. Many prop shop managers will write out a master “to-do” list with all projects and notes written down. This is hung up where all the artisans can see. If one of them needs a project, they check the list and pick one that fits their skill level and the amount of time they have to devote to it. Have the artisans write their name next to a project when they start it, otherwise another artisan may check the list and start working on the same project.
It is especially helpful for this list to include both major and minor projects. If it is fifteen minutes before lunch and a prop builder cannot proceed on his project, he will want a quick and easy project, such as “shorten the magic wand by one inch.” If he is waiting for materials to be shipped before continuing on a project, he may want a bigger project that will keep him busy for a few days.
Expertise
Your labor time depends on your skill and experience. Someone more skilled than you may be able to perform some tasks quicker; you do not want to estimate how long it will take you to do something based on their speed.
If you are a good carpenter and have a lot of woodworking tools and machines, it makes sense to build props out of wood (if wood is one of the materials that will fulfill a prop’s needs). You may wish to braze copper and tin together for a prop, but if you have never used a torch before, you may not know the correct material to use, how to set up your tools, how to maneuver the torch, or even how to determine if you were successful when finished.
What materials do you know how to work with? What tools and machines do you have to work with? Will you have to buy, borrow, or rent tools or machines to work with some materials? What is your space like? Do you have room to work with certain materials and techniques?
Experimentation with new materials and techniques is an important part of furthering your skills as a props artisan, but you should research the methods first, test them out on samples, and have a backup plan ready.
Safety and Sustainability
Do not neglect to consider the safety infrastructure needed for working with certain materials. A product such as expanding spray foam may seem quick and easy for a number of props, but it requires adequate ventilation, a respirator with forced or supplied air, and the appropriate chemical gloves and sleeves. Safety is not an optional expense. You only get one life, and you want to spend as much of it as possible building props.
If you do not have the right kinds of gloves to protect your hands from a certain material or adequate ventilation to work with another, then you cannot consider using it for your prop. This can be hard; as props people, we always want to experiment with new materials and techniques. Our deadlines are often very tight and our budgets slim. It is tempting to let health and safety, especially when dealing with chemicals that have no immediate side effects, take a back seat. This is a mistake. You always need to consider your health and safety. Maybe one day we can live in a world where safety and health is not an expense that our bosses pressure us to minimize, or a hassle and hurdle to having fun; until then we need to take care of ourselves and remain vigilant for situations that are unsafe or unhealthy, even when working for a company that should, theoretically, be following the laws that safeguard our health.
Sustainability is an important need. In many ways, props is already a fairly sustainable field: we save items that otherwise would be thrown away; we store all sorts of objects and goods for future use; we recycle, reuse, repurpose, and upcycle materials, particularly those of us working in low-budget productions or educational settings. Only a props person can take a $100 budget and fill a stage with what looks like thousands of dollars’ worth of stuff.
In our world it is extraordinarily difficult to be fully sustainable, but it is always possible to be more sustainable. Look at the products and materials you buy. Research and test those that are better for the environment. Consider all aspects of your carbon footprint; often, using a local product is more environmentally beneficial than shipping in a “greener” alternative.
As you plan out the props for a production or event, think of what will happen to them afterward. If I know I can use a prop in future shows, I will build it out of nicer and more durable materials. If I think I can reuse any of the materials, I might construct it so it can be disassembled or easily cut apart.
Readjusting Your Estimates
The ability to make accurate budget and schedule estimates for a project is a skill that is often underestimated. Don’t worry when your estimates do not remain accurate over the course of a production. You have a lot of variables to deal with. Every prop can be built with a number of materials, every step of the process can take an indeterminate amount of time, and little setbacks and problems crop up to throw you off.
Over the course of the whole production, the designs may change, and the needs for each prop may evolve. Your tools may break, your materials may exhibit unexpected properties, and your employees may call in sick. You may experience unexpected bottlenecks, such as when everyone simultaneously needs to use the table saw, or when you run out of room in your shop because projects are set up in various stages of completion throughout. Someone may want to paint while someone else wants to sand, but you cannot do both at the same time as you will get dust in the wet paint.
Putting It All Together
In the example of a Yoruban throne, we have a chair with many carvings over it. Rather than attempting the traditional, but excessively time-consuming method of carving it from a solid piece, we broke it down into simpler parts.
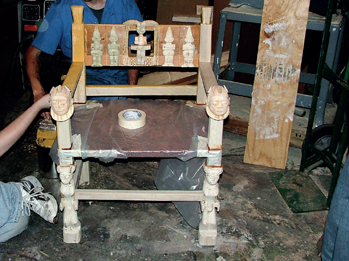
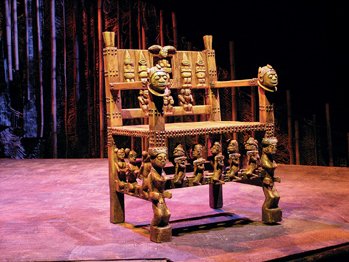
Figure 2-8 and 2-9: Yoruban throne. The Gods Are Not to Blame, Ohio University, 2004. Scenic design by Natalie Taylor Hart. Photographs by Natalie Taylor Hart and Ryan Trupp.
It’s essentially a regular chair that happens to have extra sculptural bits added to it. Since it would be painted, the chair parts could be built from wood, while the figures could be sculpted from whatever material the artisan felt most proficient in, and attached later. It even allowed the less experienced students to each sculpt their own figure while another artisan was busy building the chair, saving time and giving the students valuable experience.
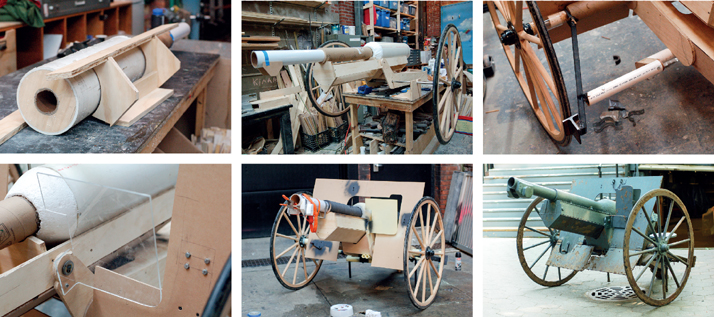
Figure 2-10 to 2-15: The evolution of this cannon shows how different materials are shaped and attached together to form a unified whole. PVC and cardboard was used for the barrel because they came in the right size and shape. Acrylic was used because it is lightweight and could be bent. Welded steel was used along the base because it needed the strength to support all the other materials plus the weight of an actor who sat on it. All’s Well That Ends Well, the Public Theater, 2011. Scenic design by Scott Pask.