eleven
flat patterning
Patterning is the construction, fabrication, or assembling of an object by cutting (and sometimes bending or folding) two-dimensional surfaces according to a pattern or template, and then attaching the edges of these surfaces together to make a three-dimensional object.
Patterning techniques for props come from several crafts and industries. Costume and fashion have methods for patterning with fabric and textiles to make clothes and accessories. Sheet metal workers have methods for drafting and cutting flat patterns into steel to fold and bend into all sorts of tubes, duct work, and other shapes. Geometric solids can be represented by flat patterns. The packaging industry uses dielines to create templates for cutting and scoring sheets of cardstock and plastic that are folded into boxes and other packages. Paper crafts develop a number of ways to fold paper to create complex shapes. We can use all these means and methods separately—using costume design techniques to make things from fabric and sheet metal techniques to make things in metal—but the real breakthroughs happen when you combine these various techniques and use them for all sorts of materials.
Fabric Patterning
Fabric is unique with pattern making because it is not rigid like other materials. When a fabric object is constructed, it will not hold a specific shape unless it is stiffened or completely stuffed, as in upholstered cushions. Most fabric items are designed to move in a certain way and to change depending on the underlying structure. Clothing, for instance, is designed to let your arms and legs move while remaining close so that it does not fall off or drag on the ground. The pattern for a burlap sack is designed so that when you throw a severed head inside, the inside can expand to accommodate the head, and the sack can be carried so that the head does not roll out of the opening.
Pattern-makers use two main methods to create shapes from fabric: the seam and the dart. A seam is where two pieces of fabric are stitched together to create a single piece (see Chapter 12 for a discussion of various seams). A dart is created when you remove part of a piece of fabric and sew it back together to create a new shape. If you cut a pie-shaped piece from a circle to make a Pac-Man shape, and sew it back together, you create a cone. You do not always need to cut the dart out; sometimes, you can simply pull the fabric closer together and stitch the fold shut.
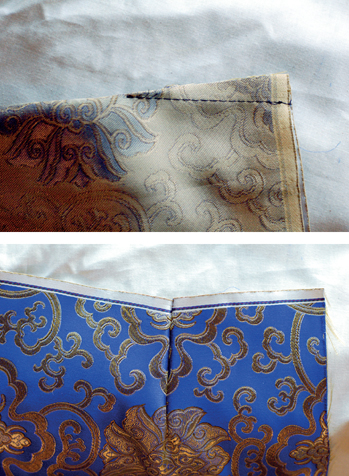
Figure 11-1 and 11-2: Sewing a dart pinches one side of a piece of fabric to create a slight curve.
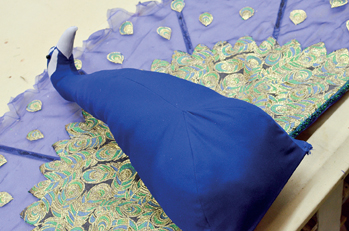
Figure 11-3: The body of this stuffed peacock is a two-piece pattern with a gusset added to the bottom. The gusset expands the shape, making the bottom “fatter” than the top. Beautiful Star, Triad Stage, 2015. Prop by Lisa Bledsoe.
Further ways to shape fabric are gussets and folds. A gusset is a small piece of fabric added into a seam to expand the fabric; it is typically shaped like a diamond or triangle. Sewing folds in place creates pleats, tucks, or gathers (see Chapter 12).
Take a look at existing fabric bags and accessories to see what individual pieces are used and how they come together. If possible, rip the seams and disassemble the piece; you can use the individual parts to trace your own pattern (known as “reverse engineering”).
With just a few basic patterns for bags, sacks, pillowcases, and pouches, you can adapt them to make countless different props. It is helpful to develop your ability to see a pattern not as a specific thing, but as a collection of shapes that can be altered to create different shapes. For instance, a pattern for a gunny sack can easily be scaled down and flipped over to make a black hood for a Guantanamo prisoner.
You can find many ready-made patterns, which shortens your experimentation time. Sewing centers and fabric stores have loads of pattern books for draperies, backpacks, animals, and doll bodies (which can be scaled up to human size). Searching online will lead to many more patterns, both for sale and for free; historical reenactors will often post patterns for period-accurate satchels, pouches, accessories. Stuffed animals can sometimes be adapted to real dead animal shapes.
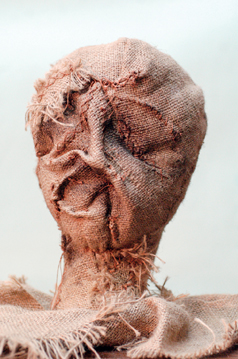
Figure 11-4: After patterning a basic head shape for this scary scarecrow effigy, thread was sewn in various places and pulled through to gather the fabric into wrinkles and lumps that resembled facial features. Measure for Measure, the Public Theater, 2011. Scenic design by Scott Pask.
The fabric “hand,” or “handle,” is how a fabric feels to the touch.
When working with a limited or expensive fabric, you can refine the pattern by constructing the piece out of muslin first. You can see if all the pieces line up correctly and that you get the shape you want. You can make small changes or even start over completely without wasting any of your real fabric.
When you are satisfied with your piece, lay these fabric pieces onto paper, and trace the shape. You can note on the paper the directions of the grain lines, notches for lining up two pieces, and seam and hem allowances. Use rulers and drafting curves (such as hip curves and French curves) to clean up your drawings and make smooth lines. The patterns can now be traced onto the correct fabric.
The final fabric hand, the thickness and stiffness of the fabric, and the weave or knit will affect how it drapes and patterns. Making a pattern out of muslin for a fabric that is very different from muslin may be problematic. Sometimes it is necessary to pattern directly with your real fabric.
Soft Sculpture
Soft sculpture is the use of non-rigid, aka “soft,” materials to create a three-dimensional shape. You cut pieces of fabric into different shapes, sew them together, and when you fill it, the fabric takes on a three-dimensional shape. Soft sculpture is usually filled with stuffing or foam, but some pieces use beans or sand. You can use soft sculpture to create objects like pillow cushions, stuffed animals, or even realistic-looking animal carcasses.
The easiest way to create a symmetrical piece is to trace the side view of the shape you wish to replicate. Cut two pieces of fabric from this pattern. Sew them together, adding stuffing before you completely close it up.
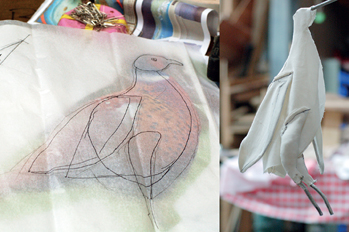
Figure 11-5: The shape of this pheasant was made by breaking a photograph of the bird into individual components. The legs, wings, and body were each simple two-piece patterns. The legs and wings were stitched to the body along one edge, leaving them free to “flap” in a realistic manner. This approximated the shape closely enough that when it was covered in feathers, it looked (and moved) like a dead pheasant. King Lear, the Public Theater, 2011.
Computers can automate much of the patterning process. Starting with a three-dimensional model, a program can flatten all the surfaces and break it apart into individual pieces that you can print out and trace or transfer to your flat materials. Programs that develop pattern pieces for fabric can factor in the stretch and sag of fabric, the compression and extension of fabric over complex shapes, and other distortion of fabric. Some programs deal with stretchy fabrics and can calculate what shapes various pieces create when under tension.
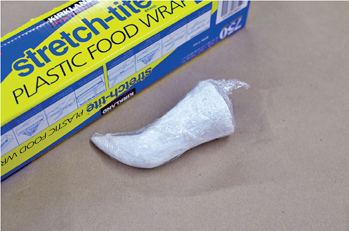
Figure 11-6: You may have heard of costumers making a “duct tape mannequin”; you can use the same process to develop flat pattern pieces from an existing three-dimensional objects, like this small horn. We will wrap the entire horn in a shell of masking tape. To keep the tape from sticking to the horn, we first cover it in shrink wrap.
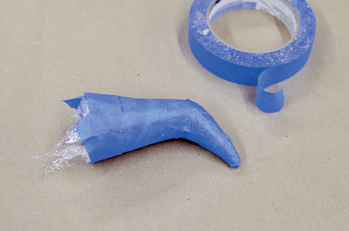
Figure 11-7: Wrap the tape snugly, and make sure it lies as flat as possible against the object. Wrap at least two overlapping layers, running the tape in perpendicular directions in each layer. Masking tape allows you to draw potential seam lines on the object.
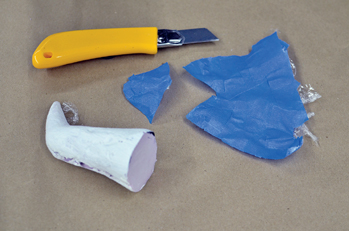
Figure 11-8: When you are happy with where your seams are placed, you can cut them out and remove the tape shell from the object (taking care not to cut the object underneath). If the pieces still have a shape, you will need to cut further darts and seams until they lie completely flat. Once the pieces are flat and you are happy with your pattern, you can trace it onto fabric, leather, or whatever material you are making your prop out of.
Patterns for Geometric Solids
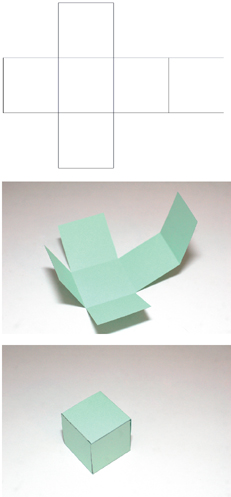
Figure 11-9 to 11-11: A cube has six faces, each a square. One of the possible “nets” of a cube is the arrangement shown on the top. When you cut it out of a piece of paper and fold the edges as seen in the middle, you can make a cube like the one on the bottom.
Complicated patterns can be simplified by breaking them down into more basic geometric solids. A geometric solid is formed when a two-dimensional shape such as a square or circle is given three-dimensional form. Geometric solids fall into several basic categories: cube, cone, cylinder, prism, tetrahedron, pyramid, polyhedron, and sphere.
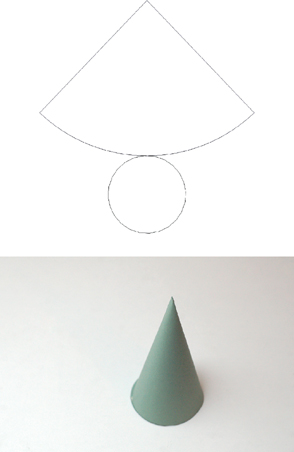
Figure 11-12 and 11-13: To make a cone from a flat piece of paper, you must roll one of the faces up rather than leave it lying flat.
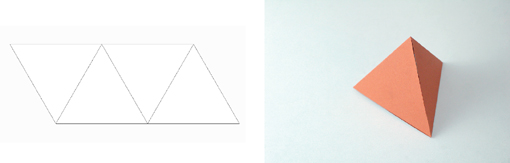
Figure 11-14 and 11-15: A tetrahedron is a four-sided shape with every face a triangle. This shape can also be called a triangular pyramid.
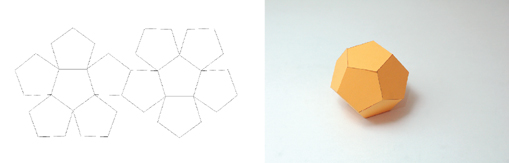
Figure 11-16 and 11-17: A polyhedron is made from multiple instances of simple, two-dimensional shapes to form a three-dimensional figure. Each 2D shape is a side or facet; all facets do not have to be identical shapes. This dodecahedron has twelve identical faces, each a pentagon.
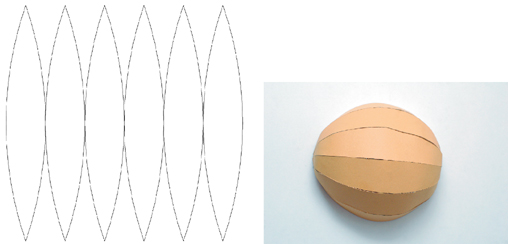
Figure 11-18 and 11-19: A sphere has complex curves and an infinite number of faces, so it can only be approximated from a flat sheet of material. One method involves using a number of “gores” (or “lunes”). This is how globes of the Earth are made. The more gores you use, the closer the final shape appears as a sphere.
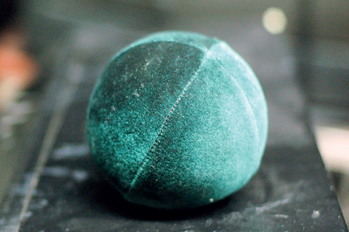
Figure 11-20: A sphere can never truly be recreated with a flat pattern because it has complex curves (surfaces that curve in more than one direction). You can only make it if your material has some stretch, like hammering sheet metal or using a stretchy fabric.
The net of a geometric solid is the arrangement of its surfaces in a single plane (or a flat piece of paper), joined along their edges so that they can be folded into the faces of that solid. Most polyhedra can have several possible nets depending on which edges you wish to be folded and which you wish to join.
Many shapes can be made through a combination of the basic geometric solids. More shapes can be made by truncating, or cutting off, a portion of the shape.
Developing a three-dimensional object into a template is useful if your piece needs to be hollow or open to show the inside, or if it is made out of a transparent material that would reveal any structure on the inside. Open boxes, buckets, and megaphones all benefit by being built out of a flat piece of material that is folded or rolled into a geometric solid.
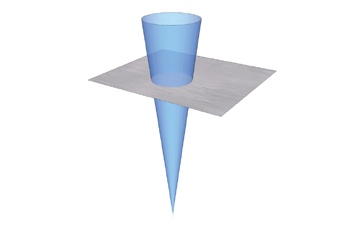
Figure 11-21: An inverted cone that is truncated parallel to the base creates a shape reminiscent of a bucket.
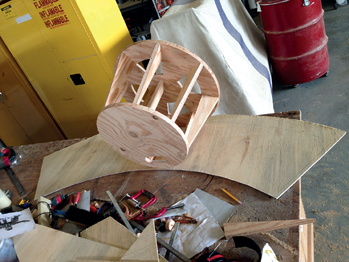
Figure 11-22: As a bucket is a truncated cone, and a cone has the pattern seen in Figure 11-12, we can see that a piece of wiggle wood needs to be cut in the above shape to wrap around the sides of this bucket-shaped circus stool.
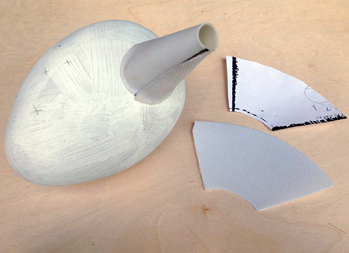
Figure 11-23: The same truncated cone pattern is used to make the mouthpiece on this ocarina.
Packaging Dielines
A dieline is a line drawing of all the folds and cuts used to turn a flat piece of cardstock or paper into packaging and containers. They also include tabs which overlap the joints to help glue pieces together.
You can include a dieline in a computer file so you can lay out all the graphics and text that get printed onto your packaging material. This lets you fold and assemble various boxes, envelopes, and cartons without needing to add stickers or paint afterward.
Paper Patterns
Paper craft is the collection of techniques that involve cutting and folding designs onto paper, cardstock, or any laminar (flat) material that can be folded.
Do not confuse paper craft with origami, which is the Japanese art of folding a design from a single piece of paper (or kirigami—like origami but involving cutting and/or gluing the paper as well). In origami, portions of the paper overlap each other. Of course, the skills of origami can be very useful for a props artisan in various situations, but they will not be discussed here.
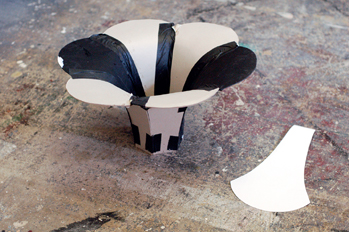
Figure 11-24: A gramophone horn is made from a simple pattern piece which is cut out six times. Once this shape is perfected in a paper mockup, you can use the pattern piece to cut the shapes out of metal or plastic.
Thick materials such as corrugated cardboard, foam core, or heavy cardstock may need to be scored at the folds to give a clean bend. Convex folds and seams will have visible gaps. To avoid gaps, the seams can be cut at a beveled angle, covered with tape, or filled with putty.
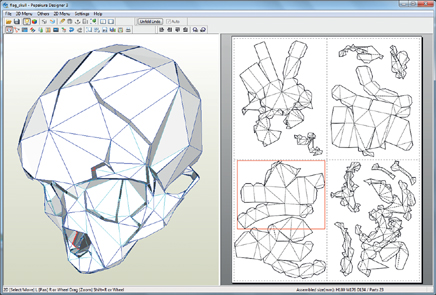
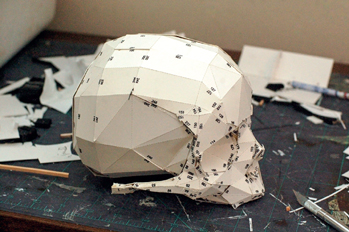
Figure 11-25 and 11-26: Pepakura Designer is a computer program that can take a three-dimensional file and transform it into a pepakura pattern, complete with tabs and numbers to match both sides of a joint, which can be printed on standard sizes of paper.
The Japanese term for paper craft, pepakura, has been popularized with the spread of computer programs that will automatically create a pattern from a three-dimensional computer model. These complex paper models are a far cry from the simple blocky shapes whose patterns were found on the backs of cereal and cookie cartons during the mid-twentieth century.
Pepakura hobbyists use a number of methods for stiffening these paper objects into sturdy props. First, the seams on the outside are sealed with tape, resin, or glue. Then the inside surfaces are coated. Again, resin or glues work best. Mâché or fiberglass can be used for extra durability. Water-based materials can warp the paper, so seal it with PVA glue or shellac before using them.
The outside surface of the paper can then be coated. Thin coats are used to keep all the details of the folded paper. Thicker coatings are useful to hide the folds and make more of a curved surface (a lot of sanding and filling is in your future if you build props like this).
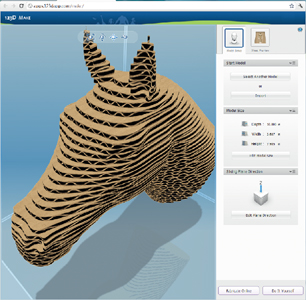
Figure 11-27: Programs like Autodesk 123D Make can transform three-dimensional digital files into all manner of flat drawings that can be printed and cut out. This horse head was transformed into a stack of corrugated cardboard. The program can print out the patterns for each piece of cardboard, or send instructions to a computerized cutter to cut out the pieces for you.
Sheet Metal Patterning
In the terminology of the sheet metal industry, you develop the surfaces of a three-dimensional shape to create a flat template to construct it from scratch. These patterns are known as developments, or sometimes stretchouts.
A sheet metal pattern will show fold lines, cut lines, tabbed edges, and tab fold lines. When you bend sheet metal, the bends will have a slight radius. The thicker the metal, the greater the radius will be.
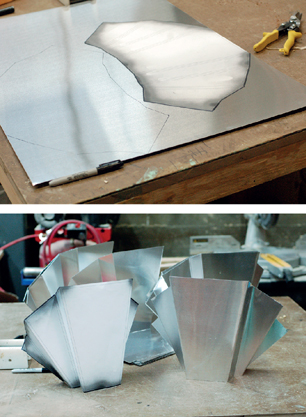
Figure 11-28 and 11-29: A simple pattern for a footlight is created on paper and traced to a sheet of aluminum. It is cut out and folded along the same folds indicated on the paper, making it a perfect duplicate of the paper pattern. Sleep No More, New York City, 2011.
The edges of a sheet metal piece are often rolled or folded over since it can be sharp, no matter how much you sand and file it.
Some computer programs (like Autodesk Inventor) can take a 3D model and make a flat pattern for sheet metal.
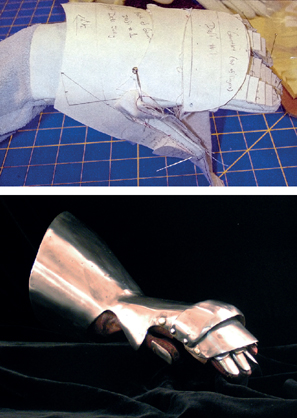
Figure 11-30 and 11-31: If you heat or hammer metal it to bend it, you introduce distortions to the surface. This is useful when you want complex curves over a single surface that you cannot achieve with paper. Photographs and gauntlet by Debi Jolly.
Soft Foam Patterning
Soft foam and foam rubber are often patterned and assembled to create three-dimensional shapes. Thin foam rubber, like XLPE and EVA foam, has been used as a material for flat patterning just like paper and sheet metal. The patterns are typically created on paper, and then traced to the foam and assembled.
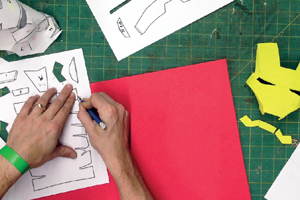
Figure 11-32: Pepakura patterns can be traced onto flexible foam.
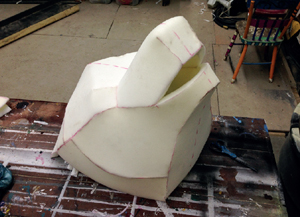
Figure 11-33: Flat foam patterned into a bear head. Designed by Bill Brewer. Snow Queen, Triad Stage, 2013.
Pieces can be attached together with hot melt glue. If the foam is thick enough, you can glue end-to-end without needing any overlapping tabs. Convex joints will have gaps unless the edges are beveled or filled. If you want the piece to remain flexible, use a flexible filler, like paintable silicone caulk.
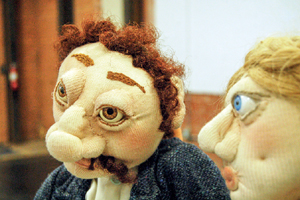
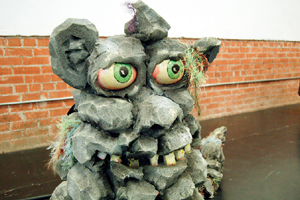
Figure 11-34 and 11-35: The foam puppets in the first picture show how foam can be shaped by pulling and pinching, either with glue or stitches. Contrast that with the second picture, where the foam is shaped by cutting and carving. Puppets constructed by Rebecca Akins for Childsplay Theatre in Arizona.
Puppet makers often work with soft polyurethane rubber, nicknamed polyfoam (similar to upholstery foam). Polyfoam can be even thicker than EVA foam, which introduces some additional techniques for shaping and patterning it.
It can be helpful to attach a knit fabric with spray adhesive on the unseen portion of the foam to give it reinforcement, particularly when using stitching to create shapes.
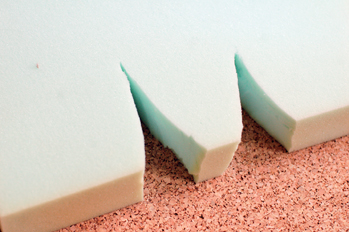
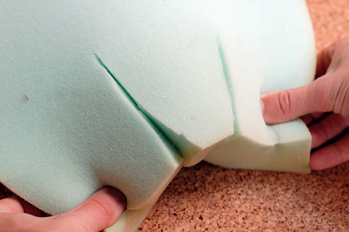
Figure 11-36 and 11-37: As with fabric, multiple dart closures will create a curve in soft foam.