five
assemblage
Props are rarely made from one piece of material. Artisans combine a whole variety of materials and objects to construct a single prop. Some props may be made entirely of found objects assembled together. This chapter will look at combining objects and materials into props; it will also look at the means of attaching different materials together, particularly all the different kinds of glues and adhesives out there.
Unconventional Materials
Raw materials are not the only materials you can use. While wood comes in a myriad of forms, like sheets, sticks, and rods, you can also find wooden beads, buttons, and knobs. Further, there are any number of already-made items made out of wood, such as finials, carvings, and toys. The same is true of all materials. Objects and products of all kinds can be added to your repertoire of materials for use in prop making.
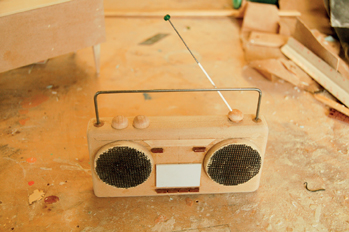
Figure 5-1: This tiny boombox began as a rectangular piece of MDF. Wooden knobs and disks were attached to make the dials and speakers; a piece of screen was cut into circles and attached on top of the disks to finish the speakers. The handle is a bent section of wire. The antenna is a piece of coated wire with half of the coating stripped away, and a bead attached to the end. The panels are thin sections of styrene glued on. The buttons were cut from a sheet of fake bricks used in model railroad-making.
Creative Gizmology
Take a look around you. Tables, chairs, stools, cushions, desks, and other furniture probably line the room you are in. Small objects are everywhere: cups, utensils, computer parts, speakers, bowls, coasters, etc. If you are in your home, you can go to other rooms and find vacuum cleaner attachments, bottles and containers of all shapes, disposable pens, shaving razors, tools, toys, lamps, etc. If you browse the various aisles of a hardware store, you will find hoses, pipes, connectors, knobs, and all sorts of shapes and devices in a variety of materials. Flea markets and thrift stores are full of an assortment of goods that can be appropriated, or that can be taken apart for pieces. Many salvage yards allow you to hunt for interesting hunks of metal and machinery. Items for use in your props are everywhere, from the most expensive stores to the garbage can.
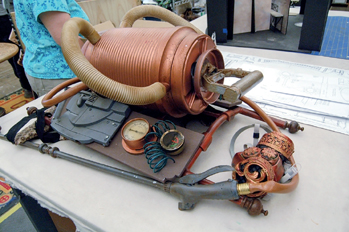
Figure 5-2: This “steampunk” exterminator device is an example of “creative gizmology” in action. It is assembled entirely from existing objects. Prop made by Jim Luther at Childsplay Theatre for The Borrowers.
“Creative gizmology” means using random pieces and parts to make your prop look more complicated than it is. Found objects and materials with unusual shapes help save time in constructing the parts of a prop that would take hours to construct from scratch. One of a prop builder’s greatest skills is looking beyond what an object is to imagining what it can become.
Model makers use the term “kit-bashing,” which means taking pieces from commercially available models, such as the tires from a car or the fuel tank from a jet, to use in a scratch-built model as a way to save time in creating complex shapes. For the prop builder, the world is their kit to bash.
Of course, when you are looking for a specific item, you will not be able to find it. It is inefficient to go hunting for pieces one at a time depending on what prop you are currently building. It is far better to collect these pieces as you find them and keep a collection handy for when the need arises. The dilemma comes in organizing these parts. How do you catalog pieces that are not only disparate but possibly unique? Some prop builders divide them up by material: one bin for steel bits, one for brass things, and a third for rubber parts. Others classify them by shape: balls, tubes, rosettes, disks, etc. Many use a combination of these two methods, with containers for wood beads, plastic rods, shell cameos, and any other pieces they may have in multiple. It is, obviously, a highly personalized system dependent on what the shop has and what it uses, and a good system will allow for easy reorganizing and updating.
Helpful Items to Store and Stock in a Prop Shop
The following is a suggestion of various items and materials you can stock for use in props:
Beads, feathers, glass, sequins, bottle tops, wire, wrappers, foils, coins, braids, cotton balls, glitter, popsicle sticks, buttons, wooden pieces, cans and containers, tubing, pipe connectors, plumbing parts, door hardware, lamp and chandelier parts, tassels, fringe, cord, hooks, ribbon, yarn, costume jewelry, decorative appliqués, trunk parts, handles, springs, plastic bottles, medicine containers, egg cartons, hoses, gauze, screen, dials, electronic parts, textured papers, gears, dowel, dried beans, curtain rings, vacuum cleaner attachments, toys and toy parts, disposable flatware, rods, pegs.
Diapering, Nurnies, and Greebles
Diapering is the old art of adding a repeated or decorative pattern to a plain surface to break it up and add interest. Greebles are the modern-day equivalent of diapering: small pieces of detail added to a surface to add interest and complexity. The term was reportedly coined by model makers on the original Star Wars movies, and used to refer to unnecessary and sometimes random three-dimensional details to make a surface look more intricate than it actually is. Other terms for this process include wiggets and nurnies.
Real items have any number of bumps, ridges, and divots that you can carve or attach to make your prop look more realistic. Some examples I’ve seen props artisans do over the years include scribing lines into a large surface to make it look like it is constructed of smaller plates and pieces, adding a line of bumps to look like rivets or bolt heads, covering a standard hinge with a cutout detail to make it look like a wrought-iron hinge made by hand, and attaching thin sheets of material on top to look like raised panels or doors.
Cutting shapes out of thin sheets of material is a fast and common way to give your prop another level of detail. When the surface is curved, you will need a more pliable material that will still appear to be a rigid one.
One of the more popular materials used for this purpose in the past has been industrial felt. It gives a fairly clean edge when cut, and it can easily be wrapped around curves and rounded surfaces. It can be sealed and hardened with shellac, glue, or resin. A closed-cell foam, such as XLPE or EVA foam, can give very clean raised details; it can also be sealed and hardened with glue or resin. Styrene, while not as pliable as felt or foam, can bend around simple curves or be heated to conform itself to more complex curves. It comes in multiple thicknesses, giving it a lot of versatility.
Textured and patterned materials are useful for quickly diapering a large surface as well. With a strong mounting surface and the right kind of coating, even textured fabrics and papers can appear to be solid surfaces.
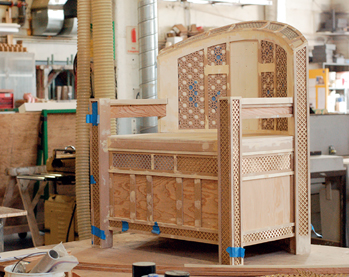
Figure 5-3: Panels in this throne were diapered by applying materials with cutout patterns, such as fireplace screens and grills. King Roger, the Santa Fe Opera, 2012. Scenic design by Thomas Lynch.
Adhesives
An adhesive is a substance that sticks two materials together. Glue and cement also refer to soft or glutinous substances that stick materials together. Though some practitioners differentiate between the terms (using glue to refer only to adhesives derived from plants and animals, for instance), all three can be used interchangeably. One company may sell “epoxy cement,” while another sells “epoxy adhesive,” and in terms of chemical composition and practical properties, both are identical.
Adhesives form bonds in a few different ways. Some adhesives work by “drying”; that is, either the water or solvent evaporates. Porous materials like wood, can also pull the water away to help the adhesive dry where it is not directly exposed to air. Other adhesives “cure,” or undergo a chemical conversion. Any “two-part” glue falls in this category, where the mixture of the two parts catalyzes, or begins, the chemical conversion. Other adhesives can be catalyzed by exposure to moisture or air. Some two-part adhesives come in a special container that mixes the two parts as you apply it, so it is as easy to use as a single-part adhesive. Finally, some adhesives work through heat, becoming soft and/or liquid at a high enough temperature, and solid again when cooled (usually to room temperature). Others, known as thermosetting adhesives, cure through the addition of heat, and cannot be resoftened once fully cured. Different glues will form a bond through at least one of these three means: evaporation, curing, or heat.
Every adhesive has specific working properties that may help or hinder your particular gluing situation. Even alternative formulations of the same adhesive can behave differently from each other.
The assembly time is how long you can reposition the two materials before the glue becomes too rigid to move any more, or where further repositioning will result in a weaker bond. The assembly time is a combination of the open assembly time (the time from when the glue is applied to when the materials need to be stuck together) and the closed assembly time (the time between when the materials are closed to when they need to be clamped). Finally, the clamp time (sometimes called the pressure period or press time) is how long the two pieces need to remain clamped together for the strongest possible bond.
The initial tack is the amount of “stickiness” a glue has when the two materials are first pressed together. A glue with a high initial tack will allow you to press two materials together and not have them move when you remove your hands. A low initial tack lets you easily reposition the two materials after attaching them together.
Glues that harden chemically have their own set of terms used to describe their various working properties. The cure time is the time it takes for an adhesive to transform from a liquid to a solid. The initial cure is when the glue fully hardens (sets) but has not developed all of its properties, particularly its strength. The final cure is when all of its properties have been fully developed. Most often, a two-part glue will have an initial cure of an hour or so with a final cure of twenty-four to forty-eight hours.
The pot life is the amount of time a glue remains usable while it remains in the pot, or container, it was mixed in. This may or may not be different from the working life or the amount of time a glue remains usable after it is mixed and dispensed from its pot or container. Some glues (such as epoxies) set faster when they remain in the pot than when they are spread out thinly.
Besides the working properties, different glues have all sorts of variations in what kind of bond they achieve when dried. Some give a flexible bond, while others create a rigid one. Some can even be sanded once dry. If you are working with a translucent material or are creating a joint where the dried glue will be visible, you probably want a glue which dries clear or semiclear. Some glues dry with a dark or deep color. Some can be painted when dry. One glue may create a permanent bond, while another creates a reversible one. You may need to create a waterproof bond in some situations, while in others, you want a glue that can be washed off with water. Some glues can actually cure or harden while completely submerged in water, while others require exposure to air until they harden. Some glues are thick and can fill gaps or adhere rough surfaces together, while others are thin enough that you can stick a thin and flexible material to another without any lumps or wrinkles.
All the variations in how you work with a glue and what properties the joint can have once the glue hardens prove that there is no such thing as a single “miracle” adhesive. Every situation is different; it is not enough just to know which materials you are joining, but also the type of glue joint you wish to create. I have put together a chart of suggested adhesives for various materials (see pp. 64–65), but keep in mind when using it that selecting a glue involves many more considerations than just the materials. Common glues in the prop shop like PVA and epoxy come in such a vast array of working and final properties that the different types can almost be thought of as separate products.
The glue you choose is practically useless if you do not apply it correctly. Read the directions. You need to apply the correct amount; some glues only need to be applied to one side, while contact cements need to be applied to both materials. Some glues require exposure to air for a length of time or some other activation before materials are pressed together. Some glues only work when bonded with the material directly, and have a completely different strength if your material is painted or coated, or if the glue is applied over old glue. You may need to treat, clean, or otherwise prepare the surface of your material before applying the glue. Many glues require clamping the two materials together for a length of time (the clamping time). You will save a lot of trouble if you plan ahead how you will clamp your materials together before applying the glue. It is helpful to dry-fit your materials and make sure everything fits.
If your glue is not doing what you think it should do, it may be because you haven’t followed all the directions.
Choosing a Glue
The chart on pp. 64–65 lists some common materials and suggestions for the best kinds of adhesives to choose. I’ve kept it to the most useful kinds you would find in a prop shop; many others exist. I also give descriptions of these glues as well as popular brand names.
The variety in materials is practically endless. A glue that works well on brass may not work on cast iron, but the chart only lists the more general category of “metal.”
Keep in mind the scale and scope of the materials you are joining. While many bridal glue manufacturers claim that their products work on “wood,” they usually mean decorative carvings, rosettes, and beads made from wood that you wish to apply to a surface. This is very different from attaching several boards together to make a giant dining table.
Finally, remember that adhesives are not the only, or even the best, way to join two materials. Materials can be fastened mechanically, tied or sewn together, or even taped. The first step of choosing an adhesive is deciding whether or not you actually need an adhesive.
White and Wood Glue
Polyvinyl acetate, or PVA glue, comes in a vast array of forms, though at its most basic, we know it as “white glue.” Regular white glue, such as Elmer’s Glue-All is a very cheap glue useful for gluing together papers and some wood. It is not very water-resistant though. “School glue” is made to be as nontoxic and easy to clean as possible. Even dry, it can be washed up with water.
Other formulations of PVA have different properties suited for various other tasks. Some dry with a more flexible bond, such as Sobo and Rhoplex. PVA for bookbinders is pH-neutral, so it can be used for archival purposes. PVA can also be formulated for spreading over large surface areas, either to adhere the materials to a surface (like in scrapbooking-type tasks), or as a coating to seal it all in (like in découpage work). One of the most popular brands of this type of PVA is Mod Podge.
For carpentry, PVA glue is modified with aliphatic resin, making it more tacky and less runny when applying. It is quicker to dry, and leaves a stronger and more moisture-resistant bond that is less likely to creep (a fancy term for “stretch” or “pull apart”) than straight white glue. The dried glue is also more rigid, making it easier to sand, whereas many white glues are rubbery when dry. Wood glue is often yellow in color to indicate the addition of aliphatic resin, however the color is just a dye; you can find white wood glues that work just as well as their yellow counterparts (likewise, you can find “dark” wood glues for use on darker woods). Titebond is one of the oldest and best known brands, though many other companies offer their own carpenter’s or wood glue.
Super Glue
“Super” glue is prized for its ability to make instant or near-instant bonds between two materials. It is properly called cyanoacrylate or CA glue, and some brands refer to it as “instant” or “Krazy” glue. In many cases, only a few drops give a strong bond, making it especially useful for smaller parts; larger quantities are extremely expensive, so it is less useful as an all-purpose adhesive. Thinner amounts also harden faster than thicker amounts. While the glue is strong enough to handle your piece within seconds of gluing, full curing strength takes twenty-four hours.
Some types of cyanoacrylates are viscous to help fill gaps, while others are thin enough to run down the smallest of cracks. It works well on nonporous materials and on many plastics (though it does not dry completely clearly and it can cloud the plastic, so you may wish to avoid it on transparent plastics). CA glue can also be used as a coating on many materials.
It will glue your skin together almost instantly; several variations are actually used to seal wounds in medical emergencies, but the stuff you buy in a hardware or art store is likely a skin irritant or even toxic, so don’t use it to seal your cuts.
CA glue accelerator (such as the famous Zip Kicker) is a spray that will instantly harden CA glue. Be sure to read the Safety Data Sheet (SDS) for proper safety precautions, because it is particularly nasty on the lungs. You can also sprinkle baking soda or cornstarch onto the glue to cure it instantly. It will leave the surface of the glue a bit rough, but it is easily sanded. You may also mix the baking soda or cornstarch in with the glue first to make more of a gap-filling paste.
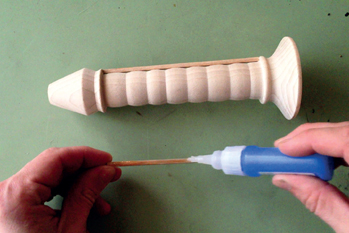
Figure 5-4: The thinner the layer of CA glue, the faster it will cure. If two parts are pressed together tightly, the glue will cure almost instantly. If you have a “blob” of glue which is filling a gap, it will take longer to cure. Filling a gap of greater than 0.25 mm can potentially never cure unless you use gap-filling CA glue or an accelerator.
Because CA glue cures in the presence of moisture (or dust, which contains moisture), do not touch the tip of the bottle to your material when applying it. Otherwise the glue will harden and clog the tip.
Hot Glue
“Hot” glue, or hot melt adhesives, are glues that are heated, melted, and applied with hot glue guns. The thick body makes it useful to fill gaps and bond materials that do not fit together tightly; it also makes it useful to quickly add raised decorations to a surface. It comes in both “low” and “high” melt variety. Some hot glue guns, particularly those found in craft stores, will only do the low-melt version. High-melt glue is needed for more structural purposes.
The glues also come in many colors; you can use these for all sorts of effects, such as fake sealing wax on medieval letters. Be careful of getting the hot glue on your skin; if this should happen, allow it to cool before trying to remove it. If you try to pull or wipe it off, you will simply spread more hot glue around and burn more of your skin. Keep a bowl of cool water nearby to douse your hands in if they get hot glue on them.
Fugitive glue is a special type of hot glue that is easily peeled up and remains gummy. It is also known as “snot glue” or “credit card glue” because it is the type of adhesive used to stick new credit cards to paper when they are mailed out. It requires a different gun than standard hot glue. It is useful for making temporary and removable attachments between paper, plastic, and other thin materials, while leaving no residue.
Epoxy
Epoxy is a type of resin usually found in a two-part liquid form. It can be as thin as baby oil or as thick as ketchup; when mixed with fillers, it can even come in putty form, which is used to fill large gaps and repair holes, as well as to sculpt small details and shapes. Most epoxies are fairly rigid when cured, so they are not useful for joints or materials that are flexible. They are especially useful for joining disparate materials, especially if one or both of them are nonporous. You can find all sorts of epoxies formulated for specific materials, such as metal epoxy and plastic epoxy.
Some epoxies cure incredibly fast (frequently sold as “five-minute epoxy,” though others can cure in as quickly as one minute), making them useful for emergency repairs or situations where prolonged clamping is not an option.
Contact Cement
Contact cement refers to an adhesive which is applied to both surfaces, allowed to dry, and then pressed together. They are often used for applying laminate or veneer to wood. They are also extremely useful on rubber, leather, and flexible foam. Barge cement is a popular brand, though fairly toxic; newer versions of Barge can be found with less-toxic solvents.
Rubber cement can also be used as a contact cement. Water-based rubber cements exist as well, such as Copydex.
Water-based contact adhesives contain less-toxic solvents than regular contact cements. This makes them useful both for health reasons as well as for use on materials that are normally dissolved by solvents. Styrofoam works well with water-based contact adhesives. Water-based contact adhesives are often called green glue because of their perceived environmental benefits and because of their color. Common brands include LePage’s Press-Tite Green Contact Cement and 3M Fastbond 30-NF.
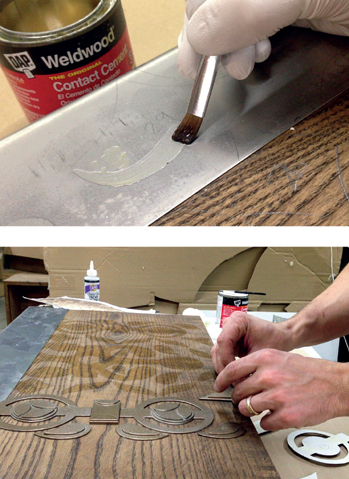
Figure 5-5 and 5-6: Contact cement is applied to both surfaces being attached, allowed to dry, and then pressed together. It is important to spread the glue to the very edge of what you are adhering, or it is liable to peel back off. Excess glue on a surface can be rubbed away when dry.
Goops and Cements
This is a broad category of glues that have some kind of polymer dissolved in a solvent. Because they are solvent-based, they require adequate ventilation and/or the use of a respirator.
Bridal glue is a synthetic polymer dissolved in a solvent (usually acetone) that leaves behind a slightly flexible material; it behaves almost like “cold hot glue.” Similar glues tout themselves as floral glue, craft glue, or jewelry adhesive. These glues are useful for assemblage-type crafts involving flowers, fabric, beads, feathers, and other small decorative items of various materials. They work especially well when attaching items to fabric, or fabric to itself; some props artisans will even use it to hem an edge or close a seam when sewing is not an option (though unlike thread, the adhesive is not reversible). Many of the most popular brands used by props artisans are made by Beacon Adhesives, which sells products such as Bridal Glue, Fabri-Tac, Magna-Tac, and Gem-Tac.
Household cement, sometimes called “goop” or “jewelry cement,” is like a thicker, stronger version of bridal glue, formulated and marketed for general household repairs. Their thickness allows them to fill gaps or adhere irregularly shaped surfaces together. They are especially useful on nonporous materials. These types of adhesives fill the store shelves these days and are often touted as “miracle” adhesives, or as glues that will “repair anything.” As this chapter will attest, though, no single glue will be perfect for every situation.
Check the SDS because they may use some pretty potent solvents, such as tetrachloroethylene; most of these solvents are known or suspected carcinogens, and the long drying time of these types of adhesives (twenty-four to forty-eight hours) means you are exposed to fumes for quite a while. These glues are less useful for large-scale work but handy for small details, particularly when gluing very disparate materials together. Common brand names include Amazing GOOP, E6000, and Elmer’s Household Cement. Variations exist for general auto and machine repair, such as Seal-All.
“Spray” adhesives are a quick way of adhering thin materials, such as paper or fabric, to rigid materials such as wood or metal. They are usually a spray version of goops and cements. There are hazards inherent in the solvents themselves, as well as the additional hazards that come from being sprayed into the air. Though these hazards mean they should be avoided when possible, their advantage over water-based adhesives is that they will not wrinkle the paper as they dry. 3M produces some of the most popular spray adhesives, such as 3M Super 77, which some artisans simply call “spray 77.” Other versions exist for other materials.
Sundry Other Glues
Polyurethane adhesive, such as the popular Gorilla Glue, foams as it dries, so it will fill slight gaps, though it works best when the two materials fit closely together. It uses moisture to activate, so you can either dampen the surface you are gluing, or spritz the glue with water right before attaching the materials together. I like it for adhering expanded foam to plywood. Any two-part polyurethane, such as casting resin or expanding foam, can also be used as an adhesive.
Starch glues and pastes include flour glue, wheat paste, and similar substances. They are useful for work involving paper, particularly in papier-mâché. These are usually homemade since they spoil quickly after being made, so a bit of labor is involved, but they are the least expensive glue you can find.
Construction adhesives are used for attaching paneling, molding, or other general home construction tasks. Most are a fairly thick paste (with inert fillers such as kaolin, quartz, or limestone) that comes in a tube meant to be applied from a caulk gun. Familiar brands include Liquid Nails, No More Nails, and PL 200.
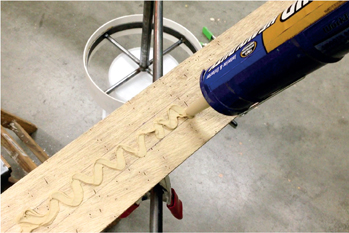
Figure 5-7: Construction adhesive is placed on one of the surfaces. For a faster drying time, the two surfaces can be pressed together, than pulled apart for a few seconds before pressing them back together and clamping.
“Flex” glue is a general term for any adhesive that remains flexible after drying. Older prop-making texts frequently refer to Phlexglu, a brand made by Spectra Dynamics until the early 2000s. Often misspelled “Plexglue” or “Phlex-glue,” it dried clear and flexible; it was used as an adhesive, for texturing, and as a binder for pigments, metallic powders, and textural material (sawdust, dirt, etc.). Modern alternatives include well-known theatrical brands such as Rosco FlexBond and Rose Brand’s Flex Glue; you can also find these glues labeled as book binder’s glues.
Silicone adhesives remain flexible when dry and fill gaps well. These are usually used as bath and shower sealants and to construct glass aquariums because they make joints that are both waterproof and watertight. They come in one-part or two-part formulas, and may dry translucent or opaque. They are difficult, if not impossible, to paint over, so choose a color that you like.
Solvent welders are technically not adhesives, but they are used in the same way. These use a solvent to soften the two pieces of plastic, which will resolidify as a single piece when the solvent evaporates. Common types include PVC glue and model airplane glue. Check Chapter 10 for a list of common plastics that can be solvent welded.
Latex can be used as an adhesive. Its main advantage is that it is very flexible and stretchy. Rubber cement is latex dissolved in a solvent; when the solvent evaporates, the rubber portion is left behind. Other latex-based adhesives are used as contact cements or as carpet and fabric glues.
Casein is a paint binder derived from milk with some adhesive properties. The working time can be several hours, but it leaves a fairly strong and water-resistant joint. It is rare to find these days, but you can make it yourself or find ready-to-mix powders.
Most animal glue used today comes from the hide or hooves of horses. You can purchase it in either flakes or powder, which are melted down in a double boiler; you can also find bottles of premixed glue that are applied cold. It is still preferred by many furniture makers for its distinct properties. It remains slightly flexible when dry, so it will not crack as the furniture is abused, or the wood expands and contracts. It can be remelted with heat, so loose joints in furniture can be taken apart and reglued with ease.
Urea glue may be rare in many prop shops, but it is known to hardcore woodworkers. It can come in powdered or a two-component form. It is sometimes referred to as “plastic resin glue,” urea-formaldehyde, or UF glue. It can have a pot life of up to four hours, and a clamping time of over thirteen hours. This makes it useful for veneer and laminates where precise positioning and repositioning is preferred. It is also very waterproof and has no creep, unlike PVA. I’ve even seen it used for papier-mâché.
Resorcinol glue is another two-component glue used for gluing lumber joints and laminates; it is used primarily in boatbuilding applications and for aircraft as it is completely waterproof and highly weatherproof. It has almost no gap-filling abilities, which makes it incredibly difficult to use for anything but the most precise work. It dries to a dark maroon/purple color, so don’t use it where the seam will be visible.
Avoid most of these glues if you need to glue something to an actor’s skin. Only glues approved for use on skin should be used, such as prosthetic adhesives (Pros-Aide) or medical adhesives.
Removing Glues
Sometimes you want to remove your glue, whether you need to alter or repair a prop, or if you accidentally got some in the wrong place. Some heat-activated glues can be resoftened with heat and removed. Glues that dry can often be removed by reapplying the solvent used, whether water or an industrial solvent. Some glues have their own special removers, such as “debonder,” which will soften and break the joints created with cyanoacrylate glue. Finally, some glues can only be removed mechanically, by either cutting, sanding, or otherwise wearing away the dried glue and wherever it has soaked into the material itself.
Most of the time, it is easier to clean up the glue before it has dried; read the label to see what you should clean it up with. Some glues you want to let set first before cleaning. Hot glue, for example, will just burn your hands and make a stringy mess if you try to wipe it away while hot. Let it cool and then peel it off in one piece.
Tape
Though tape is rarely used for permanent attachment, prop making does include a few situations when tape comes in handy. Often it is used as a temporary attaching device, such as when an adhesive is drying and you need to hold the pieces together.
You can find it handy to tape a drawing or template to a piece you wish to cut, sculpt, or carve. Certain tapes are great for masking areas you need to paint or otherwise treat. When carving pieces on a band saw, tape is helpful to reattach the cutoffs so that you have a flat surface to sit on the table of the saw.
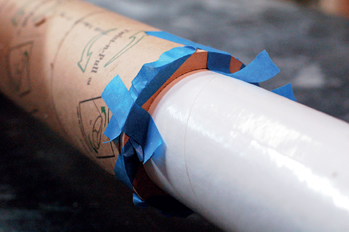
Figure 5-8: Blue masking tape used to hold materials together while glue dries.
Many tapes contain a “pressure-sensitive” adhesive on a backing of paper, cloth, or plastic. A pressure-sensitive adhesive creates a bond when you push down on it. They can be either permanent or temporary. Other tapes may be activated when you moisten or wet them (such as brown packing tape) or when you heat them. You can find innumerable tapes for a variety of needs and purposes; I will describe a few which props people should definitely know about.
Gaffers tape is a cloth-backed tape that leaves almost no residue. It is used frequently throughout the various departments of a theatre or film/TV set, particularly by lights and audio. It is fairly strong, comes in wide rolls (usually 2” or 50 mm), and can be painted over easily. “Spike” tape is exactly the same as gaffers tape except that it is thinner in width and comes in a multitude of colors. Your stage manager will often have a collection of all the colors, which can be helpful when you need to repair a prop and don’t have time to paint it.
Masking tape, or painter’s tape, is useful for masking areas when painting that you wish to not receive paint. It is easily removable with no residue. You’ll find a wide variety of types and widths at any hardware store.
Double-stick tape is great for attaching two pieces together. Carpet seam tape is a double-sided tape which is fairly thick and good for bonding fabric to rigid materials. Twin-tac is a sheet of plastic that is sticky on both sides, like a double-sided piece of contact paper. It is used a lot by scenic design model makers (and in architectural modeling) as a great nontoxic alternative to spray adhesives for paper and cardstock. Foam-backed double-stick tape is great for mounting together two surfaces that may not be perfectly smooth or level.
Box sealing tape, also called “packing tape” or “parcel tape,” is a clear or opaque plastic tape made for sealing boxes to be shipped. The clear kind is often used by props people as a quick and cheap way of covering and waterproofing something like a custom label on a wine bottle that needs to be washed and rinsed every night.
Office tape is popularly known as Scotch tape. This is similar to box sealing tape, just smaller, less tacky, and easier to tear. It is useful for assembling and attaching paper props, but not really strong or sticky enough for much else.
Duct tape is a strong tape similar to gaffers tape, except that the adhesive is more permanent and the backing is coated with polyethylene. Hobbyists and fans of the tape have found it useful for nearly everything (except for use in actual ducts). Enthusiasts have expanded duct tape’s repertoire to an actual building material; by laying down sheets of duct tape and alternating the direction of the strips with every layer, one can construct shapes and patterns. Items ranging from prom dresses and wallets to functioning cannon barrels have been constructed in this manner. Props artisans find it less useful other than for dire emergency repairs, as the coating prohibits most paints from adhering to its surface, and the tape leaves an awful residue when removed.
Electrical tape is made with an insulated vinyl backing to help safely cover electrical wires. Besides being indispensable for any electrical work, its stretchiness, multitude of colors, ability to be written on, and clean removal from many smooth surfaces gives it a number of other uses in the props world, such as labeling, temporary attachment, and wrapping around a handle to make a quick “grip.” You can make removable pin or racing stripes on a prop that has been rented or borrowed.
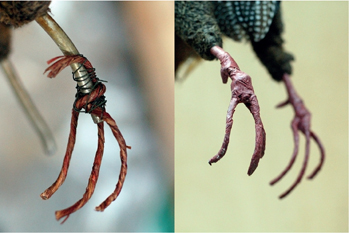
Figure 5-9: Sometimes the tape itself will be used as the outermost visual surface. Brown floral tape is wrapped around a frame of different wires to simulate these pheasant feet. King Lear, the Public Theater, 2011.
Floral tape (or “stem wrap tape”) is a waxy tape that, when stretched, will stick to itself. It is meant to wrap the stems of flowers together into bundles, or to hide supporting wires in flower stems. It usually comes in brown or green, making it great for all sorts of floral and organic props.
Medical tape should be used if you ever need to tape something to an actor’s skin. They offer a secure connection without irritating the skin or causing a reaction. They come in a variety of types, like clear plastic (Tegaderm and Transpore), cloth (Durapore) or paper.
You can find various putties that can be used for securing objects to surfaces. These putties remain soft and pliable for years, and can be removed with little or no residue, giving you a strong but reversible bond. Museum Putty and Mortite are popular brands. Floral putty is a similar product, only less goopy. It is available at floral supply and craft stores. If you need a clear putty, Museum Gel is a brand that lets you attach clear or translucent objects together.
Mechanical Attachment
Mechanical attachment is the joining together of two materials without the use of adhesives, chemicals, or heat (such as welding and soldering). It can involve fasteners, sewing, capturing the object, or magnets.
Fasteners
A fastener is some kind of object or bit of material that is attached to two or more materials to hold them all together. Fasteners can be used to add strength to a glue joint, to attach two pieces that cannot be glued or welded together, or to allow pieces to be removable in the future. I cannot possibly describe or even list all the possible types of fasteners one may come upon and the countless variations each one can take, but I will describe some of the more common types which prop builders use on a daily basis.
A nail is a metal spike driven through one material and into a second material. Pins and tacks for soft goods and upholstery use the same concept.
A staple looks like a two-pronged nail. The top, or “crown,” can be rounded, or bent at sharp angles. Staples can be hammered in one at a time, but most are driven from a staple gun. They are used for attaching paper, thin lumber, and other sheet goods, as well as for fabric and upholstery. Special staples can also be driven over wires or hoses to hold them to a surface.
The width of a staple refers to the distance between the two prongs. The gauge refers to the thickness of the metal used. Common widths are referred to as narrow, medium, and wide crown. Narrow crown is used for light work where the staple needs to be invisible, like trim and fine furniture; the width can be anywhere between 3/16″ to ⅜″ (6 mm–9.5 mm). Medium crown is a multipurpose workhorse used in a variety of locations, like furniture framing; they can be either 7/16″ or ½″ (11 mm–13 mm) wide. Wide crown is used where looks don’t matter and you just need something strong; their widths range from 15/16″ to 11/32″ (23 mm–26 mm). All these staples start at 18 gauge. Thinner staples are called “fine wire” and are useful for tasks like upholstery and picture frames.
When buying staples, you need to know the brand and model of your stapler. Some boxes of staples will list which models they are compatible with. Otherwise, you need to know the correct gauge and crown size your stapler uses so it does not jam. The definitions of narrow, medium, and wide crown are not universal among brands; be sure you are buying the correct size staples for your specific make and model of staple gun.
Hand staple guns and office staplers use their own types of staples. A popular hand staple gun is the Arrow Stapler (particularly the T50). They use a proprietary method for naming the different widths and gauges of staples; T50 staples fit T50 staplers, T20 staples fit T20 staplers, etc. Other manufacturers have adopted their system as well.
A screw has a spiral thread running down its length that allows you to drive it into a material by turning it. Screws come in a dizzying array of types; prop shops commonly use a few such as wood screws, drywall screws (frequently employed as an “all-purpose” screw in shops), self-tapping (for both drilling and screwing through metal), and sheet metal screws.
Screws come with a variety of head shapes, such as pan head, round head, and flat head. The heads have a variety of different slots or shapes for use with different types of screwdrivers; common ones include slotted (or flat head), Phillips, and square (or Robertson). Many other variations exist that may come in handy for more specialized tasks.
A bolt has a thread like a screw, but the end is not pointed or tapered. A nut is turned onto the other end to trap the materials in between the nut and the head of the bolt. Bolts have different head types, such as hex, stove, and carriage. Lag bolts actually do have a pointed tip, and are driven in like screws.
The terminology differentiating various screws, machine screws, and bolts is not entirely standardized and has evolved throughout history, so if you hear someone refer to a fastener as a “bolt” when you think it should be called a “screw,” that person may not necessarily be wrong.
With some materials, especially metal, you can drill and “tap” (cut the female portion of the threads) a hole directly in the material, so that a bolt screws directly to the material without needing a nut. One of the biggest advantages to using nuts and bolts over screws is that it gives you a reversible bond rather than a permanent one.
Rivets are like a permanent version of a nut and bolt. A shaft with a head on one end is inserted through a hole in two or more materials. The other end is deformed so the rivet cannot be pulled back out of the holes. They are useful for joining thin sheets of materials together and in places where a nut and bolt will protrude too much from the surface of the materials. Most props artisans use pop rivets (also called blind rivets), which use a rivet gun and a special rivet that allows you to attach a rivet without having to access the other side of your materials. While hand-operated rivet guns are cheap and easy to use, a pneumatic rivet gun makes life much easier when you have multiple rivets to attach.
Corrugated fasteners, also known as “wiggle nails,” are meant to be driven in perpendicularly to both sides of a butt joint at once. They are especially useful for joining the four pieces of wood used in a picture frame.
Plumber’s strap is made to hang or hold pipes and plumbing. It is also known as plumber’s tape, hanger iron, or pipe strap. It is an easily bent metal strap with regularly occurring holes that comes in long rolls like tape. It can strap items and objects down by driving a screw or bolt through one of the many holes. Though it has a reputation for being an inelegant solution used by lazy builders, it does have many uses in the appropriate situations.
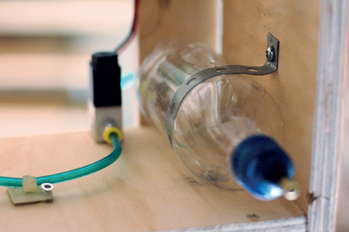
Figure 5-10: A piece of plumber’s strap holds this plastic bottle in place.
Hook and loop fasteners are commonly known by their most popular brand name, Velcro. Hook and loop allows you to attach and remove objects simply by pushing them together or pulling them apart, and they can be infinitely reusable if kept clean. The materials used to make hook and loop fasteners can range anywhere from a soft fabric to a hard and rigid plastic. Hook and loop fasteners can be sewn to fabrics or glued to rigid materials. You can also buy them with self-adhesive backs.
Sewing, Lashing, and Wiring
Fabric can be sewn, sticks can be lashed, and metal can be wrapped in wire. These techniques are useful when you cannot attach two pieces with an adhesive and a readymade fastener is not appropriate. They can also give you a more flexible joint if that is what you need. Lashing or wrapping can be hidden, or it can double as a visible and decorative finish for a prop. Lashing tutorials can be found later in this chapter.
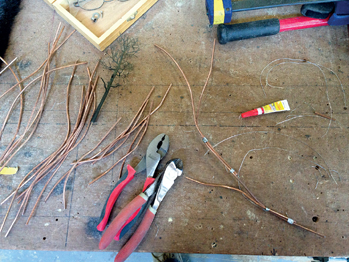
Figure 5-11: These thin metal tree branches are joined together with wire before glue is applied. The glue keeps the pieces from twisting and slipping, while the wire prevents unnecessary strain on the glue joint.
Information about traditional fabric sewing will be covered in Chapter 12. But you can use rudimentary sewing techniques to sew hard objects together, or sew using wire. In fact, staples are a way of stitching together sheets of paper with wire.
Monofilament, commonly called fishing line, is a single strand of plastic with enough strength to catch and hold a fish. Since it is translucent, it practically disappears on camera or on stage, so prop builders use it to add invisible reinforcement to a prop. Monofilament can be wrapped or sewn around objects to keep them together; it can also be strung between two points of an object to maintain a shape that might otherwise collapse.

Figure 5-12: Jay Duckworth attaches fake leaves to a staff by wrapping floral wire around the stems.
Knots and Tying
These basic knots are also highly useful for many other aspects of both prop making and general stagehand work.
The working end of a knot is the end of the rope (or the active part if you are tying a knot in the middle of a continuous length of rope). The standing end is the unused length of rope that comes before the position you wish to tie your knot. A bight is a curved section, and a loop is a full circle made by passing the working end over or under itself.

Figure 5-13: On the left, an overhand knot (the kind used to tie your shoes) is a simple twist of rope. You make a loop with the working end passing over the standing end, and then bring it around back and pull it through the loop. A square knot (center) is made by tying a second overhand knot in the opposite direction; wrap the standing end behind the working end, and then bring it around front and pull it through the loop. A granny knot (right) is made by making two overhand knots in the same direction, and is what is commonly made by those without a knowledge of knots. Notice the difference in how the square knot and granny knot look; a square knot is a stronger knot.
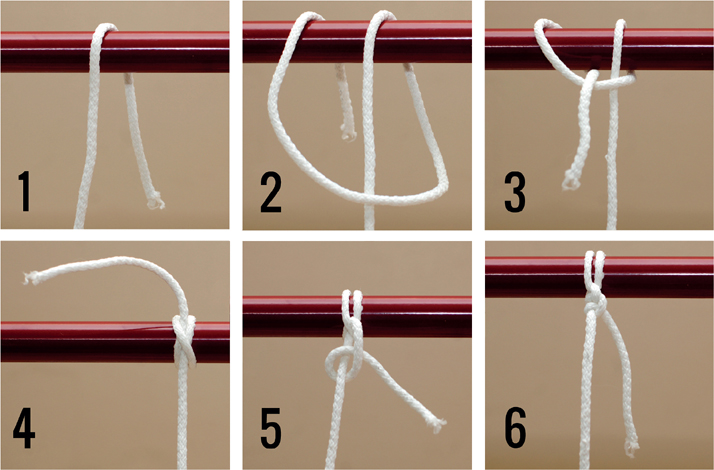
Figure 5-14: A clove hitch is useful for tying a rope tightly to a pipe or other bar. 1. Pass the working end over the pipe or bar you are tying your clove hitch to. 2. Bring the working end back out, cross over in front of the standing end, and pass it over the pipe on the opposite side. 3. Pull the working end through the loop you just made without crossing back over the standing end. 4. Cinch the rope tight, and your clove hitch should look like the photograph. 5. To secure your clove hitch, add a half hitch. 6. Two half hitches will complete the knot.
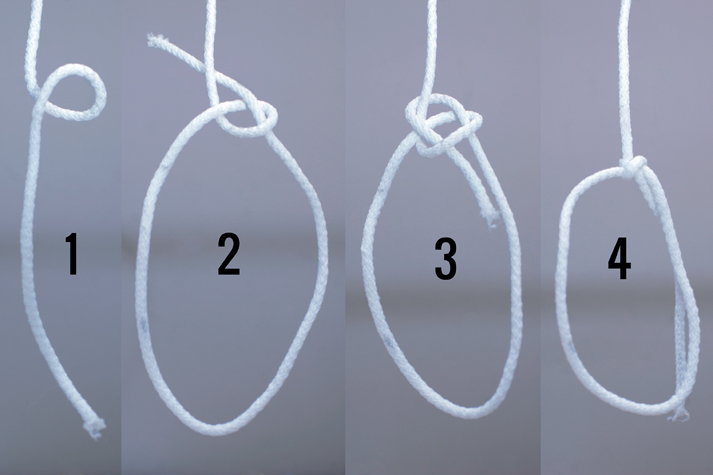
Figure 5-15: A bowline is a general knot for making a loop; this loop can be used to lift things. 1. Start with a small overhand loop. The rope between this loop and the working end will form your bowline loop, so leave enough length to make the size of the loop you want. 2. Pass the working end through the back of the loop and under the back of the standing end. 3. Bight the working end around the standing end, and pass it back through the loop in the direction it came. 4. Pull everything tight, and you have a bowline.
Whipping and Lashing
Lashing is perfect when you are constructing a skeletal structure out of bamboo or other poles. It can be useful for joining poles or even square tubes together for other reasons, either because you need a slightly flexible joint, or you want to make a connection without drilling, welding, gluing, or otherwise destroying the poles.
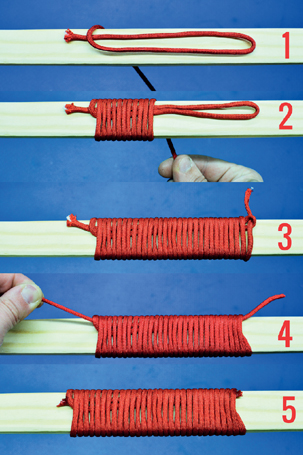
Figure 5-16: Whipping is a way to keep the end of a rope from fraying (and is a great technique to make ropes look period-correct). Common whipping can also be used to hold several rods or poles together, or to make decorative handles and grips. 1. Run the cord down to where you want the wrap to end, then double back to where it begins. 2. Make your wraps tight as you go down the length of the rod. 3. When you reach the end, bring the working end through the loop you made in the first step. 4. Now pull the other end tight, drawing the loop and the working end underneath the wraps. 5. You can trim the excess cord, and use a bit of super glue to secure the ends.
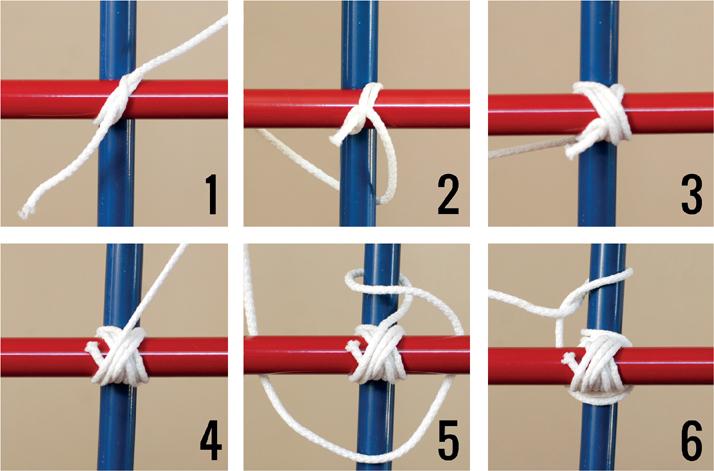
Figure 5-17: Diagonal lashing can be used for poles that cross anywhere from 45° to 90°. 1. Tie a clove hitch diagonally around both poles. 2. Begin wrapping the rope around both poles diagonally in the other direction. 3. Three or four wraps should be fine. Keep the wraps lying next to each other rather than on top of each other so that it will be easier to pull them tight. Bring the rope around the back of the rear pole, and start wrapping diagonally in the other direction. 4. Again, three or four wraps should do it. Remember to keep everything pulled tight. 5. The frapping turns are wraps that tighten everything up. Loop the rope around the back of the rear pole and back out front. Wrap it around the lashing, keeping in front of the rear pole and behind the front pole. This loop should only be going around the ropes connecting the two poles and not the poles themselves. Wrap two or three of these loops to frap it as tight as you can. 6. Finish with a half hitch around the rear pole. You can tie two half hitches for extra strength.
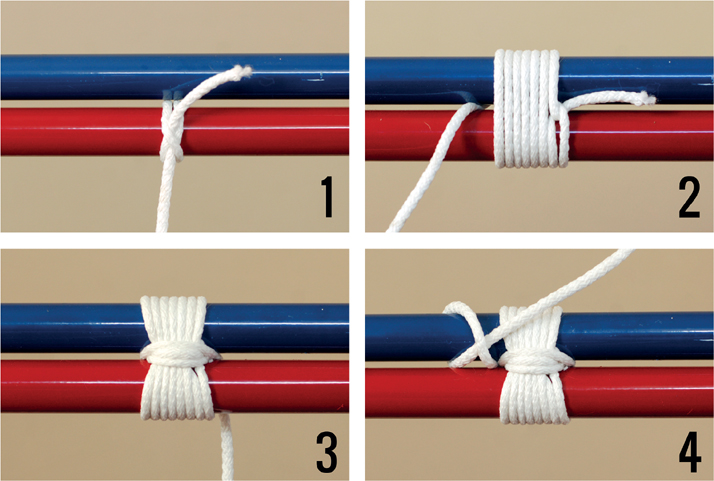
Figure 5-18: Sheer lashing is good for joining adjacent poles (up to 45°), and also for reinforcing long poles. 1. With the poles side by side, tie a clove hitch around one or both. 2. Wrap the rope around both poles tightly, keeping the wraps from overlapping. Make around four to eight turns, or enough so that the lashing is as wide as the diameter of your poles. Pass the rope through the center of both poles. 3. Make two or three frapping turns around the lashing between the two poles. This will be (and should be) difficult if you pulled your lashing tight enough. 4. Finish off with one or two half hitches, or a clove hitch, to secure it.
Capturing the Object
You can hold a piece of material in place by building around it so that it has nowhere to move. In a picture frame, for example, the picture is sandwiched between the glass and a backing board. The picture is not glued or otherwise attached to the frame, but it is still held in place. When you cannot use glue or hardware to secure a piece of material, think of ways you can sandwich or encapsulate it within other materials.
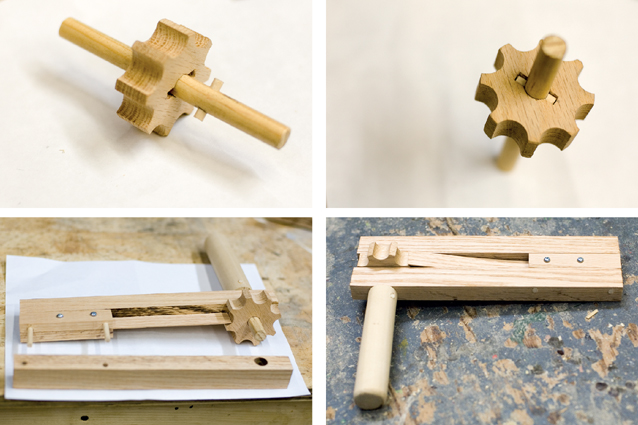
Figure 5-19 to 5-22: In these four photographs, the wooden handle and gear are not attached with glue, screws, nails, or any other type of fastener, yet the way the object is constructed prevents it from falling off.
Magnets
Magnets are useful for constructing certain kinds of breakaway items, or for attaching a number of items together that need to be removable, but which cannot be altered with holes for bolts or residue from tape. You may find them useful to keep doors or panels from accidentally swinging open, or for items that need to be quickly struck during a scene change. The two most common types of magnets you will find are rare earth and ceramic.
Rare earth magnets are the strongest nonelectrical magnets you can buy. They are found in a wide variety of shapes, sizes, and thicknesses. You can also find magnets with holes in the middle that allow you to screw or bolt them to a surface.
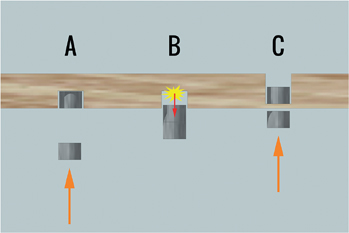
Figure 5-23: If you embed the magnet in the surface of your material (A), it may rip free (B) when another magnet or metal is brought close to it. It’s hard to find a glue that can properly bond to the smooth surface of the magnet and hold up against the magnetic forces. A better method is to drill into the material from the other end and insert the magnet so just a thin layer of the material is holding it back (C).
Be careful with these magnets, as they will snap together quickly with any other magnet or steel surface in the vicinity; if your hand is between them, they can pinch your skin off, while larger ones can crush or even break fingers.
Ceramic magnets are your basic inexpensive magnet you find in craft stores and the like. They are so much weaker than rare earth magnets that they are rarely used by prop builders any more, especially since rare earth magnets have become more readily available in recent years.
Clamps and Clamping
Clamps hold materials together while joining them with fasteners or while glue dries. They can also secure materials to your table when you need two hands to hold a tool. Finally, they can be employed to pull apart or push together materials that are too rigid to manipulate with hands alone.
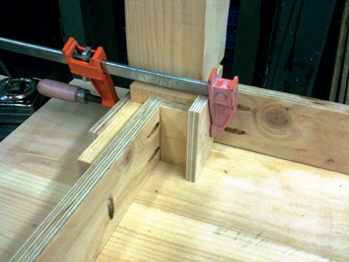
Figure 5-24: A caul is a piece of scrap material placed between the clamp and the material being clamped. It is usually meant to keep the clamp from marring or denting the surface of your prop, though it can also be used to spread the force of the clamp out to a larger surface area.
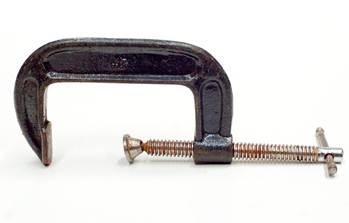
Figure 5-25: A C clamp (sometimes called a G clamp) is a single C-shaped piece of metal with a screw vise on one end.
Pipe clamps have two jaws on a pipe, one fixed and the other free to move. The jaws can fit standard sizes of pipes, giving you the flexibility to use any length of pipe you can get your hands on. Bar clamps are similar, but the jaws are on a bar; this keeps them from freely rotating, as the jaws can do on a pipe. Most pipe and bar clamps allow you to position the jaws by sliding them, then tighten with a screw vise attached to one of the jaws. Quick clamps are similar in appearance to bar clamps. Rather than a screw vise to tighten them, they have a trigger that you can squeeze to ratchet it slightly tighter.
Alligator clips and spring clamps open by squeezing the two handles together. A spring keeps them closed when they are not being squeezed. They act similarly to clothespins (which can also make useful clamps).
A wood handscrew clamp involves two thick pieces of wood held together with two large screws. Manipulating two screws allows you to keep the two pieces of wood parallel, so you can use these clamps to place an even amount of clamping pressure over a large area. These are often called Jorgensen clamps; Jorgensen is one of the most popular manufacturers of wood handscrew clamps.
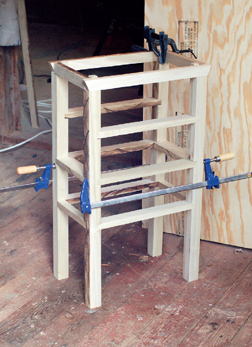
Figure 5-26: Bar clamps.
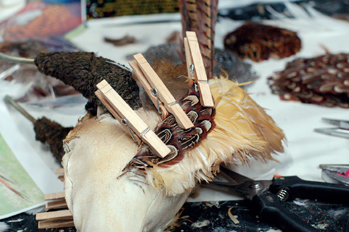
Figure 5-27: Clothespins are useful clamps for smaller or more delicate materials.
Difficult-to-clamp areas can be held together by wrapping rope or string tightly around the pieces. If possible, you can insert a stick or garrote through the string; as you rotate the stick, the rope is pulled together even more tightly.
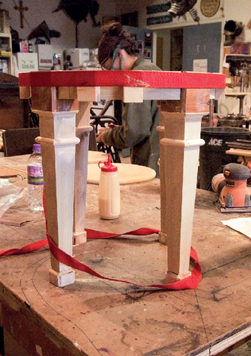
Figure 5-28: A strap clamp (or just a regular ratchet strap) is useful when you need to apply equal pressure around a circumference. Photo courtesy of Anna Warren.
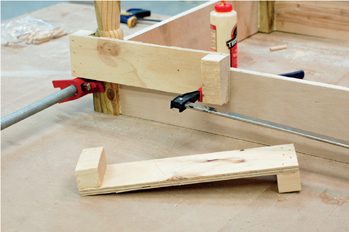
Figure 5-29: When your clamps are too short, you can use clamp extenders. The ones pictured here are simple shop-built extenders made from three pieces of wood.