nineteen
maintaining a portfolio
The best way to find work is to show people what you've built. For that, you will need a portfolio. You can have a paper portfolio that you carry around in person, or a digital one that can be viewed either online or downloaded to a computer. Ideally, you would have both.
When you are beginning your career, you will be applying for jobs that are highly competitive. You will not be brought out for a face-to-face interview until the pool has been narrowed down. Employers do this by looking through résumés and digital portfolios. You need a solid digital portfolio or web page to get these jobs.
If you are at a conference or job fair, a paper portfolio is extremely handy because you will be meeting a lot of people face-to-face. Internet and Wi-Fi connections can be spotty, batteries can die, and computers can crash. If you are visiting a props shop for an interview, you also have to worry about dust and sparks getting in your electronic devices. A paper portfolio ensures you can still show your work when technology fails.
What to Include in a Portfolio
I take photographs of any project I devote time to. It is far preferable to take pictures and never use them than it is to realize later that you should have taken pictures. Besides showing employers what you have built, it is also a good personal record to remind you what you have done in the past.
Never assume that you will be able to take a photograph of your prop once it leaves your hands. The prop may be destroyed, or your schedule may keep you from visiting the theatre or set. If you can get a photograph later on, that's great; a picture of a finished prop in action, or in front of a neutral background is a wonderful addition to your portfolio. Keep in mind that many actors' unions control how their images are presented, so any photographs of your prop being used by an actor on set cannot be posted publicly without permission.
When you first begin your career, you will most likely be putting everything you have ever built into your portfolio. It is only after you have been working a while that you can be more selective. Your portfolio should be a representation of the work you excel at and what you are capable of doing in the future. If you consider yourself a props carpenter, then your portfolio should reflect that by showing a lot of carpentry projects. If you are really good at molding and casting, your portfolio should feature some good molding and casting projects.
Pay attention to what job postings or employers are looking for. If an advertisement lists upholstery skills as a prerequisite for the job, make sure to have some upholstery projects in your portfolio.
Collaborative projects can go in your portfolio as long as you are clear about what your contribution was. For instance, you may build a prop, but someone else may paint it. Try to include photographs of the prop both before and after it was painted. That way, you can indicate that the “before” picture is what you personally achieved. When in doubt, remember that a portfolio should reflect what you are capable of doing in the future. If a photograph of a prop makes it appear that you can use a certain material or technique that in reality you can't, your future employer will be less than thrilled. Do not try to pass off a photograph of a complicated and beautiful prop as your own work if you simply sanded it. Always indicate, in text if necessary, what your exact contribution to a collaborative project was.
Should you include work done outside of film, theatre, or television? If it is created in similar circumstances, such as display or exhibition work, then sure. Work done in classes can also be included. Outside projects can be a great way to flesh out certain areas of your portfolio. For instance, if you have taught yourself upholstery but have not had a chance to use it on a prop project, you can take photographs of your own personal projects to showcase your skills. Personal projects are a great way to learn or practice a craft skill without the pressure of show budgets or deadlines.
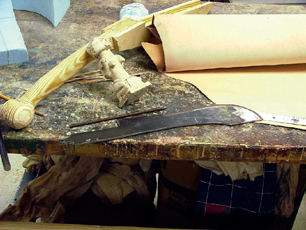
Figure 19-1 This process shot shows how this African sword was made and what materials were used; the blade was cut from a piece of steel, and the handle was carved from a single chunk of wood.
What you want to avoid is having a portfolio that is overwhelmingly personal projects or artwork done outside of any sorts of constraints. I heard of a woodworker who had a portfolio filled with beautiful examples of fine furniture. When the interviewer asked him how long it took to construct a particularly interesting desk, the woodworker replied, “Eighteen months.” This is not terribly useful for show business! Employers are not only interested in the quality of your work, but how well you work within budget and time constraints, as well as how well you react to design changes on the fly.
A process shot shows your prop in mid-construction. Because a finished prop will successfully conceal its method of construction, a process shot will show what materials were used, how it was assembled, and other details. If you make a prop out of chicken wire and papier-mâché, a good process shot would show the chicken wire structure before the paper is applied. If you are sculpting an object out of clay, a process shot may show the armature or the drawings and guides you made. A useful process shot will “tell the story” of how the prop was constructed. Do this with as few photographs as possible; it may be possible to describe the construction of a prop with a single photograph if is staged correctly.
Process shots show an interviewer how you work and how you think. It also gives tangible proof that you know what you are doing (and gives proof you did the work yourself). Interviewers love to ask how you achieved something, and having a visual road map of the process in your portfolio makes it easier to speak about it. Sometimes, you may even teach a new trick or technique to an interviewer, and props people love learning new tricks. Finally, your process shots can help remind yourself how you achieved something in the past.
Drawings or other reference material from the designer are good to include too. They will show how accurately you can translate a picture to a three-dimensional object. Even rough or rudimentary sketches can be useful, as they give clues to your working process.
If your prop has special properties, show photographs that highlight them. For example, if you build a table that can support a dancer, show someone dancing on it. If your prop transforms or moves, show a “before” and “after” photograph.
Along with photographs and drawings, include the title of the production, as well as the venue and the key players, such as the director and designer. Even the most obvious photographs need the context of where and when they were used. You may also wish to include information about materials used, techniques applied, special properties the prop had, special circumstances you had to overcome, or anything else which may not be readily apparent from the photographs. In a digital portfolio, you can include video showing a prop that utilizes motion or other effects, but in a static portfolio, you need to tell the whole story with photographs and text.
A well-designed portfolio will not just show what props you have built, it will show that you understand what skills are valuable and which props are worth showing off. If you include a poorly constructed prop in your portfolio, your interviewer may assume you do not have a good eye for quality, and thus you cannot be trusted to build props to the standard they need to be.
Digital Portfolios
A digital portfolio is often part of a website, but you can also have a digital version that you email or otherwise share. With a digital portfolio, you can show your work to people all over the world without having to print multiple copies or travel anywhere.
With a website, you can email the address to potential employers so they can peruse it on their own time. You do not have to worry about file compatibilities as long as your website is viewable on any computer. When you are cold-contacting people, you do not want to email large files that may fill up their mailbox or get marked as “spam.”
A website is also like “hanging out a shingle” in the physical world. It allows new employers and clients to seek you out rather than the other way around.
Website Layout
An online portfolio should be easy to navigate, intuitively laid out, and allow large enough pictures so that you can easily see your work on any screen.
An easy-to-navigate website will have your props categorized and organized. Some common categories I've seen include “prop carpentry,” “soft goods,” “molding and casting,” “metalwork,” “hand props,” and “painting.” Your portfolio does not just represent the work you have done; it should also show the kind of work you want to do. If you really want to make paper props, your portfolio should not focus on all the tablecloths you made.
The pictures should be viewable with just a few clicks. Make sure it is easy to return to the main page or locate your contact information no matter where you are on the website. You do not want photographs of your best work buried deep within the website so that a potential employer never reaches them or does not realize they are there.
Domains and Contact Info
A custom domain name, such as eric-hart.com or eric-hart.co.uk, will cost around $12 a year (more if you also need to host your website). Otherwise, your website will have an address like your-name.carbonmade.com or your-name.wix.com. You want to avoid something like members.artslynx.ca/∼propswizard/portf/e/b17ab777-ceb6-f7fd-8411/prop.html.
Having a clean website address makes it easier to find your site. A custom domain name signals a bit more commitment and credibility. This is more important if you are trying to brand yourself to individual clients and companies. If you are looking for staff jobs at theatres, it is less important.
If you use your name in a custom domain name, it will help others find your site easier. Even if you don't, you should still check that your site is easy to find when others search for it. You should also display it on whatever other sites you use: Facebook, LinkedIn, Twitter, etc. You may even wish to include it in your email signature.
Print your web address on your business card. This is especially useful at conferences or other networking events where you are meeting many people and may not have time to show a portfolio, or where the expense of handing out CDs or DVDs to dozens of people is just too much.
You need a way for people to contact you on your website. Ideally it would be an email address. If you are concerned about privacy, you can set up a separate email address just for your website, and have it forward to your regular email. (I personally hate websites that only provide a “contact form” for getting in touch with the owner, as I prefer to keep a record of all emails I send.)
Likewise, you should give some indication of where you live. You may not wish to provide your home address in such a public arena, which is understandable and encouraged. A general geographic region or major metropolitan area will suffice. The worst is when you go to someone's website and you don't even know what country they live in.
A website that has clear photographs, is relatively up-to-date, has a résumé and a way to contact you will make me forgive a weird domain name or a bit of ads because you have a free site. A slick site with a custom domain name becomes less exciting if all the photos are over a year old and I don't know where you currently live.
Hosting
You can find many free or low-cost options for putting your work online. Many of these are great, especially for the beginning prop builder. You should not postpone putting your work online; it is better to have a “good enough” website on a free service rather than a perfect idea for a website that is never executed. I have met many prop builders who say “I'm working on a website but it is not online yet”; six months later, they still do not have a website online. As an employer, I will be hiring other people rather than waiting for them to get their act together.
However, plenty of free portfolio sites should be avoided. They may have distracting advertisements or be difficult to navigate. They may also be downright ugly and make your work look amateurish. Some sites have a lot of “social” features which make it easy to navigate to another user's portfolio from your own site; you do not want a potential employer looking at someone else's work and thinking it is yours.
Prop builders have found sites like Wix, Weebly, Squarespace, and OtherPeoplesPixels to be most helpful for portfolios. Sites like Tumblr and WordPress can also be used with a bit of customization. Many of these allow you to use a custom domain name for an additional fee. You can make your own website from scratch, though if you know how to do that, you don't need me to tell you about it. Keep in mind that with hosting, domain names, and the actual coding, building and maintaining your own website will not necessarily save you money over joining a portfolio site service.
Whether you go with a free service, a paid service, or make your own website, make it easy to update and maintain. A website that has not been updated for a few years makes it seem like you no longer work; if your skills have improved and you have made some spectacular props since your last update, you may be missing out on better jobs. In today's world, one of the first things a potential employer will do is search for you on the Internet. You want them to be able to find your website, and for it to show what you are currently capable of.
Other Types of Digital Portfolios
Besides a website, you can also share your portfolio through email. When emailing a digital portfolio, it is best to restrict this to as few files as possible. Sending one or two image files is fine; sending twenty separate images is excessive. A file that contains multiple pages, such as a PDF, is best; make sure whatever type of file you send is compatible with the computer your recipient is using and that you do not need any special programs or applications to open or view it. Simplest is best; do not add distracting animations, sounds, or other elements. A collection of images and text that the recipient can peruse at his or her own pace will give you the most success.
Because you are emailing this, keep the overall size of this file relatively low. Many email programs have limits on what you send or receive; your recipient may not be able to receive files as large as the ones you can send. Computer nerds suggest keeping the combined size of all attachments in an email under 10 Mb.
When you are cold-contacting people, it may be better to send a much smaller sample of your portfolio. A large unsolicited file may not go over well. You can send a single image which contains a collage of different projects you have done along with your name and contact information. If you have a website, include the address on this page, as well as in your email.
With all the programs that can read a PDF, it is difficult to find a computer that cannot recognize this file. Plus, it will look consistent on every computer. Even if you want to create your portfolio in PowerPoint or a word processor, you can convert it to a PDF when finished.
These kinds of “teaser” pages are also great to print out and bring to conferences or networking events, particularly ones where you are displaying your portfolio; it gives people something to take away along with your business card and résumé. These are sometimes called “leave-behinds” because it is a physical item you leave behind after meeting someone.
Whatever files you send out, make sure they are clearly named. “EricHart-portfolio.pdf” is a much better name than “new_project(3).pdf.” Your recipient is likely to copy the file to his or her computer, and if the file name does not include your name and a description of the contents, the recipient may later forget what your file was named and be unable to locate it when searching.
Having multiple options ready is a necessity for showing your portfolio in any situation. If you meet with a person and they want to look at your portfolio while standing in the middle of the shop far from any computers, you will want a paper portfolio. If you have a tablet or other viewing device but lack Internet access, keep some photos saved on the device itself so you can show them off. If you do not have a paper portfolio with you and no computer is available, the least you want to do is give them a business card with your website and a photo or two of your work.
Paper Portfolios
In graduate school, fellow scenic designers were still creating portfolios that held pages as large as 24″ by 36″ (roughly equivalent to A1). These have shrunk over the years, as airlines charge more and more for luggage and the use of the Internet has made face-to-face meetings optional rather than mandatory. Props people have never needed the large portfolios that scenic designers have. Pages that range between standard letter size and tabloid size are more than sufficient. You want something that can be carried around everywhere so that it is not such a chore. A standard size also makes it economical to print new pages as you add props to your portfolio, which will ensure it remains updated.
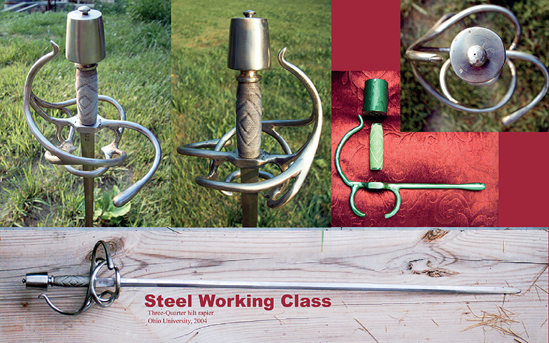
Figure 19-2 A sample portfolio page showing different views and a process shot.
You can print your pictures out and mount them to cardstock or paperboard, or you can do the layout digitally, and print your pages straight from the printer.
I prefer a presentation case that allows you to add and remove pages. This allows me to update and rearrange my portfolio depending on whom I am showing it to without having to spend a lot of money getting the entire thing reprinted. You can find all sorts of presentation cases that are slightly more fancy than an office three-ring binder. As a props person, you can probably construct your own as well. You don't necessarily need a binder; I've seen portfolios that were simply a nice box filled with individual pages.
For my highlight props, I like to devote a single page to each one. For some particularly interesting props, I may spread it across two pages, but this becomes less frequent as I add more projects to my portfolio. Some props are less interesting, but display competency in a certain skill, so I sometimes put a whole group of related props on a single page. For instance, I have a page dedicated to standard carpentry projects, and another filled with examples of computer graphics and paper props.
Sequence
The sequence of your portfolio is very important for paper and PDF portfolios. While some digital portfolios and websites can be explored in a more nonlinear fashion, keep in mind that an employer is more likely to start with the first picture or category listed and proceed down the line, so the guidelines for ordering your portfolio still apply to some extent.
The beginning of your portfolio should have relevant contact and professional information. If you are a specific type of props artisan, such as “sculptor” or “soft goods artisan,” you should include that as well.
Start with one of your most eye-catching and exciting props. You want to grab the attention of whoever is looking at your portfolio. It may not necessarily be the most complex or challenging prop you've built; it may, in fact, just be one of the best photographs of your props.
Follow this with one of the best props you have built. Your second page should show off your best skills. Unlike the first page, the second need not be as eye-catching, but it should highlight the best that you have achieved. Where the first page is meant to draw the viewer in, the second is there to set a trend that the best is yet to come.
Order the remaining pages under the assumption that you may run out of time and not get a chance to show your whole portfolio. Imagine that you can only look at the first five pages, or the first ten, or fifteen; does that still give a good representation of your work? This is why I am hesitant to divide my portfolio into strict categories. If half of my portfolio is devoted to carpentry projects, and half to craft projects, then someone who stops halfway through will only see carpentry projects. A categorical approach works well on a website where the reviewer is free to explore the pages at his or her own pace and in whatever order he or she wants.
If, however, it does make sense to divide your paper portfolio into categories, have tabs on the side so you can quickly skip to whatever section you need. If your interviewer suddenly wants to see your paper props, a tab at the beginning of your paper props section will help keep you from nervously flipping through every page. The organization of your portfolio gives clues to your organizational skills, and employers pick up on that. How you present your portfolio can be just as revealing as what is in your portfolio.
Your last page is important too, and should be a solid example of an exciting prop, though the skills it showcases should be included earlier in your portfolio as well. I have been to many interviews where the employer finishes looking through my portfolio, and then leaves it open on the last page as we spend another half an hour discussing the job and my résumé. That last page just sits there, staring at us the whole time. You do not want your last page to be a throwaway page.
If you have multiple images for a prop, make sure they are clearly grouped together. Sometimes I see a process shot in someone's portfolio but I do not know which prop it belongs to. Or there is a photograph from the performance of a show, but I do not know which prop I should be looking at.
When showing your portfolio, remember that it is more of a conversation with your interviewer rather than a presentation. You cannot predict how long you will remain on each page, and in some cases, the interviewer may ask to go back to look at a previous page.
Photography
You may not be a professional photographer, but I was, so I can give you some tips. Bad photographs really distract from good work. Most bad photographs are caused by camera movement, poor lighting, and bad backgrounds.
Blurry or grainy photographs are caused by too little light. You can adjust your camera's exposure in three different ways: the shutter speed, the aperture, and the sensitivity of the film or the chip. A fast shutter speed will freeze moving objects in place. As you slow down the shutter speed, objects that are moving will appear blurry in the photograph. With a very slow shutter speed, the slight shaking of your hands will be enough to blur the whole picture.
The aperture refers to how open the iris is; the more you open it, the more light you let in. So if a low shutter speed is causing blurry pictures, you can open up your aperture and raise your shutter speed to get the same exposure. The iris only opens so far, though, so you may find it is still too dark to take a sharp photograph. Also, a wider aperture gives you less depth of field. A tiny aperture can keep a wide range of things in focus, from items close to the camera to objects further away. A wide aperture will have only a sliver of depth in focus. A really wide aperture may have only your nose in focus while your eyes are out of focus. This is annoying when you want your entire prop to be in focus.
With many cellphone cameras, you cannot adjust the aperture and shutter speed; everything is adjusted automatically for you. You can often find different camera apps which give you more control over the settings, especially in low light conditions.
One solution is to use a tripod. This keeps your camera steady so you can use slower shutter speeds and not have to open the aperture too wide. You can also simply set your camera onto a solid surface, or clamp it in place using the tools in your shop. If a tripod is not handy, you can brace yourself against a wall and hold yourself as steady as possible while shooting pictures. If you are shooting digitally, take a lot of shots in succession; this increases your odds that at least one of them will be taken while your hand is still for a split second.
Figure 19-3 Blurry photographs are not only amateurish, but they will obscure the details of your prop. A busy background will also make it hard to distinguish the prop from everything else.
Besides the aperture and shutter speed, your camera can also boost the sensitivity of its chip (known as the ISO) to let in more light. This usually results in grainy pictures. On professional cameras, you can control the ISO manually, while cellphone cameras will adjust it automatically. Camera technology is improving every year, and cameras that can shoot at ISO 6400 and higher today exhibit less grain than cameras five or ten years ago shooting at just ISO 800. Of course, the best way to avoid grainy and blurry pictures is to add more light.
Adding Light
Some shops have uneven lighting; find the brightest area and position your prop so it picks up the most light. You can move it to keep shadows from falling across the important parts, or lay it down on its back, and shoot it from above for maximum brightness. You can shine additional lights from the sides to brighten it as well; most theatres have clip lights or work lights, or you can keep a set of dedicated lights in your shop just for the purposes of photographing.
Another option is to bring your prop outside to photograph if possible. On sunny days, you will have harsh shadows cast over your prop, which may actually make it look worse than if you had photographed it inside. If you can't wait for a cloudy day, then move your prop out of direct sunlight, or hang a sheet above to diffuse the lighting.
Your on-camera flash is perhaps one of the worst ways to add light. It is harsh, and its head-on position makes everything look flat and cheaply made. If you absolutely must use it, you can diffuse it by attaching a piece of tissue paper or a sheet of diffusion gel from the lighting department in front of the flash.
Backgrounds
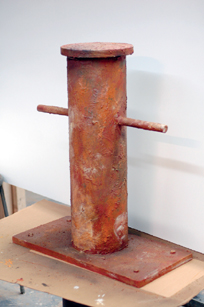
Figure 19-4 You can throw some fabric or sheet goods behind a prop to make a pretty quick neutral background when photographing it.
Conclusion
All I have just described is the most rudimentary introduction to photography. Good photographs of your props are vital to finding work, but photography is too vast of a subject to cover in a book about prop building. You can find tons of books, magazines, and websites to further your skills. Look especially for information on product photography and shooting still-lifes.
When you excel at a technique, it can be difficult to describe in words how you differ from someone who is merely competent at it. A photograph of a finely made table in your portfolio has a much larger, and much more immediate impact in a job interview than simply listing the word “carpentry” on your résumé.
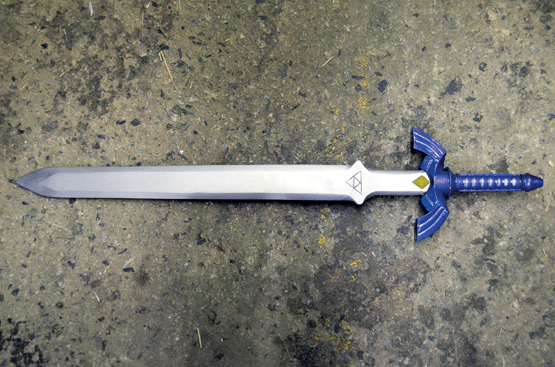
Figure 19-5 This may not be the most exciting background in the world, but placing this prop on the shop floor allows you to focus on just the prop without any other distracting elements. Taking the photograph while looking down also takes advantage of the overhead lighting, which casts shadows when looking at objects straight-on.
The only way to guarantee photographs of your work is to take the pictures yourself. Even when someone promises to photograph your prop, it may take weeks or even months to track them down and get copies of the pictures. You need to make it a habit to take pictures whenever you get to a new stage of the prop's construction. Ultimately, you are the only one who can make sure you are getting the shots you need to make your portfolio an accurate reflection of your skills.
Often, particularly at the beginning of your career, the pictures in your portfolio are the sum total of what you have to show for your skills. Sometimes, all it takes is a single interesting and well-documented prop in your portfolio to convince the job interviewer to take a chance on you. That's certainly happened to me; even after working at a company for an entire season, the props master will remember that one prop I had in my portfolio that impressed him.