six
measuring and marking
In this chapter, we will look at the process a prop builder uses to go from idea to reality. Your idea may be a construction drawing or drafting from a designer, or even just a doodle. It may be a photograph, or a real object. In some cases, you have to draw or draft the prop yourself, whether it is from your imagination, or if a reference image needs to be altered. Occasionally, you may be provided with simply a verbal or written description of what needs to be built.
Your idea must then be transferred to your construction materials. This covers a number of techniques of measuring and marking your materials so they can be cut, bent, sculpted, carved, folded, sewn, crumpled, attached, or otherwise manipulated into the shape and structure you need. We will also look at jigs, which can add precision or automation to the measuring, marking, and manipulation of materials.
Building from a Construction Drafting
A drawing of a prop can range from a fully realized technical drafting to the most basic of doodles, and everything in between. A drafting is an orthographic projection of the prop, used to represent a three-dimensional object in two dimensions. An orthographic projection is a way of drawing the object without the effects of perspective; lines do not converge toward a vanishing point, and shapes do not get smaller as they move farther away. So if you draw an orthographic projection of a box from the front, it would appear as a square.
A typical drafting includes the orthographic projections of the top, left, and front sides, though simpler props may only include the front and a side. Choosing where these sides are can be arbitrary on props with no definite “front” or “top,” but once chosen, these projections are all at right angles to each other.
The different types of lines used indicate different things. A solid line shows the outer boundaries of the material. A dashed line is used to show the outline of something obscured by the material in front. An “X” within a shape means the material is cut out or hollow. Dimension lines give the measurements between the two arrows used. A section line is used to indicate where a section is taken from; a section drawing shows what the object looks like if it were cut at the section line. Designers use section lines when a portion of the prop is hidden because it is on the inside or because it is behind the outermost parts of the prop. In a section drawing, cross-hatching is used to indicate where you are looking at a shape that has been cut through, rather than at the outermost boundaries of the material. Break lines are used for long or repetitive sections so that the designer does not need to draw the whole thing out. Standards exist for drafting in the entertainment industries, such as the USITT (United States Institute for Theatre Technology) graphics standards for theatre in the United States and Canada, but designers will bend these rules if it helps make the drafting clearer to read, particularly with props.
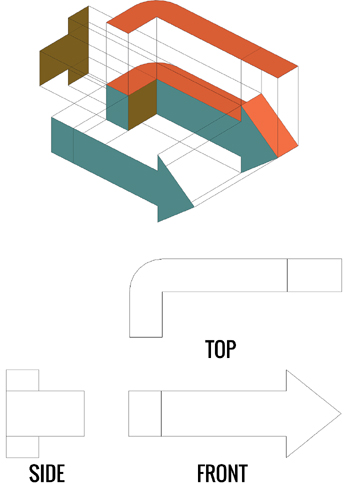
Figure 6-1 and 6-2: How the orthographic projection of the front, left, and top of an object is derived.
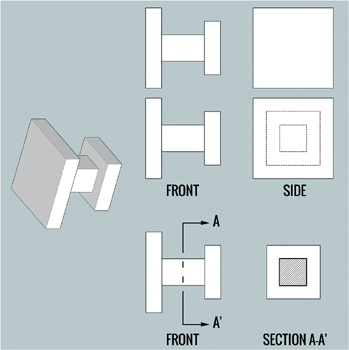
Figure 6-3: This object can be drafted a number of different ways, with three simple examples shown here. The top example shows just the front and the side; this does not really convey that much information. The middle drawing uses hidden lines (the dashed lines) to show what is behind the shapes drawn. The bottom drawing shows a section drawing. First, the cutting line, indicated by a heavy line with two dashes, shows where the section is taken from. The arrows indicate which direction you are looking at the section. In the section view itself, cross-hatching indicates where a shape has been “cut” by the cutting line. We do not see the larger square in the section view because it is “behind” us.
Designers will also write notes on their drafting for further clarification. Notes can indicate the materials to be used, the final look of the piece, or other needs of the prop that are not apparent from the drafting itself. Drafting is done in black and white and often does not convey any texture. Check through the entire drafting to see if any information is missing. Do all the parts fit together like they should? Do you know what every line means? Do you know what the back needs to look like?
Drafting a prop in scale makes all the measurements very specific, whether or not this was the designer’s intent. There may be times they want their measurements to merely be suggestions; for instance, if they draw something 13/16″ thick but they would be happy for you to build it out of ¾″ plywood, or if you need to make something slightly thicker for structural reasons. However, some measurements do need to be precise. Critical measurements are the measurements that need to be exact because of how they relate to some other element of the production. For example, a piece of furniture may need to fit through a door during a scene change. Its overall width is a critical measurement. If a wand needs to hold lights and a battery inside it, its interior dimensions are the critical measurement. Clarify as early as possible which measurements are critical, and which are merely guidelines.
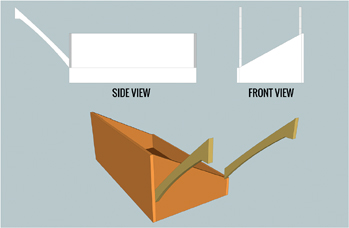
Figure 6-4: Always study a drafting carefully before you start cutting up your materials. A drawing may look correct in two dimensions, but not actually work in three. This is a simplified version of a drafting for a wagon with handles I once got (minus the wheels). Looking at the side and front views, it looks okay, but when I turn it into a 3D model, you can see that the handle on the right is barely connected to anything. I talked with the props master and we altered the drawing slightly to make it work.
Building from a Sketch
While a sketch or illustration is less exact than a drafting, it frees the designer from having to provide precision and exact detail where it is not needed. It can provide critical measurements, or it may simply provide notes: “should be standard chair height,” “must be taller than the actor,” “needs to fit inside the champagne box.” When measurements are given in relation to other elements of the production, it is important to keep in contact with the other departments while constructing the prop.
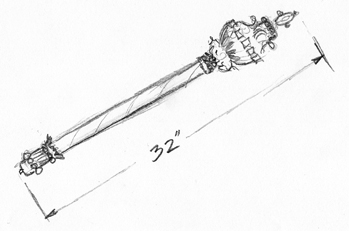
Figure 6-5: This sketch of a king’s scepter gives critical measurements, overall shape, and a “feel” for what the prop should look like, but the specifics of the details and ornamentation are only hinted at with rough lines. This gives the prop builder some freedom to use found objects and applied decoration if necessary, or to fabricate the entire piece from scratch with whatever level of intricacy the budget and schedule will allow.
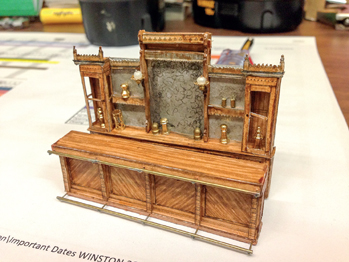

Figure 6-6 and 6-7: For custom furniture pieces and other large props, the designer may have a scale model piece that you can reference along with a drawing. In some rare cases, you may even need to build a prop solely from a model piece. Anna Christie. Scene Design by Fred Kinney. Triad Stage, 2014.
Drawings can distill the essence of what a prop looks like down to a few lines. For example, squiggly lines are often used to represent intricate detail, such as those found in baroque or rococo architecture. You may need to do your own research or make a more exact drawing to flesh out the detail. You will also need to pay attention to whether the detail is invented, or if it is mirrored throughout other elements of the production. Often, a designer may latch onto a specific detail, such as a rosette or scroll work, which they insert into the set design, the costumes, and other props. You need to know if your specific prop will also contain that specific design detail. Squiggly lines can convey a lot of information.
Building from a Photograph
Sometimes you need to make an exact duplicate of an item in a photograph. Other times, the photograph is simply a guide. It may be a photograph of an object that needs alteration, such as “I want you to build this teddy bear, but it needs to be these measurements.” Other times, the prop you are building is a combination of elements from several photographs. When you are given a photograph for a project, find out what information the designer or props master is attempting to convey to you.
There are several ways to determine measurements from a photograph. If a person is holding a staff in the photograph, and the staff is as tall as that person, you know to make the staff as tall as the actor who will be holding it. If you have a photograph of a prop in a person’s hands, you can use your own hands to scale the prop.
You can compare the size of the prop to other objects in the photograph which have a standard size. People often photograph an object next to a coin so you get a sense of the scale. Many other objects have standard sizes; if the object is photographed next to a chair, even though we don’t know the size of that exact chair, we know what the size of a standard chair is, and we can start determining measurements from that.
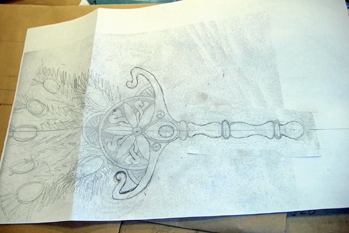
Figure 6-8: Using a photograph as reference, this ornate fan was drafted by the prop builder in full scale to establish proportions and solidify the details.
You may only get the measurements for one or two parts of your object in this manner. The rest of the measurements will be deduced from the proportions of the various elements. The proportion of elements in a piece goes a long way in creating a prop that “looks right.” Often, it is the correct proportions that create a more successful prop rather than finding exact measurements. For example, if you are making a fantasy oversized book, it will convey itself as a book to the audience more successfully if it fits within the usual proportions of a book.
Sometimes, you have a chance to take your own photographs of an object you need to replicate. It may be in a museum, on location, or at someone’s house. It is likely you only have one chance to photograph or measure the object, so you have to do it right.
Start off with a front, a side, and a top view, and add any other views that may be helpful in reconstructing the object later. If it is an asymmetrical object, then take photographs from both sides. Isometric views give you a guide as to how the different views join together. Take close-up shots of details. Don’t forget the back and the bottom!
Be careful about the distortions inherent in photographs. They do not reproduce reality exactly, at least as far as taking measurements is concerned. Many consumer cameras you use shoot with a wide-angle lens, which makes the center appear closer to the viewer, while the sides are pushed farther away. The front-to-back distances are exaggerated. You often have to zoom out and step farther back to make the lens approximate that which we see with our eyes. If you have a camera with interchangeable lenses, take your photographs with a “standard” lens, which approximates what the human eye sees.
Taking photographs from different angles will help ensure you have the correct proportions and measurements. For instance, while a front view will make details in front appear larger than details at the back, the top view will show the correct relationship in size of the front and back.
Even with a standard lens, photographs have a number of distortions. If the picture is not taken completely straight on, you may get “converging parallels,” where lines that are parallel in reality appear to move toward each other in the photograph. Again, this is why it is important to take photographs from multiple angles.
Take measurements while you photograph; start with overall width, length, and height, and work from there. You may not know all the measurements you will need until you start building your prop, so include other objects in the photos to help with scale. Take pictures of the object in your hand or while standing next to it; include coins next to small objects; if you have a ruler with you, include that in your photos.
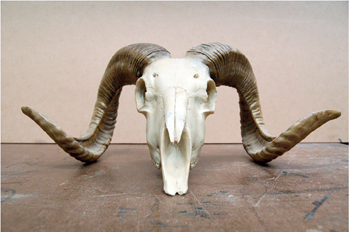
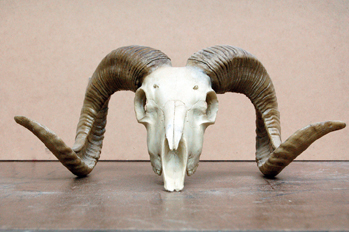
Figure 6-9 and 6-10: The first image is photographed with a wide-angle lens (which is what most cellphones and point-and-shoot cameras use), while the second image is shot with a normal focal length. Look how much longer the nasal cavity is; the horns are also heavily distorted.
Scale
US scene designers typically work in ¼″ or ½″ scale, while designers in metric parts of the world will work in 1:25 or 1:50. In grander works, particularly opera, designers may work in larger scales. These scales are the most common because anything bigger would mean the model could not fit through a door, and anything smaller would not have enough detail to be useful. For props, though, they may draft in an even larger scale to fit as much information as possible on a sheet of paper.
A ¼″ scale means that every quarter of an inch on the drawing equals 1′ in real life. So a 3′ tall box will be drawn as a ¾″ tall square. Metric scales are expressed as a ratio, so the drawing needs to list the units as well. Centimeters are the most common units for prop and set drafting in theatre, film, and TV, but it could very well be meters. So 1:50 means that 1 cm on the drawing equals 50 cm in real life.
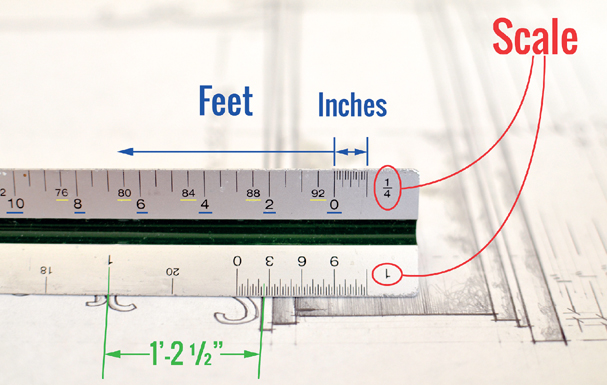
Figure 6-11: An architect’s scale ruler is vital for reading scale drawings (do not use an engineer’s scale ruler, which looks similar but uses different numbers). Most rulers will have multiple scales on a single ruler. On the scale ruler above, the scale is the first number from the end, circled in red. On the top is ¼″ scale, on the bottom is 1″. The small tick marks between the scale and the zero mark represent inches. After the zero mark, the numbers represent feet. The ascending numbers (underlined in blue) are the ones we use; the descending numbers (underlined in yellow) are what we would use for the scale which starts at the other end of the ruler. This particular drafting is in 1″ scale so we use the bottom edge of the ruler. To measure the size of the curlicue in the drawing, position the ruler so the top of the curlicue is lined up with a foot marking, and the bottom falls within the inch tick marks (if it falls outside of the inch marks, line the other end up with a different foot marking). This gives us a measurement of 1′ 2½″.
Imperial scale can be expressed in ratios as well. So ¼″ scale would be 1:48 and ½″scale is 1:24. You can see that the imperial 1:48 and 1:24 are close, but not the same, to the metric 1:50 and 1:25.
Always check the scale before taking measurements. The designer should have the scale written on the drafting. If they have any dimensions written out, you can check them against your scale ruler to make sure they match. Also, use common sense; if you are building a chair from a drawing, and your scale ruler says it should be 20′ tall, you’re probably using the wrong scale.
Enlarging Drawings
If your prop is fairly geometric, you can pull measurements from your drawing and just cut your materials out. But if you have parts with intricate curves, organic shapes, or other complexities, it is helpful to generate a full-scale drawing or pattern. Patterns are a way to record the full-scale sizes and shapes of individual pieces you need to cut out.
You can enlarge a scale drawing on a computer or a copy machine. You can also use a projector or a grid overlay to make an enlargement. We will go through each of these methods in turn.
With a computer, you can use a program like Adobe Photoshop to enlarge a scale drawing to print out at full scale. If the drawing is small enough, you can print it on one page, otherwise you will need to print multiple pages, line them up, and tape them together.
You need a program like Photoshop to print your picture at the precise size you need; printing directly from your operating system or using a more basic program may not maintain the scale of the image. For more on using these programs, refer to Chapter 17: Graphics.

Figure 6-12: This box was small enough that it could be drawn out full scale on a single sheet of paper. The widths and thicknesses of all the pieces were laid out exactly so when the time came to construct it, the measurements could be taken directly from the drawing without needing a scale ruler or math.
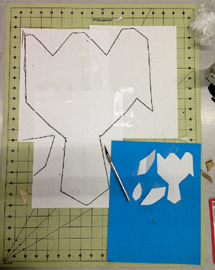
Figure 6-13: A paper pattern was developed in scale, then flattened and taped to a sheet of paper. It was scanned into the computer and enlarged to full size, then printed to multiple sheets of paper which were taped together.
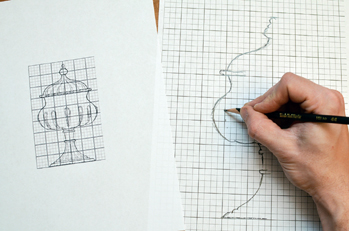
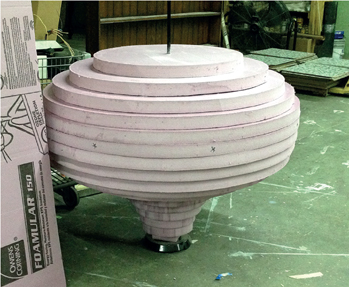
Figure 6-14: With a grid overlay, you add a grid over your reference image. You then use a larger grid to draw the object at full scale. Simply find out where the lines in the original cross over various intersections and lines of the grid, and mark those intersections on the larger grid; connect-the-dots to complete the drawing.
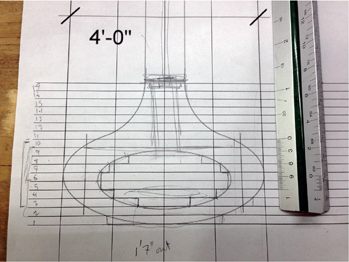
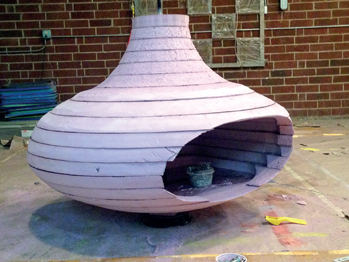
Figure 6-15 to 6-17: In this variation on a grid overlay method, the drawing was divided into 2″ slices because it was being built out of a stack of 2″ thick pieces of foam. Each slice was a circle, so the circumference of each layer could be taken from the drawing and transferred to the foam. Once assembled, the foam was easily carved down into a fireplace which was symmetrical and proportionally correct. Deathtrap. Triad Stage, 2015. Scene design by John Coyne. Prop built by Lisa Bledsoe.
Many copy machines allow you to enlarge a drawing. For instance, if you want it to be twice as big, you would enlarge it by 200 percent. It can take a bit of fine-tuning to position your original so it does not get cropped on your new copy.
You can use either an overhead or a digital projector to shine your image onto a flat surface and then trace the lines. This makes everything bigger, including the lines of the drawing, which in some cases leaves too much room for ambiguity and imprecision. Avoid shining the projector at an angle, which will distort the image with a keystone effect. Some projectors have keystone correction capabilities; otherwise you need to move either the projector or the screen until the image is perfectly flat.
To double-check the size of your enlargement, you can include a scale drawing of a ruler on the original picture. When it is enlarged on the computer or with a projector, you can compare the drawing of the ruler to a real ruler.
Transferring Drawings to Materials
Once you have your full-scale drawings or patterns, you need a way to transfer them to your material.
With carbon or transfer paper, you can trace your lines on top, and they will appear on your material below. For some materials, you may wish to pounce it. Rather than tracing with a pencil, you trace with a rotary tool that leaves a trail of little holes or indentations along the material. For materials that cannot be pierced, you can still punch the holes in your paper, and then take some colored chalk and pounce it through the holes. Special pouncing bags exist for this. If your material is translucent or transparent, you can place the drawing below and draw directly on the material on top.
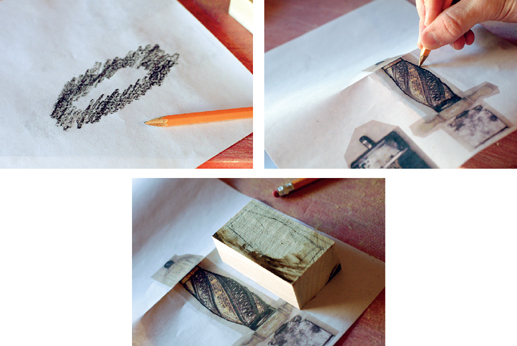
Figure 6-18 to 6-20: For a cheap and quick method of transferring when you do not have access to transfer paper, shade the back of your paper with a graphite pencil or charcoal. You do not need to fill the whole thing, just the areas where the lines are. Flip the paper over and trace the lines on the front over your material. The graphite or charcoal will be transferred to your material.
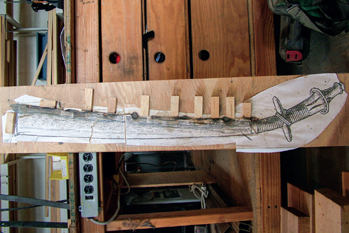
Figure 6-21: This full-scale drawing of a sword was adhered to a board, and the sword was constructed directly on top of it.
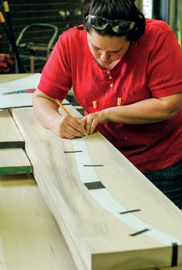
Figure 6-22: If your drawing has a simple outline, you can cut out the paper, and draw around the edge. Natalie Taylor Hart uses a full-scale paper cutout of a chair leg to trace multiple exact copies out on a piece of wood.
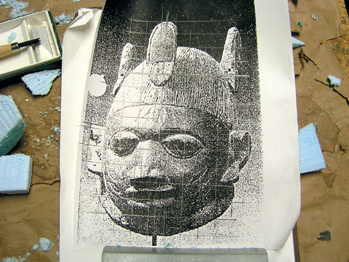
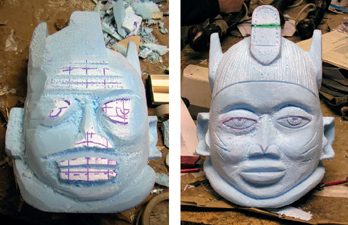
Figure 6-23 to 6-25: This sculpted mask was enlarged with a grid overlay, but the grid was drawn directly on the foam. The Gods Are Not to Blame, Ohio University, 2004. Scenic design by Natalie Taylor Hart. Photograph and sculpture by Debi Jolly, costume crafts and prop builder.
An alternative to tracing or transferring your drawing is to adhere it directly to your material. You want a temporary adhesive (spray adhesives work well here) unless that surface will be covered or removed in a later process.
Mock-Ups and Patterns
A prop builder may build a full-scale mock-up of a prop. When an actor needs to interact heavily with a prop, they may wish to use it during the rehearsal process. It may be difficult to have the real prop completed that early, so a mock-up that matches the size and weight as closely as possible may be substituted. Having a mock-up in rehearsal also allows the director to make changes to the prop before the prop builder builds the real prop out of more expensive materials. When a prop is mocked up in full size and placed next to actors in the rehearsal hall, they can see more clearly whether it is the size and proportion that they were hoping for, or whether parts need to be lengthened or shortened. When it comes time to construct the real prop, all the design factors (size, weight, shape, balance, etc.) will have been refined to a point where the designer, director, and actor are happy.
A prop builder may also build a mock-up for their own clarity. A drawing or photograph of an item does not fully convey all the information of a three-dimensional object, even if it is drawn up in full scale.
Pattern pieces can be developed from your mock-up. In some cases, your mock-up may actually become your pattern; you can disassemble it into individual pieces that you trace onto a different material. When constructing armor or other sheet metal products, artisans will frequently use thick cardstock or heavy paper to get the fit and shape right before tracing the patterns to steel.
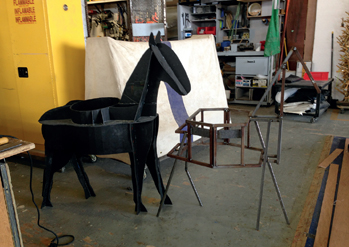
Figure 6-26: This full-size toy horse was mocked up in foam core to use in rehearsal. Once approved, it could be used to take measurements from for constructing a steel frame for the real prop.
Some tools will even let you duplicate shapes if you have a pattern cut out of a rigid material, like MDF or a hard plastic. A router with a pattern bit, for instance, can follow the shape of a pattern on top to cut an exact duplicate out of the material on bottom.
Computer-aided drafting (CAD) and 3D drawing software can be used to construct a virtual mock-up. You can play with the sizes and proportions of the parts that may not be clearly defined in the drawing. They can also be used to communicate to the designer what you intend to build before committing any materials.
The parts you draw on the computer can be printed out at whatever scale you need and transferred to the materials you need to cut. You can also use the drawings to digitally fabricate some or all of the pieces.
A three-dimensional digital model may still be incomplete, because you cannot see how the item feels in your hand, how it is balanced, or what it looks like in proportion to a human being or other objects it will need to interact with.
Measuring Length and Width
Prop builders utilize a number of devices for making simple measurements. A ruler is the most basic. These come in multiple lengths, and can measure either in inches, metric, or both. Longer measuring devices, such as yardsticks and steel straightedges, are useful not just for measuring, but also for drawing and cutting straight lines. Always be certain when taking your measurement that the ruler remains parallel to the edge you are measuring, otherwise your measurements will be inaccurate.
A tape measure comes as large as 100′ or 30 m (or more!), but it is rare for the prop builder to need anything larger than 25′ or 30′, 7.5 m or 10 m. Tape measures have a little tab on the end that is used to hold the tape in place when measuring a piece of material. This tab is free to wiggle; this allows you take accurate measurements either from the outside or inside of a piece.
While a rigid device like a ruler or tape measure will give you accurate measurements on hard goods, a flexible cloth tape allows you to follow the folds of fabric and to wrap around contours, such as when measuring fabric for upholstery.
Calipers are handy if you need to measure diameters or odd-shaped pieces. Some calipers have a ruler or dial showing the measurement, while others can be held to a ruler to get a measurement.
Check your measuring devices against each other and get rid of the ones that deviate from the average. Metal rulers are more accurate than wooden ones, so use those as a standard. Try to stick with a single measuring device on a project so at least the measurements will be internally consistent.
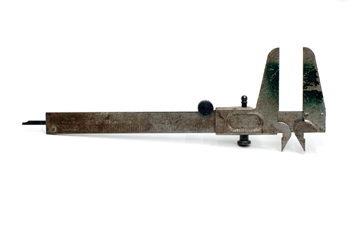
Figure 6-27: Calipers.
Tape measures can be the least reliable measuring devices if not taken care of. The little metal tab at the end is easily bent and will make all measurements inaccurate. Check your tape measure regularly by laying it over an accurate straight-edge ruler. The markings should line up. If they don’t, you can bend the metal tab back into shape with a set of pliers.
To overcome the potential inaccuracy of a tape measure, carpenters sometimes “burn an inch”; they begin measuring from the one-inch mark and subtract an inch from the measurement. While, this is indeed more accurate, it is easy to forget to subtract that inch. A common lament heard in the prop shop by carpenters is, “I forgot to burn an inch!”
Cloth tape measures can also involve some inaccuracy, as they easily stretch up to a half an inch longer over several feet. The plastic-reinforced flexible tape measures are more reliable.
Measuring Volume
You need to know the volume of an item if you are casting a piece and need to know how much casting material you need. If you can get the original object wet, you can find the volume by submerging it in a cup of liquid. Mark the height of the water both before and after you submerge your object. The amount of water it takes to fill the cup from the first line to the second is the amount of material you will need to cast that item. If you cannot get your item wet, you can use this method with sand (do not pack it down).


Figure 6-28 and 6-29: Measuring the volume of an object.
Measuring Depth
To measure the depth of a hole or groove, you can use a specialized depth gauge, or just stick a thin rod down there, mark the depth, and measure that. For drilling to a specific depth, some drill presses come with adjustable stops that allow you to set the depth which you drill to. You can also add a stop-block directly to your drill bit, but you need a different stop-block for every diameter of drill bit you have. A quicker and cheaper option is to simply wrap a piece of masking tape around your drill bit to let you know how deep to drill.
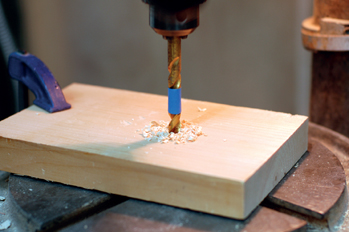
Figure 6-30: Using masking tape to mark the depth of a drill bit.
Marking
In addition to maintaining accuracy with your measuring devices, you want to maintain accuracy with the markings you make. A dull pencil can create a thick enough line that if you cut the wrong part of it, your piece will end up slightly larger or smaller than you wanted it to be. If you use a pencil, make sure it is as sharp as possible when making your marks.
For precise work, you can use a sharp knife to make a mark. Knife marks are harder to see unless you are up close (you can circle it with a pencil to solve that problem) and not every material can be marked with a knife.
The tools and machines to cut your materials also have widths. A razor blade’s width is inconsequential, but the blade on a table saw or radial arm saw can be ⅛″ thick or more. The width of a blade is called the kerf. If you mark a piece of wood at 6″ and cut it so the kerf is on the wrong side of your mark, your wood will be 5⅞″ long. So the other consideration in making your marks is indicating which side of the mark the kerf should go on. This is known as the waste side of your mark to indicate that it is not the piece of material you are keeping; all cuts should be made on the waste side of your mark.
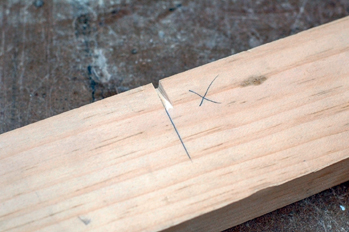
Figure 6-31: The kerf of a blade is wider than your pencil line. Mark which side of the line you should cut on.
For layout, there are a whole class of tools for making and marking perpendicular lines. Combination squares and speed squares enable you to push one side to an edge and make a quick mark. Framing squares will also let you find perpendicular lines.
To find and mark angles, sliding bevel squares are extraordinarily useful, particularly in their ability to find an angle on one piece and transfer it to another. A protractor can do the same, as well as tell you what the angle is.
For fabric, paper, and other delicate materials, plastic versions of the above tools exist (commonly sold with drafting supplies at hobby and art stores). Clear plastic squares and triangles allow you to see the material underneath while measuring and marking.
When using a straight-edge as a guide for cutting, set it up so you are cutting on the waste side. Then, if you accidentally veer away from the straight-edge, you are cutting into the unused portion. Otherwise, you may potentially ruin the good material. This is true if you are using a knife along a straight-edge, or a power tool like a jigsaw, circ saw or router against a rail.
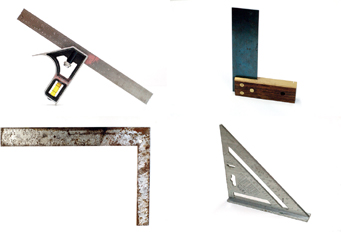
Figure 6-32: A combination square, try square, framing square, and speed square.
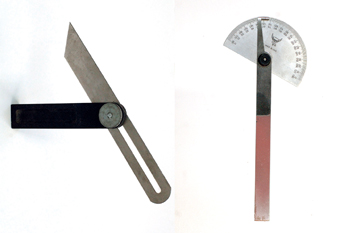
Figure 6-33: A sliding bevel and a bevel protractor.
Making sure your pieces are square when they are supposed to be is important for a lot of constructed props. In some cases, your tools may not be large enough to check the overall squareness. If you have a box, the best way to check if it is square is to measure the diagonals. If these are equal, the box is square. If not, you may need to rack the box to tweak it into squareness.
To make circles, you can use a compass. The kind of compasses you find in elementary schools are typically low quality, and do not hold their settings for very long. Much better ones exist for the professional. Larger circles can be drawn with a pair of trammel points attached to a wooden stick or other rigid bar (trammel points are easily improvised if you do not own a pair).
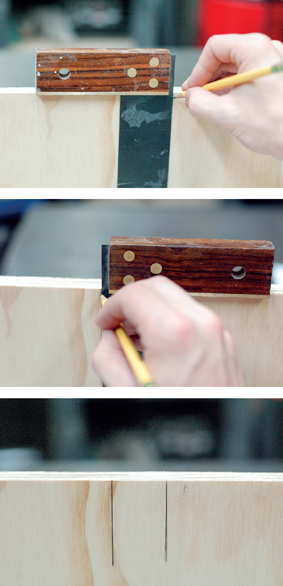
Figure 6-34 to 6-36: To check if your tools are square, draw a line. Flip the tool over and draw a second line in the same place. If the two lines match, the tool is square. If the lines form a slight V, you have an inaccurate tool.
What follows are a number of shortcuts that carpenters and others find useful to make precise and accurate shapes and marks with the tools available in the typical shop.
Some people draw large circles using a string. The downfall with this is that the string stretches and sags, and does not hold the pencil at a consistent distance from the center.
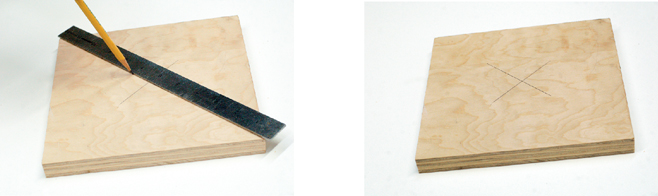
Figure 6-37 and 6-38: To find the center of a square or rectangle, draw two diagonal lines connecting the opposing corners. The intersection is your center point. This works for other parallelograms as well, such as rhomboids and rhombi, but not for quadrilaterals with unequal opposing sides.
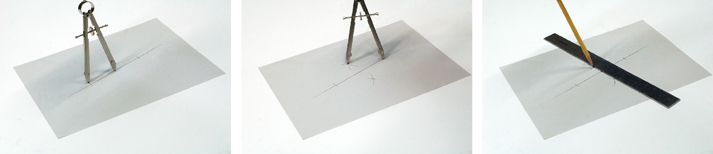
Figure 6-39 to 6-41: 1. You can create a perpendicular line with a compass rather than a square. Stick the point of your compass where you want the line to cross, and make a mark on either side. 2. Set your compass to a larger radius. Inscribe an arc from each of these two points on either side of your line. These arcs should intersect once above your line, and once below. 3. If you draw a line connecting these two intersections, it will be perpendicular to your original line. You can modify this method to find the center of a line as well. If you set your compass to a radius greater than half the length of your line and draw an arc from either end point, the line connecting the two intersections of the two arcs will run through the exact middle of your line.
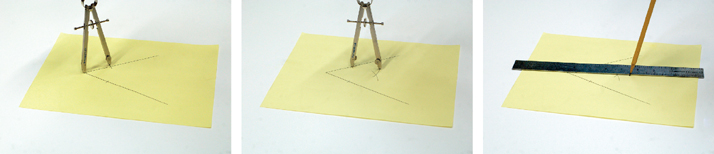
Figure 6-42 to 6-44: One way to bisect an angle (divide it in half) with a compass is to mark off a point along each side, keeping the compass set at the same radius. From each of these two points, draw a small arc. Take the point where those two arcs connect, and draw a line connecting that to the vertex; this line is your bisection.
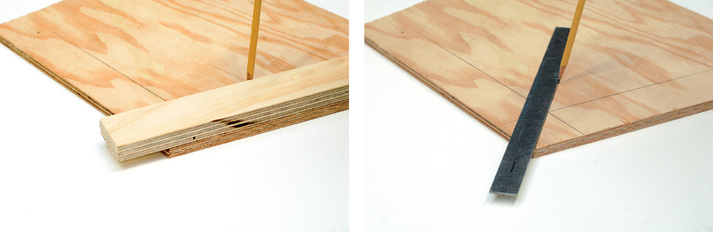
Figure 6-45 and 6-46: Another method involves laying a board along the edge of one side of your angle so the edge is flush. Inscribe a line, and then repeat with the board along the other edge. Take the point where these two lines connect, and draw a line to your vertex. Bisecting an angle is helpful when you need to determine what angle to cut for molding that runs along the perimeter; the angles need to match for the shapes to line up with each other.
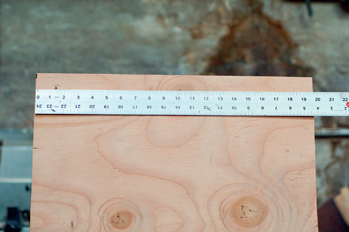
Figure 6-47: If you need to divide 20″ into four equal parts, you can make a mark every 5″. But if you need to divide 19¾″ into seven equal parts, you need a mark every 2.82142857″. In that case, you can use geometry rather than trying to find a ruler that precise.
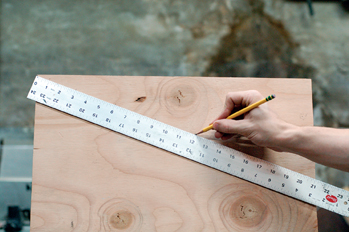
Figure 6-48: Hold the ruler at an angle so that the zero is at one end, and a multiple of the number of divisions you need is at the other end. In this photograph, we hold the ruler at 21, a multiple of 7. If we place a mark every 3″, we will have seven equal parts.
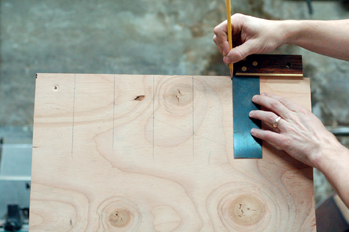
Figure 6-49: You can now use a square to extend your marks to the edge of the board. No math needed!
Making a Cut List
A cut list is a list that displays the sizes of all the pieces you will assemble together. It allows you to estimate the amount of material you will need to purchase and use for a project. You can also do all your cutting at the same time, so you do not have to walk back and forth between the power saws, or set up and reset machines, particularly if you are working in a small shop where your table saw surface doubles as your assembly table.
For many prop projects, you may not be able to develop your entire cut list at the beginning. Sometimes it is more helpful to build a portion of your prop before taking the next step; maybe it has some tricky geometry that you cannot sketch or visualize in your head and which you’d rather see in real physical form. Sometimes, you just do not have all the parts figured out yet, and you like to construct your prop little by little before making the decisions on how to proceed.
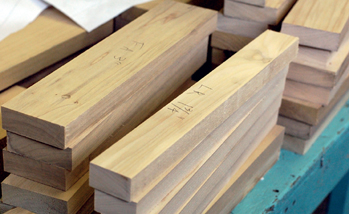
Figure 6-50: A cut list allows you to cut all the pieces out first. This can be incredibly efficient, especially when you need to cut many pieces out to the same measurements. These pieces have been labeled to help keep track of where they go on the final prop (as well as to distinguish them from scrap pieces that other artisans may grab for their own projects!)
Whether you make a complete cut list at the beginning, or develop one as you move along, you should know how to make one.
In this example, we have a box we wish to make out of ¾″ plywood. It has four sides and a bottom, and is open on top. It has a 20″ by 20″ footprint, and is 28″ tall. We have our first bit of information: our cut list will have five pieces of wood listed. So our cut list should look like this, right?
| Length (inches) | Width (inches) | |
| Piece 1 | 20 | 28 |
| Piece 2 | 20 | 28 |
| Piece 3 | 20 | 28 |
| Piece 4 | 20 | 28 |
| Piece 5 | 20 | 20 |
Wrong! Look again; if we draw the cube out as if we would construct it, you will see that not all the pieces are the same size; you have to take into account the thickness of your materials.
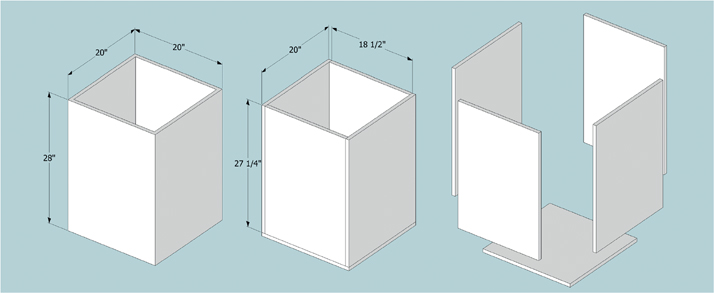
Figure 6-51: Breaking apart a box to develop a cut list.
This is one of the most common mistakes made by beginners (and even some experts) when making a cut list for carpentry and other constructive projects. Here is our correct cut list:
| Length (inches) | Width (inches) | |
| Piece 1 | 20 | 27¼ |
| Piece 2 | 20 | 27¼ |
| Piece 3 | 18½ | 27¼ |
| Piece 4 | 18½ | 27¼ |
| Piece 5 | 20 | 20 |
Once you have your cut list, you can also plan out the most efficient way to make all the cuts while using the least amount of material possible. For our box example, you can lay out the pieces on a stock 4′ by 8′ piece of plywood in a manner that will maximize the size of the leftover piece or pieces.
Jigs
A jig is a device for maintaining the spatial relationship between two or more objects. The objects may be your tool and your material, or it may be several pieces of your materials. A jig can be as simple as a spacer block, which holds two materials apart at a certain distance. A more complex example is a circle jig for the band saw that allows you to cut a nearly perfect circle from a piece of material.
You can find all sorts of commercial jigs that simplify certain tasks or allow you a greater precision with your tools. Books, magazines, and websites have countless ideas for jigs you can make yourself. Homemade jigs can range anywhere from simple devices for accomplishing a single task on a specific prop, to fully adjustable reusable jigs, such as a router table for your router.
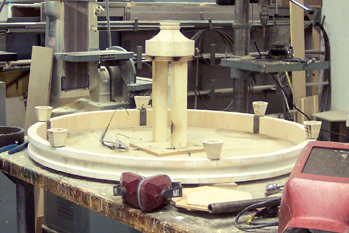
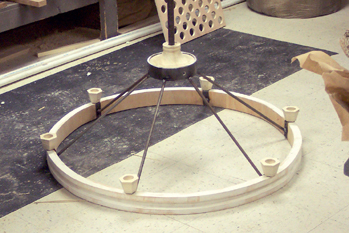
Figure 6-52 and 6-53: A jig holds the body dish of this chandelier in the center and at the required height so the arms can be welded on. Romeo and Juliet, Ohio University, 2004. Scenic design by Pavlo Bosyy.
If your project has a repetitive task, like placing hundreds of evenly spaced tacks around the perimeter of an upholstered seat, or if it requires a certain amount of precision, consider using a jig. Being able to freehand something is not necessarily the sign of a good prop builder. Often, it is the experienced artisan who spends more time measuring, laying out, and preparing jigs before beginning a project. The novice is more likely to jump right in with a saw and make a mess of the whole thing.
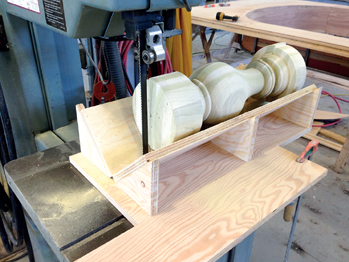
Figure 6-54: This jig uses the miter track on the band saw to cut a balustrade directly in half.
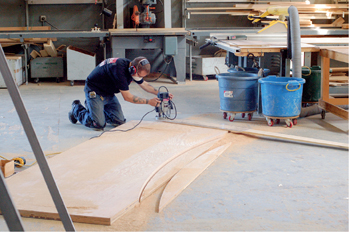
Figure 6-55: David Schneider uses a shop-made jig to cut large arcs and circles with a router.