ten
plastics construction
Plastics comprise such a wide variety of materials that to attempt to describe them all in one book, let alone one chapter, would be foolish. Even if it were possible, there are so many new materials being developed all the time that even the most comprehensive guide would be outdated by the time it is published. This is what makes them so exciting for theatre work; with their endless iterations and unique properties, you can solve any number of props problems by finding the right material. Some are transparent or translucent. Many can be intricately shaped by heat. They are often much lighter than wood or metal. Working with plastics in props involves a lot of experimentation.
Many plastics are known by several chemical and technical names. Acrylic, for instance, can also be called polymethylmethacrylate, or PMMA. Plastics are manufactured under a variety of brand names, some of which are used generically; “Plexiglas” is a specific brand of acrylic. The inconsistent naming of various plastics can make it confusing when you are trying to order materials or learn more about a product you saw demonstrated.
Plastics can also be combined together, forming either copolymers (like ABS) or alloys (like Kydex). They can also be modified with any number of additives, such as plasticizers (chemicals that make them softer and more flexible), colorants, fillers, flame retardants, and antioxidants. So the EVA foam you get at the craft store can exhibit slightly different properties than the EVA foam you buy at the foam supplier.
All in all, plastics can be a confusing and dizzying world. This chapter deals with common plastics used in construction and fabrication. These plastics are versatile, easy to work with, economical in price, and readily available from a number of stores and suppliers in sheets of various thicknesses, as well as rods, tubes, bars, and other shapes that can be cut apart, shaped, and attached together. We will also look at foams and rubbers that can be used for fabrication (as opposed to foams used for sculpting, which is covered in Chapter 13).
Thermoset Plastics
Plastics are divided into thermosets and thermoplastics. When thermosets are cured, set, or hardened (usually through heat), they will not soften again. A thermoset material is like a lump of bread dough; you can't turn it back into dough after it is baked. A plastic can come in both forms: polystyrene sheets are thermoplastic, but polystyrene foam (such as Styrofoam) is a thermoset.
Props people mainly use thermoset plastics when molding and casting. For plastic fabrication, you are more likely to find thermosets in the forms of laminates and composites. For instance, melamine can be found laminated to particleboard as whiteboard panels, or as Formica countertops. Phenolic resin sheets, like Bakelite and Garolite, are hard, dense sheets useful for making table saw throat plate inserts or router table tops.
Working with these is similar to working with other engineered wood products covered in Chapter 8, on carpentry. This chapter is more interested in thermoplastics.
Thermoplastics
Thermoplastics become fluid and plastic whenever they are heated to a certain point, and can be reshaped repeatedly without changing their chemical nature (though repeated heating and cooling will eventually lead to degradation).
Acrylic is one of the most common thermoplastics used in prop making because of its versatility, wide variety of colors and forms, and price. Transparent and translucent varieties are sold under the brand names Plexiglas, Lucite, Perspex, and Altuglas. It has essentially replaced the use of glass on every theatrical stage and many film and television sets as well.
Acrylic comes in a wide variety of tints and finishes. You can find nearly any color. It can be opaque, or it can be tinted translucent, which allows it to glow when light is placed behind it. You can find many specialty acrylics too, such as frosted, pebbled, fluorescent, mirrored (good for replacing glass mirrors), and metallic. It comes in a wide range of thicknesses, from 0.06″ up to 2″ (1.5 mm to 50 mm).
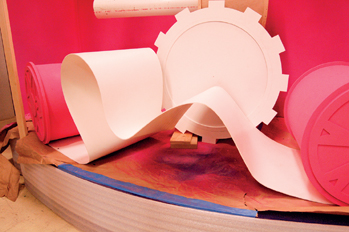
Figure 10-1: This long sheet of styrene was heated with a hot air gun and manipulated to appear like a flowing piece of ribbon between two spools in this holiday window display for a retail store. It holds this shape without any reinforcement or hidden lines.
Acrylic comes either extruded or cast. If you engrave cast acrylic with a laser cutter, it will leave a frosty white line. Engraving extruded acrylic leaves a clear line that is difficult to see.
Polycarbonate is another transparent plastic. It is more impact resistant and less brittle than acrylic, but it is also more likely to scratch. It is used where strength or structural support is needed. Unlike acrylic, it will yellow over time with exposure to sunlight (UV rays). It can also be two to three times as expensive as acrylic, and it contains Bisphenol A (BPA), which messes with the body's hormones. Common brand names include Lexan, Makrolon, Makroclear, and Tuffak. Though you can find a few different tints and colors, it does not approach the variation of colors and finishes that you find with acrylic.
PETG is a popular transparent plastic for use in vacuum forming and other thermoform processes. It is far less likely than acrylic to crack or craze when being thermoformed. It can be dyed with dyes meant for polyester (which is technically what it is). Vivak and Spectar are some popular brands of PETG.
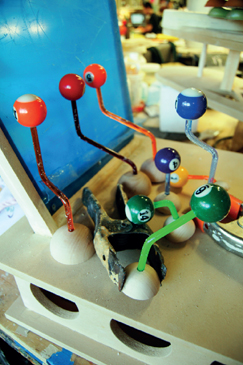
Figure 10-2: Colored acrylic rods were bent by blowing a heat gun onto a single spot for a few seconds. After fully cooling in a few minutes, they maintain their bend indefinitely.
While Plexiglas is the proper registered trademark, the spelling “plexiglass” is used far more frequently, often as a generic term for any transparent acrylic. While most people use the terms plexiglass and acrylic interchangeably, it can be important when ordering your materials to be specific in the brand you wish to purchase, as different brands have slightly different properties.
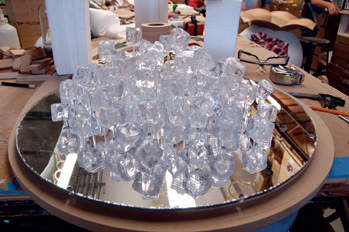
Figure 10-3: Cast acrylic ice cubes are mounted on a circle of mirrored acrylic using clear acrylic rods.
PETG is more impact resistant than acrylic, but not as much as polycarbonate. The prices of PETG and acrylic are very comparable; PETG tends to be cheaper for thinner pieces, while acrylic is cheaper for thicker ones. Like polycarbonate, PETG is not weather resistant. Neither PETG or polycarbonate are as optically clear as acrylic, which lets in the most light out of all the transparent plastics.
Polystyrene (often shortened to styrene) is commonly formed into sheets known as either high-impact styrene (HIS), high-impact polystyrene (HIPS), or just “high-impact plastic.” It is very popular for model making and vacuum forming. Styrene sheets come in a variety of thicknesses, with the most popular ones ranging between 0.020″ and 0.125″ (0.5 mm to 3 mm). It is opaque and usually found in white, but it takes a variety of paints very well.
ABS, or acrylonitrile butadiene styrene, is a copolymer of styrene, acrylonitrile, and polybutadiene (it's what Legos are made out of). It is similar to styrene, but the butadiene makes it stronger and more impact resistant. You can buy it in sheet form, or as plumbing parts (similar to PVC, but black instead of white).
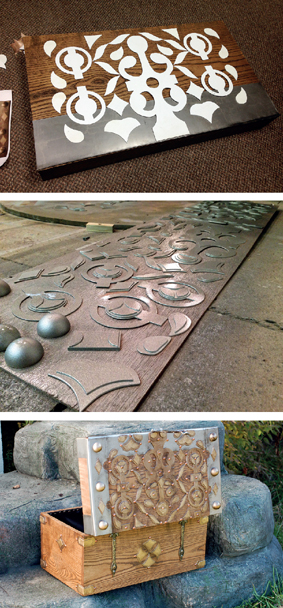
Figure 10-4 to 10-6: Layers of styrene are used to create raised details on this chest lid. When painted, they mimic decorative metal onlays.
PVC or vinyl is a hard plastic often sold as boards (called “PVC lumber”) or as plumbing pipes and connectors. These are useful for erecting quick frames and skeletons, or wherever tube shapes are needed. Some types of connectors and joints can be found at plumbing supply stores, while different kinds can be found at pool supply stores. You can also find “furniture grade” PVC pipe which is glossy white and does not have any ink printed on it. PVC pipes can be shaped with heat, but a respirator and proper ventilation are required.
CPVC (chlorinated polyvinyl chloride) is an even stronger version of PVC.
You can find PVC in sheets, but most prop builders prefer to use sheets of Expanded PVC Foam (XPVC), also called Closed-Cell PVC Foam. It has the same smooth surface as PVC but half the weight. Popular brand names are Sintra, Komatex, Celtec, and Forex. Under ⅛″ (3 mm) you can cut it with an X-ACTO knife; thicker and you need a band saw. It can be heat formed, but you definitely need a respirator. The best glue to join XPVC pieces to each other is CA glue.
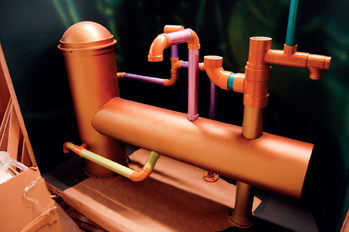
Figure 10-7: PVC pipes and connectors were used to create this whimsical plumbing-type contraption for a holiday window display at a retail store.
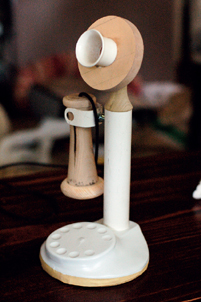
Figure 10-8: PVC pipe was used for the stem of this candlestick phone. The mouthpiece is also a piece of PVC pipe that was heated and spread open into a flange shape. Finally, the yoke holding the receiver is a section of PVC that was cut into a “C” shape.
Kydex is an alloy of acrylic and PVC which comes in a thermoplastic sheet. It is frequently used as a replacement for leather to make gun holsters, as well as for making faux stage armor that needs to withstand stage combat.
Cellulose Acetate Butyrate (CAB), sometimes known as butyrate, is a glossy transparent or translucent copolymer. Common brand names include Tenite, Uvex, Excelon, and Spartech.
High-density polyethylene (HDPE) is used to make milk jugs, plastic bags, and paint buckets, among other things. Because it is a thermoplastic, it can be used for vacuum forming; some prop builders cut apart milk jugs to form small parts. It is nearly impossible to make paint or glue stick to it, so it is rarely used.
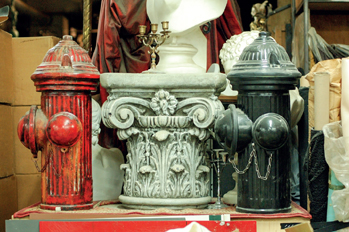
Figure 10-9: These fire hydrants were made by vacuum forming Kydex. Some of these Kydex props have been in use for over twenty years without cracking or deforming. Props created by Costume Armour, Inc.
A few plastics are very dense and are used to reduce friction between moving parts. One common one in prop shops is ultra-high-molecular-weight polyethylene, or UHMW. Another is acetal, which is often referred to by one of its most popular brand names, Delrin.
Buying Plastics
Sheets of plastic come in common lengths and widths, such as 12″, 18″, 24″, and 48″ (250 mm, 500 mm, 1000 mm, and 2000 mm). Hobby and craft stores will sell smaller and thinner sheets (under ¼″ or 6 mm) of materials such as styrene, acrylic, and PVC. Model train and car shops also carry some sheet plastics. Home improvement stores will often carry larger and thicker sheets of plastics such as acrylic and polycarbonate. Full sheets of plastic are usually 48″ by 96″ (1220 mm by 2440 mm, though full sheet sizes vary a lot more outside of the US).
A film is a thin section of plastic between 0.5 mil and 10 mil (0.0127 mm and 0.254 mm). Anything thicker is called a sheet. A mil is a thousandth of an inch, so 10 mil equals 0.01″ (between 1/128″ and 1/64″).
Cellulose acetate (also known as “Safety Film” because its predecessor, cellulose nitrate, tended to explode) is a transparent film used as “transparencies.” An older trade name is Rhodoid.
Cellophane is a transparent sheet form frequently used as candy and food wrappers (the kind that crinkle as you open them). It differs from cellulose acetate in that it will not dissolve in acetone.
Polyethylene and polypropylene can both be found in sheet form. Their ability to be heat welded together makes them useful in the construction of bags for effects like blood packs.
PET can be stretched into a film as well, such as the well-known Mylar.
Plastic suppliers will have the greatest selection of plastics and often the best prices. These can be found in many areas, though they are often tucked away and poorly advertised, so some searching is necessary. Ask local plastic fabrication shops and signmaking shops where they buy their plastics from.
You can get nearly any kind of plastic shipped, but larger sizes can make shipping costs exorbitant. It can be hundreds of dollars cheaper to buy a full sheet locally rather than online, and many shops will also cut your sheets to length and width for a nominal fee.
Cutting Plastic
Thin sheets of plastic can be cut easily and cleanly with a mat or hobby knife.
For thicker pieces or for faster results, you can use woodworking tools such as the table saw, chop saw, band saw, and jigsaw. You do not want to use a wood or combination blade to cut plastic with your table or chop saw; use one with a relatively large number of uniform teeth intended for finishing cuts on plywood or veneers. Triple chip ground teeth are ideal. On a 10″ (254 mm) blade, the recommended teeth for pieces up to ¼″ (6.35 mm) is eighty, while sixty are fine for pieces thicker than ½″ (12.7 mm). A rake angle between zero and positive 5° is usually recommended, though some blades have a slight negative rake angle if you are having problems with your plastic melting in the saw. You can also purchase blades specially made for cutting plastics to take the guesswork out of what properties your blade should have.
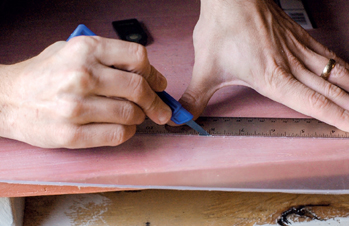
Figure 10-10: You can cut acrylic sheet less than ¼″ (6 mm) thick by scribing it. Acrylic can also be cut with a mat knife, but because it is more rigid than styrene and PVC, scribing is often quicker and cleaner. Make a cut with a scribing or other pointed tool along a straight edge; you may need to score it four or five times to get the cut deep enough.
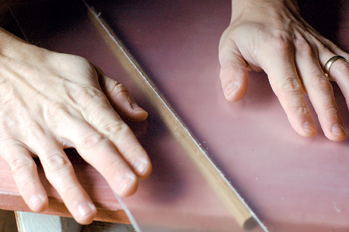
Figure 10-11: Place the sheet so that the scribed line is directly over a dowel (at least ¾″); push down, and the sheet will snap along the scribe.
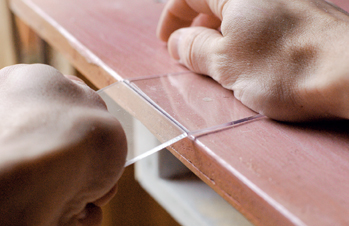
Figure 10-12: You can also place the scribed line over the edge of a work table to snap it. Scribing requires a piece at least 1½″ (38 mm) wide.
On a band saw, use a blade with 10–15 TPI (teeth per inch). Most woodcutting blades have too few teeth for cutting plastic. If you use a metal-cutting blade, do not use it for plastic if it has already been used to cut a piece of metal; the metal dulls the blade in a way that makes it less desirable for cutting plastic.
Saber, jig, reciprocating, and hand saws are also highly useful. Again, new metal-cutting blades (or specialty plastic-cutting blades) are ideal for optimum cuts. Choose blades with at least 14 TPI for sheets thicker than ⅛″ (3 mm) and 32 TPI for sheets under ⅛″ (3 mm). On both band saws and electric hand saws, a raker-set blade is best.
One of the most important things to remember when using power tools and machines to cut plastic is that the plastic cannot be allowed to vibrate or “chatter”; this will cause cracking or even shattering. With a band saw and table saw, use a zero clearance throat insert when possible. Make sure the plastic is held firmly in place as close to the saw as possible. If you are using a tool where the plastic sheet remains stationary, clamp it to the surface it sits on. Make your cuts as close to that surface as you can get; cutting where the plastic is hanging out in mid-air will surely cause vibrations as the teeth of the blade hit against the plastic. Thin pieces of plastic are especially prone to vibrating, which is why it is suggested to cut them with a knife or scribing tool. If you are having trouble keeping the plastic from vibrating, you can sandwich it between two pieces of sacrificial plywood.
Proceed steadily when cutting plastic. If you feed it through the blade too fast, it will chip; too slow, and it will burn and melt. If the blade or bit heats the plastic up too much as it cuts, it may cause the chips to melt and stick back to the plastic. If these chips stick to both sides of the kerf, they can actually weld the plastic back together; you finish your cut and realize that the two pieces are still connected. This is known as chip welding.
If your tools are heating the plastic too much, you can direct a stream of compressed air at the blade or bit as you cut. If you need a lubricant, detergent and water are best. You can also use wax or mineral oil, but avoid anything with solvents, as they can attack the plastic.
Drilling and Machining Plastic
Special plastic bits have tip angles between 90° and 60°, as opposed to regular bits, which are 120° (plastic bits are much more “pointed”). The cutting edge also must have a 0° to 4° rake angle; regular drill bits will gouge the plastic (causing chipping) rather than scrape them as plastic drill bits do. If you use a regular drill bit, it may shatter or crack the plastic, and even break a piece off if the hole is near the edge. If you absolutely have to use a regular drill bit, make sure to drill slowly.
Hold the plastic down firmly. If you push the drill bit through too fast or with too much force, it may cause chipping on the back. For a truly clean hole, clamp the plastic firmly on top of a piece of sacrificial MDF or other lumber so that as the drill bit exits the back of the plastic, it immediately enters the wood, leaving no room for chips or burrs to occur.
For thicker pieces, you want to peck drill through the plastic. This means what it sounds like; you periodically raise the drill bit out of the plastic as you drill so that you can clear the chips and keep the bit from heating up too much.
For drilling large holes in thinner pieces of plastic, you may want to try a step drill bit. Otherwise you may need to sandwich the plastic between two pieces of wood so the drill bit will go through cleanly.
Using a router on plastic is possible, and even preferred in some situations because of the clean edge it can produce. As with other fabrication tasks, making sure the plastic is secured well to prevent chattering is a must. Router bits for wood work well, though they need to be sharp; if the bits have been previously used on wood, they may not be sharp enough. Bits over ½″ work the best. Run the router at the highest RPM that the bit will allow. The speed you move the router along the plastic has a big effect on the quality of your cuts; too slow and the plastic will soften and melt, too fast and it will chip and shatter. Don't force the router through though; if you can't rout through the material fast enough to prevent burning, you will need to make several passes, cutting off just a bit of the material at a time. If you are routing through the middle of a piece of material, do this by sneaking up on the depth.
Joining Plastic
If you attempt to screw some plastics, the plastic may crack or break. However, you can drill a hole wider than the screw and put the screw over a washer to hold it in. It can also be bolted this way. When bolting, drill the hole slightly larger to allow for changes in size from temperature; metal and plastic contract and expand at different rates and amounts, so a tight fit might cause cracking under the hot stage lights or the rays of the outside sun. You can tap threads into plastics as well, but again, tap it a bit larger than the bolt you are using.
Solvent Welding
With solvent welding, you take a solvent that dissolves your plastic and place it between the two pieces on either side of your joint. The plastic softens from the solvent, and the two pieces of plastic start to intermingle and mix together. When the solvent evaporates, the plastic hardens again, but now it is effectively one piece of plastic.
Plastics that can be solvent welded include acrylic, polycarbonate, styrene (including copolymers of styrene such as ABS), and PVC. Some adhesives only work on similar materials, such as welding acrylic to acrylic, while others are designed for disparate materials, such as welding PVC to ABS. Some popular brands of solvent welders include Weld-On, Plastruct, and Oatey cement.
Plastics that cannot be solvent welded include poly-ethylene (including LDPE, HDPE, and UHMW), polypropylene, Teflon, acetal, nylon, and other exotic plastics.
To test whether your particular plastic can be solvent welded, take a solvent like acetone or methyl ethyl ketone (MEK) and dab it on a scrap of the material. If the plastic becomes tacky, it can be solvent welded; otherwise you need some kind of mechanical fastener. Remember that solvents are particularly hazardous; the liquid is absorbed through your skin, and the fumes have both immediate and long-term effects with the first breath. Always wear the proper chemically resistant gloves and the correct type of respirator when working with them.
“Water-thin” solvent adhesives require the two pieces to fit together as tightly as possible, with their edges free of saw marks (but not polished). Apply the solvent cement with a hypodermic needle or eyedropper along the edge of the joint; capillary action pulls the liquid into the joint. The joint should be clamped snugly together the entire time, but it should not be squeezed together tightly like when you clamp wood glue joints. Be particularly careful of dripping the solvent on the surface of the plastic as it will almost immediately begin to soften and deform it.
“Bodied” adhesives allow some gap filling, and a longer working time. The body comes from some plastic, such as styrene, dissolved within the glue. This body helps add material to fill the gap.
Solvent welding plastics require a full twenty-four hours to cure before you can touch them, and forty-eight hours to cure to full strength (technically, they cure to 85 percent strength in the first twenty-four hours, 90 percent in the next twenty-four hours, and take a few more days to get to full strength). Many plastic adhesives claim a twenty to thirty minute “setting” time and seem strong enough to move after that; they are not. You should wait until at least the next day to even test the bond.
If you have laser-cut extruded acrylic pieces, using a solvent-based adhesive on the edge can cause cracking. You need to relieve the internal stresses by annealing your plastic at 180°F (82°C). Place it in a shop oven on top of a flat sheet of glass, and leave it in for one hour per millimeter of thickness. Then let it air cool.
Welding
Some plastics can be joined using heat, including plastics that cannot be solvent welded together. Hot air welding (also known as hot gas welding) involves blowing compressed air over a heating element in a tool known as a hot air welder. It requires a welding rod to be melted into the sheet joint to make a bond. Hot air welding can only be used to join two pieces of the same material, and the welding rod needs to match as well (one exception is welding acrylic to PVC). Common plastics that can be joined with hot air welding include polyethylene (both LDPE and HDPE), polypropylene, PVC, and ABS.
If you work with films or packaging plastic, an impulse sealer can quickly join two pieces together. These use a metal bar that can heat up for a second or two to weld thin plastic without burning through it. These work mainly with polyethylene or polypropylene bags, as well as other films like Cellophane and Mylar, and most can deal with films up to 6 mil (0.1524 mm) thick.
A speed tip welder is a plastic welder used to weld tight corners and irregular profiles. This welder resembles a soldering iron in design and use, except that it has a hole to feed a welding rod through. Some artisans have been known to use a regular soldering iron; without a welding rod, you can only weld thinner films or make tack welds to hold the plastics in place until you can get a sturdier weld on it. Some people even use a fabric iron on occasion. One of the drawbacks of using a direct heat source like a soldering iron or fabric iron is that you may burn through the plastic before a weld is made. Also, the plastic can melt onto the metal surface, where it will stick and continue to burn and give off fumes whenever the iron is turned on.
Heating and melting any plastic will release fumes that you need to remove through ventilation; use the appropriate respirator on yourself. PVC, in particular, creates very hazardous fumes during welding.
Laser welding is used to create an optically perfect (completely invisible) weld on acrylic and polycarbonate. Laser welders for plastics are usually out of the realm of affordability for prop shops, but local plastics fabricators may be able to do it for you if you have a prop that requires it.
Other Adhesives
Multipurpose glues are “sticky” glues, which adhere the plastics together rather than solvent welding them. Contact adhesives and two-part mixes fall in this category. Some glues designed for plastics have solvents in them that eat into the surface of the plastic a bit to give the glue a bit more “grip.” For the plastics that cannot be solvent welded, these glues are not much better. They are handy for attaching plastics to other materials though. Super glue (cyanoacrylate) can be used to join some plastics, particularly acrylic.
Pressure-sensitive adhesives (i.e., tape), are often strong enough to join pieces of plastic. Double stick tape is especially useful, particularly when you are attaching the face of one sheet to the face of another. Some plastics come with a pressure-sensitive adhesive already applied, such as UHMW tape.
Shaping Plastic
Besides the uniform smoothness of its surface, the other great advantage in using plastics is the ease of shaping them with a relatively little amount of heat. Many thermoplastics become pliable around 300°F (148°C), which can be achieved with a variety of tools. Heating metal requires the use of forges or torches using tanks of fuel. Wood can be bent with steam, but it requires the piece to be positioned in a clamp for several hours. Plastic, on the other hand, can be blown with a hot air gun, bent, and cooled down within a few minutes.
Always use good ventilation when heating plastics. In theory, plastics become shapeable at a lower temperature than when they begin to decompose; for example, styrene becomes formable at 325°F (162°C). It begins decomposing and releasing toxins as low as 390°F (198°C). Unfortunately, most plastics contain impurities and additives that can burn off at lower temperatures. Always heat your thermoform plastics with the minimum amount of heat possible, and do it in a well-ventilated area.
You have a few options for heating and shaping plastic. A strip heater is a great tool to heat plastics to give an angled bend in a straight line. Good ones will keep the plastic away from the heating element itself. Bend the plastic in the direction away from the heat; the heat should be applied to the hill of the fold, not the valley.
You can set a toaster oven to 200°F (93°C), crack the door open, and set your plastic over it so the heat from the crack in the door is hitting the strip that you want to bend.
A heat gun can be used for more irregular shaping and deforming, or for bending rods, tubes, and sticks. Be careful with the heat gun—you can burn a hole right through your plastic in just a few short seconds if the gun is too close or if you stay in one spot too long. If you need to heat an entire sheet, an oven could be used, though it should never be reused for food cooking after that. Material thicker than ¼″ (6.35 mm) may require heating on both sides of the fold.
For sharp bends in thicker plastic, you can cut a V-shaped groove about three fourths of the way into the interior side of where your bend will be. After you make the bend, you can seal the groove with a water-thin solvent adhesive.
| plastic | temperature for thermoforming | |
| Fahrenheit | Celsius | |
| Acrylic | 240–340 | 115–171 |
| Styrene (high impact) | 325–350 | 162–176 |
| ABS | 300–350 | 148–176 |
| Acrylic PVC (Kydex) | 350–365 | 176–185 |
| Polycarbonate | 350–425 | 176–218 |
| Expanded PVC (Sintra) | 300 | 148 |
| PETG | 230–350 | 110–176 |
| Cellulose acetate butyrate | 335–390 | 168–198 |
| Polyethylene and polyethylene foam | 325–425 | 162–218 |
Most tests on the substances released when plastics are heated use pure forms in ideal conditions; real plastics have all sorts of chemical additives, and heating plastics in the prop shop is done unevenly and with much variation. You literally do not know what is in the chemical soup created when plastics are heated to their decomposition point, but odds are, it isn't vitamins or medicine. If you smell something, you are breathing fumes. If you see smoke or fumes, you are releasing fumes. If you get a headache while working, you are breathing fumes. Adequate ventilation and fume extraction are key if you wish to work with plastics and heat.
Jigs, formers, and clamps are vital for bending your plastic to the correct shape and holding it there. Often, when you bend a heated piece of plastic, it will try to spring back to its unbent shape; you need to hold it firmly in position until it fully cools. Jigs and formers also help line up your pieces and allow you to get bends with precise measurements and shapes, which is particularly helpful when you need to bend multiple copies of the same shape.
If you use any kind of jig that involves pressing or clamping the plastic, be aware that if a heated portion of plastic is pushed or pressed into another material, it will pick up the texture of that material. To avoid this, cover the former with a thin and smooth piece of material, such as cardstock. Formers do not necessarily need to be complicated; draping a plastic sheet over a pipe will give a gentle curve with the radius of that pipe, for instance. Bend against a piece of wood or metal for a clean and straight bend.
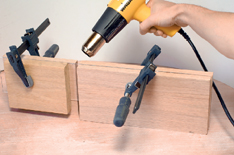
Figure 10-13: Fashion a jig similar to a sheet metal bending brake, or clamp several pieces of plywood on your acrylic, leaving exposed the area that will bend. Make sure the thickness of the plywood doesn't prevent you from bending your acrylic all the way.
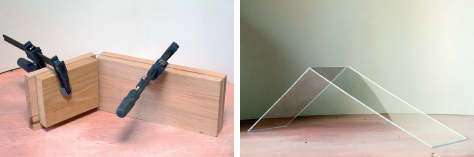
Figure 10-14 and 10-15: This ensures that only the area you want to bend will bend; even if the acrylic in surrounding areas heats up to the softening point, the plywood keeps it from deforming. It also helps guide your bend to keep it perpendicular and straight.
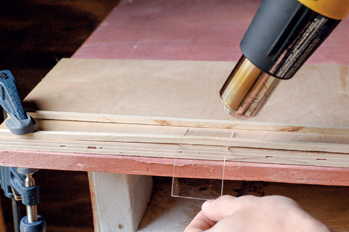
Figure 10-16: This piece of acrylic is bent using a quick handmade jig that approximates a sheet metal bending brake.
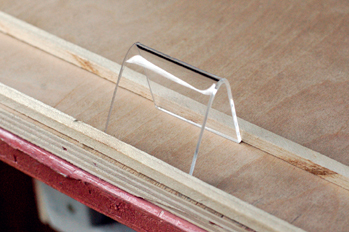
Figure 10-17: This simple jig holds an acrylic piece in position while it cools back down. It ensures that multiple pieces will have the same distance between their two ends, as well as the same angle of bend. The jig also helps keep the two ends parallel to each other, as this kind of bend can easily introduce a twist to the plastic.
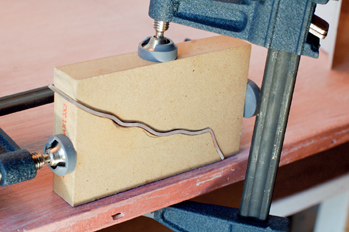
Figure 10-18: Press forming of thermoform plastics requires that the shape of the two molds on top and bottom match each other. This rudimentary press former imparts a series of curves to a strip of acrylic.
Vacuum Forming
Vacuum forming involves heating a sheet of plastic until it is pliable, draping it over a shape, and then using a vacuum to suck the plastic tight against the form until it cools and hardens. In “straight” vacuum forming, you suck the plastic into a negative mold. In “drape” forming, you suck the plastic over the top of a positive form known as a buck. The pieces you make with this method tend to be one-sided, and cannot have any undercuts.
You can buy vacuum-forming machines, though it also remains a popular do-it-yourself machine among hobbyists and small shops. The machine itself consists of a table surface, called a platen, which is covered in many tiny holes leading to a vacuum. Any type of vacuum pump can be used, even a hand-operated one, and some machines are made so that a standard vacuum cleaner can be hooked up to it.
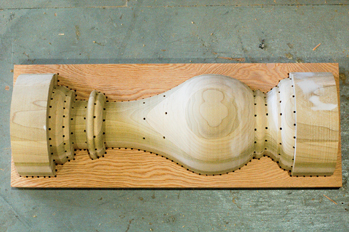
Figure 10-19: A buck needs holes drilled in any convex areas and along edges where you want the plastic pulled in tight.
The plastic is clamped into a frame. This frame helps hold the plastic taut as it is stretched over the buck. The frame also serves the purpose of sealing the table surface so that a true vacuum can be formed between the buck and the plastic. With vacuum forming, it is vital that the plastic be brought straight down over the buck, otherwise it will stretch the plastic on one side and make it thinner. To facilitate this, many vacuum formers have a track for the frame to travel in so it can be slid straight down onto the buck.
The final element of a vacuum-forming machine is the heating element itself. The plastic needs to be heated evenly until it is floppy, almost like fabric. A kitchen oven can fit a small-to-mid-sized sheet of plastic and easily generate the heat needed in an even manner (do not use an oven that you also prepare food in; the toxins that may be released when plastics are heated can leach into the oven and will leach into any food you cook in it afterward). Other vacuum formers have dedicated heating elements. Because the plastic sags in the frame when it is heated, the heating element is typically placed above the plastic. Some machines place the heating element directly above the table so that a track can move the framed plastic straight from the heat down to the platen.

Figure 10-20 to 10-22: These candlestick phone bases are made on a very simple homemade vacuum former. In the first photograph, the buck sits on the platen. A shop-vac is hooked up underneath. The styrene is clamped into a wooden frame, heated with a hot air gun and placed over the platen. When the vacuum is turned on, the heated styrene is sucked over the buck as seen in the second photograph. After cooling, the pieces are cut out, trimmed, and attached to the prop.
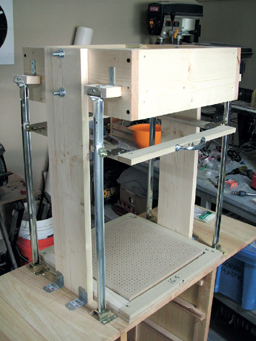
Figure 10-23: This vacuum former built by Harrison Krix has a frame and platen that can use sheets of plastic up to 14″ by 14″. The box on top contains heating elements to heat the plastic. The frame is on four drawer slides, so it can travel up and down between the heating box and the platen. It also has a handle for easy maneuvering. Photo courtesy of Harrison Krix.
A heat gun can be used for very small vacuum formers. A heat gun is also useful for selectively heating any portion of the plastic while it is being vacuum formed to further manipulate it. Sometimes the plastic cools before it is sucked completely over parts of your mold or buck.
Leave the vacuum running for a few minutes after the plastic has sucked down over the buck until the plastic has cooled enough to maintain its new shape. To prevent your plastic from sticking to your mold or buck, you can lightly sprinkle the mold's surface with baby or talcum powder. After the plastic has cooled, a blast of compressed air between the plastic and the buck will also help break the suction that may make it hard to remove. You can also remove the plastic as soon as it has cooled enough to hold its shape; it may still be warm enough to have a little “give” that allows it to flex without distorting.
Webbing occurs when a severe or sharp angle in your buck causes the plastic to fold onto itself and stick. You can avoid webbing by putting small risers under your bucks and allowing the plastic to partially curl underneath it, or by manipulating the webbing with a push stick while the plastic is still soft. If the webbing occurs on the off-cut parts of your plastic, don't worry about it. If you wish to manipulate the webbing but the plastic has already cooled too much, you can heat that section back up with a heat gun.
Bucks
On a buck, the details are on the outside; when you vacuum form a sheet of plastic over it, those details will be on the inside. The details on the outside will be softened by the thickness of the plastic; the thicker the plastic, the softer the details. You may need to reduce the size of your buck and exaggerate the details if you are pulling a particularly thick plastic. At other times, you may let the details be softened on purpose, as this can create a slicker and more “mass-produced” visual appearance.
The bucks need to withstand the force of the vacuum. Bucks made out of hand-carved foam, such as polystyrene foam, can be crushed when the plastic is sucked on top of it. Bucks are commonly made from wood, plaster, fiberglass, rigid polyurethane foam over 8 lb/ft3 (128 kg/m3), and aluminum. If the model is made from a softer material, such as clay or polystyrene foam, the top will need to be reinforced with something like epoxy or fiberglass. Keep in mind that the plastic sheet is hot when placed on the buck, so bucks made from a material that will melt or burn will also need to be coated or reinforced.
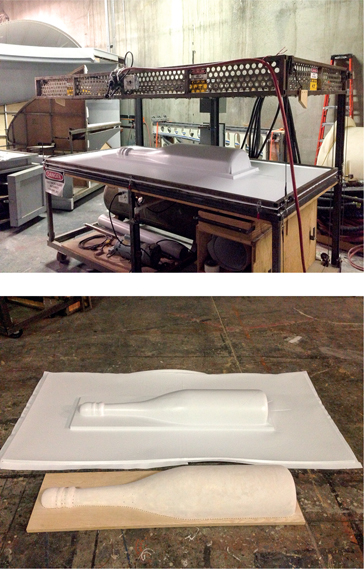
Figure 10-24 and 10-25: This large-scale vacuum former at the Santa Fe Opera can handle full 4′ by 8′ sheets of plastic. Here I have vacuum formed half of a large champagne bottle out of a sheet of styrene. The buck was carved from polystyrene foam which was coated in Aqua Resin so it would not crush or melt in the process.
Plastics for Vacuum Forming
Plastics popular with vacuum formers include high-impact styrene, XPVC, Kydex, PETG, and acrylic. ABS, CAB, and polyethylene are occasionally used too. Really, any thermoform plastic sheet can be used, but props people stick with these few because they are economical, readily available, and accomplish everything they need.
For general use, 0.06″ (1.5 mm) thick material is a good starting point. For larger pieces, such as torso-sized armor pieces, 0.08″ (2 mm) offers some advantages in strength. Pieces that need even more strength can use plastic up to 0.93″ (23.5 mm) thick, though keep in mind that the thicker the plastic, the softer the details will be. You also need more heat and vacuum power.
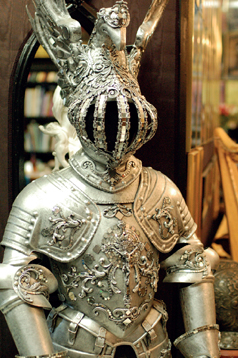
Figure 10-26: This suit of armor is created entirely from vacuum-formed plastic. Armor constructed by Costume Armour, Inc., for the original Man of La Mancha on Broadway.
The taller your mold or buck is, the thicker your plastic needs to be; as the plastic is stretched over the buck, it thins out. If you start out with plastic too thin for a tall buck, it may tear as it is sucked down, or leave you with a very thin and fragile object.
Transparent Plastics
With opaque plastics, sanding, filling, and painting will hide any imperfections. Transparent and translucent plastics will show every scratch and saw mark, so you need to know how to avoid or remove them.
These plastics usually come with a protective paper sheet or film adhered to both sides. Keep it on as long as you can to protect the surface from scratches. Sometimes, you can leave it on through rehearsal, and only remove it when you finally get on stage.
You can cut right through the paper or film; in fact, it will keep it from scratching as you push it through a table or band saw, or as you move tools around on top. It also helps keep the plastic from chipping as you cut it.
You will need to remove the paper or film from the surfaces you wish to heat, bend, or glue. Remove as little as possible to expose only the surface you need to work on.
If the masking paper has dried out, or if your plastic has other labels or adhesives that prove stubborn to remove, the best way to remove it is with either kerosene or WD-40. WD-40 is great for the little stickers, while kerosene may be necessary for larger areas of masking paper. In either case, let it soak for a few minutes before trying to peel it off; masking paper may need to soak in kerosene for fifteen to thirty minutes. You can scrape it off with a tool softer than the acrylic, like a plastic spatula or HDPE kitchen tools. Clean the kerosene or WD-40 off with dish soap and water, and wipe dry with a soft cloth.

Figure 10-27: The blue protective film for the acrylic sheets on this gun cabinet is left on through the whole construction process. Why Torture is Wrong, and the People Who Love Them, the Public Theater, 2009. Scenic design by David Korins.
For cleaning acrylic and polycarbonate, never use a cleaner with ammonia, like Windex or Formula 409. Dish soap and water is fine for many situations. For more heavy-duty cleaning, special plastic cleaners, such as Brillianize, the Novus 3-step cleaner, or even Pledge will help you out. Use a wet cloth or a cloth sprayed with antistatic agents to wipe your plastic; a dry cloth will build up static electricity that will attract all the dust in your shop onto the surface.
For minor scratches on acrylic, you can use special scratch removers made by the same companies that make the above-mentioned plastic cleaners. A minor scratch is any scratch you cannot feel with your fingernail. The abrasives in toothpaste are also mild enough to remove these scratches. If you are able to feel the scratches with your fingernail, you will need to sand and buff it out. Start with a coarse sandpaper, and work your way up to the finer grades. For example, you might start with 150 grit followed by 320, then 400, then 600, and finally end with 800. Use a buffing wheel on your drill and some plastic buffing compound. Do not press too hard, or you will burn the compound into the plastic.
Many plastics fabricators will say you cannot sand and buff out scratches in polycarbonate, but for props people, you can usually get it “good enough.” After polishing, you will need to coat the polycarbonate in a clear car wax or similar clear coat to fill the remaining microscopic scratches and make the surface transparent again. Note that many polycarbonates come with a coating to protect against UV rays, so this method will remove that coating.
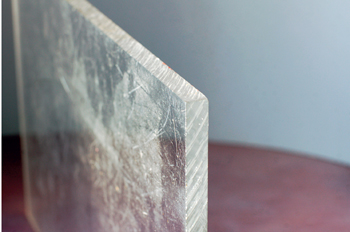
Figure 10-28: A piece of acrylic that has just been cut shows the saw marks that will need to be scraped and polished.
For minor scratches in PETG, you can use a heat gun to get them out. If the plastic is thin enough that the heat will distort the shape, you can use a solvent method. Make a 50/50 mix of water and acetone. Submerge the plastic for one to two minutes. Remove it and rinse with water. Let it dry for at least one hour without touching the surface. If you cannot submerge the part in the solvent, you can pour the solvent over the part, as long as you can keep it continuously covered for at least one minute.
When you cut transparent sheet goods, the edges are foggy and cloudy. If you want to get the edges to be as clear as the other surfaces, you need to first remove all the saw marks, and then polish it to make it shiny.
Remove saw marks by scraping the edges with a scraping tool or by dragging a razor blade perpendicularly along the edge. You can also try 60 or 80 grit sandpaper or various files. Whenever you sand plastic, always wet sand, as dry sanding will generate too much heat. In wet sanding, you apply a lubricant (usually water) between the sand paper and the material's surface; make sure to use sand paper intended for wet sanding. The result of scraping and sanding will give you a uniformly smooth but matte edge (known as a dressed edge). To get a glossy and completely transparent edge, you need to polish and buff it.
To polish, continue wet sanding with ever-increasing grits of sandpaper up to around 600 grit. Rub the edge with a damp, soft cloth to remove all the dust. Buff it with a clean muslin wheel and fine-grit buffing compound. Follow that with a clean, soft flannel wheel. You can also buff it with a clean cloth and a bit of toothpaste.
Flame polishing will also clear a dressed edge. Slowly wave a propane or MAP gas torch across the edges. They will melt slightly and achieve a polished look. Be careful not to melt and deform the edge.
Foam and Foam Rubber
Foam is made by mixing bubbles into a material. A foam can be either an open cell foam or a closed cell foam. Open cell foams are porous, like a sponge (a kitchen sponge is actually a piece of open cell foam). Air and water can pass through them. In closed cell foams, the air bubbles are completely encased within the solid material; you can't fill them with water. This makes them more rigid, dense, and dimensionally stable than open cell foam; they also general have a smoother surface. Foams which are flexible, spongey, or stretchy are sometimes called foam rubber.
There are a few flexible foams that come in sheets and can be thermoformed and vacuum formed like the other plastics in this chapter, so we will talk about them here.
Polyethylene foam is an open celled foam found in many items that can be reappropriated by the props artisan as raw materials. Most “pool noodles” or “fun noodles” are a very cheap form of polyethylene foam. Pipe insulation foam is another form of polyethylene foam that comes in hollow cylinders. Polyethylene foam can be thermoformed at the same temperatures as plain polyethylene.
Ethafoam is a brand of polyethylene foam that most props people recognize in its backing rod form (used to fill gaps between the concrete slabs in a sidewalk). Ethafoam rod is like pool noodles in a vast range of different diameters and lengths. When Ethafoam rod is cut in half, it can be placed along and around curves to simulate curved molding pieces.
Soft polyurethane foam, sometimes called polyfoam or flexible polyurethane foam (FPF), comes in sheets, tubes, rods, and blocks, and is the most common material used for upholstery foam. Puppet makers love it as well. Nerf products are a type of polyurethane foam. It comes in a wide range of densities, often delineated by “low,” “medium,” and “high” (and even “ultra-high”). Of course, there is no standard to these terms, so one supplier's “medium density” may be the same as another supplier's “low density.”
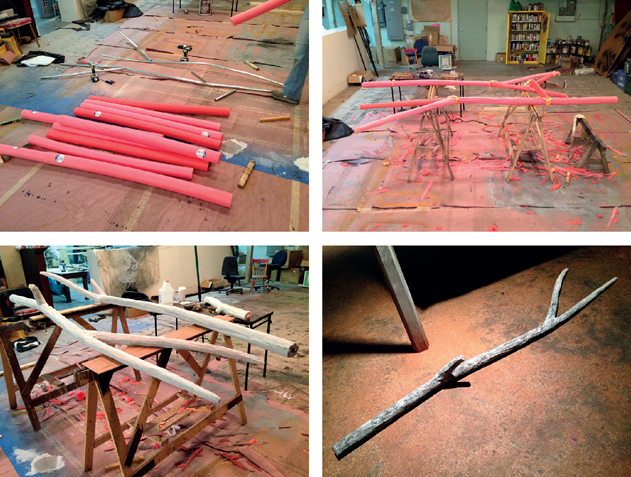
Figure 10-29 to 10-32: Pool noodles (polyethylene foam) are used to make these fight-worthy tree branches. Since the noodles are hollow, they slip right onto a structure made of aluminum tubes. The noodles are carved down, coated with glue and cheesecloth, and painted.
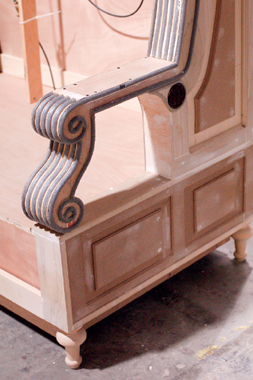
Figure 10-33: Ethafoam strips (in gray) added to the arm of this ornate bench give the appearance of fanciful carving without too much time spent on labor.
Expanded polypropylene (EPP) has the advantage of flexibility and high impact resistance, so it is frequently used as a cushioning material. It is very popular with the radio-controlled airplanes crowd.
Dense and rigid foams can be cut on a band saw. For softer foams and foam rubber, you may need to put a knife-edged blade on the saw. If the foam is too soft and the band saw teeth are too large, the teeth may grab the foam and pull it down into the band saw. Most foams can be cut with a foam cutter, which looks like a jigsaw, but with a really big throat and a rigid piece behind the blade. For smaller or more precise cuts, a utility knife is good. The kind with the “snap-off” blades are great because you can extend the blade all the way for a long but thin cutting edge. Cutting foam quickly dulls these blades, but a few drops of sewing machine oil on the sharp edge will help lubricate your cuts and make them cleaner.
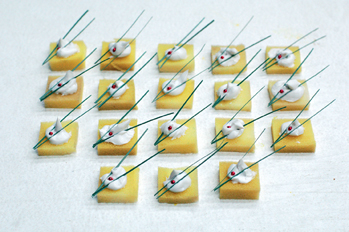
Figure 10-34: Polyurethane foam rubber was cut into squares to make a quick base for these fancy hors d'oeuvres. Timon of Athens, the Public Theater, 2011.
EVA Foam and Other Cross-Linked Closed Cell Foams
Of particular use to prop builders is cross-linked closed cell foam. While the previous foams have pockmarked surfaces and are full of bubbles, cross-linked closed cell foam is smooth and uniform throughout. It can be thermoformed and vacuum formed. It comes in a variety of thicknesses and can be carved into to make textures. Many of these foams come in black, white, and gray, but some can be found in an assortment of colors.
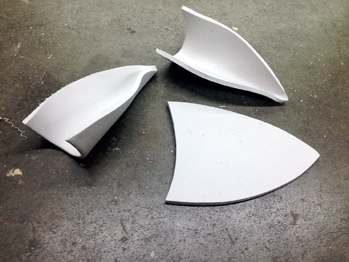
Figure 10-35: This EVA foam was shaped with heat. The end result is still pliable, but it retains its new shape in its resting position.
The most common of these foams is cross-linked polyethylene foam (XLPE). A popular brand of XLPE foam among puppet makers is Plastazote.
It comes in a variety of densities measured in pounds per cubic foot. Manufacturers use the system LX00, where “X” is the density. So a 2 lb/ft3 foam is called L200 foam, and a 4 lb/ft3 is called L400 foam.
Companies like the Jim Henson Creature Shop and Stan Winston Studios which use a lot of XLPE foam refer to it simply as “L200 foam,” and suppliers in the Los Angeles area follow suit. Since L200 is simply an indication of the density, suppliers in the rest of the world may ask what type of foam you want if you just say “I want some L200 foam.”
EVA foam is another cross-linked closed cell foam. It tends to be a bit softer and more flexible than XLPE foam, though it also comes in range of densities. One popular brand of EVA is Evalite.
A third type is cross-linked polyolefin foam. Alveolit and Softlon are cross-linked polyolefin foams.
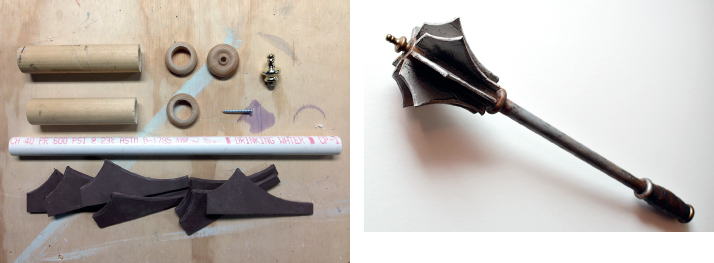
Figure 10-36 and 10-37: Foamies were used to make the flanges on this mace. The foam was cut with a hobby knife. The edges were shaped with a sanding drum on a Dremel. They were glued to a dowel with hot glue, stiffened with fiberglass resin, and painted with spray paint.
You can find cheaper versions of these foams which include blue camping pads (specifically from Walmart), yoga mats, anti-fatigue floor mats (particularly from Harbor Freight), and “craft foam” (such as Foamies and “fun foam”). It can be difficult to tell exactly what type of foam these are, since manufacturers use different additives and sometimes blend two or more types together (like XLPE with EVA). Some brand names are made of different types, depending on what grade you get: Minicel, for instance, can be either XLPE or EVA, while Volara can be XLPE, EVA, cross-linked polypropylene, or a blend.
For prop builders, it is easier to experiment with a few different foams to find the one with the properties you need at a cost that makes sense. There's no point blowing your budget on shipping to get “the Jim Henson foam” if your local foam supplier has a comparable product that will fulfill your prop's needs.
Thinner cross-linked foams can be cut with hobby knives or mat knives. Again, snap-blade knives work well for thicker pieces. Your band saw or scroll saw works well on thicker or denser pieces as well. Contact cement or Barge is one of the best glues for sticking them together, though hot glue works well for some pieces too.
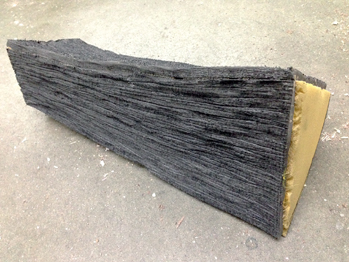
Figure 10-38: Cross-linked closed cell foam is easily textured with wire wheels, sanding tools, and knives. When you score the foam and run a hot air gun over it, the cut spreads open, making it look like a carved groove or bevel.
Sealing the foam helps paint stick better and go on more evenly. You can heat seal these foams just by running a hot air gun over the surface until it gets a bit of a shine. Use paintable silicone caulk to fill gaps before coating, since it remains flexible when dry. You can coat it with PVA glue, liquid latex, or specialty products like Plasti Dip (or FlexiDip) or Flex Coat. You can also stiffen the pieces with cheesecloth and glue, or epoxy/polyester/polyurethane resin. Keep in mind that if you want the piece to remain flexible, you need to use sealers and paints that remain flexible when dry. Otherwise they will crack when the foam bends.
Rubber
Rubber comes from vulcanized latex. It comes in a number of variations for when you need cushioning or stretching. It is also useful as a gasket, which creates an air or water-tight seal between two detachable pieces. It is most easily cut with a straight edge and sharp knife, a pair of tin snips, or heavy-duty scissors.
Several synthetic materials can also be called “rubber,” though the more technically correct term is elastomer, which refers to a material with elastic properties.
Neoprene, or polychloroprene, is a family of synthetic rubbers and foam rubbers. Props people are more familiar with liquid neoprene used for casting, but you can buy it in sheets as well.
EPDM (ethylene propylene diene) is a dense synthetic rubber. It can be bought from a materials supplier, but it is easier to find in pure form in rolls for waterproofing roofs, or in sheets for lining artificial ponds.