fifteen
shells and laminates
A shell requires either an underlying shape or a mold; these materials are distinct in that they are not formed on their own by tools and machines, but by making the shape first through fabrication, patterning, or sculpting, and then wrapping, covering, or laminating materials onto or into that shape.
Shells can be any sort of hollow prop with a continuous skin. Masks, helmets, armor, vases, bowls are just a few examples; you can also construct large props that appear solid but are hollow to save on weight.
The first group of materials in this chapter comprises flexible sheet materials that can be manipulated into shapes and made rigid or semirigid enough to maintain that shape. They may become flexible with heat, like thermoplastics, or by soaking in water, like leather.
The second group comprises materials known as “composites” or “laminates.” A composite is a material made through the combination of two materials: a fibrous cloth or sheet embedded in a matrix of hardened polymer. They are called laminates because you apply the sheets or pieces of sheets in several layers to form a continuous skin without any seams. Papier-mâché and fiberglass are the major composites used by prop builders.
Shells can be made over the top of forms, in negative molds, or on top of a skeleton or other framework.
Thermoform Plastics
Thermoform plastics begin as rigid sheets of plastic, but become pliable and flexible (almost like fabric) when heated. They retain their shape when they cool down. Thermoform plastics allow you to quickly form hollow shapes over forms, in molds, or freehand in the air. This makes them popular for larger masks and mascot heads, as well as for armor, giant puppets, and any other shape that needs to be hollow or more lightweight than fiberglass. They retain some flexibility, and can “bounce back” from being crushed, rather than breaking or bending.
Wonderflex is one of the more common brands. It has a fabric mesh embedded within, giving it more tear strength then straight plastic. Worbla is a brand without any mesh, giving it a more even texture at the expense of strength. It also comes in black and transparent versions. Varaform (once known as Hexcelite) is a version that comes as a plastic netting with hexagonal holes.
The market for these products has exploded in recent years. Other products include Cosplayflex, TerraFlex, Thibracast, and Thermoflex.
FOSSHAPE is a plastic-impregnated fabric that turns into a more rigid shell when heated. It can be activated with a fabric iron or a costume steamer. The amount of stiffness it has can be controlled with the amount of heat applied to it. It shrinks considerably depending on the amount of heat it receives, so many patterns should be made oversized. It can be stretched over forms and pinned in place to create shapes, or you can pattern and sew pieces together to create shapes. It can be sewn to other fabrics too, which is useful when you need a hidden stiffener for a loose fabric.
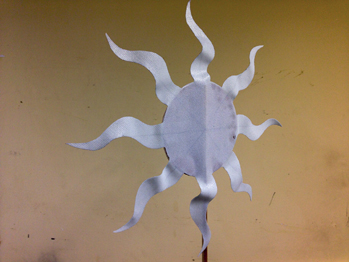
Figure 15-1: Wonderflex can be used freehand without a form or mold. These sun rays were cut out and attached, then heated and given a “wave” by hand.
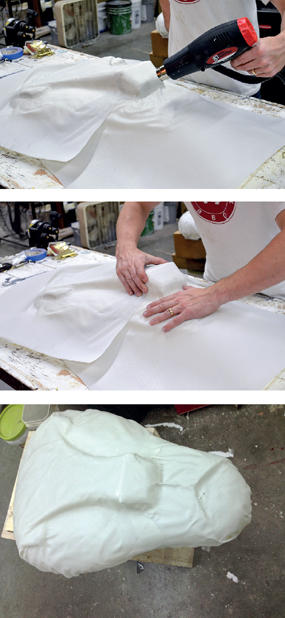
Figure 15-2 to 15-4: Wonderflex being shaped over a form.
Most of these products soften around 150°F to 170°F (65°C to 76°C). A conventional oven or microwave is good for heating a whole piece (but do not use the same oven or microwave you use for food). Dipping the piece in boiling water also works. A heat gun or hair dryer is good for softening small areas and to help with joining two pieces together.
At the lower ends of the temperature range, thermoform plastics can be worked by hand. However, it can easily be heated enough to cause discomfort or burns, so wear a pair of thin leather gloves or other tight-fitting insulated gloves.
The material itself is waterproof. Cold water can cool down a soft section to freeze it in place, either by spraying it or dipping the piece in a bucket. Ice packs can also be used.
Cut the pieces with a heavy-duty pair of scissors, tin snips, or a utility knife.
It can be shaped freehand, over a positive form or in a negative mold. Lecithin can be used as a mold release, though for many cases, a layer of aluminum foil is all that is necessary, as thermoform plastics will not be picking up much fine detail. With enough heat and pressure, you can make it pick up finer details and impart a texture to the surface itself.
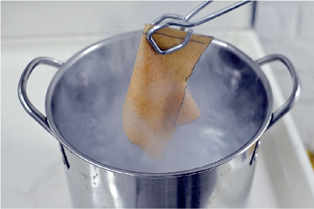
Figure 15-5: Low-temperature thermoplastics like Worbla and Wonderflex can be softened quickly and evenly in a pot of boiling water. The boiling water also keeps them from overheating and melting.
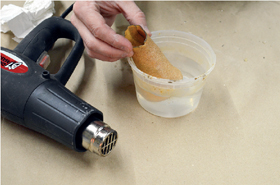
Figure 15-6: You can “freeze” your soft thermoplastic by submerging it in cold water.
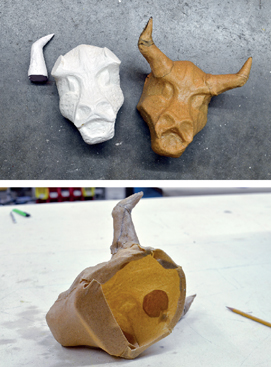
Figure 15-7 and 15-8: Worbla pieces are shaped over foam forms and attached together. You can see from the back that this creates a hollow shell.
Thermoform plastics adhere to themselves when heated. When you are making shapes larger than a single sheet, you can stick multiple sheets together. This means that you will have overlapping seams, even when you press them together vigorously. You can stiffen and strengthen pieces by laminating two or three layers together. The sheets can be cut into small strips and shaped like papier-mâché, or you can heat a large sheet and shape it all at once.
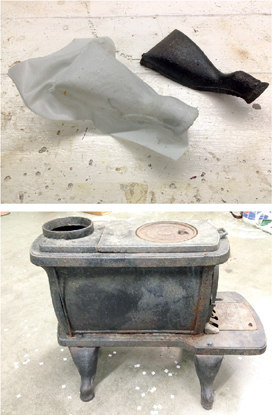
Figure 15-9 and 15-10: A piece of Wonderflex was molded directly over the top of this cast iron leg to replace a missing one. Once trimmed and painted, it was nearly indistinguishable from the real ones. Note: It did not actually support the stove; a hidden leg was added underneath.
They also adhere well to other materials, such as wood, leather, metal, and plastics. While the material is hot, you can also work it with sculpting tools or stamp textures into it to refine the surface and the shape.
It should hold up perfectly fine under stage lights or outside, but it may begin to soften if left in a car outside on a sunny day or in a metal trailer.
Finishing and Coating Thermoplastics
Seams can be filled with any acrylic or latex caulk. Many of the theatrical texturing compounds can be used as well, such as Sculpt or Coat or Rosco's Crystal Gel. These pieces can remain flexible, so you want to use a flexible filler that won't crack off.
Thermoplastics can be painted directly with most acrylic, latex, and scenic paints. They can be coated with anything that retains some flexibility as well. Gesso, shellac, flexible PVA glue, and FlexBond all work well. PVA glue can be thinned with water if you wanted to paint the entire surface of your prop. Most thermoplastics have an inherent texture, so coatings like gesso and glue may require several layers with sanding in between to gain a really smooth finish.
Leather
Leather becomes very pliable after it is soaked. You drape it over your form and work it into the cracks and crevices. As it dries, you can hammer it to further define the detail, and then burnish it to remove the hammering marks. When completely dry, it has the same rigidity as a pair of fine leather shoes.
Most of the leather you find in stores is “chrome tanned” leather. This includes garment leather, dress leather, and all the other leathers with finished surfaces. This kind of leather cannot be molded, shaped, or tooled. You need “vegetable-tanned” leather, also known as tooling leather. This is usually sold by the hide or in smaller scraps. If you drape vegetable-tanned leather over a positive mold, you can form it into a more permanent shape. The mold cannot have too many undercuts, or you will need to pattern several pieces of leather with seams, darts, and cuts.
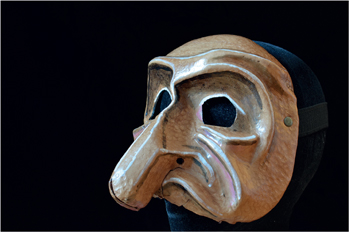
Figure 15-11: Leather can “breathe,” unlike many plastics; this gives it an advantage when used as masks and armor against the skin. Plastics will cause the skin to get wet with sweat and possibly overheat, while leather will allow the sweat to evaporate even when covered. Servant of Two Masters, Elon University, 2015. Mask designed and built by Natalie Taylor Hart.
Soak the leather in water for fifteen minutes to twelve hours, depending on the thickness, type, and pliability needed. Drape it over the mold. It can be held by pinning it to the back of the mold. If you use steel pins, they will stain the leather, so make sure to place them in parts of the leather that will eventually be trimmed off. Do not stretch the leather tight over the mold; leave some slack in places with deep valleys so you have enough leather to push into place.
A rounded piece of wood, known as a sticketta, helps shape the leather while it is damp. You need to work the leather anywhere from 20 minutes to an hour depending on the shape you are trying to create. As you press and work the leather with your sticketta (or whatever type of tool you wish to use), the leather will not really hold the shape. It is only through repeated pressing and working that it will begin to stay in place. Harder lines can be emphasized by using a sharper part of your sticketta.
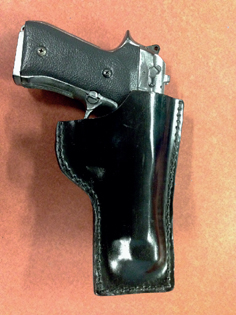
Figure 15-12: The top half of this gun holster was made by soaking and shaping a piece of leather directly over the prop gun so it would have a perfect fit.
Cuir bouilli, or boiled leather, is a method for making the leather harder (but more brittle). After soaking the leather in regular water, dip it in boiling water; this can quickly cook and ruin the leather, so keep it in no longer than two minutes. The leather will now be flexible and stretchy like rubber. It loses its stretchiness in a minute or two, but remains flexible. It gradually hardens over the next few hours.
Because it sets up so much quicker, you cannot form boiled leather into intricate shapes like masks the same way you can with soaked leather. However, you can give it curves and bowl shapes by clamping it around various rigid forms.
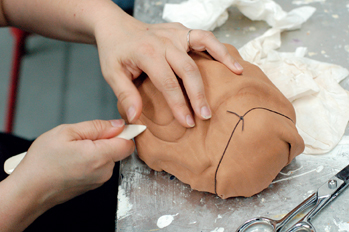
Figure 15-13: A sticketta in use.
Buckram
“Millinery buckram” is an open-weave fabric impregnated with starch and used in hatmaking and costume crafts.
Buckram keeps its shape, but it is somewhat collapsible. Buckram starts off as a fairly stiff sheet, but it becomes soft when it soaks in warm water for a few minutes. You drape it over your form, and push the fabric into all the cracks and crevices. It becomes stiff again as it dries out. It is incredibly easy to work with as it requires no specialized tools, and it is nontoxic and very “green.” It can also be resoaked for endless reuse and reworking.
Buckram can serve as an underlying structure for another fabric on top. You can stiffen larger shapes by sewing millinery wire around the edge. Buckram can also be further stiffened by adding additional layers, or by brushing on a coating of PVA glue or polyester resin.
With severe undercuts, you may need to pattern together several pieces.
Industrial Felt
Industrial felt is a heavy-duty blend of wool and other fibers. Also known as “pressed felt,” it comes in thicknesses up to 2″ and a variety of densities. Prop builders use it to simulate cast iron and armor. Large sheets can mimic breastplates, while small pieces can resemble iron trunk hardware. Cut it with scissors or razors (such as X-ACTO knives); the denser the felt, the cleaner the edge you can achieve.
“Woven” felt, the kind used in blankets and clothes, tends to fray at the edges when cut, and so may not produce as clean an edge as industrial felt.
Submerge the felt in PVA glue. Squeeze the glue out, mold it like wet leather over a form, and let it dry. Pin it in place while it is drying. It can take several days to dry. This is known as sizing the felt (just like sizing a piece of canvas for painting) because it causes the felt to shrink. Dilute the glue with water to make it soak more easily (and keep costs down); you can add as much as one part water to two parts PVA glue. Use a flexible white glue if you want the felt to be stiff but moveable. Layer two pieces of felt together for added strength. When dry, coat the whole thing with more PVA glue, shellac, or varnish.
For faster results, use plastic resin (polyester, polyurethane, or epoxy) rather than glue.
Celastic
Older guides to prop building talk about Celastic. It is similar to thermoform plastics, except it becomes pliable when soaked in a solvent like acetone or MEK. It becomes hard again as it dries. It can be cut into smaller pieces for easier workability. It also adheres to itself when it dries, so smaller pieces can be attached to each other, or the artisan could build up several layers for additional strength.
“Celastic” itself is no longer manufactured, but the modern equivalent, named Form Fast and made by Douglas and Sturgess, shares most of the same properties. Some prop builders still refer to Form Fast as Celastic.
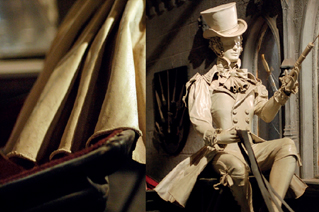
Figure 15-14: The clothing for the statue of Cinderella's coachmen was constructed in Celastic. Celastic sheets drape much more realistically than other materials, yet dries to a very rigid and hard material. This statue has been in use for over thirty years, yet shows no signs of wear or weakness. Into the Woods, 1987. Scenic design by Tony Straiges, constructed by Costume Armour, Inc.
Because you are dealing with large buckets of solvents, long chemical-resistant gloves, proper ventilation, and a respirator are vital. This process usually cannot be carried out when other people are in the shop, unless they are also wearing respirators. Working in a walk-in spray booth or outside is helpful. The fumes are also flammable, so steer clear of open flames and heat sources.
On the plus side, these solvents evaporate rather quickly, and no longer off-gas once the material has hardened. While plenty of safer materials exist, none approach the “drapability” that Celastic had; Celastic and Form Fast are also much more heat-resistant than modern thermoplastics, which can deform if left in a vehicle on a hot day.
Composites and Laminates
A composite is a material made of two or more different materials that remain distinct. Papier-mâché and fiberglass are both composites (as are cloth-mâché and carbon fiber). Each consist of a “matrix” (paste, glue, or resin) and a reinforcing fiber (paper or fiberglass cloth).
The concept of mâché, fiberglass, and carbon fiber is similar. You laminate together strips or sections of overlapping material soaked in the liquid polymer. With enough layers, you can create a self-supporting and continuous “skin” or “shell.”
Releases
When making laminates in a mold or over a form, you will need a mold release just like with casting. Chapter 14 has information on what to use depending on the material of your mold and the resin you are using.
Both papier-mâché and fiberglass shrink a little bit as they dry. When they are laminated inside a negative mold with no undercuts, they will pull away from the mold walls as they dry, basically releasing themselves. On a positive form, it may be helpful to pop the laminate loose from the form while it is still wet and slightly flexible. Once the seal between laminate and form is broken, it can be laid back on the form to resume curing in the proper shape.
Papier-Mâché
Papier-mâché has long been used to create props for theatre. It can be argued that up until the middle of the twentieth century, nearly all props were made of papier-mâché, wood, and fabric.
Papier-mâché can be laid down over a form, or formed in a mold. Many of us are familiar with the technique of laying papier-mâché onto a form made of chicken wire or over a balloon to make a spherical shape. One can also make quick forms by crumpling aluminum foil into a rough shape, or by crumpling up paper and wrapping tape or string around it.
Traditional binders for mâché include wheatpaste and wallpaper paste. You can find myriad recipes and variations for making your own wheatpaste, but a basic recipe involves using two parts water to one part flour. Any kind of all-purpose wheat flour will do, as long as it contains gluten. Separate a bit of the water out to mix with the flour to create a runny liquid. Bring the rest of the water to a boil. When it is boiling, slowly stir in the flour/water concoction. Let the whole thing boil for three to five minutes, then let it cool. It is more comfortable to work with the paste while it is still slightly warm, but it will keep for two to three days if refrigerated.
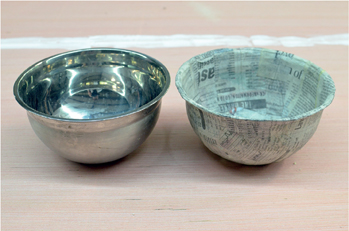
Figure 15-15: Applying papier-mâché over a bowl is an easy way to make dome shapes and hemispheres.
Wallpaper paste comes in either a powder that is mixed with water or premixed.
A more modern binder is PVA or white glue. It can be used straight from the bottle or thinned a bit with water. Carpenter's glue can be used as well, though it usually dries more rigid; this does make it easier to sand though. These glues are more expensive than pastes and other homebrew methods. Variations on PVA, such as Mod-Podge, can also be used.
Other polymer emulsions can be experimented with. Acrylic media such as acrylic paint, gesso, and coatings, polyurethane emulsions such as floor coating, and any number of mixed and proprietary polymer emulsions such as Crystal Gel, Polycrylic, or Sculpt or Coat are all possibilities, depending on whatever unique circumstances you find yourself in.
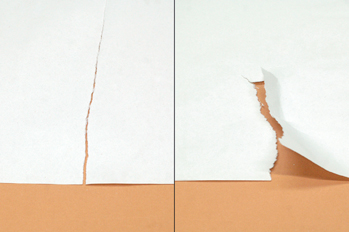
Figure 15-16: Some paper, like newsprint, has a grain. Tear it across the grain, and you are left with a jagged edge. Tear it along the grain, and you get a clean and straight tear. Tearing is preferred to cutting; the ragged edge will blend much better into the next piece, leaving less sanding needed at the end of the process.
Some of these products will be flexible when dry, while others will be rigid. A well-made papier-mâché prop, properly sealed, can last longer than a fiberglass prop in certain situations because it will bend, rather than break, under impact.
Prop builders use papers like newsprint, kraft paper, sugar paper, and butcher paper. Use only uncoated and unsized papers; many office papers and stationery have coatings that prevent the water and paste from soaking in. Print-making paper, such as lithography or engraving paper, works well too; they are smooth, though more expensive than newsprint and kraft paper. Cotton paper is preferable. If you are using newsprint or other recycled papers with ink, the colors and patterns may show through unless you coat the surface completely with paint.
When you are building up your layers with strips of paper, lay each successive layer perpendicular to the one before. This ensures you have grain running in all directions, which adds to the prop's strength.
For the outer surface, some prop builders switch to tissue paper or other finer materials to give a smoother coat. Tissue paper can also be used by itself to make translucent props that are lit from within. You can also finish the surface with a thin surface of just paper pulp, which can fill gaps, smooth curves, or add texture.
If you are making your papier-mâché object in a mold as opposed to over a form, the layers are reversed. A plaster mold is preferred because it will draw the water out of the paper. Soak the plaster mold in water before starting. Soak your first layer of paper in water too. The rest of the layers should be saturated in paste.
Begin with a water coat of fine paper; with a water coat, the paper is soaked only in water, not paste or glue. With a water coat, you do not need a mold release. Use smaller chunks rather than long strips to keep the paper from wrinkling on curves. Overlap the pieces as little as possible so that you do not have noticeable seams. If your mold contains very fine details or texture, you may wish to begin with a beauty coat of just pulp mixed with paste. Remember in this case to use the appropriate mold release so that your papier-mâché will not stick.
Continue with a layer or two of fine paper, and then reinforce the whole thing with a few layers of newsprint or kraft paper. You can even do a layer of chipboard for the final layer for a very strong shape.
You may also find various commercial products that call themselves “instant papier-mâché”; these are made of pulped and powdered paper premixed with a binder. They form a thick paste that can be molded and shaped like clay when soaked in water. As with other papier-mâché objects, work in thin layers or it will take forever to dry. It is helpful to allow the powder to soak in water for a few hours before use so that it has time to break down. You can mix it the night before use, and store it in the refrigerator; it should last in the refrigerator up to a week before getting moldy. To keep dust out of the air, you can mix it by adding the powder and water to a sealed bag (like a Ziploc) and squishing it around.
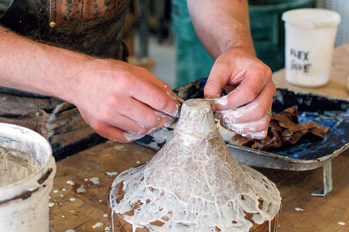
Figure 15-17: Tobias Harding builds up a strong funnel-shaped structure with brown kraft paper soaked in Rose Brand Flex Glue at the Santa Fe Opera.
You can also pulp your own paper. Place the paper into a blender and shred it up. Mix this with glue or paste to make a material that is useful for sculpting features or casting intricate details.
For additional structural integrity, lay in some stiff wires between the layers of paper.
If you need to make a papier-mâché object inside a two-part mold, the easiest method is to laminate each mold half separately. When they are dry enough to demold, first trim each side to the parting line. Remove each half from the mold. You can glue the two halves together with hot glue, tape, or whatever works best for the shape you have. Now add another layer of papier-mâché, making sure that the strips of paper cross from one side of the seam to the other.
Papier-mâché shrinks as it dries; applying it over the top of a form with undercuts makes it difficult to remove it later. Also, since you are building out from the form, the details will become smoother and less crisp as you build up thickness. You can minimize shrinking by using the least amount of water possible (while not inhibiting its ability to adhere to itself). This also helps keep drying time to a minimum.
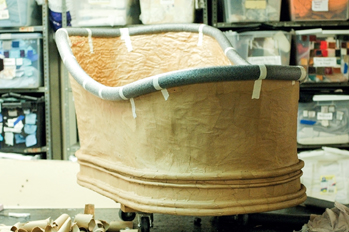
Figure 15-18: This bathtub was constructed of papier-mâché. The top is a piece of Ethafoam that has been attached; another layer of papier-mâché will be added to make the whole tub look like it was constructed of a single sheet of hammered copper. Henry IV and V, PlayMakers Repertory Company, 2012. Scenic design by Jan Chambers.
Another way to speed up drying time is with heat lamps or an oven (again, avoid using the same oven as you use for food, unless you have only used wheatpaste). If you dry it too fast though, it can crack. Since most of the shrinking happens in the beginning, let the piece air dry to the point where it can be demolded or removed from its form; in other words, when it is simply damp rather than wet. At this point, placing it in an oven (100°F–150°F or 37°C–65°C) or placing it under heat lamps will be less likely to cause cracking. If you cannot place the prop near a heat source, even a simple fan can help.
Dried papier-mâché props need to be waterproofed if they have any chance of coming in contact with water.
Cloth-Mâché
Like paper, cloth can also be soaked in glue and laid up into a form that will dry to a hard shell. Muslin or cheesecloth are common fabrics of choice. When it is used with a flexible glue or binder, the resulting surface or shape can have more “give” than paper, which can be advantageous for props that need to be impact-resistant.
For the strongest cloth-mâché, cut strips along the bias of the fabric. Lay subsequent layers perpendicularly to the layer before.
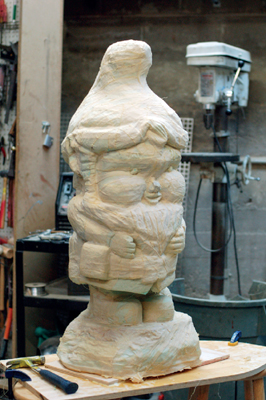
Figure 15-19: This large gnome is coated in a layer of cloth-mâché.
Fiberglass
Glass, in fiber form, is very flexible, yet incredibly strong. Glass appears fragile because of the defects; a sheet of glass is practically impossible to manufacture without introducing some defects. Fibers, on the other hand, can be made without defects, making them an incredibly strong reinforcing material for plastic resins. Fiberglass is also chemically stable, so it will not rot or rust. It is dimensionally stable and does not shrink during processing. It can withstand temperatures up to 1000°F (537°C) and does not absorb moisture.
When fiberglass is saturated with a liquid resin, it cures to a hard, strong, and lightweight sheet. This material is known as glass reinforced plastic (GRP). However, many people refer to the finished material as fiberglass.
Fiberglass comes in many forms. Woven cloth is the most expensive but also the strongest. Like textiles, fiberglass cloth can be woven in many different ways, such as plain or twill, and comes in rolls of various widths. Fiberglass mat is a nonwoven material where the fiberglass strands are laid in randomly throughout. It is much cheaper than cloth though much less strong. It can soak up a lot of resin, and it is a little trickier to form around curves. Chopped strand mat (or CSM) is a fiberglass mat in which the strands are chopped into tiny lengths and held together by some kind of binder that dissolves when saturated with resin. CSM gives omnidirectional strength, but it is thicker than woven cloth. Be advised that most fiberglass CSM is held together with a styrene binder that dissolves only when submerged in polyester resin; epoxy or water-based resins will just sit on top of CSM rather than soaking in to create an actual composite.
A thin and delicate layer of fiberglass is sometimes laid between the surface coat and the reinforcing fiberglass to hide the texture of the fiberglass cloth. This may be called surfacing cloth, tissue, veil, or some similar variation of those words. Surfacing cloth has very fine fibers in a random orientation that disappear completely in the resin and become transparent.
Woven roving is a very coarse weave made of a dozen or more untwisted strands of glass woven as a whole. It is almost as strong as cloth and almost as cheap as mat. Its coarse pattern requires additional layers on top unless you want to see the texture.
Fiberglass mat tape is useful for the selective reinforcement of seams, corners, or edges. Though you can cut your own fiberglass mat into thin strips to use as tape, purchasing a roll of tape can save you time.
You can also cast with fiberglass by mixing chopped glass directly together with catalyzed resin to make a paste. This thick paste is brushed directly on the mold. Though not as strong as reinforced glass cloth or mat, the fiberglass does help minimize the shrinkage of the resin. This is good for hard to reach areas, or for building up thickness between layers of fabric. Some coatings come with chopped glass already mixed in.
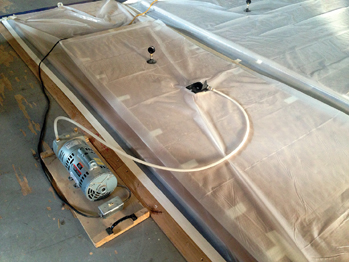
Figure 15-20: Vacuum bagging involves surrounding the material in an airtight bag, and then pulling all the air out as the resin hardens; it is like having a clamp on every inch of the surface. It is a bit more complex than can be described here, but information is easily found online and in books.
Fiberglass comes in prepreg versions, which are pre-impregnated with resin. Prepreg fiberglass is laid in a mold or on a form without additional resin. They require heat and pressure to cure. Pressure usually comes from vacuum bagging; they are heated in an oven to 270°F (132°C) or higher for a few hours (never heat plastics in the same oven you cook food in).
Fiberglass used in home insulation is full of defects and so cannot be used to reinforce resin. Some people have used fiberglass insulation and resin mixed to a paste as a patch for small holes. Most insulation uses formaldehyde-based binders to hold them together, so it is best just to avoid it.
As you cut and trim fiberglass, the scrap pieces of glass fiber become a nuisance. They work their way through clothes and into skin, even after the object is finished. They are re-released into the air as you sand a finished fiberglass sculpture. The ends of fiberglass mats in particular become a hazard, as the individual strands that poke out become sharp spikes and needles when coated in resin.
Fiberglass Resin
Most of the resin you find that is labeled “fiberglass resin” will be polyester resin. This is specially formulated to be a “laminating” resin. Any resin you choose should be made for lamination; “casting” resin is intended to be poured into a mold, and may have trouble curing when it is spread in thin layers.
Most theatrical prop builders have moved away from polyester resin because of its toxicity. The alternatives are epoxy resin or newer water-based resins. Epoxy still has toxicity that needs to be dealt with, but not nearly as much, plus it lacks the explosiveness that old polyester catalyst has.
Polyurethane resins are usually more expensive than epoxy without having any advantages. They also cure very quickly; with fiberglass, you need time to saturate the cloth and lay it in place before the resin hardens.
Water-based resins may not be as strong as plastic resins, but they are still far stronger than most other prop-building materials. Their low toxicity makes them much easier to use in your average prop shop which lacks adequate ventilation for polyester. The most popular brand for use with fiberglass is Aqua-Resin. For theatrical purposes, it has the added benefit of being flame retardant; plastic resins require either a coating or additive to become flame retardant. Other water-based resins include Zeller Aqua Form, Steve Biggs' Indoor Laminating Resin, and Eze-Kote.
You can use epoxy resin on top of cured polyester resin, but you cannot use polyester resin on top of epoxy resin without risk of delamination. This is important if you ever need to add a repair patch of fiberglass on top of a fiberglass prop. However, if the surfaces are prepared correctly, you may create a “good-enough” bond for prop-making.
You cannot use polyester resin in the rain. The ambient temperature needs to be between 60°F and 85°F (15°C and 29°C), and the relative humidity needs to be below 60 percent. The moisture in the air will become trapped between the individual layers and can cause delamination months or years later.
Always use the least toxic alternative for your prop. Unless you can deal with the fumes of polyester resin while working and have a sequestered environment for it to cure in, you should be using a water-based resin. Fiberglass itself is hard to deal with safely because the dust created when sanding is a skin and lung irritant. Ask yourself whether fiberglass is absolutely necessary or if you can substitute a different material or process.
All plastic resins, such as polyester and epoxy, are particularly toxic in their uncured form. With enough exposure, you will develop an allergy. You might work with them for ten or twenty years with no side effects, then suddenly have your skin break out into rashes and blisters and your throat close up. It can take weeks to recover from one of these attacks, and afterward, even just a tiny amount of exposure will cause a new reaction.
Keep the liquid components off your skin. Wear gloves, sleeves, and splash goggles. You can apply a barrier cream to your skin for added protection, but never use a barrier cream in the absence of gloves. An apron or coveralls that stay in your shop are handy to avoid tracking toxic and irritating dust back to your home.
Plastic resins releases toxic vapors as they cure. Work with adequate ventilation and respiratory protection. Fiberglassing should be done in an area separated from other workers. Use disposable mixing sticks and brushes; when you throw them out, seal up the trash bag and remove it from the shop.
Cured resin still contains bits of uncured resin that get released when you sand or cut it. You should continue using gloves and respiratory protection until the prop is finished and clean.
This may all sound overwhelming; it is. This is why so many prop builders are switching to water-based resins for fiberglass work.
Making a Fiberglass Piece
Prop builders use the hand lay-up process combined with open molding. The fiberglass cloth or mat is impregnated with resin and layered into an open mold or form (positive or negative) and allowed to set. With rigid mold forms, such as wood, plaster, metal, or glass, a release agent is needed and you cannot have undercuts. Flexible molds supported by a mother mold allow some undercuts.
Petroleum jelly inhibits the surface cure of polyester resin, so use polyvinyl alcohol (PVA). However, water-based resins like Aqua-Resin should not be paired with water soluble releases like PVA or green soap. Use petroleum jelly or specially formulated spray release agents.
Your first coat, called the surface coat, will be just resin. Coat the entire surface of the mold with either a thickened resin, or by slush-casting the interior. The impression coat will take on whatever texture the mold has.
Polyester gel coat is a particular kind of resin used for the surface coat of pieces made with polyester resin. It is a bit thicker and gives the piece a smooth and glossy finish. Regular polyester resin remains slightly tacky when it cures; this is helpful when you need to stick another layer on top, but not helpful for your final layer.
If you are making a piece inside a negative mold and putting the surface coat in first, you need a gel coat that remains tacky when cured. If you are making a piece on top of a form where the surface coat is put on last, you can use a “wax-type” gel coat, which contains wax that seals the surface of the resin and allows it to cure hard. Gel coat can impart other properties, such as chemical resistance, mechanical strength, UV resistance, and weathering properties.
Epoxy and polyester resin can be thickened with calcium carbonate (like chalk or marble dust), CAB-O-SIL, microballoons, or fiberglass flock (ground-up fiberglass). Use sparingly as it slows the curing process, and too much may even prevent the resin from fully curing. Indoor Laminating Resin can be thickened with inert fillers like powdered chalk, marble dust, or kaolin clay. Aqua-Resin can be thickened simply by increasing the proportion of powder to liquid.
For a multi-piece mold, lay up each piece individually and trim them to the parting line. Join them with another layer of fiberglass that you wet with resin over the seam. Try to make this as smooth as possible. Doing this, of course, means you will not get perfect fidelity, particularly if your mold has a lot of fine definition and detail.
If you are putting fiberglass over a form, you work in the opposite direction, where the last layer is the one that is visible. You may finish with a layer of fiberglass finishing cloth, which is a finer and thinner type of cloth that will give a smoother surface.
Once you have one layer of the mold completely covered, begin covering with a second layer in the same manner, but crisscross the strips over the seams of the previous layer so that the strands are running in a perpendicular direction. Do not pick up or slide the fiberglass once it has been placed down in the resin. Again, work air bubbles out by pressing or rolling; all the pieces need to be pressed fully against the layer before it.
Two layers are often enough for handheld items, but you can continue adding more layers in this manner if you need it. Fiberglass mat or chopped strand mat can be used to add thickness over or between the layers of cloth. If you are using woven roving, you can do so after your first or second layer of cloth.
Some projects benefit from a layer of mat or surface tissue (sometimes called “veil”) between your surface coat and the first layer of your cloth. This helps mask the texture of the fiberglass, which may show through on the surface of the final piece.
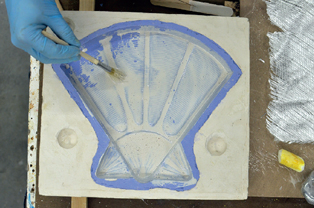
Figure 15-21: When making fiberglass in a negative mold, lay a surface coat down first. This will capture all the surface detail and help hide the texture of the fiberglass cloth.
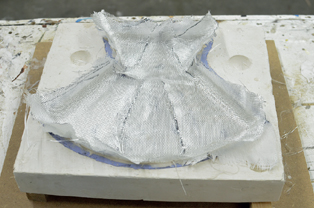
Figure 15-22: It is helpful to have all the pieces you will need cut and laid out beforehand. Cut the pieces with a sharp scissor, as a knife does not always work as well. Wear gloves even when cutting, as the nearly invisible glass shards will get into and under your skin. Do not try to make a large sheet of fiberglass conform to a complex shape; it is better to use several little pieces. For most props, you want to keep your pieces of fiberglass cloth no bigger than a sheet of paper.
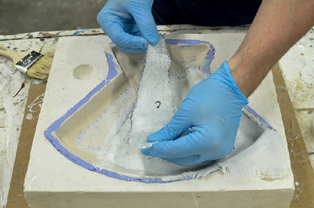
Figure 15-23: Check the instructions of your resin to see how long after applying the surface coat you can apply the first layer of fiberglass. Paint another coating of resin over the mold right before laying in your cloth. Lay your pieces over the entire surface of your mold, with the edges slightly overlapping each other. Brush or roll more resin over the surface of all the cloth until it is fully saturated. Press out any air bubbles that get trapped under the cloth; a brush stiffened with previously cured resin can be helpful for this task. For larger areas, use a roller. Specialized rollers with ridges are especially useful for fiberglassing. Try to avoid breaking large bubbles up into several smaller bubbles as these become more difficult to remove.

Figure 15-24: To finish off, you can paint a thicker “flow coat” of resin over the whole piece. For polyester resins, use either a wax-type gel coat or cover the top with plastic sheeting such as polypropylene or cellophane (avoid plastics that are dissolved by polyester resin, such as polystyrene).
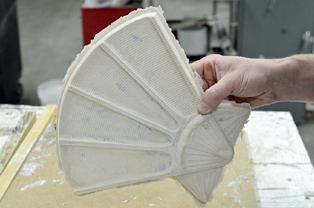
Figure 15-25: Let your piece cure for a few hours. Once it is hard enough to hold its shape, you can remove it from the mold. If you do this before it has fully set, it will still have enough flexibility to make demolding easy.
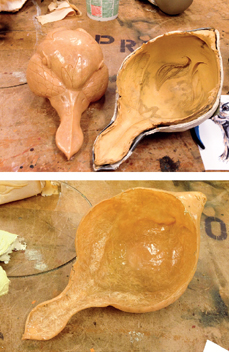
Figure 15-26 and 15-27: Fiberglass with an epoxy resin. Cast in a rubber mold with a plaster jacket. Mask by Marie Schneggenburger.

Figure 15-28: A finished fiberglass piece made with Aqua-Resin.
An alternative method for applying fiberglass is to dip the pieces of cloth directly into the resin, then squeeze out the excess, and lay it on your form or in your mold. This method is much closer to the method used to apply papier-mâché.
Finishing a Fiberglassed Piece
Most resins reach an intermediate or “beta” stage where they are solid and dry but not yet rock hard. Any rasping, filing, or sanding is best done during this phase, which is typically during the first twenty-four hours of when the resin was mixed. Sanding releases tiny glass particles and fibers into the air that are highly irritating. The dust from the resin is also irritating, and can release fumes as you sand away bits of uncured resin. Fiberglass dust that gets in the air will settle over everything, and if it is disturbed months or even years later, it can still harm the lungs when inhaled.
To minimize your sanding, cover your surface with a coating that can be sanded smooth rather than trying to sand the fiberglass itself.
Cut and trim the jagged edges from the cured piece with very strong scissors or a hacksaw. Any individual glass strands that stick out are as sharp as daggers, and extra care needs to be taken to make sure nothing will pierce an actor's skin while handling the prop. An angle grinder makes the job a lot faster, but raises way more dust; use only when the dust can be adequately contained.
To give the edge a smooth finish, paint it with more resin that has been thickened.
Other Composite Fabrics
Other fabrics that can be reinforced with resin are carbon fiber and Kevlar. Both of these are usually way overkill for props; we're building giant peaches here, folks, not airplanes. Also, carbon fiber and Kevlar are both opaque, while fiberglass can retain some translucency if you need a glowing prop.
Carbon fiber is significantly more expensive than fiberglass. Epoxy is the most commonly used resin, which also adds to the cost. Though it can be laid up by hand just like fiberglass, it really needs to be vacuum-bagged to reach its full potential of high strength and low weight. For most prop shops, the proper setup is far too costly and complex, so plain old fiberglass is more than enough.
Kevlar offers greater resistance to both impact (hence its use in bulletproof vests) and abrasion. Its abrasion-resistance makes it incredibly difficult to cut and sand. Use specialized scissors to make cutting easier. Use a layer of regular fiberglass on the very outside to make filling and sanding easier.
Molds and Forms for Laminates
The shells and laminates discussed in this chapter can be formed with both negative and positive molds. We discussed mold making in Chapter 14, and sculpting in the chapter prior to that. You can also create a wireform mesh directly to cover it in a skin of papier-mâché, fiberglass, or some other material.
Wireform and Chicken Wire
Wireform mesh can be found at many hobby and art supply stores. It is flexible enough to bend to any shape or curve you need, but remains rigid when let go. The mesh allows you expand or contract in any direction, allowing you to form tight compound curves.
Larger prop pieces are built from chicken wire, also known as poultry fencing. Chicken wire is made of galvanized wire with hexagonal holes, and is far more economical than art store wireform mesh.
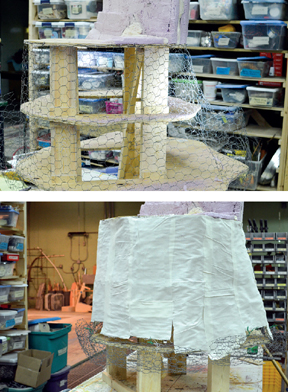
Figure 15-29 and 15-30: Chicken wire is used to form this tree stump. Muslin strips go on next to create a base for further coating.
A wooden frame of formers and stringers helps define the shape more precisely. The wireform mesh can be stapled to the frame to help give the prop more structure, or it can be made to be removable so the prop remains hollow once the laminate is applied.
A good set of wire cutters is necessary to work with chicken wire. Sharp edges are created when you cut the edge, so wear thick gloves whenever possible. Cut your edges as cleanly as possible, and fold them over onto themselves at the edges or when you staple to the frame. Multiple pieces of chicken wire can be joined together by interfolding the open edges, or by “sewing” them together with thin wire.
Bamboo and Similar Frames
You can make your own mesh form with any flexible rod or pipe. Common choices include cane, bamboo, and PVC pipe.
Cane and bamboo have a certain amount of flex to them, though if they are soaked, they become pliable enough to make very tight curves. To hold the frame together, the pieces can be lashed or taped.