seventeen
graphics
Graphics are text and illustrations on a surface meant to present some kind of information or art. Prop builders use graphics to make all kinds of paper props, such as newspapers, book covers, and train tickets. They can also add graphics to objects, such as beer cans, shipping crate labels, and warning plates on sci-fi machines. Lastly, the techniques for applying graphics can also be used in abstract manners for faux finishes and other paint treatments. For example, stencils can help you create a repetitive natural texture, while a complicated marble surface can be printed from a computer and adhered to a hard surface.
Creating Graphics by Hand
A props artisan who enjoys making paper props would do well to learn calligraphy and other handwriting techniques. You can use handwritten fonts on a computer and print them out, but the regularity of the letter spacing and shapes betrays their manufactured origin. You can always photocopy it or scan it in to create a digital file so that you can make multiples as needed.
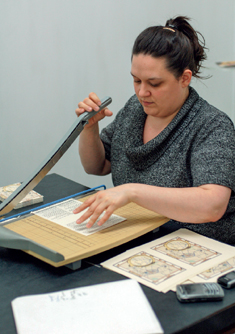
Figure 17-1: Paper can be cut with a razor knife (such as an X-ACTO blade) along a straight edge, or with a paper cutter as seen here. Remember that standard copy and printer paper is not the same size and aspect ratio as period paper, so cutting your paper to a more historically accurate size is an easy way to add authenticity to your paper props.
Documents typed up on a typewriter can benefit from actually being typed and then scanned in. Mimicking it on a computer makes it look too precise and regular, since real typewriters have so many subtle defects and inconsistencies.
Desktop Publishing
Word processors like Microsoft Word and Google Docs are useful for creating documents with a lot of text. Besides being ideal for creating contemporary documents, they can simulate period typeset documents by choosing different fonts, colors, and layouts.
More complex layouts can be made with desktop publishing software. Any document with heavy use of graphics, such as magazine covers, brochures, and restaurant menus, may be easier to create with desktop publishing rather than just with a word processor. Popular programs include Adobe InDesign, Scribus, Microsoft Publisher, and even Microsoft PowerPoint.
Importing Graphics to Computers
A scanner is useful for creating digital versions of printed material. While you can also get pictures on a computer through a digital camera, it is difficult to make an exact replica of a printed sheet of paper in terms of even lighting, flat positioning, and maintenance of proportion. If you can take a label off or flatten the packaging of a product, you can use a scanner to import it to your computer to modify. You can also scan historical ephemera and clean it up in your computer to print out new versions. If you create paper props by hand, like handwritten letters, a scanner will turn it into a digital file for multiple copies and backups.
Choosing the text for a paper prop can be a challenge. If it will be seen up close, it will need to be “real”; take clues from the script, and use your research from the period or location to fill in the rest. For film and television, any text that is seen will need to be cleared, so do not duplicate anything that is copyrighted.
If the actor needs to “read” certain lines from a paper prop, ask if they want them actually written out. Most prefer it to be written out for real, but some find it distracting.
If you are making a prop for the stage, or you are sure the prop will never be viewed closely, you can use a font or handwriting that is completely illegible so that no words can be made out. Feel free to repeat large blocks of text to fill up space, or use a “lorem ipsum” generator, to generate gibberish which looks like English from a distance.
Avoid the temptation to write something “funny” or “clever.” Even the most disciplined actor may become distracted or break character when reading something that does not belong in the world of the production.
A graphics tablet is a computer device which consists of a flat surface and a special pen or stylus. Whatever you draw on it is inputted directly into the computer; unlike a standard touchscreen, graphics tablets are more precise and have pressure sensitivity, allowing you to simulate pushing harder on a marker to make a thicker line, for instance.
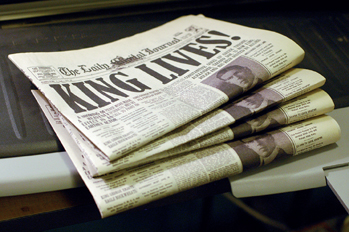
Figure 17-2: The text and graphics for this newspaper were created on a computer and then printed onto blank newsprint. All's Well That Ends Well, the Public Theater, 2011. Scenic design by Scott Pask.
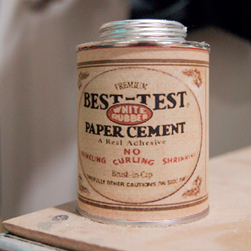
Figure 17-3: This vintage rubber cement jar was created by scanning in a modern label, altering it with computer graphics software, printing it out, and adhering it to a regular rubber cement jar. Sherlock Holmes: The Final Adventure, Actors Theatre of Louisville, 2006. Scenic design by Neil Patel.
Copying or replicating photographs, illustrations, text, logos, and other graphics often requires permission or clearance from the owner or rights holder. You should never “guess” whether something is all right to use or assume that you won't get caught by replicating copyrighted material or trademarked brands and logos. Just because you find it for free on the Internet does not mean it is free to use in your production.
A small regional theatre once replicated the logo of a California high school on giant banners. Though this theatre was hundreds of miles away in another state, the school found out, and a cease-and-desist letter meant they had to reprint the entire banner with a different logo at great expense.
Even when something is specified in the script, you may still need separate permission to replicate it. These issues are complicated and span a number of laws and regulations, and you should never accept general advice from someone who is not a lawyer, as every instance has its own unique circumstances; the decisions should be made by someone higher up than you, whether a production manager or a legal department if you are working for a production company that has one.
A digital camera lets you take photographs to use in your graphics. It can also capture documents if you do not have a scanner, repeating the limitations from above.
Resolution
The resolution of a digital image can be measured in ppi, or pixels per inch. The resolution is a relationship, not a specific size; you need to know how many pixels (px) make up the width and height of your image to determine its printed size at certain resolutions. In the table, we have an image which is 1800 pixels wide. Let us look at how wide it will be at common resolutions such as 72 ppi, 150 ppi, and 300 ppi.
When printing, you are actually using dots per inch (dpi). For prop purposes, ppi and dpi can be used interchangeably.
| image width | 72 ppi | 150 ppi | 300 ppi |
| 1800 px (pixels) | 25′ | 12′ | 6′ |
The 72 ppi image will look fuzzier and not as dense as the 300 ppi image. If you wanted the same quality as the 300 ppi image, but printed to 25″ wide, your image would need to be 7500 px wide.
The farther away people will be from your prop, the lower your resolution can be. Larger prints can have lower resolutions as well, since you need to stand farther away to see the whole thing. A billboard, for instance, only needs to be 10 ppi to 20 ppi. An 8″ × 10″ photograph only needs to be about 200 ppi. Keep in mind where your images will be shown. In theatre, you really only need to make it look good for the closest audience member (although we often want our props to look good for the actors as well, since it helps keep them in the world of the play). In film or television, you need to know whether the picture will be filmed in a close-up or not.
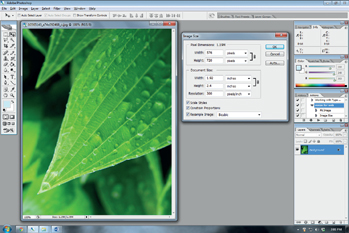
Figure 17-4: In more advanced photo editors like Adobe Photoshop, you can adjust both the pixel size and the resolution. Though this photograph looks great on a computer screen, you can see it will only be 1.92″ wide and 2.4″ tall if printed at 300 ppi.
The metric equivalent is pixels per centimeter, or ppcm. So 72 ppi would equal 28 ppcm. Many programs allow you to simply switch the measurement units, so you do not have to calculate your own conversions.
Raster and Vector Images
Generally, vector images are used for logos, text, and heavily graphic designs. Raster images are used for photographs and scanned artwork. Any image from your scanner or camera will be a raster image, and nearly all of the photographs, drawings, and paintings you find online are raster images. You can find some logos, graphics, and other elements in vector formats online; otherwise, you need to create them yourself or convert them from raster images.
Since raster images become blurry when you enlarge them too much, you want to make sure to work with the largest image possible for your needs. If you are filming a close-up of an 8″ × 10″ photograph, a 300 px × 180 px image you grab off the web won't cut it.
Common raster image formats include JPG, GIF, PNG, and BMP. Common vector file formats include AI, SVG, and EPS. Many CAD (computer-aided design) files, like DXF and DWG, are also vector-based.

Figure 17-5: A vector image (top row) is a mathematical representation of an image, storing information such as the start and end points of lines, their thickness and color, whether they are straight or curved, and what color is filled inside. A raster image (bottom row) stores the color of each individual pixel. When you enlarge a vector image, it remains sharp, because the computer simply redraws all the lines based on the information stored. When a raster image is enlarged, the computer makes its best guess as to what colors all the new pixels need to be, so the end result will have some blur.
Vector images are also necessary if you are creating artwork for digital fabrication tools like vinyl cutters, laser cutters, and CNC routers.
Raster Graphics
A basic raster graphics editor will enable you to resize, crop (remove the outer edges), and rotate your image. You can also adjust the brightness, contrast, and colors, make it black and white, or add text on top. Programs like this often come with a computer, like Microsoft Paint or iPhoto for Mac, and you can find tons of free programs or online apps for other basic editing tasks.
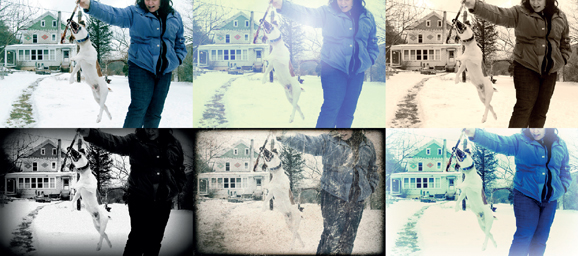
Figure 17-6: You can find a lot of free or cheap websites and apps for applying overall effects to a photograph. These can range from altering the colors, turning it black and white or sepia, and even mimicking vintage film. Some can get pretty complicated and robust, such as Adobe Photoshop Express Editor.
Removing the background from images to isolate an object is tricky and laborious in these basic editors though. Say you have a photograph of a chicken in a yard, and you want to erase all the yard parts so you just have the chicken to use on your “Wild Chicken” whiskey bottle. It gets even trickier if you want to take an object from one photograph and lay it on top of another, like when you want to put an actor's head on someone else's body. If you find you need to move, rotate, or resize just that head, it will mess with the background.
Mid-level photo editors, like Paint.NET, allow you to avoid that by keeping different elements in an image on their own layer. Layers are kind of like a stack of transparencies; any transparent areas allow you to see through to the layers below. You can manipulate the individual layers without affecting the other layers. You can even make a layer semitransparent.
Advanced raster image editors give you a whole host of tools to create more complex images. The most ubiquitous is Adobe Photoshop, but others like GIMP, ACDSee, Autodesk SketchBook, and Corel PaintShop Pro, offer similar tools. One of the main features for prop builders that set these programs off from their basic counterparts is the ability to create layer masks. Instead of just deleting portions of an image to reveal the layers underneath, you can mask it off, leaving the image itself intact. So if you realize on Friday that you accidentally masked off a bit too much of one of the layers last Monday, you can go back and adjust the layer mask. Basic image editors only allow you to “undo” steps in reverse chronological order, so if you make a lot of edits to an image before realizing you deleted too much of one of the layers, you are out of luck.

Figure 17-7: In the bottom left toolbar, you can see all the layers that make up this image. Some of the layers come from other images, like the weather map and the photograph of the actress. Others are text layers or shapes created within Photoshop. With everything on separate layers, you can edit the different parts individually, so if you wanted to move the picture of the actress to another part of the newspaper, you can select that layer and drag it without having all the text and other images move with it.
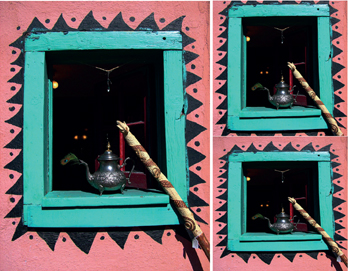
Figure 17-8: The designer wants to use the photograph on the left as set dressing, but wants it to hang in a square frame. Normally, we have two options. In the top right, the photo is cropped to a square shape, but that cuts off some of the painted detail around the window. In the bottom right, we squash the photo, but that distorts the shape of the tea pot and other elements.
Graphics people call this “nondestructive editing”, meaning that you never delete or alter the original images themselves, but rather build layers and masks on top to manipulate the image.
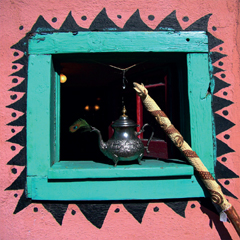
Figure 17-9: With a new digital tool known as “seam carving,” we can resize the photo to fit a square without distorting the major elements, like the teapot and the stick. Current editions of Photoshop include this tool, calling it “content-aware scaling.” Programs like GIMP can add it as a plugin (sometimes referred to as “liquid rescaling”). You can also find it in stand-alone apps like iResizer. It's a powerful tool for whenever you need to change the ratio of an image but cannot crop out or distort elements within the photograph.
Vector Graphics
The typical theatrical prop shop can accomplish the majority of their graphics work with word processors and raster image editors. Larger film and television productions will often have a separate graphics department that handles any graphics creations. But if you find yourself having to create crisp, clean graphics on a regular basis, particularly at larger scales, then a vector graphic editor may be what you need.
Two of the most popular programs are Adobe Illustrator and Inkscape (a free program). The layouts of these programs are comparable to advanced raster editors like Photoshop. They use layers and have many of the same toolbars.
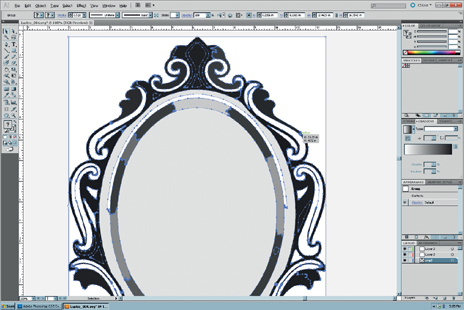
Figure 17-10: The blue lines in this vector drawing are highlighting the nodes and paths which define the drawing; the blue will not actually be printed.
In television and film, trademarks and brand names often need to be cleared to avoid potential infringement (or to avoid conflicts with the program's advertisers). To avoid this, the labels can be Greeked, or obscured so they are no longer recognizable.
The old way was to simply cover them with masking tape. More creative ways include borrowing some of the recognizable colors or fonts of a well-known brand but changing enough of the design and name to avoid conflict. Examples from real shows include WcDonalds, Morley Cigarettes, and Supperware. Other times, completely fictional or generic brands are often invented, such as Acme Products, Duff Beer, and Wonka Chocolate.
These programs are far more complex than what I can cover in this chapter. What follows is simply some of the terminology and general principles of vector graphics editing.
Many drawings can be made with either the pencil or pen tool. The pencil tool allows you to draw freehand; if you have a graphics tablet, the pencil tool is especially useful. The pen tool lets you place points throughout the drawing and connect them with either straight lines or Bézier curves. Each of these tools create paths, which are made up of individual nodes. Even after drawing a path, you can go back and further refine the shape by adding, subtracting, or moving nodes. The thickness and color of the path can be edited at any time. The path does not need to be a solid line; you can change it to a dashed or dotted line, or apply various other patterns to it. If the path is a closed path, you can fill the inside with a color, gradient, or pattern. If it is an open path, meaning the start and end points are not connected, then you cannot fill it.
Digital Printing
The types and variations of computer printers are vast, and the technology changes rapidly, so I will not discuss specific makes and models here. Most printers highlight their ability to print photographs, which is less important for the props artisan. We are more concerned with what sizes of paper a printer can handle, what types of paper can be used (some can even print to fabrics), and what method it uses to print, as some processes require specific ink or toner. It may be helpful to have several different printers that excel at specific tasks rather than one printer that does everything only marginally well.
The two major types of printers on the market are ink-jet and laser. An ink-jet printer shoots tiny drops of ink through jets to transfer a graphic to the paper. These printers are the most common, and often the most affordable. Most are built to deliver finely detailed photographs. The colors are mixed from a set of colored inks; printers can use anywhere from a single black cartridge up to twelve different cartridges (most use four to six). Some even allow you to use different sets of specialty ink cartridges, such as white ink or metallic colors. Most inks used by ink-jet printers are water-soluble, so the image may be smeared if the paper gets wet.
Laser printers use lasers to melt black or colored toner onto paper, much like a photocopier. They are much faster and cheaper than ink-jets when printing multiple copies of black and white text or images. Their printing process results in waterproof prints; it also gives it the ability to print onto acetate and other transparent plastic sheets, which are far too slick for ink-jet ink to stick to (though you can find specially-coated transparencies for use in ink-jets). While you can find affordable color laser printers, they typically only print on regular-sized paper; you need a large-format ink-jet to make giant prints.
A plotter is a large-format printer used for printing out CAD and other line drawings. Most “plotters” today are actually wide-format ink-jet printers that can print any kind of graphic or photograph. The most common can use paper up to 44″ (1118 mm) wide; with paper on rolls, they can print almost any length. A few prop shops have their own, while others share one with the scenery and/or costume shop.
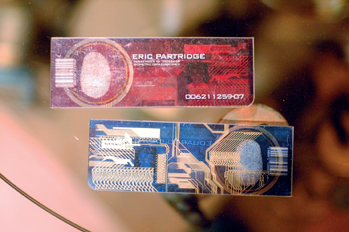
Figure 17-11: These tickets to the Ark in the film 2012 were printed on clear plastic with metallic ink used as highlights. Most prop shops will need to find a commercial printer for jobs like this, since regular computer printers cannot do metallic inks. Alternatively, you can apply the metallic ink after printing, either with a metallic ink pen or a silkscreen.
It is also helpful to explore local print shops to find out their capabilities and pricing. When you have to print especially large pieces or use particularly unusual paper, it can be advantageous to get it printed rather than investing in a brand-new type of printer for that one job. For large quantities of copies, it can also be more cost-effective to have a shop duplicate them rather than printing them all from your computer.
Applying Graphics to Props
Besides creating paper props, computer programs and printers are used to create graphics that are applied to other props as part of their decoration. We find ourselves making beer and wine labels a lot, as well as other vintage or custom packaging. Some means for achieving this include stickers, decals, and découpage. These give your prop a more mass-produced look than hand painting.

Figure 17-12: Printing out a book cover and placing it over a book is a quick and easy way to make a fake book. If the actor is supposed to flip through the pages, make sure they match up with what the book is supposed to be. It should not have color photographs inside if it is meant to be a period text. A book of poems will also look different from a book of prose. The Human Scale, The Public Theater, 2010.
A sticker is a piece of paper or film with adhesive on the back. You can either find print onto peel and stick paper, or add your own adhesive to the back of regular paper. Spray adhesives or rubber cement are great choices; water-based glues can warp the paper.
Stickers are great for adding custom or period labels to containers. When adding a label to a glass bottle, like for beer or wine, cover the label with clear plastic tape or with clear glue (like Mod Podge). This way the label will not be destroyed when you wash the glass in between shows.
A decal is a special kind of paper, often clear, that can be printed on. The back becomes adhesive when soaked in water for a few minutes. It is then applied to a smooth surface while wet. Some decals can be activated by heat as well. Most decals can only be printed with laser printers, as the ink from ink-jet printers will wash off when soaked in water.
Découpage is the art of gluing paper over a surface until it is completely covered; in many cases, multiple pieces of colored, printed, and patterned papers are used to create a layered or collage effect. In traditional découpage, the idea is to make the surface look painted or like inlay work.
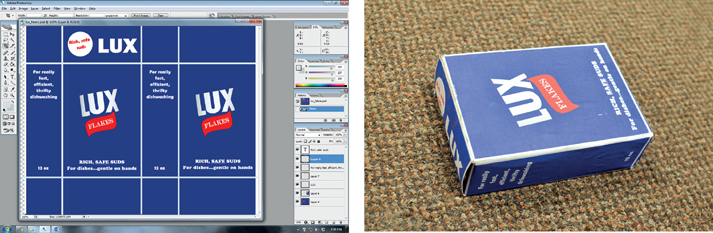
Figure 17-13 and 17-14: Developing an unfolded box in Photoshop to print and paste on a box to make vintage packaging.
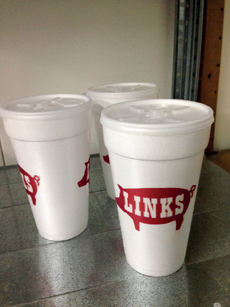
Figure 17-15: This logo was printed onto adhesive transparency, so when it was applied to the Styrofoam cup, it appeared to be printed directly on. When using transparencies as the base of a sticker, make sure you do not use an adhesive that will show through. Common Enemy, Triad Stage, 2015. Logo design by Miwa Ishii.
The toner from photocopies and laser printed pages can be remelted and transferred onto other surfaces such as fabric. Soak the print in a solvent (acetone works well), and then lay it face down on your material. The toner should transfer to your material (it will appear reversed from what was printed, so be sure to reverse your image before printing).
Stencils are shapes and patterns cut from a thicker piece of paper and laid on a surface. Paint or ink is stippled or sprayed over the top. The stencil acts like masking, keeping the color from reaching the surface underneath the parts that are not cut out. They are useful when you need to keep your graphics from looking too “handmade,” especially on surfaces that cannot be run through a computer printer; they can also be used to lay down repetitive images and patterns, by using the stencil on multiple parts of the surface.
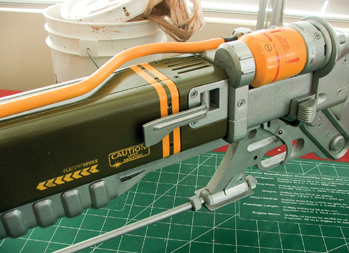
Figure 17-16: Decals applied to the surface of this AER9 Laser Rifle from Fallout 3 give it a mass-produced look. Photograph and prop by Harrison Krix.
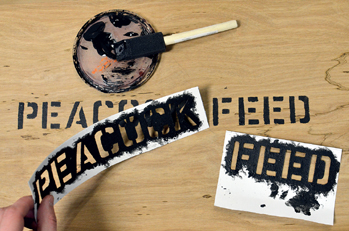
Figure 17-17: With a stencil, any “floating” portion of the unpainted area needs to be connected to the main area. This is especially noticeable in letters, though this look is preferred when creating vintage shipping or military labels. If these connecting lines are not wanted, you can go in after stenciling and paint over them by hand.
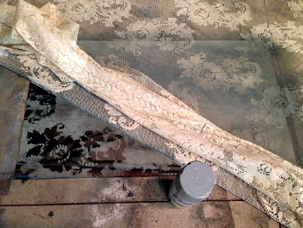
Figure 17-18: You can use any number of existing materials as a makeshift stencil. Here, a piece of lace is used over Mylar as a stencil to simulate an etched glass pattern.
Screen printing, also known as silkscreen, is like a stencil but uses a design blocked out on a woven mesh. The mesh is fine enough that the ink can pass through it without printing the lines. The mesh is covered with an impermeable material to block areas from receiving ink. This gives it an advantage over stenciling in that it can print designs where blocked areas are unconnected to each other. The disadvantage is that the preparation of the screen is far more complex than simply cutting out a stencil.
The most common technique for screen printing uses the photo emulsion technique. The design is created on a transparency either by hand, through a photocopier, or from a computer. It is then laid on a screen which is coated with photo-sensitive emulsion and exposed to light; when done, the darker areas are washed away, allowing ink to pass through them.
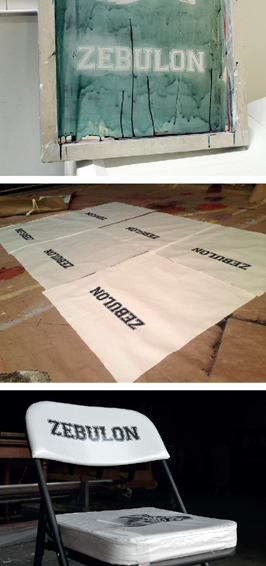
Figure 17-19 to 17-21: This fabric was screen printed before being used to upholster a set of chairs. The green areas in the first image are the dried photo emulsion which prevents ink from passing through the screen. Common Enemy, Triad Stage, 2015. Scenic design by Fred Kinney.
You can also use a vinyl cutter for silk screening. The self-adhesive vinyl shapes will stick directly to the screen, blocking ink from passing through.
Stamps, blocks, and presses are all means to transfer ink or paint from a raised design to a surface. The design itself has to be in reverse so that when it is touched to the surface you are decorating, it will be oriented the correct way. Rubber stamps of an endless variety can be found in craft and stationery stores or purchased online. You can also find numerous shops that will custom-make stamps for you from artwork you provide. You may also carve or cut your own stamp. Rubber, foam, or even potatoes can be used as stamps; it helps to attach them to a wood backing so you can apply even pressure when stamping.
A block refers to a rigid material that has been carved with a relief design. Blocks were traditionally cut from wood, though modern blocks are often made from linoleum or composite materials. A block can be stamped, just like stamps, or used in a press. A press is a machine that holds a number of blocks which can be stamped onto paper at the same time.
“Taking a rubbing” means placing a sheet of paper or other thinner material over a textured or carved block and rubbing graphite (like in a pencil), chalk, or some other material onto it. The block can be a drawing or engraving, or just random textures (known as frottage).
Aging Paper Props
Paper props, such as pages in a book, letters, posters, and the like, can be aged and distressed like other props. The same thought and consideration goes into how and why they will be distressed as well.
The most common aging technique is soaking a sheet of paper in a bath of coffee or tea. Brew the tea or coffee as you would normally, and let it cool. It is helpful to use a baking sheet or cookie sheet large enough to fit the paper lying down flat with a lip to hold in a small amount of liquid.
You can also “paint” the paper with the tea bag or a rag soaked in coffee. Remove the paper from the liquid, and let it dry. Alternatively, you can put it in an oven for a few minutes to dry it. The oven should be preheated to 200°F (93°C). Paper can ignite in an oven set at 480°F (248°C), and it will smolder before that. If you used a baking sheet, you can get rid of the excess liquid, and place the paper in that when it goes in the oven. You can also dry it in a microwave for a few minutes, or use a hair dryer or heat gun.
For more dramatic effects, rub used coffee grounds or used tea leaves removed from a tea bag directly onto the surface of the paper. Sprinkling individual instant coffee crystals on top and allowing them to soak will create “blooms” on the surface of your paper. These techniques can be combined for more control over the effect; soaking creates a uniform color, painting gives a more varied look, while the grounds, leaves, and crystals can be added for more selective coloring.
For a different kind of texture, cover the paper loosely with wax paper or plastic as it dries. This will cause the liquid to pool randomly in spots over the surface, creating variable levels of coloring.
Crumpling the paper beforehand and then flattening it by hand or with an iron adds an additional layer of texture.
Another handy technique involves lemon juice and heat. The paper will brown wherever the lemon juice is, so specific parts of the paper can be colored, or the lemon juice can be spattered randomly all over. Bake it in the oven, or use a hot air gun to dry the lemon juice and brown the paper. Other useful dyes are walnut ink crystals and soy sauce.
Some inks will run when you soak them in these solutions, so you may need to age your paper first, and add the graphics after it dries. The downside to this is that your writing may look like new writing on old paper, as opposed to writing that has aged along with the paper. If your paper is wrinkled and curled, it may also jam in some computer printers.
Finally, I implore you not to burn the edges of your paper. This is a common practice for crafters and scrapbookers, but unless your document was literally in a fire, there is no reason for the edges to be burnt. For rough edges, tear the edges (a deckled straight edge can help) or rub them with your finger while wet.