
C H A P T E R 14
![]()
Pages and Pages of Fun!
Creating Custom Editing, Management, and Presentation Pages
Custom page development is important to the user experience. After all, everything the user sees is a page, right? So, if we are able to customize the pages, we have maximum control over the user interface.
This chapter will work both with the EmpireTimes solution and with separate and stand-alone solutions. I'll show a range of options for creating pages, including pages that are not tied to any particular solution. So, without further ado, let's get started.
Mission Statement
In this chapter, we'll explore page construction in SharePoint. We will create two types of pages: an application page and a site page. We will also use two different methods for adding code to our pages, both using inline code and using a code-behind assembly. The application page will be a content type hierarchical list, while the site page will be a list of the categories we have put in our Categories list.
Finally, we will use a custom action to add a link to the Site Settings page so that we get a link to the content type hierarchy application page.
Sound good? Let's go!
Basics of Page Authoring in SharePoint
SharePoint is nothing but a relatively standard ASP.NET solution. So, we should be able to create custom pages as much as we like.
We need to consider a few things, however. First, SharePoint uses a common _layouts virtual directory that is mapped to the [12]TEMPLATELAYOUTS folder. This virtual directory is shared between all sites in the entire farm, so it is a very useful place to put pages that are going to be used in all or most sites.
If you want your page to be accessible only to a certain site or site collection, it makes sense to package the pages as a module and make that module part of a feature. That way, you can deploy or retract the page or pages on a site-by-site basis.
Let's start with the latter and create a basic page for our Empire News web site.
Exercise 14-1. Creating a Site Page
In this exercise, you will add a custom page to the EmpireTimes solution. This page will just display the categories you've created and any articles in that category. First you will set up the custom page framework just to make sure the page works.
- In your EmpireTimes solution, add a new blank feature. No need for a receiver this time. Name the new feature something like
TimesCategoryPage. I did, and you want to be like me, right? Also, make the feature web scoped. - In the feature folder for
TimesCategoryPage, add a new folder calledCategoryPage.This folder will remain inside
TimesCategoryPagewhen deployed, so naming is less important here. - In the
CategoryPagefolder, add a new text file, and name itcategories.aspx. - In your elements file, add the following code:
<Elements xmlns="http://schemas.microsoft.com/sharepoint/">

  <Module Name="CategoryPage" Path="CategoryPage">

    <File Url="categories.aspx">

    </File>

  </Module>

</Elements>
This code will place our file in a module for deployment. The
Pathattribute refers to the folder insideTimesCategoryPagewe just created. TheFileelement'sUrlattribute tells SharePoint we want to place the file at the URLcategories.aspx, which will be relative to the root of the site in which the feature is deployed. Also, theUrlattribute doubles as the file name in this case.Refer to Chapter 4 for more information about modules.
- In the
categories.aspxpage, add the following code:<%@ Assembly Name="Microsoft.SharePoint, Version=12.0.0.0, Culture=neutral,
PublicKeyToken=71e9bce111e9429c" %>
<%@ Page
Language="C#"
MasterPageFile="~masterurl/default.master"
Inherits="Microsoft.SharePoint.WebPartPages.WebPartPage"
%>
<asp:Content runat="server" ContentPlaceHolderID="PlaceHolderMain">
</asp:Content>This code simply adds the
Microsoft.SharePointnamespace and declares that we are making a web part page that uses thedefault.mastermaster page.We will explore the other classes from which you may inherit later in this chapter.
 Note The string
 MasterPageFile="~masterurl/default.master"is not a URL. The~masterurl/default.masterpart is a token that SharePoint translates to the current master page URL of our site. If we change the master page for the site, all pages will get the new master page. Very convenient.You can read more about master page tokens on MSDN at
http://www.understandingsharepoint.com/url/10033. - Add a random control to the
asp:Contentcontrol. If you are in a particularly noncreative mood this day, here is a suggestion:<asp:Label Text="Custom content" runat="server" />The control doesn't really matter at this point; we just want to set up the framework.
- Build, deploy, and then activate your new feature on the site you use for the Empire Times example. Go to the page
siteurl/categories.aspx. For my example, that would behttp://lab-s02:10000/categories.aspx.Check out Figure 14-1 for how this looks on my server.
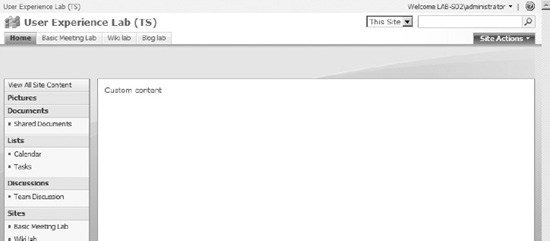
Figure 14-1. Custom site page
That's it. It's nothing too fancy for the moment. We will return to the more elaborate examples in a moment.
The custom page you just created can serve as a template for creating other site pages. From this point on, we will add page-specific content, so I thought it would be wise to just pause here for a moment so you can admire your creation.
Note that most of the content in our page is still housed in the default master page. To maintain a consistent user experience, this makes sense. I am not saying you should keep the standard SharePoint master page; after all, we are here to learn how to customize the user experience, not re-create the existing experience. However, if you stick to using the ~masterurl/ default.master token, then updating the user experience for all pages is a lot easier.
Also note that we are inheriting the Microsoft.SharePoint.WebPartPages.WebPartPage class. In a later exercise, we will create our own class to serve as the code-behind class, but for now we will make do with the basic functionality that WebPartPage provides.
I think we should move on and start adding some interesting stuff to our page.
Exercise 14-2. Adding Some Content to the Page, Take 1
In this exercise, you will add content directly to the asp:content control. You will manipulate the page using inline code to archive an article listing grouped by categories.
- (Optional) Start from the page you created in Exercise 14-1, and add the following line to the top of the
categories.aspxpage:<%@ Register TagPrefix="SharePoint" Namespace="Microsoft.SharePoint"
Assembly="Microsoft.SharePoint, Version=12.0.0.0, Culture=neutral,
PublicKeyToken=71e9bce111e9429c" %>Adding those lines makes code writing a lot easier because you do not have to prefix all your
SPXXXXobjects withMicrosoft.SharePoint. - Add a
scripttag below theASP:Contentcontrol you added earlier:<asp:Content ID="Content1" runat="server"
ContentPlaceHolderID="PlaceHolderMain">
</asp:Content>
<script runat="server">
</script> - Inside the
scripttag, override theOnLoadmethod, and remove thebase.OnLoadmethod call:<script runat="server">
protected override void OnLoad(EventArgs e)
{
}
</script>Note The rest of our code will happen inside the OnLoadmethod, so I will refrain from mentioning that fact every time. - Add some objects, and get some proper web and list references to the
OnLoadmethod:EnsureChildControls();
SPWeb web = SPContext.Current.Site.RootWeb;
SPList categoryList = web.Lists["Categories"];
ContentPlaceHolder cp =

    (ContentPlaceHolder)Master.FindControl("PlaceHolderMain");

cp.Controls.Clear();


Table table = new Table();

// Whoops, better not, or we'll have the entire

// HTML TABLES ARE BAD crowd on our tails.
Yeah, we'll stay away from the table-based layout, just to please the CSS geeks out there. Skip the last three lines if you like.
Next we want to iterate over the category items and place the correct items in a list beneath the category name.
- Add the following code after the object initialization in step 4:
foreach (SPListItem categoryItem in categoryList.Items)

{

    Panel p = new Panel();

    p.CssClass = "empirenews-categorylist";

    Label lb = new Label();

    lb.CssClass = "empirenews-heading";

    lb.Text = categoryItem.Title;

    p.Controls.Add(lb);


    foreach (SPListItem articleItem in web.Lists["News"].Items)

    {

        SPFieldLookupValue articleCategory =

            new SPFieldLookupValue(articleItem["ArticleCategory"].ToString());

        if (articleCategory.LookupValue == categoryItem.Title.ToString())

        {

            LinkButton linkbutton = new LinkButton();

            linkbutton.CssClass = "empirenews-articleitem";

            linkbutton.Text = articleItem.Title;

            p.Controls.Add(linkbutton);

        }

    }


    cp.Controls.Add(p);

}
As stated, this code iterates the category items, adds a nice
<div>tag for each category, and then iterates all the items in the news list to check whether the item belongs to the category.Note If your current thought at this point includes the acronym WTF, you are not alone. Iterating every single item in the news list for every single category is a highly unoptimized way of generating a list. We will improve this later. - (Optional) Since we added the
.CssClassproperty to our controls, we might as well add the CSS code to our page. Add the following code outside thescripttag and existingasp:Contentcontrols:<asp:Content runat="server"
ContentPlaceHolderID="PlaceHolderAdditionalPageHead">
<style type="text/css">
.empirenews-heading
{
font-size: medium;
font-weight: bold;
display: block;
}
.empirenews-articleitem
{
display: block;
}
</style>
</asp:Content>Yeah, I know, that is CSS. There won't be much more, I promise. This is just done to pretty things up a bit.
- Build and then deploy or update. You changes should be immediate; there's no need to reactivate the feature. Your result should resemble Figure 14-2.
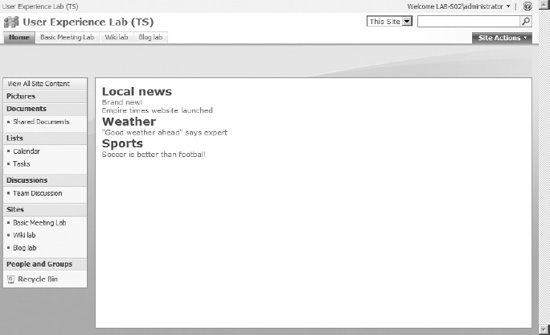
Figure 14-2. Custom site page deployed
It's cool but not very efficient. We should work to improve our example a bit.
![]() Note We are adding inline code to our site page, which must present a security problem. After all, if you can just upload an
Note We are adding inline code to our site page, which must present a security problem. After all, if you can just upload an .aspx page and have code run inside, anyone could upload code to a page library and run the page. The answer to this mystery is that we are not running our page from a library at all. If you try the same trick with a page stored in a library or even if you customize the page we have created here using SharePoint Designer, you get an error message stating that you are not allowed to run inline code in this page.
![]() Tip If you need to specify paths where you will allow inline code to run, you need to modify the
Tip If you need to specify paths where you will allow inline code to run, you need to modify the web.config file and set the PageParserPaths element inside the SafeMode element of the SharePoint element in web.config. MSDN has an article describing this issue at http://www.understandingsharepoint.com/url/10035.
When you deployed your updated categories.aspx page in the previous exercise, you did not need to reactivate the feature. The reason for this is that you are updating the source of the module created in the first exercise. SharePoint maintains the link to the source file in a module as long as we do not customize the page further using tools such as SharePoint Designer. As such, any edits made to the source file will immediately affect any page that has been provisioned from that source file.
Here comes a cool thing about WSPBuilder: in your Solution Explorer, you copy a file directly to [12] using a context menu shortcut. Developing this is extremely handy because you do not need to rebuild the WSP file, deploy, wait for solution retraction, and deploy for every minor change you do to your page. All you do is right-click the file, hit “Copy to 12 hive,” and refresh the page. Figure 14-3 shows where this option is located.
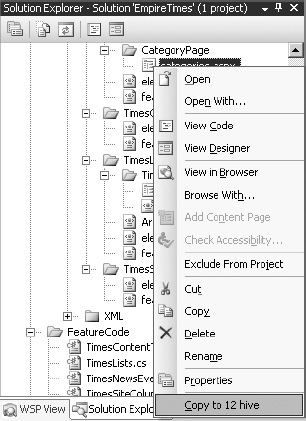
Figure 14-3. “Copy to 12 hive” option in WSPBuilder
OK, it is time to fix that horrible iteration code from the previous exercise.
Exercise 14-3. Improving the Site Page Code
In this exercise, you will improve the code from the previous exercise and utilize an SPQuery object to optimize the page.
- Replace the code you added in step 5 of Exercise 14-2 with the following code:
foreach (SPListItem categoryItem in categoryList.Items)

{

    Panel p = new Panel();

    p.CssClass = "empirenews-categorylist";

    Label lb = new Label();

    lb.CssClass = "empirenews-heading";

    lb.Text = categoryItem.Title;

    p.Controls.Add(lb);


    SPQuery query = new SPQuery();

    query.Query = @"<Where><Eq>

        <FieldRef Name=""ArticleCategory"" LookupId=""True""

        <Value Type=""Lookup"">"

        + categoryItem.ID +

        "</Value></Eq></Where>";


    foreach (SPListItem articleItem in web.Lists["News"].GetItems(query))

    {

            LinkButton linkbutton = new LinkButton();

            linkbutton.CssClass = "empirenews-articleitem";

            linkbutton.Text = articleItem.Title;

            p.Controls.Add(linkbutton);

    }


    cp.Controls.Add(p);

}
The major changes here are that we now use an
SPQueryobject and design a CAML query to return only the relevant items from the news list. Since we get only the relevant items from the query, we have also simplified theforeachloop that iterates the news list.Note Look at the FieldRefelement of our query, and note that we add theLookupId="True"attribute. This ensures that we query theIdpart of the lookup value. If you do not care about the possibility of duplicate names in a lookup list, you can skip theLookupIdattribute and just put theSPListItem.Titleproperty in theValueelement.That should be it. Running your code should yield exactly the same result as shown in Figure 14-2.
By using the SPQuery object, we get a lot more control over what is displayed. For example, you might want to add RowLimit to your SPQuery object to just get the first five items within each category:
query.RowLimit = 5;
Or, knowing that the default sort is by ID, you might want to sort the items in a different order. You could sort the news by the modified date to bring the latest news first by adding a few elements to the query:
<OrderBy>

<FieldRef Ascending="False" Name="Modified"/>

</OrderBy>
Look, this exercise is about creating pages, so I don't want to get too deep into the list querying stuff. In any case, doing this using a custom view is likely to be much more efficient and will also add the benefit of being able to modify the view using the web interface rather than updating compiled code.
As such, let's move on.
Adding a Global Page and a Code-Behind
Sometimes you want to improve or expand the management experience, and this is a situation where placing files in the [12]TEMPLATELAYOUTS folder would be a wise choice. As mentioned before, files placed in this folder are available to all sites in all site collections.
For this example, I have chosen to do a simple content type hierarchy page. For the sake of brevity, the example will be extremely simple and just add the content types to a TreeView control. I will leave any expansion beyond that, such as adding fancy icons for sealed or read-only content types or linking to other custom or out-of-the-box management pages, for your exploration.
For this exercise I want you to create a new solution. This solution will be globally available and not dependant on the EmpireTimes solution.
![]() Note There are probably way smarter methods of creating the tree. This is not an exercise in tree building but in global page development.
Note There are probably way smarter methods of creating the tree. This is not an exercise in tree building but in global page development.
Exercise 14-4. Adding a Global Page
In this exercise, you will create and deploy a global page that will display the content type hierarchy.
- Start by creating a new Visual Studio solution based on the WSPBuilder project template. Call it whatever you like; I have called mine CustomPages.
If you like to maintain full control, feel free to start with a class library and make scripts to deploy the pages on your own. WSPBuilder will help out with certain aspects of the page creation but is in no way an absolute requirement for page development.
- (Optional) Add a Feature with Receiver item to your solution.
Adding a Feature with Receiver will make WSPBuilder create some of the folder structure for us, sign our assembly, and output the strong name in the
Feature.xmlfile. It just saves a bit of time. - Add a folder structure as shown in Figure 14-4. If you performed step 2, this will be just a matter of adding the
LAYOUTSfolder. If you did not perform step 2, just ignore theFeatureWithReceiver1folder; the important thing is to mimic the12/TEMPLATE/LAYOUTSstructure as shown.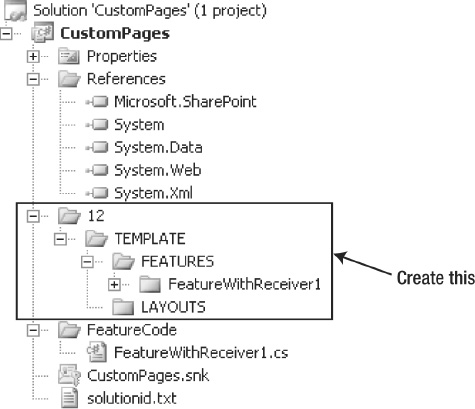
Figure 14-4. The folder structure for
Layoutsdeployment - In the
LAYOUTSfolder, create a new text file, and name itContentTypeHierarchy.aspxor something you like better.Again, using a text file but naming it
.aspxwill give us a plain file that Visual Studio will interpret as an ASPX file. - Open the ASPX file. Enter the following code at the very beginning of the page:
<%@ Assembly Name="" %> - Inside the
Nameattribute, put the strong name of your assembly.If you performed step 2, this is as easy as opening the
Feature.xmlfile of your Feature with Receiver feature and copying the strong name from there. If you did not perform that step, you need to add a key file from the project properties, build your solution, and get the strong name manually. I recommend using .NET Reflector for this task; refer to Chapter 1 for detailed instructions. - Add a new class file to your solution. This will be your code-behind file. I have called mine
ContentTypeHierarchy.cs, but you can call it whatever you like. - Add a reference to the
Microsoft.SharePoint.dllfile if it is not already present. - In your new class file, named
ContentTypeHierarchy.csin my example, add the followingUsingstatements:using Microsoft.SharePoint.WebControls;
using System.Web.UI.WebControls;
using Microsoft.SharePoint;Microsoft.SharePoint.WebControlsis used for theLayoutsPageBaseparent class,System.Web.Ui.Webcontrolsholds the TreeView control, andMicrosoft.SharePointgives us access to the content types. - In the class file, make your class inherit from the
LayoutsPageBaseclass as such:public class ContentTypeHierarchy: LayoutsPageBaseInheriting from the
LayoutsPageBaseensures that we can limit access to our page based on SharePoint permissions. The alternative is to inherit from theUnsecuredLayoutsPageBase, which effectively gives us a global open-for-all page.At this point, your class file should look like Figure 14-5.
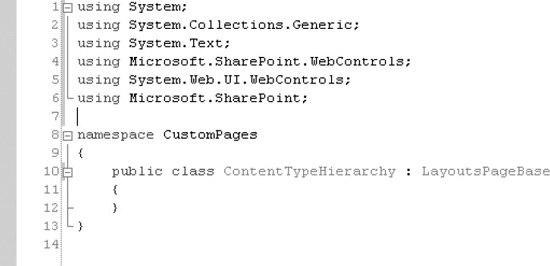
Figure 14-5. Class file after initial setup
- In your
ContentTypeHierarchy.aspxpage, or whatever you chose to call it, add the following code after theAssemblystatement:<%@ Page Language="C#"
MasterPageFile="~/_layouts/application.master"
Inherits="" %>You may, of course, change the language if you are writing your code in a different language. My examples are in C#, though.
- In the
Inheritsattribute, add the namespace and class name of your class. In my example, this would be
Inherits="CustomPages.ContentTypeHierarchy".
At this point, we have connected our code-behind file with our page, so we are ready to add some content. Let's take a short break first.
What we have created up to this point is the outline of a custom layouts page, often referred to as an application page. You basically have the stem cell of a SharePoint layouts page; from here on, the page can be turned into virtually any page you need. Note that System.Web.UI.WebControls is not strictly necessary, but you will be using this so often I thought it made sense to include it in this example.
We are also using the ~/layouts/application.master master page. As you learned in Chapter 5, this page is global to the farm, and modifications to the application.master page are not supported by Microsoft. You may want to create your own master page, and if so, a good starting point is to copy the existing application.master from the [12]TEMPLATE LAYOUTS folder and place it into your solution. However, the default application.master contains a lot of nonvalidating code and certain…features…that will break the Visual Studio rendering engine and display errors. As such, you might want to just start from scratch, especially if you are developing a master page for your solution anyway.
I will leave custom application master page development as an exercise for you to do on your own.
![]() Note Starting down the path of custom
Note Starting down the path of custom application.master development should not be done without considering the consequences. Maintaining a separate application.master includes both operations and development maintenance, because you need to update your application.master as part of your regular update cycle.
We should get back to our regularly scheduled page development.
Exercise 14-5. Adding Content to the Page
In this exercise, you will add some content to your application page. Because this is for illustrative purposes only, the actual content will be very simple.
- In your
ContentTypeHierarchy.aspxpage, add the following code:<asp:Content ID="Main" contentplaceholderid="PlaceHolderMain" runat="server">
<asp:TreeView ID="tvContentTypes" runat="server">
</asp:TreeView>
</asp:Content> - In your code-behind file,
ContentTypeHierarchy.cs, add the following code to theContentTypeHierarchyclass:protected TreeView tvContentTypes;
protected override void OnLoad(EventArgs e)
{
SPContentTypeCollection cts = this.Web.AvailableContentTypes;
Dictionary<SPContentTypeId, TreeNode> ctsNodes = new
Dictionary<SPContentTypeId, TreeNode>();
TreeNodeCollection nodes = tvContentTypes.Nodes;
foreach (SPContentType ct in cts)
{
TreeNode ctnode = new TreeNode(ct.Name, ct.Id.ToString());
if (ctsNodes.ContainsKey(ct.Parent.Id))
{
TreeNode parent = ctsNodes[ct.Parent.Id];
parent.ChildNodes.Add(ctnode);
}
else
{
nodes.Add(ctnode);
}
ctsNodes.Add(ct.Id, ctnode);
}
}This code essentially builds the node tree of the TreeView control.
Note that simply adding a protected TreeView object with the same name as the ID of the TreeView in our ASPX page will cause ASP.NET to map our object to the correct control.
- Build your solution and deploy it. There are no features to activate, and WSPBuilder will make sure your file gets placed where it should inside
[12]. Also, WSPBuilder puts the assembly in the GAC for you. If you have chosen not to use WSPBuilder, you must perform these steps manually. - Go to any site in your site collection, add
/_layouts/ContentTypeHierarchy.aspxto the URL of your site (for examplehttp://lab-s02:1000/_layouts/ContentTypeHierarchy.aspx), and see your new application page in all its glory.
If something didn't work, you can see my results, in all their glory, in Figure 14-6.
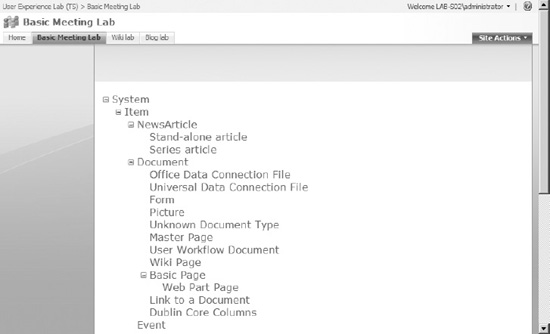
Figure 14-6. Custom application page in action!
Another pat on the back for you. Let's see how we can make access to our page a bit easier.
What we did in our previous example was to add some content in the form of an asp: Content control and a standard TreeView control to display our content type hierarchy. Then we added some code in our code-behind file to fill the tree with the content types. It wasn't anything fancy; it was just to show you the outline of how you can create a custom page.
![]() Note There are many more content placeholders you may want to utilize to make a better-looking page. I highly recommend reading through the
Note There are many more content placeholders you may want to utilize to make a better-looking page. I highly recommend reading through the application.master page to learn about the different placeholders.
Next we want to add our page to the site settings. After all, we don't want to type the _layouts/ContentTypeHierarchy.aspx string every time we want to see our page. For this we need to use a CustomAction feature.
Exercise 14-6. Adding Links to the Custom Page
In this exercise, you will create a farm-scoped feature to add links to your page from the Site Settings page. You will do this in two ways, first as a separate column on the Site Settings page and then as part of the Galleries column on that page.
- Add a new Blank Feature WSPBuilder item to your CustomPages solution. Yes, that's right, no receivers this time either.
- Add the following code to the elements file:
<Elements xmlns="http://schemas.microsoft.com/sharepoint/">

  <CustomActionGroup Id="MyCustomSettings"

                   Location="Microsoft.SharePoint.SiteSettings"

                   Description="Custom administration options"

                   Sequence="5"

                   Title="Custom administration"/>

  <CustomAction Id="MyCustomSiteAction"

                GroupId="MyCustomSettings"

                Location="Microsoft.SharePoint.SiteSettings"

                Rights="ManageWeb"

                Title="Content Type hierarchy"

                >

    <UrlAction Url="_layouts/ContentTypeHierarchy.aspx"/>

  </CustomAction>

</Elements>
Note You may recognize this code. It is very similar to the example used for custom actions in Chapter 5. - Build and deploy your feature. Go to the Site Settings page to verify that you do have a new column, as shown in Figure 14-7.
Tip Remember that our new feature is farm scoped, so if you need to deactivate it, you need to go to the Central Administration web site. You will find farm features on the Operations tab.
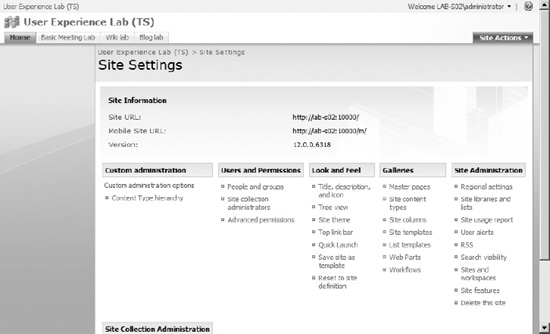
Figure 14-7. Custom column for page links
I realize this looks horrible, so let's modify our
elements.xmlfile a bit to put our custom link in the Galleries column instead. - (Optional) Modify your elements file as such:
<Elements xmlns="http://schemas.microsoft.com/sharepoint/">

  <CustomAction Id="MyCustomSiteAction"

                GroupId="Galleries"

                Sequence="22"

                Location="Microsoft.SharePoint.SiteSettings"

                Rights="ManageWeb"

                Title="Content Type hierarchy"

                >

    <UrlAction Url="_layouts/ContentTypeHierarchy.aspx"/>

  </CustomAction>

</Elements>
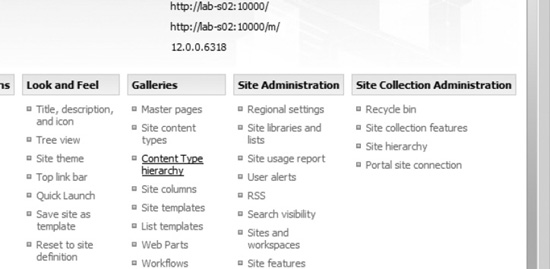
Your content type hierarchy should now be moved to the Galleries column, just below the “Site content types” link. Check out Figure 14-8 if you don't believe me.
I think that's it!
You may ask yourself how I knew about the GroupId and Sequence values. Go ahead, ask yourself. No answer? I'll provide one for you.
Look in the [12]TEMPLATEFEATURESSiteSettings folder, specifically in the SiteSettings.xml file. Inside you will find all the links on the Site Settings page. Just search for the CustomAction tag with Id="ManageCType", and you have your answer.
If you need a refresher, check out Chapter 5 for the details on CustomAction.
Last Page
Well, at least it is the last page of this chapter. And, since this chapter was about pages…well, you get the pun.
Anyway, we've explored a few different methods for page creation in SharePoint. You should consider this an introduction, however, because the topic is a massive one, and your possibilities are endless. Needless to say (but I'll say it anyway), custom page creation is a very powerful user experience feature. I'd encourage you to experiment and keep exploring, but I may have mentioned this a few times already.
We still have one more chapter to go, in which we will wrap up everything into a single site definition. We will create a site definition, dabble with the site navigation, and explore methods to improve our site creation. Oh, and the killer won't be revealed on this last page. There will be another.
I love these little teasers….