
It is rare to find an organization with seamlessly integrated data that is uniformly used by the organization's business applications. More common is a set of siloed tools that duplicate data islands with no obvious authoritative source. Information workers in this type of environment often jump in and out of such tools, copying and pasting data from one screen to the next to accomplish their tasks. With SharePoint, the organization is introducing enterprise portals and collaboration workspaces into this environment—and without careful planning, they are increasing the risk of redundant data. SharePoint lists often need to relate to values whose source is an external application. In this chapter, we will detail how as a developer you can register an external application so that its data is available in SharePoint, rather than expecting your end users to duplicate data in yet another system. This will be accomplished using SharePoint 2010's Business Connectivity Services (BCS).
But you were expecting this to be a chapter on Outlook, right? Integrating SharePoint with the external application is only the beginning. Shouldn't this effort be reusable by other applications? Microsoft Outlook is capable of maintaining lots of different types of objects— messages, contacts, tasks, notes, and so forth. These objects often need to relate to the data that is usually locked in your external applications. Therefore, this chapter will also show you not only how to connect an external database to SharePoint, but also how to make its data available offline in Outlook. We will also extend Outlook's functionality so users can see visualizations of the data in the external system from the Outlook interface and create follow-up tasks in a SharePoint site.
Almost every organization has classic integration problems with their data repositories whose values need to be a part of other applications. Obvious examples include a database of customers or products. Other repositories may describe units of the organization, such as divisions, departments, and teams. Having this data referenceable is useful for task-oriented processes, project-management plans, and lists of issues.
Organizations also routinely extend Outlook forms in solutions. Often, they want to use Outlook as a tool to construct messages that require more metadata than the average e-mail. Such data is usually required to enforce routing logic, security, or retention policies. Customer relationship management systems (CRM) are also built on the fundamental principle of extending the basic message, contact, meeting, or task with more data about its context.
Data in a line-of-business system tends to be siloed to its particular application. However, within an organization this data must often be available to users who may never even open the application. This is especially true for data elements that are referenced often. To provide some context, in this chapter we will simulate a line-of-business CRM system implemented as a simplified database of customer and order information.
The first goal of this solution is to detail how SharePoint 2010's Business Connectivity Services and SharePoint Designer enable the integration of line-of-business applications. The Business Connectivity Services functionality is an evolution of the Business Data Catalog (BDC) feature that first appeared in SharePoint 2007. In the 2010 release, BCS provides new functionality as well as a dramatically improved toolset. We will use SharePoint Designer to quickly define our external system, letting the designer generate all the necessary steps for performing the normal operations of read, write, list, and delete. We will then choose how this data should be interpreted by the Microsoft Office client application (Outlook) and create an external list in a SharePoint site. This list will be a SharePoint entry point into the data and, unlike the BDC of old, we can modify the list items and have the changes reflected in the original data store.
With the external list created, we will connect the list to Outlook 2010. This will invoke an integration point between the SharePoint server and the Office client, in that the server creates a dynamic solution package and registers it in Outlook. The solution then works with the BCS client functionality of Office to control the synchronization process between server and client. Once the solution is completed, the customers in our CRM database will appear as contacts in Outlook, with the columns of SQL data mapped to Outlook contact properties.
But why stop there? Not only do we want to present our database records in Outlook, we want to provide our end users with a way to visualize order information and act on the data they are seeing. Therefore, this solution will also include an Outlook form region that will add new functionality to the Outlook contact form. The extension will provide two key features. The first is a chart that shows the total sales by month for the customer in a specified year. This chart will be created in an Excel 2010 spreadsheet that will be published through SharePoint's Excel Services. The Outlook form region will be able to specify parameters for the chart and receive an image rendering of it through a URL using Excel Services' REST API.
The second feature of the Outlook form region will enable the end user to create a new follow-up action. The feature will consist of a few fields on the form region that when submitted create a task in a SharePoint site, thus enabling a team of users to be notified of the request and appropriate action to be taken. In coding this piece, we will use SharePoint's new client-side API for managed .NET applications.
Now let's look at the major elements of the solution and the decisions that were made in coding it. We'll show you how to use SharePoint Designer to connect an external database to SharePoint and render it in an external list, then describe how to connect this list to Outlook so users can see the customer records as Outlook contacts. We will detail how to use Microsoft Excel and Excel Services to render a visualization of the order information in the CRM database. Using Visual Studio, we will build an Outlook add-in and Outlook form region that extends the functionality of the Outlook contact form to provide the desired capabilities. Lastly, we will enable the user to issue follow-up items from the form region that result in SharePoint tasks being created. As with most of the chapters in this book, not every line of code will be explained. Since there are so many moving pieces to this solution, we want to focus on the major elements. We highly recommend you download the accompanying code for this chapter from Apress's site in order to follow along and to use some of the objects there.
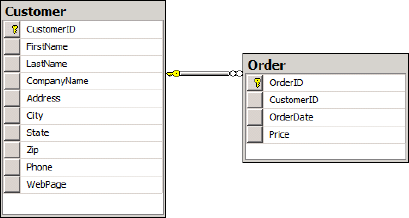
For our sample LOB application, we will use a SQL Server 2008 database named CRMSample. This database stores a list of the organization's customers and some orders that have been placed by them. The cardinality of the relationship between customers and orders is one to many, which means that a single customer could have multiple orders. Figure 10-1 shows the Customer and Order tables of the database.
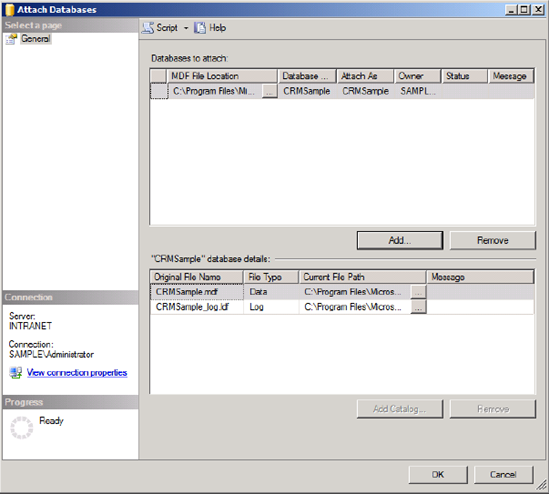
To set up the database in your environment, copy the MDF and LDF files of the CRMSample database to your SQL Server. If you did a default install, SQL Server 2008 uses the following path to store these database files: C:Program FilesMicrosoft SQL ServerMSSQL.10.MSSQLSERVERMSSQLData. Once the files are in place, right-click on the Databases node of Management Studio's Object Explorer and select Attach. In the dialog, click Add and locate the CRMSample.mdf file. The default options are fine. Your dialog should look like Figure 10-2. Click OK; the Object Explorer will refresh to include the CRMSample database. (If you need more help attaching databases in SQL Server 2008, use the steps at http://msdn2.microsoft.com/en-us/library/ms190209.aspx.)
While you are in SQL Server's Management Studio, it's a good idea to confirm that the server's security settings will support our integration strategy. There are several options for controlling security when tying an application to SharePoint, which we will elaborate on later in this chapter. In this solution, we will rely on a model in which BCS impersonates the end user's account information when talking to SQL Server. Since both SharePoint and SQL Server are on the same machine in our environment, this will not require any configuration other than making sure the user accounts have rights to the SQL Server database either explicitly or through group membership. Later we will discuss the impact of this choice and also show a different model for Excel Services where we use a service account to communicate with SQL Server regardless of the end user account. For now, make sure your users have access to read and modify the data in this database and that an Active Directory (AD) service account (preferably one of the SharePoint 2010 managed accounts you created when setting up the environment) also has access.
BCS provides a framework to integrate external applications into SharePoint so that sites can surface data stored there. SharePoint Designer supports connections to external data through a WCF web service, custom .NET class, or directly to a SQL Server database.
Note
You can also create BCS models using Visual Studio 2010, an approach that provides more flexibility in the types of systems you can integrate with. But the rapid development time of SharePoint Designer is so compelling that we decided to focus on it in this chapter.
There are several supported integration scenarios, including surfacing the external application as an external list where the data appears to the user as if it were in a SharePoint list. You can also use the external data in web parts as well as for columns of lists and libraries. BCS also allows you to hook the application into SharePoint's search so it can be crawled by the search service and displayed as search-result items. All of these scenarios are supported without a developer having to introduce new compiled code into the environment. This is an important advantage, as in earlier versions of SharePoint developers sometimes built their own web parts, controls, or protocol handlers to accomplish these tasks. Regardless of the project type, each required custom code to be written, tested, deployed, and maintained. With BCS, you can focus on describing the application, detailing how to connect to the external application as well as its different entities, relationships, and methods. In addition, new to Office 2010, is the ability for Office clients to synchronize this data to a local cache so that it is usable in the Office clients. It is this functionality we will use to have the customer data rendered as Outlook contacts.
Start by creating a SharePoint site as a host for the integration solution. This can be a normal site using the normal SharePoint Team Site template. In our environment, this site was located at http://edhild3/sites/crm. Once the site has been created, open it in SharePoint Designer 2010. Just click Open Site and specify your team site's URL.
If you're familiar with SharePoint Designer 2007, you will notice that the interface of the 2010 release has been dramatically changed. Like the rest of the Office applications, SharePoint Designer 2010 now uses the ribbon interface to make actions easier to find. A new Site Objects navigation on the left-hand side of the tool simplifies finding the right starting point to perform certain types of work. This navigation replaces the folder structure of the site, which required you to understand cryptic folder names in order to know where items such as master pages and content types were located. You can still access the structure of the site by clicking the All Files folder at the bottom of the Site Objects menu.
Since our goal is to integrate the SharePoint site with the external CRMSample database, click on the External Content Types node in Site Objects. The first time you access this it may take a few seconds to resolve. If this is a brand new site, you shouldn't have any types defined, so just click the External Content Type button in the New group of the ribbon. This will take you to a Summary View of the external content type. We want to first focus our attention on the External Content Type Information group of controls in the top-left portion of the screen. It is here that you can enter the basic information about the content type. Use the steps below and when you are finished, the page should look like Figure 10-3.
Specify Customer as the display name of the content type.
Change the Office Item Type drop-down to Contact. This is the setting that lets Outlook treat the customer database records as Outlook contacts.
Change the Office Sync for External List drop-down to Enabled. Otherwise, Outlook will not be able to take the content offline.

Now we need to use SharePoint Designer on the external system we wish to pair with this external content type definition. On the ribbon, click the Operations Design View button in the Ribbon to go to the area where you can define your SQL Server connection and the content you want to interact with. Use the following steps to establish the connection to the Customer table of the CRMSample database:
Click the Add Connection button at the top of the Operations Design View.
Choose SQL Server in the External Data Source Type Selection dialog.
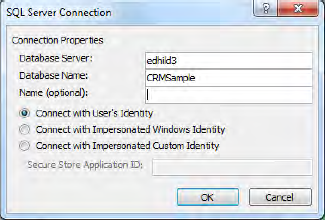
Specify the SQL Server connection properties. In our environment, the SQL Server is on the same machine as SharePoint. Even so you need to make sure you provide a name that both the SharePoint Server and a potential client can resolve. We entered edhild3. The name of the database is CRMSample. And for security, select the option to Connect with User's Identity. You can see these options in Figure 10-4.
Note
As mentioned earlier, this solution takes advantage of the fact that our SQL Server and SharePoint Server are the same machine. If your users are using Windows authentication and your CRMSample database is on a remote server, your users would have to authenticate using Kerberos instead of NTLM to make sure their credentials could make it to the remote SQL Server. If you don't care about your users' credentials being used to access the SQL Server or you need to have alternate credentials for users, the last two options allow you to rely on the Secure Store Service of SharePoint 2010 to configure the account to be used. We will use this technique in setting up Excel Services later, and you can read more about it at
http://msdn.microsoft.com/en-us/library/ms566523(office.14).aspxIn the SQL Server Connection dialog, click OK.
In the Data Source Explorer area, expand the CRMSample database node and then the Tables node so you can find the Customer table.
Right-click on the Customer table and choose Create All Operations from the context menu.
Our next step in connecting the Customer table to SharePoint involves giving SharePoint Designer enough information to generate the operations it will use to interact with the data store, including reading, editing, listing, and deleting customers. You won't have to write any SQL statements. You simply supply the wizard that opened when you chose Create All Operations with the appropriate information. Use the following steps to complete the All operations wizard:
Click Next to enter the Parameters configuration screen.
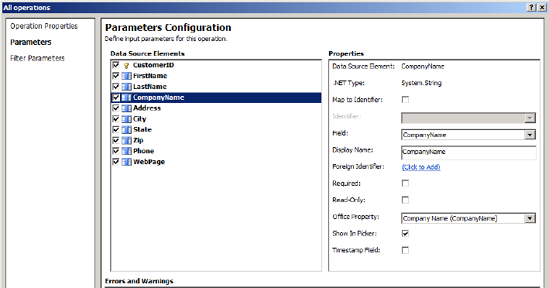
All of the columns of the table will be used as parameters, but you need to configure how the Office client applications will treat the data in each column. Use Table 10-1 to set properties for each parameter. Figure 10-5 shows the CompanyName field settings.
Table 10-1. Configuring the Customer Operation Parameters
Data Source Element
Office Property Setting
Notes
CustomerID
Custom Property
Make sure Map to Identifier is checked
FirstName
First Name
LastName
Last Name
CompanyName
Company Name
Select Show In Picker checkbox
Address
Business Address Street
City
Business Address City
State
Business Address State
Zip
Business Address Postal Code
Phone
Business Telephone Number
WebPage
Business Home Page
You will see a warning at the bottom of the wizard recommending that you add a Limit Filter for this type to help prevent reading extremely large datasets that may cause a bottleneck in your system. Click the Add Filter Parameter button.
Click the (Click to Add) hyperlink on the right-hand side of the screen next to the Filter label.
In the Filter Configuration dialog, set the filter type to Limit and click OK.
Optional: Underneath the Filter link you clicked earlier, use the Default Value setting to set a limit on the number of records that should be returned. You can simply type that number over the
<<None>>text. In our environment, we set it to 3000, but obviously there are a lot of factors that should go into this setting, such as the power of your servers, your network, and the number of records you expect in the table.Click Finish.
Click Save in the Quick Access Toolbar area (just above the File menu of SharePoint Designer) to save your changes to the Customer external content type.
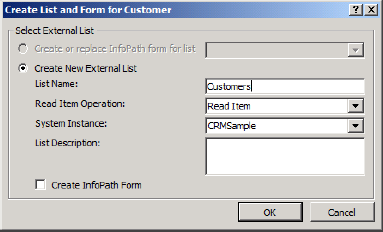
Now that you have defined the external content type and given SharePoint Designer information about the data, you can create an external list in the SharePoint site. This external list will appear to end users as any other SharePoint list, but it is really an interface to the data in your external system. SharePoint will automatically build the forms necessary for users to view, edit, delete, and even add new customers to the CRMSample database. SharePoint Designer will create the external list in the same SharePoint site you opened at the beginning of this chapter. Click the Create Lists and Form button on the ribbon, and use Figure 10-6 to complete the resulting dialog. Here you specify the name of the list to create and the operation that should be used to read an item. For this example we won't create a custom InfoPath form for interacting with the data, though we will discuss it as a possible extension point at the end of the chapter.
After you click OK, SharePoint Designer will create the external list in the SharePoint site. We are now done with SharePoint Designer. There is one additional configuration option you may have to set before jumping to the list in your site. Mainly, you will need to confirm the security settings of the BDC Service Application in your SharePoint farm. Use the following steps to set up security settings for the Customer external content type.
From Central Administration, click the Manage service applications link in the Application Management group.
Highlight the Business Data Connectivity Service application and click Manage in the Ribbon.
Click the checkbox next to the Customer external content type and click the Set Object Permissions button in the Ribbon.
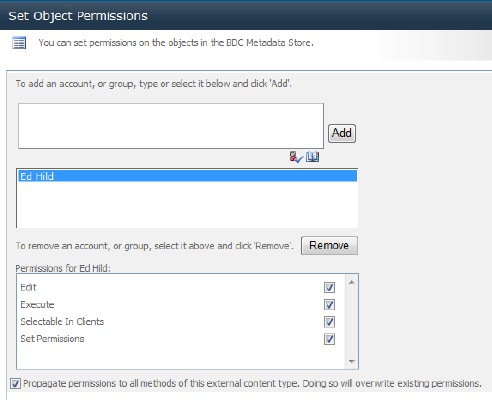
Enter an account or group for the users who should have access to the external content type and click the Add button. You can then define specific permissions for these users. In our development environment, we simply granted ourselves all of the permissions. Make sure the checkbox for these permissions to apply to all the methods of the external content type is checked.
Your Set Object Permissions dialog should look like Figure 10-7. Click OK.
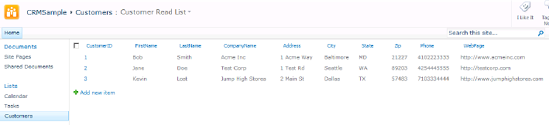
Now navigate back to your development team site and play around with some edits in both in the external list and directly in the SQL database. Figure 10-8 shows the Customers external list in the SharePoint site.
In the previous section we focused on connecting the external database into SharePoint and creating an external list in a SharePoint site. With this complete, our users can interact with the data in the SharePoint site and the corresponding changes are made to the CRMSample database. Now we will extend the reach of this data onto the desktop, to Outlook. Use the following steps to connect the external list to Outlook:
While viewing the items on the Customers external list, click the List tab on the ribbon.
Click the Connect to Outlook button in the Connect & Export group.
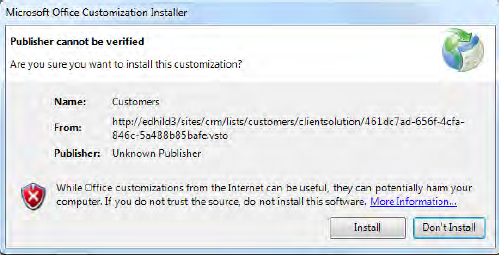
SharePoint will generate a dynamic solution package to register this list with the BCS client functionality. Click Install when you are asked to install the Office customization as shown in Figure 10-9. Note that the warning about the "Unknown Publisher" results from SharePoint using self-signed certificates to sign the packages. An administrator in a production environment can change this to use a specific certificate that is trusted by the client machines, or else a trust with the BCS signing certificate must be established.
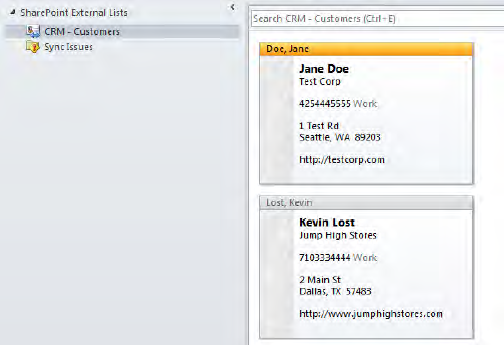
When you are informed that the installation has been successful, open up Microsoft Outlook. You should see a new heading below your Outlook Tasks navigation button entitled SharePoint External Lists, with your Customers list underneath as in Figure 10-10. There may be a delay before you actually see the customer contacts in Outlook as it may take a while for the first synchronization to complete.
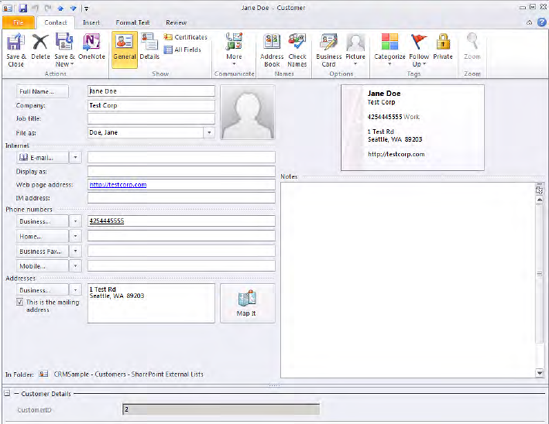
Remember that when we defined the parameters of our external content type, we were very explicit in mapping each data value to a known Office property. As shown in Figure 10-11, Outlook honored these settings and when you open a particular Customer contact, each of the parameters is placed on the contact form as you would expect.
Just as you played a bit to get a feel for making edits in the SharePoint external list and the database, now take some time to gain experience with the Customers in Outlook. You can edit, delete, and even create new customers. Just note that external lists in Outlook have their own method of synchronization. They do not update during a Send/Receive action as you might expect. There is an internal timer that determines the synchronization schedule. You can force a sync, however, by right-clicking on the Customers external list node where Outlook displays its folders and selecting Sync Now.
As this point, we already have a very interesting solution and we have not written one line of code. To review, we took external data that lived in a line-of-business application's SQL database and connected it to SharePoint through SharePoint's Business Connectivity Services. With that done, we could get an offline copy in Outlook. Since our data is most like Outlook contacts, we mapped each field to a corresponding Office contact property. After the synchronization, our external data can be maintained as Outlook contacts.
One of the goals for our solution is to give a user a visual representation of a customer's total dollar value of orders by month for a given calendar year. To accomplish this, we will use SharePoint's Excel Services to build a parameterized spreadsheet containing a chart we can display in Outlook. But before we get into Excel and the chart, we need to take care of a few items in the environment to make this approach possible. First, we need a SQL Server Analysis Services cube that will enable us to slice the data across different dimensions. The code download for this chapter includes a Visual Studio solution named CRMSampleCube. Open this project on your SQL Server using the SQL Server Business Intelligence Development Studio tool. Note that for SQL Server 2008, this tool is Visual Studio 2008-based. We will review elements of this solution, confirm that its settings are correct, and deploy it to Analysis Services. Figure 10-12 shows the structure of this project.
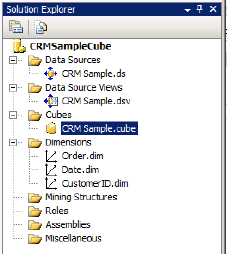
The first node in this project is the data source, connecting this solution to the transactional CRMSample database. Right-click on the CRM Sample.ds node and choose View Designer. Confirm that the connection string is valid for your environment. If it's not, correct it. If you are doing everything on a single machine, using "." (without the quotes) instead of the server name is adequate. The second node, CRM Sample.dsv is the data source view that lets you see all artifacts you'll be building your cube on. Viewing this in the designer shows you that we are focusing on the Orders table from the CRMSample database. In the Dimensions group, you can see the three ways we want to analyze our data. The first dimension is Order, which is based on the primary key of the table OrderID and uniquely defines each row. The second dimension, Date, lets you slice the data by an element of time, such as year, month, or day. The CustomerID dimension allows you to group the data by customer for analysis. Update the cube by right-clicking on it and choosing Process. Your analysis solution should now be deployed to your SQL Server.
Note
The Customer dimension is based only on the CustomerID since that's all that is necessary for the visualization we are going to build. If you prefer, you could add the Customer table to the cube and build the dimension from the company's name. Just be sure to make corresponding change to the Excel spreadsheet we will create later.
With the OLAP cube created, we will now configure Excel Services. Remember when we discussed the security options related to accessing the CRMSample database through BCS? We need to specify how we want security to be handled as the user interacts with the Excel spreadsheet that has to access to our Analysis Services cube. With BCS, we showed you how you can have the user's identity pass all the way through to the data source. This time, we will incorporate another technique relying on a single account to access the cube, no matter which user is interacting with the spreadsheet. This approach is useful when you don't need individual identity information or configuration at the back-end and you want all users to be treated equally. Getting this to work with Excel Services is going to involve configuring security settings both on the server and on the Excel workbook itself. On the server, we will configure an application account in the Secure Store Service and tell Excel Services to use this when no other security configuration preferences have been set in the workbook. Use the following steps to configure the Secure Store Service:
From Central Administration, click Application Management.
In the Service Applications group, click Manage service applications.
Find the Secure Store Service Application node. Click to select it and click the Manage button in the ribbon.
Note
If you have not set up this shared service application, you will be required to generate a new key before creating the new application detailed below. Just click the Generate New Key button in the ribbon and specify a pass phrase.
Click New in the ribbon to create a new application entry in the Secure Store Service.
Enter the following Application Settings:
Target Application ID: Excel Services Unmanaged Acct
Display Name: Unmanaged Acct
Contact Email: [email protected]
Target Application Type: Group (since we want all users to use the same account)
Click Next.
Click Next in the fields dialog, as the only two pieces of information we need are the user name and password.
For membership settings, specify an Active Directory group that will administer these settings. We chose northamericaedhild. Also, specify which users will be members and leverage the application account. We used northamericaDomain Users.
Click OK.
When the screen refreshes, you should be back at the list of applications defined in the Secure Store Service. Select the Excel Services Unmanaged Acct you just created, and choose Set in the Credentials group of the ribbon. This lets you specify the user name and password to use to connect to the Analysis Service cube, regardless of which user is using the spreadsheet.
Specify the user name and password of the account you'd like the system to use. It is OK to use one of your SharePoint service accounts here. Click OK.
Now that we have an account defined in the Secure Store Service, we must tell Excel Services to use this information when no other security preferences have been specified. This approach is called specifying the Unmanaged Account. Use the following steps to complete this task:
From Central Administration, click Application Management.
In the Service Applications group, click Manage service applications.
Find the Excel Services Application node. Click to select it and click the Manage button in the ribbon.
Click Global Settings.
At the end of this page, there is a set of settings specific to external data. There will be a textbox allowing you to specify the Application ID in the Secure Store Service that Excel Services should use as an unmanaged account. Enter the ID of Excel Services Unmanaged Acct.
Click OK.
We can now focus on the spreadsheet. Grab the spreadsheet named CRMSales.xlsx from the code download. We won't cover how to build this from scratch, but instead explain its key components. First, let's finish the security discussion by looking at the security configuration of the data connection in the workbook. You can find the CRMSampleCube connection through the ribbon by clicking on the Data tab and then the Connections button. Choose to display the properties of the connection, and on the Definition tab you'll see an Authentication Settings button. Click it to show the dialog in Figure 10-13. The setting of None means that Excel Services will use the Unmanaged Account configuration to talk to the data source.

Now look at the top of Sheet1 of the spreadsheet, where you'll see two named ranges (cells B1 and B2) that serve as parameters for the spreadsheet. These ranges are named CustomerID and CalYear. As these values change, so do the values in the table and the chart. We have formatted these cells as Text (make sure these cells have a green corner to them) since we will use their values to build some strings that will serve as filtering expressions as we query the cube. You can see these expressions being built on Sheet2. These expressions will be used as parameters to cube queries and therefore they are built using the values of the named ranges. Listing 10-1 shows a few of these expressions for CustomerID 2 and CalYear 2008.
Note
You might wonder why we are not simply using an Excel PivotTable in this solution. As you will see in a bit, we are planning to access the chart through the REST API of Excel Services, and you can't set the filters of an Excel PivotTable through the REST API, only named ranges. This approach is a work-around to that limitation.
Example 10-1. Dynamic Expressions for Querying the Cube
[CustomerID].[2]
[Date].[Month].[January 2008]
[Date].[Month].[February 2008]
[Date].[Month].[March 2008]
[Date].[Month].[April 2008]
Now turn your attention back to Sheet1 and look at the table. It is here where these expressions will be used. The first column is simply the months of the year. The second column uses Excel's CUBEVALUE function to query the cube for specific data. Here is the function call for the month of January.
=CUBEVALUE("CRMSampleCube","[Measures].[Price]", Sheet2!A1, Sheet2!A2)The parameters to this call specify the name of the cube, the metric (data point) we would like returned, and the two expressions we saw earlier slice the data. These expressions specify the particular customer (CustomerID 2) and the timeframe (January 2008) we want to consider.
From here, the chart is simply a column chart based on the data in the table. You can see that it is sensitive to the values in the named ranges by changing the customer or the calendar year. Note that the database in the code download only has order data for customers 1 and 2 for years 2008 and 2009. Use the following steps to publish this spreadsheet to the SharePoint site you used to create the external list:
From Excel's File menu, choose Save & Send.
Choose Save to SharePoint.
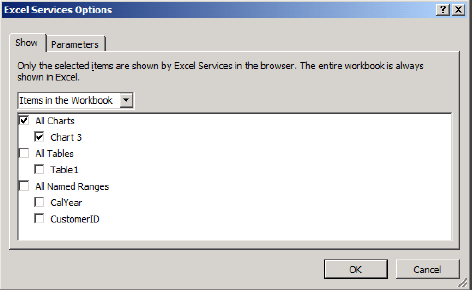
Click the Publish Options button at the top-right of the screen. These options allow you to choose to show only specific items in the workbook. Select the chart (named Chart 3). This choice is shown in Figure 10-14.
On the Parameters tab, make sure CalYear and CustomerID have been specified as parameters.
Click OK.
Click the Save As button to save the file to the Shared Documents library of your team site using
CRMSales.xlsxas the file name. For us the URL is:http://edhild3/sites/CRM/SharedDocuments/CRMSales.xlsx. You can also confirm the publish options on the Save As dialog.Click Save.
This will publish your spreadsheet to the SharePoint server. It should open automatically into the Excel Service web interface. The parameters of CustomerID and CalYear should appear in a pane to the right of the chart. Just as in the Excel client, changing these values and clicking Apply will redraw the chart. You can get back to this interface by choosing the View In Browser option in your CRMSales.xlsx file in the Shared Documents library.
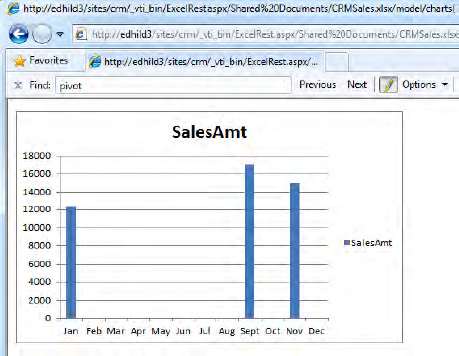
We are almost finished. Our desired visualization has been created in Excel and published to Excel Services. We can even change the parameters interactively in the browser and get the different charts we want. However, this browser interface isn't the ideal experience to bring into the Outlook client. When we extend the Outlook form (in the next section), we already know which customer we want selected and shouldn't need to change it; the user would simply open up a different customer contact. Fortunately, Excel Services in SharePoint 2010 provides another means for us to specify the parameters for the spreadsheet and get the chart we want. This alternative is called the REST API and it involves simply specifying a properly formatted URL that will return the corresponding chart as a PNG image. We could have used a web service to interact with Excel Services, but that would require a bit more code to be written, and the REST API gives us exactly what we need. Here is the URL you can use to request an image of the chart for CustomerID 1 and CalYear 2008.
http://edhild3/sites/crm/_vti_bin/ExcelRest.aspx/Shared%20Documents/CRMSales.xlsx/model/charts('Chart%203')?Ranges('CalYear')=2008&Ranges('CustomerID')=1
Note that this should all be one line and is wrapped here just to fit in the text.
As you can see, the URL points to the spreadsheet asking for the chart object named Chart 3 while specifying input values for the two named ranges. You can put this URL in the browser now to test it. We will use it in the next section as we integrate this chart into Outlook. Figure 10-15 shows the resulting chart image. (You can find more Excel Services REST API examples at http://msdn.microsoft.com/en-us/library/ee556820(office.14).aspx.)
Users of Outlook interact with several different types of objects, including messages, contacts, tasks, and events. Each of these objects is presented in an Outlook form. It seems as if from the very beginning organizations have wanted to customize, extend, and inject code into these forms. This is largely due to Outlook's prominent place in the work lives of users. Many users leave it open all day, checking messages and maintaining their calendar. Before Outlook 2007, developers who wanted to customize an Outlook form usually found themselves redesigning the entire form, even when all they wanted to do was add a few fields. In older versions of Outlook, these custom forms were deployed centrally on the Exchange server. Developers also had a difficult time injecting their own code or script into their forms. Outlook 2007 introduced a new concept called Form Regions, which brought managed code to Outlook form development, and this continues in Outlook 2010.
An Outlook 2010 form-region solution is made up of two main elements. The first is the form region itself, which contains the layout of the form and its controls. The second is an Outlook add-in that hosts the form region. To build your form region, you can either use the Form Region Designer in Visual Studio 2010 or construct the form region in Outlook and store it as an Outlook Form Storage (OFS) file. We will use the Form Region Designer in this solution.
There are four types of form regions, which are distinguished by the way they interact with the existing Outlook form.
Separate: Adds the form region as a new page in an Outlook form.
Adjoining: Appends the form region to the bottom of an Outlook form's default page.
Replacement: Adds the form region as a new page that replaces the default page of an Outlook form.
Replace-all: Replaces the whole Outlook form with the form region.
Because we still want the customer information to display in the default contact form, we will choose to create our custom user interface as a separate form region type. This will place a new button in the ribbon that displays the new form region page. Use the following steps to create the Outlook form region add-in project and the form region item that will extend the contact form:
From Visual Studio 2010's New Project dialog, display the Office 2010 C# project types and select the Outlook 2010 add-in template.
Name the project and solution CRMExtension.
Make sure the .NET Framework 4 is selected and click OK.
Right-click on your project in Solution Explorer and choose Add -> New Item.
Select Office to filter the item templates and select OutlookFormRegion. Name this item CustomerDetails.cs and click Add.
Choose the Design a new form region option and click Next.
Select Separate and click Next.
Name the form region CustomerDetails and click Next.
Select Contact to associate this form region with the default contact form. Make sure no other message classes are selected and click Finish.
Remember our design goals? We aim to extend the contact form for our customer records in Outlook so that the user can see the chart we built earlier and issue follow-up items that will be tasks in the SharePoint site. Again, we recommend grabbing this solution from the code download so you won't have to worry about identifying the value of every property of every control. So that we don't lose site of the overall goal, Figure 10-16 shows the completed solution running in Outlook.
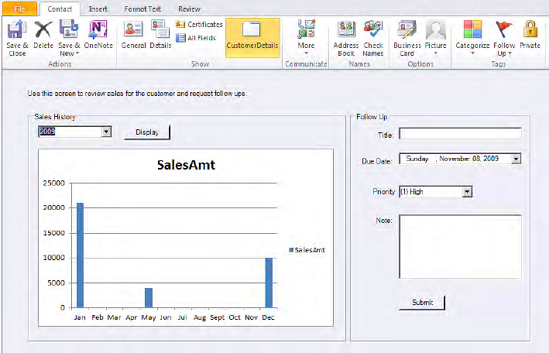
If you dig through the code in the download, you'll see that in the form region's FormRegionShowing event handler, the form region is making sure that the contact that it is operating on is indeed a customer. To make this check, we look for the CustomerID parameter that was passed to Outlook as a custom property. This code is in Listing 10-2.
Example 10-2. The FormRegionShowing Event Handler
private void CustomerDetails_FormRegionShowing(object sender, System.EventArgs e)
{
  Outlook.ContactItem item = (Outlook.ContactItem)this.OutlookItem;
  if (item.UserProperties["CustomerID::5"] != null)
  {
    lstYear.Items.Clear();
    int currentYear = DateTime.Today.Year;
for (int i = 0; i < 5; i++)
{
lstYear.Items.Add(currentYear - i);
}
lstYear.SelectedIndex = 0;
lstPriority.SelectedIndex = 0;
}
else
{
lblMessage.Text = "This contact is not a CRM customer.";
groupBox1.Enabled = false;
groupBox2.Enabled = false;
}
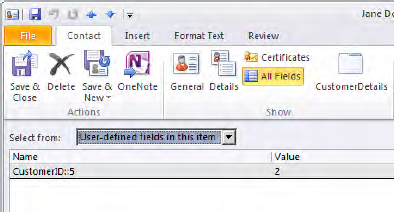
}You'll notice that we are accessing the CustomerID property using the string CustomerID::5. This was the key that Outlook assigned to our custom property. You may wonder how we discovered it. Simply click the All Fields button in the Show group of one of your customer contacts and you can see this property, as in Figure 10-17. In the FormRegionShowing event we also initialize the year drop-down to display the current year and the four previous.
If you look at the left side of the form region (in Figure 10-16), you see that we have integrated the chart from Excel Services. To get the image on the form region, we first created a Windows Presentation Foundation (WPF) user control named chart.xaml that has a single image control on its design surface. We chose to use WPF because its image control has no problem rendering a graphic from a URL source. In the code-behind of this file, we added one method, shown in Listing 10-3, which sets the source of the image to a specified URL.
Example 10-3. Using the WPF Image Control
public void SetImage(string Url)
{
  image1.Source = new BitmapImage(new Uri(Url));
}
Now when the user selects a calendar year and clicks the display button, the code in Listing 10-4 takes over to generate a properly formatted URL to use in the WPF control. Since this may take a few seconds to render, we disable the display button while this code is running so the user doesn't just continue to click it. The slowest response will be when your Outlook form region loads for the first time and the spreadsheet is examined for the first time.
Example 10-4. Retrieving the Selected Chart from Excel Services
private void btnDisplay_Click(object sender, EventArgs e)
{
 btnDisplay.Enabled = false;
 Outlook.ContactItem item = (Outlook.ContactItem)this.OutlookItem;
 int customerID = (int)item.UserProperties["CustomerID::5"].Value;
 int year = (int) lstYear.SelectedItem;
 string url = string.Format(@"http://edhild3/sites/crm/_vti_bin/ExcelRest.aspx/
    Shared%20Documents/CRMSales.xlsx/model/charts('Chart%203')
    ?Ranges('CalYear')={0}&Ranges('CustomerID')={1}", year, customerID);
 chart1.SetImage(url);
 btnDisplay.Enabled = true;
}
Shared%20Documents/CRMSales.xlsx/model/charts('Chart%203')
?Ranges('CalYear')={0}&Ranges('CustomerID')={1}", year, customerID);
chart1.SetImage(url);
btnDisplay.Enabled = true;
}Note
You may want to control Excel Services' behavior as to whether or not a call through the REST API causes a refresh of the data in the spreadsheet. You can find this option in the configuration of the Trusted File Location in the Excel Services service application in Central Administration.
The right-hand side of our Outlook form region enables the user to specify a follow-up action if required. The result that we want from this portion of the form region is that the data the user enters here should be used to create a task in the SharePoint site that hosts our Customers external list. This list just an out-of-the-box tasks list named FollowUps with an additional text column named Customer.
It is important to understand that this Outlook add-in and form region will not have access to the same SharePoint assemblies that make up the server-side object model. This is because the add-in will run within the Outlook application on a user's desktop, and therefore remote to the SharePoint server. As you will see a bit later, SharePoint 2010 provides a client-side library to assist us with the communication. This communication between our add-in and the SharePoint server will be over HTTP. However, the current setting of the project will prevent us from leveraging code that references the System.Web assembly. Let's remove this restriction by changing the Target Framework setting for the project. Follow these instructions to change the Target Framework setting on the project so that the client-side library will be permitted:
Right-click on the project and choose Properties.
On the Application tab, locate the Target Framework selection dialog.
Change this setting from .NET Framework 4 Client Profile to .NET Framework 4.
Click Yes in the confirmation dialog.
Now we can add the references to the SharePoint 2010 client-side library and runtime for .NET applications. As was discussed in Chapter 3, SharePoint 2010 provides several different types of client-side libraries, enabling communication from solutions not running on the server. For this project, add the Microsoft.SharePoint.Client and Microsoft.SharePoint.Client.Runtime assemblies to the project. These assemblies may show up on the .NET tab of the Add References dialog or you can find them in the C:Program FilesCommon FilesMicrosoft SharedWeb Server Extensions14ISAPI folder in a default installation.
With this change in place, our Outlook form region can now take advantage of the SharePoint client API for managed applications. The code in Listing 10-5 establishes a client context for the desired SharePoint site, creates a new task item, and sets the item's fields to match our Outlook form region. The ExecuteQuery call at the end submits this request to the SharePoint server.
Example 10-5. Using the SharePoint Client API to Add FollowUp Tasks
private void btnSubmit_Click(object sender, EventArgs e)
{
  btnSubmit.Enabled = false;
  using (ClientContext context = new ClientContext("http://edhild3/sites/crm"))
  {
    List oList = context.Web.Lists.GetByTitle("FollowUps");
    ListItemCreationInformation itemCreateInfo = new ListItemCreationInformation();
    ListItem oListItem = oList.AddItem(itemCreateInfo);
    oListItem["Title"] = txtTitle.Text;
    oListItem["DueDate"] = dpDueDate.Value.ToShortDateString();
    Outlook.ContactItem item = (Outlook.ContactItem)this.OutlookItem;
    oListItem["Customer"] = item.CompanyName;

    oListItem["Priority"] = lstPriority.SelectedItem.ToString();
    oListItem["Body"] = txtNote.Text;

    oListItem.Update();
    context.ExecuteQuery();

    MessageBox.Show("Follow up submitted");
    btnSubmit.Enabled = true;
   }
}This CRM extension application incorporated several key techniques that are worth highlighting as they can easily be reused in other projects.
- Leveraging SharePoint Designer 2010 to connect external data to SharePoint BCS:
SharePoint Designer 2010 provided us with a wizard-based, rapid toolset to project our database into SharePoint as an external list. It generated the methods for interacting with the data and enabled us to control how those values would be interpreted by the Office clients.
- Connecting an external list to Outlook:
Since our data was contact-like, it made sense to extend our use of BCS to the user's desktop in the form of Outlook contacts. There was no need to write additional code. SharePoint created the customization for Outlook dynamically, and once it was installed our users had a synchronized view of the data in their Outlook client.
- Visualizing data with Excel Services:
In this solution, we used Excel Services for much more than just rendering spreadsheets or web parts on a SharePoint site. We were able to use the Excel Services' REST API to request the chart object in the spreadsheet as an image to use in our custom application. This meant that we didn't need to have a copy of the data ourselves, or code any fancy web services, or use any complex chart controls in our Outlook form region.
- Extending Outlook with form regions:
This solution extended the functionality of the default contact form to provide the user with additional information and the ability to act on it. This was accomplished without making the user leave the contact form or open another application or browser.
While coding this example, we thought of several variations to the solution that we didn't incorporate. Mostly, these were not included because they distracted from the overall objective of the solution. We call them out now as extension points since they may be applicable to a specific project you're working on.
- Create a custom InfoPath form for the external list:
In our example, we just used the default interface for external lists. SharePoint supports customization of this form using InfoPath. With the custom form, you could add advanced validation or even look up information in other systems if necessary.
- Take more data offline:
Currently, the only data available offline to the user is the customer contacts in Outlook. You could incorporate Order information into the BCS so that it too is available offline, but then you wouldn't have access to Excel Services to render the chart. The chart control from the Microsoft Chart Controls for Microsoft .NET Framework 3.5 may be an alternative. You could also take the FollowUps list offline by connecting it to Outlook. Because it is not an external list, however, it would behave differently than the Customers.
- Add workflow for FollowUps:
You can add a workflow so that action is taken when new follow-up items are posted to the SharePoint site. You could do some sort of lookup on the Customer to determine which user is the relationship manager for that account and send out an e-mail notifying that user that a certain sales representative had asked her to look into something regarding the account.
The following links are to resources that we think a reader interested in the material presented in this chapter would find useful:
Creating Outlook Form Regions
http://msdn.microsoft.com/en-us/library/bb386301(VS.100).aspxSQL Server 2008 Analysis Services Resources
http://www.microsoft.com/sqlserver/2008/en/us/analysis-services.aspxPlan Excel Services Authentication
http://technet.microsoft.com/en-us/library/ee662541(office.14).aspxHow to Use Excel's CUBEVALUE function
http://www.ehow.com/how_2248736_use-excels-cubevalue-function.htmlExcel Services in SharePoint 2010 REST API Syntax
http://blogs.msdn.com/excel/archive/2009/11/05/excel-services-in-sharepoint-2010-rest-api-syntax.aspxClient Object Model
http://msdn.microsoft.com/en-us/library/ee537247(office.14).aspxData Retrieval Overview
http://msdn.microsoft.com/en-us/library/ee539350(v=office.14).aspxHow to: Create an External Content Type Based on a SQL Server Table
http://msdn.microsoft.com/en-us/library/ee557243(v=office.14).aspxMicrosoft Business Connectivity Services
http://msdn.microsoft.com/en-us/library/ee556826(v=office.14).aspxAccessing Excel Services' REST API
http://msdn.microsoft.com/en-us/library/ee556820(office.14).aspx